• Skip to primary navigation
  • Skip to main content
  • Skip to primary sidebar
Homesmad

Homesmad

  • Home
  • Breakfast & Brunch
  • Appetizers & Snacks
  • Dinner
  • Dessert
  • About
  • Privacy Policy
  • Contact
Homesmad
  • Home
  • Breakfast & Brunch
  • Appetizers & Snacks
  • Dinner
  • Dessert
  • About
  • Privacy Policy
  • Contact

Fiery Dragon Chicken: Easy Asian Recipe for Dinner

September 28, 2025 by Lily author

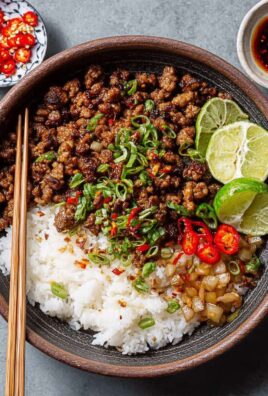
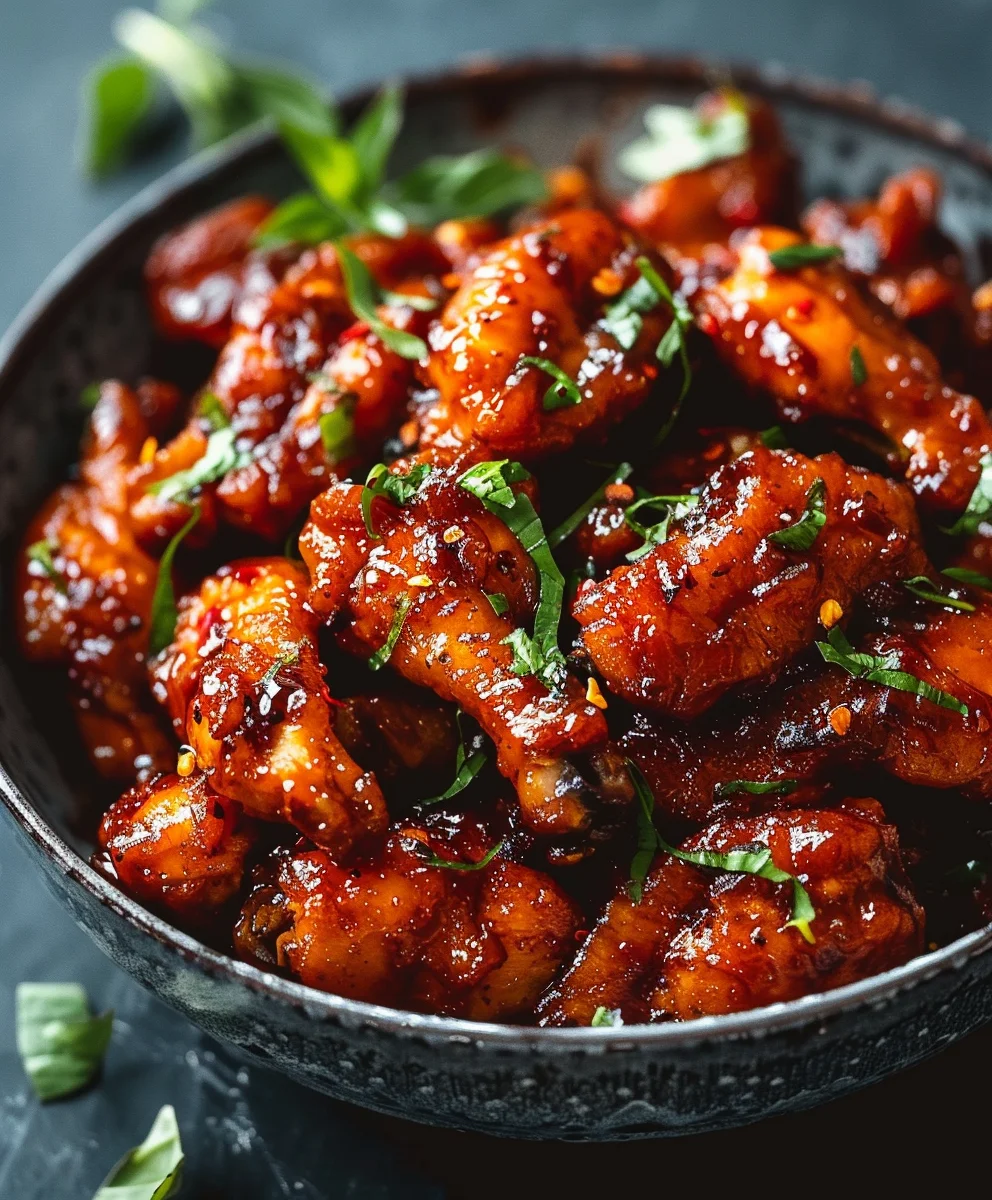
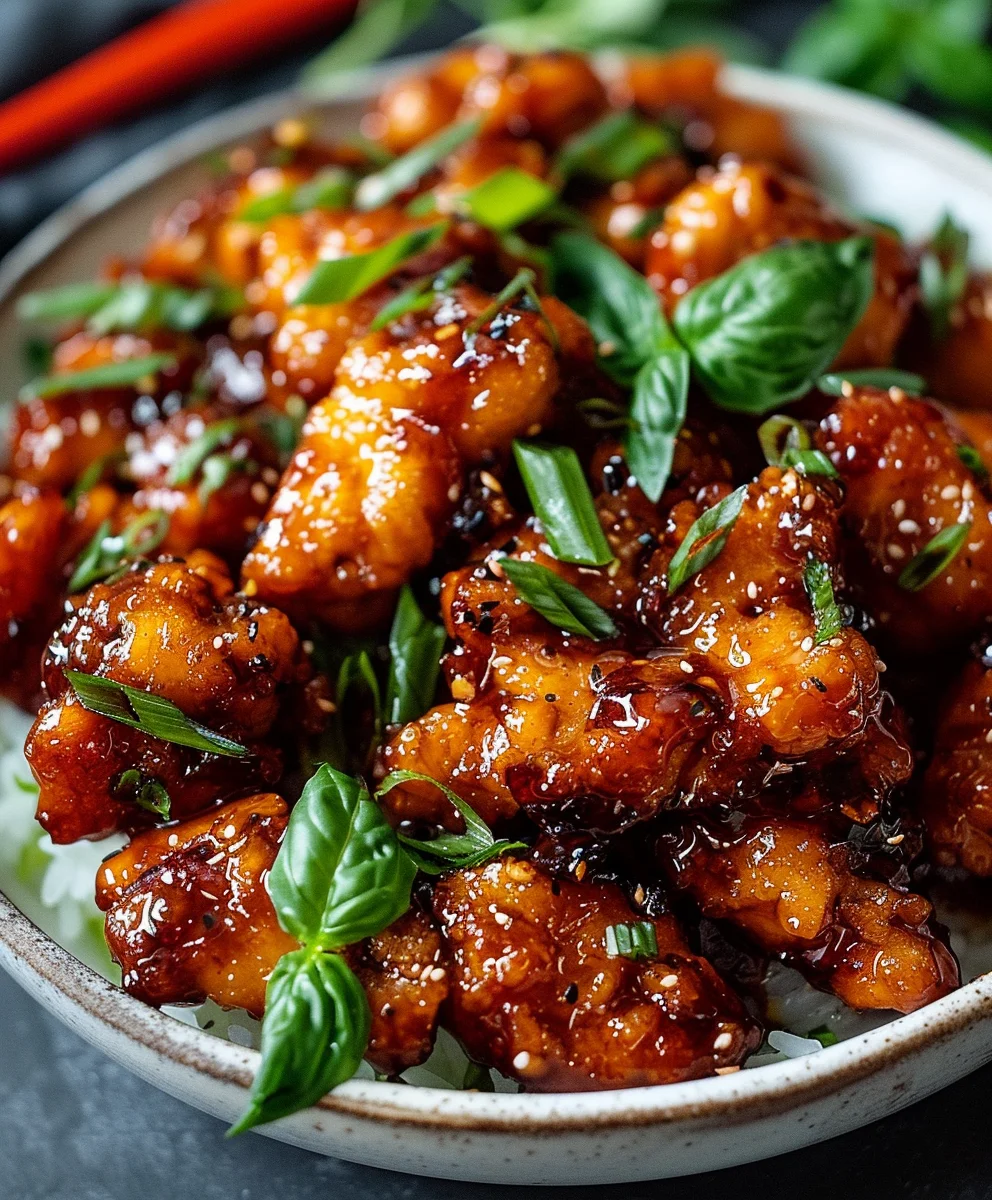
Dragon Chicken – are you ready to embark on a culinary adventure that promises to awaken your senses and leave an unforgettable impression? I certainly am, and I’m thrilled to share insights into this magnificent dish. This iconic recipe, a beloved staple in Indo-Chinese cuisine, stands as a vibrant testament to the incredible fusion of two distinct and vibrant culinary traditions. Imagine succulent pieces of chicken, perfectly fried to a golden crisp, then generously tossed in a luscious, fiery red sauce that is an exquisite balance of sweet, spicy, and tangy notes. It’s not merely a meal; it’s an experience that ignites the palate with every single, delectable bite.

The undeniable allure of this dish lies in its dynamic flavor profile and utterly satisfying texture. From its humble origins in the bustling streets and elegant dining rooms where Indian and Chinese culinary arts brilliantly converge, Dragon Chicken has captivated hearts and taste buds worldwide. People adore it for its striking, vibrant presentation, its intoxicating aromatic appeal, and that irresistible kick that makes it utterly addictive. It’s the perfect centerpiece for any gathering, a guaranteed crowd-pleaser that embodies comfort, excitement, and sophisticated simplicity all at once.

Prepare yourself for an explosion of flavor!

Fiery Dragon Chicken: Easy Asian Recipe for Dinner this RECIPE

Ingredients:

  • For the Chicken Marinade:
    • 500 grams boneless chicken, cut into 1-inch cubes (I prefer chicken breast for tenderness, but thighs work wonderfully too for a richer flavor)
    • 1 tablespoon fresh ginger-garlic paste
    • 1 teaspoon soy sauce (I always use light soy sauce for marinades)
    • ½ teaspoon black pepper powder
    • ½ teaspoon salt, or to taste
    • 1 large egg (this is my secret for a tender, moist chicken)
    • 2 tablespoons cornstarch (also known as corn flour)
    • 1 tablespoon all-purpose flour (maida)
  • For Frying the Chicken:
    • Oil for deep frying (vegetable oil or sunflower oil are my go-to choices)
  • For the Dragon Chicken Sauce:
    • 2 tablespoons oil (I often use the same oil I fried the chicken in, just a cleaner portion)
    • 1 tablespoon finely chopped garlic
    • 1 tablespoon finely chopped ginger
    • 2-3 green chilies, slit lengthwise or finely chopped (adjust to your spice preference; I like a good kick!)
    • ¼ cup finely chopped red bell pepper (for color and sweetness)
    • ¼ cup finely chopped yellow bell pepper (again, color and a different sweet note)
    • ¼ cup finely chopped onion (I prefer red onion for its pungency)
    • 2 tablespoons tomato ketchup (adds a lovely tang and sweetness)
    • 1 tablespoon red chili sauce (like Sriracha or any Asian chili sauce you prefer)
    • 1 tablespoon soy sauce (dark soy sauce this time, for richer color and deeper flavor)
    • 1 tablespoon white vinegar (cuts through the richness and adds a bright note)
    • 1 teaspoon sugar (balances the spice and tang)
    • ½ teaspoon black pepper powder
    • ½ cup chicken stock or water (chicken stock adds so much more depth!)
    • 1 tablespoon cornstarch mixed with 2 tablespoons water (for a smooth slurry to thicken the sauce)
    • A pinch of salt, if needed (taste before adding, as soy sauce and ketchup already have salt)
  • For Garnish:
    • 2 tablespoons chopped spring onion greens (for freshness and a vibrant finish)
    • 1 tablespoon roasted sesame seeds (optional, but they add a fantastic nutty crunch)

Preparing the Chicken: Marinating for Maximum Flavor

  1. First things first, I take my chicken and ensure it’s perfectly prepared. I start by thoroughly washing the 500 grams of boneless chicken under cold running water. It’s important to pat it completely dry with paper towels. Removing excess moisture is crucial for achieving a crispy coating later on. Once dry, I cut the chicken into uniform 1-inch cubes. This ensures even cooking and a consistent texture in every bite of our Dragon Chicken.
  2. Now, for the marinade, which is where a lot of the flavor infusion begins. In a medium-sized mixing bowl, I combine the chicken cubes with 1 tablespoon of fresh ginger-garlic paste. I always make sure my ginger-garlic paste is freshly prepared; it makes a world of difference in the aroma and taste compared to store-bought varieties.
  3. Next, I add 1 teaspoon of light soy sauce. This provides a foundational savory and umami note to the chicken. Then, I sprinkle in ½ teaspoon of black pepper powder and ½ teaspoon of salt. I gently toss everything together to ensure every piece of chicken is coated evenly.
  4. Here’s my personal touch for tenderness: I crack open one large egg and add it to the chicken. The egg acts as a binder and helps tenderize the chicken, making it incredibly moist on the inside after frying. I mix it in well until the chicken is thoroughly coated with the egg mixture.
  5. Finally, to achieve that signature crispy exterior for our Dragon Chicken, I add 2 tablespoons of cornstarch and 1 tablespoon of all-purpose flour. These flours create a light, crisp batter when fried. I gently fold them into the chicken mixture until no dry flour spots remain, making sure not to overmix.
  6. Once everything is perfectly combined, I cover the bowl with plastic wrap and let the chicken marinate. For the best results, I recommend refrigerating it for at least 30 minutes. However, if you have the luxury of time, marinating for 1 to 2 hours, or even overnight, will deepen the flavors immensely and result in an even more tender and delicious Dragon Chicken. This waiting period allows the chicken to absorb all the wonderful seasonings, setting the stage for a truly fantastic dish.

Frying the Chicken: Achieving that Perfect Crispy Texture

  1. When I’m ready to fry, I take the marinated chicken out of the refrigerator and let it sit at room temperature for about 10-15 minutes. This helps the chicken cook more evenly.
  2. I select a deep, heavy-bottomed pan or a Dutch oven for frying. I pour enough oil into the pan to ensure the chicken pieces can be submerged. The key to perfectly crispy chicken is to use sufficient oil. I usually aim for about 2-3 inches of oil depth.
  3. Now, for the most crucial step: heating the oil. I place the pan over medium-high heat. To test if the oil is ready, I often drop a tiny bit of the marinade into it. If it sizzles immediately and floats to the top, the oil is at the perfect temperature, usually around 350-375°F (175-190°C). If the oil isn’t hot enough, the chicken will absorb too much oil and become greasy; if it’s too hot, the exterior will burn before the inside cooks through.
  4. Carefully, using tongs or a slotted spoon, I gently place the marinated chicken pieces into the hot oil, ensuring not to overcrowd the pan. Frying in batches is absolutely essential for maintaining the oil temperature and achieving that beautiful golden-brown crispiness. Overcrowding will lower the oil temperature, leading to soggy chicken. I usually fry about 8-10 pieces at a time, depending on the size of my pan.
  5. I let the chicken fry undisturbed for about 2-3 minutes on one side to allow a crust to form. Then, I gently turn the pieces with tongs to ensure they cook evenly on all sides. I continue to fry for a total of 5-7 minutes per batch, or until the chicken pieces are beautifully golden brown, wonderfully crispy, and cooked through. You’ll know they’re done when they float to the surface and have a firm texture.
  6. As each batch finishes frying, I use a slotted spoon to carefully remove the cooked chicken and transfer it to a plate lined with paper towels. This helps drain any excess oil, ensuring our Dragon Chicken remains light and crispy. I repeat this process with the remaining chicken batches until all the chicken is perfectly fried. Once done, I set the crispy chicken aside, ready to be coated in our amazing Dragon Chicken sauce.

Crafting the Signature Dragon Chicken Sauce: A Symphony of Sweet, Spicy, and Savory

  1. While the chicken rests, I immediately begin preparing the sauce. I drain off most of the oil from the frying pan, leaving just about 2 tablespoons. If the oil seems too heavy or has too many charred bits, I’ll use fresh oil. I heat this oil over medium heat.
  2. Once the oil is shimmering, I add 1 tablespoon of finely chopped garlic and 1 tablespoon of finely chopped ginger. I sauté these aromatics for about 30 seconds to 1 minute, until they become incredibly fragrant. Don’t let them brown; we just want to release their beautiful aromas. This fragrant base is critical for the depth of flavor in our Dragon Chicken.
  3. Next, I toss in the 2-3 slit green chilies. I adjust the quantity here based on how much heat I’m craving. For a milder dish, I use fewer or deseed them. For a real kick, I might add more or even some dried red chilies. I stir-fry them briefly, for about 15-20 seconds.
  4. Then come the vibrant vegetables: ¼ cup each of finely chopped red bell pepper, yellow bell pepper, and onion. I add these to the pan and stir-fry them for about 2-3 minutes. I aim for them to be slightly softened but still retain a pleasant crunch. The aim here is not to cook them until mushy, but to keep some of their texture, which adds a lovely contrast to the tender chicken.
  5. Now it’s time for the liquid flavor boosters. I pour in 2 tablespoons of tomato ketchup, 1 tablespoon of red chili sauce, 1 tablespoon of dark soy sauce, 1 tablespoon of white vinegar, and 1 teaspoon of sugar. I also add ½ teaspoon of black pepper powder. I stir everything thoroughly, allowing the sauces to combine and slightly caramelize with the vegetables for about 1 minute. The aroma at this stage is absolutely intoxicating!
  6. After the sauces have had a moment to meld, I pour in ½ cup of chicken stock. If you don’t have chicken stock, water will work, but I find chicken stock adds a profound richness and savory depth that truly elevates the Dragon Chicken sauce. I bring the mixture to a gentle simmer.
  7. While the sauce is simmering, I quickly prepare the cornstarch slurry. In a small bowl, I combine 1 tablespoon of cornstarch with 2 tablespoons of water and whisk until there are no lumps. This slurry is what will thicken our sauce to that perfect glossy consistency.
  8. Once the sauce is simmering, I gradually pour in the cornstarch slurry, stirring continuously. It’s important to stir constantly to prevent lumps and ensure even thickening. I continue to cook and stir until the sauce thickens to my desired consistency – usually a beautiful, glossy, and spoon-coating texture. This usually takes about 1-2 minutes.
  9. Finally, I taste the sauce. This is a crucial step! I check for seasoning and adjust with a pinch of salt if necessary. Remember that soy sauce and ketchup already contribute salt, so taste before adding more. This ensures the perfect balance of sweet, spicy, and savory that defines an excellent Dragon Chicken.

Bringing It All Together: Assembling Your Dragon Chicken Masterpiece

  1. With the sauce perfectly thickened and seasoned, it’s time for the grand finale! I add all the crispy fried chicken pieces back into the pan with the sauce.
  2. Using a spatula or tongs, I gently but quickly toss the chicken in the sauce. The goal here is to coat every single piece of that wonderfully crispy chicken evenly with the luscious Dragon Chicken sauce. It’s important to work quickly at this stage to ensure the chicken retains its crispiness for as long as possible before serving. I don’t let it sit in the sauce for too long, as it will start to lose its crunch.
  3. Once the chicken is thoroughly coated, I immediately remove the pan from the heat. The residual heat will continue to meld the flavors, but we want to prevent the chicken from becoming soft.
  4. Now for the beautiful finishing touches! I generously sprinkle the 2 tablespoons of freshly chopped spring onion greens over the Dragon Chicken. The bright green color provides a wonderful contrast to the rich red sauce, and the fresh oniony flavor adds a delightful zing.
  5. If I’m feeling extra fancy or simply love the added texture, I’ll also sprinkle 1 tablespoon of roasted sesame seeds. These add a subtle nutty flavor and a lovely crunch that complements the dish perfectly.
  6. And there you have it! Your incredible Dragon Chicken is ready to be served. I always make sure to serve it immediately, while the chicken is still hot and wonderfully crispy, and the sauce is glistening. It pairs wonderfully with steamed rice, fried rice, or even noodles. Each bite is a burst of flavor – the tender, crispy chicken enveloped in that tantalizingly sweet, spicy, and savory Dragon Chicken sauce. Enjoy your culinary creation!

Fiery Dragon Chicken: Easy Asian Recipe for Dinner

And so, my dear fellow food enthusiasts, we reach the grand finale of our culinary adventure with this incredible recipe. I genuinely believe that if you’re looking to ignite your taste buds and impress everyone at your table, this dish is not just an option, it’s a necessity. It’s a recipe that transcends the ordinary, offering a truly unforgettable experience. What makes it a must-try, you ask? Well, for starters, the harmonious blend of textures is simply divine – each piece of chicken is wonderfully crispy on the outside, yet unbelievably tender and juicy within. This textural contrast is the foundation upon which the magic is built. Then, there’s the flavor profile, which is nothing short of spectacular. It’s a masterful dance between sweet, savory, and a captivating spicy kick that awakens every part of your palate without overwhelming it. The vibrant colors alone are a feast for the eyes, promising the explosive flavors that await. But the true star, the undeniable heart of this dish, lies in its exquisite sauce. It’s a glossy, rich, aromatic masterpiece, clinging perfectly to every piece of chicken, delivering a symphony of flavors with each bite. The interplay of the subtle sweetness, the invigorating heat, and the deep umami notes creates a truly addictive experience that will leave you craving more. This isn’t just a meal; it’s an event, a celebration of bold flavors and comforting warmth that makes any occasion feel special. Trust me when I say, once you taste the succulent, flavor-packed morsels, you’ll understand why this

Dragon Chicken

has become a beloved favorite in kitchens around the world.

Now, let’s talk about enhancing your experience even further with some delightful serving suggestions and exciting variations. For a classic and universally loved pairing, I always recommend serving this with a generous portion of fluffy steamed jasmine rice or fragrant basmati rice. The delicate neutrality of the rice is the perfect canvas, soaking up every drop of that incredible sauce and balancing the intense flavors with its subtle aroma. If you’re feeling adventurous and want to turn it into a heartier meal, consider serving it over a bed of stir-fried egg noodles or even quick-cooking ramen for a complete and satisfying bowl. To add a refreshing contrast and a dose of vibrant greens, a side of simple steamed broccoli, sautéed bok choy, or a light cucumber salad with a sesame dressing works wonders, cutting through the richness beautifully. Don’t limit this to just a main course either; served with toothpicks, it transforms into an incredibly popular and sophisticated appetizer for any gathering, sure to be devoured in minutes. And here’s where you can truly make it your own: the spice level is incredibly customizable. Feel free to add more dried red chili flakes or fresh bird’s eye chilies if you crave an extra fiery kick, or dial it back for a milder, family-friendly version. For those exploring alternative diets, this recipe is wonderfully adaptable; swap out the chicken for firm tofu or paneer to create a delightful vegetarian

Dragon Chicken

that doesn’t compromise on flavor. Seafood lovers might even try it with shrimp for a different take! And finally, don’t forget the finishing touches: a sprinkle of toasted sesame seeds, a generous scattering of fresh chopped spring onions, or a few sprigs of fresh cilantro will not only add visual appeal but also enhance the aromatic profile.

I genuinely hope you feel inspired to bring this incredible

Dragon Chicken

recipe to life in your own kitchen. It truly is a game-changer, and I promise you, the effort is well worth the reward. Don’t be intimidated by the list of ingredients; the steps are straightforward, and the process is incredibly rewarding. Imagine the aroma filling your kitchen as the sauce simmers to perfection – it’s a sensory experience that builds anticipation for the first magnificent bite.

I can hardly wait to hear about your culinary adventure!

Please, after you’ve tried it, come back here and share your experience with me and our wonderful community. Did you make any exciting variations? What did your family and friends think? Did you find a new favorite side dish to pair with it? Your insights and feedback are incredibly valuable and they truly motivate me. Share your photos, your tweaks, and your triumphs in the comments below! Join our growing community of food lovers and let me know how your Dragon Chicken turned out. Happy cooking, and may your kitchen always be filled with delicious aromas and joyful moments!


Fiery Dragon Chicken

Fiery Dragon Chicken

Dragon Chicken is an iconic Indo-Chinese recipe featuring succulent pieces of chicken, perfectly fried to a golden crisp, then tossed in a luscious, fiery red sauce. It’s an exquisite balance of sweet, spicy, and tangy notes, offering an unforgettable culinary experience.

Prep Time
30 Minutes

Cook Time
35 Minutes

Total Time
5 Minutes

Servings
4 servings

Ingredients

  • 1 lb boneless, skinless chicken breasts (or thighs), thinly sliced
  • 1 tbsp fresh ginger-garlic paste
  • 1 tsp light soy sauce
  • ½ tsp black pepper powder
  • ½ tsp salt
  • 1 large egg
  • ¼ cup cornstarch
  • 1 tbsp all-purpose flour (maida)
  • Oil for deep frying
  • 2 tbsp oil (for sauce)
  • 1 tbsp finely chopped garlic
  • 1 tbsp finely chopped ginger
  • 2-3 green chilies, slit or finely chopped
  • ¼ cup finely chopped red bell pepper
  • ¼ cup finely chopped yellow bell pepper
  • ¼ cup finely chopped onion
  • 2 tbsp tomato ketchup
  • 1 tbsp red chili sauce (e.g., Sriracha)
  • 1 tbsp dark soy sauce
  • 1 tbsp white vinegar
  • 1 tsp sugar
  • ½ cup chicken stock or water
  • 1 tbsp cornstarch mixed with 2 tbsp water (for slurry)
  • Pinch of salt, if needed
  • 2 tbsp chopped spring onion greens
  • 1 tbsp roasted sesame seeds (optional)

Instructions

  1. Step 1
    Wash, pat dry, and cut chicken into 1-inch cubes. In a bowl, combine chicken with ginger-garlic paste, light soy sauce, ½ tsp black pepper, ½ tsp salt, egg, ¼ cup cornstarch, and all-purpose flour. Mix well. Cover and marinate in the refrigerator for at least 30 minutes (or 1-2 hours for best results).
  2. Step 2
    Heat enough oil for deep frying in a deep pan to 350-375°F (175-190°C). Fry chicken in batches for 5-7 minutes per batch until golden brown, crispy, and cooked through. Avoid overcrowding. Remove fried chicken with a slotted spoon and drain on paper towels. Set aside.
  3. Step 3
    Drain oil from the pan, leaving 2 tbsp. Heat over medium. Sauté chopped garlic and ginger for 30-60 seconds until fragrant. Add green chilies, then red and yellow bell peppers and onion; stir-fry for 2-3 minutes. Stir in tomato ketchup, red chili sauce, dark soy sauce, white vinegar, sugar, and ½ tsp black pepper. Cook for 1 minute.
  4. Step 4
    Pour in ½ cup chicken stock (or water) and bring to a simmer. Mix 1 tbsp cornstarch with 2 tbsp water to create a slurry. Gradually add to simmering sauce, stirring constantly, until thickened and glossy (1-2 minutes). Taste and adjust salt if needed.
  5. Step 5
    Add all crispy fried chicken pieces to the sauce. Toss gently and quickly to coat chicken evenly. Remove from heat immediately. Garnish with chopped spring onion greens and optional roasted sesame seeds. Serve immediately with steamed rice, fried rice, or noodles.

Important Information

Nutrition Facts (Per Serving)

It is important to consider this information as approximate and not to use it as definitive health advice.

Allergy Information

Please check ingredients for potential allergens and consult a health professional if in doubt.

« Previous Post
Easy Honey Garlic Chicken w/ Creamy High Protein Mac Cheese
Next Post »
Quick & Easy Street Corn Chicken Rice Bowl – Flavorful Dinner!

If you enjoyed this…

Spicy Brazilian Coconut Chicken: A Flavorful & Easy Recipe

Huli Huli Chicken: The Ultimate Guide to Hawaiian BBQ

Chicken Fajita: The Ultimate Guide to Making Perfect Fajitas

Primary Sidebar

Browse by Diet

BreakfastDinnerLunchDessertAppetizer

Sweet Peach Yogurt Parfait Delight

One of my fondest memories is from a lazy summer afternoon spent at my grandmother’s house. The sun filtered through the kitchen window, casting a warm glow over the table where she would create her culinary magic. It was during one of those blissful moments that I first tasted her Peach Yogurt Parfait with Honey and Granola. The sweet aroma of ripe peaches mingling with creamy yogurt and the crunch of granola was nothing short of heavenly. It felt like summer captured in a bowl, and I still remember the joy of diving in with a spoon, each layer revealing a new burst of flavor.

When I think about that parfait, I can almost hear the gentle hum of the bees outside, reminding me of the floral notes that honey brings to every bite. The vibrant yellows and soft oranges of the peaches contrast beautifully with the creamy white yogurt and the golden crunch of granola. It’s a dish that not only looks delightful but also tastes like a celebration of fresh, wholesome ingredients.

What makes my version of this Peach Yogurt Parfait special is the careful balance of flavors and textures. I use ripe, juicy peaches, drizzled with locally sourced honey, and a homemade granola that’s bursting with nuts and seeds for an extra crunch. It’s a simple dish, but every layer is crafted with love and attention.

Let me show you exactly how to make this delightful parfait, so you can bring a bit of that summer magic into your kitchen!

Sweet Peach Yogurt Parfait Delight

Why You’ll Love This Recipe

  • Delightfully creamy texture from the Greek yogurt, paired with the juicy sweetness of fresh peaches.
  • Ready in under 20 minutes, making it a quick and satisfying breakfast or snack option.
  • Budget-friendly, using common ingredients that you may already have in your pantry.
  • Customizable with your favorite granola and nuts, allowing you to tailor each parfait to your taste.
  • Perfectly balanced flavors with the bright acidity of lemon juice and the sweetness of honey enhancing the peaches.

Ingredients

  • For the Parfait:
  • 2 cups plain Greek yogurt (or vanilla yogurt for a sweeter option)
  • 2 large ripe peaches, diced (about 2 cups)
  • 1 tablespoon fresh lemon juice (to prevent browning of peaches)
  • 2 tablespoons honey (plus more for drizzling)
  • 1 teaspoon vanilla extract (optional for extra flavor)
  • For the Granola:
  • 1 cup granola (store-bought or homemade; see notes for a simple granola recipe)
  • 1/4 cup sliced almonds (optional for added crunch)
  • 1/4 cup shredded coconut (optional for added flavor)

Let’s dive into some key ingredients that make this Peach Yogurt Parfait so delightful! First, the Greek yogurt is not only creamy but also packed with protein, making it a satisfying option for breakfast or a snack. If you’re looking for a sweeter option, you can easily substitute it with vanilla yogurt, though it may alter the overall flavor balance. Next, the ripe peaches are the star of the show; their natural sweetness shines through, so I recommend choosing peaches that yield slightly to pressure, indicating they’re perfectly ripe. If peaches aren’t in season, feel free to use nectarines or even frozen peaches—just thaw them before use. Finally, honey adds a lovely floral sweetness that ties everything together. If you prefer, maple syrup can serve as a delicious substitute.

Step-by-Step Instructions

  1. Start by preparing the peaches. Wash them thoroughly, then slice and dice them into bite-sized pieces. In a medium bowl, toss the diced peaches with 1 tablespoon of fresh lemon juice to prevent browning. Set aside for about 5 minutes while the lemon juice works its magic.
  2. In a separate bowl, combine the Greek yogurt, 2 tablespoons of honey, and 1 teaspoon of vanilla extract if using. Stir the mixture until smooth and thoroughly blended. This should take about a minute. Avoid overmixing to maintain the creaminess of the yogurt.
  3. Now it’s time to layer your parfait. Grab a clear glass or bowl to showcase your beautiful creation. Start with a generous spoonful of the yogurt mixture at the bottom—about 1/4 cup will do. Use a spoon to spread it evenly.
  4. Add a layer of the diced peaches over the yogurt, ensuring they cover the yogurt completely. You might want to use about half of what you have prepared—roughly 1 cup. This layer should be visually appealing, so arrange the peaches neatly.
  5. Sprinkle 1/4 cup of granola over the peaches. This adds a delightful crunch. Make sure to distribute it evenly to ensure every bite has that satisfying texture. Avoid packing it down too tightly, as you want it to maintain its crunch.
  6. Repeat the layers: spoon in another 1/4 cup of yogurt, followed by another cup of peaches, and another sprinkle of granola. You should have at least two layers, but feel free to add more depending on your glass size.
  7. Finish off your parfait with a drizzle of honey on top for added sweetness and a touch of elegance. If you’re using sliced almonds or shredded coconut, sprinkle them on top now. It adds a lovely visual contrast and extra flavor.
  8. Serve immediately or refrigerate for up to 30 minutes before serving to allow the flavors to meld together. However, I recommend enjoying it fresh to maintain the granola’s crunch.

Pro Tips for the Best Peach Yogurt Parfait With Honey And Granola

  • Make sure to choose ripe peaches for the best flavor and texture. A common mistake is using unripe fruit, which can lead to a less enjoyable parfait. Look for peaches that are fragrant and slightly soft to the touch.
  • Use a clear glass to assemble your parfait; this not only makes for a beautiful presentation but also allows you to see the colorful layers, which adds to the enjoyment of eating it.
  • For an even creamier texture, consider whipping the Greek yogurt with a hand mixer for a couple of minutes before layering. This small adjustment makes a huge difference in mouthfeel.
  • Be mindful of the granola-to-yogurt ratio. Too much granola can overwhelm the parfait, while too little can make it feel too creamy. Aim for about 1/4 cup of granola per layer for the perfect balance.
  • If you’re making this for a gathering, consider preparing the yogurt and peaches ahead of time and layering them just before serving. This ensures the granola stays crunchy!

Variations & Serving Ideas

There are so many ways to get creative with your Peach Yogurt Parfait! For a tropical twist, swap out the peaches for mangoes or pineapples and top with coconut flakes. If you prefer a berry flavor, mix in some blueberries or strawberries with the peaches for added color and taste. For a nutty version, incorporate chopped walnuts or pecans instead of almonds.

As for serving ideas, this parfait pairs beautifully with a side of scrambled eggs for a hearty breakfast or fresh fruit salad for a light lunch. You might also enjoy it alongside whole grain toast with almond butter for an energizing snack. The contrast of flavors and textures will elevate your meal experience!

Storage, Make-Ahead & Reheating

The Peach Yogurt Parfait is best enjoyed fresh, but you can prepare some components ahead of time. Store the layered parfait in an airtight container in the refrigerator for up to 24 hours. However, be cautious; the granola may lose its crunch if stored too long. You can freeze the yogurt and peach mixture for up to 2 months; just remember to thaw it in the refrigerator overnight before serving.

If you plan to enjoy this dish the next day, it can taste even better as the flavors meld together. Just remember to add the granola right before serving to keep its delightful crunch!

Frequently Asked Questions

Can I make Peach Yogurt Parfait With Honey And Granola ahead of time?

Yes — in fact, it tastes even better the next day as the flavors meld. However, I recommend waiting to add the granola until just before serving to maintain its crunch.

What can I substitute for Greek yogurt?

If you prefer a lighter option, you can substitute Greek yogurt with regular yogurt or a dairy-free alternative like coconut yogurt. Just remember that this may alter the creaminess and flavor profile slightly.

Can I use frozen peaches for this parfait?

Absolutely! Just make sure to thaw the frozen peaches before using them. They will still add great flavor, though the texture may be slightly softer than fresh peaches.

How do I make the parfait vegan?

To make a vegan version, substitute the Greek yogurt with a plant-based yogurt alternative, and replace honey with maple syrup or agave nectar. This keeps the parfait sweet while adhering to a vegan diet.

What other fruits can I use in this recipe?

You can mix and match fruits based on your preference. Try using strawberries, blueberries, raspberries, or even bananas. Just make sure to adjust the lemon juice as needed to prevent browning.

Sweet Peach Yogurt Parfait Delight

Final Thoughts

The Peach Yogurt Parfait with Honey and Granola is a delightful blend of creamy yogurt, sweet peaches, and crunchy granola that creates a satisfying and nourishing treat. Each layer bursts with flavor, making it a perfect choice for breakfast or a light dessert.

This is the kind of recipe I come back to again and again, especially when I want something refreshing and wholesome to start my day. The harmony of sweet and tart flavors, combined with the delightful crunch, never fails to lift my spirits!

I encourage you to give this parfait a try and indulge in its comforting goodness. Feel free to share your results or even add your own twist—perhaps a sprinkle of cinnamon or a handful of nuts. Enjoy creating your perfect parfait!

Print
clock clock iconcutlery cutlery iconflag flag iconfolder folder iconinstagram instagram iconpinterest pinterest iconfacebook facebook iconprint print iconsquares squares iconheart heart iconheart solid heart solid icon

Peach Yogurt Parfait


  • Author: Lily author
  • Total Time: 15 minutes
  • Yield: 4 servings 1x
Pin Recipe
Print Recipe

Description

This Peach Yogurt Parfait combines creamy Greek yogurt, juicy peaches, and crunchy granola for a delightful treat. It’s a perfect breakfast or snack that captures the essence of summer in every bite.


Ingredients

Scale
  • For the Parfait:
  • 2 cups plain Greek yogurt (or vanilla yogurt for a sweeter option)
  • 2 large ripe peaches, diced (about 2 cups)
  • 1 tablespoon fresh lemon juice (to prevent browning of peaches)
  • 2 tablespoons honey (plus more for drizzling)
  • 1 teaspoon vanilla extract (optional for extra flavor)
  • For the Granola:
  • 1 cup granola (store-bought or homemade; see notes for a simple granola recipe)
  • 1/4 cup sliced almonds (optional for added crunch)
  • 1/4 cup shredded coconut (optional for added flavor)

Instructions

  1. Start by preparing the peaches. Wash them thoroughly, then slice and dice them into bite-sized pieces. In a medium bowl, toss the diced peaches with 1 tablespoon of fresh lemon juice to prevent browning. Set aside for about 5 minutes while the lemon juice works its magic.
  2. In a separate bowl, combine the Greek yogurt, 2 tablespoons of honey, and 1 teaspoon of vanilla extract if using. Stir the mixture until smooth and thoroughly blended. This should take about a minute. Avoid overmixing to maintain the creaminess of the yogurt.
  3. Now it’s time to layer your parfait. Grab a clear glass or bowl to showcase your beautiful creation. Start with a generous spoonful of the yogurt mixture at the bottom—about 1/4 cup will do. Use a spoon to spread it evenly.
  4. Add a layer of the diced peaches over the yogurt, ensuring they cover the yogurt completely. You might want to use about half of what you have prepared—roughly 1 cup. This layer should be visually appealing, so arrange the peaches neatly.
  5. Sprinkle 1/4 cup of granola over the peaches. This adds a delightful crunch. Make sure to distribute it evenly to ensure every bite has that satisfying texture. Avoid packing it down too tightly, as you want it to maintain its crunch.
  6. Repeat the layers: spoon in another 1/4 cup of yogurt, followed by another cup of peaches, and another sprinkle of granola. You should have at least two layers, but feel free to add more depending on your glass size.
  7. Finish off your parfait with a drizzle of honey on top for added sweetness and a touch of elegance. If you’re using sliced almonds or shredded coconut, sprinkle them on top now. It adds a lovely visual contrast and extra flavor.
  8. Serve immediately or refrigerate for up to 30 minutes before serving to allow the flavors to meld together. However, I recommend enjoying it fresh to maintain the granola’s crunch.
  • Prep Time: 15 mins
  • Cook Time: 0 mins
  • Category: Breakfast
  • Method: No-cook
  • Cuisine: American

Nutrition

  • Serving Size: 1 parfait
  • Calories: 250
  • Sugar: 20 g
  • Sodium: 50 mg
  • Fat: 5 g
  • Saturated Fat: 2 g
  • Unsaturated Fat: 3 g
  • Trans Fat: 0 g
  • Carbohydrates: 40 g
  • Fiber: 3 g
  • Protein: 10 g
  • Cholesterol: 10 mg

Keywords: Choose ripe peaches for the best flavor and texture. Use a clear glass for a beautiful presentation. For creaminess, consider whipping the yogurt before layering. Be mindful of the granola-to-yogurt ratio. Prepare yogurt and peaches ahead of time for gatherings, layering just before serving.

Did you make this recipe?

Share a photo and tag us — we can't wait to see what you've made!

Sun-Kissed Frozen Orange Cream Slush

As a child, summer days felt like they lasted forever. I remember the sticky heat wrapping around me as I played outside, my laughter mingling with the sounds of the neighborhood. But nothing could cool me down quite like the moment I’d spot my grandmother, laboring over her blender, whipping up her famous Frozen Orange Creamsicle Slush. That vibrant orange treat, with its frosty texture and sweet citrus aroma, was like a burst of sunshine in a cup. Just one sip, and I could feel the coolness wash over me, sparking pure joy.

This Frozen Orange Creamsicle Slush has a way of making you feel like a kid again. Its creamy, dreamy consistency is a delightful balance of bright orange and soft vanilla, inviting you to dive right in. The refreshing tang of orange dances on your tongue, while the smooth creaminess envelops you in a comforting embrace. It’s a nostalgic treat that’s perfect for hot summer afternoons or anytime you need a little pick-me-up.

What makes my version of this slush stand out is the addition of a hint of vanilla bean, which elevates the flavor and adds an extra layer of richness. Plus, it’s super easy to whip up with just a few simple ingredients that you probably already have on hand! So, if you’re ready to relive those sun-soaked memories, let me show you exactly how to make it.

Sun-Kissed Frozen Orange Cream Slush

Why You’ll Love This Recipe

  • Each slush is a perfect blend of creamy vanilla and zesty orange, creating a nostalgic flavor reminiscent of summer days.
  • This refreshing treat is ready in under 15 minutes, making it an ideal quick dessert for unexpected guests or hot afternoons.
  • With just 8 simple ingredients, it’s budget-friendly, ensuring you don’t have to break the bank to enjoy a delicious slush.
  • The slush has a perfectly smooth texture, thanks to the combination of ice and ice cream, providing a delightful contrast to the bright citrus flavors.
  • It’s highly customizable; you can easily adjust the sweetness and add fresh herbs for a unique twist that suits your taste.

Ingredients

  • 2 cups orange juice (freshly squeezed or store-bought)
  • 1 cup vanilla ice cream
  • 1 cup crushed ice
  • 1/2 cup milk (whole or 2%)
  • 1/4 cup granulated sugar (adjust based on sweetness preference)
  • 1 teaspoon vanilla extract
  • Zest of 1 orange (for added flavor)
  • Fresh orange slices and mint leaves (for garnish)

The star of this Frozen Orange Creamsicle Slush is the orange juice, which provides the vibrant, citrusy base. Freshly squeezed juice will yield the brightest flavor, but store-bought options can be just as convenient. If you’re opting for store-bought, choose 100% pure juice with no added sugars for the best results. Another essential ingredient is the vanilla ice cream; it adds creaminess and sweetness. You can substitute it with dairy-free ice cream if you’re looking for a vegan option. Whole or 2% milk complements the ice cream, creating a smooth blend. If you want a lower-calorie version, almond or oat milk can be good alternatives.

Lastly, the granulated sugar can be adjusted based on your sweetness preference. If you prefer a more natural sweetener, consider using honey or agave syrup. The orange zest enhances the flavor profile, providing an aromatic pop that brings the whole slush together. Don’t skip it! It adds an extra layer of brightness that makes this slush truly special.

Step-by-Step Instructions

  1. Start by preparing your ingredients. Gather 2 cups of orange juice, 1 cup of vanilla ice cream, and 1 cup of crushed ice. Make sure the ice is finely crushed, as larger chunks can make blending difficult.
  2. In a blender, combine the orange juice, vanilla ice cream, crushed ice, and 1/2 cup of milk. Add 1/4 cup of granulated sugar and 1 teaspoon of vanilla extract. If you like a sweeter slush, consider adding a bit more sugar at this stage.
  3. Add the zest of 1 orange to the blender. This step is crucial for enhancing the citrus flavor of your slush. Make sure not to include the bitter white pith—only the flavorful zest.
  4. Blend the mixture on medium-high speed for about 30-45 seconds. Stop once the ingredients are fully combined and the slush has a smooth, even consistency. If you notice large chunks of ice, blend for an additional 10-15 seconds. Avoid over-blending, as this can make the slush too liquidy.
  5. Once blended, taste the slush. If it needs more sweetness, add a little more sugar and blend for a few more seconds. If it’s too thick, you can add a splash of milk to reach your desired consistency.
  6. Pour the slush into glasses. This recipe typically serves 4, but you can easily double it for larger gatherings. Use a spoon to help guide the slush into the glasses if needed.
  7. Garnish each serving with fresh orange slices and mint leaves. The mint not only adds a pop of color but also a refreshing aroma that complements the citrus flavors beautifully.
  8. Serve immediately and enjoy! If you’ve made extra, you can refrigerate it for a short time, but it’s best enjoyed fresh.

Pro Tips for the Best Frozen Orange Creamsicle Slush

  • Don’t skip the orange zest! It’s a game-changer for flavor. Always zest before juicing to make it easier.
  • Use a high-powered blender for the best texture. A standard blender may struggle with ice, leading to uneven consistency. If you have a food processor, that can work too, but ensure the ice is finely crushed.
  • Adjust the ice-to-liquid ratio carefully. If your slush is too thick, it won’t blend well. Start with less ice and add more until you reach your preferred texture.
  • Be cautious with the sugar! Always start with the lower amount, as you can easily add more, but it’s hard to fix an overly sweet slush.
  • For a fun twist, consider adding a splash of coconut milk or a handful of fresh fruit like strawberries or pineapple. This not only enhances the flavor but also adds a beautiful color contrast.

Variations & Serving Ideas

There are countless ways to put a spin on your Frozen Orange Creamsicle Slush. Consider making a tropical version by adding in some pineapple juice or coconut milk for a delightful tropical twist. If you’re feeling adventurous, try incorporating a handful of frozen mango or peach slices for added sweetness. For a lighter version, swap out the vanilla ice cream for Greek yogurt for a creamy yet tangy alternative.

As for serving ideas, this refreshing slush pairs wonderfully with light summer dishes like grilled chicken skewers, fish tacos, or a simple salad topped with citrus vinaigrette. The bright, zesty flavors of the slush complement these dishes perfectly, making them an ideal pairing for a sunny day.

Storage, Make-Ahead & Reheating

This Frozen Orange Creamsicle Slush is best enjoyed fresh, but if you have leftovers, you can store them in an airtight container in the fridge for up to 2 days. Just keep in mind that the slush may lose some of its texture over time as the ice melts. It doesn’t freeze well, as the ice will turn into a solid block. If you must freeze it, blend again after thawing to restore the slushy consistency. This treat is best the day you make it, as the flavors meld together beautifully overnight, enhancing its deliciousness.

Frequently Asked Questions

Can I make Frozen Orange Creamsicle Slush ahead of time?

Yes — in fact, it tastes even better the next day as the flavors meld. However, it’s best to enjoy it fresh, as the texture can change if stored for too long. If you need to prepare it ahead, keep it in the fridge and re-blend before serving.

What kind of orange juice should I use?

For the best flavor, use freshly squeezed orange juice. However, if you’re short on time, opt for 100% pure store-bought juice without added sugars. This will ensure that your slush remains flavorful and refreshing.

Can I substitute the vanilla ice cream?

Absolutely! If you’re looking for a dairy-free option, coconut milk ice cream or a non-dairy vanilla ice cream can work wonderfully. They will still provide the creamy texture and sweetness you desire.

How can I adjust the sweetness of my slush?

You can easily adjust the sweetness by modifying the amount of sugar added. Start with 1/4 cup and taste the mixture before blending. If you prefer it sweeter, add more sugar gradually until it reaches your desired level.

What should I do if my slush is too thick?

If your slush is too thick, simply add a splash of milk or orange juice and blend again. This will help achieve a more drinkable consistency while maintaining the slushy texture. Adjust gradually to reach your preferred thickness.

Sun-Kissed Frozen Orange Cream Slush

Final Thoughts

The Frozen Orange Creamsicle Slush is a delightful blend of refreshing citrus and creamy goodness, making it a perfect treat for warm days or any time you crave a taste of nostalgia. The way the bright orange flavor dances with the creamy texture truly elevates this slush, transforming it into a satisfying escape from the everyday.

This is the kind of recipe I come back to again and again, especially when I’m looking to cool down or impress guests at a summer gathering. It’s simple to make and always brings smiles all around! I encourage you to try this recipe for yourself—don’t hesitate to share your results or even put your own spin on it. Happy slushing!

Print
clock clock iconcutlery cutlery iconflag flag iconfolder folder iconinstagram instagram iconpinterest pinterest iconfacebook facebook iconprint print iconsquares squares iconheart heart iconheart solid heart solid icon

Frozen Orange Creamsicle Slush


  • Author: Lily author
  • Total Time: 15 minutes
  • Yield: 4 servings 1x
Pin Recipe
Print Recipe

Description

This Frozen Orange Creamsicle Slush is a refreshing treat that combines creamy vanilla and zesty orange flavors. Perfect for hot summer days, it brings back nostalgic memories with every sip.


Ingredients

Scale
  • 2 cups orange juice (freshly squeezed or store-bought)
  • 1 cup vanilla ice cream
  • 1 cup crushed ice
  • 1/2 cup milk (whole or 2%)
  • 1/4 cup granulated sugar (adjust based on sweetness preference)
  • 1 teaspoon vanilla extract
  • Zest of 1 orange (for added flavor)
  • Fresh orange slices and mint leaves (for garnish)

Instructions

  1. Start by preparing your ingredients. Gather 2 cups of orange juice, 1 cup of vanilla ice cream, and 1 cup of crushed ice. Make sure the ice is finely crushed, as larger chunks can make blending difficult.
  2. In a blender, combine the orange juice, vanilla ice cream, crushed ice, and 1/2 cup of milk. Add 1/4 cup of granulated sugar and 1 teaspoon of vanilla extract. If you like a sweeter slush, consider adding a bit more sugar at this stage.
  3. Add the zest of 1 orange to the blender. This step is crucial for enhancing the citrus flavor of your slush. Make sure not to include the bitter white pith—only the flavorful zest.
  4. Blend the mixture on medium-high speed for about 30-45 seconds. Stop once the ingredients are fully combined and the slush has a smooth, even consistency. If you notice large chunks of ice, blend for an additional 10-15 seconds. Avoid over-blending, as this can make the slush too liquidy.
  5. Once blended, taste the slush. If it needs more sweetness, add a little more sugar and blend for a few more seconds. If it’s too thick, you can add a splash of milk to reach your desired consistency.
  6. Pour the slush into glasses. This recipe typically serves 4, but you can easily double it for larger gatherings. Use a spoon to help guide the slush into the glasses if needed.
  7. Garnish each serving with fresh orange slices and mint leaves. The mint not only adds a pop of color but also a refreshing aroma that complements the citrus flavors beautifully.
  8. Serve immediately and enjoy! If you’ve made extra, you can refrigerate it for a short time, but it's best enjoyed fresh.
  • Prep Time: 15 min
  • Cook Time: 0 min
  • Category: Dessert
  • Method: Blending
  • Cuisine: American

Nutrition

  • Serving Size: 1 serving
  • Calories: 200
  • Sugar: 30 g
  • Sodium: 50 mg
  • Fat: 5 g
  • Saturated Fat: 3 g
  • Unsaturated Fat: 2 g
  • Trans Fat: 0 g
  • Carbohydrates: 40 g
  • Fiber: 1 g
  • Protein: 2 g
  • Cholesterol: 20 mg

Keywords: Don't skip the orange zest! It's a game-changer for flavor. Always zest before juicing to make it easier.

Did you make this recipe?

Share a photo and tag us — we can't wait to see what you've made!

Zesty Lemon Poppy Seed Delight

One rainy afternoon, I found myself in my grandmother’s cozy kitchen, the kind that always smelled like warmth and love. She was whipping up her famous Lemon Poppy Seed Loaf, a recipe that had been passed down through generations. As the batter came together, the zesty aroma of fresh lemons filled the air, mingling perfectly with the nutty fragrance of poppy seeds. I can still picture her, apron-clad, as she expertly drizzled a vibrant citrus icing over the loaf, creating a glossy, sun-kissed finish that beckoned us to dive in. It was a moment that sparked my own passion for baking, and this recipe has become a cherished staple in my home ever since.

When you take a bite of this Lemon Poppy Seed Loaf, it’s like a burst of sunshine on your palate. The loaf is beautifully golden, with a tender crumb that melts in your mouth. Each slice is speckled with tiny poppy seeds, adding a delightful crunch that contrasts beautifully with the tangy sweetness of the lemon. And that citrus icing? It’s the finishing touch that elevates this loaf from ordinary to extraordinary, with its bright, zesty flavor dancing on your taste buds.

This recipe stands out because it embraces simplicity while delivering on flavor. I’ve added a hint of vanilla to the batter, enhancing the overall taste and making it even more indulgent. Trust me, once you make this Lemon Poppy Seed Loaf With Citrus Icing, it’ll become a go-to in your baking repertoire.

So, let me show you exactly how to make it!

Zesty Lemon Poppy Seed Delight

Why You’ll Love This Recipe

  • Moist and tender crumb that melts in your mouth, thanks to the perfect balance of butter and buttermilk.
  • Bright, zesty lemon flavor paired with crunchy poppy seeds, creating a delightful texture and taste experience.
  • Easy to whip up in just about an hour, perfect for last-minute gatherings or a cozy afternoon treat.
  • Budget-friendly with everyday ingredients, making it an accessible option for all home bakers.
  • The citrus icing adds a sweet tang that elevates the loaf, turning a simple recipe into a showstopper!

Ingredients

  • 1 ½ cups (190g) all-purpose flour
  • 1 teaspoon baking powder
  • ½ teaspoon baking soda
  • ½ teaspoon salt
  • 3 tablespoons poppy seeds
  • ½ cup (115g) unsalted butter, softened to room temperature
  • 1 cup (200g) granulated sugar
  • 2 large eggs
  • 1 teaspoon vanilla extract
  • 1 teaspoon lemon zest (from about 1 medium lemon)
  • ½ cup (120ml) buttermilk
  • 2 tablespoons fresh lemon juice

For the Citrus Icing:

  • 1 cup (120g) powdered sugar
  • 2 tablespoons fresh lemon juice
  • 1 tablespoon orange juice
  • 1 teaspoon lemon zest (for garnish, optional)

Let’s dive into the key ingredients that make this Lemon Poppy Seed Loaf so special. The all-purpose flour provides the structure and base for the loaf, while the baking powder and baking soda ensure it rises perfectly, giving the loaf a light texture. For a gluten-free variation, you could substitute the flour with a gluten-free all-purpose blend. Poppy seeds not only add a delightful crunch but also contribute to the unique flavor profile that pairs well with the citrus notes.

Unsalted butter is crucial for achieving the buttery richness that makes this loaf so moist. If you’re looking for a dairy-free option, coconut oil or a vegan butter can be used instead. The buttermilk is another essential component, providing acidity that activates the baking soda for a fluffy texture. If you don’t have buttermilk on hand, you can easily make a substitute by mixing ½ cup of milk with 1 tablespoon of vinegar or lemon juice and letting it sit for about 5 minutes.

Step-by-Step Instructions

  1. Preheat your oven to 350°F (175°C). Grease a 9×5-inch loaf pan or line it with parchment paper for easy removal later.
  2. In a medium mixing bowl, whisk together 1 ½ cups of all-purpose flour, 1 teaspoon of baking powder, ½ teaspoon of baking soda, ½ teaspoon of salt, and 3 tablespoons of poppy seeds. This helps to evenly distribute the baking agents and ensures a uniform rise.
  3. In a large mixing bowl, cream together ½ cup of softened unsalted butter and 1 cup of granulated sugar using an electric mixer on medium speed for about 3-4 minutes, until the mixture is light and fluffy. Make sure to scrape down the sides of the bowl occasionally.
  4. Add 2 large eggs, 1 teaspoon of vanilla extract, and 1 teaspoon of lemon zest to the creamed butter and sugar, mixing until fully combined. You want a smooth consistency, so ensure there are no lumps of butter.
  5. In a small bowl, combine ½ cup of buttermilk and 2 tablespoons of fresh lemon juice. Alternately add the dry ingredients and buttermilk mixture to the butter mixture, starting and ending with the dry ingredients. Mix just until combined; do not overmix, as this can lead to a dense loaf.
  6. Pour the batter into the prepared loaf pan. Smooth the top with a spatula, ensuring it’s even. Bake in the preheated oven for 50-60 minutes, or until a toothpick inserted in the center comes out clean. The edges should be lightly golden brown, and the center should feel just set.
  7. Once baked, remove the loaf from the oven and allow it to cool in the pan for about 10 minutes. Then, transfer it to a wire rack to cool completely. Resist the urge to slice too soon, as it will be crumbly if it’s still warm.
  8. While the loaf is cooling, prepare the citrus icing. In a medium bowl, whisk together 1 cup of powdered sugar, 2 tablespoons of fresh lemon juice, and 1 tablespoon of orange juice until smooth. If the icing is too thick, you can add a little more juice to reach your desired consistency.
  9. Once the loaf is completely cool, drizzle the citrus icing over the top. If you like, sprinkle with an additional teaspoon of lemon zest for an extra pop of flavor and color.

Pro Tips for the Best Lemon Poppy Seed Loaf With Citrus Icing

  • Be careful not to overmix your batter; this is a common mistake that can lead to a dense loaf. Mix just until the dry ingredients are incorporated for a light and fluffy texture.
  • Use room temperature ingredients, especially the butter and eggs. This helps to create a smoother batter and ensures even baking. Take your eggs out of the fridge about 30 minutes before you start.
  • For a more pronounced lemon flavor, consider adding a little lemon extract in addition to the zest and juice. Just a half teaspoon can elevate the citrus notes significantly.
  • When measuring your flour, spoon it into the measuring cup and level it off with a knife instead of scooping directly from the bag. This prevents packing and ensures you don’t end up with a dry loaf.
  • Invest in a good quality loaf pan; it makes a difference in heat distribution, which ensures even baking. If your pan is dark-coated, reduce the oven temperature by 25°F to prevent over-browning.

Variations & Serving Ideas

For a delightful twist, consider adding blueberries or raspberries to the batter for a fruity burst of flavor. You can also experiment with different citrus fruits—try lime or grapefruit zest and juice for a refreshing change. For a healthier option, substitute half of the all-purpose flour with whole wheat flour for added fiber without compromising too much on texture.

This Lemon Poppy Seed Loaf pairs beautifully with a light salad, such as a mixed greens salad with a vinaigrette, or a cup of tea for a cozy afternoon treat. It also complements a creamy cheese platter, as the acidity of the loaf balances rich cheeses perfectly. Lastly, a scoop of vanilla ice cream on the side creates a delightful contrast of temperatures and flavors!

Storage, Make-Ahead & Reheating

This Lemon Poppy Seed Loaf can be stored at room temperature for up to 3 days if wrapped tightly in plastic wrap. If you want to keep it longer, it freezes well for up to 3 months. To freeze, wrap the loaf tightly in plastic wrap and then in aluminum foil to prevent freezer burn.

When you’re ready to enjoy it again, simply thaw it in the fridge overnight. Reheat individual slices in the microwave for 15-20 seconds or in a toaster oven until warmed through. Interestingly, many people find that this loaf tastes even better the next day, as the flavors have time to meld!

Frequently Asked Questions

Can I make Lemon Poppy Seed Loaf With Citrus Icing ahead of time?

Yes — in fact, it tastes even better the next day! You can make the loaf a day in advance, allowing the flavors to develop. Just be sure to store it in an airtight container to maintain its moisture.

Can I substitute the poppy seeds?

Absolutely! If you don’t have poppy seeds on hand or prefer an alternative, you can use sesame seeds for a similar crunch or omit them entirely for a smooth loaf.

What can I use instead of buttermilk?

If you don’t have buttermilk, you can easily create a substitute by mixing ½ cup of milk (dairy or plant-based) with 1 tablespoon of vinegar or lemon juice. Let it sit for 5 minutes before using in the recipe.

How can I make this recipe gluten-free?

To make a gluten-free version of this Lemon Poppy Seed Loaf, substitute the all-purpose flour with a gluten-free all-purpose flour blend. Just ensure that the blend contains a binding agent like xanthan gum for the best results.

What is the best way to store leftover loaf?

Leftover Lemon Poppy Seed Loaf should be stored in an airtight container at room temperature for up to 3 days. For longer storage, wrap it tightly and freeze for up to 3 months. Thaw it before serving for the best texture.

Zesty Lemon Poppy Seed Delight

Final Thoughts

The Lemon Poppy Seed Loaf with Citrus Icing is truly a delightful treat that brings a burst of brightness to any occasion. The zesty lemon flavor combined with the subtle crunch of poppy seeds creates a satisfying balance, while the citrus icing adds a touch of sweetness that perfectly complements the loaf’s tanginess.

This is the kind of recipe I come back to again and again, especially when I want to brighten up a gloomy day or celebrate a small victory. The aroma that fills the kitchen as it bakes is absolutely heavenly! I encourage you to give this recipe a try; you might just find it becoming a beloved staple in your home. Don’t forget to share your results or even add your own unique twist—I can’t wait to see what you create!

Print
clock clock iconcutlery cutlery iconflag flag iconfolder folder iconinstagram instagram iconpinterest pinterest iconfacebook facebook iconprint print iconsquares squares iconheart heart iconheart solid heart solid icon

Lemon Poppy Seed Loaf


  • Author: Lily author
  • Total Time: 28 minute
  • Yield: 1 loaf 1x
Pin Recipe
Print Recipe

Description

This Lemon Poppy Seed Loaf is a delightful treat that combines zesty lemon flavor with crunchy poppy seeds. Topped with a citrus icing, it’s perfect for any occasion.


Ingredients

Scale
  • 1 ½ cups (190g) all-purpose flour
  • 1 teaspoon baking powder
  • ½ teaspoon baking soda
  • ½ teaspoon salt
  • 3 tablespoons poppy seeds
  • ½ cup (115g) unsalted butter, softened to room temperature
  • 1 cup (200g) granulated sugar
  • 2 large eggs
  • 1 teaspoon vanilla extract
  • 1 teaspoon lemon zest (from about 1 medium lemon)
  • ½ cup (120ml) buttermilk
  • 2 tablespoons fresh lemon juice
  • 1 cup (120g) powdered sugar
  • 2 tablespoons fresh lemon juice
  • 1 tablespoon orange juice
  • 1 teaspoon lemon zest (for garnish, optional)

Instructions

  1. Preheat your oven to 350°F (175°C). Grease a 9×5-inch loaf pan or line it with parchment paper for easy removal later.
  2. In a medium mixing bowl, whisk together 1 ½ cups of all-purpose flour, 1 teaspoon of baking powder, ½ teaspoon of baking soda, ½ teaspoon of salt, and 3 tablespoons of poppy seeds. This helps to evenly distribute the baking agents and ensures a uniform rise.
  3. In a large mixing bowl, cream together ½ cup of softened unsalted butter and 1 cup of granulated sugar using an electric mixer on medium speed for about 3-4 minutes, until the mixture is light and fluffy. Make sure to scrape down the sides of the bowl occasionally.
  4. Add 2 large eggs, 1 teaspoon of vanilla extract, and 1 teaspoon of lemon zest to the creamed butter and sugar, mixing until fully combined. You want a smooth consistency, so ensure there are no lumps of butter.
  5. In a small bowl, combine ½ cup of buttermilk and 2 tablespoons of fresh lemon juice. Alternately add the dry ingredients and buttermilk mixture to the butter mixture, starting and ending with the dry ingredients. Mix just until combined; do not overmix, as this can lead to a dense loaf.
  6. Pour the batter into the prepared loaf pan. Smooth the top with a spatula, ensuring it’s even. Bake in the preheated oven for 50-60 minutes, or until a toothpick inserted in the center comes out clean. The edges should be lightly golden brown, and the center should feel just set.
  7. Once baked, remove the loaf from the oven and allow it to cool in the pan for about 10 minutes. Then, transfer it to a wire rack to cool completely. Resist the urge to slice too soon, as it will be crumbly if it’s still warm.
  8. While the loaf is cooling, prepare the citrus icing. In a medium bowl, whisk together 1 cup of powdered sugar, 2 tablespoons of fresh lemon juice, and 1 tablespoon of orange juice until smooth. If the icing is too thick, you can add a little more juice to reach your desired consistency.
  9. Once the loaf is completely cool, drizzle the citrus icing over the top. If you like, sprinkle with an additional teaspoon of lemon zest for an extra pop of flavor and color.
  • Prep Time: 15 mins
  • Cook Time: 50-60 mins
  • Category: Dessert
  • Method: Baking
  • Cuisine: American

Nutrition

  • Serving Size: 1 slice
  • Calories: 200
  • Sugar: 15 g
  • Sodium: 150 mg
  • Fat: 8 g
  • Saturated Fat: 5 g
  • Unsaturated Fat: 3 g
  • Trans Fat: 0 g
  • Carbohydrates: 30 g
  • Fiber: 1 g
  • Protein: 3 g
  • Cholesterol: 40 mg

Keywords: Be careful not to overmix your batter; this is a common mistake that can lead to a dense loaf. Use room temperature ingredients for a smoother batter and even baking.

Did you make this recipe?

Share a photo and tag us — we can't wait to see what you've made!

  • Privacy Policy
  • Terms Of Service
  • Contact
  • About
  • GDPR

Copyright © 2025 Homesmad