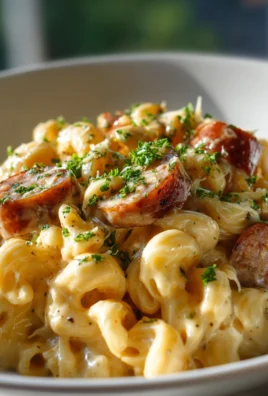
French Onion Chicken Orzo Casserole – just hearing those words instantly conjures images of ultimate comfort food, doesn’t it? I am so excited to share this incredible recipe with you, a culinary marvel that effortlessly combines the soulful depth of classic French Onion Soup with the hearty satisfaction of a baked casserole. It’s a dish that promises to transform your weeknight dinner routine into an experience of gourmet delight, perfect for any evening when you crave something truly special and profoundly comforting.
A Delicious Twist on a Beloved Classic
While this particular casserole is a modern American comfort food innovation, its delicious roots delve deep into French culinary tradition. We all adore the rich, complex flavors of perfectly caramelized onions simmered in a savory broth, crowned with crusty bread and melted Gruyère – a testament to the timeless appeal of French Onion Soup, whose origins stretch back centuries. This casserole pays a loving homage to that enduring classic, thoughtfully reimagining its iconic components into a convenient and incredibly satisfying form for today’s busy kitchens.
Why This Casserole Becomes an Instant Favorite
What makes this specific rendition so incredibly beloved by everyone who tries it? It’s the irresistible combination of tender, succulent chicken pieces, al dente orzo pasta, and those deeply savory, sweet caramelized onions, all generously enveloped in a luxurious, creamy, and wonderfully cheesy sauce. This “French Onion Chicken Orzo Casserole” isn’t just a meal; it’s a warm, culinary hug that promises both ease of preparation and a gourmet flavor profile. The golden, bubbly crust from baked cheese and crispy fried onions adds a textural delight that ensures every spoonful is an absolute pleasure, leaving everyone at the table utterly satisfied and eager for more.
Ingredients:
- 3 tablespoons unsalted butter, divided
- 2 tablespoons olive oil, divided
- 3 large sweet onions (such as Vidalia) or yellow onions, thinly sliced (about 6-7 cups)
- 1 teaspoon granulated sugar (optional, helps with caramelization)
- 1 teaspoon salt, plus more to taste
- ½ teaspoon black pepper, plus more to taste
- 2 pounds boneless, skinless chicken thighs or breasts, cut into 1-inch pieces
- 4 cloves garlic, minced
- ½ cup dry white wine (like Sauvignon Blanc or Pinot Grigio), or additional beef broth
- 6 cups beef broth (low sodium preferred), divided
- 1 teaspoon dried thyme, or 1 tablespoon fresh thyme leaves
- 1 bay leaf
- 1 ½ cups orzo pasta
- ¼ cup all-purpose flour
- 1 cup heavy cream (optional, for extra richness)
- 2 cups shredded Gruyere cheese, divided
- 1 cup shredded mozzarella cheese
- ½ cup grated Parmesan cheese
- Fresh parsley, chopped, for garnish (optional)
Caramelizing the Onions: The Heart of French Onion Flavor
Alright, let’s dive into making this absolutely irresistible French Onion Chicken Orzo Casserole! The very first step, and arguably the most crucial for truly capturing that authentic French onion flavor, is caramelizing your onions. This isn’t a step to rush, my friends; it requires a bit of patience, but the depth of flavor it brings to our casserole is immeasurable. Trust me, it’s worth every minute.
- First things first, grab a large, heavy-bottomed pot or Dutch oven – something with plenty of surface area. Place it over medium-low heat. Add 1 tablespoon of unsalted butter and 1 tablespoon of olive oil. Once the butter has melted and is shimmering, toss in your thinly sliced onions.
- Add ½ teaspoon of salt and the optional teaspoon of granulated sugar to the onions. The sugar isn’t strictly necessary, but it really helps to kickstart the caramelization process and achieve that beautiful, deep golden-brown color much more efficiently. Stir everything together to coat the onions evenly.
- Now, here’s where the patience comes in. Cook the onions slowly, stirring frequently, for about 30 to 45 minutes. You’re not trying to brown them quickly; you want them to soften, release their moisture, and then gradually turn a rich, deep amber color. They should shrink considerably, becoming wonderfully sweet and incredibly fragrant. If they start to stick to the bottom of the pot, don’t panic! Just add a tablespoon or two of water or broth to deglaze the pan, scraping up any delicious browned bits, and continue cooking. This is the foundation for our amazing French Onion Chicken Orzo Casserole, so don’t skimp on this step.
- Once your onions are deeply caramelized and tender, remove about half of them from the pot and set them aside in a small bowl. These will be added back into our sauce later, ensuring we have those lovely onion textures throughout.
Preparing the Chicken and Orzo Base
While our remaining onions continue to cook down just a touch more, let’s get our chicken and orzo ready. This ensures everything comes together smoothly for our ultimate French Onion Chicken Orzo Casserole.
- In the same pot with the remaining caramelized onions (which should now be a touch darker and even sweeter), add the remaining 1 tablespoon of olive oil. Increase the heat to medium. Add your chicken pieces to the pot. Season the chicken generously with the remaining ½ teaspoon of salt and ½ teaspoon of black pepper.
- Cook the chicken, stirring occasionally, until it’s nicely browned on all sides and cooked through, which should take about 5-7 minutes. Don’t worry if it’s not perfectly cooked yet, as it will finish baking in the oven. The browning adds another layer of flavor to our casserole. Remove the cooked chicken from the pot and set it aside with the reserved onions.
- Reduce the heat back to medium-low. Add the minced garlic to the pot and cook for just 1 minute until fragrant, being careful not to burn it.
- Pour in the dry white wine (or extra beef broth) to deglaze the pot, scraping up all those delicious browned bits from the bottom. This is where so much flavor lives! Let it simmer for 2-3 minutes until the liquid has reduced by about half.
- Add 4 cups of the beef broth, the dried thyme, and the bay leaf to the pot. Bring the mixture to a gentle simmer.
- Stir in the orzo pasta. Cook the orzo directly in the broth for about 8-10 minutes, or until it’s al dente – meaning it’s still a little firm to the bite. It will continue to cook in the oven, so we don’t want it mushy now. The orzo will absorb a lot of that delicious broth, infusing it with flavor for our French Onion Chicken Orzo Casserole.
- Once the orzo is al dente and most of the liquid has been absorbed, remove the bay leaf. Remove the pot from the heat.
Building the Rich French Onion Sauce
Now that our onions are caramelized, our chicken is seared, and our orzo is absorbing all that goodness, it’s time to build the rich, velvety sauce that ties this entire French Onion Chicken Orzo Casserole together. This is where we create that classic French onion soup-like broth that makes this dish so comforting and deeply flavorful.
- In a separate medium saucepan, melt the remaining 1 tablespoon of unsalted butter over medium heat. Once it’s melted and bubbly, sprinkle in the ¼ cup of all-purpose flour. Whisk continuously for 1-2 minutes to create a light roux. This will thicken our sauce beautifully. Cook it just long enough to get rid of the raw flour taste; we’re aiming for a light blonde roux, not a dark one.
- Slowly, and I mean slowly, whisk in the remaining 2 cups of beef broth into the roux. Keep whisking to ensure there are no lumps. As you whisk, the mixture will start to thicken. Bring it to a gentle simmer and let it cook for about 5 minutes, allowing the sauce to thicken to your desired consistency. It should be rich but still pourable.
- If you’re opting for extra richness, now is the time to stir in the 1 cup of heavy cream. This will add a luxurious mouthfeel to our sauce, making the French Onion Chicken Orzo Casserole even more decadent. Continue to simmer for another 2-3 minutes, just until heated through.
- Taste the sauce and adjust seasonings as needed. You might want a little more salt or pepper. Remember, this sauce is the backbone of your flavor!
- Once the sauce is ready, gently fold the cooked chicken, the reserved caramelized onions, and about 1 cup of the shredded Gruyere cheese into the pot with the orzo. Stir gently until everything is well combined and coated in that incredible flavor. This step really brings the main components of our French Onion Chicken Orzo Casserole together before baking.
Assembling the French Onion Chicken Orzo Casserole
We’re almost there! It’s time to bring all these delicious components together in one glorious baking dish, ready for its transformation in the oven. This is where our French Onion Chicken Orzo Casserole truly starts to look like the comforting masterpiece it will become.
- Preheat your oven to 375°F (190°C). Lightly grease a 9×13-inch baking dish with a little butter or cooking spray.
- Pour the entire chicken and orzo mixture into the prepared baking dish, spreading it out evenly.
- Pour the rich French onion sauce directly over the orzo and chicken mixture in the baking dish. Make sure the sauce is distributed as evenly as possible, getting into all the nooks and crannies.
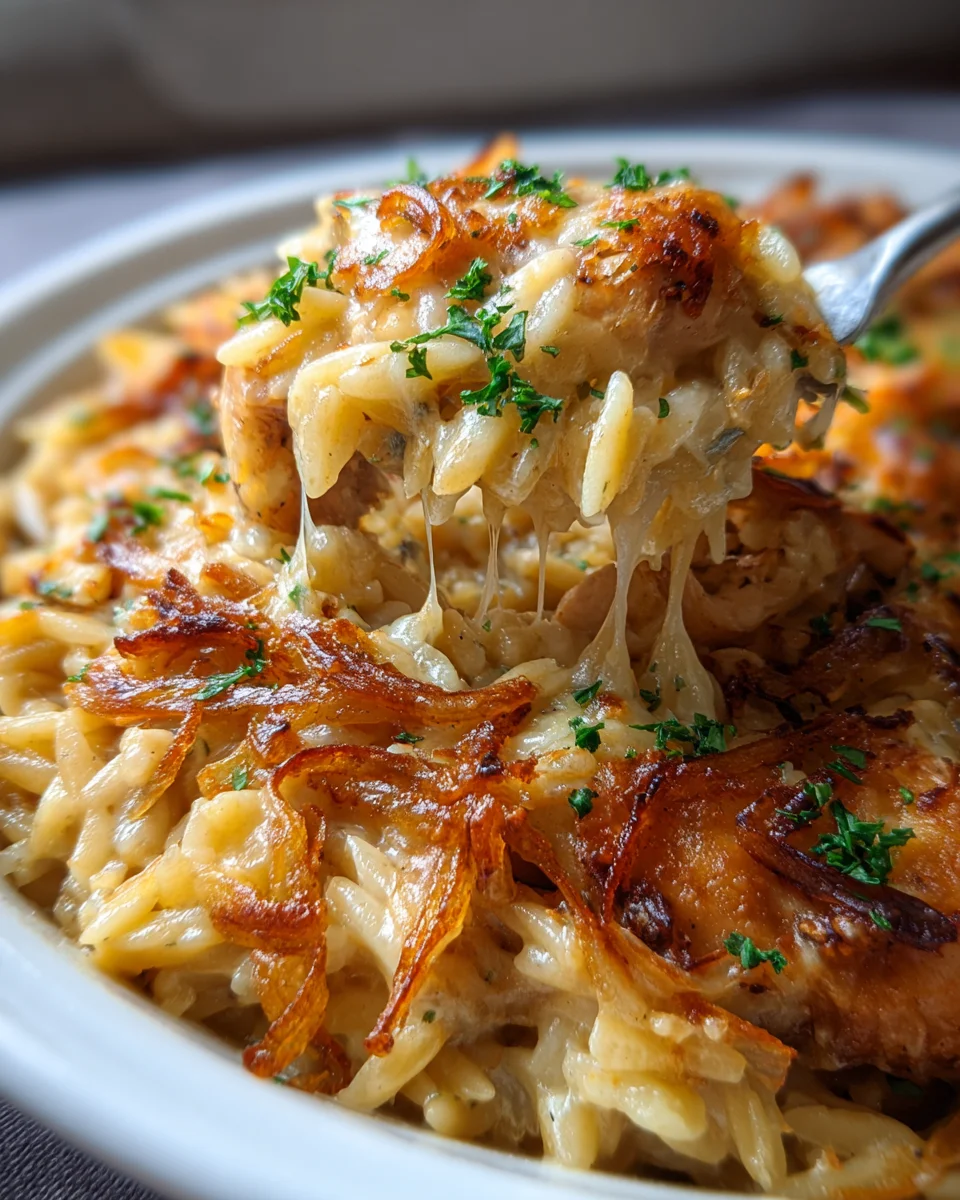
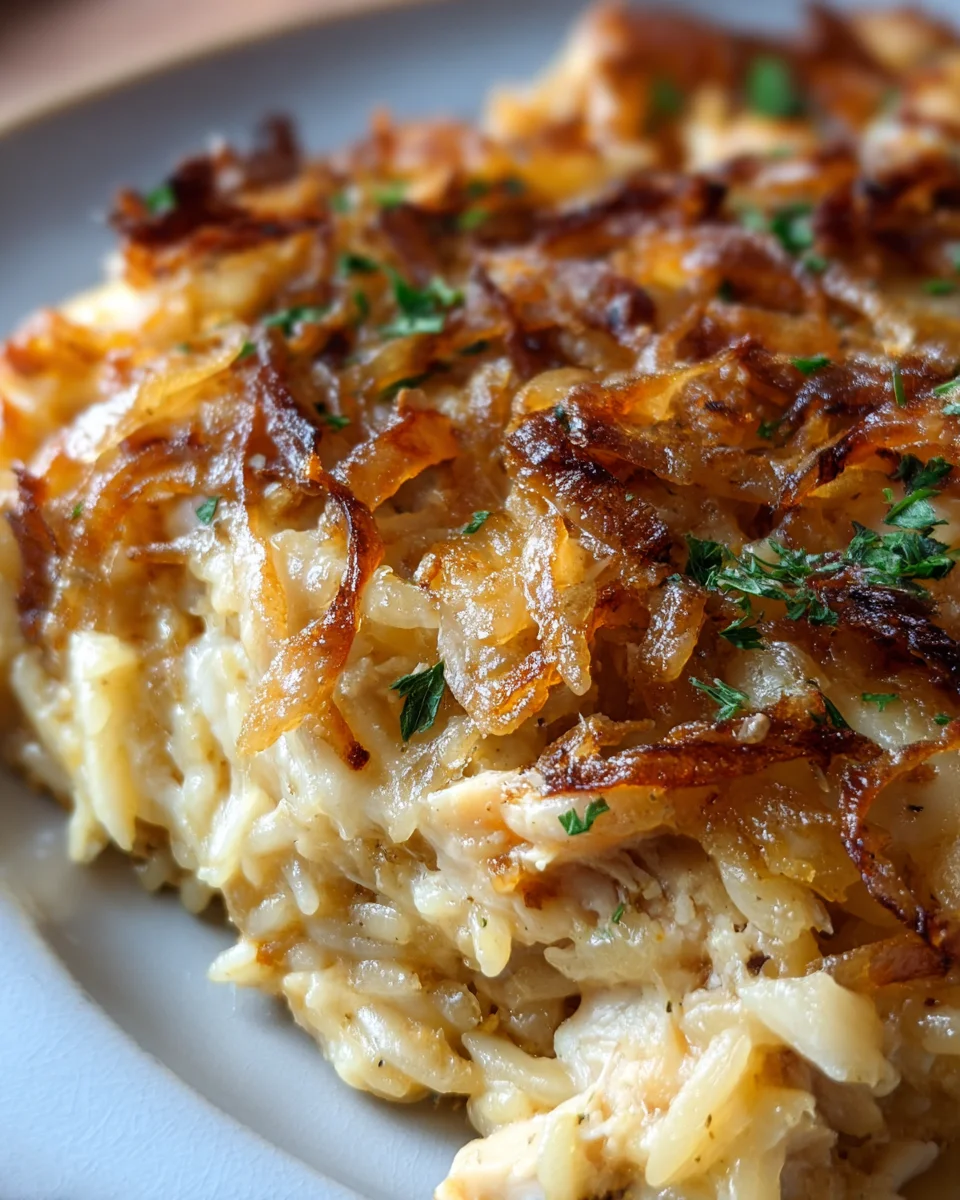
- Now for the cheese crown! Sprinkle the remaining 1 cup of shredded Gruyere cheese evenly over the top of the casserole. Then, sprinkle the shredded mozzarella cheese and the grated Parmesan cheese over the Gruyere. Using a combination of cheeses provides both that classic French onion flavor and a beautiful, bubbly, golden crust. The Gruyere gives that nutty, distinctive flavor, while the mozzarella ensures a lovely stretch and the Parmesan adds a salty, savory kick. This cheese layer is absolutely essential for a truly authentic French Onion Chicken Orzo Casserole experience.
Baking to Golden Perfection
The final stretch! Into the oven our French Onion Chicken Orzo Casserole goes, where it will bake to golden, bubbly perfection. The aromas that will fill your kitchen during this stage are simply divine – a true testament to the layers of flavor we’ve built.
- Place the baking dish in your preheated oven. Bake for 25-30 minutes, or until the casserole is bubbling around the edges and the cheese on top is melted and beautifully golden brown.
- For an extra crispy, deeply golden cheese topping, you can carefully turn on the broiler for the last 2-3 minutes. Keep a very close eye on it during this time, as cheese can go from perfectly golden to burnt in a flash! We want a magnificent crust for our French Onion Chicken Orzo Casserole.
- Once baked to perfection, remove the casserole from the oven. It will be incredibly hot and bubbling. It’s crucial to let it rest for at least 10-15 minutes before serving. This resting period allows the flavors to meld further and the casserole to set, making it much easier to portion and ensuring every bite is cohesive and delicious.
- Garnish with fresh chopped parsley, if desired, for a touch of freshness and color.
Serving Suggestions and Tips for Your French Onion Chicken Orzo Casserole
Congratulations, you’ve just created a truly heartwarming and flavorful French Onion Chicken Orzo Casserole! This dish is a complete meal in itself, but a few simple additions can elevate the experience even further.
Serving:
- Serve generous portions of this comforting casserole warm. It’s perfect on its own, but it also pairs wonderfully with a simple green salad dressed with a light vinaigrette to cut through the richness.
- A crusty baguette or some garlic bread would be fantastic for soaking up any extra sauce. There’s nothing quite like dipping a piece of crusty bread into that flavorful French onion sauce.
- For a slightly lighter meal, you could serve smaller portions alongside some steamed green beans or roasted asparagus.
Storage & Leftovers:
- Leftovers of this French Onion Chicken Orzo Casserole are absolutely delicious! Store any remaining casserole in an airtight container in the refrigerator for up to 3-4 days.
- To reheat, you can warm individual portions in the microwave until heated through, or reheat larger portions in an oven-safe dish covered with foil at 350°F (175°C) for about 20-25 minutes, or until hot and bubbly. You might want to remove the foil for the last few minutes to crisp up the cheese again.
Tips & Variations:
-
Onion Patience is Key:
I cannot stress this enough – take your time with the onions. The longer and slower they caramelize, the deeper and sweeter your French Onion Chicken Orzo Casserole will taste. Don’t rush this step!
-
Chicken Choice:
While chicken thighs offer more flavor and tend to stay juicier, you can certainly use boneless, skinless chicken breasts. Just be mindful not to overcook them during the initial searing, as they can dry out more easily.
-
Broth Quality:
Since beef broth is such a prominent flavor in this dish, use a good quality low-sodium beef broth. This gives you more control over the final saltiness of your French Onion Chicken Orzo Casserole. If you only have regular broth, be sure to taste and adjust salt sparingly throughout the process.
-
Cheese Selection:
While Gruyere is traditional for French onion flavors, feel free to experiment. Swiss cheese can be a good substitute, and a mix of other melting cheeses like provolone or fontina could also work beautifully, though it might slightly alter the classic profile.
-
Add Mushrooms:
For an earthy twist, sauté some sliced mushrooms (cremini or button) with the onions or chicken. They would complement the savory notes of the French Onion Chicken Orzo Casserole perfectly.
-
Herb Power:
If you have fresh thyme, it will offer a more vibrant flavor than dried. A sprig of fresh rosemary could also be a delightful addition, added with the bay leaf and removed before serving.
-
Make Ahead:
You can assemble the entire French Onion Chicken Orzo Casserole up to the point of baking, cover it tightly, and refrigerate for up to 24 hours. When ready to bake, add an extra 10-15 minutes to the baking time to ensure it’s heated through.
Enjoy every comforting, cheesy, deeply flavorful bite of your homemade French Onion Chicken Orzo Casserole!
Ingredients:
- 3 tablespoons unsalted butter, divided
- 2 tablespoons olive oil, divided
- 3 large sweet onions (such as Vidalia) or yellow onions, thinly sliced (about 6-7 cups)
- 1 teaspoon granulated sugar (optional, helps with caramelization)
- 1 teaspoon salt, plus more to taste
- ½ teaspoon black pepper, plus more to taste
- 2 pounds boneless, skinless chicken thighs or breasts, cut into 1-inch pieces
- 4 cloves garlic, minced
- ½ cup dry white wine (like Sauvignon Blanc or Pinot Grigio), or additional beef broth
- 6 cups beef broth (low sodium preferred), divided
- 1 teaspoon dried thyme, or 1 tablespoon fresh thyme leaves
- 1 bay leaf
- 1 ½ cups orzo pasta
- ¼ cup all-purpose flour
- 1 cup heavy cream (optional, for extra richness)
- 2 cups shredded Gruyere cheese, divided
- 1 cup shredded mozzarella cheese
- ½ cup grated Parmesan cheese
- Fresh parsley, chopped, for garnish (optional)
Caramelizing the Onions: The Heart of French Onion Flavor
Alright, let’s dive into making this absolutely irresistible French Onion Chicken Orzo Casserole! The very first step, and arguably the most crucial for truly capturing that authentic French onion flavor, is caramelizing your onions. This isn’t a step to rush, my friends; it requires a bit of patience, but the depth of flavor it brings to our casserole is immeasurable. Trust me, it’s worth every minute.
- First things first, grab a large, heavy-bottomed pot or Dutch oven – something with plenty of surface area. Place it over medium-low heat. Add 1 tablespoon of unsalted butter and 1 tablespoon of olive oil. Once the butter has melted and is shimmering, toss in your thinly sliced onions.
- Add ½ teaspoon of salt and the optional teaspoon of granulated sugar to the onions. The sugar isn’t strictly necessary, but it really helps to kickstart the caramelization process and achieve that beautiful, deep golden-brown color much more efficiently. Stir everything together to coat the onions evenly.
- Now, here’s where the patience comes in. Cook the onions slowly, stirring frequently, for about 30 to 45 minutes. You’re not trying to brown them quickly; you want them to soften, release their moisture, and then gradually turn a rich, deep amber color. They should shrink considerably, becoming wonderfully sweet and incredibly fragrant. If they start to stick to the bottom of the pot, don’t panic! Just add a tablespoon or two of water or broth to deglaze the pan, scraping up any delicious browned bits, and continue cooking. This is the foundation for our amazing French Onion Chicken Orzo Casserole, so don’t skimp on this step.
- Once your onions are deeply caramelized and tender, remove about half of them from the pot and set them aside in a small bowl. These will be added back into our sauce later, ensuring we have those lovely onion textures throughout.
Preparing the Chicken and Orzo Base
While our remaining onions continue to cook down just a touch more, let’s get our chicken and orzo ready. This ensures everything comes together smoothly for our ultimate French Onion Chicken Orzo Casserole.
- In the same pot with the remaining caramelized onions (which should now be a touch darker and even sweeter), add the remaining 1 tablespoon of olive oil. Increase the heat to medium. Add your chicken pieces to the pot. Season the chicken generously with the remaining ½ teaspoon of salt and ½ teaspoon of black pepper.
- Cook the chicken, stirring occasionally, until it’s nicely browned on all sides and cooked through, which should take about 5-7 minutes. Don’t worry if it’s not perfectly cooked yet, as it will finish baking in the oven. The browning adds another layer of flavor to our casserole. Remove the cooked chicken from the pot and set it aside with the reserved onions.
- Reduce the heat back to medium-low. Add the minced garlic to the pot and cook for just 1 minute until fragrant, being careful not to burn it.
- Pour in the dry white wine (or extra beef broth) to deglaze the pot, scraping up all those delicious browned bits from the bottom. This is where so much flavor lives! Let it simmer for 2-3 minutes until the liquid has reduced by about half.
- Add 4 cups of the beef broth, the dried thyme, and the bay leaf to the pot. Bring the mixture to a gentle simmer.
- Stir in the orzo pasta. Cook the orzo directly in the broth for about 8-10 minutes, or until it’s al dente – meaning it’s still a little firm to the bite. It will continue to cook in the oven, so we don’t want it mushy now. The orzo will absorb a lot of that delicious broth, infusing it with flavor for our French Onion Chicken Orzo Casserole.
- Once the orzo is al dente and most of the liquid has been absorbed, remove the bay leaf. Remove the pot from the heat.
Building the Rich French Onion Sauce
Now that our onions are caramelized, our chicken is seared, and our orzo is absorbing all that goodness, it’s time to build the rich, velvety sauce that ties this entire French Onion Chicken Orzo Casserole together. This is where we create that classic French onion soup-like broth that makes this dish so comforting and deeply flavorful.
- In a separate medium saucepan, melt the remaining 1 tablespoon of unsalted butter over medium heat. Once it’s melted and bubbly, sprinkle in the ¼ cup of all-purpose flour. Whisk continuously for 1-2 minutes to create a light roux. This will thicken our sauce beautifully. Cook it just long enough to get rid of the raw flour taste; we’re aiming for a light blonde roux, not a dark one.
- Slowly, and I mean slowly, whisk in the remaining 2 cups of beef broth into the roux. Keep whisking to ensure there are no lumps. As you whisk, the mixture will start to thicken. Bring it to a gentle simmer and let it cook for about 5 minutes, allowing the sauce to thicken to your desired consistency. It should be rich but still pourable.
- If you’re opting for extra richness, now is the time to stir in the 1 cup of heavy cream. This will add a luxurious mouthfeel to our sauce, making the French Onion Chicken Orzo Casserole even more decadent. Continue to simmer for another 2-3 minutes, just until heated through.
- Taste the sauce and adjust seasonings as needed. You might want a little more salt or pepper. Remember, this sauce is the backbone of your flavor!
- Once the sauce is ready, gently fold the cooked chicken, the reserved caramelized onions, and about 1 cup of the shredded Gruyere cheese into the pot with the orzo. Stir gently until everything is well combined and coated in that incredible flavor. This step really brings the main components of our French Onion Chicken Orzo Casserole together before baking.
Assembling the French Onion Chicken Orzo Casserole
We’re almost there! It’s time to bring all these delicious components together in one glorious baking dish, ready for its transformation in the oven. This is where our French Onion Chicken Orzo Casserole truly starts to look like the comforting masterpiece it will become.
- Preheat your oven to 375°F (190°C). Lightly grease a 9×13-inch baking dish with a little butter or cooking spray.
- Pour the entire chicken and orzo mixture into the prepared baking dish, spreading it out evenly.
- Pour the rich French onion sauce directly over the orzo and chicken mixture in the baking dish. Make sure the sauce is distributed as evenly as possible, getting into all the nooks and crannies.
- Now for the cheese crown! Sprinkle the remaining 1 cup of shredded Gruyere cheese evenly over the top of the casserole. Then, sprinkle the shredded mozzarella cheese and the grated Parmesan cheese over the Gruyere. Using a combination of cheeses provides both that classic French onion flavor and a beautiful, bubbly, golden crust. The Gruyere gives that nutty, distinctive flavor, while the mozzarella ensures a lovely stretch and the Parmesan adds a salty, savory kick. This cheese layer is absolutely essential for a truly authentic French Onion Chicken Orzo Casserole experience.
Baking to Golden Perfection
The final stretch! Into the oven our French Onion Chicken Orzo Casserole goes, where it will bake to golden, bubbly perfection. The aromas that will fill your kitchen during this stage are simply divine – a true testament to the layers of flavor we’ve built.
- Place the baking dish in your preheated oven. Bake for 25-30 minutes, or until the casserole is bubbling around the edges and the cheese on top is melted and beautifully golden brown.
- For an extra crispy, deeply golden cheese topping, you can carefully turn on the broiler for the last 2-3 minutes. Keep a very close eye on it during this time, as cheese can go from perfectly golden to burnt in a flash! We want a magnificent crust for our French Onion Chicken Orzo Casserole.
- Once baked to perfection, remove the casserole from the oven. It will be incredibly hot and bubbling. It’s crucial to let it rest for at least 10-15 minutes before serving. This resting period allows the flavors to meld further and the casserole to set, making it much easier to portion and ensuring every bite is cohesive and delicious.
- Garnish with fresh chopped parsley, if desired, for a touch of freshness and color.
Serving Suggestions and Tips for Your French Onion Chicken Orzo Casserole
Congratulations, you’ve just created a truly heartwarming and flavorful French Onion Chicken Orzo Casserole! This dish is a complete meal in itself, but a few simple additions can elevate the experience even further.
Serving:
- Serve generous portions of this comforting casserole warm. It’s perfect on its own, but it also pairs wonderfully with a simple green salad dressed with a light vinaigrette to cut through the richness.
- A crusty baguette or some garlic bread would be fantastic for soaking up any extra sauce. There’s nothing quite like dipping a piece of crusty bread into that flavorful French onion sauce.
- For a slightly lighter meal, you could serve smaller portions alongside some steamed green beans or roasted asparagus.
Storage & Leftovers:
- Leftovers of this French Onion Chicken Orzo Casserole are absolutely delicious! Store any remaining casserole in an airtight container in the refrigerator for up to 3-4 days.
- To reheat, you can warm individual portions in the microwave until heated through, or reheat larger portions in an oven-safe dish covered with foil at 350°F (175°C) for about 20-25 minutes, or until hot and bubbly. You might want to remove the foil for the last few minutes to crisp up the cheese again.
Tips & Variations:
-
Onion Patience is Key:
I cannot stress this enough – take your time with the onions. The longer and slower they caramelize, the deeper and sweeter your French Onion Chicken Orzo Casserole will taste. Don’t rush this step!
-
Chicken Choice:
While chicken thighs offer more flavor and tend to stay juicier, you can certainly use boneless, skinless chicken breasts. Just be mindful not to overcook them during the initial searing, as they can dry out more easily.
-
Broth Quality:
Since beef broth is such a prominent flavor in this dish, use a good quality low-sodium beef broth. This gives you more control over the final saltiness of your French Onion Chicken Orzo Casserole. If you only have regular broth, be sure to taste and adjust salt sparingly throughout the process.
-
Cheese Selection:
While Gruyere is traditional for French onion flavors, feel free to experiment. Swiss cheese can be a good substitute, and a mix of other melting cheeses like provolone or fontina could also work beautifully, though it might slightly alter the classic profile.
-
Add Mushrooms:
For an earthy twist, sauté some sliced mushrooms (cremini or button) with the onions or chicken. They would complement the savory notes of the French Onion Chicken Orzo Casserole perfectly.
-
Herb Power:
If you have fresh thyme, it will offer a more vibrant flavor than dried. A sprig of fresh rosemary could also be a delightful addition, added with the bay leaf and removed before serving.
-
Make Ahead:
You can assemble the entire French Onion Chicken Orzo Casserole up to the point of baking, cover it tightly, and refrigerate for up to 24 hours. When ready to bake, add an extra 10-15 minutes to the baking time to ensure it’s heated through.
Enjoy every comforting, cheesy, deeply flavorful bite of your homemade French Onion Chicken Orzo Casserole!
Conclusion:
Well, we’ve reached the end of our culinary journey for today, and I truly hope you’re feeling as inspired as I am about this incredible dish! If there’s one recipe I could implore you to try this week, it would absolutely be this one. I’ve poured my heart into perfecting the balance of rich, savory flavors with comforting textures, and I am confident that the French Onion Chicken Orzo Casserole will become an instant classic in your kitchen. It’s more than just a meal; it’s an experience, transforming simple ingredients into something truly extraordinary. Imagine the golden-brown crust, the bubbling cheese, the tender chicken, and the perfectly cooked orzo, all bathed in that unforgettable sweet and savory French onion essence. It’s the kind of dish that warms you from the inside out, making even the busiest weeknight feel a little more special, or bringing a touch of gourmet comfort to your weekend gatherings.
What truly sets this casserole apart is its remarkable ability to deliver complex flavors with surprising ease. You get all the depth and sophistication of classic French onion soup, combined with the hearty satisfaction of a chicken and pasta bake, all without spending hours slaving over the stove. It’s a testament to the power of thoughtful layering and quality ingredients. Every spoonful promises a delightful blend of creamy, cheesy goodness, tender chicken, and that signature umami punch from the caramelized onions. This isn’t just another casserole; it’s a celebration of comfort food elevated to an art form, designed to impress without intimidating. It’s foolproof, flavorful, and incredibly fulfilling – a true trifecta for any home cook.
Now, let’s talk about how to make this culinary masterpiece even more enjoyable. While the casserole is absolutely fantastic on its own, it truly shines when paired with a few simple accompaniments. I highly recommend serving it alongside a crisp, vibrant green salad dressed with a light vinaigrette to cut through the richness and add a refreshing contrast. A rustic loaf of crusty bread, perfect for soaking up any leftover sauce, is also an excellent addition. For a lighter touch, a side of steamed green beans or asparagus would complement the flavors beautifully. And don’t forget the wine! A dry white wine, like a Sauvignon Blanc or an unoaked Chardonnay, would pair wonderfully with the savory chicken and cheese, enhancing the overall dining experience.
Beyond serving suggestions, don’t be afraid to make this recipe your own with a few delightful variations. Love mushrooms? Sauté some thinly sliced cremini mushrooms with your onions for an added layer of earthy flavor. For an extra creamy texture, stir in a splash of heavy cream with your orzo before baking. If you’re feeling adventurous, try swapping out some of the Gruyère for other melty cheeses like Fontina or even a sharp white cheddar to experiment with different flavor profiles. You could even add some fresh spinach in the last few minutes of cooking for a boost of greens. The versatility of this casserole is one of its greatest strengths, allowing you to tailor it perfectly to your taste preferences or whatever ingredients you have on hand. Don’t be shy; let your culinary creativity take the wheel!
So, there you have it. My heartfelt plea for you to carve out some time and bring this amazing dish to life in your own kitchen. I promise you won’t regret it. The aroma alone as it bakes will have your household eagerly anticipating dinner. Once you taste that first spoonful of the French Onion Chicken Orzo Casserole, you’ll understand why I’m so passionate about it. I genuinely believe that sharing delicious food is one of life’s greatest joys, and I can’t wait for you to experience that joy firsthand. After you’ve had a chance to whip up this comforting delight, please, please come back and share your experience with me! I’d love to hear how it turned out, what variations you tried, and any special memories you made while enjoying it. Happy cooking, my friends, and bon appétit!
French Onion Chicken Orzo Casserole
A comforting and savory casserole that combines the rich, sweet flavors of deeply caramelized onions with tender chicken and creamy orzo pasta, all topped with a bubbly, golden cheese crust. This dish offers the soulful depth of classic French Onion Soup in an easy-to-make, satisfying weeknight dinner.
Ingredients
Instructions
Important Information
Nutrition Facts (Per Serving)
It is important to consider this information as approximate and not to use it as definitive health advice.
Allergy Information
Please check ingredients for potential allergens and consult a health professional if in doubt.