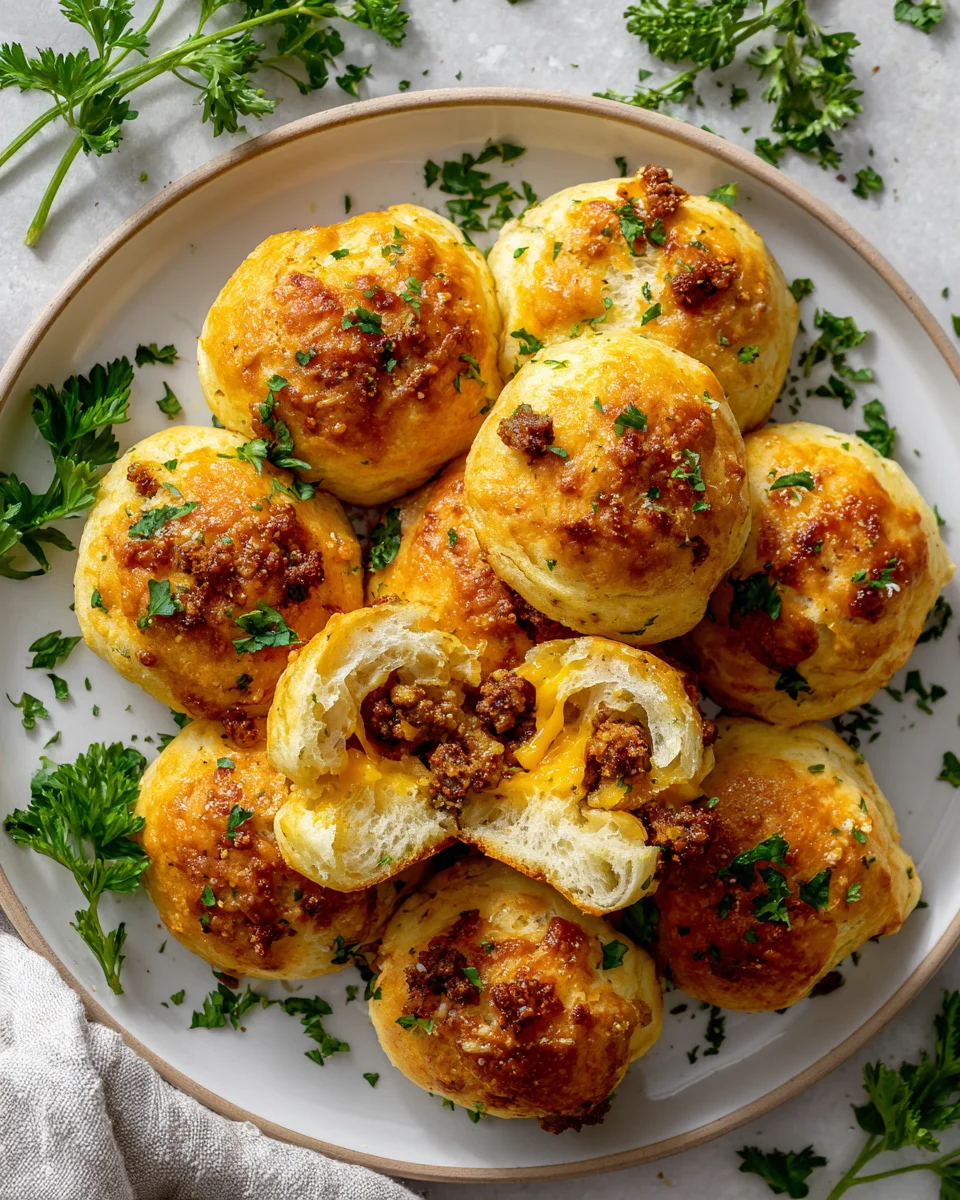
Garlic Parmesan Cheeseburger Bombs Recipe
Get ready to have your taste buds absolutely blown away because I’m so excited to share my Garlic Parmesan Cheeseburger Bombs Recipe with you! Forget everything you thought you knew about cheeseburgers, because we’re taking all those incredible, comforting flavors and wrapping them up in a ridiculously delicious, garlic-infused package. What makes these “bombs” so special, you ask? Well, imagine perfectly seasoned, juicy beef, gooey melted cheese, and a generous kick of aromatic garlic and savory Parmesan, all tucked inside a soft, golden dough. It’s a genius fusion that delivers all the satisfaction of a classic cheeseburger, but in a fun, pop-able form that’s absolutely impossible to resist. I promise, you and your family are going to absolutely adore these for game nights, parties, or just a super fun weeknight dinner. They’re easy to make, incredibly flavorful, and perfectly portioned for maximum enjoyment. Trust me, once you try these irresistible Garlic Parmesan Cheeseburger Bombs, you’ll be making them again and again!

Ingredient Notes
Crafting the perfect Garlic Parmesan Cheeseburger Bombs starts with understanding the star players in our ingredient lineup. I’ve designed this recipe to be straightforward yet incredibly flavorful, focusing on classic cheeseburger elements wrapped in a golden, garlicky embrace.
- Ground Beef: I always recommend using a lean ground beef, like 85/15 or 90/10. This minimizes excess grease, which can make your bombs soggy. While ground beef is traditional for a cheeseburger, you could certainly experiment with ground turkey or chicken for a lighter twist, though the classic beef flavor is truly special here.
- Canned Biscuit Dough: This is our secret weapon for convenience! Flaky, refrigerated biscuit dough (the larger “grands” size works wonderfully) creates that perfect fluffy, slightly chewy exterior. I love how easily it wraps around the filling. While crescent roll dough could work in a pinch, biscuit dough gives you a more substantial “bomb” texture. If you’re feeling ambitious, a homemade yeast dough would be fantastic, but the canned biscuits make this recipe lightning fast.
- Cheese: For that irresistible cheesy core, I typically use a sharp cheddar or a Monterey Jack for its meltiness and flavor. American cheese slices also melt beautifully and provide that classic cheeseburger gooeyness. Don’t be shy about mixing cheeses, either! A blend of cheddar and mozzarella offers both flavor and a great stretch. Ensure your cheese is shredded or cut into small cubes for even melting within the bomb.
- Fresh Garlic: Absolutely critical for the “Garlic Parmesan” part of our bombs! Freshly minced garlic, lots of it, is folded into melted butter for brushing over the bombs. This is where the magic happens, infusing every bite with aromatic garlic flavor. Garlic powder is a fine addition to the beef mixture, but the fresh garlic for the topping is non-negotiable for that vibrant taste.
- Parmesan Cheese: Again, for the “Garlic Parmesan,” freshly grated Parmesan is superior in flavor and melts better than pre-grated varieties. It forms a delicious, savory crust on the outside of our bombs, complementing the garlic butter beautifully.
- Butter: Unsalted butter is used primarily for our glorious garlic parmesan topping. It’s the vehicle for the garlic and Parmesan, giving the bombs a rich, golden finish and incredible flavor.
- Worcestershire Sauce: A splash of Worcestershire sauce in the ground beef mixture adds a fantastic depth of umami and a subtle tang that really elevates the “cheeseburger” flavor. If you prefer a non-alcohol alternative, you can substitute it with a combination of soy sauce and a dash of apple cider vinegar or balsamic vinegar to achieve a similar savory-tangy profile.
- Onion: Finely diced yellow or white onion, sautéed with the ground beef, adds another layer of classic burger flavor. It’s not strictly necessary, but I find it makes a big difference. Ensure it’s very finely diced so it melts into the beef and doesn’t create chunky bits within your bomb.
- Seasonings: Salt and freshly ground black pepper are essential for seasoning the ground beef to perfection. I also like to add a pinch of onion powder and garlic powder to the beef mixture for an extra layer of savory goodness.
Remember, the beauty of these bombs is their versatility. Don’t hesitate to personalize your filling!
Step-by-Step Instructions
Let’s get cooking! Assembling these Garlic Parmesan Cheeseburger Bombs is a fun and relatively quick process. Follow these steps, and you’ll have a batch of savory, cheesy goodness ready to devour.
- Prepare Your Workspace and Preheat: First things first, preheat your oven to 375°F (190°C). Line a large baking sheet with parchment paper or a silicone baking mat for easy cleanup and to prevent sticking. Gather all your ingredients so they’re ready to go – this is key for a smooth assembly line!
- Cook the Ground Beef Filling: In a large skillet over medium-high heat, brown your ground beef. As it cooks, break it up into small crumbles. If you’re adding finely diced onion, stir it in after the beef has started to brown and cook until softened, about 5 minutes. Once the beef is fully cooked and no pink remains, drain off any excess grease very thoroughly. This step is crucial to prevent soggy bombs! Return the beef to the skillet and stir in the Worcestershire sauce, salt, pepper, and any additional seasonings (like onion powder or garlic powder) you desire. Mix well and then remove from heat. Let the beef mixture cool slightly while you prepare the other components.
- Prepare the Garlic Parmesan Butter: In a small, microwave-safe bowl or a small saucepan, melt the unsalted butter. Once melted, stir in the minced fresh garlic and grated Parmesan cheese. This fragrant mixture will be brushed over our bombs. Set aside.
- Get Your Biscuit Dough Ready: Open your can of biscuit dough. On a lightly floured surface or a piece of parchment paper, gently flatten each biscuit into a round about 4-5 inches in diameter. You can use your hands or a rolling pin. Try to keep them somewhat uniform in size.
- Assemble the Cheeseburger Bombs: Now for the fun part!
- Place about 1 ½ to 2 tablespoons of the cooled ground beef mixture in the center of each flattened biscuit. Don’t overfill, or they’ll be hard to seal.
- Top the beef mixture with a small cube or a generous pinch of shredded cheese.
- Carefully gather the edges of the biscuit dough up and over the filling, bringing them together at the top. Pinch the seams tightly to seal the bomb completely. It’s essential that these are well-sealed to prevent cheese from oozing out during baking. Gently roll the bomb in your hands to create a neat, round shape.
- Brush and Bake: Place the assembled bombs seam-side down on your prepared baking sheet, leaving a little space between each one. Using a pastry brush, generously brush the tops and sides of each bomb with your delicious garlic Parmesan butter mixture.
- Bake to Golden Perfection: Transfer the baking sheet to your preheated oven. Bake for 15-20 minutes, or until the biscuit dough is golden brown and cooked through. The exact time may vary slightly depending on your oven and the size of your bombs. You’ll know they’re ready when they look beautifully puffed and golden.
- Serve Warm: Once out of the oven, you can brush them with any remaining garlic Parmesan butter for an extra burst of flavor. Let them cool for a few minutes before serving, as the filling will be very hot. These Garlic Parmesan Cheeseburger Bombs are best enjoyed warm, perhaps with a side of ketchup, mustard, or your favorite burger dipping sauce!
Tips & Suggestions
To make your Garlic Parmesan Cheeseburger Bombs absolutely stellar, I’ve gathered a few tips and suggestions that I’ve learned along the way. These will help you achieve the best flavor and texture every time!
- Preventing Soggy Bombs: The absolute key to a crispy exterior and a non-soggy interior is to thoroughly drain the cooked ground beef. I mean really drain it. After browning, you can even press it with paper towels to absorb any lingering grease. Excess moisture is the enemy of a perfectly baked bomb. Also, ensure your bombs are sealed tightly; any open seams can allow steam to escape and make the dough less crisp.
- Don’t Overfill: It’s tempting to cram as much delicious filling as possible into each bomb, but overfilling can lead to explosions of cheese and beef in your oven, and it makes sealing difficult. Stick to the recommended amount of filling for easy assembly and secure bombs.
- Cheese Choices Matter: While most melting cheeses will work, consider the flavor profile. Sharp cheddar provides a classic burger taste, while Monterey Jack or a Colby Jack blend offers excellent meltiness and a milder flavor. For an extra touch, I sometimes add a tiny piece of American cheese slice directly on top of the beef for that ultimate gooey burger effect.
- Enhance the Beef Flavor: Beyond the Worcestershire sauce, consider mixing in a tiny bit of smoked paprika or a dash of liquid smoke with your ground beef for a deeper, grill-like flavor. A pinch of red pepper flakes can add a subtle kick if you like a little heat.
- Customize Your Filling: This is where you can truly make these bombs your own!
- Pickle Power: Finely dice a few dill pickles and mix them into your cooled beef filling for that quintessential cheeseburger tang.
- Bacon Bliss: Cook up some crispy bacon, crumble it, and add it to the beef mixture. Everything’s better with bacon!
- Jalapeño Kick: For those who love a bit of heat, finely dice some pickled jalapeños and mix them in.
- Saucy Center: A tiny dollop of your favorite burger sauce (like a special sauce or BBQ sauce) in the center with the cheese can be a delightful surprise.
- Handling the Dough: Work quickly but gently with the biscuit dough. Overworking it can make it tough. If the dough gets too warm and sticky, pop it back into the fridge for a few minutes.
- Brush Generously: Don’t be shy with that garlic Parmesan butter! A generous coating ensures a beautiful golden crust and maximizes that incredible garlicky, cheesy flavor. You can even brush them again immediately after they come out of the oven.
- Serving Suggestions: These Garlic Parmesan Cheeseburger Bombs are fantastic on their own as an appetizer or party snack. For a light meal, serve them alongside a crisp green salad or some baked potato fries. They’re also a huge hit at potlucks and game day gatherings. Provide a variety of dipping sauces like ketchup, mustard, ranch dressing, or a homemade burger sauce.
Storage
These Garlic Parmesan Cheeseburger Bombs are incredibly delicious fresh out of the oven, but sometimes you’ll have leftovers, or you might want to make them ahead. Here’s how I handle storage to keep them tasting great.
- Refrigeration: If you have any leftover bombs, allow them to cool completely to room temperature. Then, store them in an airtight container in the refrigerator. They will keep well for about 2-3 days. Make sure they are fully cooled before sealing the container to prevent condensation, which can make them soggy.
- Reheating: For the best results when reheating, I highly recommend using an oven or an air fryer.
- Oven: Preheat your oven to 350°F (175°C). Place the bombs on a baking sheet and heat for 10-15 minutes, or until warmed through and the crust has re-crisped.
- Air Fryer: Reheat in an air fryer at 325°F (160°C) for about 5-8 minutes, checking periodically, until hot and crispy. This method is fantastic for restoring that initial texture.
- Microwave: While you can reheat them in the microwave, be aware that the crust will likely soften, and the cheese might become rubbery. If you’re in a hurry, microwave for 30-60 seconds per bomb, but it won’t yield the same crispy results.
- Freezing Cooked Bombs: These bombs freeze remarkably well once cooked!
- First, allow the baked bombs to cool completely.
- Arrange them in a single layer on a baking sheet and place the sheet in the freezer for about 1-2 hours, or until the bombs are individually frozen solid. This prevents them from sticking together.
- Once frozen, transfer the bombs to a freezer-safe zip-top bag or an airtight container. They can be stored in the freezer for up to 2-3 months.
- To Reheat from Frozen: You can reheat frozen bombs directly in the oven. Preheat your oven to 375°F (190°C). Place the frozen bombs on a baking sheet and bake for 20-30 minutes, or until thoroughly heated through and golden brown. You might want to brush them with a little extra melted butter before reheating from frozen for added moisture and flavor.
- Freezing Uncooked Bombs: While technically possible, I generally don’t recommend freezing these bombs uncooked if you’re using canned biscuit dough. The texture of the dough can change significantly upon thawing, leading to a less flaky and potentially tougher crust. It’s usually best to bake them fresh or freeze them after they’ve been cooked.
Having a stash of these in the freezer is a fantastic idea for quick snacks, appetizers, or an easy weeknight meal when you’re short on time!
Final Thoughts
And there you have it! I truly believe that the Garlic Parmesan Cheeseburger Bombs Recipe is a culinary delight you absolutely must try. This isn’t just another snack; it’s a vibrant explosion of savory beef, fragrant garlic, and rich Parmesan cheese, all nestled in a perfectly baked bomb that’s as fun to make as it is to eat. I promise, once you experience the irresistible combination of these flavors and the sheer joy of pulling apart one of these cheesy, garlicky wonders, you’ll understand why it’s become a personal favorite. Whether you’re planning a party, looking for a comforting family meal, or simply craving something uniquely delicious, the Garlic Parmesan Cheeseburger Bombs Recipe delivers every single time. Go on, give it a go; I know you’re going to love them!

Garlic Parmesan Cheeseburger Bombs: Easy & Flavorful Recipe
- Total Time: 35 minutes
- Yield: 12 servings 1x
Description
Get ready to indulge in these Garlic Parmesan Cheeseburger Bombs, a fun and flavorful twist on classic cheeseburgers! These pop-able delights are filled with seasoned beef, gooey cheese, and aromatic garlic, all wrapped in a golden dough.
Ingredients
- 1 lb ground beef (lean, like 85/15 or 90/10)
- 1 can (large 'grands' size) refrigerated biscuit dough
- 1 cup shredded sharp cheddar cheese or Monterey Jack cheese
- 1 cup freshly minced garlic
- 1/2 cup freshly grated Parmesan cheese
- 1/4 cup unsalted butter
- 2 tablespoons Worcestershire sauce
- 1/2 cup finely diced yellow or white onion
- Salt to taste
- Freshly ground black pepper to taste
- 1/2 teaspoon onion powder
- 1/2 teaspoon garlic powder
Instructions
- Preheat your oven to 375°F (190°C) and line a large baking sheet with parchment paper or a silicone baking mat.
- In a large skillet over medium-high heat, brown the ground beef, breaking it into small crumbles. If using onion, add it after the beef has started to brown and cook until softened, about 5 minutes. Drain excess grease and return beef to skillet. Stir in Worcestershire sauce, salt, pepper, and any additional seasonings. Remove from heat and let cool slightly.
- In a small bowl, melt the unsalted butter and stir in minced garlic and grated Parmesan cheese. Set aside.
- Open the can of biscuit dough and flatten each biscuit into a round about 4-5 inches in diameter on a lightly floured surface.
- Place 1 ½ to 2 tablespoons of the cooled ground beef mixture in the center of each flattened biscuit. Top with a small cube or pinch of shredded cheese. Gather the edges of the biscuit dough over the filling and pinch to seal tightly.
- Place the assembled bombs seam-side down on the prepared baking sheet. Brush the tops and sides with the garlic Parmesan butter mixture.
- Bake for 15-20 minutes, or until the biscuit dough is golden brown and cooked through.
- Once out of the oven, brush with any remaining garlic Parmesan butter and let cool for a few minutes before serving.
- Prep Time: 15 mins
- Cook Time: 20 mins
- Category: Appetizer
- Method: Baking
- Cuisine: American
Nutrition
- Serving Size: 1 bomb
- Calories: 250
- Sugar: 1 g
- Sodium: 400 mg
- Fat: 15 g
- Saturated Fat: 7 g
- Unsaturated Fat: 6 g
- Trans Fat: 0 g
- Carbohydrates: 20 g
- Fiber: 1 g
- Protein: 10 g
- Cholesterol: 40 mg
Keywords: Ensure to drain the cooked ground beef thoroughly to prevent soggy bombs. Don't overfill the biscuits to make sealing easier. Feel free to customize your filling with ingredients like diced pickles or crispy bacon.