• Skip to primary navigation
  • Skip to main content
  • Skip to primary sidebar
Homesmad

Homesmad

  • Home
  • Breakfast & Brunch
  • Appetizers & Snacks
  • Dinner
  • Dessert
  • About
  • Privacy Policy
  • Contact
Homesmad
  • Home
  • Breakfast & Brunch
  • Appetizers & Snacks
  • Dinner
  • Dessert
  • About
  • Privacy Policy
  • Contact

Grilled Balsamic Steak Salad: A Delicious & Healthy Recipe

June 21, 2025 by Lily author

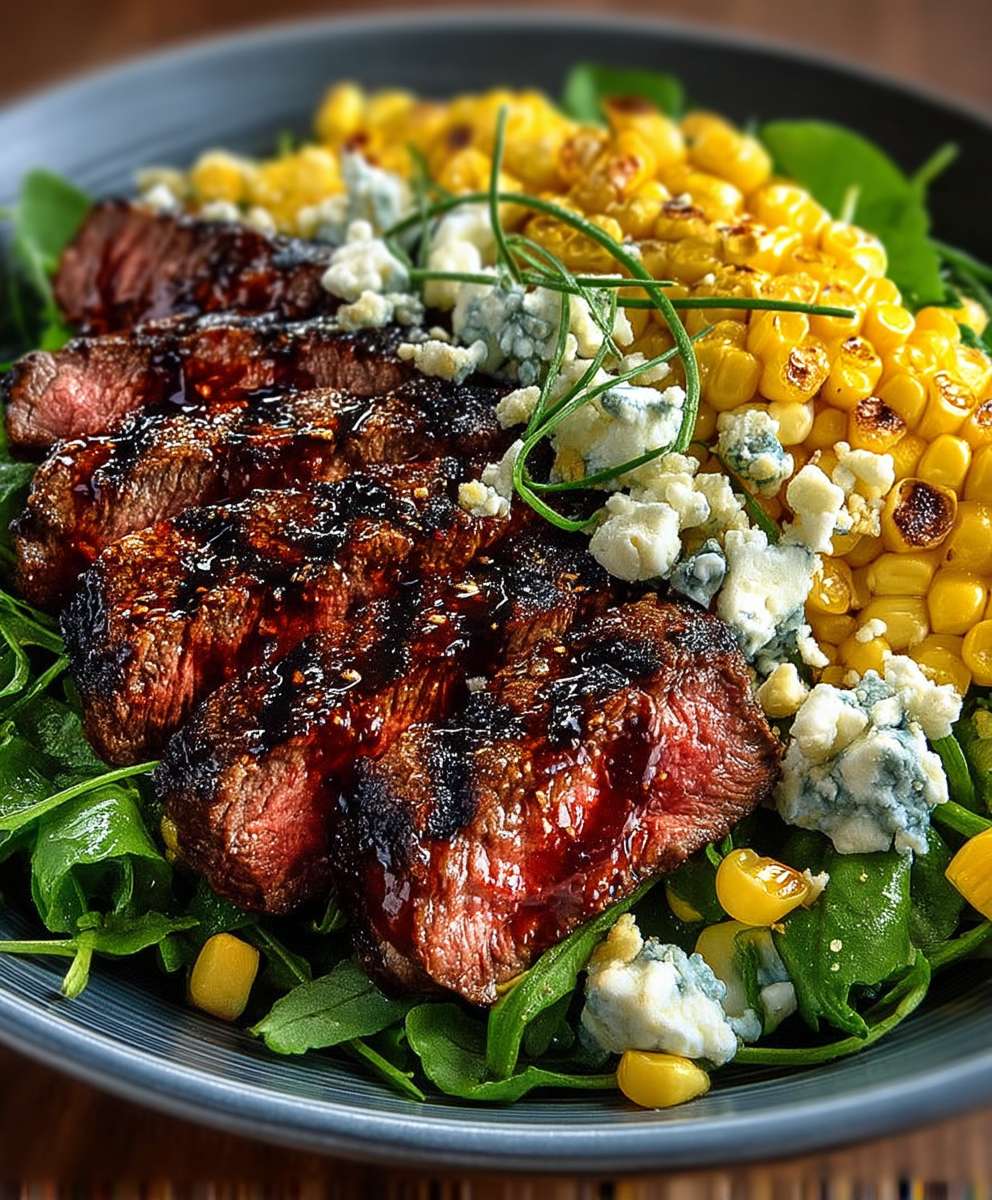
Grilled Balsamic Steak Salad: Prepare to elevate your salad game with this vibrant and flavorful dish! Imagine tender, juicy slices of perfectly grilled steak, marinated in a tangy balsamic glaze, nestled atop a bed of crisp, fresh greens. This isn’t your average salad; it’s a complete meal that’s both satisfying and surprisingly easy to prepare.

While the concept of a steak salad might seem modern, the combination of meat and greens has roots stretching back centuries. Cultures around the world have long enjoyed pairing protein with fresh produce, creating balanced and delicious meals. The addition of balsamic vinegar, a staple in Italian cuisine, adds a touch of sophistication and depth to this already impressive dish.

So, why is grilled balsamic steak salad such a crowd-pleaser? It’s the perfect harmony of textures and tastes. The richness of the steak is beautifully balanced by the acidity of the balsamic marinade and the freshness of the salad. People love that it’s a relatively quick and healthy option for a weeknight dinner, yet impressive enough to serve to guests. Plus, it’s incredibly versatile! You can customize the salad with your favorite vegetables, cheeses, and dressings to create a truly unique culinary experience. Get ready to discover your new favorite way to enjoy steak!

Grilled Balsamic Steak Salad this RECIPE

Ingredients:

  • For the Steak:
    • 2 (8-ounce) sirloin steaks, about 1-inch thick
    • 2 tablespoons olive oil
    • 2 tablespoons balsamic vinegar
    • 1 tablespoon Dijon mustard
    • 1 clove garlic, minced
    • 1 teaspoon dried Italian herbs
    • 1/2 teaspoon salt
    • 1/4 teaspoon black pepper
  • For the Salad:
    • 8 ounces mixed greens
    • 1 cup cherry tomatoes, halved
    • 1/2 cup cucumber, thinly sliced
    • 1/4 cup red onion, thinly sliced
    • 1/2 cup crumbled Gorgonzola cheese (or feta, if preferred)
    • 1/4 cup toasted walnuts or pecans (optional)
  • For the Balsamic Vinaigrette:
    • 3 tablespoons olive oil
    • 2 tablespoons balsamic vinegar
    • 1 tablespoon Dijon mustard
    • 1 tablespoon honey or maple syrup
    • 1 clove garlic, minced
    • 1/4 teaspoon salt
    • 1/8 teaspoon black pepper

Preparing the Balsamic Steak Marinade:

  1. In a medium bowl, whisk together the olive oil, balsamic vinegar, Dijon mustard, minced garlic, Italian herbs, salt, and pepper. This is going to be our flavor bomb for the steak!
  2. Place the sirloin steaks in a resealable plastic bag or a shallow dish. Pour the balsamic marinade over the steaks, ensuring they are well coated.
  3. Seal the bag or cover the dish and refrigerate for at least 30 minutes, or up to 4 hours. The longer it marinates, the more flavorful and tender the steak will be. I usually aim for at least an hour if I have the time.

Grilling the Steaks:

  1. Preheat your grill to medium-high heat. You want it hot enough to get a good sear on the steak, but not so hot that it burns before it cooks through.
  2. Remove the steaks from the marinade and discard the marinade. Pat the steaks dry with paper towels. This helps them to get a nice crust when grilling.
  3. Place the steaks on the preheated grill and cook for 4-5 minutes per side for medium-rare, or longer depending on your desired level of doneness. Use a meat thermometer to check the internal temperature. For medium-rare, aim for 130-135°F (54-57°C); for medium, aim for 135-145°F (57-63°C); and for medium-well, aim for 145-155°F (63-68°C).
  4. Once the steaks are cooked to your liking, remove them from the grill and place them on a cutting board. Tent them loosely with foil and let them rest for at least 5-10 minutes before slicing. This allows the juices to redistribute, resulting in a more tender and flavorful steak. Don’t skip this step!
  5. After resting, slice the steaks thinly against the grain. This makes them easier to chew and enhances the tenderness.

Preparing the Balsamic Vinaigrette:

  1. While the steaks are grilling or resting, prepare the balsamic vinaigrette. In a small bowl, whisk together the olive oil, balsamic vinegar, Dijon mustard, honey (or maple syrup), minced garlic, salt, and pepper.
  2. Taste and adjust the seasonings as needed. You might want to add a little more honey for sweetness or a pinch more salt for flavor.
  3. Set the vinaigrette aside until ready to assemble the salad.

Assembling the Grilled Balsamic Steak Salad:

  1. In a large bowl, combine the mixed greens, cherry tomatoes, cucumber, and red onion.
  2. Drizzle a portion of the balsamic vinaigrette over the salad and toss gently to coat. Be careful not to overdress the salad, as it can become soggy. I usually start with about half of the vinaigrette and add more as needed.
  3. Arrange the dressed salad on plates or in a large serving bowl.
  4. Top the salad with the sliced grilled steak.
  5. Sprinkle with crumbled Gorgonzola cheese (or feta) and toasted walnuts or pecans (if using).
  6. Drizzle with any remaining balsamic vinaigrette.
  7. Serve immediately and enjoy your delicious and healthy Grilled Balsamic Steak Salad!

Tips and Variations:

  • Steak Doneness: Use a meat thermometer to ensure your steak is cooked to your desired level of doneness.
  • Cheese Options: If you’re not a fan of Gorgonzola, feta cheese is a great alternative. You can also use crumbled goat cheese or shaved Parmesan.
  • Nut Options: Toasted walnuts or pecans add a nice crunch to the salad, but you can also use almonds, pistachios, or sunflower seeds.
  • Vegetable Variations: Feel free to add other vegetables to the salad, such as bell peppers, avocado, or grilled asparagus.
  • Make it a Meal Prep: You can grill the steak and prepare the vinaigrette ahead of time. Store them separately in the refrigerator and assemble the salad just before serving.
  • Grilling Alternatives: If you don’t have a grill, you can cook the steak in a cast-iron skillet on the stovetop or broil it in the oven.
  • Sweetness Adjustment: Adjust the amount of honey or maple syrup in the vinaigrette to your liking. Some people prefer a sweeter vinaigrette, while others prefer a more tangy one.
  • Herb Variations: Experiment with different herbs in the marinade and vinaigrette. Fresh herbs like rosemary, thyme, or oregano would be delicious.
  • Spice it Up: Add a pinch of red pepper flakes to the marinade or vinaigrette for a little heat.
  • Lemon Zest: A little lemon zest in the vinaigrette can brighten up the flavors.
Serving Suggestions:

This Grilled Balsamic Steak Salad is a complete meal on its own, but you can also serve it with a side of crusty bread or a simple soup. It’s perfect for a light lunch, a satisfying dinner, or even a potluck. I often make it when I want something healthy and flavorful that doesn’t take too long to prepare.

Storage Instructions:

If you have any leftover steak salad, store the steak and salad separately in airtight containers in the refrigerator. The salad is best consumed within 1-2 days, while the steak can be stored for up to 3-4 days. Reheat the steak gently before adding it to the salad.

Nutritional Information (approximate, per serving):

Calories: 450-550

Protein: 35-45g

Fat: 25-35g

Carbohydrates: 15-25g

Note: Nutritional information may vary depending on specific ingredients and portion sizes.

Grilled Balsamic Steak Salad

Conclusion:

So, there you have it! This Grilled Balsamic Steak Salad isn’t just another salad; it’s a flavor explosion waiting to happen. From the perfectly seared steak, marinated in that tangy-sweet balsamic glaze, to the crisp, fresh greens and vibrant veggies, every bite is a symphony of textures and tastes. I truly believe this recipe is a must-try for anyone looking to elevate their salad game and impress their friends and family.

Why is it a must-try, you ask? Well, beyond the incredible flavor profile, it’s surprisingly easy to make. The balsamic marinade does most of the work, infusing the steak with incredible depth. And the rest of the salad comes together in a snap. It’s perfect for a quick weeknight dinner, a weekend barbecue, or even a fancy lunch. Plus, it’s packed with protein and nutrients, making it a healthy and satisfying meal.

Serving Suggestions and Variations:

Now, let’s talk about how you can make this salad your own! Feel free to get creative with the ingredients. Here are a few ideas to get you started:

  • Cheese, please! Crumbled blue cheese, feta, or goat cheese would add a lovely creamy tang.
  • Nutty crunch: Toasted pecans, walnuts, or almonds would provide a satisfying crunch.
  • Fruity twist: Add some sliced strawberries, blueberries, or even grilled peaches for a touch of sweetness.
  • Spice it up: A pinch of red pepper flakes in the marinade or a drizzle of sriracha mayo on top would add a kick.
  • Grain bowl upgrade: Serve the steak and salad over a bed of quinoa, farro, or brown rice for a heartier meal.
  • Dressing variations: While I love the balsamic vinaigrette, you could also try a honey mustard dressing, a creamy avocado dressing, or even a simple lemon vinaigrette.
  • Vegetarian option: Replace the steak with grilled halloumi cheese or portobello mushrooms for a delicious vegetarian alternative.

For serving, I love to arrange the salad on a large platter for a beautiful presentation. You can also serve it in individual bowls. If you’re making it ahead of time, keep the steak and dressing separate until you’re ready to serve to prevent the salad from getting soggy. And don’t forget a side of crusty bread to soak up all that delicious balsamic vinaigrette!

I’m so excited for you to try this Grilled Balsamic Steak Salad. I know you’re going to love it as much as I do. It’s a guaranteed crowd-pleaser that’s both delicious and easy to make. It’s the perfect way to enjoy a healthy and flavorful meal any time of year.

So, what are you waiting for? Head to the grocery store, gather your ingredients, and get grilling! And most importantly, don’t forget to share your experience with me. I’d love to hear what you think of the recipe and any variations you try. Tag me in your photos on social media – I can’t wait to see your creations! Happy cooking!

I’m confident that this recipe will become a staple in your kitchen. It’s a versatile and flavorful dish that’s perfect for any occasion. So go ahead, give it a try, and let me know what you think. I’m always looking for feedback and new ideas. And who knows, maybe your variation will become my new favorite!


Grilled Balsamic Steak Salad: A Delicious & Healthy Recipe

Tender grilled sirloin steak marinated in balsamic goodness, served atop a vibrant salad with Gorgonzola, tomatoes, cucumber, and a homemade balsamic vinaigrette. A healthy and flavorful meal!

Prep Time15 minutes
Cook Time10 minutes
Total Time55 minutes
Category: Lunch
Yield: 2 servings
Save This Recipe

Ingredients

  • 2 (8-ounce) sirloin steaks, about 1-inch thick
  • 2 tablespoons olive oil
  • 2 tablespoons balsamic vinegar
  • 1 tablespoon Dijon mustard
  • 1 clove garlic, minced
  • 1 teaspoon dried Italian herbs
  • 1/2 teaspoon salt
  • 1/4 teaspoon black pepper
  • 8 ounces mixed greens
  • 1 cup cherry tomatoes, halved
  • 1/2 cup cucumber, thinly sliced
  • 1/4 cup red onion, thinly sliced
  • 1/2 cup crumbled Gorgonzola cheese (or feta, if preferred)
  • 1/4 cup toasted walnuts or pecans (optional)
  • 3 tablespoons olive oil
  • 2 tablespoons balsamic vinegar
  • 1 tablespoon Dijon mustard
  • 1 tablespoon honey or maple syrup
  • 1 clove garlic, minced
  • 1/4 teaspoon salt
  • 1/8 teaspoon black pepper

Instructions

  1. Prepare the Balsamic Steak Marinade: In a medium bowl, whisk together the olive oil, balsamic vinegar, Dijon mustard, minced garlic, Italian herbs, salt, and pepper.
  2. Place the sirloin steaks in a resealable plastic bag or a shallow dish. Pour the balsamic marinade over the steaks, ensuring they are well coated.
  3. Seal the bag or cover the dish and refrigerate for at least 30 minutes, or up to 4 hours.
  4. Grill the Steaks: Preheat your grill to medium-high heat.
  5. Remove the steaks from the marinade and discard the marinade. Pat the steaks dry with paper towels.
  6. Place the steaks on the preheated grill and cook for 4-5 minutes per side for medium-rare, or longer depending on your desired level of doneness. Use a meat thermometer to check the internal temperature. For medium-rare, aim for 130-135°F (54-57°C); for medium, aim for 135-145°F (57-63°C); and for medium-well, aim for 145-155°F (63-68°C).
  7. Remove the steaks from the grill and place them on a cutting board. Tent them loosely with foil and let them rest for at least 5-10 minutes before slicing.
  8. After resting, slice the steaks thinly against the grain.
  9. Prepare the Balsamic Vinaigrette: While the steaks are grilling or resting, prepare the balsamic vinaigrette. In a small bowl, whisk together the olive oil, balsamic vinegar, Dijon mustard, honey (or maple syrup), minced garlic, salt, and pepper.
  10. Taste and adjust the seasonings as needed.
  11. Set the vinaigrette aside until ready to assemble the salad.
  12. Assemble the Grilled Balsamic Steak Salad: In a large bowl, combine the mixed greens, cherry tomatoes, cucumber, and red onion.
  13. Drizzle a portion of the balsamic vinaigrette over the salad and toss gently to coat.
  14. Arrange the dressed salad on plates or in a large serving bowl.
  15. Top the salad with the sliced grilled steak.
  16. Sprinkle with crumbled Gorgonzola cheese (or feta) and toasted walnuts or pecans (if using).
  17. Drizzle with any remaining balsamic vinaigrette.
  18. Serve immediately and enjoy!

Notes

  • Steak Doneness: Use a meat thermometer to ensure your steak is cooked to your desired level of doneness.
  • Cheese Options: If you’re not a fan of Gorgonzola, feta cheese is a great alternative. You can also use crumbled goat cheese or shaved Parmesan.
  • Nut Options: Toasted walnuts or pecans add a nice crunch to the salad, but you can also use almonds, pistachios, or sunflower seeds.
  • Vegetable Variations: Feel free to add other vegetables to the salad, such as bell peppers, avocado, or grilled asparagus.
  • Make it a Meal Prep: You can grill the steak and prepare the vinaigrette ahead of time. Store them separately in the refrigerator and assemble the salad just before serving.
  • Grilling Alternatives: If you don’t have a grill, you can cook the steak in a cast-iron skillet on the stovetop or broil it in the oven.
  • Sweetness Adjustment: Adjust the amount of honey or maple syrup in the vinaigrette to your liking. Some people prefer a sweeter vinaigrette, while others prefer a more tangy one.
  • Herb Variations: Experiment with different herbs in the marinade and vinaigrette. Fresh herbs like rosemary, thyme, or oregano would be delicious.
  • Spice it Up: Add a pinch of red pepper flakes to the marinade or vinaigrette for a little heat.
  • Lemon Zest: A little lemon zest in the vinaigrette can brighten up the flavors.

« Previous Post
Whipped Pink Lemonade: The Ultimate Summer Drink Recipe
Next Post »
Grilled Shrimp Bowl: The Ultimate Healthy & Delicious Recipe

If you enjoyed this…

Grilled Veggie Mozzarella Sandwiches: Quick & Cheesy Lunch

Maple Bacon Waffle Burger: The Ultimate Sweet & Savory Recipe

Peach Watermelon Salad: The Ultimate Summer Recipe

Primary Sidebar

Browse by Diet

BreakfastDinnerLunchDessertAppetizer

Sweet Peach Yogurt Parfait Delight

One of my fondest memories is from a lazy summer afternoon spent at my grandmother’s house. The sun filtered through the kitchen window, casting a warm glow over the table where she would create her culinary magic. It was during one of those blissful moments that I first tasted her Peach Yogurt Parfait with Honey and Granola. The sweet aroma of ripe peaches mingling with creamy yogurt and the crunch of granola was nothing short of heavenly. It felt like summer captured in a bowl, and I still remember the joy of diving in with a spoon, each layer revealing a new burst of flavor.

When I think about that parfait, I can almost hear the gentle hum of the bees outside, reminding me of the floral notes that honey brings to every bite. The vibrant yellows and soft oranges of the peaches contrast beautifully with the creamy white yogurt and the golden crunch of granola. It’s a dish that not only looks delightful but also tastes like a celebration of fresh, wholesome ingredients.

What makes my version of this Peach Yogurt Parfait special is the careful balance of flavors and textures. I use ripe, juicy peaches, drizzled with locally sourced honey, and a homemade granola that’s bursting with nuts and seeds for an extra crunch. It’s a simple dish, but every layer is crafted with love and attention.

Let me show you exactly how to make this delightful parfait, so you can bring a bit of that summer magic into your kitchen!

Sweet Peach Yogurt Parfait Delight

Why You’ll Love This Recipe

  • Delightfully creamy texture from the Greek yogurt, paired with the juicy sweetness of fresh peaches.
  • Ready in under 20 minutes, making it a quick and satisfying breakfast or snack option.
  • Budget-friendly, using common ingredients that you may already have in your pantry.
  • Customizable with your favorite granola and nuts, allowing you to tailor each parfait to your taste.
  • Perfectly balanced flavors with the bright acidity of lemon juice and the sweetness of honey enhancing the peaches.

Ingredients

  • For the Parfait:
  • 2 cups plain Greek yogurt (or vanilla yogurt for a sweeter option)
  • 2 large ripe peaches, diced (about 2 cups)
  • 1 tablespoon fresh lemon juice (to prevent browning of peaches)
  • 2 tablespoons honey (plus more for drizzling)
  • 1 teaspoon vanilla extract (optional for extra flavor)
  • For the Granola:
  • 1 cup granola (store-bought or homemade; see notes for a simple granola recipe)
  • 1/4 cup sliced almonds (optional for added crunch)
  • 1/4 cup shredded coconut (optional for added flavor)

Let’s dive into some key ingredients that make this Peach Yogurt Parfait so delightful! First, the Greek yogurt is not only creamy but also packed with protein, making it a satisfying option for breakfast or a snack. If you’re looking for a sweeter option, you can easily substitute it with vanilla yogurt, though it may alter the overall flavor balance. Next, the ripe peaches are the star of the show; their natural sweetness shines through, so I recommend choosing peaches that yield slightly to pressure, indicating they’re perfectly ripe. If peaches aren’t in season, feel free to use nectarines or even frozen peaches—just thaw them before use. Finally, honey adds a lovely floral sweetness that ties everything together. If you prefer, maple syrup can serve as a delicious substitute.

Step-by-Step Instructions

  1. Start by preparing the peaches. Wash them thoroughly, then slice and dice them into bite-sized pieces. In a medium bowl, toss the diced peaches with 1 tablespoon of fresh lemon juice to prevent browning. Set aside for about 5 minutes while the lemon juice works its magic.
  2. In a separate bowl, combine the Greek yogurt, 2 tablespoons of honey, and 1 teaspoon of vanilla extract if using. Stir the mixture until smooth and thoroughly blended. This should take about a minute. Avoid overmixing to maintain the creaminess of the yogurt.
  3. Now it’s time to layer your parfait. Grab a clear glass or bowl to showcase your beautiful creation. Start with a generous spoonful of the yogurt mixture at the bottom—about 1/4 cup will do. Use a spoon to spread it evenly.
  4. Add a layer of the diced peaches over the yogurt, ensuring they cover the yogurt completely. You might want to use about half of what you have prepared—roughly 1 cup. This layer should be visually appealing, so arrange the peaches neatly.
  5. Sprinkle 1/4 cup of granola over the peaches. This adds a delightful crunch. Make sure to distribute it evenly to ensure every bite has that satisfying texture. Avoid packing it down too tightly, as you want it to maintain its crunch.
  6. Repeat the layers: spoon in another 1/4 cup of yogurt, followed by another cup of peaches, and another sprinkle of granola. You should have at least two layers, but feel free to add more depending on your glass size.
  7. Finish off your parfait with a drizzle of honey on top for added sweetness and a touch of elegance. If you’re using sliced almonds or shredded coconut, sprinkle them on top now. It adds a lovely visual contrast and extra flavor.
  8. Serve immediately or refrigerate for up to 30 minutes before serving to allow the flavors to meld together. However, I recommend enjoying it fresh to maintain the granola’s crunch.

Pro Tips for the Best Peach Yogurt Parfait With Honey And Granola

  • Make sure to choose ripe peaches for the best flavor and texture. A common mistake is using unripe fruit, which can lead to a less enjoyable parfait. Look for peaches that are fragrant and slightly soft to the touch.
  • Use a clear glass to assemble your parfait; this not only makes for a beautiful presentation but also allows you to see the colorful layers, which adds to the enjoyment of eating it.
  • For an even creamier texture, consider whipping the Greek yogurt with a hand mixer for a couple of minutes before layering. This small adjustment makes a huge difference in mouthfeel.
  • Be mindful of the granola-to-yogurt ratio. Too much granola can overwhelm the parfait, while too little can make it feel too creamy. Aim for about 1/4 cup of granola per layer for the perfect balance.
  • If you’re making this for a gathering, consider preparing the yogurt and peaches ahead of time and layering them just before serving. This ensures the granola stays crunchy!

Variations & Serving Ideas

There are so many ways to get creative with your Peach Yogurt Parfait! For a tropical twist, swap out the peaches for mangoes or pineapples and top with coconut flakes. If you prefer a berry flavor, mix in some blueberries or strawberries with the peaches for added color and taste. For a nutty version, incorporate chopped walnuts or pecans instead of almonds.

As for serving ideas, this parfait pairs beautifully with a side of scrambled eggs for a hearty breakfast or fresh fruit salad for a light lunch. You might also enjoy it alongside whole grain toast with almond butter for an energizing snack. The contrast of flavors and textures will elevate your meal experience!

Storage, Make-Ahead & Reheating

The Peach Yogurt Parfait is best enjoyed fresh, but you can prepare some components ahead of time. Store the layered parfait in an airtight container in the refrigerator for up to 24 hours. However, be cautious; the granola may lose its crunch if stored too long. You can freeze the yogurt and peach mixture for up to 2 months; just remember to thaw it in the refrigerator overnight before serving.

If you plan to enjoy this dish the next day, it can taste even better as the flavors meld together. Just remember to add the granola right before serving to keep its delightful crunch!

Frequently Asked Questions

Can I make Peach Yogurt Parfait With Honey And Granola ahead of time?

Yes — in fact, it tastes even better the next day as the flavors meld. However, I recommend waiting to add the granola until just before serving to maintain its crunch.

What can I substitute for Greek yogurt?

If you prefer a lighter option, you can substitute Greek yogurt with regular yogurt or a dairy-free alternative like coconut yogurt. Just remember that this may alter the creaminess and flavor profile slightly.

Can I use frozen peaches for this parfait?

Absolutely! Just make sure to thaw the frozen peaches before using them. They will still add great flavor, though the texture may be slightly softer than fresh peaches.

How do I make the parfait vegan?

To make a vegan version, substitute the Greek yogurt with a plant-based yogurt alternative, and replace honey with maple syrup or agave nectar. This keeps the parfait sweet while adhering to a vegan diet.

What other fruits can I use in this recipe?

You can mix and match fruits based on your preference. Try using strawberries, blueberries, raspberries, or even bananas. Just make sure to adjust the lemon juice as needed to prevent browning.

Sweet Peach Yogurt Parfait Delight

Final Thoughts

The Peach Yogurt Parfait with Honey and Granola is a delightful blend of creamy yogurt, sweet peaches, and crunchy granola that creates a satisfying and nourishing treat. Each layer bursts with flavor, making it a perfect choice for breakfast or a light dessert.

This is the kind of recipe I come back to again and again, especially when I want something refreshing and wholesome to start my day. The harmony of sweet and tart flavors, combined with the delightful crunch, never fails to lift my spirits!

I encourage you to give this parfait a try and indulge in its comforting goodness. Feel free to share your results or even add your own twist—perhaps a sprinkle of cinnamon or a handful of nuts. Enjoy creating your perfect parfait!

Print
clock clock iconcutlery cutlery iconflag flag iconfolder folder iconinstagram instagram iconpinterest pinterest iconfacebook facebook iconprint print iconsquares squares iconheart heart iconheart solid heart solid icon

Peach Yogurt Parfait


  • Author: Lily author
  • Total Time: 15 minutes
  • Yield: 4 servings 1x
Pin Recipe
Print Recipe

Description

This Peach Yogurt Parfait combines creamy Greek yogurt, juicy peaches, and crunchy granola for a delightful treat. It’s a perfect breakfast or snack that captures the essence of summer in every bite.


Ingredients

Scale
  • For the Parfait:
  • 2 cups plain Greek yogurt (or vanilla yogurt for a sweeter option)
  • 2 large ripe peaches, diced (about 2 cups)
  • 1 tablespoon fresh lemon juice (to prevent browning of peaches)
  • 2 tablespoons honey (plus more for drizzling)
  • 1 teaspoon vanilla extract (optional for extra flavor)
  • For the Granola:
  • 1 cup granola (store-bought or homemade; see notes for a simple granola recipe)
  • 1/4 cup sliced almonds (optional for added crunch)
  • 1/4 cup shredded coconut (optional for added flavor)

Instructions

  1. Start by preparing the peaches. Wash them thoroughly, then slice and dice them into bite-sized pieces. In a medium bowl, toss the diced peaches with 1 tablespoon of fresh lemon juice to prevent browning. Set aside for about 5 minutes while the lemon juice works its magic.
  2. In a separate bowl, combine the Greek yogurt, 2 tablespoons of honey, and 1 teaspoon of vanilla extract if using. Stir the mixture until smooth and thoroughly blended. This should take about a minute. Avoid overmixing to maintain the creaminess of the yogurt.
  3. Now it’s time to layer your parfait. Grab a clear glass or bowl to showcase your beautiful creation. Start with a generous spoonful of the yogurt mixture at the bottom—about 1/4 cup will do. Use a spoon to spread it evenly.
  4. Add a layer of the diced peaches over the yogurt, ensuring they cover the yogurt completely. You might want to use about half of what you have prepared—roughly 1 cup. This layer should be visually appealing, so arrange the peaches neatly.
  5. Sprinkle 1/4 cup of granola over the peaches. This adds a delightful crunch. Make sure to distribute it evenly to ensure every bite has that satisfying texture. Avoid packing it down too tightly, as you want it to maintain its crunch.
  6. Repeat the layers: spoon in another 1/4 cup of yogurt, followed by another cup of peaches, and another sprinkle of granola. You should have at least two layers, but feel free to add more depending on your glass size.
  7. Finish off your parfait with a drizzle of honey on top for added sweetness and a touch of elegance. If you’re using sliced almonds or shredded coconut, sprinkle them on top now. It adds a lovely visual contrast and extra flavor.
  8. Serve immediately or refrigerate for up to 30 minutes before serving to allow the flavors to meld together. However, I recommend enjoying it fresh to maintain the granola’s crunch.
  • Prep Time: 15 mins
  • Cook Time: 0 mins
  • Category: Breakfast
  • Method: No-cook
  • Cuisine: American

Nutrition

  • Serving Size: 1 parfait
  • Calories: 250
  • Sugar: 20 g
  • Sodium: 50 mg
  • Fat: 5 g
  • Saturated Fat: 2 g
  • Unsaturated Fat: 3 g
  • Trans Fat: 0 g
  • Carbohydrates: 40 g
  • Fiber: 3 g
  • Protein: 10 g
  • Cholesterol: 10 mg

Keywords: Choose ripe peaches for the best flavor and texture. Use a clear glass for a beautiful presentation. For creaminess, consider whipping the yogurt before layering. Be mindful of the granola-to-yogurt ratio. Prepare yogurt and peaches ahead of time for gatherings, layering just before serving.

Did you make this recipe?

Share a photo and tag us — we can't wait to see what you've made!

Sun-Kissed Frozen Orange Cream Slush

As a child, summer days felt like they lasted forever. I remember the sticky heat wrapping around me as I played outside, my laughter mingling with the sounds of the neighborhood. But nothing could cool me down quite like the moment I’d spot my grandmother, laboring over her blender, whipping up her famous Frozen Orange Creamsicle Slush. That vibrant orange treat, with its frosty texture and sweet citrus aroma, was like a burst of sunshine in a cup. Just one sip, and I could feel the coolness wash over me, sparking pure joy.

This Frozen Orange Creamsicle Slush has a way of making you feel like a kid again. Its creamy, dreamy consistency is a delightful balance of bright orange and soft vanilla, inviting you to dive right in. The refreshing tang of orange dances on your tongue, while the smooth creaminess envelops you in a comforting embrace. It’s a nostalgic treat that’s perfect for hot summer afternoons or anytime you need a little pick-me-up.

What makes my version of this slush stand out is the addition of a hint of vanilla bean, which elevates the flavor and adds an extra layer of richness. Plus, it’s super easy to whip up with just a few simple ingredients that you probably already have on hand! So, if you’re ready to relive those sun-soaked memories, let me show you exactly how to make it.

Sun-Kissed Frozen Orange Cream Slush

Why You’ll Love This Recipe

  • Each slush is a perfect blend of creamy vanilla and zesty orange, creating a nostalgic flavor reminiscent of summer days.
  • This refreshing treat is ready in under 15 minutes, making it an ideal quick dessert for unexpected guests or hot afternoons.
  • With just 8 simple ingredients, it’s budget-friendly, ensuring you don’t have to break the bank to enjoy a delicious slush.
  • The slush has a perfectly smooth texture, thanks to the combination of ice and ice cream, providing a delightful contrast to the bright citrus flavors.
  • It’s highly customizable; you can easily adjust the sweetness and add fresh herbs for a unique twist that suits your taste.

Ingredients

  • 2 cups orange juice (freshly squeezed or store-bought)
  • 1 cup vanilla ice cream
  • 1 cup crushed ice
  • 1/2 cup milk (whole or 2%)
  • 1/4 cup granulated sugar (adjust based on sweetness preference)
  • 1 teaspoon vanilla extract
  • Zest of 1 orange (for added flavor)
  • Fresh orange slices and mint leaves (for garnish)

The star of this Frozen Orange Creamsicle Slush is the orange juice, which provides the vibrant, citrusy base. Freshly squeezed juice will yield the brightest flavor, but store-bought options can be just as convenient. If you’re opting for store-bought, choose 100% pure juice with no added sugars for the best results. Another essential ingredient is the vanilla ice cream; it adds creaminess and sweetness. You can substitute it with dairy-free ice cream if you’re looking for a vegan option. Whole or 2% milk complements the ice cream, creating a smooth blend. If you want a lower-calorie version, almond or oat milk can be good alternatives.

Lastly, the granulated sugar can be adjusted based on your sweetness preference. If you prefer a more natural sweetener, consider using honey or agave syrup. The orange zest enhances the flavor profile, providing an aromatic pop that brings the whole slush together. Don’t skip it! It adds an extra layer of brightness that makes this slush truly special.

Step-by-Step Instructions

  1. Start by preparing your ingredients. Gather 2 cups of orange juice, 1 cup of vanilla ice cream, and 1 cup of crushed ice. Make sure the ice is finely crushed, as larger chunks can make blending difficult.
  2. In a blender, combine the orange juice, vanilla ice cream, crushed ice, and 1/2 cup of milk. Add 1/4 cup of granulated sugar and 1 teaspoon of vanilla extract. If you like a sweeter slush, consider adding a bit more sugar at this stage.
  3. Add the zest of 1 orange to the blender. This step is crucial for enhancing the citrus flavor of your slush. Make sure not to include the bitter white pith—only the flavorful zest.
  4. Blend the mixture on medium-high speed for about 30-45 seconds. Stop once the ingredients are fully combined and the slush has a smooth, even consistency. If you notice large chunks of ice, blend for an additional 10-15 seconds. Avoid over-blending, as this can make the slush too liquidy.
  5. Once blended, taste the slush. If it needs more sweetness, add a little more sugar and blend for a few more seconds. If it’s too thick, you can add a splash of milk to reach your desired consistency.
  6. Pour the slush into glasses. This recipe typically serves 4, but you can easily double it for larger gatherings. Use a spoon to help guide the slush into the glasses if needed.
  7. Garnish each serving with fresh orange slices and mint leaves. The mint not only adds a pop of color but also a refreshing aroma that complements the citrus flavors beautifully.
  8. Serve immediately and enjoy! If you’ve made extra, you can refrigerate it for a short time, but it’s best enjoyed fresh.

Pro Tips for the Best Frozen Orange Creamsicle Slush

  • Don’t skip the orange zest! It’s a game-changer for flavor. Always zest before juicing to make it easier.
  • Use a high-powered blender for the best texture. A standard blender may struggle with ice, leading to uneven consistency. If you have a food processor, that can work too, but ensure the ice is finely crushed.
  • Adjust the ice-to-liquid ratio carefully. If your slush is too thick, it won’t blend well. Start with less ice and add more until you reach your preferred texture.
  • Be cautious with the sugar! Always start with the lower amount, as you can easily add more, but it’s hard to fix an overly sweet slush.
  • For a fun twist, consider adding a splash of coconut milk or a handful of fresh fruit like strawberries or pineapple. This not only enhances the flavor but also adds a beautiful color contrast.

Variations & Serving Ideas

There are countless ways to put a spin on your Frozen Orange Creamsicle Slush. Consider making a tropical version by adding in some pineapple juice or coconut milk for a delightful tropical twist. If you’re feeling adventurous, try incorporating a handful of frozen mango or peach slices for added sweetness. For a lighter version, swap out the vanilla ice cream for Greek yogurt for a creamy yet tangy alternative.

As for serving ideas, this refreshing slush pairs wonderfully with light summer dishes like grilled chicken skewers, fish tacos, or a simple salad topped with citrus vinaigrette. The bright, zesty flavors of the slush complement these dishes perfectly, making them an ideal pairing for a sunny day.

Storage, Make-Ahead & Reheating

This Frozen Orange Creamsicle Slush is best enjoyed fresh, but if you have leftovers, you can store them in an airtight container in the fridge for up to 2 days. Just keep in mind that the slush may lose some of its texture over time as the ice melts. It doesn’t freeze well, as the ice will turn into a solid block. If you must freeze it, blend again after thawing to restore the slushy consistency. This treat is best the day you make it, as the flavors meld together beautifully overnight, enhancing its deliciousness.

Frequently Asked Questions

Can I make Frozen Orange Creamsicle Slush ahead of time?

Yes — in fact, it tastes even better the next day as the flavors meld. However, it’s best to enjoy it fresh, as the texture can change if stored for too long. If you need to prepare it ahead, keep it in the fridge and re-blend before serving.

What kind of orange juice should I use?

For the best flavor, use freshly squeezed orange juice. However, if you’re short on time, opt for 100% pure store-bought juice without added sugars. This will ensure that your slush remains flavorful and refreshing.

Can I substitute the vanilla ice cream?

Absolutely! If you’re looking for a dairy-free option, coconut milk ice cream or a non-dairy vanilla ice cream can work wonderfully. They will still provide the creamy texture and sweetness you desire.

How can I adjust the sweetness of my slush?

You can easily adjust the sweetness by modifying the amount of sugar added. Start with 1/4 cup and taste the mixture before blending. If you prefer it sweeter, add more sugar gradually until it reaches your desired level.

What should I do if my slush is too thick?

If your slush is too thick, simply add a splash of milk or orange juice and blend again. This will help achieve a more drinkable consistency while maintaining the slushy texture. Adjust gradually to reach your preferred thickness.

Sun-Kissed Frozen Orange Cream Slush

Final Thoughts

The Frozen Orange Creamsicle Slush is a delightful blend of refreshing citrus and creamy goodness, making it a perfect treat for warm days or any time you crave a taste of nostalgia. The way the bright orange flavor dances with the creamy texture truly elevates this slush, transforming it into a satisfying escape from the everyday.

This is the kind of recipe I come back to again and again, especially when I’m looking to cool down or impress guests at a summer gathering. It’s simple to make and always brings smiles all around! I encourage you to try this recipe for yourself—don’t hesitate to share your results or even put your own spin on it. Happy slushing!

Print
clock clock iconcutlery cutlery iconflag flag iconfolder folder iconinstagram instagram iconpinterest pinterest iconfacebook facebook iconprint print iconsquares squares iconheart heart iconheart solid heart solid icon

Frozen Orange Creamsicle Slush


  • Author: Lily author
  • Total Time: 15 minutes
  • Yield: 4 servings 1x
Pin Recipe
Print Recipe

Description

This Frozen Orange Creamsicle Slush is a refreshing treat that combines creamy vanilla and zesty orange flavors. Perfect for hot summer days, it brings back nostalgic memories with every sip.


Ingredients

Scale
  • 2 cups orange juice (freshly squeezed or store-bought)
  • 1 cup vanilla ice cream
  • 1 cup crushed ice
  • 1/2 cup milk (whole or 2%)
  • 1/4 cup granulated sugar (adjust based on sweetness preference)
  • 1 teaspoon vanilla extract
  • Zest of 1 orange (for added flavor)
  • Fresh orange slices and mint leaves (for garnish)

Instructions

  1. Start by preparing your ingredients. Gather 2 cups of orange juice, 1 cup of vanilla ice cream, and 1 cup of crushed ice. Make sure the ice is finely crushed, as larger chunks can make blending difficult.
  2. In a blender, combine the orange juice, vanilla ice cream, crushed ice, and 1/2 cup of milk. Add 1/4 cup of granulated sugar and 1 teaspoon of vanilla extract. If you like a sweeter slush, consider adding a bit more sugar at this stage.
  3. Add the zest of 1 orange to the blender. This step is crucial for enhancing the citrus flavor of your slush. Make sure not to include the bitter white pith—only the flavorful zest.
  4. Blend the mixture on medium-high speed for about 30-45 seconds. Stop once the ingredients are fully combined and the slush has a smooth, even consistency. If you notice large chunks of ice, blend for an additional 10-15 seconds. Avoid over-blending, as this can make the slush too liquidy.
  5. Once blended, taste the slush. If it needs more sweetness, add a little more sugar and blend for a few more seconds. If it’s too thick, you can add a splash of milk to reach your desired consistency.
  6. Pour the slush into glasses. This recipe typically serves 4, but you can easily double it for larger gatherings. Use a spoon to help guide the slush into the glasses if needed.
  7. Garnish each serving with fresh orange slices and mint leaves. The mint not only adds a pop of color but also a refreshing aroma that complements the citrus flavors beautifully.
  8. Serve immediately and enjoy! If you’ve made extra, you can refrigerate it for a short time, but it's best enjoyed fresh.
  • Prep Time: 15 min
  • Cook Time: 0 min
  • Category: Dessert
  • Method: Blending
  • Cuisine: American

Nutrition

  • Serving Size: 1 serving
  • Calories: 200
  • Sugar: 30 g
  • Sodium: 50 mg
  • Fat: 5 g
  • Saturated Fat: 3 g
  • Unsaturated Fat: 2 g
  • Trans Fat: 0 g
  • Carbohydrates: 40 g
  • Fiber: 1 g
  • Protein: 2 g
  • Cholesterol: 20 mg

Keywords: Don't skip the orange zest! It's a game-changer for flavor. Always zest before juicing to make it easier.

Did you make this recipe?

Share a photo and tag us — we can't wait to see what you've made!

Zesty Lemon Poppy Seed Delight

One rainy afternoon, I found myself in my grandmother’s cozy kitchen, the kind that always smelled like warmth and love. She was whipping up her famous Lemon Poppy Seed Loaf, a recipe that had been passed down through generations. As the batter came together, the zesty aroma of fresh lemons filled the air, mingling perfectly with the nutty fragrance of poppy seeds. I can still picture her, apron-clad, as she expertly drizzled a vibrant citrus icing over the loaf, creating a glossy, sun-kissed finish that beckoned us to dive in. It was a moment that sparked my own passion for baking, and this recipe has become a cherished staple in my home ever since.

When you take a bite of this Lemon Poppy Seed Loaf, it’s like a burst of sunshine on your palate. The loaf is beautifully golden, with a tender crumb that melts in your mouth. Each slice is speckled with tiny poppy seeds, adding a delightful crunch that contrasts beautifully with the tangy sweetness of the lemon. And that citrus icing? It’s the finishing touch that elevates this loaf from ordinary to extraordinary, with its bright, zesty flavor dancing on your taste buds.

This recipe stands out because it embraces simplicity while delivering on flavor. I’ve added a hint of vanilla to the batter, enhancing the overall taste and making it even more indulgent. Trust me, once you make this Lemon Poppy Seed Loaf With Citrus Icing, it’ll become a go-to in your baking repertoire.

So, let me show you exactly how to make it!

Zesty Lemon Poppy Seed Delight

Why You’ll Love This Recipe

  • Moist and tender crumb that melts in your mouth, thanks to the perfect balance of butter and buttermilk.
  • Bright, zesty lemon flavor paired with crunchy poppy seeds, creating a delightful texture and taste experience.
  • Easy to whip up in just about an hour, perfect for last-minute gatherings or a cozy afternoon treat.
  • Budget-friendly with everyday ingredients, making it an accessible option for all home bakers.
  • The citrus icing adds a sweet tang that elevates the loaf, turning a simple recipe into a showstopper!

Ingredients

  • 1 ½ cups (190g) all-purpose flour
  • 1 teaspoon baking powder
  • ½ teaspoon baking soda
  • ½ teaspoon salt
  • 3 tablespoons poppy seeds
  • ½ cup (115g) unsalted butter, softened to room temperature
  • 1 cup (200g) granulated sugar
  • 2 large eggs
  • 1 teaspoon vanilla extract
  • 1 teaspoon lemon zest (from about 1 medium lemon)
  • ½ cup (120ml) buttermilk
  • 2 tablespoons fresh lemon juice

For the Citrus Icing:

  • 1 cup (120g) powdered sugar
  • 2 tablespoons fresh lemon juice
  • 1 tablespoon orange juice
  • 1 teaspoon lemon zest (for garnish, optional)

Let’s dive into the key ingredients that make this Lemon Poppy Seed Loaf so special. The all-purpose flour provides the structure and base for the loaf, while the baking powder and baking soda ensure it rises perfectly, giving the loaf a light texture. For a gluten-free variation, you could substitute the flour with a gluten-free all-purpose blend. Poppy seeds not only add a delightful crunch but also contribute to the unique flavor profile that pairs well with the citrus notes.

Unsalted butter is crucial for achieving the buttery richness that makes this loaf so moist. If you’re looking for a dairy-free option, coconut oil or a vegan butter can be used instead. The buttermilk is another essential component, providing acidity that activates the baking soda for a fluffy texture. If you don’t have buttermilk on hand, you can easily make a substitute by mixing ½ cup of milk with 1 tablespoon of vinegar or lemon juice and letting it sit for about 5 minutes.

Step-by-Step Instructions

  1. Preheat your oven to 350°F (175°C). Grease a 9×5-inch loaf pan or line it with parchment paper for easy removal later.
  2. In a medium mixing bowl, whisk together 1 ½ cups of all-purpose flour, 1 teaspoon of baking powder, ½ teaspoon of baking soda, ½ teaspoon of salt, and 3 tablespoons of poppy seeds. This helps to evenly distribute the baking agents and ensures a uniform rise.
  3. In a large mixing bowl, cream together ½ cup of softened unsalted butter and 1 cup of granulated sugar using an electric mixer on medium speed for about 3-4 minutes, until the mixture is light and fluffy. Make sure to scrape down the sides of the bowl occasionally.
  4. Add 2 large eggs, 1 teaspoon of vanilla extract, and 1 teaspoon of lemon zest to the creamed butter and sugar, mixing until fully combined. You want a smooth consistency, so ensure there are no lumps of butter.
  5. In a small bowl, combine ½ cup of buttermilk and 2 tablespoons of fresh lemon juice. Alternately add the dry ingredients and buttermilk mixture to the butter mixture, starting and ending with the dry ingredients. Mix just until combined; do not overmix, as this can lead to a dense loaf.
  6. Pour the batter into the prepared loaf pan. Smooth the top with a spatula, ensuring it’s even. Bake in the preheated oven for 50-60 minutes, or until a toothpick inserted in the center comes out clean. The edges should be lightly golden brown, and the center should feel just set.
  7. Once baked, remove the loaf from the oven and allow it to cool in the pan for about 10 minutes. Then, transfer it to a wire rack to cool completely. Resist the urge to slice too soon, as it will be crumbly if it’s still warm.
  8. While the loaf is cooling, prepare the citrus icing. In a medium bowl, whisk together 1 cup of powdered sugar, 2 tablespoons of fresh lemon juice, and 1 tablespoon of orange juice until smooth. If the icing is too thick, you can add a little more juice to reach your desired consistency.
  9. Once the loaf is completely cool, drizzle the citrus icing over the top. If you like, sprinkle with an additional teaspoon of lemon zest for an extra pop of flavor and color.

Pro Tips for the Best Lemon Poppy Seed Loaf With Citrus Icing

  • Be careful not to overmix your batter; this is a common mistake that can lead to a dense loaf. Mix just until the dry ingredients are incorporated for a light and fluffy texture.
  • Use room temperature ingredients, especially the butter and eggs. This helps to create a smoother batter and ensures even baking. Take your eggs out of the fridge about 30 minutes before you start.
  • For a more pronounced lemon flavor, consider adding a little lemon extract in addition to the zest and juice. Just a half teaspoon can elevate the citrus notes significantly.
  • When measuring your flour, spoon it into the measuring cup and level it off with a knife instead of scooping directly from the bag. This prevents packing and ensures you don’t end up with a dry loaf.
  • Invest in a good quality loaf pan; it makes a difference in heat distribution, which ensures even baking. If your pan is dark-coated, reduce the oven temperature by 25°F to prevent over-browning.

Variations & Serving Ideas

For a delightful twist, consider adding blueberries or raspberries to the batter for a fruity burst of flavor. You can also experiment with different citrus fruits—try lime or grapefruit zest and juice for a refreshing change. For a healthier option, substitute half of the all-purpose flour with whole wheat flour for added fiber without compromising too much on texture.

This Lemon Poppy Seed Loaf pairs beautifully with a light salad, such as a mixed greens salad with a vinaigrette, or a cup of tea for a cozy afternoon treat. It also complements a creamy cheese platter, as the acidity of the loaf balances rich cheeses perfectly. Lastly, a scoop of vanilla ice cream on the side creates a delightful contrast of temperatures and flavors!

Storage, Make-Ahead & Reheating

This Lemon Poppy Seed Loaf can be stored at room temperature for up to 3 days if wrapped tightly in plastic wrap. If you want to keep it longer, it freezes well for up to 3 months. To freeze, wrap the loaf tightly in plastic wrap and then in aluminum foil to prevent freezer burn.

When you’re ready to enjoy it again, simply thaw it in the fridge overnight. Reheat individual slices in the microwave for 15-20 seconds or in a toaster oven until warmed through. Interestingly, many people find that this loaf tastes even better the next day, as the flavors have time to meld!

Frequently Asked Questions

Can I make Lemon Poppy Seed Loaf With Citrus Icing ahead of time?

Yes — in fact, it tastes even better the next day! You can make the loaf a day in advance, allowing the flavors to develop. Just be sure to store it in an airtight container to maintain its moisture.

Can I substitute the poppy seeds?

Absolutely! If you don’t have poppy seeds on hand or prefer an alternative, you can use sesame seeds for a similar crunch or omit them entirely for a smooth loaf.

What can I use instead of buttermilk?

If you don’t have buttermilk, you can easily create a substitute by mixing ½ cup of milk (dairy or plant-based) with 1 tablespoon of vinegar or lemon juice. Let it sit for 5 minutes before using in the recipe.

How can I make this recipe gluten-free?

To make a gluten-free version of this Lemon Poppy Seed Loaf, substitute the all-purpose flour with a gluten-free all-purpose flour blend. Just ensure that the blend contains a binding agent like xanthan gum for the best results.

What is the best way to store leftover loaf?

Leftover Lemon Poppy Seed Loaf should be stored in an airtight container at room temperature for up to 3 days. For longer storage, wrap it tightly and freeze for up to 3 months. Thaw it before serving for the best texture.

Zesty Lemon Poppy Seed Delight

Final Thoughts

The Lemon Poppy Seed Loaf with Citrus Icing is truly a delightful treat that brings a burst of brightness to any occasion. The zesty lemon flavor combined with the subtle crunch of poppy seeds creates a satisfying balance, while the citrus icing adds a touch of sweetness that perfectly complements the loaf’s tanginess.

This is the kind of recipe I come back to again and again, especially when I want to brighten up a gloomy day or celebrate a small victory. The aroma that fills the kitchen as it bakes is absolutely heavenly! I encourage you to give this recipe a try; you might just find it becoming a beloved staple in your home. Don’t forget to share your results or even add your own unique twist—I can’t wait to see what you create!

Print
clock clock iconcutlery cutlery iconflag flag iconfolder folder iconinstagram instagram iconpinterest pinterest iconfacebook facebook iconprint print iconsquares squares iconheart heart iconheart solid heart solid icon

Lemon Poppy Seed Loaf


  • Author: Lily author
  • Total Time: 23 minute
  • Yield: 1 loaf 1x
Pin Recipe
Print Recipe

Description

This Lemon Poppy Seed Loaf is a delightful treat that combines zesty lemon flavor with crunchy poppy seeds. Topped with a citrus icing, it’s perfect for any occasion.


Ingredients

Scale
  • 1 ½ cups (190g) all-purpose flour
  • 1 teaspoon baking powder
  • ½ teaspoon baking soda
  • ½ teaspoon salt
  • 3 tablespoons poppy seeds
  • ½ cup (115g) unsalted butter, softened to room temperature
  • 1 cup (200g) granulated sugar
  • 2 large eggs
  • 1 teaspoon vanilla extract
  • 1 teaspoon lemon zest (from about 1 medium lemon)
  • ½ cup (120ml) buttermilk
  • 2 tablespoons fresh lemon juice
  • 1 cup (120g) powdered sugar
  • 2 tablespoons fresh lemon juice
  • 1 tablespoon orange juice
  • 1 teaspoon lemon zest (for garnish, optional)

Instructions

  1. Preheat your oven to 350°F (175°C). Grease a 9×5-inch loaf pan or line it with parchment paper for easy removal later.
  2. In a medium mixing bowl, whisk together 1 ½ cups of all-purpose flour, 1 teaspoon of baking powder, ½ teaspoon of baking soda, ½ teaspoon of salt, and 3 tablespoons of poppy seeds. This helps to evenly distribute the baking agents and ensures a uniform rise.
  3. In a large mixing bowl, cream together ½ cup of softened unsalted butter and 1 cup of granulated sugar using an electric mixer on medium speed for about 3-4 minutes, until the mixture is light and fluffy. Make sure to scrape down the sides of the bowl occasionally.
  4. Add 2 large eggs, 1 teaspoon of vanilla extract, and 1 teaspoon of lemon zest to the creamed butter and sugar, mixing until fully combined. You want a smooth consistency, so ensure there are no lumps of butter.
  5. In a small bowl, combine ½ cup of buttermilk and 2 tablespoons of fresh lemon juice. Alternately add the dry ingredients and buttermilk mixture to the butter mixture, starting and ending with the dry ingredients. Mix just until combined; do not overmix, as this can lead to a dense loaf.
  6. Pour the batter into the prepared loaf pan. Smooth the top with a spatula, ensuring it’s even. Bake in the preheated oven for 50-60 minutes, or until a toothpick inserted in the center comes out clean. The edges should be lightly golden brown, and the center should feel just set.
  7. Once baked, remove the loaf from the oven and allow it to cool in the pan for about 10 minutes. Then, transfer it to a wire rack to cool completely. Resist the urge to slice too soon, as it will be crumbly if it’s still warm.
  8. While the loaf is cooling, prepare the citrus icing. In a medium bowl, whisk together 1 cup of powdered sugar, 2 tablespoons of fresh lemon juice, and 1 tablespoon of orange juice until smooth. If the icing is too thick, you can add a little more juice to reach your desired consistency.
  9. Once the loaf is completely cool, drizzle the citrus icing over the top. If you like, sprinkle with an additional teaspoon of lemon zest for an extra pop of flavor and color.
  • Prep Time: 15 mins
  • Cook Time: 50-60 mins
  • Category: Dessert
  • Method: Baking
  • Cuisine: American

Nutrition

  • Serving Size: 1 slice
  • Calories: 200
  • Sugar: 15 g
  • Sodium: 150 mg
  • Fat: 8 g
  • Saturated Fat: 5 g
  • Unsaturated Fat: 3 g
  • Trans Fat: 0 g
  • Carbohydrates: 30 g
  • Fiber: 1 g
  • Protein: 3 g
  • Cholesterol: 40 mg

Keywords: Be careful not to overmix your batter; this is a common mistake that can lead to a dense loaf. Use room temperature ingredients for a smoother batter and even baking.

Did you make this recipe?

Share a photo and tag us — we can't wait to see what you've made!

  • Privacy Policy
  • Terms Of Service
  • Contact
  • About
  • GDPR

Copyright © 2025 Homesmad