Homemade bubble gum, a nostalgic treat from childhood, is surprisingly easy and fun to create in your own kitchen! Forget the store-bought packs filled with artificial flavors and questionable ingredients. Imagine the satisfaction of blowing a giant, perfectly pink bubble made entirely from scratch. Are you ready to unlock the secrets to crafting this chewy confection?
While the history of chewing gum dates back centuries, the invention of bubble gum as we know it is credited to Walter Diemer in 1928. He stumbled upon a formula that was less sticky and more elastic than regular chewing gum, allowing for the creation of those satisfying bubbles. Since then, bubble gum has become a global phenomenon, a symbol of youthful exuberance and carefree fun.
People love bubble gum for its unique combination of sweet flavor and chewy texture. It’s a sensory experience that engages both taste and touch. Plus, let’s be honest, there’s something undeniably satisfying about blowing a big bubble and then popping it! This homemade bubble gum recipe allows you to customize the flavor and sweetness to your liking, creating a truly personalized treat. Get ready to impress your friends and family with your newfound confectionery skills!

Ingredients:
- 1/2 cup Gum Base (food grade, available online or at specialty candy stores)
- 1/4 cup Powdered Sugar (confectioners’ sugar)
- 2 tablespoons Corn Syrup (light or dark)
- 1 tablespoon Glycerin (vegetable glycerin, food grade)
- 1/2 teaspoon Citric Acid (optional, for a tangy flavor)
- 1/2 teaspoon Flavoring Oil (bubble gum, strawberry, mint, etc. – use food-grade flavoring oils)
- Food Coloring (gel or liquid, optional)
- 1-2 tablespoons Water (for adjusting consistency)
- Non-stick cooking spray or vegetable oil (for greasing)
Preparing the Gum Base:
The gum base is the foundation of our bubble gum, so we need to get it ready first. This involves softening it so it’s pliable enough to work with.
- Soften the Gum Base: The gum base usually comes in hard chunks or pellets. We need to soften it to a workable consistency. There are a couple of ways to do this. My preferred method is using a double boiler. If you don’t have one, you can create one by placing a heat-safe bowl over a saucepan of simmering water, ensuring the bottom of the bowl doesn’t touch the water. Add the gum base to the top bowl of the double boiler.
- Melt Slowly: Gently heat the gum base, stirring occasionally with a heat-resistant spatula. Be patient! This process can take some time, usually around 15-20 minutes, depending on the type of gum base you’re using. You want the gum base to become soft and pliable, almost like a thick, sticky dough. Avoid overheating, as this can damage the gum base and make it brittle. If you’re using a microwave (which I don’t recommend as it’s easy to overheat), microwave in very short bursts (5-10 seconds) and stir well between each burst.
- Check for Consistency: The gum base is ready when it’s soft enough to knead easily. It should be smooth and not grainy. If it’s still hard, continue heating it gently until it reaches the desired consistency.
Mixing the Ingredients:
Now comes the fun part – combining all the ingredients to create that classic bubble gum flavor and texture!
- Grease Your Work Surface: Before we start mixing, lightly grease a clean, smooth work surface (like a silicone mat or a clean countertop) with non-stick cooking spray or a small amount of vegetable oil. This will prevent the gum from sticking and make it easier to knead.
- Add Powdered Sugar: Once the gum base is softened, transfer it to your greased work surface. Gradually add the powdered sugar, kneading it into the gum base as you go. Add the sugar in small increments to prevent it from becoming too dry or crumbly.
- Incorporate Corn Syrup and Glycerin: Next, add the corn syrup and glycerin. These ingredients help to keep the gum soft and pliable. Knead them into the gum base until they are fully incorporated. The mixture will become sticky at this point, but don’t worry, that’s normal!
- Add Citric Acid (Optional): If you want a tangy flavor, add the citric acid now. Knead it in evenly. Be careful not to add too much, as it can make the gum too sour.
- Flavoring and Coloring: Now for the most important part – the flavor! Add the flavoring oil of your choice. Start with 1/2 teaspoon and add more to taste. Remember that flavoring oils are concentrated, so a little goes a long way. If you’re using food coloring, add a few drops at a time until you achieve the desired color. Knead the flavoring and coloring into the gum base until they are evenly distributed.
- Adjust Consistency: If the gum is too dry or crumbly, add a small amount of water (1 teaspoon at a time) and knead it in until it reaches the desired consistency. If it’s too sticky, add a little more powdered sugar. The goal is to have a smooth, pliable dough that’s easy to work with.
Kneading and Shaping:
Kneading is essential for developing the right texture. Think of it like kneading bread – we’re working the ingredients together to create a smooth, elastic gum.
- Knead Thoroughly: Knead the gum for several minutes, until it’s smooth and elastic. This will help to develop the texture and prevent it from becoming grainy. Use your hands to stretch and fold the gum, working it from all angles.
- Check for Texture: As you knead, check the texture of the gum. It should be smooth and pliable, not sticky or crumbly. If it’s still sticky, add a little more powdered sugar. If it’s too dry, add a tiny bit of water.
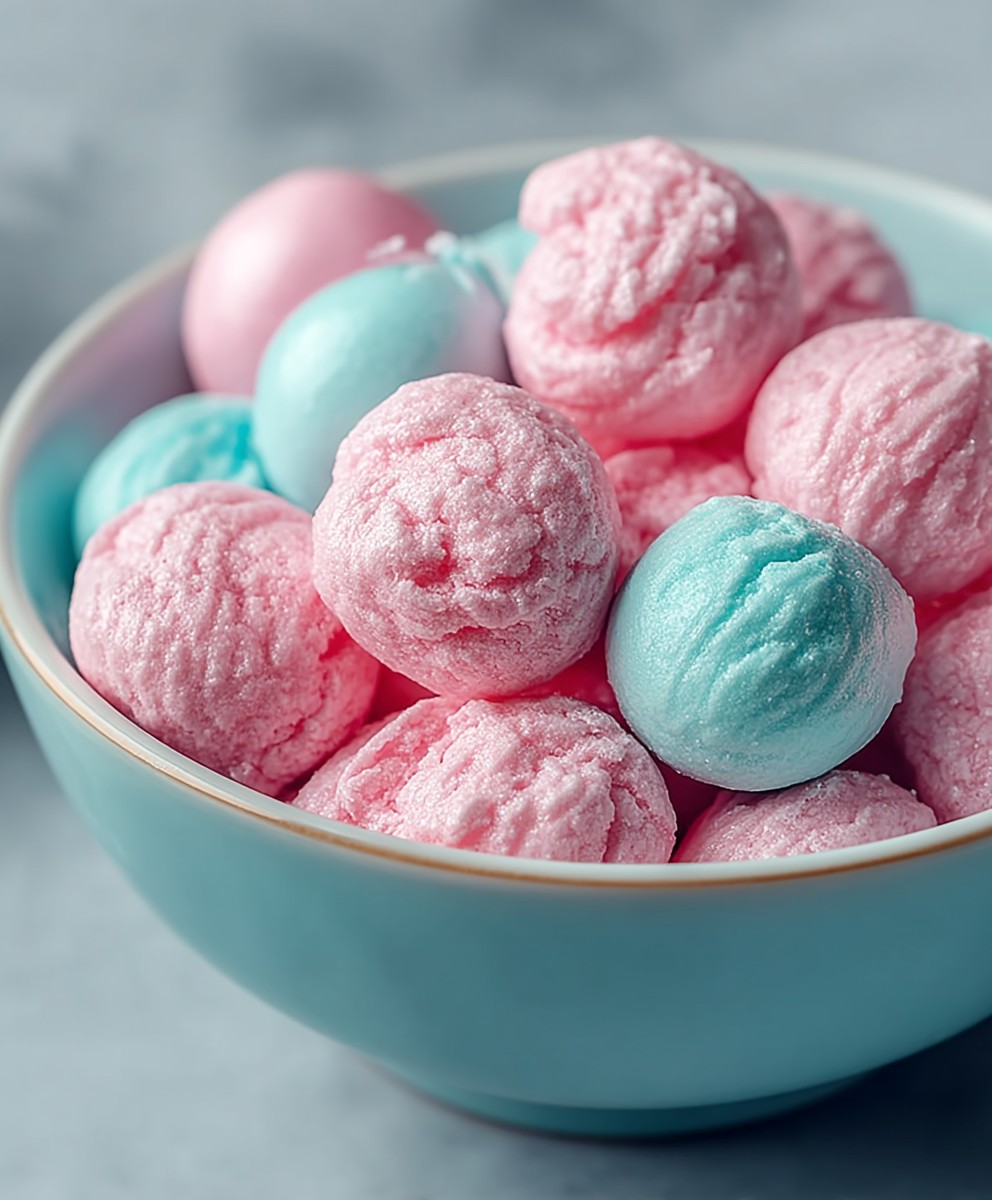
- Shaping the Gum: Once the gum is kneaded to the right consistency, you can shape it into your desired form. You can roll it out and cut it into squares, strips, or any other shape you like. You can also roll it into balls or twist it into ropes.
- Dust with Powdered Sugar: To prevent the gum from sticking together, dust the shaped pieces with powdered sugar. This will also give them a nice, smooth finish.
Storing Your Homemade Bubble Gum:
Proper storage is key to keeping your homemade bubble gum fresh and chewy.
- Wrap Individually: For best results, wrap each piece of bubble gum individually in wax paper or plastic wrap. This will prevent them from sticking together and keep them from drying out.
- Store in an Airtight Container: Place the wrapped pieces of bubble gum in an airtight container. This will help to keep them fresh and prevent them from absorbing odors from the refrigerator.
- Refrigerate (Optional): You can store the bubble gum at room temperature, but refrigerating it will help to extend its shelf life. If you refrigerate it, let it come to room temperature before chewing for the best texture.
- Shelf Life: Homemade bubble gum will typically last for several weeks if stored properly. However, it’s best to consume it within a week or two for the best flavor and texture.
Troubleshooting:
Sometimes things don’t go exactly as planned. Here are some common issues and how to fix them:
- Gum is too hard: This usually means the gum base wasn’t softened enough, or you added too much powdered sugar. Try gently warming the gum in the microwave for a few seconds (be careful not to overheat!) and kneading in a tiny bit of corn syrup or glycerin.
- Gum is too sticky: You probably added too much corn syrup or glycerin. Knead in a little more powdered sugar until it reaches the desired consistency.
- Gum is grainy: This can happen if the powdered sugar wasn’t fully incorporated. Knead the gum for a longer period of time to smooth it out.
- Gum has no flavor: Add more flavoring oil, a few drops at a time, until you achieve the desired flavor.
- Gum is too sour: You added too much citric acid. Unfortunately, there’s not much you can do to fix this except to make a new batch with less citric acid.
Tips and Variations:
Now that you’ve mastered the basic recipe, let’s explore some ways to customize your homemade bubble gum!
- Experiment with Flavors: Don’t be afraid to try different flavoring oils! Strawberry, watermelon, grape, mint, and cinnamon are all popular choices. You can even mix and match flavors to create your own unique combinations.
- Add Texture: For a fun twist, try adding small pieces of dried fruit, chopped nuts, or sprinkles to the gum. Just be sure to add them after the gum has been kneaded and shaped.
- Make Sugar-Free Gum: You can substitute the powdered sugar with a sugar-free powdered sweetener like erythritol or xylitol. However, be aware that sugar-free sweeteners can sometimes affect the texture of the gum.
- Create Layered Gum: Divide the gum into several portions and color each portion a different color. Then, layer the colored portions together and roll them out to create a striped or marbled effect.
- Make Bubble Gum Pops: Shape the gum into small balls and insert a lollipop stick into each ball. Then, dip the pops in melted chocolate or candy melts for a fun and festive treat.
Important Notes:
Gum Base Quality:
Conclusion:
So there you have it! This homemade bubble gum recipe isn’t just a fun project; it’s a delicious trip down memory lane with a personalized twist. Forget the store-bought stuff loaded with artificial flavors and questionable ingredients. With this recipe, you control everything that goes in, resulting in a chewy, flavorful gum that’s surprisingly satisfying. I truly believe this is a must-try for anyone who loves bubble gum, enjoys DIY projects, or simply wants to create a unique and memorable treat.
But why is this homemade bubble gum so special? It’s the freshness, the customization, and the sheer joy of creating something from scratch. The natural flavors really shine through, and the texture is just perfect – not too hard, not too soft, just right for blowing those impressive bubbles. Plus, it’s a fantastic activity to do with kids, teaching them about ingredients and the magic of transforming simple components into something delightful.
Now, let’s talk serving suggestions and variations! While the basic recipe is fantastic on its own, the possibilities are truly endless. For a refreshing twist, try adding a few drops of peppermint or spearmint extract. If you’re a fruit lover, consider incorporating freeze-dried fruit powders like strawberry, raspberry, or mango. These powders not only add intense flavor but also beautiful natural color. Another fun idea is to infuse the gum base with herbal teas like hibiscus or chamomile for a unique and sophisticated flavor profile.
Don’t be afraid to experiment with different sweeteners too! While the recipe calls for a specific type of sweetener, you can adjust the amount to your liking or try using alternatives like honey or maple syrup (though these may slightly alter the texture). You can also add a touch of citric acid for a tangy kick or a pinch of salt to enhance the sweetness.
For serving, I like to wrap individual pieces of gum in small squares of parchment paper or cellophane. This not only keeps them fresh but also makes them perfect for sharing with friends and family. You can even create personalized wrappers with fun designs or messages. Imagine the delight of receiving a piece of homemade bubble gum with a custom-made wrapper!
And speaking of sharing, I would absolutely love to hear about your experience making this recipe. Did you try any variations? What flavors did you use? Were you able to blow impressive bubbles? Please, please, please share your photos, tips, and stories in the comments below. Your feedback is invaluable and helps me improve the recipe and inspire others to give it a try.
I’m confident that once you try this homemade bubble gum recipe, you’ll never go back to the store-bought kind. It’s a fun, rewarding, and delicious experience that you won’t soon forget. So gather your ingredients, put on your apron, and get ready to create some bubble-blowing magic! I can’t wait to hear all about your gum-making adventures. Happy chewing!
Homemade Bubble Gum: The Ultimate Guide to Making Your Own
Make homemade bubble gum with simple ingredients! Customize with your favorite flavors and colors for a chewy, classic treat.
Ingredients
Instructions
Recipe Notes
- Gum base quality is important. Use a reputable source for food-grade gum base.
- Be patient when softening the gum base. Avoid overheating.
- Add powdered sugar gradually to prevent the gum from becoming too dry.
- Flavoring oils are concentrated, so start with a small amount and add more to taste.
- Kneading is essential for developing the right texture.
- Proper storage is key to keeping your homemade bubble gum fresh and chewy.
- Homemade bubble gum will typically last for several weeks if stored properly. However, it’s best to consume it within a week or two for the best flavor and texture.