Thank you so much for popping by! I am beyond excited to finally share this recipe because Homemade Cheez-Its are one of those nostalgic, crave-worthy snacks that hit that perfect salty, cheesy, crispy spot every single time. And once you make them from scratch? Game. Changer. The store-bought ones are great—but these are better. Way better.
They’re crunchy, real-cheese-filled little squares of joy, and making them yourself is way easier than you’d think. Whether you’re baking for the kids, prepping snacks for movie night, or just want to know exactly what’s going into your favorite crackers, this is a recipe you’ll come back to again and again.
If homemade snacks are your thing (or you want them to be), don’t forget to subscribe below for more from-scratch snack wins and cheesy goodness straight to your inbox!
What Are Homemade Cheez-Its?
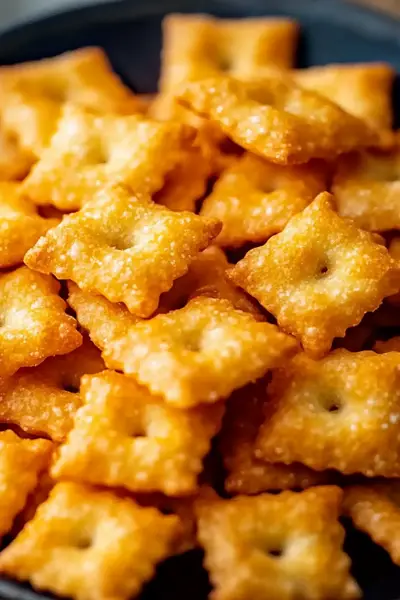
They’re bite-sized cheese crackers inspired by the iconic Cheez-Its we all know and love. The homemade version is buttery, flaky, and packed with sharp cheddar flavor—no preservatives, no artificial anything. Just real ingredients and big cheese energy in every crunchy square.
Think: savory pie crust meets cheesy cracker with a slightly puffed, perfectly crisp texture.
Why You’ll Love This Recipe
- Just 5 simple ingredients
- REAL cheese flavor that’s sharp and savory
- Fun to make (cutting tiny squares is weirdly satisfying!)
- No weird additives—just honest ingredients
- Crispy, cheesy, snack perfection for kids and adults alike
What Do They Taste Like?
Cheesy. Buttery. Slightly salty. Crispy without being dry. They’re everything you want in a savory snack—richer and flakier than the boxed kind, with a cheddar-forward flavor that makes it hard to stop at just a handful (trust me, I’ve tried).
Health & Ingredient Benefits
- Made with real cheese (hello, protein + calcium)
- No preservatives or processed powders
- Easily made gluten-free with a 1:1 GF flour blend
- Control the salt, spice, and fat content to suit your needs
Ingredients
- 8 oz sharp cheddar cheese, shredded
- 4 tbsp unsalted butter, cold and cubed
- ½ tsp salt (plus more for sprinkling)
- 1 cup all-purpose flour
- 2–3 tbsp ice water
Optional Add-Ins:
- ¼ tsp garlic powder or paprika for a flavor boost
- A pinch of cayenne for heat
- A dash of turmeric for that signature orange color
Tools You’ll Need
- Food processor (or a pastry cutter + elbow grease!)
- Rolling pin
- Sharp knife or pastry cutter
- Baking sheet + parchment paper
- Fork or skewer (to poke the center hole)
Ingredient Swaps & Add-Ins
- No cheddar? Try Gouda, pepper jack, or a mix of cheeses
- Make it spicy: Add cayenne, chili powder, or crushed red pepper
- Add herbs: Mix in dried rosemary or thyme for a gourmet twist
- Go gluten-free: Use a 1:1 gluten-free baking blend
How to Make Homemade Cheez-Its
Step 1: Make the Dough
In a food processor, pulse together cheese, flour, salt, and butter until crumbly. Add ice water, 1 tablespoon at a time, until the dough just comes together into a ball.
Step 2: Chill
Flatten into a disc, wrap in plastic wrap, and chill in the fridge for at least 30 minutes. (This step helps with that flaky texture.)
Step 3: Roll & Cut
Preheat oven to 375°F. Roll dough out on a floured surface to about ⅛-inch thickness. Cut into 1-inch squares using a pastry wheel or knife. Poke a small hole in the center of each with a skewer or fork.
Step 4: Bake
Place crackers on a parchment-lined baking sheet, leaving a little space between each. Sprinkle lightly with salt and bake for 12–15 minutes or until puffed and golden.
Step 5: Cool & Snack
Let them cool completely to crisp up fully. Then dig in, snack happy, and try not to eat the whole tray (no judgment if you do).
What to Serve With Cheez-Its
- A bowl of tomato soup (like a grilled cheese’s crunchy cousin)
- As a topping for casseroles or salads
- With sliced apples or grapes for a grown-up snack plate
- On a charcuterie board next to nuts and dried fruit
- Just straight out of the jar… let’s be honest
Tips for Perfect Homemade Cheez-Its
- Use very cold butter for the flakiest texture
- Don’t overwork the dough—it should just come together
- Shred your own cheese for the best melt and flavor
- Bake until golden brown—that crisp is everything
- Let them cool completely before storing for max crunch
Storage & Make-Ahead Tips
- Store in an airtight container at room temp for up to 1 week
- Freeze dough discs for up to 2 months—just thaw and roll when ready
- Re-crisp in a low oven (300°F) for 5 minutes if they soften over time
FAQs
Can I make these without a food processor?
Yes! Use a pastry cutter or fork to work the butter and cheese into the flour, then add water by hand until it forms a dough.
Can I double the recipe?
Absolutely. They disappear fast, so making a double batch is a pro move.
Are they super crunchy?
They’re lightly crispy with a buttery flake—think of them as the Cheez-It’s more gourmet cousin.
Final Thoughts
These Homemade Cheez-Its are simple to make and even easier to love. They’re flaky, cheesy, golden, and wildly snackable—basically everything a homemade cracker should be. Whether you’re sharing with the family or hoarding the batch for yourself (no shame), this recipe brings that classic crunch home with real ingredients and big cheesy flavor.
If you give them a try, I’d love to see your version! Leave a review, drop a comment, or tag your batch over on Pinterest so we can all get snack-happy together ????✨
More Fun & Flavorful Bakes to Try Next
- Homemade Vanilla French Beignets – Light, fluffy, and perfect with a dusting of sugar
- Sun-Dried Tomato Bacon Pesto Grilled Cheese – Crispy, melty, and seriously flavor-packed
- Easter Cake Mix Cookie Bars – Easy, festive, and totally customizable for any time of year
Nutritional Info (Per Approx. 10 Crackers)
- Calories: 170
- Fat: 12g
- Saturated Fat: 7g
- Carbs: 10g
- Sugar: 0g
- Fiber: 0g
- Protein: 5g
- Sodium: 190mg
- Cholesterol: 30mg

Homemade Cheez-Its
- Total Time: 30 minutes
- Yield: About 80–90 bite-size crackers 1x
Description
These Homemade Cheez Its are crispy, cheesy, and seriously snack-worthy! Made with just a few real ingredients like sharp cheddar, butter, and flour, they’re the perfect bite-size crackers for snack time, lunchboxes, or movie nights. This easy DIY cracker recipe delivers that nostalgic crunch—only better, because they’re baked from scratch with love.
Ingredients
-
8 oz sharp cheddar cheese, shredded
-
4 tbsp unsalted butter, cold and cubed
-
1 cup all-purpose flour
-
½ tsp salt (plus more for sprinkling)
-
2–3 tbsp ice water
Optional Add-Ins:
-
¼ tsp garlic powder or paprika
-
Pinch of cayenne pepper
-
Dash of turmeric for classic color
Instructions
-
Make the Dough
In a food processor, pulse together cheese, flour, salt, and butter until the mixture resembles coarse crumbs. -
Add Water
Add ice water, 1 tablespoon at a time, and pulse until the dough just comes together. Don’t overmix. -
Chill the Dough
Shape into a disc, wrap in plastic wrap, and chill for at least 30 minutes. -
Roll & Cut
Preheat oven to 375°F. On a floured surface, roll out dough to about ⅛-inch thick. Cut into 1-inch squares and poke a small hole in the center with a skewer or fork. -
Bake
Place crackers on a parchment-lined baking sheet, leaving space between. Sprinkle lightly with salt. Bake for 12–15 minutes, or until golden and puffed.
-
Cool & Store
Let cool completely for max crunch. Store in an airtight container for up to 1 week.
Notes
-
Use cold butter for the flakiest texture—don’t skip chilling the dough!
-
Shred cheese fresh from the block for better melt and flavor.
-
Customize with spices or herbs like rosemary, garlic powder, or chili flakes.
-
Want that classic orange tint? Add a small pinch of turmeric to the dough.
-
If crackers soften over time, re-crisp in a 300°F oven for 5–6 minutes.
- Prep Time: 15 minutes
- Cook Time: 15 minutes
- Category: Snack
- Method: Baked
- Cuisine: American
Keywords: Homemade Cheez Its