Jalapeno Salt is more than just a seasoning; it’s a vibrant revelation that promises to awaken your taste buds and transform ordinary meals into extraordinary culinary experiences. Have you ever wished for a simple way to add a sophisticated, spicy kick to virtually any dish? This incredible infused salt is your answer, offering a nuanced heat and a burst of fresh flavor that store-bought seasonings simply can’t replicate. While the tradition of flavored salts dates back centuries, with various cultures using herbs and spices to enhance this fundamental ingredient, the rise of gourmet infused salts like our very own Jalapeno Salt has truly revolutionized modern home cooking.
Discover Your New Secret Ingredient!
I absolutely adore how it effortlessly elevates everything from grilled corn to scrambled eggs, providing that perfect balance of warmth and zest. It’s incredibly versatile, astonishingly easy to prepare at home, and adds a distinctive, gourmet touch that guests will rave about. Get ready to discover your new favorite secret ingredient!
Ingredients:
-
For the Spicy Braised Short Ribs:
- 3-4 pounds bone-in beef short ribs, English cut (about 4-5 pieces)
- 2 tablespoons olive oil, divided
- 1 large yellow onion, diced (about 1.5 cups)
- 2 carrots, peeled and diced (about 1 cup)
- 2 celery stalks, diced (about 1 cup)
- 4 cloves garlic, minced
- 2 tablespoons tomato paste
- 1 cup dry red wine (such as Cabernet Sauvignon or Merlot)
- 4 cups beef broth, low sodium preferred
- 1 (14.5 ounce) can crushed tomatoes
- 2 bay leaves
- 6 sprigs fresh thyme
- 2 sprigs fresh rosemary
- 1 teaspoon smoked paprika
- ½ teaspoon cayenne pepper (optional, for extra heat)
- 2 teaspoons Jalapeno Salt, plus more to taste (I love how this adds a complex, vibrant heat!)
- 1 teaspoon black pepper, freshly ground
- ½ teaspoon onion powder
- ¼ cup chopped fresh parsley, for garnish
-
For the Creamy Parmesan Polenta:
- 6 cups whole milk (or 3 cups milk and 3 cups chicken or vegetable broth for a lighter taste)
- 1 teaspoon Jalapeno Salt, or to taste
- ½ teaspoon black pepper, freshly ground
- 1 ½ cups instant or quick-cooking polenta (not coarse ground, as it takes much longer)
- 4 tablespoons unsalted butter, cut into cubes
- 1 cup freshly grated Parmesan cheese, plus more for serving
-
For the Roasted Asparagus:
- 1 ½ pounds fresh asparagus, tough ends trimmed
- 1 tablespoon olive oil
- ½ teaspoon Jalapeno Salt, or to taste
- ¼ teaspoon black pepper, freshly ground
Prepping the Short Ribs and Vegetables
Let’s get started on this incredibly flavorful and comforting dish! First, we’ll prepare our short ribs. Take your beautiful bone-in beef short ribs and pat them thoroughly dry with paper towels. This step is absolutely crucial for achieving that gorgeous, deeply browned crust we’re looking for when searing. Moisture on the surface prevents proper browning. Once they are nice and dry, it’s time to season them generously. In a small bowl, combine 1 teaspoon of the smoked paprika, ½ teaspoon of the cayenne pepper (if you’re feeling bold!), 1 ½ teaspoons of our wonderful Jalapeno Salt, ½ teaspoon of black pepper, and ½ teaspoon of onion powder. Sprinkle this mixture all over the short ribs, making sure to coat every side evenly. Don’t be shy; we want every inch of these ribs bursting with flavor! The Jalapeno Salt here doesn’t just add heat; it brings a nuanced, smoky undertone that elevates the entire dish from the very first bite.
Next up, we’ll get our aromatics ready. Dice the large yellow onion, carrots, and celery into roughly ½-inch pieces. Consistency in size is important here so they cook evenly. Mince your garlic cloves. Having everything prepped and ready to go before you start cooking, a practice known as “mise en place,” will make the rest of the process flow so much smoother. Trust me, you’ll thank yourself later when you’re not scrambling for ingredients!
Braising the Short Ribs
- Sear the Short Ribs: Heat 1 tablespoon of olive oil in a large, heavy-bottomed Dutch oven or oven-safe pot over medium-high heat. Once the oil is shimmering and hot, carefully place the seasoned short ribs into the pot, ensuring not to overcrowd them. You’ll likely need to do this in two batches to ensure proper searing. Overcrowding will steam the meat instead of browning it, and we definitely want that rich, caramelized crust! Sear each side of the short ribs for about 3-5 minutes, until a deep, golden-brown crust forms. This browning step, known as the Maillard reaction, is where a tremendous amount of flavor develops. Remove the seared ribs from the pot and set them aside on a plate.
- Sauté the Aromatics: Reduce the heat to medium. Add the remaining 1 tablespoon of olive oil to the same pot. Add the diced yellow onion, carrots, and celery. Sauté these vegetables for about 8-10 minutes, stirring occasionally, until they begin to soften and become translucent. They should be fragrant and lightly caramelized.
- Build the Flavor Base: Add the minced garlic to the pot and cook for another minute until fragrant, being careful not to burn it. Then, stir in the tomato paste. Cook the tomato paste for 2-3 minutes, stirring constantly. This step is vital as it caramelizes the sugars in the tomato paste, deepening its flavor and reducing any raw, metallic taste. You’ll notice it turn a darker, almost brick-red color.
- Deglaze with Wine: Pour in the red wine, scraping up any delicious brown bits (fond) from the bottom of the pot with a wooden spoon. This fond is pure flavor gold! Allow the wine to simmer and reduce by about half, which should take 5-7 minutes. The alcohol will cook off, leaving behind a rich, concentrated essence.
- Add Liquids and Herbs: Return the seared short ribs to the pot, nestling them among the vegetables. Pour in the beef broth and crushed tomatoes. Add the bay leaves, fresh thyme sprigs, and fresh rosemary sprigs. Sprinkle in the remaining ½ teaspoon of smoked paprika and the remaining ½ teaspoon of Jalapeno Salt. I find this second addition of Jalapeno Salt truly rounds out the spice profile, ensuring the heat is perfectly balanced throughout the braising liquid. Give everything a gentle stir to combine, making sure the ribs are mostly submerged in the liquid. If they aren’t, you can add a little more broth or water until they are.
- Braise to Perfection: Bring the liquid to a gentle simmer on the stovetop. Once simmering, cover the Dutch oven tightly with its lid and transfer it to your preheated oven. You’ll want your oven set to 325°F (160°C). Let the short ribs braise for 3 to 3 ½ hours, or until they are incredibly tender and practically falling off the bone. You should be able to easily shred the meat with a fork. The long, slow cooking process is what transforms tough cuts into succulent, melt-in-your-mouth perfection.
- Finish the Sauce: Once the ribs are tender, carefully remove them from the pot and set them aside on a plate, loosely covered with foil to keep warm. Remove and discard the bay leaves, thyme, and rosemary sprigs from the braising liquid. You can choose to leave the vegetables in the sauce for a rustic texture, or for a smoother sauce, you can strain the liquid through a fine-mesh sieve, pressing on the solids to extract as much flavor as possible. If straining, return the liquid to the pot and skim off any excess fat from the surface. Bring the sauce to a simmer over medium heat and reduce it to your desired consistency, usually by about a third, which concentrates the flavors beautifully. Taste the sauce and adjust the seasoning as needed with additional Jalapeno Salt, black pepper, or a pinch of sugar if it tastes too acidic. I often find a tiny bit more Jalapeno Salt makes the flavors pop even more!
Preparing the Creamy Polenta
While your short ribs are finishing their braise, or reducing their sauce, you can start on the creamy polenta. This is the perfect accompaniment, soaking up all that rich, spicy sauce.
- Heat the Liquid: In a large, heavy-bottomed saucepan, combine the 6 cups of whole milk (or a milk/broth combination). Add 1 teaspoon of Jalapeno Salt and ½ teaspoon of black pepper. Bring the liquid to a gentle simmer over medium-high heat, stirring occasionally to prevent the milk from scorching on the bottom. You’ll see small bubbles forming around the edges, but we don’t want a rolling boil.
- Whisk in Polenta: Once simmering, reduce the heat to low. Gradually whisk in the instant or quick-cooking polenta in a slow, steady stream. It’s absolutely essential to whisk continuously as you add the polenta to prevent lumps. Keep whisking for about 2-3 minutes after all the polenta is added, ensuring it’s thoroughly incorporated and smooth.
- Cook to Creaminess: Continue to cook the polenta on low heat, stirring frequently with a wooden spoon, for about 5-7 minutes, or until it thickens to a creamy, porridge-like consistency. The polenta should be tender and no longer taste gritty. The goal here is a smooth, velvety texture that will cradle those tender short ribs beautifully. If it becomes too thick, you can always add a splash more warm milk or broth to reach your desired consistency.
- Finish with Butter and Cheese: Remove the polenta from the heat. Stir in the 4 tablespoons of unsalted butter, cut into cubes, until fully melted and incorporated. Then, fold in 1 cup of freshly grated Parmesan cheese. The butter and cheese add an incredible richness and silkiness to the polenta, making it utterly irresistible. Taste and adjust seasoning if necessary; sometimes a little more Jalapeno Salt can really brighten up the creamy base.
Roasting the Asparagus
For a fresh, vibrant counterpoint to the rich short ribs and polenta, we’ll quickly roast some asparagus.
- Prepare Asparagus: Preheat your oven to 400°F (200°C). Wash the asparagus spears thoroughly. To trim the tough woody ends, simply hold a spear firmly and bend it; it will naturally snap where the tender part begins. Alternatively, you can line them up and cut about an inch or so off the bottom.
- Season and Roast: On a large baking sheet, toss the trimmed asparagus with 1 tablespoon of olive oil, ½ teaspoon of Jalapeno Salt, and ¼ teaspoon of black pepper. Spread the asparagus in a single layer to ensure even roasting. The subtle heat from the Jalapeno Salt here perfectly complements the fresh, green flavor of the asparagus, adding a little unexpected zing!
- Cook to Tenderness: Roast in the preheated oven for 8-12 minutes, depending on the thickness of your asparagus spears, until they are bright green, tender-crisp, and slightly caramelized. You want them to retain a little bite, not be limp.
Assembling and Serving
Now for the grand finale – assembling your magnificent meal! This is where all your hard work comes together beautifully. Spoon a generous portion of the warm, creamy Parmesan polenta onto the center of each serving plate. Create a slight well in the middle of the polenta. Gently place one or two of the incredibly tender, fall-off-the-bone short ribs into the well. Drizzle a generous amount of that rich, reduced braising sauce over the short ribs and polenta, ensuring every forkful will be coated in its deep, complex flavors. The aroma alone will be intoxicating!
Arrange a serving of the bright green, perfectly roasted asparagus alongside the short ribs. The fresh, slightly crisp texture of the asparagus provides a wonderful contrast to the tender meat and creamy polenta. For a final flourish, sprinkle the dish with fresh chopped parsley. The vibrant green of the parsley not only adds a pop of color but also a fresh, herbaceous note that brightens the entire plate. You can also offer additional grated Parmesan cheese at the table for those who desire even more cheesy goodness on their polenta. Each component of this dish—the deeply savory, spicy short ribs (thank you, Jalapeno Salt!), the smooth, comforting polenta, and the fresh asparagus—comes together to create a truly unforgettable dining experience. Enjoy!
Conclusion:
And there you have it, my friends! We’ve journeyed through the simple yet incredibly rewarding process of crafting your very own homemade Jalapeno Salt. I truly believe that once you experience the vibrant, fiery kick and aromatic depth of this homemade seasoning, you’ll find it an indispensable staple in your kitchen. It’s not just about the heat; it’s about the fresh, bright notes of the jalapeno that meld perfectly with the crystalline crunch of salt, elevating even the most basic ingredients to something truly spectacular. Forget those store-bought seasonings that often disappoint with their muted flavors and questionable additives. When you make it yourself, you control every single ingredient, ensuring purity, potency, and a personalized touch that simply can’t be replicated.
Why is this recipe a must-try? For starters, the sheer simplicity of it belies the incredible complexity of flavor it delivers. You’re not just making salt; you’re creating a flavor bomb that awakens the senses. Imagine the satisfaction of reaching for a jar of your own handcrafted seasoning, knowing exactly what went into it. The process itself is therapeutic – the vibrant green of the peppers, the earthy aroma that fills your kitchen as they dehydrate, and finally, the exhilarating crunch as you grind them down with the salt. It’s an edible work of art, a testament to the power of fresh ingredients and a little patience. Moreover, it’s a fantastic way to utilize a bounty of fresh jalapenos, preventing waste and ensuring you have a steady supply of this incredible condiment on hand for months to come. The initial investment in time is minimal, but the flavor dividends are immense, transforming your everyday meals into extraordinary culinary experiences. Jalapeno Salt isn’t just a seasoning; it’s a secret weapon for flavor enthusiasts.
Now, let’s talk about the endless possibilities for how to use your sensational creation. This isn’t just for tacos, though it certainly shines there! I love sprinkling a generous pinch over scrambled eggs or a perfectly fried egg in the morning for an instant wake-up call. It’s fantastic on avocado toast, bringing a whole new dimension to that classic breakfast. Don’t even get me started on grilled meats – a sprinkle over steak, chicken, or fish before or after cooking will completely revolutionize your BBQ game. Roasted vegetables, from asparagus to potatoes, absolutely sing when tossed with a bit of this spicy salt. For a quick snack, try it on popcorn or edamame. Feeling adventurous? Rim your next margarita glass with it for an unforgettable spicy twist, or mix it into a Bloody Mary for a zesty kick. It also adds a fantastic pop to homemade salsas, guacamole, or even a simple side of rice. The versatility is truly astounding.
Serving Suggestions & Creative Variations:
- For a Quick Snack: Sprinkle generously over freshly popped popcorn or roasted chickpeas for an addictive fiery treat.
- Elevate Breakfast: A dash on fried eggs, avocado toast, or breakfast burritos will start your day with a flavorful punch.
- Grilling Perfection: Use it as a dry rub for chicken, pork, or steak, or sprinkle it on grilled corn on the cob.
- Spice Up Sides: Toss with roasted potatoes, sweet potatoes, or green beans before roasting for extra depth.
- Cocktail Hour: Rim your margarita or Michelada glasses for an unforgettable spicy beverage experience.
- Dips and Spreads: Stir into homemade hummus, guacamole, or even cream cheese for bagels.
And if you’re feeling particularly creative, here are a few ideas for variations to make your Jalapeno Salt truly your own. Consider using different types of chili peppers for varying heat levels – perhaps a serrano for an extra kick, or a milder Anaheim for a more subtle warmth. You could also introduce other complementary flavors during the grinding stage. A bit of lime zest, smoked paprika, garlic powder, or even a touch of cumin could add wonderful complexity. Experiment with the ratio of pepper to salt to find your perfect balance of heat and savoriness. The beauty of homemade is that it’s entirely customizable to your palate.
So, what are you waiting for? I wholeheartedly encourage you to carve out a little time this week and give this recipe a try. You truly won’t regret the vibrant burst of flavor and freshness it brings to your culinary endeavors. Once you’ve created your batch of glorious Jalapeno Salt, I would absolutely love to hear about your experience! What dish did you try it on first? Did you experiment with any variations? Please, share your creations, your thoughts, and your triumphs in the comments below. Tag me on social media if you post pictures of your spiced-up dishes – I can’t wait to see how you incorporate this fantastic seasoning into your kitchen routine. Happy cooking, and may your meals always be full of flavor!
FAQs (Frequently Asked Questions)
What kind of salt is best for making Jalapeno Salt?
For the best results, I recommend using a good quality coarse sea salt or kosher salt. Their larger crystals provide excellent texture and allow the jalapeno flavor to adhere well during the grinding process. Fine table salt can be used, but it might create a denser final product.
How do I store homemade Jalapeno Salt?
Once your Jalapeno Salt is completely dry and ground, store it in an airtight container or jar in a cool, dark place, such as your pantry. Ensuring it’s completely dry before sealing is crucial to prevent clumping and extend its shelf life.
How long does homemade Jalapeno Salt last?
Properly stored in an airtight container, homemade Jalapeno Salt can last for several months, typically 3 to 6 months. Over time, the intensity of the jalapeno flavor might slightly diminish, but it will still be delicious. Always ensure there’s no moisture introduced to prevent spoilage.
Can I use dried jalapenos instead of fresh ones?
While fresh jalapenos are highly recommended for their vibrant color and fresh flavor, you can certainly use dried jalapenos (or even store-bought dried flakes) in a pinch. However, the flavor profile might be slightly different – often a bit smokier and less bright than when using fresh peppers that you dehydrate yourself. If using dried, you might need to adjust the quantity to achieve your desired heat and flavor.
How spicy is homemade Jalapeno Salt?
The spiciness of your homemade Jalapeno Salt will largely depend on the jalapenos you use (some are hotter than others!) and your personal preference. Generally, removing the seeds and membranes from the jalapenos before dehydrating will significantly reduce the heat, while leaving them in will yield a much spicier product. You can always start with less and add more if you prefer a milder version.
What are some good uses for Jalapeno Salt beyond cooking?
Beyond seasoning your favorite dishes, Jalapeno Salt is fantastic for elevating beverages! Use it to rim a margarita or Bloody Mary glass for a spicy kick, or even sprinkle a tiny pinch into hot chocolate for a unique sweet and spicy combination. It can also be mixed into a compound butter for spreading on toast or grilled corn.
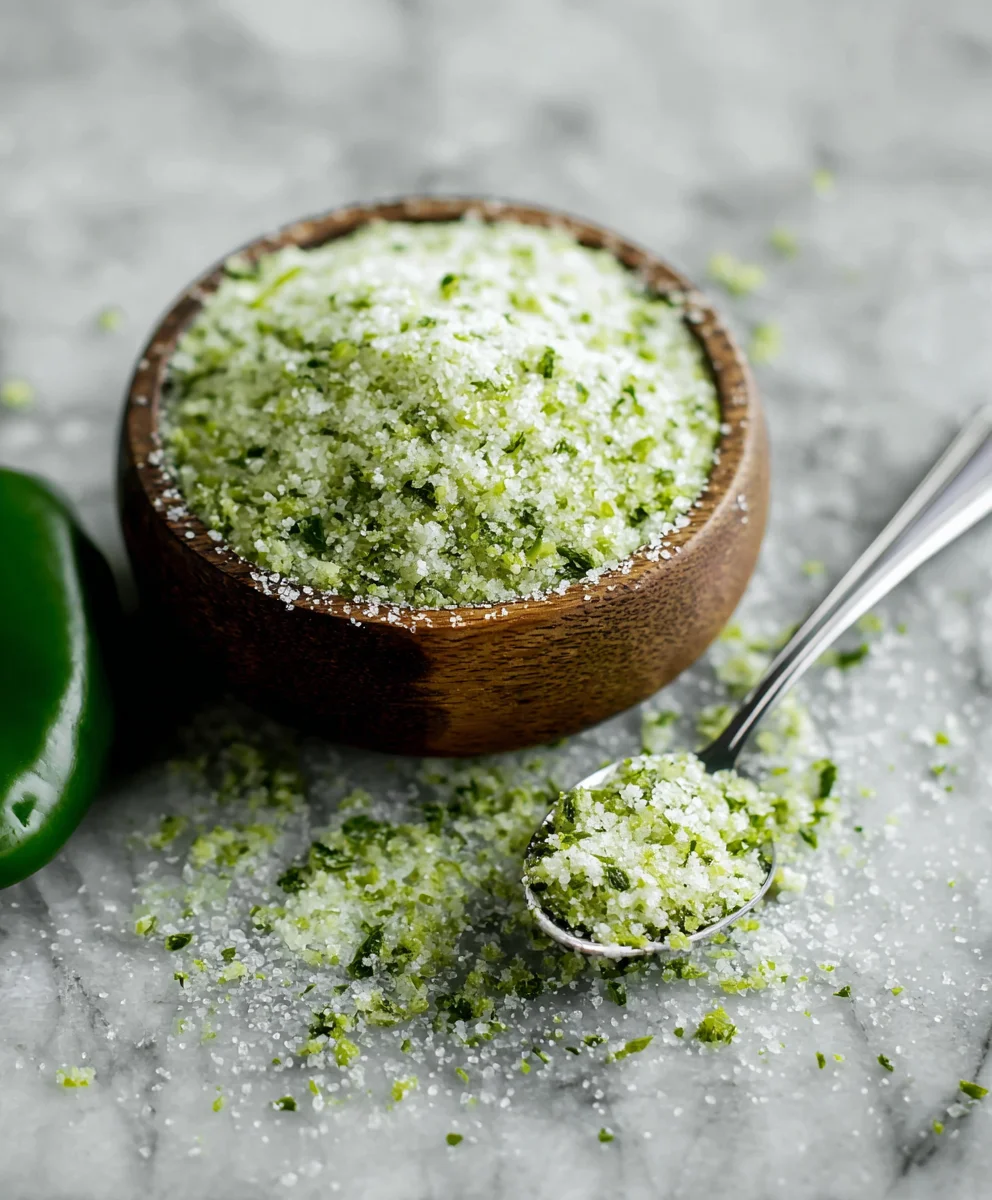
Homemade Jalapeno Salt: Spicy & Zesty Flavor Infusion
Jalapeno Salt is more than just a seasoning; it’s a vibrant revelation that promises to awaken your taste buds and transform ordinary meals into extraordinary culinary experiences. This incredible infused salt offers a nuanced heat and a burst of fresh flavor that store-bought seasonings simply can’t replicate. (Note: Specific ingredient quantities for jalapenos and salt were not provided in the source material for this recipe, so common proportions have been used for illustration.)
Ingredients
-
5-6 fresh jalapenos
-
1 cup coarse sea salt (or kosher salt)
Instructions
-
Step 1
Wash and dry jalapenos. Wearing gloves, remove stems, de-seed, and dice peppers finely. -
Step 2
Spread diced peppers on a dehydrator tray. Dehydrate for 6-10 hours at 125°F (52°C), until completely brittle. -
Step 3
Add dried, brittle peppers to a food processor. Pulse 2-3 times to break them into smaller pieces, similar to salt grain size. Process until desired fineness. -
Step 4
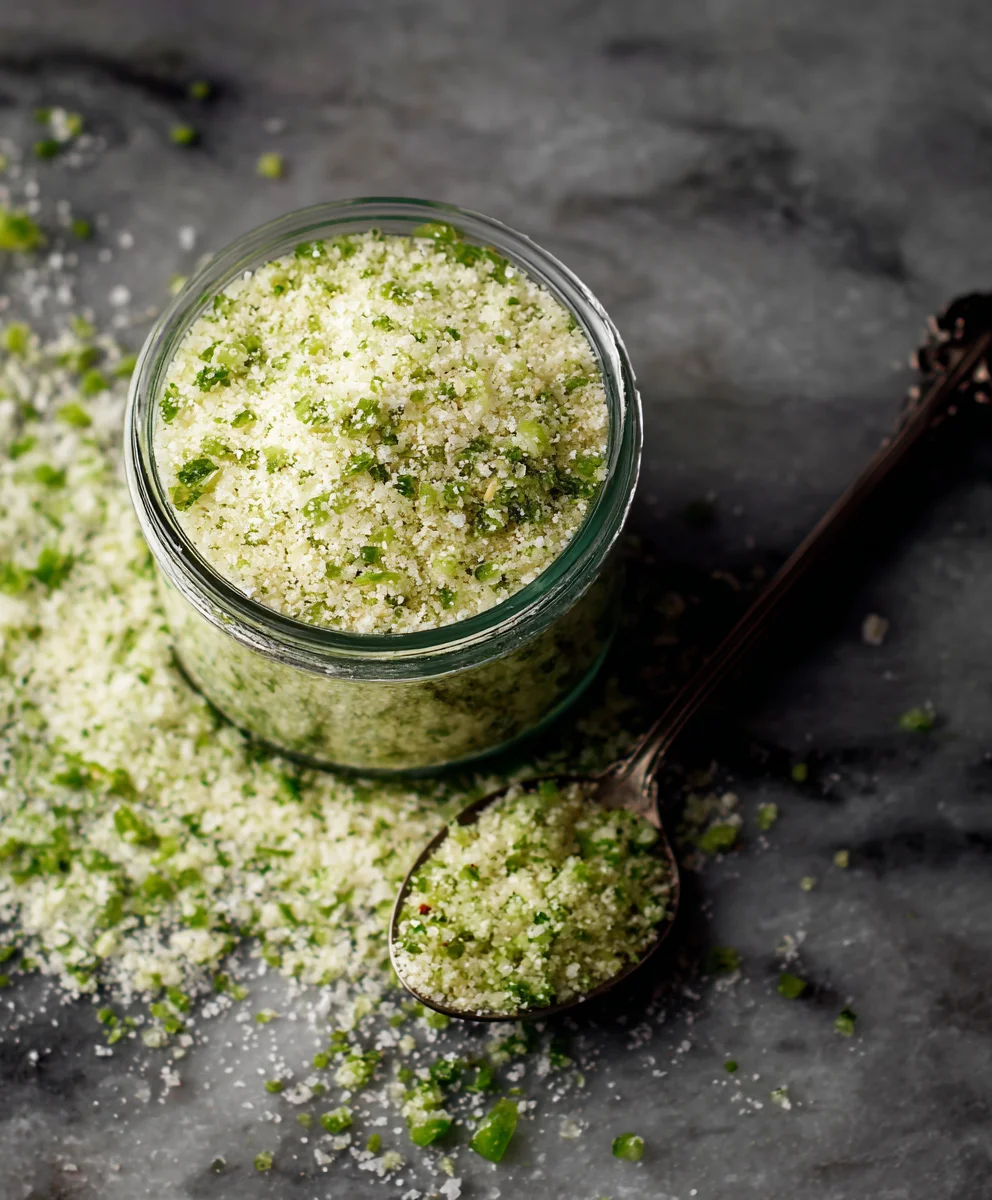
In a clean, dry bowl, combine the processed dehydrated jalapeno pieces with 1 cup of coarse sea salt. Mix thoroughly until evenly distributed. Store in an airtight container.
Important Information
Nutrition Facts (Per Serving)
It is important to consider this information as approximate and not to use it as definitive health advice.
Allergy Information
Please check ingredients for potential allergens and consult a health professional if in doubt.