Homemade Peppermint Patties, those cool and refreshing treats, are surprisingly easy to make at home! Forget the store-bought version – we’re about to embark on a delightful culinary adventure that will result in melt-in-your-mouth patties bursting with intense peppermint flavor. Have you ever wondered if you could recreate that iconic candy in your own kitchen? The answer is a resounding YES, and I’m here to guide you every step of the way.
While the exact origins of the peppermint patty are shrouded in a bit of mystery, similar mint-filled candies have been enjoyed for centuries. Mint, after all, has been prized for its refreshing and digestive properties since ancient times. What makes the modern peppermint patty so beloved? It’s the perfect balance of creamy, sweet filling and a crisp, dark chocolate coating. The cool peppermint sensation is incredibly invigorating, making it a popular choice after a meal or as a midday pick-me-up. Plus, they’re just plain fun to eat!
People adore these little candies for their simplicity and satisfying texture. The smooth, almost ethereal peppermint center gives way to a satisfying snap of chocolate, creating a symphony of sensations in your mouth. And let’s be honest, who can resist the allure of a perfectly crafted chocolate treat? This recipe for Homemade Peppermint Patties allows you to customize the sweetness and peppermint intensity to your liking, ensuring a truly personalized and unforgettable candy experience. Get ready to impress your friends and family with your newfound candy-making skills!

Ingredients:
- For the Filling:
- 3 cups powdered sugar, sifted
- 1/4 cup (2 ounces) cream cheese, softened
- 1/4 cup (2 ounces) unsalted butter, softened
- 2-4 tablespoons milk (start with 2 and add more as needed)
- 1 teaspoon peppermint extract (adjust to taste)
- Pinch of salt
- For the Chocolate Coating:
- 12 ounces semi-sweet chocolate chips (or dark chocolate, if preferred)
- 1 tablespoon shortening (vegetable or coconut oil)
Preparing the Peppermint Filling
Alright, let’s get started with the heart of our peppermint patties – the creamy, minty filling! This part is super easy, but a little patience goes a long way to achieving that perfect texture.
- Sift the Powdered Sugar: This is a crucial step! Sifting the powdered sugar ensures there are no lumps, giving you a smooth and velvety filling. Trust me, you don’t want any gritty surprises in your peppermint patties.
- Cream Together Butter and Cream Cheese: In a large bowl (or the bowl of your stand mixer), beat the softened cream cheese and butter together until they are light and fluffy. This usually takes about 2-3 minutes. Make sure your butter and cream cheese are truly softened; otherwise, you’ll end up with clumps.
- Gradually Add the Powdered Sugar: With the mixer on low speed, gradually add the sifted powdered sugar to the cream cheese and butter mixture. Add it in about 1/2 cup increments, mixing well after each addition. This prevents a powdered sugar cloud from erupting in your kitchen!
- Incorporate the Peppermint Extract and Salt: Add the peppermint extract and a pinch of salt to the mixture. Start with 1 teaspoon of peppermint extract and taste as you go. You can always add more if you want a stronger minty flavor. The salt helps to balance the sweetness and enhance the peppermint flavor.
- Adjust the Consistency with Milk: Now, for the consistency! The filling should be firm enough to hold its shape but still be soft and pliable. Start by adding 2 tablespoons of milk, one tablespoon at a time, and mix until incorporated. If the filling is still too dry, add another tablespoon of milk. Be careful not to add too much milk, or the filling will become too soft and difficult to work with. You’re aiming for a play-dough like consistency.
- Knead the Dough (Optional): If you find the mixture a little crumbly, you can lightly knead it with your hands on a clean surface for a minute or two. This will help bring it together and create a smoother texture.
Shaping the Peppermint Patties
Now comes the fun part – shaping our peppermint patties! There are a few different ways to do this, so choose the method that works best for you.
- Roll and Cut (Method 1): Lightly dust a clean surface with powdered sugar. Roll out the peppermint filling to about 1/4 inch thickness. Use a cookie cutter (round is traditional, but feel free to get creative!) to cut out the patties.
- Roll into Balls and Flatten (Method 2): Roll the peppermint filling into small balls (about 1 inch in diameter). Place the balls on a parchment-lined baking sheet and gently flatten them with your fingers or the bottom of a glass.
- Use a Cookie Scoop (Method 3): Use a small cookie scoop to portion out the filling. Drop the scoops onto a parchment-lined baking sheet and gently flatten them. This method is great for ensuring uniform patty sizes.
- Chill the Patties: Once the patties are shaped, place the baking sheet in the freezer for at least 30 minutes. This will help them firm up and make them easier to dip in the chocolate. Don’t skip this step!
Preparing the Chocolate Coating
The chocolate coating is what transforms our peppermint filling into irresistible peppermint patties. Here’s how to get that perfect, glossy finish.
- Melt the Chocolate and Shortening: In a heat-safe bowl set over a simmering pot of water (double boiler), combine the chocolate chips and shortening. Make sure the bottom of the bowl doesn’t touch the water. Stir frequently until the chocolate is completely melted and smooth. The shortening helps to thin the chocolate and gives it a nice shine. You can also melt the chocolate in the microwave in 30-second intervals, stirring in between, until melted and smooth. Be careful not to overheat the chocolate, or it will seize up.
- Maintain the Chocolate’s Temperature: Keep the melted chocolate warm while you’re dipping the patties. If it starts to cool and thicken, you can gently reheat it over the double boiler or in the microwave.
Dipping and Finishing the Peppermint Patties
Almost there! This is the final step, and it’s where the magic happens.
- Dip the Patties: Remove the chilled peppermint patties from the freezer. Using a fork or dipping tools, carefully dip each patty into the melted chocolate, making sure it’s completely coated.
- Remove Excess Chocolate: Gently tap the fork against the side of the bowl to remove any excess chocolate.
- Place on Parchment Paper: Place the dipped patties on a parchment-lined baking sheet.
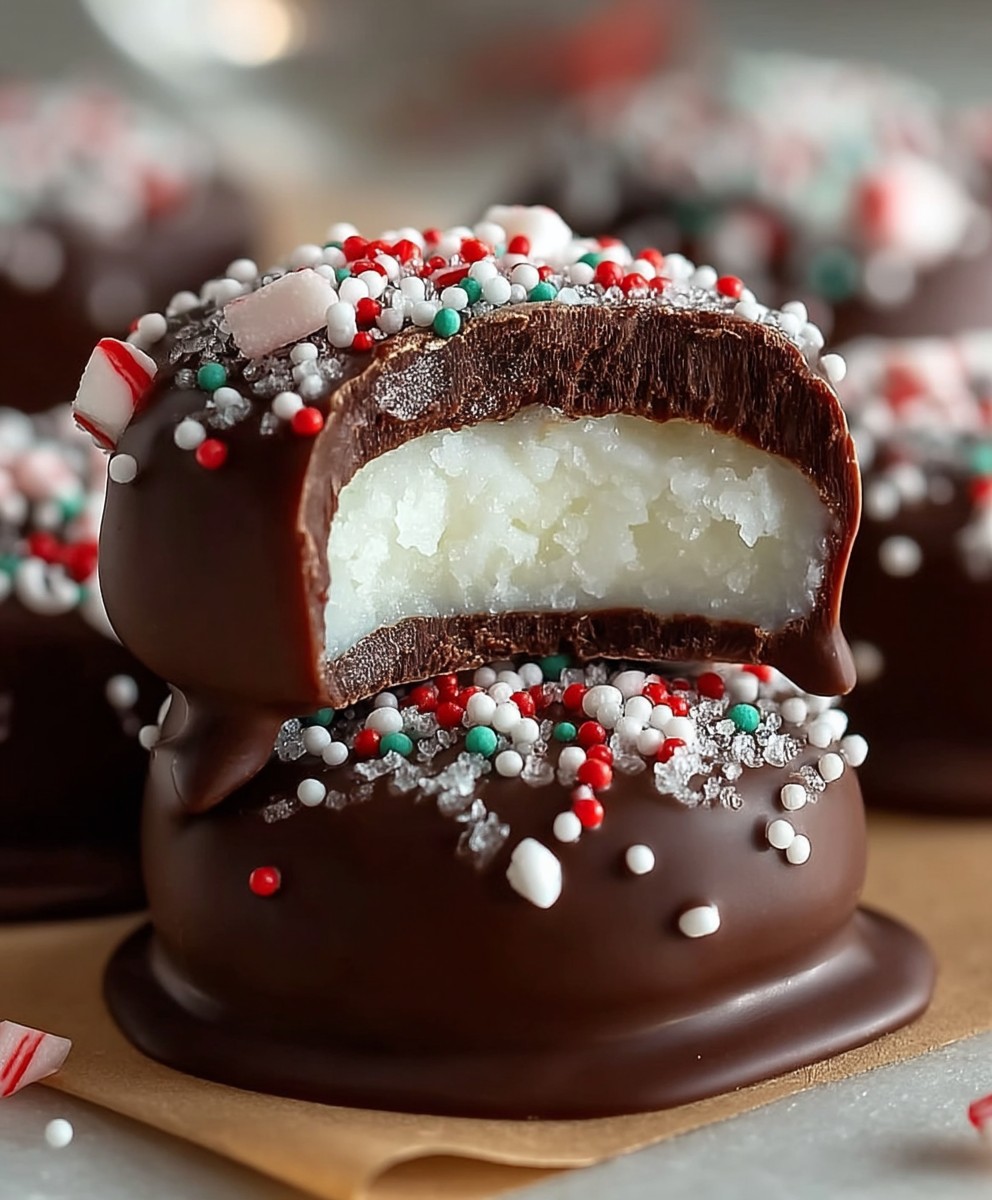
- Optional: Sprinkle with Sea Salt: For an extra touch of flavor, sprinkle the tops of the patties with a pinch of sea salt while the chocolate is still wet. This adds a lovely salty-sweet contrast.
- Chill to Set: Place the baking sheet in the refrigerator for at least 30 minutes, or until the chocolate is completely set.
Storage
Once the chocolate is set, your homemade peppermint patties are ready to enjoy! Store them in an airtight container in the refrigerator for up to a week. They’re also great frozen for longer storage. Just let them thaw in the refrigerator before serving.
Tips for Success
- Use High-Quality Chocolate: The quality of the chocolate will significantly impact the taste of your peppermint patties. Opt for a good-quality semi-sweet or dark chocolate for the best results.
- Don’t Overheat the Chocolate: Overheating the chocolate can cause it to seize up and become grainy. Melt it gently and slowly.
- Chill the Patties Thoroughly: Chilling the peppermint patties before dipping them in chocolate is essential. This helps them hold their shape and prevents the chocolate from melting too quickly.
- Adjust the Peppermint Extract to Taste: The amount of peppermint extract you use will depend on your personal preference. Start with a small amount and add more until you reach your desired level of mintiness.
- Get Creative with Decorations: Feel free to get creative with your decorations! You can drizzle the patties with white chocolate, sprinkle them with crushed peppermint candies, or add a swirl of edible glitter.
Troubleshooting
- Filling is too soft: Add more powdered sugar, a tablespoon at a time, until the desired consistency is reached.
- Filling is too dry: Add more milk, a teaspoon at a time, until the desired consistency is reached.
- Chocolate is seizing up: Try adding a little more shortening to the chocolate and stirring gently. If that doesn’t work, you may need to start over with fresh chocolate. Make sure you are not getting any water in the chocolate.
- Chocolate is not setting properly: Make sure the patties are thoroughly chilled before dipping them in chocolate. Also, ensure that the chocolate is not too warm.
Conclusion:
And there you have it! These Homemade Peppermint Patties are so much more than just a sweet treat; they’re a nostalgic trip down memory lane, a burst of refreshing flavor, and a testament to the joy of creating something delicious from scratch. I truly believe this recipe is a must-try for anyone who loves that classic peppermint-chocolate combination. Forget the store-bought versions – once you taste the creamy, intensely pepperminty center encased in that perfectly crisp dark chocolate shell, you’ll never go back!
What makes these patties so special? It’s the freshness, the control you have over the ingredients, and the sheer satisfaction of knowing you made them yourself. You can adjust the peppermint extract to your liking, ensuring the perfect level of zing. Plus, you avoid all those unnecessary additives and preservatives found in commercial candies. It’s a win-win!
But the fun doesn’t stop there! These Homemade Peppermint Patties are incredibly versatile. Serve them chilled straight from the fridge for an extra refreshing bite. Or, try crumbling them over ice cream for a decadent dessert topping. They also make a fantastic addition to a hot chocolate bar during the holidays. Imagine a steaming mug of cocoa topped with whipped cream and a generous sprinkle of homemade peppermint patty crumbles – pure bliss!
Looking for variations? Consider using different types of chocolate. Milk chocolate will create a sweeter patty, while white chocolate offers a completely different flavor profile. You could also experiment with adding a touch of vanilla extract to the peppermint filling for a subtle twist. For a festive touch, dip the finished patties in melted white chocolate and sprinkle with crushed candy canes. The possibilities are endless!
These patties also make wonderful gifts. Package them in a pretty tin or cellophane bag and tie with a ribbon for a thoughtful and homemade present. They’re perfect for birthdays, holidays, or just because. Trust me, anyone who receives these will be delighted!
I know making candy can sometimes seem intimidating, but I promise this recipe is surprisingly easy. Just follow the instructions carefully, and you’ll be rewarded with the most delicious and satisfying Homemade Peppermint Patties you’ve ever tasted. Don’t be afraid to experiment and make them your own!
So, what are you waiting for? Gather your ingredients, put on some music, and get ready to embark on a peppermint patty-making adventure. I’m confident you’ll love the process and, even more importantly, the results.
I’m so excited for you to try this recipe! Once you do, please come back and share your experience in the comments below. Did you make any variations? What did you think of the flavor? I’d love to hear all about it! Happy candy-making! Let me know if you have any questions, and I’ll do my best to help. Enjoy your delicious, homemade peppermint patties!
Homemade Peppermint Patties: The Ultimate Recipe Guide
Make your own delicious peppermint patties with a creamy mint filling and a smooth chocolate coating. A perfect homemade treat!
Ingredients
Instructions
Recipe Notes
- Use high-quality chocolate for the best taste.
- Don’t overheat the chocolate.
- Chill the patties thoroughly before dipping.
- Adjust the peppermint extract to your preference.
- Get creative with decorations like white chocolate drizzle or crushed peppermint.
- Filling too soft: Add more powdered sugar, 1 tablespoon at a time.
- Filling too dry: Add more milk, 1 teaspoon at a time.
- Chocolate seizing: Try adding a little more shortening. Ensure no water is getting in the chocolate.
- Chocolate not setting: Ensure patties are chilled and chocolate is not too warm.