• Skip to primary navigation
  • Skip to main content
  • Skip to primary sidebar
Homesmad

Homesmad

  • Home
  • Breakfast & Brunch
  • Appetizers & Snacks
  • Dinner
  • Dessert
  • About
  • Privacy Policy
  • Contact
Homesmad
  • Home
  • Breakfast & Brunch
  • Appetizers & Snacks
  • Dinner
  • Dessert
  • About
  • Privacy Policy
  • Contact

Incredible Mini Creme Brulee Cheesecakes: Ultimate Recipe

October 18, 2025 by Lily author

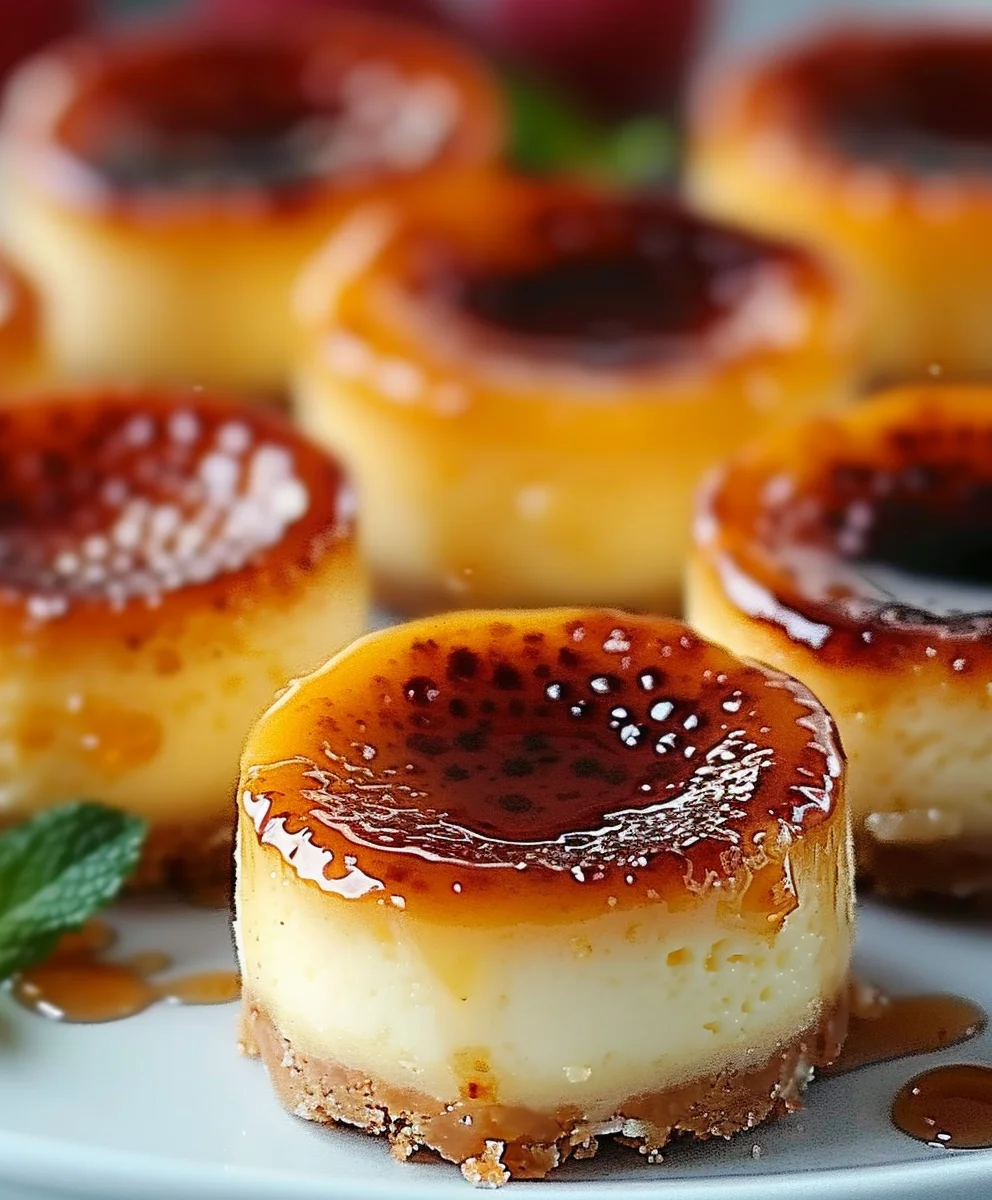
Mini Creme Brulee Cheesecakes An Incredible Ultimate Recipe is what I am absolutely thrilled to share with you today. Imagine, if you will, the rich, velvety texture of a classic New York cheesecake perfectly complemented by the delicate, caramelized sugar crust of a traditional crème brûlée. This isn’t just a dessert; it’s a sublime fusion, a culinary dream come true for anyone who appreciates elegance and innovation in their sweet treats. While cheesecake boasts ancient origins, dating back to the Greeks, and crème brûlée is a celebrated French masterpiece, bringing these two beloved components together in a miniature, individual format offers a truly unparalleled experience.

Why People Adore This Fusion Dessert

People simply adore this dish for its captivating blend of textures and tastes. Each bite delivers the creamy tang of the cheesecake, followed by the satisfying crack of the torched sugar, creating a symphony on the palate. The mini size makes them perfect for any gathering, offering a sophisticated, perfectly portioned indulgence that’s both convenient and impressive. I truly believe that this Mini Creme Brulee Cheesecakes An Incredible Ultimate Recipe provides the definitive guide to creating these show-stopping desserts, ensuring every single one is a masterpiece. Prepare to captivate your guests and yourself with these sensational little wonders!

Incredible Mini Creme Brulee Cheesecakes: Ultimate Recipe this RECIPE

Ingredients:

  • For the Graham Cracker Crust:
    • 1 ½ cups (about 10-12 full sheets) finely ground graham cracker crumbs
    • ¼ cup granulated sugar, for a touch of added sweetness and structural integrity
    • ½ cup (1 stick) unsalted butter, melted and cooled slightly to avoid cooking the crumbs
  • For the Cheesecake Filling:
    • 3 (8-ounce) blocks full-fat cream cheese, softened to room temperature for optimal creaminess and lump-free mixing
    • 1 cup granulated sugar, to provide the perfect balance of sweetness
    • 2 large eggs, also at room temperature, for better emulsification
    • ¼ cup sour cream or full-fat Greek yogurt, at room temperature, for a delightful tang and extra moisture
    • 1 teaspoon pure vanilla extract, a classic flavor enhancer that truly elevates the cheesecake
    • ¼ teaspoon salt, to balance the sweetness and bring out other flavors
  • For the Creme Brulee Topping:
    • 4 large egg yolks, essential for the rich, custardy texture of the brulee layer
    • ⅓ cup granulated sugar, for sweetness and the all-important caramelization
    • 1 ½ cups heavy cream, for luxurious richness
    • ½ teaspoon pure vanilla extract, complementing the cheesecake’s vanilla notes
    • Pinch of salt, to balance the flavors
    • Extra granulated sugar for torching (about 1-2 teaspoons per mini cheesecake)

Preparing the Crust for Our Incredible Ultimate Recipe

Let’s kick things off by creating the perfect foundation for our Mini Creme Brulee Cheesecakes An Incredible Ultimate Recipe. A truly fantastic cheesecake starts with a perfectly executed crust, and I’m here to guide you every step of the way to achieve just that.

  1. First things first, preheat your oven to 350°F (175°C). While the oven is warming up, grab a 12-cup standard muffin tin. You’ll want to line each well with paper liners. I find that using good quality paper liners or even foil liners makes removal much easier and keeps the mini cheesecakes looking pristine. Nobody wants a sticky situation when the goal is perfection!
  2. In a medium-sized bowl, combine your finely ground graham cracker crumbs and the ¼ cup of granulated sugar. Use a whisk or a fork to mix them thoroughly. You want to make sure the sugar is evenly distributed, as it helps with both flavor and the binding process.
  3. Now, pour the ½ cup of melted, slightly cooled unsalted butter into the crumb mixture. Stir this with a fork until all the crumbs are moistened and resemble wet sand. This thorough mixing is crucial; every single crumb needs to be coated with butter to ensure a firm, yet tender, crust that won’t crumble apart when you take a bite. It should feel cohesive and slightly sticky.
  4. Spoon about 1 ½ to 2 tablespoons of the mixture into the bottom of each prepared muffin cup. Don’t eyeball this too much; consistency is key here. Then, using the bottom of a small glass, a tart tamper, or even your fingertips, press the crumbs down firmly and evenly into a flat layer. A well-compacted crust is essential for holding up against the creamy cheesecake filling. Take your time with this step; a solid base is the secret to a great mini cheesecake.
  5. Once all the crusts are pressed, bake them in your preheated oven for 5 to 7 minutes. This short baking time helps to set the crust, making it sturdy and preventing it from becoming soggy once the filling is added. You’ll notice a lovely fragrance filling your kitchen – that’s the smell of deliciousness in the making!
  6. Remove the muffin tin from the oven and set it aside to cool completely on a wire rack while you prepare the cheesecake filling. It’s important for the crust to be cool before adding the filling to prevent it from absorbing too much moisture.

Making the Silky Cheesecake Filling

Now, onto the heart of our Mini Creme Brulee Cheesecakes An Incredible Ultimate Recipe: the incredibly smooth and decadent cheesecake filling. This is where the magic truly begins to take shape, so let’s get started with precision and care.

  1. In a large mixing bowl, using an electric mixer (either a stand mixer with the paddle attachment or a hand mixer), beat the softened cream cheese on low speed until it is completely smooth and free of any lumps. This initial step is paramount for achieving that signature silky-smooth cheesecake texture. Resist the urge to rush this; a perfectly creamy base is non-negotiable for an ultimate cheesecake experience.
  2. Gradually add the 1 cup of granulated sugar to the cream cheese, continuing to beat on low speed. Mix until the sugar is fully incorporated and the mixture is light and fluffy. Make sure to scrape down the sides and bottom of the bowl frequently with a rubber spatula. This ensures that everything is evenly combined and there are no grainy bits of sugar left unmixed.
  3. Add the eggs, one at a time, mixing on low speed just until each egg is incorporated before adding the next. This is a crucial step: do not overmix once the eggs are added! Overmixing introduces too much air into the batter, which can cause the cheesecakes to puff up excessively during baking and then crack dramatically upon cooling. We want beautifully smooth tops, so gentle mixing is key.
  4. Stir in the room temperature sour cream (or Greek yogurt), pure vanilla extract, and salt. Mix gently on low speed until just combined. The sour cream adds a wonderful tanginess and moisture that enhances the richness of the cream cheese, while the vanilla extract provides that classic, comforting aroma and flavor. The pinch of salt, often overlooked, balances all the sweet notes perfectly. Again, be mindful not to overmix.

Baking Our Mini Creme Brulee Cheesecakes

Baking these Mini Creme Brulee Cheesecakes requires a little finesse, particularly with the water bath technique, but trust me, it’s worth it for the incredibly even bake and crack-free tops. This is how we ensure an ultimate texture for our Mini Creme Brulee Cheesecakes An Incredible Ultimate Recipe.

  1. Carefully spoon the cheesecake batter evenly into the prepared muffin cups with the cooled graham cracker crusts. Fill each cup almost to the top, leaving just a tiny bit of space. Gently tap the muffin tin on the counter a few times to release any air bubbles. This also helps the batter settle evenly.
  2. Now, for the water bath – a critical step for perfect cheesecakes. Place the muffin tin inside a larger baking pan (a roasting pan works wonderfully). Carefully pour hot water into the larger baking pan, surrounding the muffin tin, until the water comes about halfway up the sides of the muffin tin. Be very careful not to get any water into the cheesecake batter! The water bath creates a humid environment in the oven, promoting even baking and preventing the cheesecakes from drying out and cracking on top. It’s essentially a gentle steam bath for your mini treats.
  3. Carefully transfer the entire baking setup (large pan with water bath and muffin tin) to your preheated 350°F (175°C) oven.
  4. Bake for 20 to 25 minutes. You’ll know they’re done when the edges are set and appear slightly firm, but the centers still have a slight jiggle to them when you gently shake the pan. This slight jiggle is exactly what you want; they will continue to set as they cool. Do not overbake, as this can lead to dry cheesecakes and cracks.
  5. Once baked, carefully remove the entire baking pan from the oven. Let the cheesecakes cool in the water bath for about 15 minutes on a wire rack. This gradual cooling process is another key to preventing cracks, as it helps the cheesecakes adjust to the temperature change slowly.
  6. After 15 minutes, carefully remove the muffin tin from the water bath. Let the mini cheesecakes cool completely on a wire rack at room temperature. This will take at least an hour, possibly more. Resist the urge to move them too soon.
  7. Once completely cool, transfer the muffin tin to the refrigerator and chill the cheesecakes for at least 4 hours, or ideally, overnight. Chilling is absolutely essential for the cheesecakes to firm up properly and develop their full flavor and texture. This step ensures a truly ultimate base for our Mini Creme Brulee Cheesecakes An Incredible Ultimate Recipe.

Crafting the Silky Creme Brulee Topping

The creme brulee topping is what truly elevates these mini cheesecakes into an “incredible ultimate recipe.” This delicate, creamy layer, combined with the caramelized sugar, is a game-changer. Let’s make it perfectly smooth and rich.

  1. In a medium-sized heatproof bowl, whisk together the 4 large egg yolks and ⅓ cup granulated sugar until the mixture is pale yellow and slightly thickened. This process, known as “ribbon stage,” incorporates air and helps to dissolve the sugar, leading to a smoother custard.
  2. In a small saucepan, gently heat the 1 ½ cups heavy cream over medium-low heat until it just begins to simmer around the edges – you’ll see tiny bubbles forming. Do not let it boil vigorously.
  3. Now, we’re going to temper the egg yolks. While continuously whisking the egg yolk mixture, slowly pour about half of the warm cream into the yolks in a thin, steady stream. This slowly brings the temperature of the yolks up, preventing them from scrambling. Once combined, pour the egg yolk-cream mixture back into the saucepan with the remaining cream.
  4. Return the saucepan to low heat. Cook, stirring constantly with a wooden spoon or heatproof spatula, until the mixture thickens enough to coat the back of the spoon. When you draw a line with your finger across the spoon, the line should hold without the custard running into it. This typically takes about 5 to 8 minutes. Do not boil the custard, as this can cause it to curdle. Keep the heat low and be patient.
  5. Remove the saucepan from the heat and stir in the ½ teaspoon pure vanilla extract and a pinch of salt.
  6. To ensure an ultra-smooth topping, strain the custard through a fine-mesh sieve into a clean bowl. This removes any potential cooked egg bits or lumps, resulting in a perfectly silky texture for our Mini Creme Brulee Cheesecakes An Incredible Ultimate Recipe.
  7. Cover the bowl with plastic wrap, pressing the wrap directly onto the surface of the custard to prevent a skin from forming. Chill the custard in the refrigerator for at least 2 hours, or until thoroughly cold and slightly thickened. This cooling time is essential for the custard to set properly before we assemble our treats.

Assembling and Torching the Mini Creme Brulee Cheesecakes An Incredible Ultimate Recipe

This is the grand finale! The moment where our incredible ultimate recipe truly comes to life with the iconic caramelized sugar topping. Get ready for some culinary fireworks!

  1. Once the mini cheesecakes are thoroughly chilled and the creme brulee custard is cold and set, carefully unwrap each cheesecake from its paper liner. They should pop out easily if the liners were good quality and you allowed them to cool properly. Place them on a serving platter or a baking sheet lined with parchment paper for easier handling during torching.
  2. Spoon about 1 to 2 tablespoons of the chilled creme brulee custard evenly over the top of each mini cheesecake. You want a thin, uniform layer that completely covers the cheesecake surface. Use the back of the spoon to gently spread it if needed.
  3. Now for the magic! Sprinkle about 1 to 2 teaspoons of granulated sugar evenly over the creme brulee layer of each mini cheesecake. You can be a little generous here, as this is the sugar that will caramelize to form that irresistible crackly crust. Ensure an even coating; bald spots won’t caramelize properly.
  4. Using a kitchen torch, hold the flame a few inches above the sugar layer. Move the torch steadily and evenly in a circular motion, heating the sugar until it melts, bubbles, and turns a beautiful golden-amber color. The aroma of caramelized sugar is truly intoxicating, signaling that you’re moments away from enjoying these Mini Creme Brulee Cheesecakes An Incredible Ultimate Recipe. Be careful not to burn the sugar, as it will taste bitter. You’re looking for that perfect, shiny, hard shell. This process takes anywhere from 30 seconds to a minute per cheesecake, depending on your torch.
  5. Let the torched cheesecakes sit for a minute or two, allowing the caramelized sugar to cool and harden into that signature brittle crust. You’ll hear a faint crackling sound as it sets, which is just music to a baker’s ears!
  6. Serve your Mini Creme Brulee Cheesecakes An Incredible Ultimate Recipe immediately to enjoy the delightful contrast between the warm, crisp sugar topping and the cool, creamy cheesecake and brulee layers. This is truly an ultimate dessert experience, perfect for impressing guests or simply indulging yourself. Any leftover cheesecakes can be stored in the refrigerator, though the torched sugar topping is best enjoyed fresh, as it tends to soften over time in the fridge. If you anticipate leftovers, you might consider torching only the cheesecakes you plan to serve immediately and torching the rest just before serving. Enjoy every incredible bite!

Incredible Mini Creme Brulee Cheesecakes: Ultimate Recipe

Conclusion:

This isn’t just another dessert recipe; it’s an experience, a moment of pure culinary delight that I genuinely believe you’ll cherish creating and, more importantly, devouring. We’ve journeyed through the steps to transform simple ingredients into something truly extraordinary, something that marries the creamy, tangy allure of classic cheesecake with the sophisticated, caramelized crunch of a perfectly torched crème brûlée. Imagine that first bite: the delicate crackle as your spoon breaks through the golden sugar crust, followed by the smooth, rich, and utterly luxurious cheesecake base that melts in your mouth. It’s a symphony of textures and flavors that captivates from the very first taste. There’s an undeniable elegance to these bite-sized wonders, making them an impeccable choice for virtually any occasion, whether you’re hosting a grand dinner party, celebrating a special milestone, or simply craving a sophisticated treat to elevate a quiet evening at home.

What truly makes these cheesecakes a must-try, in my humble opinion, is their unique ability to impress with minimal fuss. While they look incredibly fancy and refined, the process itself is surprisingly straightforward, proving that you don’t need to be a professional pastry chef to create stunning desserts. The individual portions are also a huge win; they eliminate the mess of slicing a traditional cheesecake and offer a perfectly controlled serving size, which is always appreciated. They are designed to be decadent yet approachable, striking that sweet spot between gourmet indulgence and home-baked comfort. Every component, from the buttery crust to the velvety filling and that iconic brûléed topping, works in perfect harmony, making this a truly unforgettable dessert. It’s a guaranteed crowd-pleaser and a recipe you’ll undoubtedly want to add to your permanent repertoire, ready to pull out whenever you want to dazzle your guests or simply treat yourself to something truly special.

Now, let’s talk about how to make these beauties even more spectacular and versatile. While they are absolutely divine on their own, a few thoughtful accompaniments can elevate the experience further. Consider serving them alongside a freshly brewed espresso or a delicate cup of herbal tea for a sophisticated after-dinner treat. For a touch of freshness, a scattering of vibrant fresh berries – raspberries, blueberries, or sliced strawberries – creates a beautiful contrast in both color and flavor, adding a slight tartness that perfectly cuts through the richness. A tiny dollop of homemade whipped cream, lightly sweetened and perhaps infused with a hint of vanilla bean, would also be a lovely, airy addition, though I personally adore them without, to let the star flavors shine.

Don’t be afraid to experiment and make this recipe your own! While vanilla is a classic for a reason, you could easily introduce different flavor profiles to the cheesecake filling. A dash of almond extract could add a subtle nutty note, or a swirl of lemon zest could brighten the whole affair. For a truly adventurous twist, consider infusing your cream with lavender or rose petals before mixing, straining it out for an aromatic floral cheesecake. You could even play with the crust, perhaps using crushed ginger snaps for a spicier base, or even finely ground pistachios for a unique texture and flavor. The possibilities are truly endless, and that’s part of the joy of baking – making a recipe uniquely yours.

So, my dear baking enthusiasts, I sincerely hope you feel inspired and excited to dive into your kitchen and create these exquisite desserts. Trust me when I say that making the Mini Creme Brulee Cheesecakes An Incredible Ultimate Recipe is not just about following steps; it’s about experiencing the joy of crafting something beautiful and delicious with your own hands. The satisfaction you’ll feel when you see those golden, bubbling sugar tops, or hear the “crack” as someone takes their first bite, is truly rewarding. I urge you to gather your ingredients, set aside some time, and embark on this delightful culinary adventure. And once you do, please, please, please come back and share your experiences! Did you add a special twist? What did your friends and family think? Your feedback and creative takes are what make this baking community so wonderful. Happy baking, and get ready to impress!


Mini Creme Brulee Cheesecakes: An Incredible Ultimate Recipe

Mini Creme Brulee Cheesecakes: An Incredible Ultimate Recipe

Experience the ultimate fusion dessert: rich, velvety New York cheesecake topped with a delicate, caramelized sugar crust of traditional crème brûlée. These individual mini cheesecakes offer a captivating blend of creamy tang and satisfying crack in every bite, perfect for any sophisticated gathering.

Prep Time
10 Minutes

Cook Time
40 Minutes

Total Time
35 Minutes

Servings
12 mini cheesecakes

Ingredients

  • 1 ½ cups finely ground graham cracker crumbs
  • ¼ cup granulated sugar (for crust)
  • ½ cup (1 stick) unsalted butter, melted
  • 3 (8-ounce) blocks full-fat cream cheese, softened
  • 1 cup granulated sugar (for filling)
  • 2 large eggs, room temperature
  • ¼ cup sour cream or full-fat Greek yogurt, room temperature
  • 1 teaspoon pure vanilla extract (for filling)
  • ¼ teaspoon salt (for filling)
  • 4 large egg yolks
  • ⅓ cup granulated sugar (for topping)
  • 1 ½ cups heavy cream
  • ½ teaspoon pure vanilla extract (for topping)
  • Pinch of salt (for topping)
  • 1-2 teaspoons extra granulated sugar per cheesecake (for torching)

Instructions

  1. Step 1
    Preheat oven to 350°F (175°C). Line a 12-cup muffin tin with paper liners. In a bowl, combine 1 ½ cups graham cracker crumbs and ¼ cup sugar. Add ½ cup melted butter; stir until moistened. Spoon 1 ½ to 2 tablespoons into each muffin cup and press firmly. Bake 5-7 minutes. Cool completely on a wire rack.
  2. Step 2
    Beat 3 blocks softened cream cheese on low speed until smooth. Gradually add 1 cup sugar; beat until light and fluffy, scraping down the bowl. Add 2 eggs, one at a time, mixing on low speed just until incorporated (do not overmix). Stir in ¼ cup sour cream (or Greek yogurt), 1 teaspoon vanilla extract, and ¼ teaspoon salt until just combined (do not overmix).
  3. Step 3
    Spoon cheesecake batter evenly into prepared muffin cups, almost to the top. Tap tin to release air bubbles. Place muffin tin in a larger baking pan, then pour hot water into the larger pan, reaching halfway up the muffin tin sides (water bath). Carefully transfer to the preheated oven. Bake for 20-25 minutes, until edges are set with a slight jiggle in the center. Cool in the water bath for 15 minutes, then remove muffin tin and cool completely on a wire rack. Chill in the refrigerator for at least 4 hours, or overnight.
  4. Step 4
    Whisk 4 egg yolks and ⅓ cup sugar in a heatproof bowl until pale. Heat 1 ½ cups heavy cream in a saucepan until it just simmers. Slowly temper egg yolks by gradually whisking in half of the warm cream. Pour mixture back into saucepan with remaining cream. Cook on low heat, stirring constantly, until mixture thickens to coat the back of a spoon (5-8 minutes). Do not boil. Remove from heat. Stir in ½ teaspoon vanilla extract and a pinch of salt. Strain custard through a fine-mesh sieve into a clean bowl. Cover with plastic wrap directly on the surface and chill for at least 2 hours, until cold and slightly thickened.
  5. Step 5
    Unwrap chilled cheesecakes from liners. Spoon 1-2 tablespoons of chilled creme brulee custard evenly over each cheesecake. Sprinkle 1-2 teaspoons of granulated sugar evenly over the custard layer. Using a kitchen torch, heat sugar in a circular motion until melted, bubbly, and golden-amber. Let torched cheesecakes sit for 1-2 minutes for the sugar to harden. Serve immediately. Store leftovers in the refrigerator, but the torched sugar topping is best enjoyed fresh.

Important Information

Nutrition Facts (Per Serving)

It is important to consider this information as approximate and not to use it as definitive health advice.

Allergy Information

Please check ingredients for potential allergens and consult a health professional if in doubt.

« Previous Post
Creamy Jalapeno Chicken Skillet Recipe | Quick & Flavorful
Next Post »
Hearty Pancake Beef Sausage Casserole Recipe – Family Favorite

If you enjoyed this…

Strawberry Cheesecake Cookies: A Delicious Twist on a Classic Dessert

Christmas Morning Bellini

Christmas Morning Bellini Recipe

Mini Pecan Pies Recipe: Irresistible Bite-Sized Treats

Primary Sidebar

Browse by Diet

BreakfastDinnerLunchDessertAppetizer

Sweet Peach Yogurt Parfait Delight

One of my fondest memories is from a lazy summer afternoon spent at my grandmother’s house. The sun filtered through the kitchen window, casting a warm glow over the table where she would create her culinary magic. It was during one of those blissful moments that I first tasted her Peach Yogurt Parfait with Honey and Granola. The sweet aroma of ripe peaches mingling with creamy yogurt and the crunch of granola was nothing short of heavenly. It felt like summer captured in a bowl, and I still remember the joy of diving in with a spoon, each layer revealing a new burst of flavor.

When I think about that parfait, I can almost hear the gentle hum of the bees outside, reminding me of the floral notes that honey brings to every bite. The vibrant yellows and soft oranges of the peaches contrast beautifully with the creamy white yogurt and the golden crunch of granola. It’s a dish that not only looks delightful but also tastes like a celebration of fresh, wholesome ingredients.

What makes my version of this Peach Yogurt Parfait special is the careful balance of flavors and textures. I use ripe, juicy peaches, drizzled with locally sourced honey, and a homemade granola that’s bursting with nuts and seeds for an extra crunch. It’s a simple dish, but every layer is crafted with love and attention.

Let me show you exactly how to make this delightful parfait, so you can bring a bit of that summer magic into your kitchen!

Sweet Peach Yogurt Parfait Delight

Why You’ll Love This Recipe

  • Delightfully creamy texture from the Greek yogurt, paired with the juicy sweetness of fresh peaches.
  • Ready in under 20 minutes, making it a quick and satisfying breakfast or snack option.
  • Budget-friendly, using common ingredients that you may already have in your pantry.
  • Customizable with your favorite granola and nuts, allowing you to tailor each parfait to your taste.
  • Perfectly balanced flavors with the bright acidity of lemon juice and the sweetness of honey enhancing the peaches.

Ingredients

  • For the Parfait:
  • 2 cups plain Greek yogurt (or vanilla yogurt for a sweeter option)
  • 2 large ripe peaches, diced (about 2 cups)
  • 1 tablespoon fresh lemon juice (to prevent browning of peaches)
  • 2 tablespoons honey (plus more for drizzling)
  • 1 teaspoon vanilla extract (optional for extra flavor)
  • For the Granola:
  • 1 cup granola (store-bought or homemade; see notes for a simple granola recipe)
  • 1/4 cup sliced almonds (optional for added crunch)
  • 1/4 cup shredded coconut (optional for added flavor)

Let’s dive into some key ingredients that make this Peach Yogurt Parfait so delightful! First, the Greek yogurt is not only creamy but also packed with protein, making it a satisfying option for breakfast or a snack. If you’re looking for a sweeter option, you can easily substitute it with vanilla yogurt, though it may alter the overall flavor balance. Next, the ripe peaches are the star of the show; their natural sweetness shines through, so I recommend choosing peaches that yield slightly to pressure, indicating they’re perfectly ripe. If peaches aren’t in season, feel free to use nectarines or even frozen peaches—just thaw them before use. Finally, honey adds a lovely floral sweetness that ties everything together. If you prefer, maple syrup can serve as a delicious substitute.

Step-by-Step Instructions

  1. Start by preparing the peaches. Wash them thoroughly, then slice and dice them into bite-sized pieces. In a medium bowl, toss the diced peaches with 1 tablespoon of fresh lemon juice to prevent browning. Set aside for about 5 minutes while the lemon juice works its magic.
  2. In a separate bowl, combine the Greek yogurt, 2 tablespoons of honey, and 1 teaspoon of vanilla extract if using. Stir the mixture until smooth and thoroughly blended. This should take about a minute. Avoid overmixing to maintain the creaminess of the yogurt.
  3. Now it’s time to layer your parfait. Grab a clear glass or bowl to showcase your beautiful creation. Start with a generous spoonful of the yogurt mixture at the bottom—about 1/4 cup will do. Use a spoon to spread it evenly.
  4. Add a layer of the diced peaches over the yogurt, ensuring they cover the yogurt completely. You might want to use about half of what you have prepared—roughly 1 cup. This layer should be visually appealing, so arrange the peaches neatly.
  5. Sprinkle 1/4 cup of granola over the peaches. This adds a delightful crunch. Make sure to distribute it evenly to ensure every bite has that satisfying texture. Avoid packing it down too tightly, as you want it to maintain its crunch.
  6. Repeat the layers: spoon in another 1/4 cup of yogurt, followed by another cup of peaches, and another sprinkle of granola. You should have at least two layers, but feel free to add more depending on your glass size.
  7. Finish off your parfait with a drizzle of honey on top for added sweetness and a touch of elegance. If you’re using sliced almonds or shredded coconut, sprinkle them on top now. It adds a lovely visual contrast and extra flavor.
  8. Serve immediately or refrigerate for up to 30 minutes before serving to allow the flavors to meld together. However, I recommend enjoying it fresh to maintain the granola’s crunch.

Pro Tips for the Best Peach Yogurt Parfait With Honey And Granola

  • Make sure to choose ripe peaches for the best flavor and texture. A common mistake is using unripe fruit, which can lead to a less enjoyable parfait. Look for peaches that are fragrant and slightly soft to the touch.
  • Use a clear glass to assemble your parfait; this not only makes for a beautiful presentation but also allows you to see the colorful layers, which adds to the enjoyment of eating it.
  • For an even creamier texture, consider whipping the Greek yogurt with a hand mixer for a couple of minutes before layering. This small adjustment makes a huge difference in mouthfeel.
  • Be mindful of the granola-to-yogurt ratio. Too much granola can overwhelm the parfait, while too little can make it feel too creamy. Aim for about 1/4 cup of granola per layer for the perfect balance.
  • If you’re making this for a gathering, consider preparing the yogurt and peaches ahead of time and layering them just before serving. This ensures the granola stays crunchy!

Variations & Serving Ideas

There are so many ways to get creative with your Peach Yogurt Parfait! For a tropical twist, swap out the peaches for mangoes or pineapples and top with coconut flakes. If you prefer a berry flavor, mix in some blueberries or strawberries with the peaches for added color and taste. For a nutty version, incorporate chopped walnuts or pecans instead of almonds.

As for serving ideas, this parfait pairs beautifully with a side of scrambled eggs for a hearty breakfast or fresh fruit salad for a light lunch. You might also enjoy it alongside whole grain toast with almond butter for an energizing snack. The contrast of flavors and textures will elevate your meal experience!

Storage, Make-Ahead & Reheating

The Peach Yogurt Parfait is best enjoyed fresh, but you can prepare some components ahead of time. Store the layered parfait in an airtight container in the refrigerator for up to 24 hours. However, be cautious; the granola may lose its crunch if stored too long. You can freeze the yogurt and peach mixture for up to 2 months; just remember to thaw it in the refrigerator overnight before serving.

If you plan to enjoy this dish the next day, it can taste even better as the flavors meld together. Just remember to add the granola right before serving to keep its delightful crunch!

Frequently Asked Questions

Can I make Peach Yogurt Parfait With Honey And Granola ahead of time?

Yes — in fact, it tastes even better the next day as the flavors meld. However, I recommend waiting to add the granola until just before serving to maintain its crunch.

What can I substitute for Greek yogurt?

If you prefer a lighter option, you can substitute Greek yogurt with regular yogurt or a dairy-free alternative like coconut yogurt. Just remember that this may alter the creaminess and flavor profile slightly.

Can I use frozen peaches for this parfait?

Absolutely! Just make sure to thaw the frozen peaches before using them. They will still add great flavor, though the texture may be slightly softer than fresh peaches.

How do I make the parfait vegan?

To make a vegan version, substitute the Greek yogurt with a plant-based yogurt alternative, and replace honey with maple syrup or agave nectar. This keeps the parfait sweet while adhering to a vegan diet.

What other fruits can I use in this recipe?

You can mix and match fruits based on your preference. Try using strawberries, blueberries, raspberries, or even bananas. Just make sure to adjust the lemon juice as needed to prevent browning.

Sweet Peach Yogurt Parfait Delight

Final Thoughts

The Peach Yogurt Parfait with Honey and Granola is a delightful blend of creamy yogurt, sweet peaches, and crunchy granola that creates a satisfying and nourishing treat. Each layer bursts with flavor, making it a perfect choice for breakfast or a light dessert.

This is the kind of recipe I come back to again and again, especially when I want something refreshing and wholesome to start my day. The harmony of sweet and tart flavors, combined with the delightful crunch, never fails to lift my spirits!

I encourage you to give this parfait a try and indulge in its comforting goodness. Feel free to share your results or even add your own twist—perhaps a sprinkle of cinnamon or a handful of nuts. Enjoy creating your perfect parfait!

Print
clock clock iconcutlery cutlery iconflag flag iconfolder folder iconinstagram instagram iconpinterest pinterest iconfacebook facebook iconprint print iconsquares squares iconheart heart iconheart solid heart solid icon

Peach Yogurt Parfait


  • Author: Lily author
  • Total Time: 15 minutes
  • Yield: 4 servings 1x
Pin Recipe
Print Recipe

Description

This Peach Yogurt Parfait combines creamy Greek yogurt, juicy peaches, and crunchy granola for a delightful treat. It’s a perfect breakfast or snack that captures the essence of summer in every bite.


Ingredients

Scale
  • For the Parfait:
  • 2 cups plain Greek yogurt (or vanilla yogurt for a sweeter option)
  • 2 large ripe peaches, diced (about 2 cups)
  • 1 tablespoon fresh lemon juice (to prevent browning of peaches)
  • 2 tablespoons honey (plus more for drizzling)
  • 1 teaspoon vanilla extract (optional for extra flavor)
  • For the Granola:
  • 1 cup granola (store-bought or homemade; see notes for a simple granola recipe)
  • 1/4 cup sliced almonds (optional for added crunch)
  • 1/4 cup shredded coconut (optional for added flavor)

Instructions

  1. Start by preparing the peaches. Wash them thoroughly, then slice and dice them into bite-sized pieces. In a medium bowl, toss the diced peaches with 1 tablespoon of fresh lemon juice to prevent browning. Set aside for about 5 minutes while the lemon juice works its magic.
  2. In a separate bowl, combine the Greek yogurt, 2 tablespoons of honey, and 1 teaspoon of vanilla extract if using. Stir the mixture until smooth and thoroughly blended. This should take about a minute. Avoid overmixing to maintain the creaminess of the yogurt.
  3. Now it’s time to layer your parfait. Grab a clear glass or bowl to showcase your beautiful creation. Start with a generous spoonful of the yogurt mixture at the bottom—about 1/4 cup will do. Use a spoon to spread it evenly.
  4. Add a layer of the diced peaches over the yogurt, ensuring they cover the yogurt completely. You might want to use about half of what you have prepared—roughly 1 cup. This layer should be visually appealing, so arrange the peaches neatly.
  5. Sprinkle 1/4 cup of granola over the peaches. This adds a delightful crunch. Make sure to distribute it evenly to ensure every bite has that satisfying texture. Avoid packing it down too tightly, as you want it to maintain its crunch.
  6. Repeat the layers: spoon in another 1/4 cup of yogurt, followed by another cup of peaches, and another sprinkle of granola. You should have at least two layers, but feel free to add more depending on your glass size.
  7. Finish off your parfait with a drizzle of honey on top for added sweetness and a touch of elegance. If you’re using sliced almonds or shredded coconut, sprinkle them on top now. It adds a lovely visual contrast and extra flavor.
  8. Serve immediately or refrigerate for up to 30 minutes before serving to allow the flavors to meld together. However, I recommend enjoying it fresh to maintain the granola’s crunch.
  • Prep Time: 15 mins
  • Cook Time: 0 mins
  • Category: Breakfast
  • Method: No-cook
  • Cuisine: American

Nutrition

  • Serving Size: 1 parfait
  • Calories: 250
  • Sugar: 20 g
  • Sodium: 50 mg
  • Fat: 5 g
  • Saturated Fat: 2 g
  • Unsaturated Fat: 3 g
  • Trans Fat: 0 g
  • Carbohydrates: 40 g
  • Fiber: 3 g
  • Protein: 10 g
  • Cholesterol: 10 mg

Keywords: Choose ripe peaches for the best flavor and texture. Use a clear glass for a beautiful presentation. For creaminess, consider whipping the yogurt before layering. Be mindful of the granola-to-yogurt ratio. Prepare yogurt and peaches ahead of time for gatherings, layering just before serving.

Did you make this recipe?

Share a photo and tag us — we can't wait to see what you've made!

Sun-Kissed Frozen Orange Cream Slush

As a child, summer days felt like they lasted forever. I remember the sticky heat wrapping around me as I played outside, my laughter mingling with the sounds of the neighborhood. But nothing could cool me down quite like the moment I’d spot my grandmother, laboring over her blender, whipping up her famous Frozen Orange Creamsicle Slush. That vibrant orange treat, with its frosty texture and sweet citrus aroma, was like a burst of sunshine in a cup. Just one sip, and I could feel the coolness wash over me, sparking pure joy.

This Frozen Orange Creamsicle Slush has a way of making you feel like a kid again. Its creamy, dreamy consistency is a delightful balance of bright orange and soft vanilla, inviting you to dive right in. The refreshing tang of orange dances on your tongue, while the smooth creaminess envelops you in a comforting embrace. It’s a nostalgic treat that’s perfect for hot summer afternoons or anytime you need a little pick-me-up.

What makes my version of this slush stand out is the addition of a hint of vanilla bean, which elevates the flavor and adds an extra layer of richness. Plus, it’s super easy to whip up with just a few simple ingredients that you probably already have on hand! So, if you’re ready to relive those sun-soaked memories, let me show you exactly how to make it.

Sun-Kissed Frozen Orange Cream Slush

Why You’ll Love This Recipe

  • Each slush is a perfect blend of creamy vanilla and zesty orange, creating a nostalgic flavor reminiscent of summer days.
  • This refreshing treat is ready in under 15 minutes, making it an ideal quick dessert for unexpected guests or hot afternoons.
  • With just 8 simple ingredients, it’s budget-friendly, ensuring you don’t have to break the bank to enjoy a delicious slush.
  • The slush has a perfectly smooth texture, thanks to the combination of ice and ice cream, providing a delightful contrast to the bright citrus flavors.
  • It’s highly customizable; you can easily adjust the sweetness and add fresh herbs for a unique twist that suits your taste.

Ingredients

  • 2 cups orange juice (freshly squeezed or store-bought)
  • 1 cup vanilla ice cream
  • 1 cup crushed ice
  • 1/2 cup milk (whole or 2%)
  • 1/4 cup granulated sugar (adjust based on sweetness preference)
  • 1 teaspoon vanilla extract
  • Zest of 1 orange (for added flavor)
  • Fresh orange slices and mint leaves (for garnish)

The star of this Frozen Orange Creamsicle Slush is the orange juice, which provides the vibrant, citrusy base. Freshly squeezed juice will yield the brightest flavor, but store-bought options can be just as convenient. If you’re opting for store-bought, choose 100% pure juice with no added sugars for the best results. Another essential ingredient is the vanilla ice cream; it adds creaminess and sweetness. You can substitute it with dairy-free ice cream if you’re looking for a vegan option. Whole or 2% milk complements the ice cream, creating a smooth blend. If you want a lower-calorie version, almond or oat milk can be good alternatives.

Lastly, the granulated sugar can be adjusted based on your sweetness preference. If you prefer a more natural sweetener, consider using honey or agave syrup. The orange zest enhances the flavor profile, providing an aromatic pop that brings the whole slush together. Don’t skip it! It adds an extra layer of brightness that makes this slush truly special.

Step-by-Step Instructions

  1. Start by preparing your ingredients. Gather 2 cups of orange juice, 1 cup of vanilla ice cream, and 1 cup of crushed ice. Make sure the ice is finely crushed, as larger chunks can make blending difficult.
  2. In a blender, combine the orange juice, vanilla ice cream, crushed ice, and 1/2 cup of milk. Add 1/4 cup of granulated sugar and 1 teaspoon of vanilla extract. If you like a sweeter slush, consider adding a bit more sugar at this stage.
  3. Add the zest of 1 orange to the blender. This step is crucial for enhancing the citrus flavor of your slush. Make sure not to include the bitter white pith—only the flavorful zest.
  4. Blend the mixture on medium-high speed for about 30-45 seconds. Stop once the ingredients are fully combined and the slush has a smooth, even consistency. If you notice large chunks of ice, blend for an additional 10-15 seconds. Avoid over-blending, as this can make the slush too liquidy.
  5. Once blended, taste the slush. If it needs more sweetness, add a little more sugar and blend for a few more seconds. If it’s too thick, you can add a splash of milk to reach your desired consistency.
  6. Pour the slush into glasses. This recipe typically serves 4, but you can easily double it for larger gatherings. Use a spoon to help guide the slush into the glasses if needed.
  7. Garnish each serving with fresh orange slices and mint leaves. The mint not only adds a pop of color but also a refreshing aroma that complements the citrus flavors beautifully.
  8. Serve immediately and enjoy! If you’ve made extra, you can refrigerate it for a short time, but it’s best enjoyed fresh.

Pro Tips for the Best Frozen Orange Creamsicle Slush

  • Don’t skip the orange zest! It’s a game-changer for flavor. Always zest before juicing to make it easier.
  • Use a high-powered blender for the best texture. A standard blender may struggle with ice, leading to uneven consistency. If you have a food processor, that can work too, but ensure the ice is finely crushed.
  • Adjust the ice-to-liquid ratio carefully. If your slush is too thick, it won’t blend well. Start with less ice and add more until you reach your preferred texture.
  • Be cautious with the sugar! Always start with the lower amount, as you can easily add more, but it’s hard to fix an overly sweet slush.
  • For a fun twist, consider adding a splash of coconut milk or a handful of fresh fruit like strawberries or pineapple. This not only enhances the flavor but also adds a beautiful color contrast.

Variations & Serving Ideas

There are countless ways to put a spin on your Frozen Orange Creamsicle Slush. Consider making a tropical version by adding in some pineapple juice or coconut milk for a delightful tropical twist. If you’re feeling adventurous, try incorporating a handful of frozen mango or peach slices for added sweetness. For a lighter version, swap out the vanilla ice cream for Greek yogurt for a creamy yet tangy alternative.

As for serving ideas, this refreshing slush pairs wonderfully with light summer dishes like grilled chicken skewers, fish tacos, or a simple salad topped with citrus vinaigrette. The bright, zesty flavors of the slush complement these dishes perfectly, making them an ideal pairing for a sunny day.

Storage, Make-Ahead & Reheating

This Frozen Orange Creamsicle Slush is best enjoyed fresh, but if you have leftovers, you can store them in an airtight container in the fridge for up to 2 days. Just keep in mind that the slush may lose some of its texture over time as the ice melts. It doesn’t freeze well, as the ice will turn into a solid block. If you must freeze it, blend again after thawing to restore the slushy consistency. This treat is best the day you make it, as the flavors meld together beautifully overnight, enhancing its deliciousness.

Frequently Asked Questions

Can I make Frozen Orange Creamsicle Slush ahead of time?

Yes — in fact, it tastes even better the next day as the flavors meld. However, it’s best to enjoy it fresh, as the texture can change if stored for too long. If you need to prepare it ahead, keep it in the fridge and re-blend before serving.

What kind of orange juice should I use?

For the best flavor, use freshly squeezed orange juice. However, if you’re short on time, opt for 100% pure store-bought juice without added sugars. This will ensure that your slush remains flavorful and refreshing.

Can I substitute the vanilla ice cream?

Absolutely! If you’re looking for a dairy-free option, coconut milk ice cream or a non-dairy vanilla ice cream can work wonderfully. They will still provide the creamy texture and sweetness you desire.

How can I adjust the sweetness of my slush?

You can easily adjust the sweetness by modifying the amount of sugar added. Start with 1/4 cup and taste the mixture before blending. If you prefer it sweeter, add more sugar gradually until it reaches your desired level.

What should I do if my slush is too thick?

If your slush is too thick, simply add a splash of milk or orange juice and blend again. This will help achieve a more drinkable consistency while maintaining the slushy texture. Adjust gradually to reach your preferred thickness.

Sun-Kissed Frozen Orange Cream Slush

Final Thoughts

The Frozen Orange Creamsicle Slush is a delightful blend of refreshing citrus and creamy goodness, making it a perfect treat for warm days or any time you crave a taste of nostalgia. The way the bright orange flavor dances with the creamy texture truly elevates this slush, transforming it into a satisfying escape from the everyday.

This is the kind of recipe I come back to again and again, especially when I’m looking to cool down or impress guests at a summer gathering. It’s simple to make and always brings smiles all around! I encourage you to try this recipe for yourself—don’t hesitate to share your results or even put your own spin on it. Happy slushing!

Print
clock clock iconcutlery cutlery iconflag flag iconfolder folder iconinstagram instagram iconpinterest pinterest iconfacebook facebook iconprint print iconsquares squares iconheart heart iconheart solid heart solid icon

Frozen Orange Creamsicle Slush


  • Author: Lily author
  • Total Time: 15 minutes
  • Yield: 4 servings 1x
Pin Recipe
Print Recipe

Description

This Frozen Orange Creamsicle Slush is a refreshing treat that combines creamy vanilla and zesty orange flavors. Perfect for hot summer days, it brings back nostalgic memories with every sip.


Ingredients

Scale
  • 2 cups orange juice (freshly squeezed or store-bought)
  • 1 cup vanilla ice cream
  • 1 cup crushed ice
  • 1/2 cup milk (whole or 2%)
  • 1/4 cup granulated sugar (adjust based on sweetness preference)
  • 1 teaspoon vanilla extract
  • Zest of 1 orange (for added flavor)
  • Fresh orange slices and mint leaves (for garnish)

Instructions

  1. Start by preparing your ingredients. Gather 2 cups of orange juice, 1 cup of vanilla ice cream, and 1 cup of crushed ice. Make sure the ice is finely crushed, as larger chunks can make blending difficult.
  2. In a blender, combine the orange juice, vanilla ice cream, crushed ice, and 1/2 cup of milk. Add 1/4 cup of granulated sugar and 1 teaspoon of vanilla extract. If you like a sweeter slush, consider adding a bit more sugar at this stage.
  3. Add the zest of 1 orange to the blender. This step is crucial for enhancing the citrus flavor of your slush. Make sure not to include the bitter white pith—only the flavorful zest.
  4. Blend the mixture on medium-high speed for about 30-45 seconds. Stop once the ingredients are fully combined and the slush has a smooth, even consistency. If you notice large chunks of ice, blend for an additional 10-15 seconds. Avoid over-blending, as this can make the slush too liquidy.
  5. Once blended, taste the slush. If it needs more sweetness, add a little more sugar and blend for a few more seconds. If it’s too thick, you can add a splash of milk to reach your desired consistency.
  6. Pour the slush into glasses. This recipe typically serves 4, but you can easily double it for larger gatherings. Use a spoon to help guide the slush into the glasses if needed.
  7. Garnish each serving with fresh orange slices and mint leaves. The mint not only adds a pop of color but also a refreshing aroma that complements the citrus flavors beautifully.
  8. Serve immediately and enjoy! If you’ve made extra, you can refrigerate it for a short time, but it's best enjoyed fresh.
  • Prep Time: 15 min
  • Cook Time: 0 min
  • Category: Dessert
  • Method: Blending
  • Cuisine: American

Nutrition

  • Serving Size: 1 serving
  • Calories: 200
  • Sugar: 30 g
  • Sodium: 50 mg
  • Fat: 5 g
  • Saturated Fat: 3 g
  • Unsaturated Fat: 2 g
  • Trans Fat: 0 g
  • Carbohydrates: 40 g
  • Fiber: 1 g
  • Protein: 2 g
  • Cholesterol: 20 mg

Keywords: Don't skip the orange zest! It's a game-changer for flavor. Always zest before juicing to make it easier.

Did you make this recipe?

Share a photo and tag us — we can't wait to see what you've made!

Zesty Lemon Poppy Seed Delight

One rainy afternoon, I found myself in my grandmother’s cozy kitchen, the kind that always smelled like warmth and love. She was whipping up her famous Lemon Poppy Seed Loaf, a recipe that had been passed down through generations. As the batter came together, the zesty aroma of fresh lemons filled the air, mingling perfectly with the nutty fragrance of poppy seeds. I can still picture her, apron-clad, as she expertly drizzled a vibrant citrus icing over the loaf, creating a glossy, sun-kissed finish that beckoned us to dive in. It was a moment that sparked my own passion for baking, and this recipe has become a cherished staple in my home ever since.

When you take a bite of this Lemon Poppy Seed Loaf, it’s like a burst of sunshine on your palate. The loaf is beautifully golden, with a tender crumb that melts in your mouth. Each slice is speckled with tiny poppy seeds, adding a delightful crunch that contrasts beautifully with the tangy sweetness of the lemon. And that citrus icing? It’s the finishing touch that elevates this loaf from ordinary to extraordinary, with its bright, zesty flavor dancing on your taste buds.

This recipe stands out because it embraces simplicity while delivering on flavor. I’ve added a hint of vanilla to the batter, enhancing the overall taste and making it even more indulgent. Trust me, once you make this Lemon Poppy Seed Loaf With Citrus Icing, it’ll become a go-to in your baking repertoire.

So, let me show you exactly how to make it!

Zesty Lemon Poppy Seed Delight

Why You’ll Love This Recipe

  • Moist and tender crumb that melts in your mouth, thanks to the perfect balance of butter and buttermilk.
  • Bright, zesty lemon flavor paired with crunchy poppy seeds, creating a delightful texture and taste experience.
  • Easy to whip up in just about an hour, perfect for last-minute gatherings or a cozy afternoon treat.
  • Budget-friendly with everyday ingredients, making it an accessible option for all home bakers.
  • The citrus icing adds a sweet tang that elevates the loaf, turning a simple recipe into a showstopper!

Ingredients

  • 1 ½ cups (190g) all-purpose flour
  • 1 teaspoon baking powder
  • ½ teaspoon baking soda
  • ½ teaspoon salt
  • 3 tablespoons poppy seeds
  • ½ cup (115g) unsalted butter, softened to room temperature
  • 1 cup (200g) granulated sugar
  • 2 large eggs
  • 1 teaspoon vanilla extract
  • 1 teaspoon lemon zest (from about 1 medium lemon)
  • ½ cup (120ml) buttermilk
  • 2 tablespoons fresh lemon juice

For the Citrus Icing:

  • 1 cup (120g) powdered sugar
  • 2 tablespoons fresh lemon juice
  • 1 tablespoon orange juice
  • 1 teaspoon lemon zest (for garnish, optional)

Let’s dive into the key ingredients that make this Lemon Poppy Seed Loaf so special. The all-purpose flour provides the structure and base for the loaf, while the baking powder and baking soda ensure it rises perfectly, giving the loaf a light texture. For a gluten-free variation, you could substitute the flour with a gluten-free all-purpose blend. Poppy seeds not only add a delightful crunch but also contribute to the unique flavor profile that pairs well with the citrus notes.

Unsalted butter is crucial for achieving the buttery richness that makes this loaf so moist. If you’re looking for a dairy-free option, coconut oil or a vegan butter can be used instead. The buttermilk is another essential component, providing acidity that activates the baking soda for a fluffy texture. If you don’t have buttermilk on hand, you can easily make a substitute by mixing ½ cup of milk with 1 tablespoon of vinegar or lemon juice and letting it sit for about 5 minutes.

Step-by-Step Instructions

  1. Preheat your oven to 350°F (175°C). Grease a 9×5-inch loaf pan or line it with parchment paper for easy removal later.
  2. In a medium mixing bowl, whisk together 1 ½ cups of all-purpose flour, 1 teaspoon of baking powder, ½ teaspoon of baking soda, ½ teaspoon of salt, and 3 tablespoons of poppy seeds. This helps to evenly distribute the baking agents and ensures a uniform rise.
  3. In a large mixing bowl, cream together ½ cup of softened unsalted butter and 1 cup of granulated sugar using an electric mixer on medium speed for about 3-4 minutes, until the mixture is light and fluffy. Make sure to scrape down the sides of the bowl occasionally.
  4. Add 2 large eggs, 1 teaspoon of vanilla extract, and 1 teaspoon of lemon zest to the creamed butter and sugar, mixing until fully combined. You want a smooth consistency, so ensure there are no lumps of butter.
  5. In a small bowl, combine ½ cup of buttermilk and 2 tablespoons of fresh lemon juice. Alternately add the dry ingredients and buttermilk mixture to the butter mixture, starting and ending with the dry ingredients. Mix just until combined; do not overmix, as this can lead to a dense loaf.
  6. Pour the batter into the prepared loaf pan. Smooth the top with a spatula, ensuring it’s even. Bake in the preheated oven for 50-60 minutes, or until a toothpick inserted in the center comes out clean. The edges should be lightly golden brown, and the center should feel just set.
  7. Once baked, remove the loaf from the oven and allow it to cool in the pan for about 10 minutes. Then, transfer it to a wire rack to cool completely. Resist the urge to slice too soon, as it will be crumbly if it’s still warm.
  8. While the loaf is cooling, prepare the citrus icing. In a medium bowl, whisk together 1 cup of powdered sugar, 2 tablespoons of fresh lemon juice, and 1 tablespoon of orange juice until smooth. If the icing is too thick, you can add a little more juice to reach your desired consistency.
  9. Once the loaf is completely cool, drizzle the citrus icing over the top. If you like, sprinkle with an additional teaspoon of lemon zest for an extra pop of flavor and color.

Pro Tips for the Best Lemon Poppy Seed Loaf With Citrus Icing

  • Be careful not to overmix your batter; this is a common mistake that can lead to a dense loaf. Mix just until the dry ingredients are incorporated for a light and fluffy texture.
  • Use room temperature ingredients, especially the butter and eggs. This helps to create a smoother batter and ensures even baking. Take your eggs out of the fridge about 30 minutes before you start.
  • For a more pronounced lemon flavor, consider adding a little lemon extract in addition to the zest and juice. Just a half teaspoon can elevate the citrus notes significantly.
  • When measuring your flour, spoon it into the measuring cup and level it off with a knife instead of scooping directly from the bag. This prevents packing and ensures you don’t end up with a dry loaf.
  • Invest in a good quality loaf pan; it makes a difference in heat distribution, which ensures even baking. If your pan is dark-coated, reduce the oven temperature by 25°F to prevent over-browning.

Variations & Serving Ideas

For a delightful twist, consider adding blueberries or raspberries to the batter for a fruity burst of flavor. You can also experiment with different citrus fruits—try lime or grapefruit zest and juice for a refreshing change. For a healthier option, substitute half of the all-purpose flour with whole wheat flour for added fiber without compromising too much on texture.

This Lemon Poppy Seed Loaf pairs beautifully with a light salad, such as a mixed greens salad with a vinaigrette, or a cup of tea for a cozy afternoon treat. It also complements a creamy cheese platter, as the acidity of the loaf balances rich cheeses perfectly. Lastly, a scoop of vanilla ice cream on the side creates a delightful contrast of temperatures and flavors!

Storage, Make-Ahead & Reheating

This Lemon Poppy Seed Loaf can be stored at room temperature for up to 3 days if wrapped tightly in plastic wrap. If you want to keep it longer, it freezes well for up to 3 months. To freeze, wrap the loaf tightly in plastic wrap and then in aluminum foil to prevent freezer burn.

When you’re ready to enjoy it again, simply thaw it in the fridge overnight. Reheat individual slices in the microwave for 15-20 seconds or in a toaster oven until warmed through. Interestingly, many people find that this loaf tastes even better the next day, as the flavors have time to meld!

Frequently Asked Questions

Can I make Lemon Poppy Seed Loaf With Citrus Icing ahead of time?

Yes — in fact, it tastes even better the next day! You can make the loaf a day in advance, allowing the flavors to develop. Just be sure to store it in an airtight container to maintain its moisture.

Can I substitute the poppy seeds?

Absolutely! If you don’t have poppy seeds on hand or prefer an alternative, you can use sesame seeds for a similar crunch or omit them entirely for a smooth loaf.

What can I use instead of buttermilk?

If you don’t have buttermilk, you can easily create a substitute by mixing ½ cup of milk (dairy or plant-based) with 1 tablespoon of vinegar or lemon juice. Let it sit for 5 minutes before using in the recipe.

How can I make this recipe gluten-free?

To make a gluten-free version of this Lemon Poppy Seed Loaf, substitute the all-purpose flour with a gluten-free all-purpose flour blend. Just ensure that the blend contains a binding agent like xanthan gum for the best results.

What is the best way to store leftover loaf?

Leftover Lemon Poppy Seed Loaf should be stored in an airtight container at room temperature for up to 3 days. For longer storage, wrap it tightly and freeze for up to 3 months. Thaw it before serving for the best texture.

Zesty Lemon Poppy Seed Delight

Final Thoughts

The Lemon Poppy Seed Loaf with Citrus Icing is truly a delightful treat that brings a burst of brightness to any occasion. The zesty lemon flavor combined with the subtle crunch of poppy seeds creates a satisfying balance, while the citrus icing adds a touch of sweetness that perfectly complements the loaf’s tanginess.

This is the kind of recipe I come back to again and again, especially when I want to brighten up a gloomy day or celebrate a small victory. The aroma that fills the kitchen as it bakes is absolutely heavenly! I encourage you to give this recipe a try; you might just find it becoming a beloved staple in your home. Don’t forget to share your results or even add your own unique twist—I can’t wait to see what you create!

Print
clock clock iconcutlery cutlery iconflag flag iconfolder folder iconinstagram instagram iconpinterest pinterest iconfacebook facebook iconprint print iconsquares squares iconheart heart iconheart solid heart solid icon

Lemon Poppy Seed Loaf


  • Author: Lily author
  • Total Time: 11 minute
  • Yield: 1 loaf 1x
Pin Recipe
Print Recipe

Description

This Lemon Poppy Seed Loaf is a delightful treat that combines zesty lemon flavor with crunchy poppy seeds. Topped with a citrus icing, it’s perfect for any occasion.


Ingredients

Scale
  • 1 ½ cups (190g) all-purpose flour
  • 1 teaspoon baking powder
  • ½ teaspoon baking soda
  • ½ teaspoon salt
  • 3 tablespoons poppy seeds
  • ½ cup (115g) unsalted butter, softened to room temperature
  • 1 cup (200g) granulated sugar
  • 2 large eggs
  • 1 teaspoon vanilla extract
  • 1 teaspoon lemon zest (from about 1 medium lemon)
  • ½ cup (120ml) buttermilk
  • 2 tablespoons fresh lemon juice
  • 1 cup (120g) powdered sugar
  • 2 tablespoons fresh lemon juice
  • 1 tablespoon orange juice
  • 1 teaspoon lemon zest (for garnish, optional)

Instructions

  1. Preheat your oven to 350°F (175°C). Grease a 9×5-inch loaf pan or line it with parchment paper for easy removal later.
  2. In a medium mixing bowl, whisk together 1 ½ cups of all-purpose flour, 1 teaspoon of baking powder, ½ teaspoon of baking soda, ½ teaspoon of salt, and 3 tablespoons of poppy seeds. This helps to evenly distribute the baking agents and ensures a uniform rise.
  3. In a large mixing bowl, cream together ½ cup of softened unsalted butter and 1 cup of granulated sugar using an electric mixer on medium speed for about 3-4 minutes, until the mixture is light and fluffy. Make sure to scrape down the sides of the bowl occasionally.
  4. Add 2 large eggs, 1 teaspoon of vanilla extract, and 1 teaspoon of lemon zest to the creamed butter and sugar, mixing until fully combined. You want a smooth consistency, so ensure there are no lumps of butter.
  5. In a small bowl, combine ½ cup of buttermilk and 2 tablespoons of fresh lemon juice. Alternately add the dry ingredients and buttermilk mixture to the butter mixture, starting and ending with the dry ingredients. Mix just until combined; do not overmix, as this can lead to a dense loaf.
  6. Pour the batter into the prepared loaf pan. Smooth the top with a spatula, ensuring it’s even. Bake in the preheated oven for 50-60 minutes, or until a toothpick inserted in the center comes out clean. The edges should be lightly golden brown, and the center should feel just set.
  7. Once baked, remove the loaf from the oven and allow it to cool in the pan for about 10 minutes. Then, transfer it to a wire rack to cool completely. Resist the urge to slice too soon, as it will be crumbly if it’s still warm.
  8. While the loaf is cooling, prepare the citrus icing. In a medium bowl, whisk together 1 cup of powdered sugar, 2 tablespoons of fresh lemon juice, and 1 tablespoon of orange juice until smooth. If the icing is too thick, you can add a little more juice to reach your desired consistency.
  9. Once the loaf is completely cool, drizzle the citrus icing over the top. If you like, sprinkle with an additional teaspoon of lemon zest for an extra pop of flavor and color.
  • Prep Time: 15 mins
  • Cook Time: 50-60 mins
  • Category: Dessert
  • Method: Baking
  • Cuisine: American

Nutrition

  • Serving Size: 1 slice
  • Calories: 200
  • Sugar: 15 g
  • Sodium: 150 mg
  • Fat: 8 g
  • Saturated Fat: 5 g
  • Unsaturated Fat: 3 g
  • Trans Fat: 0 g
  • Carbohydrates: 30 g
  • Fiber: 1 g
  • Protein: 3 g
  • Cholesterol: 40 mg

Keywords: Be careful not to overmix your batter; this is a common mistake that can lead to a dense loaf. Use room temperature ingredients for a smoother batter and even baking.

Did you make this recipe?

Share a photo and tag us — we can't wait to see what you've made!

  • Privacy Policy
  • Terms Of Service
  • Contact
  • About
  • GDPR

Copyright © 2025 Homesmad