• Skip to primary navigation
  • Skip to main content
  • Skip to primary sidebar
Homesmad

Homesmad

  • Home
  • Breakfast & Brunch
  • Appetizers & Snacks
  • Dinner
  • Dessert
  • About
  • Privacy Policy
  • Contact
Homesmad
  • Home
  • Breakfast & Brunch
  • Appetizers & Snacks
  • Dinner
  • Dessert
  • About
  • Privacy Policy
  • Contact

Irresistible Campbells Green Bean Casserole Recipe

November 13, 2025 by Lily author

Irresistible Campbells Green Bean Casserole is more than just a holiday side dish; it’s a beloved tradition, a comforting staple, and an icon that brings warmth and nostalgia to countless tables. For decades, this quintessential American recipe has graced our feasts, particularly becoming synonymous with Thanksgiving celebrations. Its humble yet impactful origins trace back to the innovative kitchens of Campbell’s in 1955, where Dorcas Reilly, a home economist, ingeniously combined everyday ingredients to create a culinary legend that would stand the test of time.

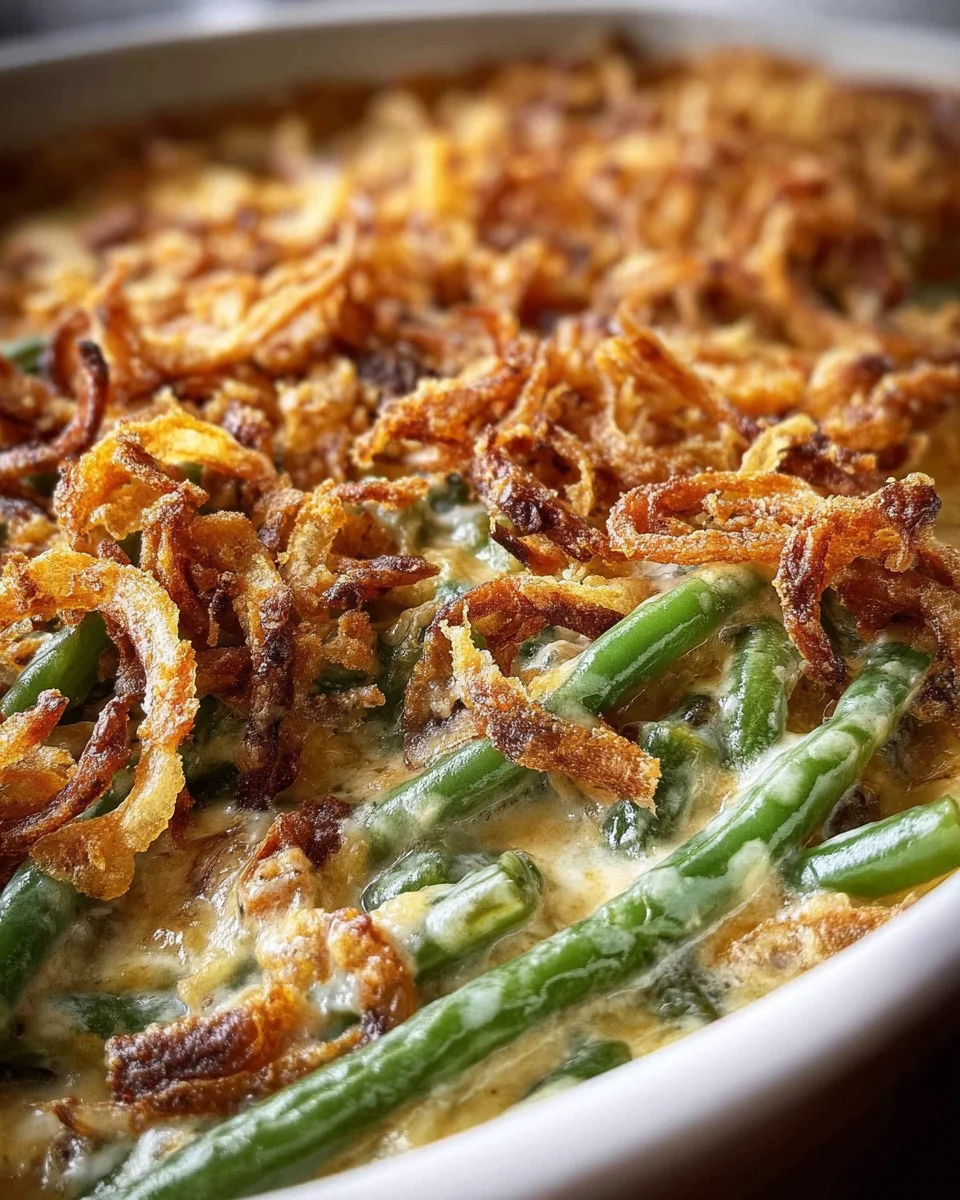
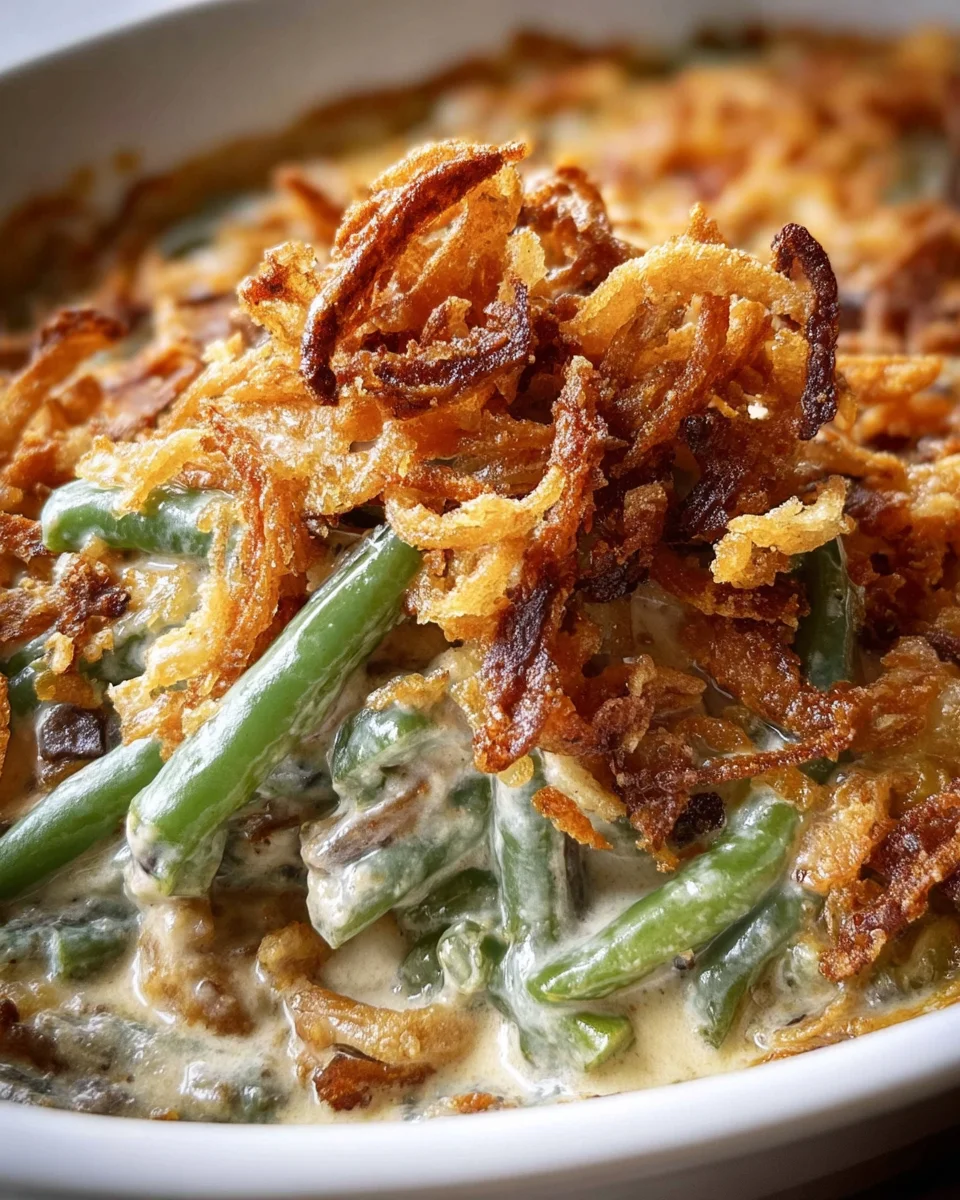
What makes this dish so enduringly popular, captivating generations with its simple charm? It’s the harmonious blend of tender green beans, enveloped in a rich and creamy mushroom soup base, all crowned with that signature crispy fried onion topping. This symphony of savory flavors and satisfying textures is universally adored, offering a delightful contrast in every bite. Beyond its incredible taste, its ease of preparation makes this particular Irresistible Campbells Green Bean Casserole recipe a go-to for busy hosts and home cooks alike. It’s a testament to how simple ingredients can create something truly extraordinary and deeply comforting.

Irresistible Campbells Green Bean Casserole Recipe this RECIPE

Ingredients:

  • Two (2) large cans (14.5 ounces each) cut green beans: For this Irresistible Campbells Green Bean Casserole, I always opt for good quality canned green beans, drained thoroughly. You can use fresh or frozen if you prefer, but be sure to blanch fresh beans and thaw frozen ones completely.
  • One (1) large can (10.5 ounces) Campbell’s Condensed Cream of Mushroom Soup: This is the absolute star of our creamy sauce, providing that iconic umami depth and velvety texture that makes this casserole so comforting. Make sure it’s condensed, not ready-to-serve!
  • One (1) cup whole milk: Whole milk contributes to a richer, creamier sauce. If you’re looking for a slightly lighter option, 2% milk can work, but for that truly indulgent feel, whole milk is my go-to.
  • One (1) teaspoon soy sauce: This secret ingredient might surprise you, but it adds an incredible layer of savory depth and enhances the mushroom flavor without making the casserole taste distinctly like soy sauce. Trust me on this one!
  • One-quarter (1/4) teaspoon black pepper: Freshly ground black pepper, if you have it, will give you the best flavor. It adds a subtle warmth and balances the richness of the other ingredients.
  • One (1) large can (6 ounces) French’s Crispy Fried Onions: Half of these will be incorporated into the casserole for texture and flavor, and the other half will be saved for that glorious, crispy topping. Don’t skimp on these; they’re essential for an authentic green bean casserole!
  • Optional: Half (1/2) cup shredded sharp cheddar cheese: While not traditional, a little cheese adds a lovely tangy, salty kick and extra creaminess. I often add it when I want to elevate the dish a bit.
  • Optional: Two (2) tablespoons unsalted butter: For sautéing aromatics if you choose to add them.
  • Optional: Half (1/2) cup sliced fresh mushrooms: For an extra boost of mushroom flavor and texture, especially if you love mushrooms as much as I do.
  • Optional: One (1) small shallot or a quarter (1/4) cup yellow onion, finely minced: To sauté and add a foundational aromatic layer.

Preparation is Key for Your Irresistible Campbells Green Bean Casserole

Gathering Your Tools and Prepping the Basics

  1. First things first, let’s get our oven ready to embrace this wonderful casserole! I always make sure to preheat it to 375°F (190°C). This ensures that when our casserole goes in, it starts cooking evenly right away, preventing a soggy bottom and promoting that beautiful golden-brown topping. It usually takes about 10-15 minutes for my oven to reach the perfect temperature, so I often start this step before anything else.
  2. Next, we need a baking dish that’s just right. I usually grab a 2-quart casserole dish. A 9×13 inch dish works perfectly if you want a slightly thinner casserole with more surface area for those crispy onions. I give it a light spray with cooking spray or a quick wipe with a bit of butter to prevent sticking, which makes cleanup so much easier later on.
  3. Now, let’s get those green beans ready. If you’re using canned green beans, which is my preferred method for this classic, make sure to drain them really well. I usually open the cans, pour them into a colander, and give them a good shake to get rid of as much excess liquid as possible. A little trick I learned is to press down on them gently with the back of a spoon to squeeze out even more water. This is crucial because too much liquid can make your casserole watery, and we want a thick, rich sauce for our Irresistible Campbells Green Bean Casserole. If you’re using fresh green beans, you’ll want to blanch them first until they are tender-crisp, then shock them in ice water and drain thoroughly. For frozen beans, simply thaw them and drain any excess water.
  4. This next step is entirely optional but highly recommended if you want to elevate the flavor even further. In a medium skillet, melt two tablespoons of unsalted butter over medium heat. Add your finely minced shallots or yellow onion and cook until softened and translucent, about 3-5 minutes. If you’re adding fresh mushrooms, toss them in now and sauté until they release their moisture and start to brown, another 5-7 minutes. This pre-cooking step builds a wonderful aromatic foundation for our casserole. Once cooked, set these savory additions aside.

Crafting the Creamy Heart of Your Green Bean Casserole

The Perfect Sauce for an Unforgettable Flavor

  1. Now for the magic! In a large mixing bowl, combine the star of the show, the Campbell’s Condensed Cream of Mushroom Soup, with the whole milk. I like to use a whisk to ensure everything is thoroughly combined and smooth. We’re looking for a velvety consistency here, with no lumps of soup concentrate remaining. This creamy mixture is what will bind all our ingredients together and provide that comforting, savory base.
  2. Next, we’re going to add our flavor enhancers. Stir in the soy sauce and the black pepper. Remember what I said about the soy sauce? It’s a game-changer! It deepens the umami notes from the mushroom soup beautifully without making the casserole taste distinctly Asian. The black pepper adds a gentle warmth and aromatic kick. Give everything another good stir to make sure these seasonings are evenly distributed throughout our luscious cream sauce. This blend of flavors is what truly makes this an Irresistible Campbells Green Bean Casserole.
  3. If you decided to sauté those optional shallots/onions and mushrooms, now is the time to add them to your cream sauce. Incorporating them at this stage ensures their delicious flavors are fully integrated into every bite. If you’re adding the optional shredded sharp cheddar cheese, fold that in now too. The cheese will melt beautifully into the sauce as it bakes, adding another layer of rich flavor and gooey texture.

Assembling the Layers of Deliciousness

Putting It All Together Before Baking

  1. It’s time to bring all our amazing components together! Gently fold the well-drained green beans into the creamy mushroom soup mixture. I use a spatula for this to avoid crushing the beans too much. You want all those lovely green beans to be thoroughly coated in the rich, savory sauce. This step is about even distribution, ensuring every spoonful of your Irresistible Campbells Green Bean Casserole is bursting with flavor.
  2. Now for one of the best parts – the crispy fried onions! Take about half of your can of French’s Crispy Fried Onions and fold them into the green bean mixture. These aren’t just for topping; incorporating some into the casserole itself adds a fantastic textural element throughout the dish, giving you little bursts of crispy, savory goodness in every bite. Save the other half for the grand finale!
  3. Once everything is nicely combined, pour the entire mixture into your prepared 2-quart casserole dish. Use your spatula to spread it evenly so you have a consistent layer across the bottom. We’re aiming for uniformity here to ensure even cooking and browning. Give the dish a gentle tap on the counter a few times to settle the mixture and remove any large air pockets.

Baking Your Irresistible Campbells Green Bean Casserole to Golden Perfection

Achieving that Crispy Topping and Bubbly Goodness

  1. Carefully transfer your casserole dish to your preheated 375°F (190°C) oven. We’re going to bake it uncovered for 25 minutes. During this initial baking phase, the casserole will heat through, the sauce will thicken, and all those wonderful flavors will meld together beautifully. You’ll start to see the edges bubbling gently, which is exactly what we want! This step is crucial for ensuring the casserole is hot and bubbly before we add the final crispy topping.
  2. After 25 minutes, carefully remove the casserole from the oven. It will be hot, so use oven mitts! Now, it’s time for the crowning glory: the remaining French’s Crispy Fried Onions. Sprinkle them generously and evenly over the top of the hot casserole. You want a nice, thick layer to achieve that perfect crispy texture. Don’t be shy here; these onions are what make the casserole truly special and provide that signature crunch.
  3. Return the casserole to the oven and continue baking for another 5 to 10 minutes. Keep a close eye on it during this final stage! The goal is for the crispy fried onions to turn a beautiful golden brown and become perfectly crisp. You’ll notice the sauce underneath bubbling vigorously. If your oven tends to brown things quickly, you might want to check it at the 5-minute mark to prevent the onions from burning. Nothing spoils an Irresistible Campbells Green Bean Casserole like burnt onions!
  4. Once the topping is golden brown and the casserole is bubbly and hot throughout, carefully remove it from the oven. I know it’s tempting to dig in immediately, but trust me, a short rest makes a big difference. Let the casserole stand for about 5-10 minutes before serving. This brief resting period allows the sauce to set up a little more, preventing it from being too runny and making it easier to scoop. Plus, it gives it a moment to cool down just enough so you don’t burn your tongue on that first glorious bite.

Tips and Tricks for the Ultimate Green Bean Casserole Experience

Making Your Casserole Stand Out

Creating an Irresistible Campbells Green Bean Casserole goes beyond just following the steps; it’s about understanding the nuances and making it your own. Over the years, I’ve picked up a few tricks that truly elevate this classic dish from good to absolutely unforgettable. Here are some of my favorite tips:

Ingredient Enhancements for Deeper Flavor
  • Roasted Garlic: For an extra layer of savory depth, try roasting a head of garlic, squeezing out the softened cloves, and mashing them into your cream of mushroom soup mixture. It adds a wonderfully sweet, pungent flavor that complements the earthiness of the mushrooms beautifully.
  • A Dash of Dry Sherry or White Wine: Just a tablespoon or two of dry sherry or a crisp white wine (like Sauvignon Blanc) stirred into the soup mixture before baking can add a sophisticated depth and complexity to the sauce. It evaporates during baking, leaving behind an incredibly rich flavor.
  • Fresh Herbs: While not traditional, a sprinkle of fresh, finely chopped thyme or parsley folded into the mixture or sprinkled on top before the final bake can brighten the flavors considerably. Thyme works exceptionally well with mushrooms and green beans.
  • Upgrade Your Onions: If you’re feeling adventurous, try making your own crispy fried onions from scratch! Thinly slice a large onion, dredge it in seasoned flour, and deep-fry until golden brown and crispy. It’s a bit more work, but the fresh flavor is unparalleled.
  • Mushroom Medley: Instead of just button mushrooms, consider using a mix of cremini, shiitake, or even a few dried porcini mushrooms (rehydrated and chopped) to give your casserole an even richer, more complex mushroom flavor.
Achieving Perfect Texture
  • Don’t Overcook the Green Beans: If using fresh green beans, blanch them only until they are tender-crisp. Overcooked beans can become mushy in the casserole. The goal is a nice contrast in textures.
  • Drain Thoroughly: I can’t stress this enough – excess moisture from the green beans is the enemy of a creamy casserole. Make sure they are as dry as possible to prevent a watery sauce. This is a critical step for an Irresistible Campbells Green Bean Casserole.
  • Crispy Topping Perfection: To ensure your crispy fried onions stay crispy, make sure the casserole is fully heated and bubbling when you add them. The steam from the hot casserole can soften them if added too early or baked for too long. If you want them extra crisp, you can even flash-bake them on a separate sheet pan for a few minutes before adding them to the casserole.
Make-Ahead and Storage Solutions
  • Make-Ahead Tips: You can assemble the entire casserole (without the final crispy onion topping) a day in advance. Cover it tightly with plastic wrap and refrigerate. When you’re ready to bake, let it sit out at room temperature for about 30 minutes while your oven preheats, then bake as directed, adding about 10-15 minutes to the initial baking time to ensure it heats through properly before adding the final topping.
  • Freezing: Green bean casserole freezes surprisingly well! Assemble the casserole without the crispy fried onions. Cover it tightly with foil and freeze for up to 3 months. To bake from frozen, thaw in the refrigerator overnight, then bake as directed. If baking from frozen, it will take significantly longer (around 1.5 to 2 hours), and you should add the crispy onions for the last 15-20 minutes of baking.
  • Reheating Leftovers: Leftovers can be gently reheated in the microwave, though the crispy onions will lose some of their crunch. For best results, reheat individual portions in a conventional oven or toaster oven at 300°F (150°C) until warmed through, often adding a fresh sprinkle of crispy onions for the last few minutes. This is how I ensure every bite of my Irresistible Campbells Green Bean Casserole remains delightful.
Serving Suggestions
  • This casserole is a Thanksgiving staple, but it’s fantastic as a side dish for any holiday meal or even a comforting weeknight dinner. It pairs beautifully with roasted turkey, ham, prime rib, or even a simple roasted chicken.
  • Don’t be afraid to double the recipe for a large crowd! Simply use a larger baking dish (or two smaller ones) and adjust baking times slightly.

With these tips and tricks, you’re not just making a recipe; you’re crafting an experience. Each step contributes to that unforgettable taste and texture that makes this Irresistible Campbells Green Bean Casserole a true crowd-pleaser every single time. Enjoy the process, and get ready for rave reviews!

Irresistible Campbells Green Bean Casserole Recipe

Conclusion:

Well, my friends, we’ve journeyed through the simple magic that transforms humble ingredients into something truly extraordinary. If you’ve been on the fence about tackling a classic, or perhaps you’re looking to perfect a dish you already adore, let me assure you: this recipe for Irresistible Campbells Green Bean Casserole is an absolute triumph, a guaranteed crowd-pleaser that embodies comfort food at its finest. What makes it a must-try, you ask? It’s the harmonious blend of creamy, savory green beans enrobed in that iconic Campbell’s mushroom soup base, crowned with a golden, crispy onion topping that delivers an explosion of texture and flavor in every single bite. It’s a dish that evokes warmth, nostalgia, and the simple joy of sharing good food with loved ones. It’s remarkably easy to prepare, forgiving for even novice cooks, and yet delivers a depth of flavor that suggests far more effort than it actually requires. Trust me, once you taste the perfect balance of tender beans, rich creaminess, and that irresistible crunch, you’ll understand why it has remained a beloved staple on countless tables for generations. It’s more than just a side dish; it’s a culinary hug, a symbol of togetherness, and a dish that truly shines whether it’s the star of a holiday feast or a comforting addition to a casual weeknight meal.

Speaking of meals, this casserole isn’t just for Thanksgiving, although it certainly reigns supreme during the festive season! Think potlucks, family gatherings, Sunday dinners, or even just a cozy evening at home when you crave something deeply satisfying. It pairs beautifully with roasted chicken, a hearty ham, or a succulent beef roast, effortlessly elevating the entire plate. But the beauty of such a timeless classic lies not just in its perfection, but also in its adaptability. While I absolutely adore the traditional rendition, I always encourage a little culinary exploration. Don’t be afraid to make this recipe truly your own!

Elevate Your Casserole with These Delicious Variations:

If you’re feeling adventurous or simply want to put a personal stamp on your dish, the possibilities are truly endless. For a richer, more decadent experience, consider folding in a handful of your favorite shredded cheese directly into the green bean mixture before baking. A sharp cheddar adds a wonderful tang, Gruyère lends a nutty, sophisticated note, and a sprinkle of Parmesan before the final bake gives it a salty, umami-rich crust. Another fantastic twist is to introduce a different topping. While crispy fried onions are non-negotiable for the classic experience, try adding some crushed buttery crackers, panko breadcrumbs toasted with a little garlic butter, or even a mix of the fried onions and some crispy bacon bits for an extra layer of savory crunch. These small additions can completely transform the texture profile without straying too far from the beloved original.

Beyond the Basic Bean: Adding More Flavor and Substance

Want to add a bit more substance? Crispy bacon, crumbled and stirred in, is always a welcome addition, imbuing the casserole with a smoky depth that is simply divine. For a vegetarian option, sautéed mushrooms (sliced cremini or button mushrooms work wonderfully) can be added to the mixture, providing an earthy, umami boost that complements the green beans perfectly. You could even get creative with your choice of soup; while Campbell’s Cream of Mushroom is the undisputed champion here, swapping in Cream of Celery or Cream of Chicken can subtly alter the flavor profile, offering a new dimension for repeat enthusiasts. A dash of garlic powder, onion powder, or even a tiny pinch of freshly grated nutmeg can also subtly enhance the overall savory notes, bringing out the best in the ingredients without overpowering them. Experiment with what you have on hand and what your taste buds crave – that’s where the real fun begins!

I truly hope this recipe inspires you to create your own cherished memories around the dinner table. There’s something profoundly satisfying about preparing a dish that brings smiles to faces and warmth to hearts, and this Irresistible Campbells Green Bean Casserole does exactly that, every single time. So, gather your ingredients, set aside a little time, and dive into this wonderful culinary experience. When you’ve had a chance to whip up your own batch, I would absolutely love to hear about it! Please, share your experience in the comments below, tell me about any creative twists you added, or even share a photo of your magnificent creation. Your insights and culinary adventures inspire me, and our community of food lovers thrives on shared experiences. Happy cooking, everyone, and get ready to enjoy a truly unforgettable side dish!


Irresistible Campbell’s Green Bean Casserole

This iconic Irresistible Campbell’s Green Bean Casserole is a beloved tradition, a comforting staple, and a quintessential American side dish, especially for Thanksgiving. Originating from Campbell’s in 1955, it features tender green beans in a rich, creamy mushroom soup base, crowned with crispy fried onions. Its harmonious blend of savory flavors and satisfying textures, combined with ease of preparation, makes it a universally adored classic.

Prep Time
25 Minutes
Cook Time
35 Minutes
Total Time
1 Hours
Servings
8 servings

Ingredients


Instructions


Important Information

Nutrition Facts (Per Serving)

It is important to consider this information as approximate and not to use it as definitive health advice.

Allergy Information

Please check ingredients for potential allergens and consult a health professional if in doubt.

« Previous Post
Delicious Italian Christmas Cookies - Your Holiday Favorite!
Next Post »
Best Christmas Fudge Recipe: Easy, Creamy, Festive Treat!

If you enjoyed this…

Spicy Crab & Shrimp Fried Rice with Garlic Chili Oil Recipe

Warm & Cozy Carrot Soup Recipe – Healthy, Simple & Flavorful

Loaded Cheddar Ranch Beef & Sweet Corn Rotini Bake Recipe

Primary Sidebar

Browse by Diet

BreakfastDinnerLunchDessertAppetizer

Sweet Peach Yogurt Parfait Delight

One of my fondest memories is from a lazy summer afternoon spent at my grandmother’s house. The sun filtered through the kitchen window, casting a warm glow over the table where she would create her culinary magic. It was during one of those blissful moments that I first tasted her Peach Yogurt Parfait with Honey and Granola. The sweet aroma of ripe peaches mingling with creamy yogurt and the crunch of granola was nothing short of heavenly. It felt like summer captured in a bowl, and I still remember the joy of diving in with a spoon, each layer revealing a new burst of flavor.

When I think about that parfait, I can almost hear the gentle hum of the bees outside, reminding me of the floral notes that honey brings to every bite. The vibrant yellows and soft oranges of the peaches contrast beautifully with the creamy white yogurt and the golden crunch of granola. It’s a dish that not only looks delightful but also tastes like a celebration of fresh, wholesome ingredients.

What makes my version of this Peach Yogurt Parfait special is the careful balance of flavors and textures. I use ripe, juicy peaches, drizzled with locally sourced honey, and a homemade granola that’s bursting with nuts and seeds for an extra crunch. It’s a simple dish, but every layer is crafted with love and attention.

Let me show you exactly how to make this delightful parfait, so you can bring a bit of that summer magic into your kitchen!

Sweet Peach Yogurt Parfait Delight

Why You’ll Love This Recipe

  • Delightfully creamy texture from the Greek yogurt, paired with the juicy sweetness of fresh peaches.
  • Ready in under 20 minutes, making it a quick and satisfying breakfast or snack option.
  • Budget-friendly, using common ingredients that you may already have in your pantry.
  • Customizable with your favorite granola and nuts, allowing you to tailor each parfait to your taste.
  • Perfectly balanced flavors with the bright acidity of lemon juice and the sweetness of honey enhancing the peaches.

Ingredients

  • For the Parfait:
  • 2 cups plain Greek yogurt (or vanilla yogurt for a sweeter option)
  • 2 large ripe peaches, diced (about 2 cups)
  • 1 tablespoon fresh lemon juice (to prevent browning of peaches)
  • 2 tablespoons honey (plus more for drizzling)
  • 1 teaspoon vanilla extract (optional for extra flavor)
  • For the Granola:
  • 1 cup granola (store-bought or homemade; see notes for a simple granola recipe)
  • 1/4 cup sliced almonds (optional for added crunch)
  • 1/4 cup shredded coconut (optional for added flavor)

Let’s dive into some key ingredients that make this Peach Yogurt Parfait so delightful! First, the Greek yogurt is not only creamy but also packed with protein, making it a satisfying option for breakfast or a snack. If you’re looking for a sweeter option, you can easily substitute it with vanilla yogurt, though it may alter the overall flavor balance. Next, the ripe peaches are the star of the show; their natural sweetness shines through, so I recommend choosing peaches that yield slightly to pressure, indicating they’re perfectly ripe. If peaches aren’t in season, feel free to use nectarines or even frozen peaches—just thaw them before use. Finally, honey adds a lovely floral sweetness that ties everything together. If you prefer, maple syrup can serve as a delicious substitute.

Step-by-Step Instructions

  1. Start by preparing the peaches. Wash them thoroughly, then slice and dice them into bite-sized pieces. In a medium bowl, toss the diced peaches with 1 tablespoon of fresh lemon juice to prevent browning. Set aside for about 5 minutes while the lemon juice works its magic.
  2. In a separate bowl, combine the Greek yogurt, 2 tablespoons of honey, and 1 teaspoon of vanilla extract if using. Stir the mixture until smooth and thoroughly blended. This should take about a minute. Avoid overmixing to maintain the creaminess of the yogurt.
  3. Now it’s time to layer your parfait. Grab a clear glass or bowl to showcase your beautiful creation. Start with a generous spoonful of the yogurt mixture at the bottom—about 1/4 cup will do. Use a spoon to spread it evenly.
  4. Add a layer of the diced peaches over the yogurt, ensuring they cover the yogurt completely. You might want to use about half of what you have prepared—roughly 1 cup. This layer should be visually appealing, so arrange the peaches neatly.
  5. Sprinkle 1/4 cup of granola over the peaches. This adds a delightful crunch. Make sure to distribute it evenly to ensure every bite has that satisfying texture. Avoid packing it down too tightly, as you want it to maintain its crunch.
  6. Repeat the layers: spoon in another 1/4 cup of yogurt, followed by another cup of peaches, and another sprinkle of granola. You should have at least two layers, but feel free to add more depending on your glass size.
  7. Finish off your parfait with a drizzle of honey on top for added sweetness and a touch of elegance. If you’re using sliced almonds or shredded coconut, sprinkle them on top now. It adds a lovely visual contrast and extra flavor.
  8. Serve immediately or refrigerate for up to 30 minutes before serving to allow the flavors to meld together. However, I recommend enjoying it fresh to maintain the granola’s crunch.

Pro Tips for the Best Peach Yogurt Parfait With Honey And Granola

  • Make sure to choose ripe peaches for the best flavor and texture. A common mistake is using unripe fruit, which can lead to a less enjoyable parfait. Look for peaches that are fragrant and slightly soft to the touch.
  • Use a clear glass to assemble your parfait; this not only makes for a beautiful presentation but also allows you to see the colorful layers, which adds to the enjoyment of eating it.
  • For an even creamier texture, consider whipping the Greek yogurt with a hand mixer for a couple of minutes before layering. This small adjustment makes a huge difference in mouthfeel.
  • Be mindful of the granola-to-yogurt ratio. Too much granola can overwhelm the parfait, while too little can make it feel too creamy. Aim for about 1/4 cup of granola per layer for the perfect balance.
  • If you’re making this for a gathering, consider preparing the yogurt and peaches ahead of time and layering them just before serving. This ensures the granola stays crunchy!

Variations & Serving Ideas

There are so many ways to get creative with your Peach Yogurt Parfait! For a tropical twist, swap out the peaches for mangoes or pineapples and top with coconut flakes. If you prefer a berry flavor, mix in some blueberries or strawberries with the peaches for added color and taste. For a nutty version, incorporate chopped walnuts or pecans instead of almonds.

As for serving ideas, this parfait pairs beautifully with a side of scrambled eggs for a hearty breakfast or fresh fruit salad for a light lunch. You might also enjoy it alongside whole grain toast with almond butter for an energizing snack. The contrast of flavors and textures will elevate your meal experience!

Storage, Make-Ahead & Reheating

The Peach Yogurt Parfait is best enjoyed fresh, but you can prepare some components ahead of time. Store the layered parfait in an airtight container in the refrigerator for up to 24 hours. However, be cautious; the granola may lose its crunch if stored too long. You can freeze the yogurt and peach mixture for up to 2 months; just remember to thaw it in the refrigerator overnight before serving.

If you plan to enjoy this dish the next day, it can taste even better as the flavors meld together. Just remember to add the granola right before serving to keep its delightful crunch!

Frequently Asked Questions

Can I make Peach Yogurt Parfait With Honey And Granola ahead of time?

Yes — in fact, it tastes even better the next day as the flavors meld. However, I recommend waiting to add the granola until just before serving to maintain its crunch.

What can I substitute for Greek yogurt?

If you prefer a lighter option, you can substitute Greek yogurt with regular yogurt or a dairy-free alternative like coconut yogurt. Just remember that this may alter the creaminess and flavor profile slightly.

Can I use frozen peaches for this parfait?

Absolutely! Just make sure to thaw the frozen peaches before using them. They will still add great flavor, though the texture may be slightly softer than fresh peaches.

How do I make the parfait vegan?

To make a vegan version, substitute the Greek yogurt with a plant-based yogurt alternative, and replace honey with maple syrup or agave nectar. This keeps the parfait sweet while adhering to a vegan diet.

What other fruits can I use in this recipe?

You can mix and match fruits based on your preference. Try using strawberries, blueberries, raspberries, or even bananas. Just make sure to adjust the lemon juice as needed to prevent browning.

Sweet Peach Yogurt Parfait Delight

Final Thoughts

The Peach Yogurt Parfait with Honey and Granola is a delightful blend of creamy yogurt, sweet peaches, and crunchy granola that creates a satisfying and nourishing treat. Each layer bursts with flavor, making it a perfect choice for breakfast or a light dessert.

This is the kind of recipe I come back to again and again, especially when I want something refreshing and wholesome to start my day. The harmony of sweet and tart flavors, combined with the delightful crunch, never fails to lift my spirits!

I encourage you to give this parfait a try and indulge in its comforting goodness. Feel free to share your results or even add your own twist—perhaps a sprinkle of cinnamon or a handful of nuts. Enjoy creating your perfect parfait!

Print
clock clock iconcutlery cutlery iconflag flag iconfolder folder iconinstagram instagram iconpinterest pinterest iconfacebook facebook iconprint print iconsquares squares iconheart heart iconheart solid heart solid icon

Peach Yogurt Parfait


  • Author: Lily author
  • Total Time: 15 minutes
  • Yield: 4 servings 1x
Pin Recipe
Print Recipe

Description

This Peach Yogurt Parfait combines creamy Greek yogurt, juicy peaches, and crunchy granola for a delightful treat. It’s a perfect breakfast or snack that captures the essence of summer in every bite.


Ingredients

Scale
  • For the Parfait:
  • 2 cups plain Greek yogurt (or vanilla yogurt for a sweeter option)
  • 2 large ripe peaches, diced (about 2 cups)
  • 1 tablespoon fresh lemon juice (to prevent browning of peaches)
  • 2 tablespoons honey (plus more for drizzling)
  • 1 teaspoon vanilla extract (optional for extra flavor)
  • For the Granola:
  • 1 cup granola (store-bought or homemade; see notes for a simple granola recipe)
  • 1/4 cup sliced almonds (optional for added crunch)
  • 1/4 cup shredded coconut (optional for added flavor)

Instructions

  1. Start by preparing the peaches. Wash them thoroughly, then slice and dice them into bite-sized pieces. In a medium bowl, toss the diced peaches with 1 tablespoon of fresh lemon juice to prevent browning. Set aside for about 5 minutes while the lemon juice works its magic.
  2. In a separate bowl, combine the Greek yogurt, 2 tablespoons of honey, and 1 teaspoon of vanilla extract if using. Stir the mixture until smooth and thoroughly blended. This should take about a minute. Avoid overmixing to maintain the creaminess of the yogurt.
  3. Now it’s time to layer your parfait. Grab a clear glass or bowl to showcase your beautiful creation. Start with a generous spoonful of the yogurt mixture at the bottom—about 1/4 cup will do. Use a spoon to spread it evenly.
  4. Add a layer of the diced peaches over the yogurt, ensuring they cover the yogurt completely. You might want to use about half of what you have prepared—roughly 1 cup. This layer should be visually appealing, so arrange the peaches neatly.
  5. Sprinkle 1/4 cup of granola over the peaches. This adds a delightful crunch. Make sure to distribute it evenly to ensure every bite has that satisfying texture. Avoid packing it down too tightly, as you want it to maintain its crunch.
  6. Repeat the layers: spoon in another 1/4 cup of yogurt, followed by another cup of peaches, and another sprinkle of granola. You should have at least two layers, but feel free to add more depending on your glass size.
  7. Finish off your parfait with a drizzle of honey on top for added sweetness and a touch of elegance. If you’re using sliced almonds or shredded coconut, sprinkle them on top now. It adds a lovely visual contrast and extra flavor.
  8. Serve immediately or refrigerate for up to 30 minutes before serving to allow the flavors to meld together. However, I recommend enjoying it fresh to maintain the granola’s crunch.
  • Prep Time: 15 mins
  • Cook Time: 0 mins
  • Category: Breakfast
  • Method: No-cook
  • Cuisine: American

Nutrition

  • Serving Size: 1 parfait
  • Calories: 250
  • Sugar: 20 g
  • Sodium: 50 mg
  • Fat: 5 g
  • Saturated Fat: 2 g
  • Unsaturated Fat: 3 g
  • Trans Fat: 0 g
  • Carbohydrates: 40 g
  • Fiber: 3 g
  • Protein: 10 g
  • Cholesterol: 10 mg

Keywords: Choose ripe peaches for the best flavor and texture. Use a clear glass for a beautiful presentation. For creaminess, consider whipping the yogurt before layering. Be mindful of the granola-to-yogurt ratio. Prepare yogurt and peaches ahead of time for gatherings, layering just before serving.

Did you make this recipe?

Share a photo and tag us — we can't wait to see what you've made!

Sun-Kissed Frozen Orange Cream Slush

As a child, summer days felt like they lasted forever. I remember the sticky heat wrapping around me as I played outside, my laughter mingling with the sounds of the neighborhood. But nothing could cool me down quite like the moment I’d spot my grandmother, laboring over her blender, whipping up her famous Frozen Orange Creamsicle Slush. That vibrant orange treat, with its frosty texture and sweet citrus aroma, was like a burst of sunshine in a cup. Just one sip, and I could feel the coolness wash over me, sparking pure joy.

This Frozen Orange Creamsicle Slush has a way of making you feel like a kid again. Its creamy, dreamy consistency is a delightful balance of bright orange and soft vanilla, inviting you to dive right in. The refreshing tang of orange dances on your tongue, while the smooth creaminess envelops you in a comforting embrace. It’s a nostalgic treat that’s perfect for hot summer afternoons or anytime you need a little pick-me-up.

What makes my version of this slush stand out is the addition of a hint of vanilla bean, which elevates the flavor and adds an extra layer of richness. Plus, it’s super easy to whip up with just a few simple ingredients that you probably already have on hand! So, if you’re ready to relive those sun-soaked memories, let me show you exactly how to make it.

Sun-Kissed Frozen Orange Cream Slush

Why You’ll Love This Recipe

  • Each slush is a perfect blend of creamy vanilla and zesty orange, creating a nostalgic flavor reminiscent of summer days.
  • This refreshing treat is ready in under 15 minutes, making it an ideal quick dessert for unexpected guests or hot afternoons.
  • With just 8 simple ingredients, it’s budget-friendly, ensuring you don’t have to break the bank to enjoy a delicious slush.
  • The slush has a perfectly smooth texture, thanks to the combination of ice and ice cream, providing a delightful contrast to the bright citrus flavors.
  • It’s highly customizable; you can easily adjust the sweetness and add fresh herbs for a unique twist that suits your taste.

Ingredients

  • 2 cups orange juice (freshly squeezed or store-bought)
  • 1 cup vanilla ice cream
  • 1 cup crushed ice
  • 1/2 cup milk (whole or 2%)
  • 1/4 cup granulated sugar (adjust based on sweetness preference)
  • 1 teaspoon vanilla extract
  • Zest of 1 orange (for added flavor)
  • Fresh orange slices and mint leaves (for garnish)

The star of this Frozen Orange Creamsicle Slush is the orange juice, which provides the vibrant, citrusy base. Freshly squeezed juice will yield the brightest flavor, but store-bought options can be just as convenient. If you’re opting for store-bought, choose 100% pure juice with no added sugars for the best results. Another essential ingredient is the vanilla ice cream; it adds creaminess and sweetness. You can substitute it with dairy-free ice cream if you’re looking for a vegan option. Whole or 2% milk complements the ice cream, creating a smooth blend. If you want a lower-calorie version, almond or oat milk can be good alternatives.

Lastly, the granulated sugar can be adjusted based on your sweetness preference. If you prefer a more natural sweetener, consider using honey or agave syrup. The orange zest enhances the flavor profile, providing an aromatic pop that brings the whole slush together. Don’t skip it! It adds an extra layer of brightness that makes this slush truly special.

Step-by-Step Instructions

  1. Start by preparing your ingredients. Gather 2 cups of orange juice, 1 cup of vanilla ice cream, and 1 cup of crushed ice. Make sure the ice is finely crushed, as larger chunks can make blending difficult.
  2. In a blender, combine the orange juice, vanilla ice cream, crushed ice, and 1/2 cup of milk. Add 1/4 cup of granulated sugar and 1 teaspoon of vanilla extract. If you like a sweeter slush, consider adding a bit more sugar at this stage.
  3. Add the zest of 1 orange to the blender. This step is crucial for enhancing the citrus flavor of your slush. Make sure not to include the bitter white pith—only the flavorful zest.
  4. Blend the mixture on medium-high speed for about 30-45 seconds. Stop once the ingredients are fully combined and the slush has a smooth, even consistency. If you notice large chunks of ice, blend for an additional 10-15 seconds. Avoid over-blending, as this can make the slush too liquidy.
  5. Once blended, taste the slush. If it needs more sweetness, add a little more sugar and blend for a few more seconds. If it’s too thick, you can add a splash of milk to reach your desired consistency.
  6. Pour the slush into glasses. This recipe typically serves 4, but you can easily double it for larger gatherings. Use a spoon to help guide the slush into the glasses if needed.
  7. Garnish each serving with fresh orange slices and mint leaves. The mint not only adds a pop of color but also a refreshing aroma that complements the citrus flavors beautifully.
  8. Serve immediately and enjoy! If you’ve made extra, you can refrigerate it for a short time, but it’s best enjoyed fresh.

Pro Tips for the Best Frozen Orange Creamsicle Slush

  • Don’t skip the orange zest! It’s a game-changer for flavor. Always zest before juicing to make it easier.
  • Use a high-powered blender for the best texture. A standard blender may struggle with ice, leading to uneven consistency. If you have a food processor, that can work too, but ensure the ice is finely crushed.
  • Adjust the ice-to-liquid ratio carefully. If your slush is too thick, it won’t blend well. Start with less ice and add more until you reach your preferred texture.
  • Be cautious with the sugar! Always start with the lower amount, as you can easily add more, but it’s hard to fix an overly sweet slush.
  • For a fun twist, consider adding a splash of coconut milk or a handful of fresh fruit like strawberries or pineapple. This not only enhances the flavor but also adds a beautiful color contrast.

Variations & Serving Ideas

There are countless ways to put a spin on your Frozen Orange Creamsicle Slush. Consider making a tropical version by adding in some pineapple juice or coconut milk for a delightful tropical twist. If you’re feeling adventurous, try incorporating a handful of frozen mango or peach slices for added sweetness. For a lighter version, swap out the vanilla ice cream for Greek yogurt for a creamy yet tangy alternative.

As for serving ideas, this refreshing slush pairs wonderfully with light summer dishes like grilled chicken skewers, fish tacos, or a simple salad topped with citrus vinaigrette. The bright, zesty flavors of the slush complement these dishes perfectly, making them an ideal pairing for a sunny day.

Storage, Make-Ahead & Reheating

This Frozen Orange Creamsicle Slush is best enjoyed fresh, but if you have leftovers, you can store them in an airtight container in the fridge for up to 2 days. Just keep in mind that the slush may lose some of its texture over time as the ice melts. It doesn’t freeze well, as the ice will turn into a solid block. If you must freeze it, blend again after thawing to restore the slushy consistency. This treat is best the day you make it, as the flavors meld together beautifully overnight, enhancing its deliciousness.

Frequently Asked Questions

Can I make Frozen Orange Creamsicle Slush ahead of time?

Yes — in fact, it tastes even better the next day as the flavors meld. However, it’s best to enjoy it fresh, as the texture can change if stored for too long. If you need to prepare it ahead, keep it in the fridge and re-blend before serving.

What kind of orange juice should I use?

For the best flavor, use freshly squeezed orange juice. However, if you’re short on time, opt for 100% pure store-bought juice without added sugars. This will ensure that your slush remains flavorful and refreshing.

Can I substitute the vanilla ice cream?

Absolutely! If you’re looking for a dairy-free option, coconut milk ice cream or a non-dairy vanilla ice cream can work wonderfully. They will still provide the creamy texture and sweetness you desire.

How can I adjust the sweetness of my slush?

You can easily adjust the sweetness by modifying the amount of sugar added. Start with 1/4 cup and taste the mixture before blending. If you prefer it sweeter, add more sugar gradually until it reaches your desired level.

What should I do if my slush is too thick?

If your slush is too thick, simply add a splash of milk or orange juice and blend again. This will help achieve a more drinkable consistency while maintaining the slushy texture. Adjust gradually to reach your preferred thickness.

Sun-Kissed Frozen Orange Cream Slush

Final Thoughts

The Frozen Orange Creamsicle Slush is a delightful blend of refreshing citrus and creamy goodness, making it a perfect treat for warm days or any time you crave a taste of nostalgia. The way the bright orange flavor dances with the creamy texture truly elevates this slush, transforming it into a satisfying escape from the everyday.

This is the kind of recipe I come back to again and again, especially when I’m looking to cool down or impress guests at a summer gathering. It’s simple to make and always brings smiles all around! I encourage you to try this recipe for yourself—don’t hesitate to share your results or even put your own spin on it. Happy slushing!

Print
clock clock iconcutlery cutlery iconflag flag iconfolder folder iconinstagram instagram iconpinterest pinterest iconfacebook facebook iconprint print iconsquares squares iconheart heart iconheart solid heart solid icon

Frozen Orange Creamsicle Slush


  • Author: Lily author
  • Total Time: 15 minutes
  • Yield: 4 servings 1x
Pin Recipe
Print Recipe

Description

This Frozen Orange Creamsicle Slush is a refreshing treat that combines creamy vanilla and zesty orange flavors. Perfect for hot summer days, it brings back nostalgic memories with every sip.


Ingredients

Scale
  • 2 cups orange juice (freshly squeezed or store-bought)
  • 1 cup vanilla ice cream
  • 1 cup crushed ice
  • 1/2 cup milk (whole or 2%)
  • 1/4 cup granulated sugar (adjust based on sweetness preference)
  • 1 teaspoon vanilla extract
  • Zest of 1 orange (for added flavor)
  • Fresh orange slices and mint leaves (for garnish)

Instructions

  1. Start by preparing your ingredients. Gather 2 cups of orange juice, 1 cup of vanilla ice cream, and 1 cup of crushed ice. Make sure the ice is finely crushed, as larger chunks can make blending difficult.
  2. In a blender, combine the orange juice, vanilla ice cream, crushed ice, and 1/2 cup of milk. Add 1/4 cup of granulated sugar and 1 teaspoon of vanilla extract. If you like a sweeter slush, consider adding a bit more sugar at this stage.
  3. Add the zest of 1 orange to the blender. This step is crucial for enhancing the citrus flavor of your slush. Make sure not to include the bitter white pith—only the flavorful zest.
  4. Blend the mixture on medium-high speed for about 30-45 seconds. Stop once the ingredients are fully combined and the slush has a smooth, even consistency. If you notice large chunks of ice, blend for an additional 10-15 seconds. Avoid over-blending, as this can make the slush too liquidy.
  5. Once blended, taste the slush. If it needs more sweetness, add a little more sugar and blend for a few more seconds. If it’s too thick, you can add a splash of milk to reach your desired consistency.
  6. Pour the slush into glasses. This recipe typically serves 4, but you can easily double it for larger gatherings. Use a spoon to help guide the slush into the glasses if needed.
  7. Garnish each serving with fresh orange slices and mint leaves. The mint not only adds a pop of color but also a refreshing aroma that complements the citrus flavors beautifully.
  8. Serve immediately and enjoy! If you’ve made extra, you can refrigerate it for a short time, but it's best enjoyed fresh.
  • Prep Time: 15 min
  • Cook Time: 0 min
  • Category: Dessert
  • Method: Blending
  • Cuisine: American

Nutrition

  • Serving Size: 1 serving
  • Calories: 200
  • Sugar: 30 g
  • Sodium: 50 mg
  • Fat: 5 g
  • Saturated Fat: 3 g
  • Unsaturated Fat: 2 g
  • Trans Fat: 0 g
  • Carbohydrates: 40 g
  • Fiber: 1 g
  • Protein: 2 g
  • Cholesterol: 20 mg

Keywords: Don't skip the orange zest! It's a game-changer for flavor. Always zest before juicing to make it easier.

Did you make this recipe?

Share a photo and tag us — we can't wait to see what you've made!

Zesty Lemon Poppy Seed Delight

One rainy afternoon, I found myself in my grandmother’s cozy kitchen, the kind that always smelled like warmth and love. She was whipping up her famous Lemon Poppy Seed Loaf, a recipe that had been passed down through generations. As the batter came together, the zesty aroma of fresh lemons filled the air, mingling perfectly with the nutty fragrance of poppy seeds. I can still picture her, apron-clad, as she expertly drizzled a vibrant citrus icing over the loaf, creating a glossy, sun-kissed finish that beckoned us to dive in. It was a moment that sparked my own passion for baking, and this recipe has become a cherished staple in my home ever since.

When you take a bite of this Lemon Poppy Seed Loaf, it’s like a burst of sunshine on your palate. The loaf is beautifully golden, with a tender crumb that melts in your mouth. Each slice is speckled with tiny poppy seeds, adding a delightful crunch that contrasts beautifully with the tangy sweetness of the lemon. And that citrus icing? It’s the finishing touch that elevates this loaf from ordinary to extraordinary, with its bright, zesty flavor dancing on your taste buds.

This recipe stands out because it embraces simplicity while delivering on flavor. I’ve added a hint of vanilla to the batter, enhancing the overall taste and making it even more indulgent. Trust me, once you make this Lemon Poppy Seed Loaf With Citrus Icing, it’ll become a go-to in your baking repertoire.

So, let me show you exactly how to make it!

Zesty Lemon Poppy Seed Delight

Why You’ll Love This Recipe

  • Moist and tender crumb that melts in your mouth, thanks to the perfect balance of butter and buttermilk.
  • Bright, zesty lemon flavor paired with crunchy poppy seeds, creating a delightful texture and taste experience.
  • Easy to whip up in just about an hour, perfect for last-minute gatherings or a cozy afternoon treat.
  • Budget-friendly with everyday ingredients, making it an accessible option for all home bakers.
  • The citrus icing adds a sweet tang that elevates the loaf, turning a simple recipe into a showstopper!

Ingredients

  • 1 ½ cups (190g) all-purpose flour
  • 1 teaspoon baking powder
  • ½ teaspoon baking soda
  • ½ teaspoon salt
  • 3 tablespoons poppy seeds
  • ½ cup (115g) unsalted butter, softened to room temperature
  • 1 cup (200g) granulated sugar
  • 2 large eggs
  • 1 teaspoon vanilla extract
  • 1 teaspoon lemon zest (from about 1 medium lemon)
  • ½ cup (120ml) buttermilk
  • 2 tablespoons fresh lemon juice

For the Citrus Icing:

  • 1 cup (120g) powdered sugar
  • 2 tablespoons fresh lemon juice
  • 1 tablespoon orange juice
  • 1 teaspoon lemon zest (for garnish, optional)

Let’s dive into the key ingredients that make this Lemon Poppy Seed Loaf so special. The all-purpose flour provides the structure and base for the loaf, while the baking powder and baking soda ensure it rises perfectly, giving the loaf a light texture. For a gluten-free variation, you could substitute the flour with a gluten-free all-purpose blend. Poppy seeds not only add a delightful crunch but also contribute to the unique flavor profile that pairs well with the citrus notes.

Unsalted butter is crucial for achieving the buttery richness that makes this loaf so moist. If you’re looking for a dairy-free option, coconut oil or a vegan butter can be used instead. The buttermilk is another essential component, providing acidity that activates the baking soda for a fluffy texture. If you don’t have buttermilk on hand, you can easily make a substitute by mixing ½ cup of milk with 1 tablespoon of vinegar or lemon juice and letting it sit for about 5 minutes.

Step-by-Step Instructions

  1. Preheat your oven to 350°F (175°C). Grease a 9×5-inch loaf pan or line it with parchment paper for easy removal later.
  2. In a medium mixing bowl, whisk together 1 ½ cups of all-purpose flour, 1 teaspoon of baking powder, ½ teaspoon of baking soda, ½ teaspoon of salt, and 3 tablespoons of poppy seeds. This helps to evenly distribute the baking agents and ensures a uniform rise.
  3. In a large mixing bowl, cream together ½ cup of softened unsalted butter and 1 cup of granulated sugar using an electric mixer on medium speed for about 3-4 minutes, until the mixture is light and fluffy. Make sure to scrape down the sides of the bowl occasionally.
  4. Add 2 large eggs, 1 teaspoon of vanilla extract, and 1 teaspoon of lemon zest to the creamed butter and sugar, mixing until fully combined. You want a smooth consistency, so ensure there are no lumps of butter.
  5. In a small bowl, combine ½ cup of buttermilk and 2 tablespoons of fresh lemon juice. Alternately add the dry ingredients and buttermilk mixture to the butter mixture, starting and ending with the dry ingredients. Mix just until combined; do not overmix, as this can lead to a dense loaf.
  6. Pour the batter into the prepared loaf pan. Smooth the top with a spatula, ensuring it’s even. Bake in the preheated oven for 50-60 minutes, or until a toothpick inserted in the center comes out clean. The edges should be lightly golden brown, and the center should feel just set.
  7. Once baked, remove the loaf from the oven and allow it to cool in the pan for about 10 minutes. Then, transfer it to a wire rack to cool completely. Resist the urge to slice too soon, as it will be crumbly if it’s still warm.
  8. While the loaf is cooling, prepare the citrus icing. In a medium bowl, whisk together 1 cup of powdered sugar, 2 tablespoons of fresh lemon juice, and 1 tablespoon of orange juice until smooth. If the icing is too thick, you can add a little more juice to reach your desired consistency.
  9. Once the loaf is completely cool, drizzle the citrus icing over the top. If you like, sprinkle with an additional teaspoon of lemon zest for an extra pop of flavor and color.

Pro Tips for the Best Lemon Poppy Seed Loaf With Citrus Icing

  • Be careful not to overmix your batter; this is a common mistake that can lead to a dense loaf. Mix just until the dry ingredients are incorporated for a light and fluffy texture.
  • Use room temperature ingredients, especially the butter and eggs. This helps to create a smoother batter and ensures even baking. Take your eggs out of the fridge about 30 minutes before you start.
  • For a more pronounced lemon flavor, consider adding a little lemon extract in addition to the zest and juice. Just a half teaspoon can elevate the citrus notes significantly.
  • When measuring your flour, spoon it into the measuring cup and level it off with a knife instead of scooping directly from the bag. This prevents packing and ensures you don’t end up with a dry loaf.
  • Invest in a good quality loaf pan; it makes a difference in heat distribution, which ensures even baking. If your pan is dark-coated, reduce the oven temperature by 25°F to prevent over-browning.

Variations & Serving Ideas

For a delightful twist, consider adding blueberries or raspberries to the batter for a fruity burst of flavor. You can also experiment with different citrus fruits—try lime or grapefruit zest and juice for a refreshing change. For a healthier option, substitute half of the all-purpose flour with whole wheat flour for added fiber without compromising too much on texture.

This Lemon Poppy Seed Loaf pairs beautifully with a light salad, such as a mixed greens salad with a vinaigrette, or a cup of tea for a cozy afternoon treat. It also complements a creamy cheese platter, as the acidity of the loaf balances rich cheeses perfectly. Lastly, a scoop of vanilla ice cream on the side creates a delightful contrast of temperatures and flavors!

Storage, Make-Ahead & Reheating

This Lemon Poppy Seed Loaf can be stored at room temperature for up to 3 days if wrapped tightly in plastic wrap. If you want to keep it longer, it freezes well for up to 3 months. To freeze, wrap the loaf tightly in plastic wrap and then in aluminum foil to prevent freezer burn.

When you’re ready to enjoy it again, simply thaw it in the fridge overnight. Reheat individual slices in the microwave for 15-20 seconds or in a toaster oven until warmed through. Interestingly, many people find that this loaf tastes even better the next day, as the flavors have time to meld!

Frequently Asked Questions

Can I make Lemon Poppy Seed Loaf With Citrus Icing ahead of time?

Yes — in fact, it tastes even better the next day! You can make the loaf a day in advance, allowing the flavors to develop. Just be sure to store it in an airtight container to maintain its moisture.

Can I substitute the poppy seeds?

Absolutely! If you don’t have poppy seeds on hand or prefer an alternative, you can use sesame seeds for a similar crunch or omit them entirely for a smooth loaf.

What can I use instead of buttermilk?

If you don’t have buttermilk, you can easily create a substitute by mixing ½ cup of milk (dairy or plant-based) with 1 tablespoon of vinegar or lemon juice. Let it sit for 5 minutes before using in the recipe.

How can I make this recipe gluten-free?

To make a gluten-free version of this Lemon Poppy Seed Loaf, substitute the all-purpose flour with a gluten-free all-purpose flour blend. Just ensure that the blend contains a binding agent like xanthan gum for the best results.

What is the best way to store leftover loaf?

Leftover Lemon Poppy Seed Loaf should be stored in an airtight container at room temperature for up to 3 days. For longer storage, wrap it tightly and freeze for up to 3 months. Thaw it before serving for the best texture.

Zesty Lemon Poppy Seed Delight

Final Thoughts

The Lemon Poppy Seed Loaf with Citrus Icing is truly a delightful treat that brings a burst of brightness to any occasion. The zesty lemon flavor combined with the subtle crunch of poppy seeds creates a satisfying balance, while the citrus icing adds a touch of sweetness that perfectly complements the loaf’s tanginess.

This is the kind of recipe I come back to again and again, especially when I want to brighten up a gloomy day or celebrate a small victory. The aroma that fills the kitchen as it bakes is absolutely heavenly! I encourage you to give this recipe a try; you might just find it becoming a beloved staple in your home. Don’t forget to share your results or even add your own unique twist—I can’t wait to see what you create!

Print
clock clock iconcutlery cutlery iconflag flag iconfolder folder iconinstagram instagram iconpinterest pinterest iconfacebook facebook iconprint print iconsquares squares iconheart heart iconheart solid heart solid icon

Lemon Poppy Seed Loaf


  • Author: Lily author
  • Total Time: 38 minute
  • Yield: 1 loaf 1x
Pin Recipe
Print Recipe

Description

This Lemon Poppy Seed Loaf is a delightful treat that combines zesty lemon flavor with crunchy poppy seeds. Topped with a citrus icing, it’s perfect for any occasion.


Ingredients

Scale
  • 1 ½ cups (190g) all-purpose flour
  • 1 teaspoon baking powder
  • ½ teaspoon baking soda
  • ½ teaspoon salt
  • 3 tablespoons poppy seeds
  • ½ cup (115g) unsalted butter, softened to room temperature
  • 1 cup (200g) granulated sugar
  • 2 large eggs
  • 1 teaspoon vanilla extract
  • 1 teaspoon lemon zest (from about 1 medium lemon)
  • ½ cup (120ml) buttermilk
  • 2 tablespoons fresh lemon juice
  • 1 cup (120g) powdered sugar
  • 2 tablespoons fresh lemon juice
  • 1 tablespoon orange juice
  • 1 teaspoon lemon zest (for garnish, optional)

Instructions

  1. Preheat your oven to 350°F (175°C). Grease a 9×5-inch loaf pan or line it with parchment paper for easy removal later.
  2. In a medium mixing bowl, whisk together 1 ½ cups of all-purpose flour, 1 teaspoon of baking powder, ½ teaspoon of baking soda, ½ teaspoon of salt, and 3 tablespoons of poppy seeds. This helps to evenly distribute the baking agents and ensures a uniform rise.
  3. In a large mixing bowl, cream together ½ cup of softened unsalted butter and 1 cup of granulated sugar using an electric mixer on medium speed for about 3-4 minutes, until the mixture is light and fluffy. Make sure to scrape down the sides of the bowl occasionally.
  4. Add 2 large eggs, 1 teaspoon of vanilla extract, and 1 teaspoon of lemon zest to the creamed butter and sugar, mixing until fully combined. You want a smooth consistency, so ensure there are no lumps of butter.
  5. In a small bowl, combine ½ cup of buttermilk and 2 tablespoons of fresh lemon juice. Alternately add the dry ingredients and buttermilk mixture to the butter mixture, starting and ending with the dry ingredients. Mix just until combined; do not overmix, as this can lead to a dense loaf.
  6. Pour the batter into the prepared loaf pan. Smooth the top with a spatula, ensuring it’s even. Bake in the preheated oven for 50-60 minutes, or until a toothpick inserted in the center comes out clean. The edges should be lightly golden brown, and the center should feel just set.
  7. Once baked, remove the loaf from the oven and allow it to cool in the pan for about 10 minutes. Then, transfer it to a wire rack to cool completely. Resist the urge to slice too soon, as it will be crumbly if it’s still warm.
  8. While the loaf is cooling, prepare the citrus icing. In a medium bowl, whisk together 1 cup of powdered sugar, 2 tablespoons of fresh lemon juice, and 1 tablespoon of orange juice until smooth. If the icing is too thick, you can add a little more juice to reach your desired consistency.
  9. Once the loaf is completely cool, drizzle the citrus icing over the top. If you like, sprinkle with an additional teaspoon of lemon zest for an extra pop of flavor and color.
  • Prep Time: 15 mins
  • Cook Time: 50-60 mins
  • Category: Dessert
  • Method: Baking
  • Cuisine: American

Nutrition

  • Serving Size: 1 slice
  • Calories: 200
  • Sugar: 15 g
  • Sodium: 150 mg
  • Fat: 8 g
  • Saturated Fat: 5 g
  • Unsaturated Fat: 3 g
  • Trans Fat: 0 g
  • Carbohydrates: 30 g
  • Fiber: 1 g
  • Protein: 3 g
  • Cholesterol: 40 mg

Keywords: Be careful not to overmix your batter; this is a common mistake that can lead to a dense loaf. Use room temperature ingredients for a smoother batter and even baking.

Did you make this recipe?

Share a photo and tag us — we can't wait to see what you've made!

  • Privacy Policy
  • Terms Of Service
  • Contact
  • About
  • GDPR

Copyright © 2025 Homesmad