• Skip to primary navigation
  • Skip to main content
  • Skip to primary sidebar
Homesmad

Homesmad

  • Home
  • Breakfast & Brunch
  • Appetizers & Snacks
  • Dinner
  • Dessert
  • About
  • Privacy Policy
  • Contact
Homesmad
  • Home
  • Breakfast & Brunch
  • Appetizers & Snacks
  • Dinner
  • Dessert
  • About
  • Privacy Policy
  • Contact

Island Coconut Pepper Rice: A Tropical Flavor Escape

October 15, 2025 by Lily author

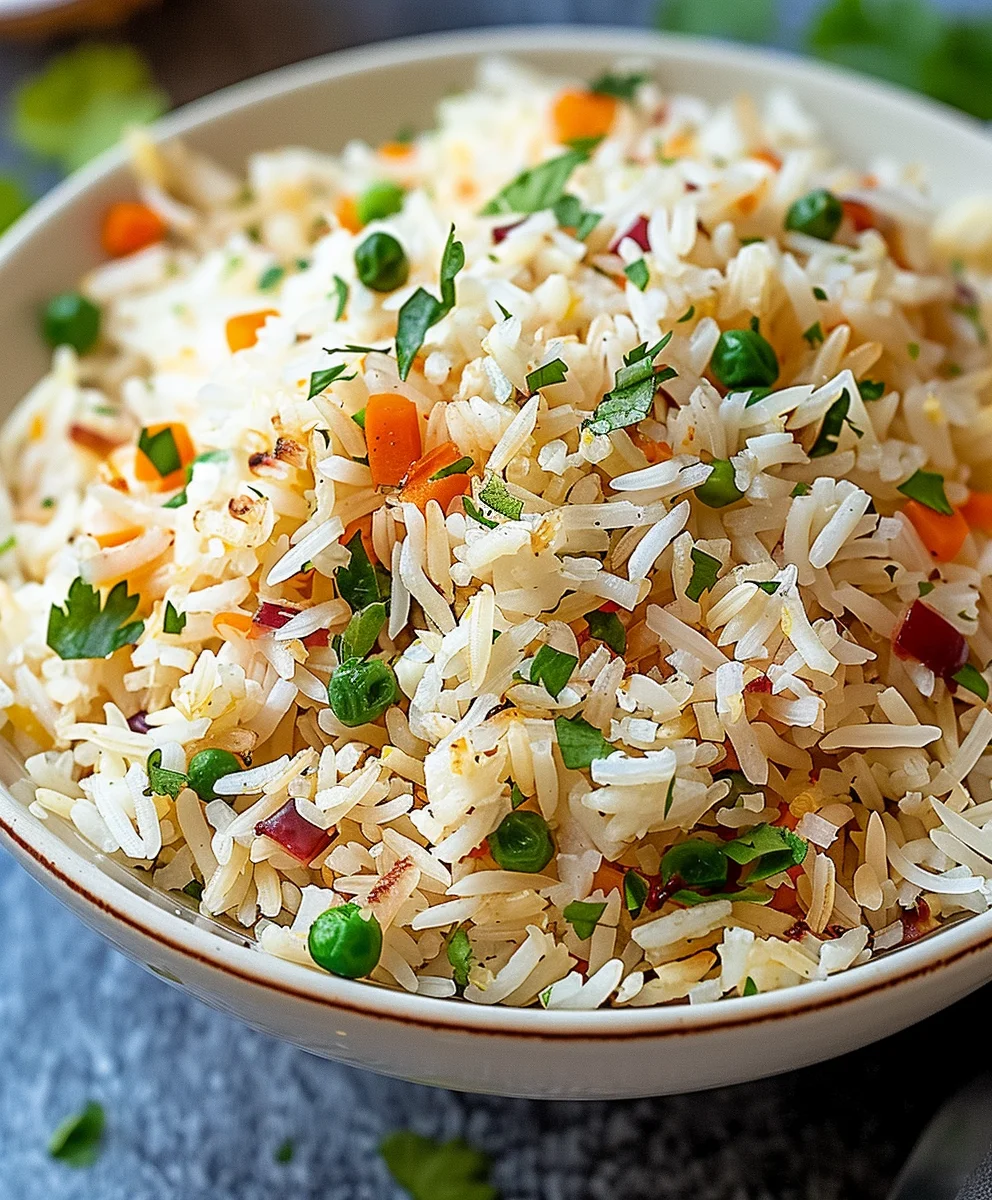
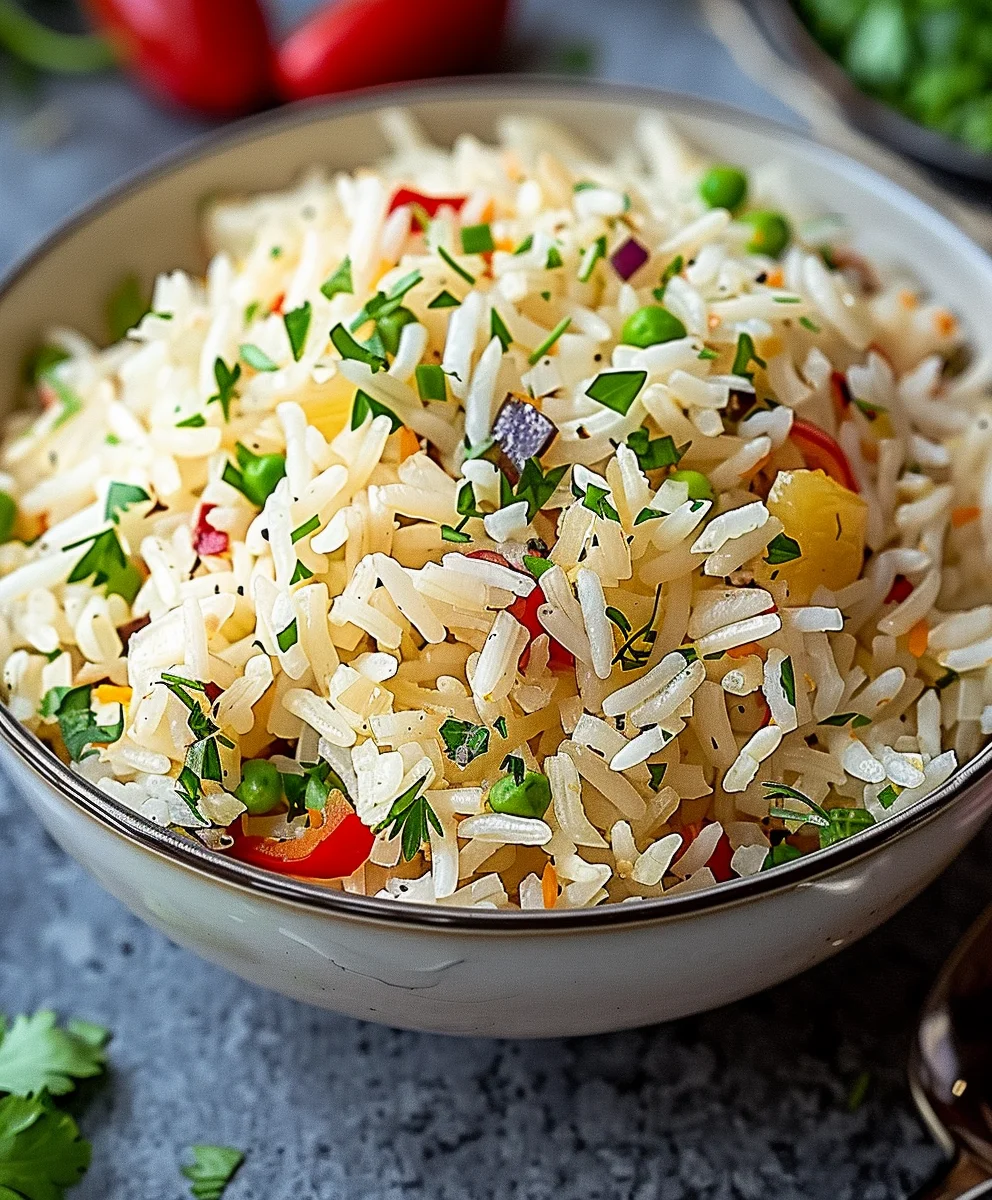
Island Coconut Pepper Rice is more than just a side dish; it’s a vibrant culinary journey that promises to transport your senses straight to sun-drenched shores with every single bite. I am truly delighted to share with you a recipe that has become a personal favorite in my kitchen, renowned for its incredible depth of flavor and irresistible aroma.

This remarkable dish, a beloved staple in various coastal cuisines around the world, masterfully combines the creamy sweetness of coconut milk with a subtle yet invigorating kick of fresh peppers. Historically, coconut rice preparations have been cherished for their ability to transform simple grains into something truly extraordinary, often served alongside grilled fish or hearty stews. People adore this particular Island Coconut Pepper Rice for its perfect balance: the fluffy, tender texture of the rice infused with rich coconut, harmoniously contrasted by the bright, zesty warmth of peppers. It’s a versatile and incredibly satisfying accompaniment that truly elevates any meal, offering a taste of the tropics right on your plate. Prepare to be enchanted by its simplicity and profound deliciousness!

Island Coconut Pepper Rice: A Tropical Flavor Escape this RECIPE

Ingredients:

  • For the Rice Base:
    • 2 cups (approx. 400g) long-grain white rice (such as Jasmine or Basmati), rinsed thoroughly until water runs clear
    • 1 tablespoon unsalted butter or coconut oil
    • 1 small yellow onion, finely diced
    • 2 cloves garlic, minced
    • 1 red bell pepper, seeds removed and finely diced
    • 1 green bell pepper, seeds removed and finely diced
    • 1-2 Scotch Bonnet peppers or Habanero peppers, seeds removed and finely minced (adjust to your spice preference, use gloves!)
    • 1 teaspoon fresh ginger, grated
    • 1 teaspoon curry powder (mild or hot, depending on preference)
    • ½ teaspoon dried thyme
    • ¼ teaspoon ground allspice
    • Salt to taste (approximately 1 ½ teaspoons, but always adjust)
    • Freshly ground black pepper to taste
  • For the Coconut Infusion:
    • 1 can (13.5 fl oz / 400ml) full-fat coconut milk
    • 1 ½ cups (360ml) vegetable broth or water
    • 2 bay leaves
    • ¼ cup fresh cilantro, chopped (for garnish and adding during cooking)
    • 2 sprigs fresh thyme (optional, for aroma during cooking)
  • Optional Garnish & Finishing Touches:
    • ¼ cup toasted shredded coconut
    • Extra fresh cilantro, chopped
    • Lime wedges for serving
    • A drizzle of your favorite hot sauce (for those who love extra heat!)

Preparing the Aromatic Base for Your Island Coconut Pepper Rice

  1. First things first, my friend, we need to get our rice ready. Take your 2 cups of long-grain white rice – Jasmine or Basmati works wonders for this dish, as their individual grains tend to stay separate and fluffy. Place the rice in a fine-mesh sieve and rinse it under cold running water. You’ll want to rinse it thoroughly, stirring it with your hand, until the water draining from the sieve runs completely clear. This step is crucial; it removes excess starch which can make your rice gummy or clumpy, and we are aiming for beautifully separated grains in our Island Coconut Pepper Rice. Once rinsed, set it aside to drain any residual water while we prepare our aromatic foundation.
  2. Now, grab a large, heavy-bottomed pot or a Dutch oven – something that has a tight-fitting lid is ideal. Place it over medium heat. Add 1 tablespoon of unsalted butter or coconut oil. Coconut oil will enhance the tropical flavors even further, but butter adds a lovely richness. Once the butter is melted and shimmering, or the coconut oil is fragrant, add your finely diced yellow onion to the pot. Sauté the onion gently, stirring occasionally, for about 5-7 minutes until it becomes translucent and soft. We’re not looking for browning here, just a gentle softening to release its sweet aromas.
  3. Next, it’s time to introduce the garlic, ginger, and our vibrant peppers. Add the 2 cloves of minced garlic and 1 teaspoon of grated fresh ginger to the softened onions. Stir constantly for about 1 minute until fragrant. Be careful not to burn the garlic! Burnt garlic can impart a bitter taste that would compromise the delicate balance of our Island Coconut Pepper Rice. Immediately follow with the finely diced red and green bell peppers. These not only add beautiful color but also a wonderful sweetness and texture.
  4. Here’s where the “pepper” in our “Island Coconut Pepper Rice” really shines! Carefully add your finely minced Scotch Bonnet or Habanero peppers. Remember, these little beauties pack a punch, so if you’re sensitive to heat, you might want to use less, or even just half of one. If you have sensitive skin, I highly recommend wearing gloves when handling them, as the capsaicin can cause irritation. Stir all these wonderful vegetables together and sauté for another 3-4 minutes until the bell peppers begin to soften slightly but still retain a bit of their crispness. The kitchen should be filling with an incredibly enticing aroma by now!
  5. Now for the spices that will truly transport us to the islands! Sprinkle in 1 teaspoon of curry powder, ½ teaspoon of dried thyme, and ¼ teaspoon of ground allspice. Stir these spices into the sautéed vegetables for about 1 minute. Toasting the spices lightly in the hot pan helps to bloom their flavors, releasing their essential oils and intensifying their aroma. You’ll notice the fragrance deepen significantly during this short period. Make sure to keep stirring to prevent the spices from burning.
  6. Finally, add your rinsed and drained long-grain rice to the pot with all those fragrant aromatics and spices. Stir well to ensure every grain of rice is coated with the butter/oil and seasoned evenly. This step, known as toasting the rice, is another secret to achieving distinct, non-sticky grains. Continue stirring gently for about 2-3 minutes until the rice grains look slightly opaque around the edges. This little bit of love at the beginning makes a huge difference in the final texture of your Island Coconut Pepper Rice.

Crafting the Creamy Coconut Infusion

  1. With our flavorful rice base ready, it’s time for the star of the show: the coconut. Pour in the entire can (13.5 fl oz / 400ml) of full-fat coconut milk. Don’t skim the cream off the top; we want all that luscious richness to infuse our rice. Follow with 1 ½ cups (360ml) of vegetable broth or water. While water will work, vegetable broth will add an extra layer of savory depth to the dish.
  2. Add 2 bay leaves to the pot. These humble leaves contribute a subtle, almost herbal, background note that complements the other flavors beautifully. If you have them, you can also toss in 2 small sprigs of fresh thyme at this stage; they will release their aroma during cooking and you can remove them before serving. Season the mixture generously with salt – I usually start with about 1 ½ teaspoons – and a good grind of fresh black pepper. Remember, you can always add more salt later, but you can’t take it away! Stir everything gently to combine.
  3. Bring the mixture to a rolling boil over medium-high heat. Once it’s boiling vigorously, give it one final, gentle stir. This ensures nothing is sticking to the bottom and that the seasonings are evenly distributed.
  4. Immediately reduce the heat to the lowest possible setting. Cover the pot tightly with its lid. This is a critical moment for perfect rice! Do not be tempted to lift the lid or stir the rice during the cooking process. The steam trapped inside is essential for cooking the rice evenly and thoroughly. Let it cook undisturbed for precisely 18-20 minutes. The exact time can vary slightly depending on your stove and pot, but 18 minutes is a good starting point for most long-grain rice.
  5. After 18-20 minutes, turn off the heat completely. Do not lift the lid yet! Let the pot sit, still covered, for an additional 10 minutes. This resting period allows the rice to continue steaming gently, absorbing any remaining liquid, and firming up its texture. It prevents the rice from being mushy and ensures each grain is perfectly cooked and separate, creating the ideal texture for our Island Coconut Pepper Rice. Trust me, patience is a virtue here!

Bringing it All Together: Assembling and Serving Your Island Coconut Pepper Rice

  1. Once the resting period is over, it’s finally time to reveal your masterpiece! Carefully remove the lid. You should be greeted by fluffy, aromatic rice, with all the liquid absorbed. Remove the bay leaves and any sprigs of fresh thyme you added during cooking.
  2. Gently fluff the rice with a fork. Instead of stirring, use a fork to lift and separate the grains from the bottom up. This aerates the rice and ensures a light, fluffy texture. As you fluff, incorporate ¼ cup of freshly chopped cilantro into the rice. The vibrant green of the cilantro adds a burst of freshness and a beautiful contrasting color to the rich tones of the rice.
  3. Taste a small portion of the Island Coconut Pepper Rice. This is your opportunity to adjust the seasoning. If it needs more salt, sprinkle it in and fluff again. If you feel it needs a little more kick, a dash of your favorite hot sauce or a tiny pinch of cayenne pepper can be added now, or simply offered at the table for individual preference.
  4. Transfer the fragrant Island Coconut Pepper Rice to a serving bowl. To make it even more enticing, consider garnishing it generously. Sprinkle with ¼ cup of toasted shredded coconut. The toasted coconut adds a lovely textural crunch and intensifies the sweet, nutty coconut flavor, which complements the savory and spicy notes of the dish so beautifully. A final flourish of extra fresh cilantro chopped on top not only looks appealing but also reinforces that fresh, herbal aroma.

Serving Suggestions and Pro Tips for the Perfect Island Coconut Pepper Rice

  1. What to Serve With: This Island Coconut Pepper Rice is incredibly versatile! It makes a fantastic side dish for grilled fish, jerk chicken, roasted pork, or even a simple pan-fried plantain. For a vegetarian meal, it pairs wonderfully with black beans, roasted vegetables, or a spicy chickpea curry. The robust flavors of the rice can stand up to and complement many different main courses.
  2. Batch Cooking & Storage: This recipe is excellent for meal prepping! Cooked Island Coconut Pepper Rice can be stored in an airtight container in the refrigerator for up to 3-4 days. To reheat, you can use the microwave (sprinkle a tablespoon of water over it before heating to keep it moist) or gently warm it in a saucepan on the stovetop over low heat with a tiny bit of water or broth, stirring occasionally.
  3. Spice Level Customization: If you love extreme heat, you can leave some of the seeds in the Scotch Bonnet or Habanero peppers, but proceed with caution! For a milder version, you can reduce the amount of spicy peppers, or even omit them entirely and just use bell peppers for flavor, perhaps adding a pinch of red pepper flakes for just a tiny warmth without the intense fruitiness of the Scotch Bonnet.
  4. Enhancing Coconut Flavor: For an even more profound coconut flavor, you can lightly toast the dry rice grains in a dry pan for a few minutes before rinsing, which gives a slightly nutty undertone. Also, using coconut oil for sautéing the aromatics instead of butter will enhance this profile.
  5. Fresh Herbs Make a Difference: While dried thyme is convenient, if you can get fresh thyme, a small amount added during the sautéing of the aromatics, and then removed before serving, will impart a brighter, more complex herbal note. Similarly, don’t skimp on the fresh cilantro at the end; it truly brightens the dish.
  6. Don’t Skimp on the Rinse: I mentioned it before, but it bears repeating: rinsing the rice until the water is clear is key. It removes surface starch, which is the enemy of fluffy, distinct rice grains. This is especially important for a dish like Island Coconut Pepper Rice where each grain should be separate and infused with flavor.
  7. Perfect Fluff Every Time: Resist the urge to peek or stir during the cooking and resting phases. Interrupting the steaming process can lead to unevenly cooked or gummy rice. Once the timer goes off, let it rest, then fluff gently with a fork. This technique will give you consistently perfect results.
  8. Serving Presentation: For a restaurant-quality presentation, you can lightly oil a small bowl or ramekin, pack some of the Island Coconut Pepper Rice into it, then invert it onto a plate to create a neat mound. Garnish around it with your chosen fresh herbs, toasted coconut, and a lime wedge.
  9. Vegetable Variations: Feel free to experiment with other finely diced vegetables you might have on hand. A little finely diced carrot or even some corn kernels can add extra sweetness and color, though they might shift the traditional “pepper rice” profile slightly. Always ensure vegetables are finely diced so they cook evenly with the rice.
  10. Salt is Your Friend (Used Wisely): Proper seasoning is paramount. Taste before adding salt, taste after adding salt, and adjust. The coconut milk and broth will absorb some salt, so don’t be afraid to season well initially, then fine-tune at the very end. A perfectly seasoned Island Coconut Pepper Rice is a truly delightful experience!

Island Coconut Pepper Rice: A Tropical Flavor Escape

Conclusion:

Well, my friends, we’ve reached the end of our culinary journey, but truly, it’s just the beginning of your adventure with this incredible dish. I sincerely hope you’re feeling as inspired and excited as I am about what you’ve learned today. This isn’t just another rice recipe; it’s an invitation to a sensory escape, a delightful fusion of flavors that promises to awaken your palate and transport you to sun-drenched shores. The rich, creamy embrace of coconut milk, perfectly balanced with the subtle kick of vibrant peppers, all infused into fluffy, fragrant rice – that’s the magic we’re talking about. It’s a dish that effortlessly marries comfort with exotic sophistication, making it an absolute must-try for anyone looking to add a truly special touch to their meal repertoire.

I’ve spent countless hours perfecting this recipe, ensuring that every step is clear, every ingredient plays its part, and the final outcome is nothing short of spectacular. What truly sets this dish apart is its unique ability to be both remarkably simple to prepare and astonishingly complex in flavor. You’ll be amazed at how easily you can create something so profoundly delicious. Imagine the aroma filling your kitchen – that sweet, tropical whisper of coconut, mingling with the fresh, slightly piquant scent of peppers, drawing everyone to the table before you even announce dinner is ready. This isn’t just food; it’s an experience, a moment of culinary bliss waiting to happen.

This beautiful Island Coconut Pepper Rice is more than just a side; it can truly be the star of your plate. Its versatility is one of its greatest strengths. For a truly unforgettable meal, I absolutely adore serving it alongside grilled seafood. Picture flaky white fish, perhaps a perfectly seared snapper or succulent jumbo shrimp, brushed with a hint of lime and garlic, nestled beside a generous mound of this flavorful rice. The textures and flavors complement each other in a way that feels utterly harmonious. If poultry is more your preference, try it with tender grilled chicken thighs marinated in a jerk-style spice blend or a simple citrus marinade. The spicy, sweet notes of the rice will provide a fantastic counterpoint to the savory chicken.

But don’t stop there! This rice is also a dream companion for heartier stews and curries. Its creamy base helps to mellow out intense spices, while its inherent flavor adds another layer of depth to your main course. For my vegetarian and vegan friends, the possibilities are equally exciting. I highly recommend pairing it with roasted root vegetables – think sweet potatoes, carrots, and parsnips caramelized to perfection – or even a hearty black bean and plantain stew. A simple pan-fried tofu or tempeh, seasoned with a touch of soy and ginger, would also be magnificent, allowing the rice to really shine.

Unleash Your Creativity: Serving Suggestions & Variations

Beyond just pairing, let’s talk about how you can make this recipe uniquely yours. While the base recipe is perfect as is, a pinch of fresh cilantro or chopped scallions as a garnish can add a vibrant burst of color and freshness. If you like a bit more heat, a finely minced Scotch Bonnet or habanero pepper can be added with caution, of course! For a milder version, simply reduce the amount of bell pepper or opt for a sweeter variety. You could even experiment with adding a squeeze of fresh lime juice at the very end to brighten all the flavors.

Consider incorporating other vegetables directly into the rice during the cooking process. Finely diced bell peppers of different colors (red, yellow, orange) would add visual appeal and a slightly different sweet crunch. A handful of frozen peas or corn stirred in during the last few minutes of cooking also works wonderfully, adding both color and a subtle sweetness. For a subtle nutty flavor, a sprinkle of toasted coconut flakes just before serving is an absolute game-changer.

And here’s a pro tip: this rice is fantastic for meal prep! Make a larger batch on the weekend, and you’ll have delicious, flavorful rice ready to accompany your lunches and dinners throughout the week. It reheats beautifully, maintaining its creamy texture and delightful aroma, making those busy weeknights a breeze.

Your Culinary Adventure Awaits!

Now, it’s your turn. I’ve shared my passion and my perfected recipe with you, and now I eagerly await to hear about your experience. Don’t be shy – dive into your kitchen, gather your ingredients, and let the magic unfold. Cook this Island Coconut Pepper Rice for your family, for your friends, or simply for yourself when you need a little culinary hug.

I am genuinely excited for you to discover the joy and satisfaction that comes from creating this extraordinary dish. Once you’ve whipped up your own batch, I wholeheartedly encourage you to share your culinary triumph! Take a photo, share your thoughts, and let me know how it turned out. Did you add your own unique twist? What did you serve it with? Your feedback and shared experiences are what make this community so vibrant and inspiring. Let’s celebrate delicious food together. Happy cooking, and I can’t wait to hear all about it!


Island Coconut Pepper Rice: A Tropical Flavor Escape

Island Coconut Pepper Rice: A Tropical Flavor Escape

Island Coconut Pepper Rice is a vibrant culinary journey that transports your senses to sun-drenched shores. This beloved staple masterfully combines the creamy sweetness of coconut milk with an invigorating kick of fresh peppers, offering a perfect balance of fluffy, tender rice infused with rich coconut and harmoniously contrasted by the bright, zesty warmth of peppers. A versatile and satisfying accompaniment that elevates any meal.

Prep Time
20 Minutes

Cook Time
45 Minutes

Total Time
5 Minutes

Servings
4 servings

Ingredients

  • 2 cups white long grain rice
  • 14 ounces plain coconut milk
  • 2 cloves garlic, finely chopped
  • 1½ teaspoons sea salt
  • ½ teaspoon ground allspice
  • ¼ teaspoon cayenne powder
  • 1 tablespoon unsalted butter
  • 1½ cups mixed yellow and red bell peppers (chopped)
  • ½ cup finely chopped red onion
  • 15 ounces canned pineapple tidbits (drained)
  • 4.5 ounces chopped green chiles
  • ¼ cup diced jalapeños
  • ¼ cup fresh cilantro (roughly chopped)

Instructions

  1. Step 1
    Rinse 2 cups long-grain white rice thoroughly until water runs clear; drain well. In a large, heavy-bottomed pot over medium heat, melt 1 tbsp unsalted butter. Add ½ cup finely chopped red onion and sauté for 5-7 minutes until translucent and soft.
  2. Step 2
    Add 2 cloves finely chopped garlic, 1½ cups chopped mixed bell peppers, 4.5 oz chopped green chiles, and ¼ cup diced jalapeños to the pot. Sauté for 3-4 minutes until bell peppers slightly soften. Stir in ½ tsp ground allspice and ¼ tsp cayenne powder; cook for 1 minute until fragrant.
  3. Step 3
    Add the rinsed and drained rice to the pot with the aromatics and spices. Stir well to coat every grain, gently toasting for 2-3 minutes until grains look slightly opaque around the edges.
  4. Step 4
    Pour in 14 oz plain coconut milk and 15 oz drained canned pineapple tidbits. Season with 1½ tsp sea salt. Bring the mixture to a rolling boil over medium-high heat, then give it one final, gentle stir. Immediately reduce heat to the lowest possible setting, cover tightly, and simmer undisturbed for 18-20 minutes.
  5. Step 5
    After 18-20 minutes, turn off the heat completely but keep the pot covered for an additional 10 minutes (do not lift the lid). Remove the lid, gently fluff the rice with a fork, and incorporate ¼ cup roughly chopped fresh cilantro. Taste and adjust seasoning as needed before serving warm.

Important Information

Nutrition Facts (Per Serving)

It is important to consider this information as approximate and not to use it as definitive health advice.

Allergy Information

Please check ingredients for potential allergens and consult a health professional if in doubt.

« Previous Post
Best Homemade Loaded Potato Soup: Hearty & Creamy Recipe!
Next Post »
Best Caramel Apple Puppy Chow - Sweet, Crunchy Snack Mix!

If you enjoyed this…

Easy Crock Pot Creamy Chicken Parmesan Soup Recipe

Slow Cooker Beef Manhattan: Easy, Tender & Flavorful Meal

Delicious Ground Beef Orzo in Creamy Tomato Sauce Recipe

Primary Sidebar

Browse by Diet

BreakfastDinnerLunchDessertAppetizer

Sweet Peach Yogurt Parfait Delight

One of my fondest memories is from a lazy summer afternoon spent at my grandmother’s house. The sun filtered through the kitchen window, casting a warm glow over the table where she would create her culinary magic. It was during one of those blissful moments that I first tasted her Peach Yogurt Parfait with Honey and Granola. The sweet aroma of ripe peaches mingling with creamy yogurt and the crunch of granola was nothing short of heavenly. It felt like summer captured in a bowl, and I still remember the joy of diving in with a spoon, each layer revealing a new burst of flavor.

When I think about that parfait, I can almost hear the gentle hum of the bees outside, reminding me of the floral notes that honey brings to every bite. The vibrant yellows and soft oranges of the peaches contrast beautifully with the creamy white yogurt and the golden crunch of granola. It’s a dish that not only looks delightful but also tastes like a celebration of fresh, wholesome ingredients.

What makes my version of this Peach Yogurt Parfait special is the careful balance of flavors and textures. I use ripe, juicy peaches, drizzled with locally sourced honey, and a homemade granola that’s bursting with nuts and seeds for an extra crunch. It’s a simple dish, but every layer is crafted with love and attention.

Let me show you exactly how to make this delightful parfait, so you can bring a bit of that summer magic into your kitchen!

Sweet Peach Yogurt Parfait Delight

Why You’ll Love This Recipe

  • Delightfully creamy texture from the Greek yogurt, paired with the juicy sweetness of fresh peaches.
  • Ready in under 20 minutes, making it a quick and satisfying breakfast or snack option.
  • Budget-friendly, using common ingredients that you may already have in your pantry.
  • Customizable with your favorite granola and nuts, allowing you to tailor each parfait to your taste.
  • Perfectly balanced flavors with the bright acidity of lemon juice and the sweetness of honey enhancing the peaches.

Ingredients

  • For the Parfait:
  • 2 cups plain Greek yogurt (or vanilla yogurt for a sweeter option)
  • 2 large ripe peaches, diced (about 2 cups)
  • 1 tablespoon fresh lemon juice (to prevent browning of peaches)
  • 2 tablespoons honey (plus more for drizzling)
  • 1 teaspoon vanilla extract (optional for extra flavor)
  • For the Granola:
  • 1 cup granola (store-bought or homemade; see notes for a simple granola recipe)
  • 1/4 cup sliced almonds (optional for added crunch)
  • 1/4 cup shredded coconut (optional for added flavor)

Let’s dive into some key ingredients that make this Peach Yogurt Parfait so delightful! First, the Greek yogurt is not only creamy but also packed with protein, making it a satisfying option for breakfast or a snack. If you’re looking for a sweeter option, you can easily substitute it with vanilla yogurt, though it may alter the overall flavor balance. Next, the ripe peaches are the star of the show; their natural sweetness shines through, so I recommend choosing peaches that yield slightly to pressure, indicating they’re perfectly ripe. If peaches aren’t in season, feel free to use nectarines or even frozen peaches—just thaw them before use. Finally, honey adds a lovely floral sweetness that ties everything together. If you prefer, maple syrup can serve as a delicious substitute.

Step-by-Step Instructions

  1. Start by preparing the peaches. Wash them thoroughly, then slice and dice them into bite-sized pieces. In a medium bowl, toss the diced peaches with 1 tablespoon of fresh lemon juice to prevent browning. Set aside for about 5 minutes while the lemon juice works its magic.
  2. In a separate bowl, combine the Greek yogurt, 2 tablespoons of honey, and 1 teaspoon of vanilla extract if using. Stir the mixture until smooth and thoroughly blended. This should take about a minute. Avoid overmixing to maintain the creaminess of the yogurt.
  3. Now it’s time to layer your parfait. Grab a clear glass or bowl to showcase your beautiful creation. Start with a generous spoonful of the yogurt mixture at the bottom—about 1/4 cup will do. Use a spoon to spread it evenly.
  4. Add a layer of the diced peaches over the yogurt, ensuring they cover the yogurt completely. You might want to use about half of what you have prepared—roughly 1 cup. This layer should be visually appealing, so arrange the peaches neatly.
  5. Sprinkle 1/4 cup of granola over the peaches. This adds a delightful crunch. Make sure to distribute it evenly to ensure every bite has that satisfying texture. Avoid packing it down too tightly, as you want it to maintain its crunch.
  6. Repeat the layers: spoon in another 1/4 cup of yogurt, followed by another cup of peaches, and another sprinkle of granola. You should have at least two layers, but feel free to add more depending on your glass size.
  7. Finish off your parfait with a drizzle of honey on top for added sweetness and a touch of elegance. If you’re using sliced almonds or shredded coconut, sprinkle them on top now. It adds a lovely visual contrast and extra flavor.
  8. Serve immediately or refrigerate for up to 30 minutes before serving to allow the flavors to meld together. However, I recommend enjoying it fresh to maintain the granola’s crunch.

Pro Tips for the Best Peach Yogurt Parfait With Honey And Granola

  • Make sure to choose ripe peaches for the best flavor and texture. A common mistake is using unripe fruit, which can lead to a less enjoyable parfait. Look for peaches that are fragrant and slightly soft to the touch.
  • Use a clear glass to assemble your parfait; this not only makes for a beautiful presentation but also allows you to see the colorful layers, which adds to the enjoyment of eating it.
  • For an even creamier texture, consider whipping the Greek yogurt with a hand mixer for a couple of minutes before layering. This small adjustment makes a huge difference in mouthfeel.
  • Be mindful of the granola-to-yogurt ratio. Too much granola can overwhelm the parfait, while too little can make it feel too creamy. Aim for about 1/4 cup of granola per layer for the perfect balance.
  • If you’re making this for a gathering, consider preparing the yogurt and peaches ahead of time and layering them just before serving. This ensures the granola stays crunchy!

Variations & Serving Ideas

There are so many ways to get creative with your Peach Yogurt Parfait! For a tropical twist, swap out the peaches for mangoes or pineapples and top with coconut flakes. If you prefer a berry flavor, mix in some blueberries or strawberries with the peaches for added color and taste. For a nutty version, incorporate chopped walnuts or pecans instead of almonds.

As for serving ideas, this parfait pairs beautifully with a side of scrambled eggs for a hearty breakfast or fresh fruit salad for a light lunch. You might also enjoy it alongside whole grain toast with almond butter for an energizing snack. The contrast of flavors and textures will elevate your meal experience!

Storage, Make-Ahead & Reheating

The Peach Yogurt Parfait is best enjoyed fresh, but you can prepare some components ahead of time. Store the layered parfait in an airtight container in the refrigerator for up to 24 hours. However, be cautious; the granola may lose its crunch if stored too long. You can freeze the yogurt and peach mixture for up to 2 months; just remember to thaw it in the refrigerator overnight before serving.

If you plan to enjoy this dish the next day, it can taste even better as the flavors meld together. Just remember to add the granola right before serving to keep its delightful crunch!

Frequently Asked Questions

Can I make Peach Yogurt Parfait With Honey And Granola ahead of time?

Yes — in fact, it tastes even better the next day as the flavors meld. However, I recommend waiting to add the granola until just before serving to maintain its crunch.

What can I substitute for Greek yogurt?

If you prefer a lighter option, you can substitute Greek yogurt with regular yogurt or a dairy-free alternative like coconut yogurt. Just remember that this may alter the creaminess and flavor profile slightly.

Can I use frozen peaches for this parfait?

Absolutely! Just make sure to thaw the frozen peaches before using them. They will still add great flavor, though the texture may be slightly softer than fresh peaches.

How do I make the parfait vegan?

To make a vegan version, substitute the Greek yogurt with a plant-based yogurt alternative, and replace honey with maple syrup or agave nectar. This keeps the parfait sweet while adhering to a vegan diet.

What other fruits can I use in this recipe?

You can mix and match fruits based on your preference. Try using strawberries, blueberries, raspberries, or even bananas. Just make sure to adjust the lemon juice as needed to prevent browning.

Sweet Peach Yogurt Parfait Delight

Final Thoughts

The Peach Yogurt Parfait with Honey and Granola is a delightful blend of creamy yogurt, sweet peaches, and crunchy granola that creates a satisfying and nourishing treat. Each layer bursts with flavor, making it a perfect choice for breakfast or a light dessert.

This is the kind of recipe I come back to again and again, especially when I want something refreshing and wholesome to start my day. The harmony of sweet and tart flavors, combined with the delightful crunch, never fails to lift my spirits!

I encourage you to give this parfait a try and indulge in its comforting goodness. Feel free to share your results or even add your own twist—perhaps a sprinkle of cinnamon or a handful of nuts. Enjoy creating your perfect parfait!

Print
clock clock iconcutlery cutlery iconflag flag iconfolder folder iconinstagram instagram iconpinterest pinterest iconfacebook facebook iconprint print iconsquares squares iconheart heart iconheart solid heart solid icon

Peach Yogurt Parfait


  • Author: Lily author
  • Total Time: 15 minutes
  • Yield: 4 servings 1x
Pin Recipe
Print Recipe

Description

This Peach Yogurt Parfait combines creamy Greek yogurt, juicy peaches, and crunchy granola for a delightful treat. It’s a perfect breakfast or snack that captures the essence of summer in every bite.


Ingredients

Scale
  • For the Parfait:
  • 2 cups plain Greek yogurt (or vanilla yogurt for a sweeter option)
  • 2 large ripe peaches, diced (about 2 cups)
  • 1 tablespoon fresh lemon juice (to prevent browning of peaches)
  • 2 tablespoons honey (plus more for drizzling)
  • 1 teaspoon vanilla extract (optional for extra flavor)
  • For the Granola:
  • 1 cup granola (store-bought or homemade; see notes for a simple granola recipe)
  • 1/4 cup sliced almonds (optional for added crunch)
  • 1/4 cup shredded coconut (optional for added flavor)

Instructions

  1. Start by preparing the peaches. Wash them thoroughly, then slice and dice them into bite-sized pieces. In a medium bowl, toss the diced peaches with 1 tablespoon of fresh lemon juice to prevent browning. Set aside for about 5 minutes while the lemon juice works its magic.
  2. In a separate bowl, combine the Greek yogurt, 2 tablespoons of honey, and 1 teaspoon of vanilla extract if using. Stir the mixture until smooth and thoroughly blended. This should take about a minute. Avoid overmixing to maintain the creaminess of the yogurt.
  3. Now it’s time to layer your parfait. Grab a clear glass or bowl to showcase your beautiful creation. Start with a generous spoonful of the yogurt mixture at the bottom—about 1/4 cup will do. Use a spoon to spread it evenly.
  4. Add a layer of the diced peaches over the yogurt, ensuring they cover the yogurt completely. You might want to use about half of what you have prepared—roughly 1 cup. This layer should be visually appealing, so arrange the peaches neatly.
  5. Sprinkle 1/4 cup of granola over the peaches. This adds a delightful crunch. Make sure to distribute it evenly to ensure every bite has that satisfying texture. Avoid packing it down too tightly, as you want it to maintain its crunch.
  6. Repeat the layers: spoon in another 1/4 cup of yogurt, followed by another cup of peaches, and another sprinkle of granola. You should have at least two layers, but feel free to add more depending on your glass size.
  7. Finish off your parfait with a drizzle of honey on top for added sweetness and a touch of elegance. If you’re using sliced almonds or shredded coconut, sprinkle them on top now. It adds a lovely visual contrast and extra flavor.
  8. Serve immediately or refrigerate for up to 30 minutes before serving to allow the flavors to meld together. However, I recommend enjoying it fresh to maintain the granola’s crunch.
  • Prep Time: 15 mins
  • Cook Time: 0 mins
  • Category: Breakfast
  • Method: No-cook
  • Cuisine: American

Nutrition

  • Serving Size: 1 parfait
  • Calories: 250
  • Sugar: 20 g
  • Sodium: 50 mg
  • Fat: 5 g
  • Saturated Fat: 2 g
  • Unsaturated Fat: 3 g
  • Trans Fat: 0 g
  • Carbohydrates: 40 g
  • Fiber: 3 g
  • Protein: 10 g
  • Cholesterol: 10 mg

Keywords: Choose ripe peaches for the best flavor and texture. Use a clear glass for a beautiful presentation. For creaminess, consider whipping the yogurt before layering. Be mindful of the granola-to-yogurt ratio. Prepare yogurt and peaches ahead of time for gatherings, layering just before serving.

Did you make this recipe?

Share a photo and tag us — we can't wait to see what you've made!

Sun-Kissed Frozen Orange Cream Slush

As a child, summer days felt like they lasted forever. I remember the sticky heat wrapping around me as I played outside, my laughter mingling with the sounds of the neighborhood. But nothing could cool me down quite like the moment I’d spot my grandmother, laboring over her blender, whipping up her famous Frozen Orange Creamsicle Slush. That vibrant orange treat, with its frosty texture and sweet citrus aroma, was like a burst of sunshine in a cup. Just one sip, and I could feel the coolness wash over me, sparking pure joy.

This Frozen Orange Creamsicle Slush has a way of making you feel like a kid again. Its creamy, dreamy consistency is a delightful balance of bright orange and soft vanilla, inviting you to dive right in. The refreshing tang of orange dances on your tongue, while the smooth creaminess envelops you in a comforting embrace. It’s a nostalgic treat that’s perfect for hot summer afternoons or anytime you need a little pick-me-up.

What makes my version of this slush stand out is the addition of a hint of vanilla bean, which elevates the flavor and adds an extra layer of richness. Plus, it’s super easy to whip up with just a few simple ingredients that you probably already have on hand! So, if you’re ready to relive those sun-soaked memories, let me show you exactly how to make it.

Sun-Kissed Frozen Orange Cream Slush

Why You’ll Love This Recipe

  • Each slush is a perfect blend of creamy vanilla and zesty orange, creating a nostalgic flavor reminiscent of summer days.
  • This refreshing treat is ready in under 15 minutes, making it an ideal quick dessert for unexpected guests or hot afternoons.
  • With just 8 simple ingredients, it’s budget-friendly, ensuring you don’t have to break the bank to enjoy a delicious slush.
  • The slush has a perfectly smooth texture, thanks to the combination of ice and ice cream, providing a delightful contrast to the bright citrus flavors.
  • It’s highly customizable; you can easily adjust the sweetness and add fresh herbs for a unique twist that suits your taste.

Ingredients

  • 2 cups orange juice (freshly squeezed or store-bought)
  • 1 cup vanilla ice cream
  • 1 cup crushed ice
  • 1/2 cup milk (whole or 2%)
  • 1/4 cup granulated sugar (adjust based on sweetness preference)
  • 1 teaspoon vanilla extract
  • Zest of 1 orange (for added flavor)
  • Fresh orange slices and mint leaves (for garnish)

The star of this Frozen Orange Creamsicle Slush is the orange juice, which provides the vibrant, citrusy base. Freshly squeezed juice will yield the brightest flavor, but store-bought options can be just as convenient. If you’re opting for store-bought, choose 100% pure juice with no added sugars for the best results. Another essential ingredient is the vanilla ice cream; it adds creaminess and sweetness. You can substitute it with dairy-free ice cream if you’re looking for a vegan option. Whole or 2% milk complements the ice cream, creating a smooth blend. If you want a lower-calorie version, almond or oat milk can be good alternatives.

Lastly, the granulated sugar can be adjusted based on your sweetness preference. If you prefer a more natural sweetener, consider using honey or agave syrup. The orange zest enhances the flavor profile, providing an aromatic pop that brings the whole slush together. Don’t skip it! It adds an extra layer of brightness that makes this slush truly special.

Step-by-Step Instructions

  1. Start by preparing your ingredients. Gather 2 cups of orange juice, 1 cup of vanilla ice cream, and 1 cup of crushed ice. Make sure the ice is finely crushed, as larger chunks can make blending difficult.
  2. In a blender, combine the orange juice, vanilla ice cream, crushed ice, and 1/2 cup of milk. Add 1/4 cup of granulated sugar and 1 teaspoon of vanilla extract. If you like a sweeter slush, consider adding a bit more sugar at this stage.
  3. Add the zest of 1 orange to the blender. This step is crucial for enhancing the citrus flavor of your slush. Make sure not to include the bitter white pith—only the flavorful zest.
  4. Blend the mixture on medium-high speed for about 30-45 seconds. Stop once the ingredients are fully combined and the slush has a smooth, even consistency. If you notice large chunks of ice, blend for an additional 10-15 seconds. Avoid over-blending, as this can make the slush too liquidy.
  5. Once blended, taste the slush. If it needs more sweetness, add a little more sugar and blend for a few more seconds. If it’s too thick, you can add a splash of milk to reach your desired consistency.
  6. Pour the slush into glasses. This recipe typically serves 4, but you can easily double it for larger gatherings. Use a spoon to help guide the slush into the glasses if needed.
  7. Garnish each serving with fresh orange slices and mint leaves. The mint not only adds a pop of color but also a refreshing aroma that complements the citrus flavors beautifully.
  8. Serve immediately and enjoy! If you’ve made extra, you can refrigerate it for a short time, but it’s best enjoyed fresh.

Pro Tips for the Best Frozen Orange Creamsicle Slush

  • Don’t skip the orange zest! It’s a game-changer for flavor. Always zest before juicing to make it easier.
  • Use a high-powered blender for the best texture. A standard blender may struggle with ice, leading to uneven consistency. If you have a food processor, that can work too, but ensure the ice is finely crushed.
  • Adjust the ice-to-liquid ratio carefully. If your slush is too thick, it won’t blend well. Start with less ice and add more until you reach your preferred texture.
  • Be cautious with the sugar! Always start with the lower amount, as you can easily add more, but it’s hard to fix an overly sweet slush.
  • For a fun twist, consider adding a splash of coconut milk or a handful of fresh fruit like strawberries or pineapple. This not only enhances the flavor but also adds a beautiful color contrast.

Variations & Serving Ideas

There are countless ways to put a spin on your Frozen Orange Creamsicle Slush. Consider making a tropical version by adding in some pineapple juice or coconut milk for a delightful tropical twist. If you’re feeling adventurous, try incorporating a handful of frozen mango or peach slices for added sweetness. For a lighter version, swap out the vanilla ice cream for Greek yogurt for a creamy yet tangy alternative.

As for serving ideas, this refreshing slush pairs wonderfully with light summer dishes like grilled chicken skewers, fish tacos, or a simple salad topped with citrus vinaigrette. The bright, zesty flavors of the slush complement these dishes perfectly, making them an ideal pairing for a sunny day.

Storage, Make-Ahead & Reheating

This Frozen Orange Creamsicle Slush is best enjoyed fresh, but if you have leftovers, you can store them in an airtight container in the fridge for up to 2 days. Just keep in mind that the slush may lose some of its texture over time as the ice melts. It doesn’t freeze well, as the ice will turn into a solid block. If you must freeze it, blend again after thawing to restore the slushy consistency. This treat is best the day you make it, as the flavors meld together beautifully overnight, enhancing its deliciousness.

Frequently Asked Questions

Can I make Frozen Orange Creamsicle Slush ahead of time?

Yes — in fact, it tastes even better the next day as the flavors meld. However, it’s best to enjoy it fresh, as the texture can change if stored for too long. If you need to prepare it ahead, keep it in the fridge and re-blend before serving.

What kind of orange juice should I use?

For the best flavor, use freshly squeezed orange juice. However, if you’re short on time, opt for 100% pure store-bought juice without added sugars. This will ensure that your slush remains flavorful and refreshing.

Can I substitute the vanilla ice cream?

Absolutely! If you’re looking for a dairy-free option, coconut milk ice cream or a non-dairy vanilla ice cream can work wonderfully. They will still provide the creamy texture and sweetness you desire.

How can I adjust the sweetness of my slush?

You can easily adjust the sweetness by modifying the amount of sugar added. Start with 1/4 cup and taste the mixture before blending. If you prefer it sweeter, add more sugar gradually until it reaches your desired level.

What should I do if my slush is too thick?

If your slush is too thick, simply add a splash of milk or orange juice and blend again. This will help achieve a more drinkable consistency while maintaining the slushy texture. Adjust gradually to reach your preferred thickness.

Sun-Kissed Frozen Orange Cream Slush

Final Thoughts

The Frozen Orange Creamsicle Slush is a delightful blend of refreshing citrus and creamy goodness, making it a perfect treat for warm days or any time you crave a taste of nostalgia. The way the bright orange flavor dances with the creamy texture truly elevates this slush, transforming it into a satisfying escape from the everyday.

This is the kind of recipe I come back to again and again, especially when I’m looking to cool down or impress guests at a summer gathering. It’s simple to make and always brings smiles all around! I encourage you to try this recipe for yourself—don’t hesitate to share your results or even put your own spin on it. Happy slushing!

Print
clock clock iconcutlery cutlery iconflag flag iconfolder folder iconinstagram instagram iconpinterest pinterest iconfacebook facebook iconprint print iconsquares squares iconheart heart iconheart solid heart solid icon

Frozen Orange Creamsicle Slush


  • Author: Lily author
  • Total Time: 15 minutes
  • Yield: 4 servings 1x
Pin Recipe
Print Recipe

Description

This Frozen Orange Creamsicle Slush is a refreshing treat that combines creamy vanilla and zesty orange flavors. Perfect for hot summer days, it brings back nostalgic memories with every sip.


Ingredients

Scale
  • 2 cups orange juice (freshly squeezed or store-bought)
  • 1 cup vanilla ice cream
  • 1 cup crushed ice
  • 1/2 cup milk (whole or 2%)
  • 1/4 cup granulated sugar (adjust based on sweetness preference)
  • 1 teaspoon vanilla extract
  • Zest of 1 orange (for added flavor)
  • Fresh orange slices and mint leaves (for garnish)

Instructions

  1. Start by preparing your ingredients. Gather 2 cups of orange juice, 1 cup of vanilla ice cream, and 1 cup of crushed ice. Make sure the ice is finely crushed, as larger chunks can make blending difficult.
  2. In a blender, combine the orange juice, vanilla ice cream, crushed ice, and 1/2 cup of milk. Add 1/4 cup of granulated sugar and 1 teaspoon of vanilla extract. If you like a sweeter slush, consider adding a bit more sugar at this stage.
  3. Add the zest of 1 orange to the blender. This step is crucial for enhancing the citrus flavor of your slush. Make sure not to include the bitter white pith—only the flavorful zest.
  4. Blend the mixture on medium-high speed for about 30-45 seconds. Stop once the ingredients are fully combined and the slush has a smooth, even consistency. If you notice large chunks of ice, blend for an additional 10-15 seconds. Avoid over-blending, as this can make the slush too liquidy.
  5. Once blended, taste the slush. If it needs more sweetness, add a little more sugar and blend for a few more seconds. If it’s too thick, you can add a splash of milk to reach your desired consistency.
  6. Pour the slush into glasses. This recipe typically serves 4, but you can easily double it for larger gatherings. Use a spoon to help guide the slush into the glasses if needed.
  7. Garnish each serving with fresh orange slices and mint leaves. The mint not only adds a pop of color but also a refreshing aroma that complements the citrus flavors beautifully.
  8. Serve immediately and enjoy! If you’ve made extra, you can refrigerate it for a short time, but it's best enjoyed fresh.
  • Prep Time: 15 min
  • Cook Time: 0 min
  • Category: Dessert
  • Method: Blending
  • Cuisine: American

Nutrition

  • Serving Size: 1 serving
  • Calories: 200
  • Sugar: 30 g
  • Sodium: 50 mg
  • Fat: 5 g
  • Saturated Fat: 3 g
  • Unsaturated Fat: 2 g
  • Trans Fat: 0 g
  • Carbohydrates: 40 g
  • Fiber: 1 g
  • Protein: 2 g
  • Cholesterol: 20 mg

Keywords: Don't skip the orange zest! It's a game-changer for flavor. Always zest before juicing to make it easier.

Did you make this recipe?

Share a photo and tag us — we can't wait to see what you've made!

Zesty Lemon Poppy Seed Delight

One rainy afternoon, I found myself in my grandmother’s cozy kitchen, the kind that always smelled like warmth and love. She was whipping up her famous Lemon Poppy Seed Loaf, a recipe that had been passed down through generations. As the batter came together, the zesty aroma of fresh lemons filled the air, mingling perfectly with the nutty fragrance of poppy seeds. I can still picture her, apron-clad, as she expertly drizzled a vibrant citrus icing over the loaf, creating a glossy, sun-kissed finish that beckoned us to dive in. It was a moment that sparked my own passion for baking, and this recipe has become a cherished staple in my home ever since.

When you take a bite of this Lemon Poppy Seed Loaf, it’s like a burst of sunshine on your palate. The loaf is beautifully golden, with a tender crumb that melts in your mouth. Each slice is speckled with tiny poppy seeds, adding a delightful crunch that contrasts beautifully with the tangy sweetness of the lemon. And that citrus icing? It’s the finishing touch that elevates this loaf from ordinary to extraordinary, with its bright, zesty flavor dancing on your taste buds.

This recipe stands out because it embraces simplicity while delivering on flavor. I’ve added a hint of vanilla to the batter, enhancing the overall taste and making it even more indulgent. Trust me, once you make this Lemon Poppy Seed Loaf With Citrus Icing, it’ll become a go-to in your baking repertoire.

So, let me show you exactly how to make it!

Zesty Lemon Poppy Seed Delight

Why You’ll Love This Recipe

  • Moist and tender crumb that melts in your mouth, thanks to the perfect balance of butter and buttermilk.
  • Bright, zesty lemon flavor paired with crunchy poppy seeds, creating a delightful texture and taste experience.
  • Easy to whip up in just about an hour, perfect for last-minute gatherings or a cozy afternoon treat.
  • Budget-friendly with everyday ingredients, making it an accessible option for all home bakers.
  • The citrus icing adds a sweet tang that elevates the loaf, turning a simple recipe into a showstopper!

Ingredients

  • 1 ½ cups (190g) all-purpose flour
  • 1 teaspoon baking powder
  • ½ teaspoon baking soda
  • ½ teaspoon salt
  • 3 tablespoons poppy seeds
  • ½ cup (115g) unsalted butter, softened to room temperature
  • 1 cup (200g) granulated sugar
  • 2 large eggs
  • 1 teaspoon vanilla extract
  • 1 teaspoon lemon zest (from about 1 medium lemon)
  • ½ cup (120ml) buttermilk
  • 2 tablespoons fresh lemon juice

For the Citrus Icing:

  • 1 cup (120g) powdered sugar
  • 2 tablespoons fresh lemon juice
  • 1 tablespoon orange juice
  • 1 teaspoon lemon zest (for garnish, optional)

Let’s dive into the key ingredients that make this Lemon Poppy Seed Loaf so special. The all-purpose flour provides the structure and base for the loaf, while the baking powder and baking soda ensure it rises perfectly, giving the loaf a light texture. For a gluten-free variation, you could substitute the flour with a gluten-free all-purpose blend. Poppy seeds not only add a delightful crunch but also contribute to the unique flavor profile that pairs well with the citrus notes.

Unsalted butter is crucial for achieving the buttery richness that makes this loaf so moist. If you’re looking for a dairy-free option, coconut oil or a vegan butter can be used instead. The buttermilk is another essential component, providing acidity that activates the baking soda for a fluffy texture. If you don’t have buttermilk on hand, you can easily make a substitute by mixing ½ cup of milk with 1 tablespoon of vinegar or lemon juice and letting it sit for about 5 minutes.

Step-by-Step Instructions

  1. Preheat your oven to 350°F (175°C). Grease a 9×5-inch loaf pan or line it with parchment paper for easy removal later.
  2. In a medium mixing bowl, whisk together 1 ½ cups of all-purpose flour, 1 teaspoon of baking powder, ½ teaspoon of baking soda, ½ teaspoon of salt, and 3 tablespoons of poppy seeds. This helps to evenly distribute the baking agents and ensures a uniform rise.
  3. In a large mixing bowl, cream together ½ cup of softened unsalted butter and 1 cup of granulated sugar using an electric mixer on medium speed for about 3-4 minutes, until the mixture is light and fluffy. Make sure to scrape down the sides of the bowl occasionally.
  4. Add 2 large eggs, 1 teaspoon of vanilla extract, and 1 teaspoon of lemon zest to the creamed butter and sugar, mixing until fully combined. You want a smooth consistency, so ensure there are no lumps of butter.
  5. In a small bowl, combine ½ cup of buttermilk and 2 tablespoons of fresh lemon juice. Alternately add the dry ingredients and buttermilk mixture to the butter mixture, starting and ending with the dry ingredients. Mix just until combined; do not overmix, as this can lead to a dense loaf.
  6. Pour the batter into the prepared loaf pan. Smooth the top with a spatula, ensuring it’s even. Bake in the preheated oven for 50-60 minutes, or until a toothpick inserted in the center comes out clean. The edges should be lightly golden brown, and the center should feel just set.
  7. Once baked, remove the loaf from the oven and allow it to cool in the pan for about 10 minutes. Then, transfer it to a wire rack to cool completely. Resist the urge to slice too soon, as it will be crumbly if it’s still warm.
  8. While the loaf is cooling, prepare the citrus icing. In a medium bowl, whisk together 1 cup of powdered sugar, 2 tablespoons of fresh lemon juice, and 1 tablespoon of orange juice until smooth. If the icing is too thick, you can add a little more juice to reach your desired consistency.
  9. Once the loaf is completely cool, drizzle the citrus icing over the top. If you like, sprinkle with an additional teaspoon of lemon zest for an extra pop of flavor and color.

Pro Tips for the Best Lemon Poppy Seed Loaf With Citrus Icing

  • Be careful not to overmix your batter; this is a common mistake that can lead to a dense loaf. Mix just until the dry ingredients are incorporated for a light and fluffy texture.
  • Use room temperature ingredients, especially the butter and eggs. This helps to create a smoother batter and ensures even baking. Take your eggs out of the fridge about 30 minutes before you start.
  • For a more pronounced lemon flavor, consider adding a little lemon extract in addition to the zest and juice. Just a half teaspoon can elevate the citrus notes significantly.
  • When measuring your flour, spoon it into the measuring cup and level it off with a knife instead of scooping directly from the bag. This prevents packing and ensures you don’t end up with a dry loaf.
  • Invest in a good quality loaf pan; it makes a difference in heat distribution, which ensures even baking. If your pan is dark-coated, reduce the oven temperature by 25°F to prevent over-browning.

Variations & Serving Ideas

For a delightful twist, consider adding blueberries or raspberries to the batter for a fruity burst of flavor. You can also experiment with different citrus fruits—try lime or grapefruit zest and juice for a refreshing change. For a healthier option, substitute half of the all-purpose flour with whole wheat flour for added fiber without compromising too much on texture.

This Lemon Poppy Seed Loaf pairs beautifully with a light salad, such as a mixed greens salad with a vinaigrette, or a cup of tea for a cozy afternoon treat. It also complements a creamy cheese platter, as the acidity of the loaf balances rich cheeses perfectly. Lastly, a scoop of vanilla ice cream on the side creates a delightful contrast of temperatures and flavors!

Storage, Make-Ahead & Reheating

This Lemon Poppy Seed Loaf can be stored at room temperature for up to 3 days if wrapped tightly in plastic wrap. If you want to keep it longer, it freezes well for up to 3 months. To freeze, wrap the loaf tightly in plastic wrap and then in aluminum foil to prevent freezer burn.

When you’re ready to enjoy it again, simply thaw it in the fridge overnight. Reheat individual slices in the microwave for 15-20 seconds or in a toaster oven until warmed through. Interestingly, many people find that this loaf tastes even better the next day, as the flavors have time to meld!

Frequently Asked Questions

Can I make Lemon Poppy Seed Loaf With Citrus Icing ahead of time?

Yes — in fact, it tastes even better the next day! You can make the loaf a day in advance, allowing the flavors to develop. Just be sure to store it in an airtight container to maintain its moisture.

Can I substitute the poppy seeds?

Absolutely! If you don’t have poppy seeds on hand or prefer an alternative, you can use sesame seeds for a similar crunch or omit them entirely for a smooth loaf.

What can I use instead of buttermilk?

If you don’t have buttermilk, you can easily create a substitute by mixing ½ cup of milk (dairy or plant-based) with 1 tablespoon of vinegar or lemon juice. Let it sit for 5 minutes before using in the recipe.

How can I make this recipe gluten-free?

To make a gluten-free version of this Lemon Poppy Seed Loaf, substitute the all-purpose flour with a gluten-free all-purpose flour blend. Just ensure that the blend contains a binding agent like xanthan gum for the best results.

What is the best way to store leftover loaf?

Leftover Lemon Poppy Seed Loaf should be stored in an airtight container at room temperature for up to 3 days. For longer storage, wrap it tightly and freeze for up to 3 months. Thaw it before serving for the best texture.

Zesty Lemon Poppy Seed Delight

Final Thoughts

The Lemon Poppy Seed Loaf with Citrus Icing is truly a delightful treat that brings a burst of brightness to any occasion. The zesty lemon flavor combined with the subtle crunch of poppy seeds creates a satisfying balance, while the citrus icing adds a touch of sweetness that perfectly complements the loaf’s tanginess.

This is the kind of recipe I come back to again and again, especially when I want to brighten up a gloomy day or celebrate a small victory. The aroma that fills the kitchen as it bakes is absolutely heavenly! I encourage you to give this recipe a try; you might just find it becoming a beloved staple in your home. Don’t forget to share your results or even add your own unique twist—I can’t wait to see what you create!

Print
clock clock iconcutlery cutlery iconflag flag iconfolder folder iconinstagram instagram iconpinterest pinterest iconfacebook facebook iconprint print iconsquares squares iconheart heart iconheart solid heart solid icon

Lemon Poppy Seed Loaf


  • Author: Lily author
  • Total Time: 15 minute
  • Yield: 1 loaf 1x
Pin Recipe
Print Recipe

Description

This Lemon Poppy Seed Loaf is a delightful treat that combines zesty lemon flavor with crunchy poppy seeds. Topped with a citrus icing, it’s perfect for any occasion.


Ingredients

Scale
  • 1 ½ cups (190g) all-purpose flour
  • 1 teaspoon baking powder
  • ½ teaspoon baking soda
  • ½ teaspoon salt
  • 3 tablespoons poppy seeds
  • ½ cup (115g) unsalted butter, softened to room temperature
  • 1 cup (200g) granulated sugar
  • 2 large eggs
  • 1 teaspoon vanilla extract
  • 1 teaspoon lemon zest (from about 1 medium lemon)
  • ½ cup (120ml) buttermilk
  • 2 tablespoons fresh lemon juice
  • 1 cup (120g) powdered sugar
  • 2 tablespoons fresh lemon juice
  • 1 tablespoon orange juice
  • 1 teaspoon lemon zest (for garnish, optional)

Instructions

  1. Preheat your oven to 350°F (175°C). Grease a 9×5-inch loaf pan or line it with parchment paper for easy removal later.
  2. In a medium mixing bowl, whisk together 1 ½ cups of all-purpose flour, 1 teaspoon of baking powder, ½ teaspoon of baking soda, ½ teaspoon of salt, and 3 tablespoons of poppy seeds. This helps to evenly distribute the baking agents and ensures a uniform rise.
  3. In a large mixing bowl, cream together ½ cup of softened unsalted butter and 1 cup of granulated sugar using an electric mixer on medium speed for about 3-4 minutes, until the mixture is light and fluffy. Make sure to scrape down the sides of the bowl occasionally.
  4. Add 2 large eggs, 1 teaspoon of vanilla extract, and 1 teaspoon of lemon zest to the creamed butter and sugar, mixing until fully combined. You want a smooth consistency, so ensure there are no lumps of butter.
  5. In a small bowl, combine ½ cup of buttermilk and 2 tablespoons of fresh lemon juice. Alternately add the dry ingredients and buttermilk mixture to the butter mixture, starting and ending with the dry ingredients. Mix just until combined; do not overmix, as this can lead to a dense loaf.
  6. Pour the batter into the prepared loaf pan. Smooth the top with a spatula, ensuring it’s even. Bake in the preheated oven for 50-60 minutes, or until a toothpick inserted in the center comes out clean. The edges should be lightly golden brown, and the center should feel just set.
  7. Once baked, remove the loaf from the oven and allow it to cool in the pan for about 10 minutes. Then, transfer it to a wire rack to cool completely. Resist the urge to slice too soon, as it will be crumbly if it’s still warm.
  8. While the loaf is cooling, prepare the citrus icing. In a medium bowl, whisk together 1 cup of powdered sugar, 2 tablespoons of fresh lemon juice, and 1 tablespoon of orange juice until smooth. If the icing is too thick, you can add a little more juice to reach your desired consistency.
  9. Once the loaf is completely cool, drizzle the citrus icing over the top. If you like, sprinkle with an additional teaspoon of lemon zest for an extra pop of flavor and color.
  • Prep Time: 15 mins
  • Cook Time: 50-60 mins
  • Category: Dessert
  • Method: Baking
  • Cuisine: American

Nutrition

  • Serving Size: 1 slice
  • Calories: 200
  • Sugar: 15 g
  • Sodium: 150 mg
  • Fat: 8 g
  • Saturated Fat: 5 g
  • Unsaturated Fat: 3 g
  • Trans Fat: 0 g
  • Carbohydrates: 30 g
  • Fiber: 1 g
  • Protein: 3 g
  • Cholesterol: 40 mg

Keywords: Be careful not to overmix your batter; this is a common mistake that can lead to a dense loaf. Use room temperature ingredients for a smoother batter and even baking.

Did you make this recipe?

Share a photo and tag us — we can't wait to see what you've made!

  • Privacy Policy
  • Terms Of Service
  • Contact
  • About
  • GDPR

Copyright © 2025 Homesmad