• Skip to primary navigation
  • Skip to main content
  • Skip to primary sidebar
Homesmad

Homesmad

  • Home
  • Breakfast & Brunch
  • Appetizers & Snacks
  • Dinner
  • Dessert
  • About
  • Privacy Policy
  • Contact
Homesmad
  • Home
  • Breakfast & Brunch
  • Appetizers & Snacks
  • Dinner
  • Dessert
  • About
  • Privacy Policy
  • Contact

Jalapeno Cheddar Turkey Burgers: The Ultimate Flavor-Packed Recipe

June 22, 2025 by Lily author

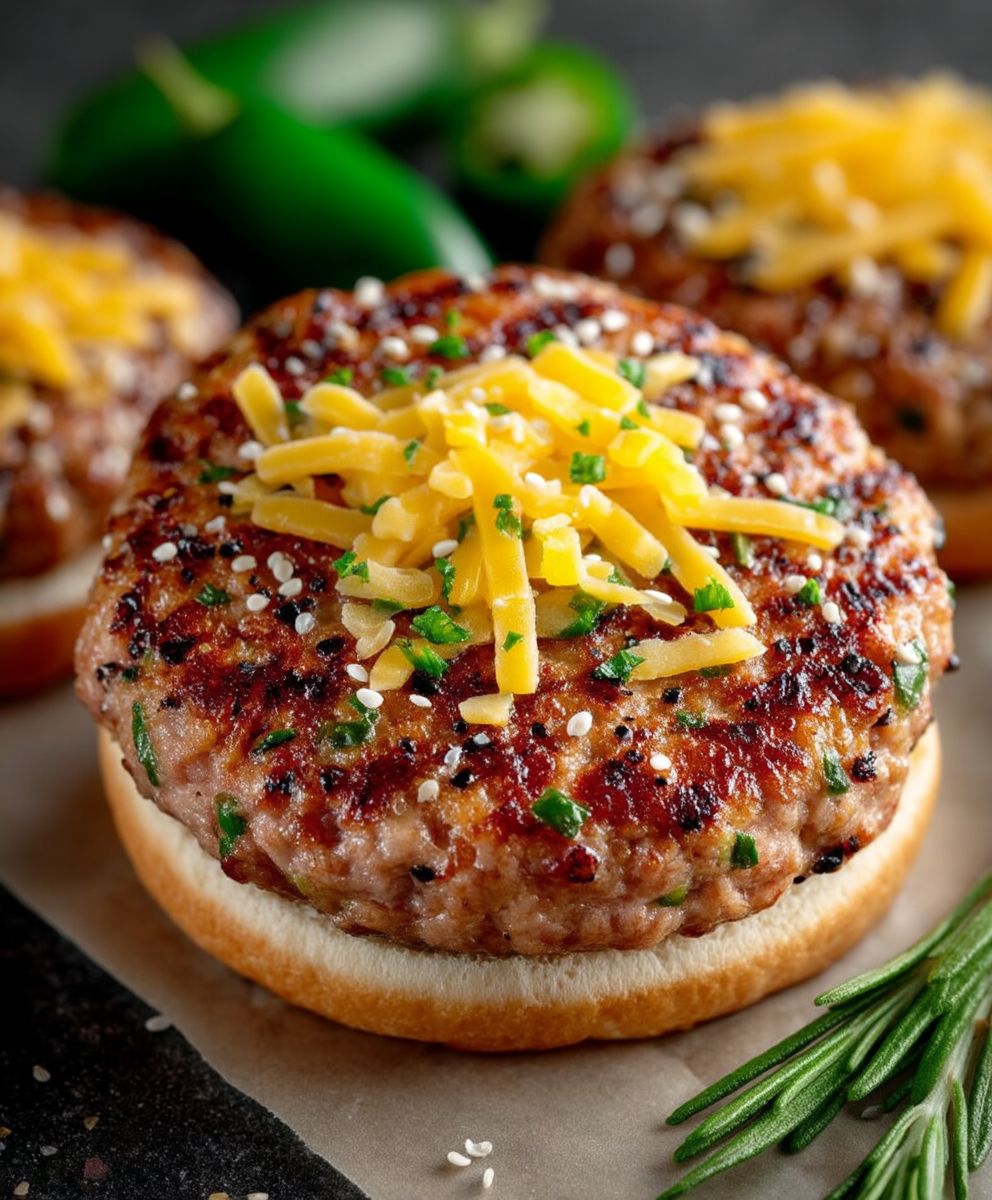
Jalapeno cheddar turkey burgers are about to revolutionize your weeknight dinner routine! Forget bland, boring turkey burgers – we’re injecting a serious dose of flavor and excitement into this healthier alternative to beef. Imagine sinking your teeth into a juicy, perfectly cooked turkey patty, bursting with the fiery kick of jalapenos and the creamy, comforting melt of sharp cheddar. Sounds amazing, right?

The concept of a burger, of course, has deep roots in American culinary history, evolving from simple ground meat patties to the gourmet creations we see today. While the classic beef burger reigns supreme for many, the turkey burger has steadily gained popularity as a lighter, leaner option. But let’s be honest, sometimes they can be a little…underwhelming. That’s where this recipe comes in. We’re taking the healthy foundation of a turkey burger and elevating it with bold flavors that will leave you craving more.

People adore jalapeno cheddar turkey burgers because they offer the best of both worlds: a guilt-free meal that doesn’t compromise on taste. The combination of spicy jalapenos and rich cheddar cheese is a classic for a reason – it’s simply irresistible! Plus, these burgers are incredibly easy to make, perfect for busy weeknights or casual weekend barbecues. The juicy texture, the satisfying heat, and the cheesy goodness all combine to create a truly unforgettable burger experience. Get ready to ditch the beef and embrace your new favorite turkey burger!

Jalapeno cheddar turkey burgers this RECIPE

Ingredients:

  • 1.5 lbs Ground Turkey (preferably 93% lean)
  • 1 cup Shredded Sharp Cheddar Cheese
  • 1/2 cup Diced Jalapeños (fresh, seeded for less heat, or use jarred)
  • 1/4 cup Finely Chopped Red Onion
  • 2 cloves Garlic, minced
  • 1 large Egg, lightly beaten
  • 1/4 cup Breadcrumbs (plain or panko)
  • 1 tbsp Worcestershire Sauce
  • 1 tsp Smoked Paprika
  • 1/2 tsp Ground Cumin
  • 1/2 tsp Garlic Powder
  • 1/4 tsp Onion Powder
  • Salt and Black Pepper to taste
  • 4 Burger Buns (brioche, pretzel, or your favorite)
  • Optional Toppings: Lettuce, Tomato, Avocado, Chipotle Mayo, Pickled Onions
  • Olive Oil or Cooking Spray for grilling/pan-frying

Preparing the Jalapeño Cheddar Turkey Burger Mixture

  1. Combine the Ground Turkey and Aromatics: In a large mixing bowl, gently combine the ground turkey, diced jalapeños, finely chopped red onion, and minced garlic. Be careful not to overmix at this stage, as it can lead to tough burgers. We want to keep the mixture light and airy.
  2. Incorporate the Cheese and Egg: Add the shredded cheddar cheese and the lightly beaten egg to the bowl. The cheese will add a wonderful richness and melty texture to the burgers, while the egg will act as a binder, helping everything hold together.
  3. Add Breadcrumbs and Worcestershire Sauce: Sprinkle in the breadcrumbs and drizzle the Worcestershire sauce over the mixture. The breadcrumbs will absorb excess moisture and further bind the ingredients, while the Worcestershire sauce will add a savory depth of flavor.
  4. Season Generously: Now it’s time to season our burger mixture! Add the smoked paprika, ground cumin, garlic powder, onion powder, salt, and black pepper. The smoked paprika will give the burgers a lovely smoky flavor, while the cumin will add a warm, earthy note. Don’t be shy with the seasoning – turkey can be a bit bland on its own, so we want to make sure these burgers are packed with flavor.
  5. Gently Mix Everything Together: Using your hands or a spatula, gently mix all the ingredients together until they are just combined. Again, be careful not to overmix. Overmixing will result in tough burgers. We want everything to be evenly distributed, but the mixture should still be relatively loose.
  6. Form the Burger Patties: Divide the turkey mixture into four equal portions. Gently form each portion into a patty, about 3/4 inch thick. Make a slight indentation in the center of each patty with your thumb. This will help prevent the burgers from puffing up in the middle while they cook.
  7. Chill the Patties (Optional but Recommended): Place the formed burger patties on a plate or baking sheet lined with parchment paper. Cover them with plastic wrap and refrigerate for at least 30 minutes, or up to 2 hours. Chilling the patties will help them firm up and hold their shape better during cooking. This step is optional, but I highly recommend it for the best results.

Cooking the Jalapeño Cheddar Turkey Burgers

  1. Prepare Your Cooking Surface: You can cook these burgers on a grill, in a skillet, or even under the broiler. If grilling, preheat your grill to medium-high heat. If using a skillet, heat a tablespoon of olive oil or cooking spray over medium-high heat. If broiling, preheat your broiler and position the rack about 6 inches from the heat source.
  2. Cook the Burgers:
    • Grilling: Place the burger patties on the preheated grill and cook for about 5-7 minutes per side, or until they are cooked through and the internal temperature reaches 165°F (74°C).
    • Skillet: Place the burger patties in the preheated skillet and cook for about 5-7 minutes per side, or until they are cooked through and the internal temperature reaches 165°F (74°C). Be careful not to overcrowd the skillet – you may need to cook the burgers in batches.
    • Broiling: Place the burger patties on a baking sheet lined with foil and broil for about 4-5 minutes per side, or until they are cooked through and the internal temperature reaches 165°F (74°C). Keep a close eye on the burgers while they are broiling, as they can burn easily.
  3. Check for Doneness: The best way to ensure that your turkey burgers are cooked through is to use a meat thermometer. Insert the thermometer into the thickest part of the burger patty. The internal temperature should reach 165°F (74°C).
  4. Rest the Burgers: Once the burgers are cooked through, remove them from the heat and let them rest for a few minutes before serving. This will allow the juices to redistribute, resulting in a more tender and flavorful burger.

Assembling the Jalapeño Cheddar Turkey Burgers

  1. Toast the Buns (Optional): While the burgers are resting, you can toast the burger buns if desired. This will add a nice texture and prevent the buns from getting soggy.
  2. Spread with Condiments: Spread your favorite condiments on the top and bottom buns. I personally love using chipotle mayo for a little extra kick, but you can use whatever you like – ketchup, mustard, mayonnaise, or even a simple aioli.
  3. Add the Burgers: Place the cooked jalapeño cheddar turkey burgers on the bottom buns.
  4. Add Toppings: Top the burgers with your favorite toppings. Some great options include lettuce, tomato, avocado, pickled onions, and extra jalapeños for those who like it extra spicy.
  5. Serve and Enjoy! Place the top buns on the burgers and serve immediately. These jalapeño cheddar turkey burgers are best enjoyed hot off the grill or skillet.

Tips and Variations

  • Adjust the Heat: If you’re sensitive to spice, be sure to remove the seeds and membranes from the jalapeños before dicing them. You can also use jarred jalapeños, which tend to be milder than fresh ones. For those who like it extra spicy, leave the seeds in or add a pinch of cayenne pepper to the burger mixture.
  • Use Different Cheese: Feel free to experiment with different types of cheese. Pepper jack, Monterey Jack, or even a smoked gouda would all be delicious in these burgers.
  • Add More Vegetables: You can add other vegetables to the burger mixture, such as finely chopped bell peppers, zucchini, or carrots. This is a great way to sneak in some extra nutrients.
  • Make it Gluten-Free: To make these burgers gluten-free, simply use gluten-free breadcrumbs and gluten-free burger buns.
  • Make it Lighter: To make these burgers even lighter, you can use a leaner ground turkey (99% lean) and skip the cheese. You can also serve the burgers on lettuce wraps instead of buns.
  • Prepare Ahead: You can prepare the burger mixture ahead of time and store it in the refrigerator for up to 24 hours. This is a great way to save time on busy weeknights.
  • Freezing Instructions: Cooked burger patties can be frozen for up to 2-3 months. Wrap each patty individually in plastic wrap and then place them in a freezer-safe bag or container. To reheat, thaw the patties in the refrigerator overnight and then reheat them in a skillet, microwave, or oven.

Serving Suggestions

These jalapeño cheddar turkey burgers are delicious served with a variety of sides. Here are a few of my favorites:

  • French Fries or Sweet Potato Fries
  • Coleslaw or Potato Salad
  • Corn on the Cob
  • Grilled Vegetables
  • A Simple Green Salad

These burgers are also great for parties and cookouts. They’re sure to be a crowd-pleaser!

Jalapeno cheddar turkey burgers

Conclusion:

So there you have it! These Jalapeno Cheddar Turkey Burgers are truly a game-changer. I know, I know, turkey burgers sometimes get a bad rap for being dry or bland, but trust me, this recipe completely shatters that stereotype. The combination of lean ground turkey with the spicy kick of fresh jalapenos and the sharp, creamy cheddar creates a flavor explosion that will leave you craving more. It’s the perfect balance of heat and comfort, making it a must-try for anyone looking to elevate their burger game.

But why is this recipe a must-try, you ask? Well, beyond the incredible flavor profile, it’s also surprisingly easy to make. We’re talking minimal ingredients and straightforward instructions, meaning you can whip up a batch of these juicy burgers even on a busy weeknight. Plus, it’s a healthier alternative to traditional beef burgers, allowing you to indulge without the guilt. And let’s be honest, who doesn’t love a good burger that’s both delicious and good for you?

Now, let’s talk serving suggestions! While these Jalapeno Cheddar Turkey Burgers are fantastic on a classic burger bun with your favorite toppings like lettuce, tomato, and onion, don’t be afraid to get creative. I personally love serving them on toasted brioche buns with a smear of chipotle mayo for an extra layer of smoky heat. Avocado slices add a creamy coolness that complements the jalapeno perfectly. For a lighter option, you can ditch the bun altogether and serve the burgers over a bed of mixed greens with a light vinaigrette.

And the variations? Oh, the possibilities are endless! If you’re not a fan of cheddar, try using pepper jack for an even spicier kick, or Monterey Jack for a milder, meltier option. You can also add other ingredients to the burger mixture, such as diced red onion, cilantro, or even a splash of Worcestershire sauce for added depth of flavor. For those who prefer a sweeter counterpoint to the spice, consider adding a dollop of mango salsa on top. If you’re feeling adventurous, try grilling some pineapple slices to add to your burger for a tropical twist.

Don’t be afraid to experiment and make these burgers your own! That’s the beauty of cooking, right? It’s all about finding what you love and creating something that’s uniquely yours.

I truly believe that this Jalapeno Cheddar Turkey Burger recipe is a winner. It’s flavorful, easy to make, and versatile enough to suit any taste. So, what are you waiting for? Head to the kitchen, gather your ingredients, and get ready to experience burger bliss.

I’m so excited for you to try this recipe and I can’t wait to hear what you think! Please, please, please, once you’ve made these amazing burgers, come back and share your experience in the comments below. Did you make any modifications? What toppings did you use? What did your family and friends think? Your feedback is invaluable and helps other readers discover new and exciting ways to enjoy this recipe.

Happy cooking, and happy burger-ing! I hope you enjoy these Jalapeno Cheddar Turkey Burgers as much as I do! Let me know if you have any questions, and I’ll be happy to help. Now go forth and create some burger magic!


Jalapeno Cheddar Turkey Burgers: The Ultimate Flavor-Packed Recipe

Juicy Jalapeño Cheddar Turkey Burgers with a spicy kick! Perfect grilled or pan-fried.

Prep Time20 minutes
Cook Time10 minutes
Total Time34 minutes
Category: Dinner
Yield: 4 Burgers
Save This Recipe

Ingredients

  • 1.5 lbs Ground Turkey (preferably 93% lean)
  • 1 cup Shredded Sharp Cheddar Cheese
  • 1/2 cup Diced Jalapeños (fresh, seeded for less heat, or use jarred)
  • 1/4 cup Finely Chopped Red Onion
  • 2 cloves Garlic, minced
  • 1 large Egg, lightly beaten
  • 1/4 cup Breadcrumbs (plain or panko)
  • 1 tbsp Worcestershire Sauce
  • 1 tsp Smoked Paprika
  • 1/2 tsp Ground Cumin
  • 1/2 tsp Garlic Powder
  • 1/4 tsp Onion Powder
  • Salt and Black Pepper to taste
  • 4 Burger Buns (brioche, pretzel, or your favorite)
  • Olive Oil or Cooking Spray for grilling/pan-frying

Instructions

  1. In a large mixing bowl, gently combine the ground turkey, diced jalapeños, finely chopped red onion, and minced garlic. Be careful not to overmix at this stage, as it can lead to tough burgers. We want to keep the mixture light and airy.
  2. Add the shredded cheddar cheese and the lightly beaten egg to the bowl. The cheese will add a wonderful richness and melty texture to the burgers, while the egg will act as a binder, helping everything hold together.
  3. Sprinkle in the breadcrumbs and drizzle the Worcestershire sauce over the mixture. The breadcrumbs will absorb excess moisture and further bind the ingredients, while the Worcestershire sauce will add a savory depth of flavor.
  4. Now it’s time to season our burger mixture! Add the smoked paprika, ground cumin, garlic powder, onion powder, salt, and black pepper. The smoked paprika will give the burgers a lovely smoky flavor, while the cumin will add a warm, earthy note. Don’t be shy with the seasoning – turkey can be a bit bland on its own, so we want to make sure these burgers are packed with flavor.
  5. Using your hands or a spatula, gently mix all the ingredients together until they are just combined. Again, be careful not to overmix. Overmixing will result in tough burgers. We want everything to be evenly distributed, but the mixture should still be relatively loose.
  6. Divide the turkey mixture into four equal portions. Gently form each portion into a patty, about 3/4 inch thick. Make a slight indentation in the center of each patty with your thumb. This will help prevent the burgers from puffing up in the middle while they cook.
  7. Place the formed burger patties on a plate or baking sheet lined with parchment paper. Cover them with plastic wrap and refrigerate for at least 30 minutes, or up to 2 hours. Chilling the patties will help them firm up and hold their shape better during cooking. This step is optional, but I highly recommend it for the best results.
  8. You can cook these burgers on a grill, in a skillet, or even under the broiler. If grilling, preheat your grill to medium-high heat. If using a skillet, heat a tablespoon of olive oil or cooking spray over medium-high heat. If broiling, preheat your broiler and position the rack about 6 inches from the heat source.
  9. Place the burger patties on the preheated grill and cook for about 5-7 minutes per side, or until they are cooked through and the internal temperature reaches 165°F (74°C).
  10. Place the burger patties in the preheated skillet and cook for about 5-7 minutes per side, or until they are cooked through and the internal temperature reaches 165°F (74°C). Be careful not to overcrowd the skillet – you may need to cook the burgers in batches.
  11. Place the burger patties on a baking sheet lined with foil and broil for about 4-5 minutes per side, or until they are cooked through and the internal temperature reaches 165°F (74°C). Keep a close eye on the burgers while they are broiling, as they can burn easily.
  12. The best way to ensure that your turkey burgers are cooked through is to use a meat thermometer. Insert the thermometer into the thickest part of the burger patty. The internal temperature should reach 165°F (74°C).
  13. Once the burgers are cooked through, remove them from the heat and let them rest for a few minutes before serving. This will allow the juices to redistribute, resulting in a more tender and flavorful burger.
  14. While the burgers are resting, you can toast the burger buns if desired. This will add a nice texture and prevent the buns from getting soggy.
  15. Spread your favorite condiments on the top and bottom buns. I personally love using chipotle mayo for a little extra kick, but you can use whatever you like – ketchup, mustard, mayonnaise, or even a simple aioli.
  16. Place the cooked jalapeño cheddar turkey burgers on the bottom buns.
  17. Top the burgers with your favorite toppings. Some great options include lettuce, tomato, avocado, pickled onions, and extra jalapeños for those who like it extra spicy.
  18. Place the top buns on the burgers and serve immediately. These jalapeño cheddar turkey burgers are best enjoyed hot off the grill or skillet.

Notes

  • Adjust the Heat: If you’re sensitive to spice, be sure to remove the seeds and membranes from the jalapeños before dicing them. You can also use jarred jalapeños, which tend to be milder than fresh ones. For those who like it extra spicy, leave the seeds in or add a pinch of cayenne pepper to the burger mixture.
  • Use Different Cheese: Feel free to experiment with different types of cheese. Pepper jack, Monterey Jack, or even a smoked gouda would all be delicious in these burgers.
  • Add More Vegetables: You can add other vegetables to the burger mixture, such as finely chopped bell peppers, zucchini, or carrots. This is a great way to sneak in some extra nutrients.
  • Make it Gluten-Free: To make these burgers gluten-free, simply use gluten-free breadcrumbs and gluten-free burger buns.
  • Make it Lighter: To make these burgers even lighter, you can use a leaner ground turkey (99% lean) and skip the cheese. You can also serve the burgers on lettuce wraps instead of buns.
  • Prepare Ahead: You can prepare the burger mixture ahead of time and store it in the refrigerator for up to 24 hours. This is a great way to save time on busy weeknights.
  • Freezing Instructions: Cooked burger patties can be frozen for up to 2-3 months. Wrap each patty individually in plastic wrap and then place them in a freezer-safe bag or container. To reheat, thaw the patties in the refrigerator overnight and then reheat them in a skillet, microwave, or oven.

« Previous Post
Soft Chewy Pretzels: The Ultimate Guide to Baking Perfection
Next Post »
Crockpot Crack Chicken: The Ultimate Easy Recipe

If you enjoyed this…

Beef Fried Rice: The Ultimate Recipe and Cooking Guide

Cajun Steak Cheesy Rigatoni: A Delicious & Easy Recipe

Mushroom Gravy Meatloaf: The Ultimate Comfort Food Recipe

Primary Sidebar

Browse by Diet

BreakfastDinnerLunchDessertAppetizer

Sweet Peach Yogurt Parfait Delight

One of my fondest memories is from a lazy summer afternoon spent at my grandmother’s house. The sun filtered through the kitchen window, casting a warm glow over the table where she would create her culinary magic. It was during one of those blissful moments that I first tasted her Peach Yogurt Parfait with Honey and Granola. The sweet aroma of ripe peaches mingling with creamy yogurt and the crunch of granola was nothing short of heavenly. It felt like summer captured in a bowl, and I still remember the joy of diving in with a spoon, each layer revealing a new burst of flavor.

When I think about that parfait, I can almost hear the gentle hum of the bees outside, reminding me of the floral notes that honey brings to every bite. The vibrant yellows and soft oranges of the peaches contrast beautifully with the creamy white yogurt and the golden crunch of granola. It’s a dish that not only looks delightful but also tastes like a celebration of fresh, wholesome ingredients.

What makes my version of this Peach Yogurt Parfait special is the careful balance of flavors and textures. I use ripe, juicy peaches, drizzled with locally sourced honey, and a homemade granola that’s bursting with nuts and seeds for an extra crunch. It’s a simple dish, but every layer is crafted with love and attention.

Let me show you exactly how to make this delightful parfait, so you can bring a bit of that summer magic into your kitchen!

Sweet Peach Yogurt Parfait Delight

Why You’ll Love This Recipe

  • Delightfully creamy texture from the Greek yogurt, paired with the juicy sweetness of fresh peaches.
  • Ready in under 20 minutes, making it a quick and satisfying breakfast or snack option.
  • Budget-friendly, using common ingredients that you may already have in your pantry.
  • Customizable with your favorite granola and nuts, allowing you to tailor each parfait to your taste.
  • Perfectly balanced flavors with the bright acidity of lemon juice and the sweetness of honey enhancing the peaches.

Ingredients

  • For the Parfait:
  • 2 cups plain Greek yogurt (or vanilla yogurt for a sweeter option)
  • 2 large ripe peaches, diced (about 2 cups)
  • 1 tablespoon fresh lemon juice (to prevent browning of peaches)
  • 2 tablespoons honey (plus more for drizzling)
  • 1 teaspoon vanilla extract (optional for extra flavor)
  • For the Granola:
  • 1 cup granola (store-bought or homemade; see notes for a simple granola recipe)
  • 1/4 cup sliced almonds (optional for added crunch)
  • 1/4 cup shredded coconut (optional for added flavor)

Let’s dive into some key ingredients that make this Peach Yogurt Parfait so delightful! First, the Greek yogurt is not only creamy but also packed with protein, making it a satisfying option for breakfast or a snack. If you’re looking for a sweeter option, you can easily substitute it with vanilla yogurt, though it may alter the overall flavor balance. Next, the ripe peaches are the star of the show; their natural sweetness shines through, so I recommend choosing peaches that yield slightly to pressure, indicating they’re perfectly ripe. If peaches aren’t in season, feel free to use nectarines or even frozen peaches—just thaw them before use. Finally, honey adds a lovely floral sweetness that ties everything together. If you prefer, maple syrup can serve as a delicious substitute.

Step-by-Step Instructions

  1. Start by preparing the peaches. Wash them thoroughly, then slice and dice them into bite-sized pieces. In a medium bowl, toss the diced peaches with 1 tablespoon of fresh lemon juice to prevent browning. Set aside for about 5 minutes while the lemon juice works its magic.
  2. In a separate bowl, combine the Greek yogurt, 2 tablespoons of honey, and 1 teaspoon of vanilla extract if using. Stir the mixture until smooth and thoroughly blended. This should take about a minute. Avoid overmixing to maintain the creaminess of the yogurt.
  3. Now it’s time to layer your parfait. Grab a clear glass or bowl to showcase your beautiful creation. Start with a generous spoonful of the yogurt mixture at the bottom—about 1/4 cup will do. Use a spoon to spread it evenly.
  4. Add a layer of the diced peaches over the yogurt, ensuring they cover the yogurt completely. You might want to use about half of what you have prepared—roughly 1 cup. This layer should be visually appealing, so arrange the peaches neatly.
  5. Sprinkle 1/4 cup of granola over the peaches. This adds a delightful crunch. Make sure to distribute it evenly to ensure every bite has that satisfying texture. Avoid packing it down too tightly, as you want it to maintain its crunch.
  6. Repeat the layers: spoon in another 1/4 cup of yogurt, followed by another cup of peaches, and another sprinkle of granola. You should have at least two layers, but feel free to add more depending on your glass size.
  7. Finish off your parfait with a drizzle of honey on top for added sweetness and a touch of elegance. If you’re using sliced almonds or shredded coconut, sprinkle them on top now. It adds a lovely visual contrast and extra flavor.
  8. Serve immediately or refrigerate for up to 30 minutes before serving to allow the flavors to meld together. However, I recommend enjoying it fresh to maintain the granola’s crunch.

Pro Tips for the Best Peach Yogurt Parfait With Honey And Granola

  • Make sure to choose ripe peaches for the best flavor and texture. A common mistake is using unripe fruit, which can lead to a less enjoyable parfait. Look for peaches that are fragrant and slightly soft to the touch.
  • Use a clear glass to assemble your parfait; this not only makes for a beautiful presentation but also allows you to see the colorful layers, which adds to the enjoyment of eating it.
  • For an even creamier texture, consider whipping the Greek yogurt with a hand mixer for a couple of minutes before layering. This small adjustment makes a huge difference in mouthfeel.
  • Be mindful of the granola-to-yogurt ratio. Too much granola can overwhelm the parfait, while too little can make it feel too creamy. Aim for about 1/4 cup of granola per layer for the perfect balance.
  • If you’re making this for a gathering, consider preparing the yogurt and peaches ahead of time and layering them just before serving. This ensures the granola stays crunchy!

Variations & Serving Ideas

There are so many ways to get creative with your Peach Yogurt Parfait! For a tropical twist, swap out the peaches for mangoes or pineapples and top with coconut flakes. If you prefer a berry flavor, mix in some blueberries or strawberries with the peaches for added color and taste. For a nutty version, incorporate chopped walnuts or pecans instead of almonds.

As for serving ideas, this parfait pairs beautifully with a side of scrambled eggs for a hearty breakfast or fresh fruit salad for a light lunch. You might also enjoy it alongside whole grain toast with almond butter for an energizing snack. The contrast of flavors and textures will elevate your meal experience!

Storage, Make-Ahead & Reheating

The Peach Yogurt Parfait is best enjoyed fresh, but you can prepare some components ahead of time. Store the layered parfait in an airtight container in the refrigerator for up to 24 hours. However, be cautious; the granola may lose its crunch if stored too long. You can freeze the yogurt and peach mixture for up to 2 months; just remember to thaw it in the refrigerator overnight before serving.

If you plan to enjoy this dish the next day, it can taste even better as the flavors meld together. Just remember to add the granola right before serving to keep its delightful crunch!

Frequently Asked Questions

Can I make Peach Yogurt Parfait With Honey And Granola ahead of time?

Yes — in fact, it tastes even better the next day as the flavors meld. However, I recommend waiting to add the granola until just before serving to maintain its crunch.

What can I substitute for Greek yogurt?

If you prefer a lighter option, you can substitute Greek yogurt with regular yogurt or a dairy-free alternative like coconut yogurt. Just remember that this may alter the creaminess and flavor profile slightly.

Can I use frozen peaches for this parfait?

Absolutely! Just make sure to thaw the frozen peaches before using them. They will still add great flavor, though the texture may be slightly softer than fresh peaches.

How do I make the parfait vegan?

To make a vegan version, substitute the Greek yogurt with a plant-based yogurt alternative, and replace honey with maple syrup or agave nectar. This keeps the parfait sweet while adhering to a vegan diet.

What other fruits can I use in this recipe?

You can mix and match fruits based on your preference. Try using strawberries, blueberries, raspberries, or even bananas. Just make sure to adjust the lemon juice as needed to prevent browning.

Sweet Peach Yogurt Parfait Delight

Final Thoughts

The Peach Yogurt Parfait with Honey and Granola is a delightful blend of creamy yogurt, sweet peaches, and crunchy granola that creates a satisfying and nourishing treat. Each layer bursts with flavor, making it a perfect choice for breakfast or a light dessert.

This is the kind of recipe I come back to again and again, especially when I want something refreshing and wholesome to start my day. The harmony of sweet and tart flavors, combined with the delightful crunch, never fails to lift my spirits!

I encourage you to give this parfait a try and indulge in its comforting goodness. Feel free to share your results or even add your own twist—perhaps a sprinkle of cinnamon or a handful of nuts. Enjoy creating your perfect parfait!

Print
clock clock iconcutlery cutlery iconflag flag iconfolder folder iconinstagram instagram iconpinterest pinterest iconfacebook facebook iconprint print iconsquares squares iconheart heart iconheart solid heart solid icon

Peach Yogurt Parfait


  • Author: Lily author
  • Total Time: 15 minutes
  • Yield: 4 servings 1x
Pin Recipe
Print Recipe

Description

This Peach Yogurt Parfait combines creamy Greek yogurt, juicy peaches, and crunchy granola for a delightful treat. It’s a perfect breakfast or snack that captures the essence of summer in every bite.


Ingredients

Scale
  • For the Parfait:
  • 2 cups plain Greek yogurt (or vanilla yogurt for a sweeter option)
  • 2 large ripe peaches, diced (about 2 cups)
  • 1 tablespoon fresh lemon juice (to prevent browning of peaches)
  • 2 tablespoons honey (plus more for drizzling)
  • 1 teaspoon vanilla extract (optional for extra flavor)
  • For the Granola:
  • 1 cup granola (store-bought or homemade; see notes for a simple granola recipe)
  • 1/4 cup sliced almonds (optional for added crunch)
  • 1/4 cup shredded coconut (optional for added flavor)

Instructions

  1. Start by preparing the peaches. Wash them thoroughly, then slice and dice them into bite-sized pieces. In a medium bowl, toss the diced peaches with 1 tablespoon of fresh lemon juice to prevent browning. Set aside for about 5 minutes while the lemon juice works its magic.
  2. In a separate bowl, combine the Greek yogurt, 2 tablespoons of honey, and 1 teaspoon of vanilla extract if using. Stir the mixture until smooth and thoroughly blended. This should take about a minute. Avoid overmixing to maintain the creaminess of the yogurt.
  3. Now it’s time to layer your parfait. Grab a clear glass or bowl to showcase your beautiful creation. Start with a generous spoonful of the yogurt mixture at the bottom—about 1/4 cup will do. Use a spoon to spread it evenly.
  4. Add a layer of the diced peaches over the yogurt, ensuring they cover the yogurt completely. You might want to use about half of what you have prepared—roughly 1 cup. This layer should be visually appealing, so arrange the peaches neatly.
  5. Sprinkle 1/4 cup of granola over the peaches. This adds a delightful crunch. Make sure to distribute it evenly to ensure every bite has that satisfying texture. Avoid packing it down too tightly, as you want it to maintain its crunch.
  6. Repeat the layers: spoon in another 1/4 cup of yogurt, followed by another cup of peaches, and another sprinkle of granola. You should have at least two layers, but feel free to add more depending on your glass size.
  7. Finish off your parfait with a drizzle of honey on top for added sweetness and a touch of elegance. If you’re using sliced almonds or shredded coconut, sprinkle them on top now. It adds a lovely visual contrast and extra flavor.
  8. Serve immediately or refrigerate for up to 30 minutes before serving to allow the flavors to meld together. However, I recommend enjoying it fresh to maintain the granola’s crunch.
  • Prep Time: 15 mins
  • Cook Time: 0 mins
  • Category: Breakfast
  • Method: No-cook
  • Cuisine: American

Nutrition

  • Serving Size: 1 parfait
  • Calories: 250
  • Sugar: 20 g
  • Sodium: 50 mg
  • Fat: 5 g
  • Saturated Fat: 2 g
  • Unsaturated Fat: 3 g
  • Trans Fat: 0 g
  • Carbohydrates: 40 g
  • Fiber: 3 g
  • Protein: 10 g
  • Cholesterol: 10 mg

Keywords: Choose ripe peaches for the best flavor and texture. Use a clear glass for a beautiful presentation. For creaminess, consider whipping the yogurt before layering. Be mindful of the granola-to-yogurt ratio. Prepare yogurt and peaches ahead of time for gatherings, layering just before serving.

Did you make this recipe?

Share a photo and tag us — we can't wait to see what you've made!

Sun-Kissed Frozen Orange Cream Slush

As a child, summer days felt like they lasted forever. I remember the sticky heat wrapping around me as I played outside, my laughter mingling with the sounds of the neighborhood. But nothing could cool me down quite like the moment I’d spot my grandmother, laboring over her blender, whipping up her famous Frozen Orange Creamsicle Slush. That vibrant orange treat, with its frosty texture and sweet citrus aroma, was like a burst of sunshine in a cup. Just one sip, and I could feel the coolness wash over me, sparking pure joy.

This Frozen Orange Creamsicle Slush has a way of making you feel like a kid again. Its creamy, dreamy consistency is a delightful balance of bright orange and soft vanilla, inviting you to dive right in. The refreshing tang of orange dances on your tongue, while the smooth creaminess envelops you in a comforting embrace. It’s a nostalgic treat that’s perfect for hot summer afternoons or anytime you need a little pick-me-up.

What makes my version of this slush stand out is the addition of a hint of vanilla bean, which elevates the flavor and adds an extra layer of richness. Plus, it’s super easy to whip up with just a few simple ingredients that you probably already have on hand! So, if you’re ready to relive those sun-soaked memories, let me show you exactly how to make it.

Sun-Kissed Frozen Orange Cream Slush

Why You’ll Love This Recipe

  • Each slush is a perfect blend of creamy vanilla and zesty orange, creating a nostalgic flavor reminiscent of summer days.
  • This refreshing treat is ready in under 15 minutes, making it an ideal quick dessert for unexpected guests or hot afternoons.
  • With just 8 simple ingredients, it’s budget-friendly, ensuring you don’t have to break the bank to enjoy a delicious slush.
  • The slush has a perfectly smooth texture, thanks to the combination of ice and ice cream, providing a delightful contrast to the bright citrus flavors.
  • It’s highly customizable; you can easily adjust the sweetness and add fresh herbs for a unique twist that suits your taste.

Ingredients

  • 2 cups orange juice (freshly squeezed or store-bought)
  • 1 cup vanilla ice cream
  • 1 cup crushed ice
  • 1/2 cup milk (whole or 2%)
  • 1/4 cup granulated sugar (adjust based on sweetness preference)
  • 1 teaspoon vanilla extract
  • Zest of 1 orange (for added flavor)
  • Fresh orange slices and mint leaves (for garnish)

The star of this Frozen Orange Creamsicle Slush is the orange juice, which provides the vibrant, citrusy base. Freshly squeezed juice will yield the brightest flavor, but store-bought options can be just as convenient. If you’re opting for store-bought, choose 100% pure juice with no added sugars for the best results. Another essential ingredient is the vanilla ice cream; it adds creaminess and sweetness. You can substitute it with dairy-free ice cream if you’re looking for a vegan option. Whole or 2% milk complements the ice cream, creating a smooth blend. If you want a lower-calorie version, almond or oat milk can be good alternatives.

Lastly, the granulated sugar can be adjusted based on your sweetness preference. If you prefer a more natural sweetener, consider using honey or agave syrup. The orange zest enhances the flavor profile, providing an aromatic pop that brings the whole slush together. Don’t skip it! It adds an extra layer of brightness that makes this slush truly special.

Step-by-Step Instructions

  1. Start by preparing your ingredients. Gather 2 cups of orange juice, 1 cup of vanilla ice cream, and 1 cup of crushed ice. Make sure the ice is finely crushed, as larger chunks can make blending difficult.
  2. In a blender, combine the orange juice, vanilla ice cream, crushed ice, and 1/2 cup of milk. Add 1/4 cup of granulated sugar and 1 teaspoon of vanilla extract. If you like a sweeter slush, consider adding a bit more sugar at this stage.
  3. Add the zest of 1 orange to the blender. This step is crucial for enhancing the citrus flavor of your slush. Make sure not to include the bitter white pith—only the flavorful zest.
  4. Blend the mixture on medium-high speed for about 30-45 seconds. Stop once the ingredients are fully combined and the slush has a smooth, even consistency. If you notice large chunks of ice, blend for an additional 10-15 seconds. Avoid over-blending, as this can make the slush too liquidy.
  5. Once blended, taste the slush. If it needs more sweetness, add a little more sugar and blend for a few more seconds. If it’s too thick, you can add a splash of milk to reach your desired consistency.
  6. Pour the slush into glasses. This recipe typically serves 4, but you can easily double it for larger gatherings. Use a spoon to help guide the slush into the glasses if needed.
  7. Garnish each serving with fresh orange slices and mint leaves. The mint not only adds a pop of color but also a refreshing aroma that complements the citrus flavors beautifully.
  8. Serve immediately and enjoy! If you’ve made extra, you can refrigerate it for a short time, but it’s best enjoyed fresh.

Pro Tips for the Best Frozen Orange Creamsicle Slush

  • Don’t skip the orange zest! It’s a game-changer for flavor. Always zest before juicing to make it easier.
  • Use a high-powered blender for the best texture. A standard blender may struggle with ice, leading to uneven consistency. If you have a food processor, that can work too, but ensure the ice is finely crushed.
  • Adjust the ice-to-liquid ratio carefully. If your slush is too thick, it won’t blend well. Start with less ice and add more until you reach your preferred texture.
  • Be cautious with the sugar! Always start with the lower amount, as you can easily add more, but it’s hard to fix an overly sweet slush.
  • For a fun twist, consider adding a splash of coconut milk or a handful of fresh fruit like strawberries or pineapple. This not only enhances the flavor but also adds a beautiful color contrast.

Variations & Serving Ideas

There are countless ways to put a spin on your Frozen Orange Creamsicle Slush. Consider making a tropical version by adding in some pineapple juice or coconut milk for a delightful tropical twist. If you’re feeling adventurous, try incorporating a handful of frozen mango or peach slices for added sweetness. For a lighter version, swap out the vanilla ice cream for Greek yogurt for a creamy yet tangy alternative.

As for serving ideas, this refreshing slush pairs wonderfully with light summer dishes like grilled chicken skewers, fish tacos, or a simple salad topped with citrus vinaigrette. The bright, zesty flavors of the slush complement these dishes perfectly, making them an ideal pairing for a sunny day.

Storage, Make-Ahead & Reheating

This Frozen Orange Creamsicle Slush is best enjoyed fresh, but if you have leftovers, you can store them in an airtight container in the fridge for up to 2 days. Just keep in mind that the slush may lose some of its texture over time as the ice melts. It doesn’t freeze well, as the ice will turn into a solid block. If you must freeze it, blend again after thawing to restore the slushy consistency. This treat is best the day you make it, as the flavors meld together beautifully overnight, enhancing its deliciousness.

Frequently Asked Questions

Can I make Frozen Orange Creamsicle Slush ahead of time?

Yes — in fact, it tastes even better the next day as the flavors meld. However, it’s best to enjoy it fresh, as the texture can change if stored for too long. If you need to prepare it ahead, keep it in the fridge and re-blend before serving.

What kind of orange juice should I use?

For the best flavor, use freshly squeezed orange juice. However, if you’re short on time, opt for 100% pure store-bought juice without added sugars. This will ensure that your slush remains flavorful and refreshing.

Can I substitute the vanilla ice cream?

Absolutely! If you’re looking for a dairy-free option, coconut milk ice cream or a non-dairy vanilla ice cream can work wonderfully. They will still provide the creamy texture and sweetness you desire.

How can I adjust the sweetness of my slush?

You can easily adjust the sweetness by modifying the amount of sugar added. Start with 1/4 cup and taste the mixture before blending. If you prefer it sweeter, add more sugar gradually until it reaches your desired level.

What should I do if my slush is too thick?

If your slush is too thick, simply add a splash of milk or orange juice and blend again. This will help achieve a more drinkable consistency while maintaining the slushy texture. Adjust gradually to reach your preferred thickness.

Sun-Kissed Frozen Orange Cream Slush

Final Thoughts

The Frozen Orange Creamsicle Slush is a delightful blend of refreshing citrus and creamy goodness, making it a perfect treat for warm days or any time you crave a taste of nostalgia. The way the bright orange flavor dances with the creamy texture truly elevates this slush, transforming it into a satisfying escape from the everyday.

This is the kind of recipe I come back to again and again, especially when I’m looking to cool down or impress guests at a summer gathering. It’s simple to make and always brings smiles all around! I encourage you to try this recipe for yourself—don’t hesitate to share your results or even put your own spin on it. Happy slushing!

Print
clock clock iconcutlery cutlery iconflag flag iconfolder folder iconinstagram instagram iconpinterest pinterest iconfacebook facebook iconprint print iconsquares squares iconheart heart iconheart solid heart solid icon

Frozen Orange Creamsicle Slush


  • Author: Lily author
  • Total Time: 15 minutes
  • Yield: 4 servings 1x
Pin Recipe
Print Recipe

Description

This Frozen Orange Creamsicle Slush is a refreshing treat that combines creamy vanilla and zesty orange flavors. Perfect for hot summer days, it brings back nostalgic memories with every sip.


Ingredients

Scale
  • 2 cups orange juice (freshly squeezed or store-bought)
  • 1 cup vanilla ice cream
  • 1 cup crushed ice
  • 1/2 cup milk (whole or 2%)
  • 1/4 cup granulated sugar (adjust based on sweetness preference)
  • 1 teaspoon vanilla extract
  • Zest of 1 orange (for added flavor)
  • Fresh orange slices and mint leaves (for garnish)

Instructions

  1. Start by preparing your ingredients. Gather 2 cups of orange juice, 1 cup of vanilla ice cream, and 1 cup of crushed ice. Make sure the ice is finely crushed, as larger chunks can make blending difficult.
  2. In a blender, combine the orange juice, vanilla ice cream, crushed ice, and 1/2 cup of milk. Add 1/4 cup of granulated sugar and 1 teaspoon of vanilla extract. If you like a sweeter slush, consider adding a bit more sugar at this stage.
  3. Add the zest of 1 orange to the blender. This step is crucial for enhancing the citrus flavor of your slush. Make sure not to include the bitter white pith—only the flavorful zest.
  4. Blend the mixture on medium-high speed for about 30-45 seconds. Stop once the ingredients are fully combined and the slush has a smooth, even consistency. If you notice large chunks of ice, blend for an additional 10-15 seconds. Avoid over-blending, as this can make the slush too liquidy.
  5. Once blended, taste the slush. If it needs more sweetness, add a little more sugar and blend for a few more seconds. If it’s too thick, you can add a splash of milk to reach your desired consistency.
  6. Pour the slush into glasses. This recipe typically serves 4, but you can easily double it for larger gatherings. Use a spoon to help guide the slush into the glasses if needed.
  7. Garnish each serving with fresh orange slices and mint leaves. The mint not only adds a pop of color but also a refreshing aroma that complements the citrus flavors beautifully.
  8. Serve immediately and enjoy! If you’ve made extra, you can refrigerate it for a short time, but it's best enjoyed fresh.
  • Prep Time: 15 min
  • Cook Time: 0 min
  • Category: Dessert
  • Method: Blending
  • Cuisine: American

Nutrition

  • Serving Size: 1 serving
  • Calories: 200
  • Sugar: 30 g
  • Sodium: 50 mg
  • Fat: 5 g
  • Saturated Fat: 3 g
  • Unsaturated Fat: 2 g
  • Trans Fat: 0 g
  • Carbohydrates: 40 g
  • Fiber: 1 g
  • Protein: 2 g
  • Cholesterol: 20 mg

Keywords: Don't skip the orange zest! It's a game-changer for flavor. Always zest before juicing to make it easier.

Did you make this recipe?

Share a photo and tag us — we can't wait to see what you've made!

Zesty Lemon Poppy Seed Delight

One rainy afternoon, I found myself in my grandmother’s cozy kitchen, the kind that always smelled like warmth and love. She was whipping up her famous Lemon Poppy Seed Loaf, a recipe that had been passed down through generations. As the batter came together, the zesty aroma of fresh lemons filled the air, mingling perfectly with the nutty fragrance of poppy seeds. I can still picture her, apron-clad, as she expertly drizzled a vibrant citrus icing over the loaf, creating a glossy, sun-kissed finish that beckoned us to dive in. It was a moment that sparked my own passion for baking, and this recipe has become a cherished staple in my home ever since.

When you take a bite of this Lemon Poppy Seed Loaf, it’s like a burst of sunshine on your palate. The loaf is beautifully golden, with a tender crumb that melts in your mouth. Each slice is speckled with tiny poppy seeds, adding a delightful crunch that contrasts beautifully with the tangy sweetness of the lemon. And that citrus icing? It’s the finishing touch that elevates this loaf from ordinary to extraordinary, with its bright, zesty flavor dancing on your taste buds.

This recipe stands out because it embraces simplicity while delivering on flavor. I’ve added a hint of vanilla to the batter, enhancing the overall taste and making it even more indulgent. Trust me, once you make this Lemon Poppy Seed Loaf With Citrus Icing, it’ll become a go-to in your baking repertoire.

So, let me show you exactly how to make it!

Zesty Lemon Poppy Seed Delight

Why You’ll Love This Recipe

  • Moist and tender crumb that melts in your mouth, thanks to the perfect balance of butter and buttermilk.
  • Bright, zesty lemon flavor paired with crunchy poppy seeds, creating a delightful texture and taste experience.
  • Easy to whip up in just about an hour, perfect for last-minute gatherings or a cozy afternoon treat.
  • Budget-friendly with everyday ingredients, making it an accessible option for all home bakers.
  • The citrus icing adds a sweet tang that elevates the loaf, turning a simple recipe into a showstopper!

Ingredients

  • 1 ½ cups (190g) all-purpose flour
  • 1 teaspoon baking powder
  • ½ teaspoon baking soda
  • ½ teaspoon salt
  • 3 tablespoons poppy seeds
  • ½ cup (115g) unsalted butter, softened to room temperature
  • 1 cup (200g) granulated sugar
  • 2 large eggs
  • 1 teaspoon vanilla extract
  • 1 teaspoon lemon zest (from about 1 medium lemon)
  • ½ cup (120ml) buttermilk
  • 2 tablespoons fresh lemon juice

For the Citrus Icing:

  • 1 cup (120g) powdered sugar
  • 2 tablespoons fresh lemon juice
  • 1 tablespoon orange juice
  • 1 teaspoon lemon zest (for garnish, optional)

Let’s dive into the key ingredients that make this Lemon Poppy Seed Loaf so special. The all-purpose flour provides the structure and base for the loaf, while the baking powder and baking soda ensure it rises perfectly, giving the loaf a light texture. For a gluten-free variation, you could substitute the flour with a gluten-free all-purpose blend. Poppy seeds not only add a delightful crunch but also contribute to the unique flavor profile that pairs well with the citrus notes.

Unsalted butter is crucial for achieving the buttery richness that makes this loaf so moist. If you’re looking for a dairy-free option, coconut oil or a vegan butter can be used instead. The buttermilk is another essential component, providing acidity that activates the baking soda for a fluffy texture. If you don’t have buttermilk on hand, you can easily make a substitute by mixing ½ cup of milk with 1 tablespoon of vinegar or lemon juice and letting it sit for about 5 minutes.

Step-by-Step Instructions

  1. Preheat your oven to 350°F (175°C). Grease a 9×5-inch loaf pan or line it with parchment paper for easy removal later.
  2. In a medium mixing bowl, whisk together 1 ½ cups of all-purpose flour, 1 teaspoon of baking powder, ½ teaspoon of baking soda, ½ teaspoon of salt, and 3 tablespoons of poppy seeds. This helps to evenly distribute the baking agents and ensures a uniform rise.
  3. In a large mixing bowl, cream together ½ cup of softened unsalted butter and 1 cup of granulated sugar using an electric mixer on medium speed for about 3-4 minutes, until the mixture is light and fluffy. Make sure to scrape down the sides of the bowl occasionally.
  4. Add 2 large eggs, 1 teaspoon of vanilla extract, and 1 teaspoon of lemon zest to the creamed butter and sugar, mixing until fully combined. You want a smooth consistency, so ensure there are no lumps of butter.
  5. In a small bowl, combine ½ cup of buttermilk and 2 tablespoons of fresh lemon juice. Alternately add the dry ingredients and buttermilk mixture to the butter mixture, starting and ending with the dry ingredients. Mix just until combined; do not overmix, as this can lead to a dense loaf.
  6. Pour the batter into the prepared loaf pan. Smooth the top with a spatula, ensuring it’s even. Bake in the preheated oven for 50-60 minutes, or until a toothpick inserted in the center comes out clean. The edges should be lightly golden brown, and the center should feel just set.
  7. Once baked, remove the loaf from the oven and allow it to cool in the pan for about 10 minutes. Then, transfer it to a wire rack to cool completely. Resist the urge to slice too soon, as it will be crumbly if it’s still warm.
  8. While the loaf is cooling, prepare the citrus icing. In a medium bowl, whisk together 1 cup of powdered sugar, 2 tablespoons of fresh lemon juice, and 1 tablespoon of orange juice until smooth. If the icing is too thick, you can add a little more juice to reach your desired consistency.
  9. Once the loaf is completely cool, drizzle the citrus icing over the top. If you like, sprinkle with an additional teaspoon of lemon zest for an extra pop of flavor and color.

Pro Tips for the Best Lemon Poppy Seed Loaf With Citrus Icing

  • Be careful not to overmix your batter; this is a common mistake that can lead to a dense loaf. Mix just until the dry ingredients are incorporated for a light and fluffy texture.
  • Use room temperature ingredients, especially the butter and eggs. This helps to create a smoother batter and ensures even baking. Take your eggs out of the fridge about 30 minutes before you start.
  • For a more pronounced lemon flavor, consider adding a little lemon extract in addition to the zest and juice. Just a half teaspoon can elevate the citrus notes significantly.
  • When measuring your flour, spoon it into the measuring cup and level it off with a knife instead of scooping directly from the bag. This prevents packing and ensures you don’t end up with a dry loaf.
  • Invest in a good quality loaf pan; it makes a difference in heat distribution, which ensures even baking. If your pan is dark-coated, reduce the oven temperature by 25°F to prevent over-browning.

Variations & Serving Ideas

For a delightful twist, consider adding blueberries or raspberries to the batter for a fruity burst of flavor. You can also experiment with different citrus fruits—try lime or grapefruit zest and juice for a refreshing change. For a healthier option, substitute half of the all-purpose flour with whole wheat flour for added fiber without compromising too much on texture.

This Lemon Poppy Seed Loaf pairs beautifully with a light salad, such as a mixed greens salad with a vinaigrette, or a cup of tea for a cozy afternoon treat. It also complements a creamy cheese platter, as the acidity of the loaf balances rich cheeses perfectly. Lastly, a scoop of vanilla ice cream on the side creates a delightful contrast of temperatures and flavors!

Storage, Make-Ahead & Reheating

This Lemon Poppy Seed Loaf can be stored at room temperature for up to 3 days if wrapped tightly in plastic wrap. If you want to keep it longer, it freezes well for up to 3 months. To freeze, wrap the loaf tightly in plastic wrap and then in aluminum foil to prevent freezer burn.

When you’re ready to enjoy it again, simply thaw it in the fridge overnight. Reheat individual slices in the microwave for 15-20 seconds or in a toaster oven until warmed through. Interestingly, many people find that this loaf tastes even better the next day, as the flavors have time to meld!

Frequently Asked Questions

Can I make Lemon Poppy Seed Loaf With Citrus Icing ahead of time?

Yes — in fact, it tastes even better the next day! You can make the loaf a day in advance, allowing the flavors to develop. Just be sure to store it in an airtight container to maintain its moisture.

Can I substitute the poppy seeds?

Absolutely! If you don’t have poppy seeds on hand or prefer an alternative, you can use sesame seeds for a similar crunch or omit them entirely for a smooth loaf.

What can I use instead of buttermilk?

If you don’t have buttermilk, you can easily create a substitute by mixing ½ cup of milk (dairy or plant-based) with 1 tablespoon of vinegar or lemon juice. Let it sit for 5 minutes before using in the recipe.

How can I make this recipe gluten-free?

To make a gluten-free version of this Lemon Poppy Seed Loaf, substitute the all-purpose flour with a gluten-free all-purpose flour blend. Just ensure that the blend contains a binding agent like xanthan gum for the best results.

What is the best way to store leftover loaf?

Leftover Lemon Poppy Seed Loaf should be stored in an airtight container at room temperature for up to 3 days. For longer storage, wrap it tightly and freeze for up to 3 months. Thaw it before serving for the best texture.

Zesty Lemon Poppy Seed Delight

Final Thoughts

The Lemon Poppy Seed Loaf with Citrus Icing is truly a delightful treat that brings a burst of brightness to any occasion. The zesty lemon flavor combined with the subtle crunch of poppy seeds creates a satisfying balance, while the citrus icing adds a touch of sweetness that perfectly complements the loaf’s tanginess.

This is the kind of recipe I come back to again and again, especially when I want to brighten up a gloomy day or celebrate a small victory. The aroma that fills the kitchen as it bakes is absolutely heavenly! I encourage you to give this recipe a try; you might just find it becoming a beloved staple in your home. Don’t forget to share your results or even add your own unique twist—I can’t wait to see what you create!

Print
clock clock iconcutlery cutlery iconflag flag iconfolder folder iconinstagram instagram iconpinterest pinterest iconfacebook facebook iconprint print iconsquares squares iconheart heart iconheart solid heart solid icon

Lemon Poppy Seed Loaf


  • Author: Lily author
  • Total Time: 27 minute
  • Yield: 1 loaf 1x
Pin Recipe
Print Recipe

Description

This Lemon Poppy Seed Loaf is a delightful treat that combines zesty lemon flavor with crunchy poppy seeds. Topped with a citrus icing, it’s perfect for any occasion.


Ingredients

Scale
  • 1 ½ cups (190g) all-purpose flour
  • 1 teaspoon baking powder
  • ½ teaspoon baking soda
  • ½ teaspoon salt
  • 3 tablespoons poppy seeds
  • ½ cup (115g) unsalted butter, softened to room temperature
  • 1 cup (200g) granulated sugar
  • 2 large eggs
  • 1 teaspoon vanilla extract
  • 1 teaspoon lemon zest (from about 1 medium lemon)
  • ½ cup (120ml) buttermilk
  • 2 tablespoons fresh lemon juice
  • 1 cup (120g) powdered sugar
  • 2 tablespoons fresh lemon juice
  • 1 tablespoon orange juice
  • 1 teaspoon lemon zest (for garnish, optional)

Instructions

  1. Preheat your oven to 350°F (175°C). Grease a 9×5-inch loaf pan or line it with parchment paper for easy removal later.
  2. In a medium mixing bowl, whisk together 1 ½ cups of all-purpose flour, 1 teaspoon of baking powder, ½ teaspoon of baking soda, ½ teaspoon of salt, and 3 tablespoons of poppy seeds. This helps to evenly distribute the baking agents and ensures a uniform rise.
  3. In a large mixing bowl, cream together ½ cup of softened unsalted butter and 1 cup of granulated sugar using an electric mixer on medium speed for about 3-4 minutes, until the mixture is light and fluffy. Make sure to scrape down the sides of the bowl occasionally.
  4. Add 2 large eggs, 1 teaspoon of vanilla extract, and 1 teaspoon of lemon zest to the creamed butter and sugar, mixing until fully combined. You want a smooth consistency, so ensure there are no lumps of butter.
  5. In a small bowl, combine ½ cup of buttermilk and 2 tablespoons of fresh lemon juice. Alternately add the dry ingredients and buttermilk mixture to the butter mixture, starting and ending with the dry ingredients. Mix just until combined; do not overmix, as this can lead to a dense loaf.
  6. Pour the batter into the prepared loaf pan. Smooth the top with a spatula, ensuring it’s even. Bake in the preheated oven for 50-60 minutes, or until a toothpick inserted in the center comes out clean. The edges should be lightly golden brown, and the center should feel just set.
  7. Once baked, remove the loaf from the oven and allow it to cool in the pan for about 10 minutes. Then, transfer it to a wire rack to cool completely. Resist the urge to slice too soon, as it will be crumbly if it’s still warm.
  8. While the loaf is cooling, prepare the citrus icing. In a medium bowl, whisk together 1 cup of powdered sugar, 2 tablespoons of fresh lemon juice, and 1 tablespoon of orange juice until smooth. If the icing is too thick, you can add a little more juice to reach your desired consistency.
  9. Once the loaf is completely cool, drizzle the citrus icing over the top. If you like, sprinkle with an additional teaspoon of lemon zest for an extra pop of flavor and color.
  • Prep Time: 15 mins
  • Cook Time: 50-60 mins
  • Category: Dessert
  • Method: Baking
  • Cuisine: American

Nutrition

  • Serving Size: 1 slice
  • Calories: 200
  • Sugar: 15 g
  • Sodium: 150 mg
  • Fat: 8 g
  • Saturated Fat: 5 g
  • Unsaturated Fat: 3 g
  • Trans Fat: 0 g
  • Carbohydrates: 30 g
  • Fiber: 1 g
  • Protein: 3 g
  • Cholesterol: 40 mg

Keywords: Be careful not to overmix your batter; this is a common mistake that can lead to a dense loaf. Use room temperature ingredients for a smoother batter and even baking.

Did you make this recipe?

Share a photo and tag us — we can't wait to see what you've made!

  • Privacy Policy
  • Terms Of Service
  • Contact
  • About
  • GDPR

Copyright © 2025 Homesmad