• Skip to primary navigation
  • Skip to main content
  • Skip to primary sidebar
Homesmad

Homesmad

  • Home
  • Breakfast & Brunch
  • Appetizers & Snacks
  • Dinner
  • Dessert
  • About
  • Privacy Policy
  • Contact
Homesmad
  • Home
  • Breakfast & Brunch
  • Appetizers & Snacks
  • Dinner
  • Dessert
  • About
  • Privacy Policy
  • Contact

Million Dollar Beef Bacon Goat Cheese Appetizer Log Recipe

November 22, 2025 by Lily author

Million Dollar Beef Bacon Goat Cheese Appetizer Log – the name alone promises something extraordinary, doesn’t it? If you’re looking for that show-stopping appetizer that leaves every guest asking for the recipe, then prepare to have your culinary world transformed. I’m absolutely thrilled to share with you a dish that is not just an appetizer, but a conversation starter, a palate pleaser, and an absolute triumph of flavors that will make you feel like a gourmet chef.

While this particular creation might not hail from ancient traditions or specific cultural ceremonies, its roots lie firmly in the modern desire for sophisticated yet approachable entertaining. It’s a testament to the innovative spirit of home cooks and chefs alike who dared to combine the rich, smoky notes of beef bacon with the tangy creaminess of goat cheese, and a medley of complementary textures into one irresistible package. This log has quickly risen through the ranks to become a beloved staple at upscale gatherings and casual get-togethers alike, a true hero in the world of gourmet finger foods.

People adore this appetizer for so many reasons. The initial bite offers a delightful crunch, followed by the savory depth of beef bacon, perfectly balanced by the luscious, slightly tart goat cheese. It’s incredibly versatile, easy to prepare in advance, and always delivers on its promise of big, unforgettable flavor.

Its unique combination hits all the right notes – salty, creamy, savory, and utterly satisfying.

Preparing this Million Dollar Beef Bacon Goat Cheese Appetizer Log means less time stressing in the kitchen and more time enjoying the company of your loved ones, all while serving an appetizer that truly tastes like a million bucks!

Million Dollar Beef Bacon Goat Cheese Appetizer Log Recipe this RECIPE

Ingredients:

  • For the Beef Bacon:
    • 1 pound thick-cut beef bacon, preferably uncured, about 10-12 slices
  • For the Creamy Goat Cheese Base:
    • 8 ounces fresh goat cheese (chevre), softened at room temperature for at least 30 minutes
    • 8 ounces full-fat cream cheese, softened at room temperature for at least 30 minutes
    • 1/4 cup oil-packed sun-dried tomatoes, thoroughly drained and very finely minced
    • 2 tablespoons fresh chives, finely chopped, plus extra for garnish
    • 1 large clove garlic, minced very finely or grated with a microplane
    • 1 teaspoon Worcestershire sauce (ensure it’s beef-friendly if preferred)
    • 1/2 teaspoon freshly ground black pepper
    • 1/4 teaspoon sea salt, or to taste (remember beef bacon and goat cheese are already salty)
  • For the Optional Toasted Pecan Crunch:
    • 1/4 cup pecans, finely chopped
  • For Serving:
    • Assortment of sturdy crackers, crostini, baguette slices, or fresh vegetable sticks (cucumber, celery, bell pepper)

Preparing the Beef Bacon and Aromatics

  1. Crisping the Beef Bacon: My first step for creating this spectacular “Million Dollar Beef Bacon Goat Cheese Appetizer Log” is to render the beef bacon to perfect crispness. Preheat your oven to 400°F (200°C). Lay the thick-cut beef bacon slices in a single layer on a large baking sheet lined with parchment paper or a silicone baking mat. This step is crucial for even cooking and easy cleanup. Avoid overcrowding the pan, as this can steam the bacon instead of crisping it. If you have a wire rack that fits inside your baking sheet, I highly recommend using it, as it allows air to circulate around the bacon, resulting in an even crispier texture and allowing excess fat to drip away.
  2. Baking the Beef Bacon: Place the baking sheet with the beef bacon into the preheated oven. Bake for 15-25 minutes, or until the bacon is deeply golden brown and very crispy. The exact time will depend on the thickness of your beef bacon and your oven’s calibration, so keep a close eye on it, especially towards the end. We’re looking for that shatteringly crisp texture that will provide a wonderful contrast to the creamy cheese log.
  3. Draining and Crushing the Beef Bacon: Once perfectly crisp, carefully remove the baking sheet from the oven. Using tongs, transfer the cooked beef bacon slices to a plate lined with several layers of paper towels. This will help absorb any excess fat. Let the beef bacon cool completely to room temperature. This is important because warm bacon can make your cheese mixture greasy and difficult to work with. Once cooled, it should be very brittle. Roughly chop or crumble about two-thirds of the beef bacon into small, bite-sized pieces. The remaining one-third should be crumbled into very fine, almost dust-like pieces. We’ll use the finely crumbled bacon for mixing into the log and the slightly larger pieces for coating the exterior, giving our “Million Dollar Beef Bacon Goat Cheese Appetizer Log” a beautiful, textured finish.
  4. Preparing the Sun-Dried Tomatoes and Chives: While the bacon cools, let’s get our other flavor enhancers ready. Take your oil-packed sun-dried tomatoes and drain them extremely well. Excess oil can make the cheese mixture too loose. Place them on a cutting board and mince them as finely as you possibly can. We want their flavor to be distributed evenly throughout the cheese log without large, chewy chunks. Next, wash and thoroughly dry your fresh chives. Finely chop them; the smaller the pieces, the better they will integrate into the creamy base. These two ingredients are key contributors to the vibrant taste of our “Million Dollar Beef Bacon Goat Cheese Appetizer Log.”
  5. Toasting the Pecans (Optional but Recommended): If you’re opting for the delightful textural crunch of pecans, now is a good time to toast them. Spread the finely chopped pecans in a single layer on a small, dry skillet over medium-low heat. Toast them for 3-5 minutes, stirring frequently, until they become fragrant and slightly darker in color. Be careful not to burn them, as nuts can go from perfectly toasted to burnt very quickly. Remove from heat and let them cool completely. The toasted pecans add another layer of flavor and a wonderful counterpoint to the creamy log and crispy bacon.

Crafting the Goat Cheese Base

  1. Combining the Cheeses: In a large mixing bowl, combine the softened goat cheese and softened cream cheese. It’s absolutely essential that both cheeses are at room temperature. If they are cold, they will be lumpy and difficult to combine smoothly, which would compromise the luxurious texture we’re aiming for. Use a sturdy spatula, a wooden spoon, or an electric mixer on low speed to beat the cheeses together until they are completely smooth and well combined. Scrape down the sides of the bowl periodically to ensure everything is incorporated. This creamy foundation is what makes our “Million Dollar Beef Bacon Goat Cheese Appetizer Log” truly decadent.
  2. Adding the Flavor Enhancers: Now, let’s infuse our cheese base with incredible flavor. Add the finely minced sun-dried tomatoes, the finely chopped chives, the very finely minced garlic, Worcestershire sauce, freshly ground black pepper, and the sea salt to the cream cheese and goat cheese mixture. I always recommend starting with a smaller amount of salt and tasting before adding more, as the beef bacon and goat cheese already contribute significant salinity.
  3. Incorporating the Finely Crumbled Beef Bacon: Add the very finely crumbled beef bacon (the ‘dust-like’ portion you prepared earlier) to the cheese mixture. This fine crumble will integrate seamlessly into the cheese, providing a subtle smoky, savory note throughout the log, rather than distinct pieces. If you’re using them, gently fold in the cooled, toasted pecans at this stage as well.
  4. Mixing and Tasting: Gently fold all the ingredients into the cheese mixture until everything is evenly distributed. Be careful not to overmix, as this can make the cheese too airy. Once everything is combined, taste the mixture. This is your chance to adjust the seasonings. Do you need a pinch more salt? A little more pepper? Perhaps a tiny dash more Worcestershire sauce for extra umami? Adjust to your personal preference until the flavor profile is perfectly balanced. This is a “Million Dollar” recipe, after all, so ensure it tastes like a million bucks!

Assembling Your Million Dollar Beef Bacon Goat Cheese Appetizer Log

  1. Preparing for Shaping: Lay out a large piece of plastic wrap on a clean work surface. You’ll want enough plastic wrap to completely encase your log. If you’re making a larger log, you might even overlap two pieces slightly to ensure full coverage. This plastic wrap is essential for shaping and chilling our “Million Dollar Beef Bacon Goat Cheese Appetizer Log” without mess.
  2. Forming the Log: Spoon the entire goat cheese mixture onto the center of the prepared plastic wrap. Using your hands (you might want to lightly dampen them to prevent sticking) or a spatula, gently shape the mixture into a log. Aim for a log that is approximately 6-8 inches long and about 2-2.5 inches in diameter. Don’t worry about perfection at this stage, as the plastic wrap will help you refine the shape.
  3. Tightening and Smoothing the Log: Once you have a basic log shape, bring the edges of the plastic wrap together over the top of the cheese mixture. Gently but firmly roll the log back and forth on your counter, using the plastic wrap to compress and smooth out the log. Twist the ends of the plastic wrap tightly to seal the log and apply gentle pressure, further compacting the cheese and refining its cylindrical shape. This tight wrapping is key to ensuring the log holds its form beautifully when sliced.
  4. Chilling the Log: Place the tightly wrapped cheese log onto a plate or a small baking sheet. Transfer it to the refrigerator and chill for a minimum of 2-3 hours. For the best results and easiest handling, I recommend chilling it for at least 4 hours, or even overnight. Chilling allows the flavors to meld beautifully and ensures the log is firm enough to handle and coat without losing its shape. This chilling time is non-negotiable for a successful “Million Dollar Beef Bacon Goat Cheese Appetizer Log.”

Finishing and Serving

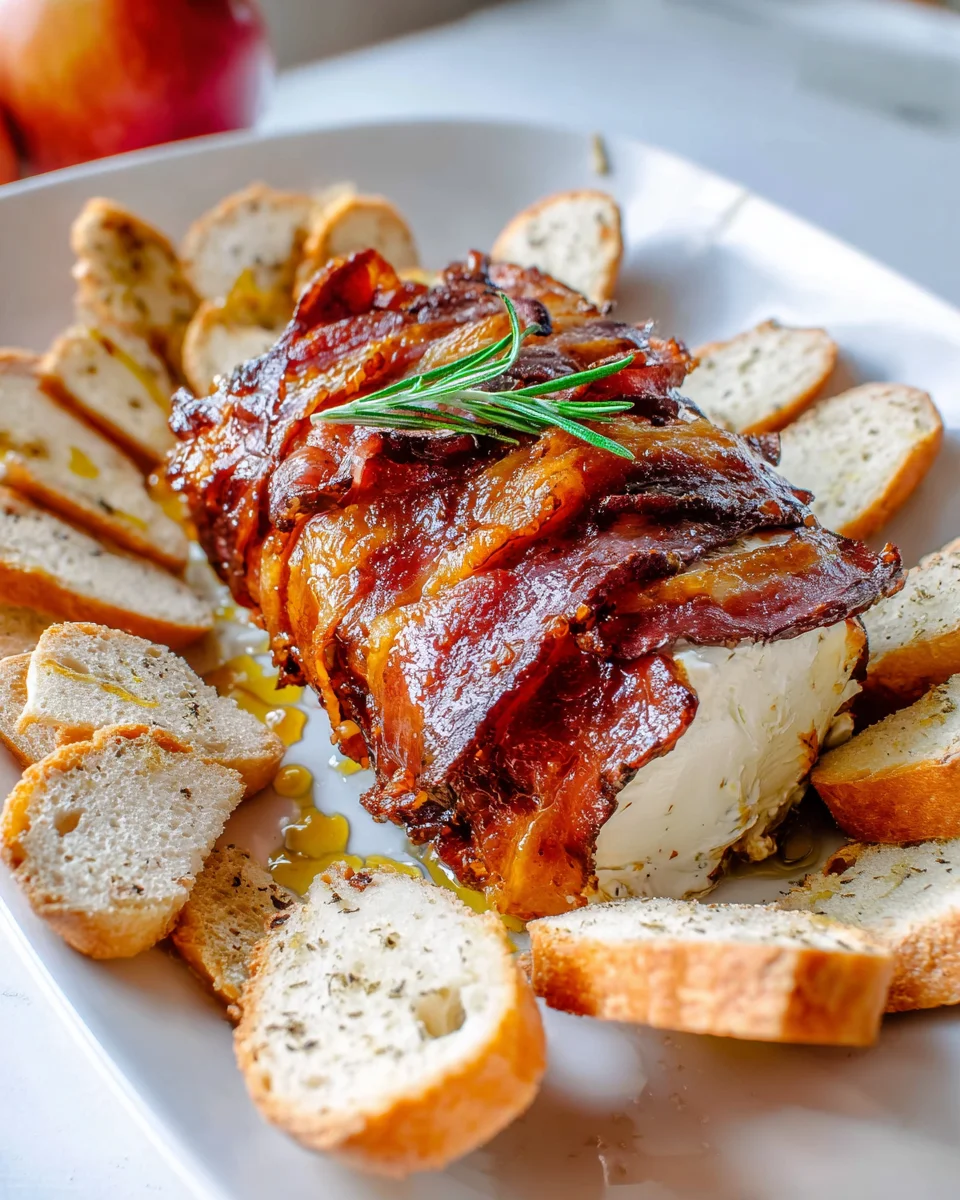
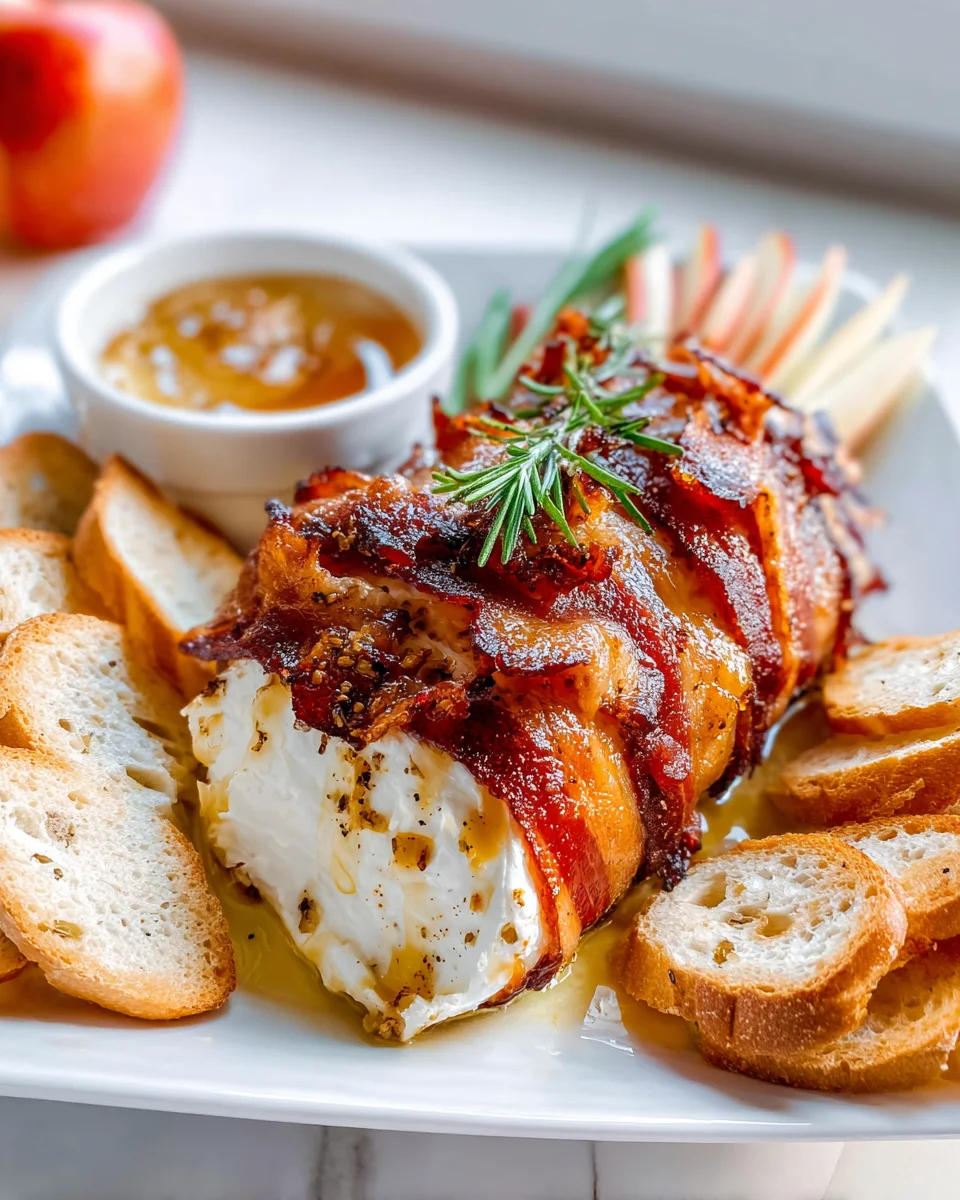
  1. Coating the Log: Once the cheese log is thoroughly chilled and firm, carefully unwrap it from the plastic wrap. Spread the remaining, slightly larger crumbled beef bacon pieces onto a clean piece of parchment paper or a shallow plate. Gently roll the cheese log in the beef bacon crumbles, pressing lightly to ensure the bacon adheres evenly to all sides. You want a generous coating of that delicious, crispy beef bacon all around the log, giving it that luxurious, “Million Dollar” appearance and texture.
  2. Garnishing and Final Chill (Optional): If desired, you can gently press a few extra fresh chives or finely chopped fresh parsley onto the ends or top of the log for a pop of color. At this point, you can return the coated log to the refrigerator for another 30 minutes to an hour to ensure the bacon coating sets firmly, or you can serve it immediately if the log is already very firm.
  3. Serving Your Million Dollar Beef Bacon Goat Cheese Appetizer Log: To serve, place the magnificent “Million Dollar Beef Bacon Goat Cheese Appetizer Log” on a serving platter. Arrange an assortment of your favorite sturdy crackers, crostini, thin slices of toasted baguette, or fresh vegetable sticks around it. Guests can then use a small knife or spreader to take a portion of the log and spread it onto their chosen accompaniment. The combination of creamy, tangy goat cheese, smoky beef bacon, savory sun-dried tomatoes, fresh chives, and optional pecan crunch is truly irresistible.
  4. Presentation Tip: For an even more elegant presentation, you can lightly toast some extra chopped pecans or chives and sprinkle them over the serving platter alongside the log. A small sprig of fresh thyme or rosemary can also add a touch of sophistication to your appetizer spread.

Tips for Success and Variations

  1. Ingredient Quality Matters: For a recipe as star-studded as the “Million Dollar Beef Bacon Goat Cheese Appetizer Log,” the quality of your ingredients makes a significant difference. Opt for high-quality, thick-cut beef bacon. Fresh goat cheese (chevre) offers the best tang and creaminess. Fresh herbs are non-negotiable for vibrant flavor.
  2. Temperature is Key for Creaminess: Always ensure your goat cheese and cream cheese are truly at room temperature. This isn’t just a suggestion; it’s a fundamental step for achieving that perfectly smooth, lump-free, spreadable consistency that defines a truly great cheese log. Cold cheese will result in a clumpy, inferior base. I often take mine out at least an hour before I plan to start mixing.
  3. Don’t Skimp on Chilling Time: Patience is a virtue, especially when making a cheese log. The extended chilling time allows the flavors to meld beautifully and, more importantly, ensures the log is firm enough to be easily handled, coated, and sliced without falling apart. A rushed log will be soft and messy. If you’re preparing this for an event, consider making it the day before; the flavors actually deepen overnight!
  4. Make Ahead Instructions: This “Million Dollar Beef Bacon Goat Cheese Appetizer Log” is an excellent make-ahead dish. You can prepare the entire log, including the bacon coating, up to 2-3 days in advance. Simply wrap it tightly in fresh plastic wrap after coating (or before coating if you prefer to coat just before serving for maximum bacon crispness) and store it in the refrigerator. Let it sit out at room temperature for about 15-20 minutes before serving to slightly soften and enhance its flavors and spreadability.
  5. Alternative Bacon Options: While this is explicitly a “Beef Bacon” appetizer log, if dietary restrictions or preferences allow, traditional pork bacon can be substituted. The cooking method for crisping would remain the same. The flavor profile will, of course, shift slightly, but it will still be a delicious cheese log.
  6. Spice It Up: For those who love a bit of heat, consider adding a pinch of red pepper flakes to the cheese mixture, or a tiny dash of hot sauce. You could also mix in some finely minced jalapeño (remove seeds for less heat) for an extra kick.
  7. Herb Variations: Don’t limit yourself to just chives. While chives pair wonderfully with goat cheese and beef bacon, you could experiment with other fresh herbs. A teaspoon of finely chopped fresh thyme or oregano would add a different aromatic dimension. Fresh dill could also offer a lovely brightness.
  8. Serving Temperature: For the best flavor experience, let your “Million Dollar Beef Bacon Goat Cheese Appetizer Log” sit out at room temperature for about 15-20 minutes before serving. This allows the cheese to soften slightly, making it more spreadable and allowing the full range of flavors to bloom on your palate. However, ensure it doesn’t sit out for longer than 2 hours for food safety reasons.
  9. Creative Presentations: Instead of a log, you could shape the mixture into a ball and roll it in the beef bacon crumbles. You could also serve it in small individual ramekins or as a spread in a decorative bowl, topped with beef bacon, chives, and pecans. This versatility makes it perfect for any gathering.
  10. Leftovers: Any leftover “Million Dollar Beef Bacon Goat Cheese Appetizer Log” should be tightly wrapped and refrigerated. It will typically last for another 3-4 days. It makes for a fantastic snack or a quick spread for lunch.

Million Dollar Beef Bacon Goat Cheese Appetizer Log Recipe

Conclusion:

As we wrap up our culinary journey, I truly hope you’re as excited as I am about trying this show-stopping creation. This isn’t just another appetizer; it’s an experience, a statement piece that effortlessly combines elegance with incredible flavor. The way the smoky, savory notes of the beef bacon perfectly complement the creamy, tangy goat cheese, all enhanced by a judicious blend of herbs and seasonings, creates a symphony for your taste buds. It’s a dish that promises to elevate any gathering, turning a simple get-together into an occasion to remember. Imagine the murmurs of appreciation, the delighted smiles, as your guests discover the rich, complex flavors packed into every bite. It’s surprisingly simple to assemble, yet the results are so sophisticated, making it an absolute must-try for both seasoned hosts and those looking to impress without spending hours in the kitchen.

I genuinely believe that the Million Dollar Beef Bacon Goat Cheese Appetizer Log is destined to become a staple in your entertaining repertoire. Its ability to be prepared ahead of time is a game-changer, allowing you to relax and enjoy your own party. Trust me, the sheer delight of seeing your friends and family savoring this unique appetizer is incredibly rewarding. It’s more than just food; it’s about creating memorable moments and sharing joy through delicious flavors. The balance of textures—the crispness of the bacon against the smooth, spreadable goat cheese—is pure perfection, ensuring every mouthful is as satisfying as the last. It’s a recipe that delivers on its promise of an indulgent, unforgettable appetizer, prompting everyone to ask for the recipe!

Elevate Your Serving Experience:

When it comes to serving, you have a fantastic array of options to truly make this appetizer shine. I adore serving slices of the log with a variety of artisanal crackers – think seeded wheat, water crackers, or even some delicate rice crackers for a gluten-free option. Toasted baguette slices or crisp crostini are also excellent choices, providing a sturdy base for scooping up all that deliciousness. For an added layer of flavor and texture contrast, consider offering fresh fruit such as crisp apple slices, juicy red grapes, or even a small bowl of fig jam on the side. The sweetness of the fruit or jam cuts through the richness of the cheese and bacon beautifully, creating a harmonious bite. For beverages, a light-bodied red wine like a Pinot Noir, a crisp Sauvignon Blanc, or even a glass of sparkling prosecco would be delightful companions, enhancing the intricate flavors of the appetizer. Don’t forget, presentation is key, so arrange your serving platter artfully with garnishes like fresh rosemary sprigs or a sprinkle of chopped chives to add visual appeal.

Creative Twists and Variations:

While the classic recipe is outstanding, don’t hesitate to experiment and make this appetizer your own. For a touch of heat, you could incorporate a pinch of red pepper flakes into the goat cheese mixture, or even a dash of hot honey for a sweet and spicy kick. If you’re feeling adventurous, try adding finely chopped roasted red peppers or sun-dried tomatoes to the cheese for an extra layer of savory depth. Another wonderful variation involves rolling the finished log in a mixture of finely chopped toasted pecans or walnuts for an irresistible nutty crust and added crunch. You could also experiment with different herbs – imagine the delicate fragrance of fresh dill or chives mixed in, or the robust aroma of finely minced rosemary or thyme. For a different cheesy experience, while keeping goat cheese as the star, consider swirling in a bit of softened cream cheese or mascarpone for an even creamier texture. The beauty of this recipe lies in its adaptability, allowing you to tailor it to your personal preferences and whatever ingredients you have on hand.

So, now it’s your turn! I wholeheartedly encourage you to roll up your sleeves and give this incredible recipe a try. You’ll be amazed at how easily you can create something so impressive and utterly delicious. Don’t be shy about getting creative with your own unique twists and serving suggestions. Once you’ve experienced the magic of this appetizer, I’d absolutely love to hear about it! Please share your photos, your triumphs, and any ingenious variations you come up with in the comments below or on social media. Your experiences not only inspire me but also help other home cooks discover new favorites. Happy cooking, and get ready to enjoy an appetizer that truly lives up to its “Million Dollar” moniker!


Million Dollar Beef Bacon with Goat Cheese & Baguette Appetizer

Prepare to have your culinary world transformed with this show-stopping appetizer. Combining the rich, smoky notes of beef bacon with the tangy creaminess of goat cheese and crispy baguette, this dish is a conversation starter, a palate pleaser, and an absolute triumph of flavors that will make you feel like a gourmet chef. Its unique combination hits all the right notes – salty, creamy, savory, and utterly satisfying.

Prep Time
20 Minutes
Cook Time
35 Minutes
Total Time
55 Minutes
Servings
6-8 servings

Ingredients


Instructions


Important Information

Nutrition Facts (Per Serving)

It is important to consider this information as approximate and not to use it as definitive health advice.

Allergy Information

Please check ingredients for potential allergens and consult a health professional if in doubt.

« Previous Post
Best Smash Burger Sauce - Quick & Tangy Homemade Recipe
Next Post »
Cracked Garlic Steak Tortellini in Rich Creamhouse Sauce

If you enjoyed this…

Mini Halloween Pizzas: Spooky Fun for Kids & Adults!

Crispy Cheese Beef Mushroom Garlic Toasts Recipe Delight

Air Fryer Garlic Flatbread: Easy Recipe & Crispy Results

Primary Sidebar

Browse by Diet

BreakfastDinnerLunchDessertAppetizer

Sweet Peach Yogurt Parfait Delight

One of my fondest memories is from a lazy summer afternoon spent at my grandmother’s house. The sun filtered through the kitchen window, casting a warm glow over the table where she would create her culinary magic. It was during one of those blissful moments that I first tasted her Peach Yogurt Parfait with Honey and Granola. The sweet aroma of ripe peaches mingling with creamy yogurt and the crunch of granola was nothing short of heavenly. It felt like summer captured in a bowl, and I still remember the joy of diving in with a spoon, each layer revealing a new burst of flavor.

When I think about that parfait, I can almost hear the gentle hum of the bees outside, reminding me of the floral notes that honey brings to every bite. The vibrant yellows and soft oranges of the peaches contrast beautifully with the creamy white yogurt and the golden crunch of granola. It’s a dish that not only looks delightful but also tastes like a celebration of fresh, wholesome ingredients.

What makes my version of this Peach Yogurt Parfait special is the careful balance of flavors and textures. I use ripe, juicy peaches, drizzled with locally sourced honey, and a homemade granola that’s bursting with nuts and seeds for an extra crunch. It’s a simple dish, but every layer is crafted with love and attention.

Let me show you exactly how to make this delightful parfait, so you can bring a bit of that summer magic into your kitchen!

Sweet Peach Yogurt Parfait Delight

Why You’ll Love This Recipe

  • Delightfully creamy texture from the Greek yogurt, paired with the juicy sweetness of fresh peaches.
  • Ready in under 20 minutes, making it a quick and satisfying breakfast or snack option.
  • Budget-friendly, using common ingredients that you may already have in your pantry.
  • Customizable with your favorite granola and nuts, allowing you to tailor each parfait to your taste.
  • Perfectly balanced flavors with the bright acidity of lemon juice and the sweetness of honey enhancing the peaches.

Ingredients

  • For the Parfait:
  • 2 cups plain Greek yogurt (or vanilla yogurt for a sweeter option)
  • 2 large ripe peaches, diced (about 2 cups)
  • 1 tablespoon fresh lemon juice (to prevent browning of peaches)
  • 2 tablespoons honey (plus more for drizzling)
  • 1 teaspoon vanilla extract (optional for extra flavor)
  • For the Granola:
  • 1 cup granola (store-bought or homemade; see notes for a simple granola recipe)
  • 1/4 cup sliced almonds (optional for added crunch)
  • 1/4 cup shredded coconut (optional for added flavor)

Let’s dive into some key ingredients that make this Peach Yogurt Parfait so delightful! First, the Greek yogurt is not only creamy but also packed with protein, making it a satisfying option for breakfast or a snack. If you’re looking for a sweeter option, you can easily substitute it with vanilla yogurt, though it may alter the overall flavor balance. Next, the ripe peaches are the star of the show; their natural sweetness shines through, so I recommend choosing peaches that yield slightly to pressure, indicating they’re perfectly ripe. If peaches aren’t in season, feel free to use nectarines or even frozen peaches—just thaw them before use. Finally, honey adds a lovely floral sweetness that ties everything together. If you prefer, maple syrup can serve as a delicious substitute.

Step-by-Step Instructions

  1. Start by preparing the peaches. Wash them thoroughly, then slice and dice them into bite-sized pieces. In a medium bowl, toss the diced peaches with 1 tablespoon of fresh lemon juice to prevent browning. Set aside for about 5 minutes while the lemon juice works its magic.
  2. In a separate bowl, combine the Greek yogurt, 2 tablespoons of honey, and 1 teaspoon of vanilla extract if using. Stir the mixture until smooth and thoroughly blended. This should take about a minute. Avoid overmixing to maintain the creaminess of the yogurt.
  3. Now it’s time to layer your parfait. Grab a clear glass or bowl to showcase your beautiful creation. Start with a generous spoonful of the yogurt mixture at the bottom—about 1/4 cup will do. Use a spoon to spread it evenly.
  4. Add a layer of the diced peaches over the yogurt, ensuring they cover the yogurt completely. You might want to use about half of what you have prepared—roughly 1 cup. This layer should be visually appealing, so arrange the peaches neatly.
  5. Sprinkle 1/4 cup of granola over the peaches. This adds a delightful crunch. Make sure to distribute it evenly to ensure every bite has that satisfying texture. Avoid packing it down too tightly, as you want it to maintain its crunch.
  6. Repeat the layers: spoon in another 1/4 cup of yogurt, followed by another cup of peaches, and another sprinkle of granola. You should have at least two layers, but feel free to add more depending on your glass size.
  7. Finish off your parfait with a drizzle of honey on top for added sweetness and a touch of elegance. If you’re using sliced almonds or shredded coconut, sprinkle them on top now. It adds a lovely visual contrast and extra flavor.
  8. Serve immediately or refrigerate for up to 30 minutes before serving to allow the flavors to meld together. However, I recommend enjoying it fresh to maintain the granola’s crunch.

Pro Tips for the Best Peach Yogurt Parfait With Honey And Granola

  • Make sure to choose ripe peaches for the best flavor and texture. A common mistake is using unripe fruit, which can lead to a less enjoyable parfait. Look for peaches that are fragrant and slightly soft to the touch.
  • Use a clear glass to assemble your parfait; this not only makes for a beautiful presentation but also allows you to see the colorful layers, which adds to the enjoyment of eating it.
  • For an even creamier texture, consider whipping the Greek yogurt with a hand mixer for a couple of minutes before layering. This small adjustment makes a huge difference in mouthfeel.
  • Be mindful of the granola-to-yogurt ratio. Too much granola can overwhelm the parfait, while too little can make it feel too creamy. Aim for about 1/4 cup of granola per layer for the perfect balance.
  • If you’re making this for a gathering, consider preparing the yogurt and peaches ahead of time and layering them just before serving. This ensures the granola stays crunchy!

Variations & Serving Ideas

There are so many ways to get creative with your Peach Yogurt Parfait! For a tropical twist, swap out the peaches for mangoes or pineapples and top with coconut flakes. If you prefer a berry flavor, mix in some blueberries or strawberries with the peaches for added color and taste. For a nutty version, incorporate chopped walnuts or pecans instead of almonds.

As for serving ideas, this parfait pairs beautifully with a side of scrambled eggs for a hearty breakfast or fresh fruit salad for a light lunch. You might also enjoy it alongside whole grain toast with almond butter for an energizing snack. The contrast of flavors and textures will elevate your meal experience!

Storage, Make-Ahead & Reheating

The Peach Yogurt Parfait is best enjoyed fresh, but you can prepare some components ahead of time. Store the layered parfait in an airtight container in the refrigerator for up to 24 hours. However, be cautious; the granola may lose its crunch if stored too long. You can freeze the yogurt and peach mixture for up to 2 months; just remember to thaw it in the refrigerator overnight before serving.

If you plan to enjoy this dish the next day, it can taste even better as the flavors meld together. Just remember to add the granola right before serving to keep its delightful crunch!

Frequently Asked Questions

Can I make Peach Yogurt Parfait With Honey And Granola ahead of time?

Yes — in fact, it tastes even better the next day as the flavors meld. However, I recommend waiting to add the granola until just before serving to maintain its crunch.

What can I substitute for Greek yogurt?

If you prefer a lighter option, you can substitute Greek yogurt with regular yogurt or a dairy-free alternative like coconut yogurt. Just remember that this may alter the creaminess and flavor profile slightly.

Can I use frozen peaches for this parfait?

Absolutely! Just make sure to thaw the frozen peaches before using them. They will still add great flavor, though the texture may be slightly softer than fresh peaches.

How do I make the parfait vegan?

To make a vegan version, substitute the Greek yogurt with a plant-based yogurt alternative, and replace honey with maple syrup or agave nectar. This keeps the parfait sweet while adhering to a vegan diet.

What other fruits can I use in this recipe?

You can mix and match fruits based on your preference. Try using strawberries, blueberries, raspberries, or even bananas. Just make sure to adjust the lemon juice as needed to prevent browning.

Sweet Peach Yogurt Parfait Delight

Final Thoughts

The Peach Yogurt Parfait with Honey and Granola is a delightful blend of creamy yogurt, sweet peaches, and crunchy granola that creates a satisfying and nourishing treat. Each layer bursts with flavor, making it a perfect choice for breakfast or a light dessert.

This is the kind of recipe I come back to again and again, especially when I want something refreshing and wholesome to start my day. The harmony of sweet and tart flavors, combined with the delightful crunch, never fails to lift my spirits!

I encourage you to give this parfait a try and indulge in its comforting goodness. Feel free to share your results or even add your own twist—perhaps a sprinkle of cinnamon or a handful of nuts. Enjoy creating your perfect parfait!

Print
clock clock iconcutlery cutlery iconflag flag iconfolder folder iconinstagram instagram iconpinterest pinterest iconfacebook facebook iconprint print iconsquares squares iconheart heart iconheart solid heart solid icon

Peach Yogurt Parfait


  • Author: Lily author
  • Total Time: 15 minutes
  • Yield: 4 servings 1x
Pin Recipe
Print Recipe

Description

This Peach Yogurt Parfait combines creamy Greek yogurt, juicy peaches, and crunchy granola for a delightful treat. It’s a perfect breakfast or snack that captures the essence of summer in every bite.


Ingredients

Scale
  • For the Parfait:
  • 2 cups plain Greek yogurt (or vanilla yogurt for a sweeter option)
  • 2 large ripe peaches, diced (about 2 cups)
  • 1 tablespoon fresh lemon juice (to prevent browning of peaches)
  • 2 tablespoons honey (plus more for drizzling)
  • 1 teaspoon vanilla extract (optional for extra flavor)
  • For the Granola:
  • 1 cup granola (store-bought or homemade; see notes for a simple granola recipe)
  • 1/4 cup sliced almonds (optional for added crunch)
  • 1/4 cup shredded coconut (optional for added flavor)

Instructions

  1. Start by preparing the peaches. Wash them thoroughly, then slice and dice them into bite-sized pieces. In a medium bowl, toss the diced peaches with 1 tablespoon of fresh lemon juice to prevent browning. Set aside for about 5 minutes while the lemon juice works its magic.
  2. In a separate bowl, combine the Greek yogurt, 2 tablespoons of honey, and 1 teaspoon of vanilla extract if using. Stir the mixture until smooth and thoroughly blended. This should take about a minute. Avoid overmixing to maintain the creaminess of the yogurt.
  3. Now it’s time to layer your parfait. Grab a clear glass or bowl to showcase your beautiful creation. Start with a generous spoonful of the yogurt mixture at the bottom—about 1/4 cup will do. Use a spoon to spread it evenly.
  4. Add a layer of the diced peaches over the yogurt, ensuring they cover the yogurt completely. You might want to use about half of what you have prepared—roughly 1 cup. This layer should be visually appealing, so arrange the peaches neatly.
  5. Sprinkle 1/4 cup of granola over the peaches. This adds a delightful crunch. Make sure to distribute it evenly to ensure every bite has that satisfying texture. Avoid packing it down too tightly, as you want it to maintain its crunch.
  6. Repeat the layers: spoon in another 1/4 cup of yogurt, followed by another cup of peaches, and another sprinkle of granola. You should have at least two layers, but feel free to add more depending on your glass size.
  7. Finish off your parfait with a drizzle of honey on top for added sweetness and a touch of elegance. If you’re using sliced almonds or shredded coconut, sprinkle them on top now. It adds a lovely visual contrast and extra flavor.
  8. Serve immediately or refrigerate for up to 30 minutes before serving to allow the flavors to meld together. However, I recommend enjoying it fresh to maintain the granola’s crunch.
  • Prep Time: 15 mins
  • Cook Time: 0 mins
  • Category: Breakfast
  • Method: No-cook
  • Cuisine: American

Nutrition

  • Serving Size: 1 parfait
  • Calories: 250
  • Sugar: 20 g
  • Sodium: 50 mg
  • Fat: 5 g
  • Saturated Fat: 2 g
  • Unsaturated Fat: 3 g
  • Trans Fat: 0 g
  • Carbohydrates: 40 g
  • Fiber: 3 g
  • Protein: 10 g
  • Cholesterol: 10 mg

Keywords: Choose ripe peaches for the best flavor and texture. Use a clear glass for a beautiful presentation. For creaminess, consider whipping the yogurt before layering. Be mindful of the granola-to-yogurt ratio. Prepare yogurt and peaches ahead of time for gatherings, layering just before serving.

Did you make this recipe?

Share a photo and tag us — we can't wait to see what you've made!

Sun-Kissed Frozen Orange Cream Slush

As a child, summer days felt like they lasted forever. I remember the sticky heat wrapping around me as I played outside, my laughter mingling with the sounds of the neighborhood. But nothing could cool me down quite like the moment I’d spot my grandmother, laboring over her blender, whipping up her famous Frozen Orange Creamsicle Slush. That vibrant orange treat, with its frosty texture and sweet citrus aroma, was like a burst of sunshine in a cup. Just one sip, and I could feel the coolness wash over me, sparking pure joy.

This Frozen Orange Creamsicle Slush has a way of making you feel like a kid again. Its creamy, dreamy consistency is a delightful balance of bright orange and soft vanilla, inviting you to dive right in. The refreshing tang of orange dances on your tongue, while the smooth creaminess envelops you in a comforting embrace. It’s a nostalgic treat that’s perfect for hot summer afternoons or anytime you need a little pick-me-up.

What makes my version of this slush stand out is the addition of a hint of vanilla bean, which elevates the flavor and adds an extra layer of richness. Plus, it’s super easy to whip up with just a few simple ingredients that you probably already have on hand! So, if you’re ready to relive those sun-soaked memories, let me show you exactly how to make it.

Sun-Kissed Frozen Orange Cream Slush

Why You’ll Love This Recipe

  • Each slush is a perfect blend of creamy vanilla and zesty orange, creating a nostalgic flavor reminiscent of summer days.
  • This refreshing treat is ready in under 15 minutes, making it an ideal quick dessert for unexpected guests or hot afternoons.
  • With just 8 simple ingredients, it’s budget-friendly, ensuring you don’t have to break the bank to enjoy a delicious slush.
  • The slush has a perfectly smooth texture, thanks to the combination of ice and ice cream, providing a delightful contrast to the bright citrus flavors.
  • It’s highly customizable; you can easily adjust the sweetness and add fresh herbs for a unique twist that suits your taste.

Ingredients

  • 2 cups orange juice (freshly squeezed or store-bought)
  • 1 cup vanilla ice cream
  • 1 cup crushed ice
  • 1/2 cup milk (whole or 2%)
  • 1/4 cup granulated sugar (adjust based on sweetness preference)
  • 1 teaspoon vanilla extract
  • Zest of 1 orange (for added flavor)
  • Fresh orange slices and mint leaves (for garnish)

The star of this Frozen Orange Creamsicle Slush is the orange juice, which provides the vibrant, citrusy base. Freshly squeezed juice will yield the brightest flavor, but store-bought options can be just as convenient. If you’re opting for store-bought, choose 100% pure juice with no added sugars for the best results. Another essential ingredient is the vanilla ice cream; it adds creaminess and sweetness. You can substitute it with dairy-free ice cream if you’re looking for a vegan option. Whole or 2% milk complements the ice cream, creating a smooth blend. If you want a lower-calorie version, almond or oat milk can be good alternatives.

Lastly, the granulated sugar can be adjusted based on your sweetness preference. If you prefer a more natural sweetener, consider using honey or agave syrup. The orange zest enhances the flavor profile, providing an aromatic pop that brings the whole slush together. Don’t skip it! It adds an extra layer of brightness that makes this slush truly special.

Step-by-Step Instructions

  1. Start by preparing your ingredients. Gather 2 cups of orange juice, 1 cup of vanilla ice cream, and 1 cup of crushed ice. Make sure the ice is finely crushed, as larger chunks can make blending difficult.
  2. In a blender, combine the orange juice, vanilla ice cream, crushed ice, and 1/2 cup of milk. Add 1/4 cup of granulated sugar and 1 teaspoon of vanilla extract. If you like a sweeter slush, consider adding a bit more sugar at this stage.
  3. Add the zest of 1 orange to the blender. This step is crucial for enhancing the citrus flavor of your slush. Make sure not to include the bitter white pith—only the flavorful zest.
  4. Blend the mixture on medium-high speed for about 30-45 seconds. Stop once the ingredients are fully combined and the slush has a smooth, even consistency. If you notice large chunks of ice, blend for an additional 10-15 seconds. Avoid over-blending, as this can make the slush too liquidy.
  5. Once blended, taste the slush. If it needs more sweetness, add a little more sugar and blend for a few more seconds. If it’s too thick, you can add a splash of milk to reach your desired consistency.
  6. Pour the slush into glasses. This recipe typically serves 4, but you can easily double it for larger gatherings. Use a spoon to help guide the slush into the glasses if needed.
  7. Garnish each serving with fresh orange slices and mint leaves. The mint not only adds a pop of color but also a refreshing aroma that complements the citrus flavors beautifully.
  8. Serve immediately and enjoy! If you’ve made extra, you can refrigerate it for a short time, but it’s best enjoyed fresh.

Pro Tips for the Best Frozen Orange Creamsicle Slush

  • Don’t skip the orange zest! It’s a game-changer for flavor. Always zest before juicing to make it easier.
  • Use a high-powered blender for the best texture. A standard blender may struggle with ice, leading to uneven consistency. If you have a food processor, that can work too, but ensure the ice is finely crushed.
  • Adjust the ice-to-liquid ratio carefully. If your slush is too thick, it won’t blend well. Start with less ice and add more until you reach your preferred texture.
  • Be cautious with the sugar! Always start with the lower amount, as you can easily add more, but it’s hard to fix an overly sweet slush.
  • For a fun twist, consider adding a splash of coconut milk or a handful of fresh fruit like strawberries or pineapple. This not only enhances the flavor but also adds a beautiful color contrast.

Variations & Serving Ideas

There are countless ways to put a spin on your Frozen Orange Creamsicle Slush. Consider making a tropical version by adding in some pineapple juice or coconut milk for a delightful tropical twist. If you’re feeling adventurous, try incorporating a handful of frozen mango or peach slices for added sweetness. For a lighter version, swap out the vanilla ice cream for Greek yogurt for a creamy yet tangy alternative.

As for serving ideas, this refreshing slush pairs wonderfully with light summer dishes like grilled chicken skewers, fish tacos, or a simple salad topped with citrus vinaigrette. The bright, zesty flavors of the slush complement these dishes perfectly, making them an ideal pairing for a sunny day.

Storage, Make-Ahead & Reheating

This Frozen Orange Creamsicle Slush is best enjoyed fresh, but if you have leftovers, you can store them in an airtight container in the fridge for up to 2 days. Just keep in mind that the slush may lose some of its texture over time as the ice melts. It doesn’t freeze well, as the ice will turn into a solid block. If you must freeze it, blend again after thawing to restore the slushy consistency. This treat is best the day you make it, as the flavors meld together beautifully overnight, enhancing its deliciousness.

Frequently Asked Questions

Can I make Frozen Orange Creamsicle Slush ahead of time?

Yes — in fact, it tastes even better the next day as the flavors meld. However, it’s best to enjoy it fresh, as the texture can change if stored for too long. If you need to prepare it ahead, keep it in the fridge and re-blend before serving.

What kind of orange juice should I use?

For the best flavor, use freshly squeezed orange juice. However, if you’re short on time, opt for 100% pure store-bought juice without added sugars. This will ensure that your slush remains flavorful and refreshing.

Can I substitute the vanilla ice cream?

Absolutely! If you’re looking for a dairy-free option, coconut milk ice cream or a non-dairy vanilla ice cream can work wonderfully. They will still provide the creamy texture and sweetness you desire.

How can I adjust the sweetness of my slush?

You can easily adjust the sweetness by modifying the amount of sugar added. Start with 1/4 cup and taste the mixture before blending. If you prefer it sweeter, add more sugar gradually until it reaches your desired level.

What should I do if my slush is too thick?

If your slush is too thick, simply add a splash of milk or orange juice and blend again. This will help achieve a more drinkable consistency while maintaining the slushy texture. Adjust gradually to reach your preferred thickness.

Sun-Kissed Frozen Orange Cream Slush

Final Thoughts

The Frozen Orange Creamsicle Slush is a delightful blend of refreshing citrus and creamy goodness, making it a perfect treat for warm days or any time you crave a taste of nostalgia. The way the bright orange flavor dances with the creamy texture truly elevates this slush, transforming it into a satisfying escape from the everyday.

This is the kind of recipe I come back to again and again, especially when I’m looking to cool down or impress guests at a summer gathering. It’s simple to make and always brings smiles all around! I encourage you to try this recipe for yourself—don’t hesitate to share your results or even put your own spin on it. Happy slushing!

Print
clock clock iconcutlery cutlery iconflag flag iconfolder folder iconinstagram instagram iconpinterest pinterest iconfacebook facebook iconprint print iconsquares squares iconheart heart iconheart solid heart solid icon

Frozen Orange Creamsicle Slush


  • Author: Lily author
  • Total Time: 15 minutes
  • Yield: 4 servings 1x
Pin Recipe
Print Recipe

Description

This Frozen Orange Creamsicle Slush is a refreshing treat that combines creamy vanilla and zesty orange flavors. Perfect for hot summer days, it brings back nostalgic memories with every sip.


Ingredients

Scale
  • 2 cups orange juice (freshly squeezed or store-bought)
  • 1 cup vanilla ice cream
  • 1 cup crushed ice
  • 1/2 cup milk (whole or 2%)
  • 1/4 cup granulated sugar (adjust based on sweetness preference)
  • 1 teaspoon vanilla extract
  • Zest of 1 orange (for added flavor)
  • Fresh orange slices and mint leaves (for garnish)

Instructions

  1. Start by preparing your ingredients. Gather 2 cups of orange juice, 1 cup of vanilla ice cream, and 1 cup of crushed ice. Make sure the ice is finely crushed, as larger chunks can make blending difficult.
  2. In a blender, combine the orange juice, vanilla ice cream, crushed ice, and 1/2 cup of milk. Add 1/4 cup of granulated sugar and 1 teaspoon of vanilla extract. If you like a sweeter slush, consider adding a bit more sugar at this stage.
  3. Add the zest of 1 orange to the blender. This step is crucial for enhancing the citrus flavor of your slush. Make sure not to include the bitter white pith—only the flavorful zest.
  4. Blend the mixture on medium-high speed for about 30-45 seconds. Stop once the ingredients are fully combined and the slush has a smooth, even consistency. If you notice large chunks of ice, blend for an additional 10-15 seconds. Avoid over-blending, as this can make the slush too liquidy.
  5. Once blended, taste the slush. If it needs more sweetness, add a little more sugar and blend for a few more seconds. If it’s too thick, you can add a splash of milk to reach your desired consistency.
  6. Pour the slush into glasses. This recipe typically serves 4, but you can easily double it for larger gatherings. Use a spoon to help guide the slush into the glasses if needed.
  7. Garnish each serving with fresh orange slices and mint leaves. The mint not only adds a pop of color but also a refreshing aroma that complements the citrus flavors beautifully.
  8. Serve immediately and enjoy! If you’ve made extra, you can refrigerate it for a short time, but it's best enjoyed fresh.
  • Prep Time: 15 min
  • Cook Time: 0 min
  • Category: Dessert
  • Method: Blending
  • Cuisine: American

Nutrition

  • Serving Size: 1 serving
  • Calories: 200
  • Sugar: 30 g
  • Sodium: 50 mg
  • Fat: 5 g
  • Saturated Fat: 3 g
  • Unsaturated Fat: 2 g
  • Trans Fat: 0 g
  • Carbohydrates: 40 g
  • Fiber: 1 g
  • Protein: 2 g
  • Cholesterol: 20 mg

Keywords: Don't skip the orange zest! It's a game-changer for flavor. Always zest before juicing to make it easier.

Did you make this recipe?

Share a photo and tag us — we can't wait to see what you've made!

Zesty Lemon Poppy Seed Delight

One rainy afternoon, I found myself in my grandmother’s cozy kitchen, the kind that always smelled like warmth and love. She was whipping up her famous Lemon Poppy Seed Loaf, a recipe that had been passed down through generations. As the batter came together, the zesty aroma of fresh lemons filled the air, mingling perfectly with the nutty fragrance of poppy seeds. I can still picture her, apron-clad, as she expertly drizzled a vibrant citrus icing over the loaf, creating a glossy, sun-kissed finish that beckoned us to dive in. It was a moment that sparked my own passion for baking, and this recipe has become a cherished staple in my home ever since.

When you take a bite of this Lemon Poppy Seed Loaf, it’s like a burst of sunshine on your palate. The loaf is beautifully golden, with a tender crumb that melts in your mouth. Each slice is speckled with tiny poppy seeds, adding a delightful crunch that contrasts beautifully with the tangy sweetness of the lemon. And that citrus icing? It’s the finishing touch that elevates this loaf from ordinary to extraordinary, with its bright, zesty flavor dancing on your taste buds.

This recipe stands out because it embraces simplicity while delivering on flavor. I’ve added a hint of vanilla to the batter, enhancing the overall taste and making it even more indulgent. Trust me, once you make this Lemon Poppy Seed Loaf With Citrus Icing, it’ll become a go-to in your baking repertoire.

So, let me show you exactly how to make it!

Zesty Lemon Poppy Seed Delight

Why You’ll Love This Recipe

  • Moist and tender crumb that melts in your mouth, thanks to the perfect balance of butter and buttermilk.
  • Bright, zesty lemon flavor paired with crunchy poppy seeds, creating a delightful texture and taste experience.
  • Easy to whip up in just about an hour, perfect for last-minute gatherings or a cozy afternoon treat.
  • Budget-friendly with everyday ingredients, making it an accessible option for all home bakers.
  • The citrus icing adds a sweet tang that elevates the loaf, turning a simple recipe into a showstopper!

Ingredients

  • 1 ½ cups (190g) all-purpose flour
  • 1 teaspoon baking powder
  • ½ teaspoon baking soda
  • ½ teaspoon salt
  • 3 tablespoons poppy seeds
  • ½ cup (115g) unsalted butter, softened to room temperature
  • 1 cup (200g) granulated sugar
  • 2 large eggs
  • 1 teaspoon vanilla extract
  • 1 teaspoon lemon zest (from about 1 medium lemon)
  • ½ cup (120ml) buttermilk
  • 2 tablespoons fresh lemon juice

For the Citrus Icing:

  • 1 cup (120g) powdered sugar
  • 2 tablespoons fresh lemon juice
  • 1 tablespoon orange juice
  • 1 teaspoon lemon zest (for garnish, optional)

Let’s dive into the key ingredients that make this Lemon Poppy Seed Loaf so special. The all-purpose flour provides the structure and base for the loaf, while the baking powder and baking soda ensure it rises perfectly, giving the loaf a light texture. For a gluten-free variation, you could substitute the flour with a gluten-free all-purpose blend. Poppy seeds not only add a delightful crunch but also contribute to the unique flavor profile that pairs well with the citrus notes.

Unsalted butter is crucial for achieving the buttery richness that makes this loaf so moist. If you’re looking for a dairy-free option, coconut oil or a vegan butter can be used instead. The buttermilk is another essential component, providing acidity that activates the baking soda for a fluffy texture. If you don’t have buttermilk on hand, you can easily make a substitute by mixing ½ cup of milk with 1 tablespoon of vinegar or lemon juice and letting it sit for about 5 minutes.

Step-by-Step Instructions

  1. Preheat your oven to 350°F (175°C). Grease a 9×5-inch loaf pan or line it with parchment paper for easy removal later.
  2. In a medium mixing bowl, whisk together 1 ½ cups of all-purpose flour, 1 teaspoon of baking powder, ½ teaspoon of baking soda, ½ teaspoon of salt, and 3 tablespoons of poppy seeds. This helps to evenly distribute the baking agents and ensures a uniform rise.
  3. In a large mixing bowl, cream together ½ cup of softened unsalted butter and 1 cup of granulated sugar using an electric mixer on medium speed for about 3-4 minutes, until the mixture is light and fluffy. Make sure to scrape down the sides of the bowl occasionally.
  4. Add 2 large eggs, 1 teaspoon of vanilla extract, and 1 teaspoon of lemon zest to the creamed butter and sugar, mixing until fully combined. You want a smooth consistency, so ensure there are no lumps of butter.
  5. In a small bowl, combine ½ cup of buttermilk and 2 tablespoons of fresh lemon juice. Alternately add the dry ingredients and buttermilk mixture to the butter mixture, starting and ending with the dry ingredients. Mix just until combined; do not overmix, as this can lead to a dense loaf.
  6. Pour the batter into the prepared loaf pan. Smooth the top with a spatula, ensuring it’s even. Bake in the preheated oven for 50-60 minutes, or until a toothpick inserted in the center comes out clean. The edges should be lightly golden brown, and the center should feel just set.
  7. Once baked, remove the loaf from the oven and allow it to cool in the pan for about 10 minutes. Then, transfer it to a wire rack to cool completely. Resist the urge to slice too soon, as it will be crumbly if it’s still warm.
  8. While the loaf is cooling, prepare the citrus icing. In a medium bowl, whisk together 1 cup of powdered sugar, 2 tablespoons of fresh lemon juice, and 1 tablespoon of orange juice until smooth. If the icing is too thick, you can add a little more juice to reach your desired consistency.
  9. Once the loaf is completely cool, drizzle the citrus icing over the top. If you like, sprinkle with an additional teaspoon of lemon zest for an extra pop of flavor and color.

Pro Tips for the Best Lemon Poppy Seed Loaf With Citrus Icing

  • Be careful not to overmix your batter; this is a common mistake that can lead to a dense loaf. Mix just until the dry ingredients are incorporated for a light and fluffy texture.
  • Use room temperature ingredients, especially the butter and eggs. This helps to create a smoother batter and ensures even baking. Take your eggs out of the fridge about 30 minutes before you start.
  • For a more pronounced lemon flavor, consider adding a little lemon extract in addition to the zest and juice. Just a half teaspoon can elevate the citrus notes significantly.
  • When measuring your flour, spoon it into the measuring cup and level it off with a knife instead of scooping directly from the bag. This prevents packing and ensures you don’t end up with a dry loaf.
  • Invest in a good quality loaf pan; it makes a difference in heat distribution, which ensures even baking. If your pan is dark-coated, reduce the oven temperature by 25°F to prevent over-browning.

Variations & Serving Ideas

For a delightful twist, consider adding blueberries or raspberries to the batter for a fruity burst of flavor. You can also experiment with different citrus fruits—try lime or grapefruit zest and juice for a refreshing change. For a healthier option, substitute half of the all-purpose flour with whole wheat flour for added fiber without compromising too much on texture.

This Lemon Poppy Seed Loaf pairs beautifully with a light salad, such as a mixed greens salad with a vinaigrette, or a cup of tea for a cozy afternoon treat. It also complements a creamy cheese platter, as the acidity of the loaf balances rich cheeses perfectly. Lastly, a scoop of vanilla ice cream on the side creates a delightful contrast of temperatures and flavors!

Storage, Make-Ahead & Reheating

This Lemon Poppy Seed Loaf can be stored at room temperature for up to 3 days if wrapped tightly in plastic wrap. If you want to keep it longer, it freezes well for up to 3 months. To freeze, wrap the loaf tightly in plastic wrap and then in aluminum foil to prevent freezer burn.

When you’re ready to enjoy it again, simply thaw it in the fridge overnight. Reheat individual slices in the microwave for 15-20 seconds or in a toaster oven until warmed through. Interestingly, many people find that this loaf tastes even better the next day, as the flavors have time to meld!

Frequently Asked Questions

Can I make Lemon Poppy Seed Loaf With Citrus Icing ahead of time?

Yes — in fact, it tastes even better the next day! You can make the loaf a day in advance, allowing the flavors to develop. Just be sure to store it in an airtight container to maintain its moisture.

Can I substitute the poppy seeds?

Absolutely! If you don’t have poppy seeds on hand or prefer an alternative, you can use sesame seeds for a similar crunch or omit them entirely for a smooth loaf.

What can I use instead of buttermilk?

If you don’t have buttermilk, you can easily create a substitute by mixing ½ cup of milk (dairy or plant-based) with 1 tablespoon of vinegar or lemon juice. Let it sit for 5 minutes before using in the recipe.

How can I make this recipe gluten-free?

To make a gluten-free version of this Lemon Poppy Seed Loaf, substitute the all-purpose flour with a gluten-free all-purpose flour blend. Just ensure that the blend contains a binding agent like xanthan gum for the best results.

What is the best way to store leftover loaf?

Leftover Lemon Poppy Seed Loaf should be stored in an airtight container at room temperature for up to 3 days. For longer storage, wrap it tightly and freeze for up to 3 months. Thaw it before serving for the best texture.

Zesty Lemon Poppy Seed Delight

Final Thoughts

The Lemon Poppy Seed Loaf with Citrus Icing is truly a delightful treat that brings a burst of brightness to any occasion. The zesty lemon flavor combined with the subtle crunch of poppy seeds creates a satisfying balance, while the citrus icing adds a touch of sweetness that perfectly complements the loaf’s tanginess.

This is the kind of recipe I come back to again and again, especially when I want to brighten up a gloomy day or celebrate a small victory. The aroma that fills the kitchen as it bakes is absolutely heavenly! I encourage you to give this recipe a try; you might just find it becoming a beloved staple in your home. Don’t forget to share your results or even add your own unique twist—I can’t wait to see what you create!

Print
clock clock iconcutlery cutlery iconflag flag iconfolder folder iconinstagram instagram iconpinterest pinterest iconfacebook facebook iconprint print iconsquares squares iconheart heart iconheart solid heart solid icon

Lemon Poppy Seed Loaf


  • Author: Lily author
  • Total Time: 11 minute
  • Yield: 1 loaf 1x
Pin Recipe
Print Recipe

Description

This Lemon Poppy Seed Loaf is a delightful treat that combines zesty lemon flavor with crunchy poppy seeds. Topped with a citrus icing, it’s perfect for any occasion.


Ingredients

Scale
  • 1 ½ cups (190g) all-purpose flour
  • 1 teaspoon baking powder
  • ½ teaspoon baking soda
  • ½ teaspoon salt
  • 3 tablespoons poppy seeds
  • ½ cup (115g) unsalted butter, softened to room temperature
  • 1 cup (200g) granulated sugar
  • 2 large eggs
  • 1 teaspoon vanilla extract
  • 1 teaspoon lemon zest (from about 1 medium lemon)
  • ½ cup (120ml) buttermilk
  • 2 tablespoons fresh lemon juice
  • 1 cup (120g) powdered sugar
  • 2 tablespoons fresh lemon juice
  • 1 tablespoon orange juice
  • 1 teaspoon lemon zest (for garnish, optional)

Instructions

  1. Preheat your oven to 350°F (175°C). Grease a 9×5-inch loaf pan or line it with parchment paper for easy removal later.
  2. In a medium mixing bowl, whisk together 1 ½ cups of all-purpose flour, 1 teaspoon of baking powder, ½ teaspoon of baking soda, ½ teaspoon of salt, and 3 tablespoons of poppy seeds. This helps to evenly distribute the baking agents and ensures a uniform rise.
  3. In a large mixing bowl, cream together ½ cup of softened unsalted butter and 1 cup of granulated sugar using an electric mixer on medium speed for about 3-4 minutes, until the mixture is light and fluffy. Make sure to scrape down the sides of the bowl occasionally.
  4. Add 2 large eggs, 1 teaspoon of vanilla extract, and 1 teaspoon of lemon zest to the creamed butter and sugar, mixing until fully combined. You want a smooth consistency, so ensure there are no lumps of butter.
  5. In a small bowl, combine ½ cup of buttermilk and 2 tablespoons of fresh lemon juice. Alternately add the dry ingredients and buttermilk mixture to the butter mixture, starting and ending with the dry ingredients. Mix just until combined; do not overmix, as this can lead to a dense loaf.
  6. Pour the batter into the prepared loaf pan. Smooth the top with a spatula, ensuring it’s even. Bake in the preheated oven for 50-60 minutes, or until a toothpick inserted in the center comes out clean. The edges should be lightly golden brown, and the center should feel just set.
  7. Once baked, remove the loaf from the oven and allow it to cool in the pan for about 10 minutes. Then, transfer it to a wire rack to cool completely. Resist the urge to slice too soon, as it will be crumbly if it’s still warm.
  8. While the loaf is cooling, prepare the citrus icing. In a medium bowl, whisk together 1 cup of powdered sugar, 2 tablespoons of fresh lemon juice, and 1 tablespoon of orange juice until smooth. If the icing is too thick, you can add a little more juice to reach your desired consistency.
  9. Once the loaf is completely cool, drizzle the citrus icing over the top. If you like, sprinkle with an additional teaspoon of lemon zest for an extra pop of flavor and color.
  • Prep Time: 15 mins
  • Cook Time: 50-60 mins
  • Category: Dessert
  • Method: Baking
  • Cuisine: American

Nutrition

  • Serving Size: 1 slice
  • Calories: 200
  • Sugar: 15 g
  • Sodium: 150 mg
  • Fat: 8 g
  • Saturated Fat: 5 g
  • Unsaturated Fat: 3 g
  • Trans Fat: 0 g
  • Carbohydrates: 30 g
  • Fiber: 1 g
  • Protein: 3 g
  • Cholesterol: 40 mg

Keywords: Be careful not to overmix your batter; this is a common mistake that can lead to a dense loaf. Use room temperature ingredients for a smoother batter and even baking.

Did you make this recipe?

Share a photo and tag us — we can't wait to see what you've made!

  • Privacy Policy
  • Terms Of Service
  • Contact
  • About
  • GDPR

Copyright © 2025 Homesmad