Million Dollar Beef Bacon Goat Cheese Appetizer Log is not just a catchy name; it’s a declaration of the culinary delight and sheer impressiveness this dish brings to any table. I’ve discovered few appetizers that command such attention and adoration with relatively little effort, making it my go-to for events where I truly want to dazzle my guests. Imagine a luxurious blend of savory, seasoned beef, smoky, crispy bacon, and creamy, tangy goat cheese, all elegantly combined and ready to be sliced and served.
The story goes that this appetizer earned its grand moniker not from its monetary cost, but from the priceless reactions it consistently elicits. It’s rumored to have first appeared at a high-stakes poker night, where the clever host, aiming to impress without slaving away in the kitchen, created this surprisingly gourmet yet simple log. Its irresistible combination of textures and flavors quickly became legendary, earning it the reputation of being “worth a million dollars” in guest satisfaction.
People absolutely adore this dish for so many reasons. The rich, umami depth of the beef perfectly complements the salty crunch of the bacon, while the luscious goat cheese provides a much-needed creamy tang that cuts through the richness, creating a perfectly balanced bite. It’s incredibly convenient, can be prepared mostly in advance, and looks stunning when presented on a platter. This incredible Million Dollar Beef Bacon Goat Cheese Appetizer Log truly offers that coveted blend of sophisticated flavor, satisfying texture, and effortless elegance that transforms an ordinary gathering into an extraordinary one, leaving everyone feeling like a million bucks!
Ingredients:
Creating this spectacular “Million Dollar Beef Bacon Goat Cheese Appetizer Log” is a true joy, and it all starts with selecting the right ingredients. Quality really shines through here, transforming simple components into something truly extraordinary and memorable. Here’s what you’ll need to assemble this crowd-pleasing delight:
- 1 pound high-quality Beef Bacon: I always recommend a good brand that crisps up well. This is going to be the backbone of our savory flavor and provide that irresistible crunch. Make sure it’s thick-cut if you can find it, as it renders beautifully and offers more texture.
- 8 ounces fresh Goat Cheese (chèvre): This should be softened at room temperature. Its tangy creaminess is absolutely essential for the character of our log. Opt for a plain, unflavored chèvre so its natural bright flavor can shine.
- 8 ounces full-fat Cream Cheese: Also softened to room temperature. This provides a wonderfully rich, smooth base, helping to bind everything together and mellowing the tang of the goat cheese just perfectly. Full-fat is key for that luxurious texture.
- 2 large cloves Garlic: Finely minced. Fresh garlic makes all the difference, offering an aromatic foundation that complements the richness of the cheeses and bacon.
- 1 small Shallot: Very finely minced. Shallots are milder and more delicate than onions, providing a subtle sweetness and depth without overpowering the other flavors.
- ¼ cup fresh Chives: Finely chopped. Their delicate oniony flavor and vibrant green color are not just for taste but also for visual appeal, making our “Million Dollar Beef Bacon Goat Cheese Appetizer Log” even more inviting.
- ¼ cup fresh Flat-leaf Parsley: Finely chopped. This adds a fresh, herbaceous note that brightens the whole dish and brings a lovely balance.
- ½ cup Pecans: Toasted and finely chopped. Nuts add a fantastic textural contrast and a subtle earthy, buttery flavor that pairs beautifully with the other ingredients. Walnuts can be a good substitute if you prefer.
- ¼ cup Dried Cranberries: Finely chopped (optional, but highly recommended). These little gems add a delightful burst of sweet-tartness that cuts through the richness and really elevates the flavor profile. They are truly the secret weapon for that ‘million dollar’ complexity.
- 1 tablespoon Honey: Or maple syrup, for a touch of sweetness. Just a hint to balance the savory and tangy notes, enhancing the overall deliciousness without making the appetizer overtly sweet.
- ½ teaspoon freshly ground Black Pepper: Freshly ground makes a huge difference in aroma and punch.
- ¼ teaspoon Red Pepper Flakes: (Optional, for a subtle kick). If you love a little warmth, these add a fantastic spark without being overly spicy. Adjust to your personal preference!
- Salt: To taste. Remember that beef bacon is salty, so taste your mixture before adding extra salt. You likely won’t need much, if any.
- Assorted Crackers, toasted baguette slices, or crostini: For serving. Choose your favorites – sturdy crackers are great, as are lightly toasted bread slices that can stand up to the creamy log.
Prepping Our Million Dollar Ingredients: The Foundation of Flavor
Alright, let’s get our hands dirty and prepare everything for our incredible “Million Dollar Beef Bacon Goat Cheese Appetizer Log.” This stage is all about setting ourselves up for success, ensuring every component is at its peak and ready to mingle.
- Crisping the Beef Bacon to Perfection:
First, preheat your oven to 375°F (190°C). Line a large baking sheet with foil or parchment paper for easy cleanup – trust me, you’ll thank yourself later! Lay out the beef bacon strips in a single layer, making sure they don’t overlap too much. I usually bake my beef bacon, as it cooks more evenly and creates consistently crispy strips without constant supervision. Bake for about 15-20 minutes, or until it’s beautifully golden brown and delightfully crispy. Cooking time can vary depending on the thickness of your bacon and your oven, so keep an eye on it! Once it’s perfectly crisp, transfer the bacon to a plate lined with paper towels to drain off any excess fat. This step is crucial for preventing a greasy appetizer log and ensures a wonderful crunch. Let it cool completely. A fully cooled, crispy texture is key here; warm bacon will wilt your herbs and melt your cheese prematurely. Once cool, crumble the beef bacon into small, irregular pieces. Some larger bits are great for texture, so don’t over-crumble it into dust!
- Softening the Cheeses: The Creamy Heart:
While your beef bacon is cooling, make sure your goat cheese and cream cheese are truly at room temperature. This isn’t just a suggestion; it’s vital for achieving a smooth, lump-free mixture that’s easy to work with. If they’re too cold, you’ll end up with a clumpy log and overworked cheese, which can lead to a tougher texture. I usually take them out of the fridge at least an hour before I plan to start. If you’re short on time, you can carefully soften them in the microwave for 10-15 second intervals, stirring well after each, until pliable. Place both softened cheeses into a large mixing bowl.
- Minced Aromatics and Herbs:
Now, let’s get those aromatics and herbs ready. Finely mince your garlic cloves. For the shallot, aim for an incredibly fine dice – you want its flavor to infuse the log, not for large pieces to dominate. Next, finely chop your fresh chives and flat-leaf parsley. When chopping herbs, I like to gather them into a tight bunch and make very thin slices, then run my knife through them a few more times. The finer, the better, for an even distribution of flavor and color throughout our “Million Dollar Beef Bacon Goat Cheese Appetizer Log.”
- Toasting and Chopping the Pecans:
If your pecans aren’t already toasted, a quick toast will bring out their best flavor. You can do this in a dry skillet over medium heat for about 3-5 minutes, stirring frequently until fragrant, or spread them on a baking sheet and toast in the preheated oven for about 5-7 minutes while the bacon bakes (just watch them closely as nuts can burn quickly!). Let them cool completely, then finely chop them. You want a good mix of sizes here, from finely ground to small visible pieces, to add dimension to the log’s texture.
- Preparing the Dried Cranberries:
If you’re using them (and I highly recommend you do for that “million dollar” touch!), finely chop the dried cranberries. They should be small enough to blend seamlessly into the cheese mixture, providing those delightful little bursts of sweet-tartness without being chunky.
Assembling Our Million Dollar Beef Bacon Goat Cheese Appetizer Log: The Magic Begins
With all our ingredients prepped and ready, it’s time for the exciting part: bringing it all together to create our magnificent “Million Dollar Beef Bacon Goat Cheese Appetizer Log”! This is where the individual flavors meld into a harmonious symphony.
- Combining the Creamy Base:
In the large mixing bowl with your softened goat cheese and cream cheese, add the minced garlic, minced shallot, chopped fresh chives, and chopped fresh parsley. Sprinkle in the finely chopped pecans and the finely chopped dried cranberries (if using). Add the honey, freshly ground black pepper, and red pepper flakes (if desired). Now, gently fold in about three-quarters of your crumbled crispy beef bacon. We’re reserving the remaining quarter for a glorious exterior coating later – it’s one of those little touches that makes this appetizer truly special.
- Mixing for Perfection:
Using a sturdy spatula or a wooden spoon, gently mix all the ingredients together until everything is well combined. Be careful not to overmix; you want the mixture to be smooth and homogeneous, but excessive mixing can make the cheeses tough. I like to fold and press until I see all the vibrant colors of the herbs and the rich texture of the bacon evenly distributed throughout the creamy cheese base. This mixture should be rich, fragrant, and bursting with promise. Taste a tiny bit of the mixture at this point. This is your chance to adjust seasoning – a tiny pinch more salt, another grind of pepper, or a whisper more honey if you feel it needs it. Remember, flavors will deepen as it chills.
- Shaping the Appetizer Log:
Tear off a generous piece of plastic wrap, about 18-24 inches long, and lay it flat on your clean counter. Spoon the entire cheese mixture onto the center of the plastic wrap. Now, carefully gather the edges of the plastic wrap around the cheese mixture and begin to shape it into a log. I usually aim for a log that’s about 6-8 inches long and about 2-2.5 inches in diameter. Gently roll and press the log, using the plastic wrap to help compress and smooth the sides, ensuring there are no air pockets. You want a nice, firm, and uniform cylinder. This process is surprisingly therapeutic!
- Chilling for Firmness and Flavor:
Once you’ve got a beautifully shaped log, twist the ends of the plastic wrap securely to seal it. Place the wrapped “Million Dollar Beef Bacon Goat Cheese Appetizer Log” in the refrigerator. This chilling step is absolutely crucial. Not only does it allow the flavors to meld and deepen, becoming even more complex and delicious, but it also firms up the log, making it much easier to handle and slice later on. Chill for at least 2 hours, or ideally, overnight. The longer it chills, the better the flavors will develop and the firmer it will become for perfect presentation. I often make this the day before a party, which saves me so much time on event day!
Finishing Touches and Serving Our Masterpiece: The “Million Dollar” Presentation
The moment has come to unveil and adorn our chilled “Million Dollar Beef Bacon Goat Cheese Appetizer Log” with its final, dazzling coat, making it truly ready for its grand debut. This final step is all about presentation and adding that irresistible exterior texture.
- Coating the Log with Crispy Bacon:
Once your appetizer log is thoroughly chilled and firm, unwrap it carefully. On a clean plate or a shallow dish, spread out the remaining one-quarter of your finely crumbled crispy beef bacon. You want an even layer here. Gently roll the entire log in the crumbled beef bacon, pressing lightly to ensure that the bacon adheres all around the surface. Don’t be shy; aim for full coverage! The contrast of the creamy interior with the salty, crunchy exterior is simply divine and visually stunning. This beef bacon coating not only adds incredible flavor and texture but also hints at the deliciousness within, making it incredibly appealing.
- Optional Embellishments:
For an extra touch of elegance and freshness, you can sprinkle a few more finely chopped chives or parsley over the coated log, or even some extra toasted pecans, just before serving. A light drizzle of honey over the top just before serving can also enhance that sweet-savory balance beautifully, adding a lovely sheen.
- Slicing and Presenting:
To serve, place the magnificent “Million Dollar Beef Bacon Goat Cheese Appetizer Log” on your most attractive serving platter. You can serve it whole, allowing guests to spread it onto crackers or crostini, which keeps the log looking pristine for longer. Alternatively, for easier serving, you can gently slice it into thick rounds (about ½ inch thick) using a sharp, thin knife. If slicing, it’s best to do this just before guests arrive to maintain its freshness and integrity. Arrange the slices artfully around your platter. Surround it with an assortment of your favorite crackers, toasted baguette slices, or artisanal crostini. I also love adding some fresh fruit like sliced apples or pears, or a small bowl of fig jam on the side; their sweetness and crispness create a lovely counterpoint to the rich, savory log.
- Serving Temperature and Enjoyment:
While the log is chilled for shaping, it’s actually best served when it’s had a chance to sit out at room temperature for about 15-20 minutes before serving. This allows the cheeses to soften ever so slightly, making them creamier and more spreadable, and allowing all those incredible flavors to really bloom. This “Million Dollar Beef Bacon Goat Cheese Appetizer Log” is truly a showstopper. It’s decadent, full of contrasting textures, and boasts an explosion of savory, tangy, sweet, and salty notes in every single bite. Prepare for rave reviews – this appetizer is always the first to disappear at any gathering!

Conclusion:
This appetizer is truly more than just a dish; it’s an unforgettable experience. The creamy, tangy delight of goat cheese, the smoky, savory crunch of perfectly cooked beef bacon, and the rich, aromatic blend of herbs – every single component comes together in a symphony of flavors and textures that will tantalize your taste buds. I promise you, this isn’t just another dip you serve; it’s a bona fide showstopper that looks incredibly sophisticated but is surprisingly simple to assemble, making you appear like a culinary genius without any unnecessary fuss. Every bite delivers that perfect balance of salty, savory, tangy, and utterly satisfying goodness. It’s precisely the kind of dish that mysteriously disappears from the table within minutes at any gathering and leaves everyone enthusiastically asking for the recipe. This profound impact on guests is why I confidently refer to it as the Million Dollar Beef Bacon Goat Cheese Appetizer Log – it genuinely delivers a million-dollar impression in taste and presentation.
When it comes to serving this magnificent creation, the possibilities are delightfully endless. My personal favorites for pairing include crisp, artisanal crackers, thin slices of perfectly toasted baguette (often called crostini), or even sturdy, lightly salted pita chips, which offer a great textural contrast. For those seeking a lighter, fresher touch, consider serving it alongside cool, crisp cucumber slices or refreshing apple wedges; the freshness provides a wonderful, palate-cleansing contrast to the richness of the log. Garnish, my friends, is absolutely key to elevating its presentation and adding another layer of flavor. A simple sprinkle of fresh chives or finely chopped parsley adds a beautiful pop of vibrant color and a subtle hint of herbaceousness. For an extra touch of gourmet decadence, a light drizzle of good quality balsamic glaze or a whisper of hot honey can introduce a beautiful sweet-tart or spicy note that magnificently complements both the goat cheese and the beef bacon. And don’t forget toasted pecans or walnuts for an added crunch and nutty depth; they truly complete the picture of a perfectly crafted appetizer.
And if you’re feeling particularly adventurous or creative in the kitchen, I wholeheartedly encourage you to put your own unique spin on it! You could experiment by swapping out some of the goat cheese for a bit of cream cheese to achieve an even creamier and milder texture, or perhaps introduce a bolder flavor profile with a touch of crumbled blue cheese for the more adventurous palates. Instead of beef bacon, crispy pancetta or even regular, perfectly rendered pork bacon would work wonderfully and offer a slightly different nuance. Craving a spicy kick? Easily incorporate a pinch of red pepper flakes directly into the mixture for a delightful warmth. For a touch of unexpected sweetness and chewiness, finely chop some dried figs or dates and mix them in. You could also try rolling the finished log in various different coatings – finely chopped pistachios for a vibrant green color and a unique, delicate crunch, or even a savory mix of everything bagel seasoning for an extra layer of umami. This recipe is wonderfully forgiving and incredibly adaptable, practically inviting your personal creativity to shine through with every iteration.
I truly hope you’re as excited as I am about trying this incredible appetizer. It’s a guaranteed hit that promises to elevate any gathering, whether it’s a casual get-together with close friends or a more formal celebration with family. I wholeheartedly encourage you to carve out some dedicated time in your kitchen, gather these fantastic ingredients, and personally experience the magic of this dish for yourself. You absolutely won’t regret taking the leap; I’m completely certain it will swiftly become a cherished and frequently requested recipe in your culinary repertoire. Once you’ve created and enjoyed your own Million Dollar Beef Bacon Goat Cheese Appetizer Log, please, please share your wonderful experience with me! I absolutely adore hearing about your culinary adventures and seeing all of your delicious creations. Feel free to drop a comment below, or share a photo on your social media and tag me; I genuinely can’t wait to celebrate your success with this truly show-stopping appetizer. Happy cooking, my friends!
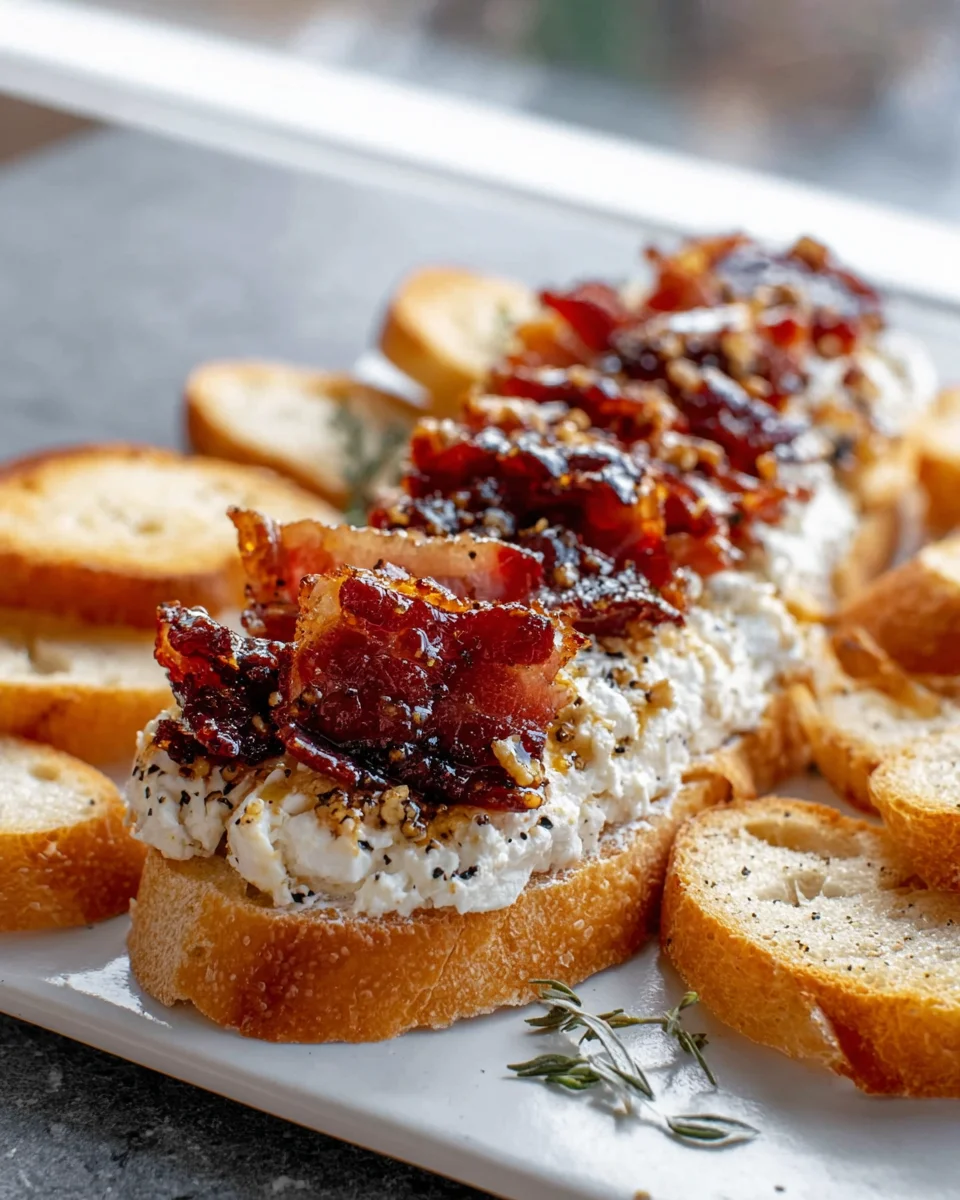
Million Dollar Beef Bacon Goat Cheese Appetizer Log
This impressive appetizer combines crispy, sweet, and spicy candied beef bacon with a creamy goat cheese log and toasted baguette. It offers a delightful blend of savory, sweet, and tangy flavors, perfect for dazzling guests with minimal effort.
Ingredients
Instructions
Important Information
Nutrition Facts (Per Serving)
It is important to consider this information as approximate and not to use it as definitive health advice.
Allergy Information
Please check ingredients for potential allergens and consult a health professional if in doubt.