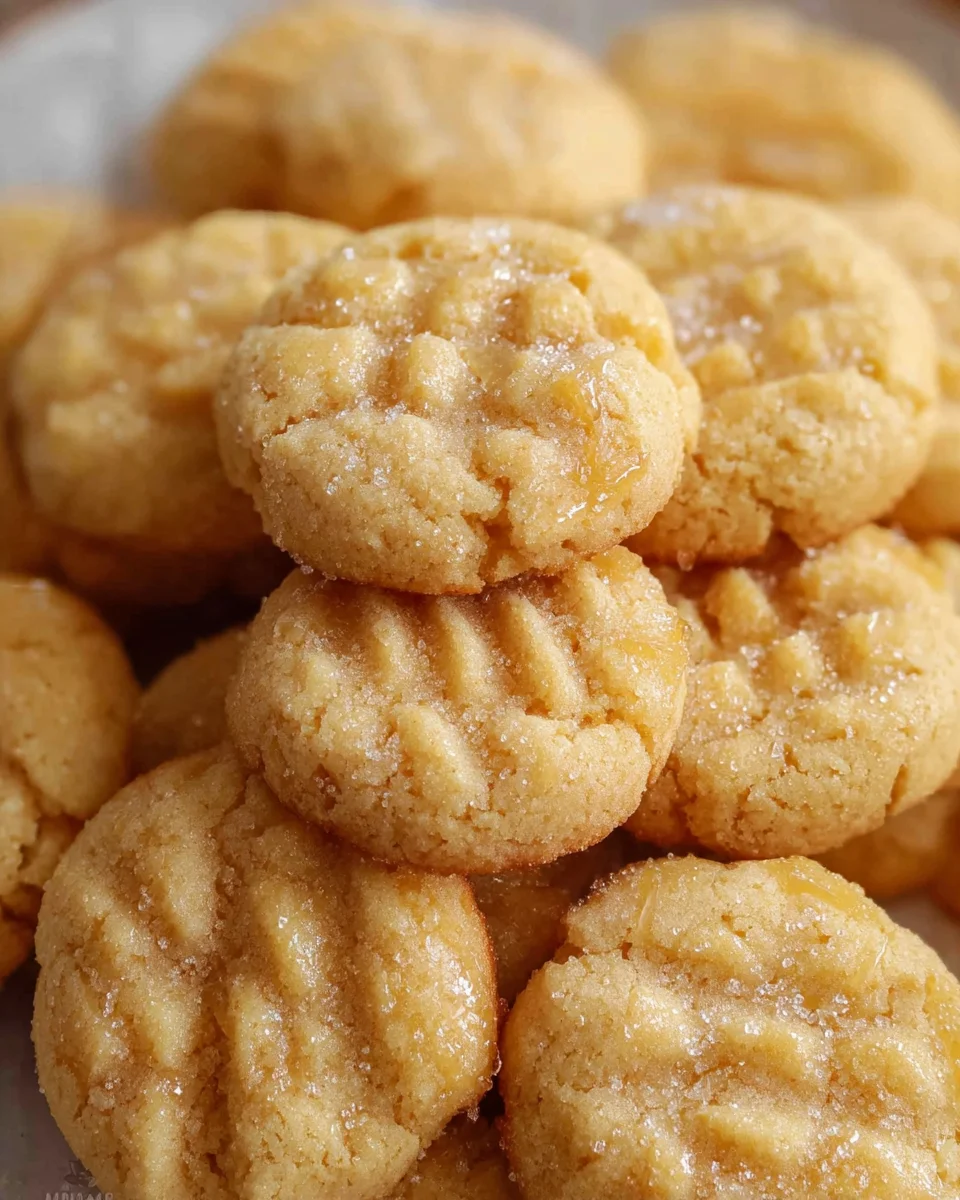
Mini Sugar Cookies are more than just a delightful treat; they are tiny canvases of joy, perfect for bringing a smile to any face or sweetness to any occasion. There’s something undeniably charming about these bite-sized wonders, making them an instant hit at parties, holiday gatherings, or simply as a comforting snack with a cup of tea. While the concept of a sugar cookie is timeless, these miniature versions elevate their appeal, offering a perfectly proportioned indulgence without the guilt of a larger dessert.
Their origins can be traced back to the 18th century, with German immigrants in Pennsylvania crafting the earliest forms of what we now cherish as sugar cookies. Over centuries, they’ve evolved into a staple for celebrations globally, but it’s their compact cousins that truly capture hearts today.
What Makes Mini Sugar Cookies So Irresistible?
Firstly, their tender, buttery texture melts in your mouth, delivering that classic sweet flavor we all adore. Beyond taste, their small stature makes them incredibly convenient for sharing and decorating. Imagine a platter of beautifully iced Mini Sugar Cookies, each a tiny work of art – they’re not just food, they’re edible decorations! Whether you’re a seasoned baker or just starting, the simplicity and versatility of these little gems make them an absolute pleasure to create and even more delightful to devour. They embody pure, unadulterated happiness in every sweet, delicate bite, ensuring they remain a beloved favorite for generations to come.

Ingredients:
- 2 ½ cups (300g) all-purpose flour: I always recommend sifting your flour for these Mini Sugar Cookies to ensure a light, airy texture and to prevent any lumps in your dough. It makes a surprising difference!
- 1 teaspoon baking powder: This little helper gives our cookies just the right amount of lift without making them cakey.
- ½ teaspoon salt: A pinch of salt is crucial. It balances the sweetness beautifully and enhances all the other flavors, making our Mini Sugar Cookies truly irresistible.
- 1 cup (226g) unsalted butter, softened: Make sure your butter is truly softened, but not melted. It should be pliable enough to leave an indentation when you gently press it with your finger. This is key for creaming properly with the sugar. Cold butter won’t emulsify correctly, and melted butter will lead to greasy, flat cookies.
- 1 ½ cups (300g) granulated sugar: The main sweetening agent! For the perfect texture in these Mini Sugar Cookies, I stick with regular granulated sugar.
- 1 large egg: Your egg should be at room temperature. A room-temperature egg incorporates more smoothly into the creamed butter and sugar mixture, creating a more uniform dough emulsion. If you forget to take it out, you can warm it gently in a bowl of warm (not hot) water for a few minutes.
- 2 teaspoons pure vanilla extract: This is where a lot of the classic sugar cookie flavor comes from! I’m a big believer in using good quality pure vanilla extract for the best taste in my Mini Sugar Cookies. You can even try a vanilla bean paste for an extra special touch.
-
For the Royal Icing (optional, but highly recommended for decorating these delightful Mini Sugar Cookies):
- 4 cups (480g) powdered sugar (confectioners’ sugar), sifted: Sifting is absolutely essential here to avoid any lumps in your icing. Trust me, you don’t want lumps when you’re trying to decorate!
- ¼ cup (60ml) milk (any kind works, whole milk gives a richer flavor): This is for consistency. You might need a little more or less depending on your desired thickness.
- 1 teaspoon pure vanilla extract: More vanilla, because why not? It adds another layer of deliciousness to the icing.
- Pinch of salt: Again, for balance.
- Food coloring (gel preferred): Gel food coloring gives vibrant colors without thinning out your icing as much as liquid colors can.
- Sprinkles or other edible decorations: Get creative! These are Mini Sugar Cookies, so mini sprinkles are perfect.
Preparing the Perfect Dough for Your Mini Sugar Cookies
Making the dough for these Mini Sugar Cookies is the first exciting step in our baking journey. It’s a relatively straightforward process, but paying attention to the details will ensure your cookies come out beautifully every time.
- Whisk Together Dry Ingredients: In a medium bowl, combine your sifted all-purpose flour, baking powder, and salt. Give them a good whisk for about 30 seconds to a minute. This step is super important because it evenly distributes the leavening agent (baking powder) and salt throughout the flour, ensuring that every cookie rises consistently and tastes perfectly balanced. Set this bowl aside for a moment.
- Cream Butter and Sugar: In a large bowl, using either a stand mixer fitted with the paddle attachment or an electric hand mixer, cream together the softened unsalted butter and granulated sugar on medium speed. You’ll want to beat them for about 2-3 minutes, or until the mixture is light, fluffy, and pale yellow in color. This creaming process incorporates air into the butter and sugar, which is crucial for the tender texture of your Mini Sugar Cookies. Don’t rush this step! Scrape down the sides of the bowl with a spatula periodically to ensure everything is well combined.
- Add Egg and Vanilla: Once your butter and sugar mixture is perfectly creamy, add the room-temperature large egg. Beat on medium speed until the egg is fully incorporated into the mixture, which usually takes about another minute. Then, stir in the pure vanilla extract. Continue to mix until the vanilla is evenly distributed and the mixture looks smooth and cohesive.
- Combine Wet and Dry Ingredients: Now it’s time to bring everything together. Gradually add your dry ingredient mixture to the wet ingredients, a third at a time, mixing on low speed after each addition. Mix just until the flour streaks disappear and the dough comes together. It’s absolutely vital not to overmix the dough at this stage. Overmixing develops the gluten in the flour too much, which can result in tough, chewy cookies instead of the delicate, tender Mini Sugar Cookies we’re aiming for. A few small streaks of flour are better than an overmixed dough. Scrape down the bowl one last time to ensure all ingredients are incorporated.
- Chill the Dough (Crucial Step!): Turn the dough out onto a piece of plastic wrap, gently flatten it into a disk about an inch thick, and wrap it tightly. Place the dough in the refrigerator to chill for at least 1 hour, or up to 2 days. Chilling the dough is one of the most important steps for making successful Mini Sugar Cookies. It allows the butter to firm up, preventing the cookies from spreading too much in the oven, and also allows the flavors to meld beautifully. If your dough is too soft, it will be incredibly difficult to roll out and cut cleanly, leading to misshapen cookies. I often chill my dough for a full 2 hours for the best results, especially if my kitchen is warm.
Rolling, Cutting, and Baking Your Adorable Mini Sugar Cookies
This is where the magic really starts to happen! Transforming that chilled dough into charming little cookies is so satisfying. Patience and a light touch are your best friends here.
- Preheat Your Oven: While your dough is chilling, or about 15-20 minutes before you plan to bake, preheat your oven to 375°F (190°C). Arrange an oven rack in the center position. Line several baking sheets with parchment paper or silicone baking mats. This prevents sticking and makes cleanup a breeze, ensuring your Mini Sugar Cookies slide right off the tray.
- Prepare Your Work Surface: Lightly flour a clean, dry surface. You can use your countertop or a large pastry board. Take about half of your chilled dough out of the refrigerator (leave the other half chilled until you’re ready for it – this keeps it firm). Lightly dust the top of the dough with flour and also your rolling pin.
- Roll Out the Dough: Roll the dough out evenly to a thickness of about ⅛ to ¼ inch (3-6mm). For crispier Mini Sugar Cookies, roll them thinner; for a softer, chewier texture, roll them a bit thicker. Try to maintain an even thickness across the entire sheet of dough for consistent baking. If the dough starts to stick, gently lift it and add a little more flour underneath. If the dough gets too warm and soft, pop it back into the fridge for 10-15 minutes to firm up again. I sometimes use rolling pin guides to ensure perfect, uniform thickness, which is especially helpful for smaller cookies like these.
- Cut Out the Mini Sugar Cookies: Now for the fun part! Dip your mini cookie cutters (any shape you like – stars, circles, hearts, squares are all great for Mini Sugar Cookies!) into a little flour to prevent sticking. Press the cutters firmly into the dough, trying to get as many cookies as possible out of each roll to minimize re-rolling scraps. Place the cut-out cookies about 1 inch apart on your prepared baking sheets.
- Gather and Re-roll Scraps: Gently gather the dough scraps, press them together to form a ball (try not to overwork the dough), and briefly chill for 10-15 minutes if they’ve become too warm. Then, you can re-roll and cut out more cookies. Repeat this process until you’ve used all the dough. You might notice that the last batch of re-rolled cookies can sometimes be a bit tougher, so try to minimize re-rolling if possible.
- Bake the Mini Sugar Cookies: Bake one sheet at a time in your preheated oven for 6-9 minutes. Baking time will vary depending on your oven and the thickness of your cookies. Keep a close eye on them! The edges should be just barely golden, and the centers should still look slightly soft. You want to avoid overbaking these Mini Sugar Cookies, as it will make them dry and crumbly. When they’re done, they will have a soft, almost ethereal texture that just melts in your mouth.
- Cooling Process: Remove the baking sheets from the oven and let the Mini Sugar Cookies cool on the sheets for about 5 minutes. This allows them to set up and become firm enough to handle without breaking. After 5 minutes, carefully transfer the cookies to a wire rack to cool completely. They must be entirely cool before you even think about frosting them, otherwise, your beautiful icing will melt and slide right off! This usually takes at least 30 minutes to an hour.
Decorating Your Masterpiece: Royal Icing for Mini Sugar Cookies
Once your Mini Sugar Cookies are completely cool, it’s time to bring them to life with vibrant, delicious royal icing! This is where you can let your creativity truly shine.
- Prepare the Royal Icing: In a medium bowl, whisk together the sifted powdered sugar, milk, vanilla extract, and a tiny pinch of salt. Start with a little less milk than specified and add more gradually, a teaspoon at a time, until you reach your desired consistency. For outlining and detailed work (known as “piping”), you’ll want a thicker consistency, similar to toothpaste. For “flooding” (filling in the outlined areas), you’ll need a slightly thinner consistency, like honey or syrup. If your icing is too thick, add more milk; if it’s too thin, add more sifted powdered sugar. Achieving the right consistency is key for beautiful Mini Sugar Cookies.
- Color Your Icing: Divide the white icing into separate small bowls if you plan on using multiple colors. Add a few drops of gel food coloring to each bowl and stir until the desired color is achieved. Remember, a little goes a long way with gel food coloring! Gel colors are excellent because they provide rich hues without significantly altering the icing’s consistency.
- Prepare for Decorating: Transfer your icing colors into piping bags fitted with small round tips (like Wilton 1 or 2 for fine detail) or simply snip a tiny corner off a zip-top bag if you don’t have piping tips.
- Outline Your Mini Sugar Cookies: Using the thicker consistency icing, carefully pipe an outline around the edge of each cookie. This creates a barrier to hold in the thinner flood icing. Allow the outline to set for about 10-15 minutes before flooding. This helps prevent the colors from bleeding together.
- Flood the Cookies: Once the outlines are set, use the thinner consistency icing to fill in the outlined areas. You can use a squeeze bottle, another piping bag, or even a small spoon to apply the flood icing. Use a toothpick or a small scribe tool to gently spread the icing to the edges and pop any air bubbles.
- Add Sprinkles and Details: If you’re adding sprinkles, do so immediately after flooding while the icing is still wet. This allows the sprinkles to adhere properly. For additional details like polka dots, stripes, or other designs, you can either add them while the flood icing is still wet (for a “wet-on-wet” marbled effect) or wait until the flood icing is completely dry (for raised designs).
- Allow Icing to Dry: This is the hardest part – waiting! Place your beautifully decorated Mini Sugar Cookies on a wire rack and allow the royal icing to dry completely. Depending on humidity levels and icing thickness, this can take anywhere from 4-8 hours, or even overnight. The icing must be fully dry and hardened before stacking or storing the cookies. This prevents smudging and ensures your beautiful designs stay intact.
- Storage: Once the icing is completely dry, you can store your delightful Mini Sugar Cookies in an airtight container at room temperature for up to 1-2 weeks. They also freeze beautifully, un-decorated or decorated, for longer storage. Just layer them with parchment paper in a freezer-safe container.
Conclusion:
Well, my friends, we’ve reached the sweet finale, and I truly hope you’re as excited as I am about the prospect of baking these incredible treats. This isn’t just another recipe; it’s an invitation to rediscover the simple, unadulterated joy of home baking. What makes these cookies an absolute must-try, you ask? First and foremost, it’s their sheer versatility and comforting familiarity. They embody everything wonderful about a classic cookie: a crisp edge giving way to a soft, tender interior that practically melts in your mouth with every bite. The delicate sweetness is perfectly balanced, making them incredibly moreish without being cloyingly sweet. Furthermore, the ease of preparation is a huge selling point. I know how precious time can be, and this recipe delivers maximum deliciousness for minimal effort, making it ideal for both seasoned bakers and complete novices. There’s an undeniable magic in rolling out the dough, cutting out those adorable shapes, and watching them transform in the oven. The aroma that fills your kitchen alone is worth the effort – a warm, inviting scent that instantly evokes feelings of nostalgia and happiness. They are truly the quintessential blank canvas, just waiting for your personal touch, whether it’s a sprinkle of demerara sugar before baking or an elaborate frosting after. Trust me, once you taste one, you’ll understand why they’re destined to become a beloved staple in your baking repertoire.
Now that you’re convinced of their deliciousness, let’s talk about how to truly make these Mini Sugar Cookies shine beyond just a simple plate. For a delightful afternoon treat, I love serving them alongside a steaming cup of Earl Grey tea or a robust coffee; their subtle sweetness is the perfect counterpoint to a warm beverage. For the little ones (or the young at heart!), a tall glass of cold milk is an absolute classic pairing. But why stop there? These cookies are incredibly adaptable. Consider them your blank canvas for culinary creativity! For a festive touch during the holidays, you could easily divide the dough and add different food colorings – vibrant reds and greens for Christmas, or pastel shades for Easter. A simple glaze made with powdered sugar and a touch of milk, perhaps flavored with a hint of lemon zest or almond extract, can elevate them beautifully. Don’t forget the power of sprinkles! A shower of colorful sprinkles before baking, or after the glaze has set, adds instant cheer. For those who love a bit of spice, a pinch of cinnamon or nutmeg in the dough can add a wonderful warmth. You can also turn them into charming sandwich cookies by filling them with a dollop of buttercream or even a fruit preserve. They make absolutely wonderful homemade gifts, too – just package them in a cute box with a ribbon, and you’ll have a thoughtful present that’s guaranteed to bring smiles. Imagine them arranged artfully on a dessert platter at your next gathering, perhaps nestled around a bowl of fresh berries or a scoop of homemade ice cream. The possibilities are genuinely endless, and each variation simply adds another layer to their already irresistible charm.
So, what are you waiting for? I wholeheartedly encourage you to roll up your sleeves, gather your ingredients, and dive into the wonderful world of baking these delightful Mini Sugar Cookies. There’s a special kind of satisfaction that comes from creating something so delicious from scratch, and I promise you, the smiles these cookies will bring to your family and friends are immeasurable. Don’t be shy about experimenting with shapes, decorations, or flavor additions – that’s part of the fun! This recipe is a fantastic starting point, a foundation for countless joyful baking adventures. Once you’ve made them, I would absolutely love to hear about your experience. Did you try a unique variation? What was your favorite part of the process? Did they disappear instantly (as mine often do)? Please, share your baking triumphs, your photos, and any creative twists you came up with in the comments section below or tag us on social media. Your feedback and stories inspire me and our entire community of home bakers. Thank you for joining me on this sweet journey, and happy baking!
Mini Sugar Cookies
Mini Sugar Cookies are delightful, bite-sized treats perfect for any occasion. These miniature versions offer a perfectly proportioned indulgence, boasting a tender, buttery texture and classic sweet flavor. While delicious plain, they are also ideal for optional decorating.
Ingredients
Instructions
Important Information
Nutrition Facts (Per Serving)
It is important to consider this information as approximate and not to use it as definitive health advice.
Allergy Information
Please check ingredients for potential allergens and consult a health professional if in doubt.