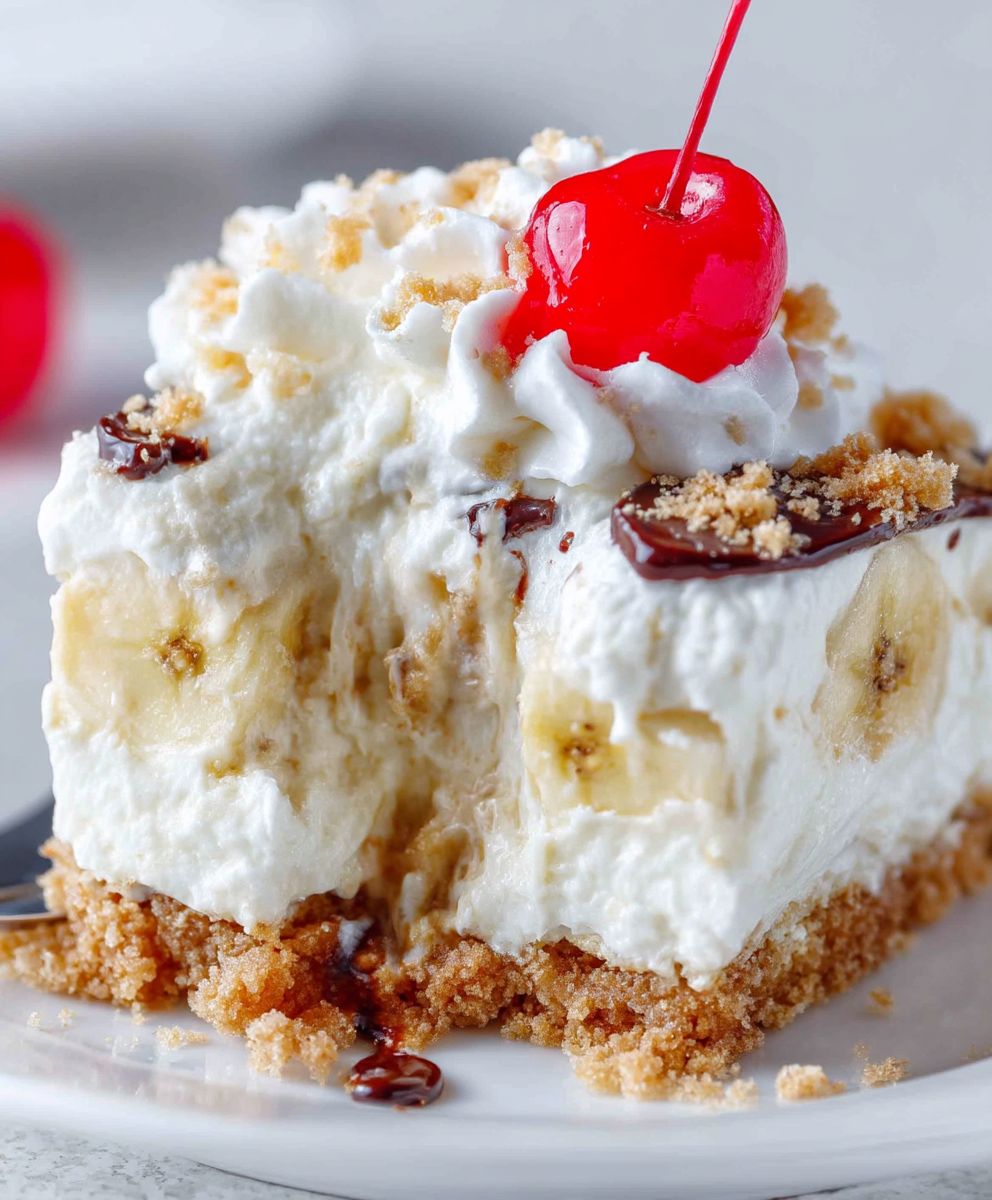
No Bake Banana Split Cake: the dessert that screams summer fun with every single bite! Imagine sinking your fork into layers of creamy, dreamy goodness, bursting with the flavors of your favorite banana split, but without ever turning on your oven. Sounds too good to be true? I promise you, it’s not! This delightful treat is the perfect solution for those hot days when you crave something sweet and satisfying, but the thought of baking makes you break out in a sweat.
While the exact origins of this particular no-bake iteration are a bit hazy, the banana split itself has a rich history, dating back to 1904 in Latrobe, Pennsylvania. A young pharmacist’s apprentice, David Strickler, created the iconic sundae to attract customers to his soda fountain. Little did he know, he was inventing a dessert that would become a beloved classic worldwide! Our no bake banana split cake takes that classic inspiration and transforms it into an even easier-to-make, crowd-pleasing dessert.
People adore this dish for so many reasons. First, the taste is simply irresistible – the combination of sweet bananas, tangy pineapple, rich chocolate, and fluffy whipped cream is a symphony of flavors. Second, the texture is divine, offering a delightful contrast between the soft cake layers and the creamy fillings. And finally, let’s not forget the convenience! This no bake banana split cake is incredibly easy to assemble, making it perfect for potlucks, barbecues, or any occasion where you need a quick and impressive dessert. So, are you ready to dive into this easy and delicious recipe? Let’s get started!

Ingredients:
- For the Crust:
- 2 cups graham cracker crumbs
- 1/2 cup (1 stick) unsalted butter, melted
- 1/4 cup granulated sugar
- For the Cream Cheese Layer:
- 8 ounces cream cheese, softened
- 1 cup powdered sugar
- 1 teaspoon vanilla extract
- 8 ounces whipped topping, thawed (like Cool Whip)
- For the Banana Layer:
- 4-5 ripe bananas, sliced
- 2 tablespoons lemon juice (to prevent browning)
- For the Pineapple Layer:
- 20 ounces crushed pineapple, well-drained
- For the Chocolate Sauce:
- 1/2 cup chocolate syrup
- For the Strawberry Topping:
- 1 cup strawberry topping or strawberry preserves
- For the Whipped Cream Topping:
- 1 cup heavy cream
- 1/4 cup powdered sugar
- 1/2 teaspoon vanilla extract
- Garnish:
- Maraschino cherries
- Chopped nuts (optional: pecans, walnuts, or peanuts)
Preparing the Graham Cracker Crust
Okay, let’s get started with the foundation of our delicious No-Bake Banana Split Cake – the graham cracker crust! This part is super easy and requires no baking, which is perfect for a hot day or when you just don’t feel like turning on the oven.
- Combine the Ingredients: In a medium-sized bowl, combine the graham cracker crumbs, melted butter, and granulated sugar. Make sure the butter is evenly distributed throughout the crumbs. I like to use a fork to help break up any clumps and ensure everything is well mixed.
- Press into the Pan: Pour the mixture into a 9×13 inch baking dish. Using the bottom of a measuring cup or your fingers, firmly press the crumbs evenly across the bottom of the dish. You want a nice, compact crust so it holds everything together. Don’t be afraid to really press down!
- Chill the Crust: Place the baking dish in the refrigerator and let the crust chill for at least 30 minutes. This will help it firm up and prevent it from crumbling when we add the layers. You can even chill it for longer if you have the time – even an hour or two won’t hurt!
Making the Cream Cheese Layer
Next up is the creamy, dreamy cream cheese layer! This adds a wonderful tanginess and richness to the cake that perfectly complements the sweetness of the other ingredients. Make sure your cream cheese is softened for the best results – nobody wants lumpy cream cheese!
- Beat the Cream Cheese: In a large bowl, beat the softened cream cheese with an electric mixer until it’s smooth and creamy. This usually takes about 2-3 minutes. Make sure there are no lumps!
- Add Powdered Sugar and Vanilla: Gradually add the powdered sugar to the cream cheese, beating on low speed until it’s fully incorporated. Then, add the vanilla extract and mix until combined. Be careful not to overmix, or the cream cheese can become too thin.
- Fold in Whipped Topping: Gently fold in the thawed whipped topping until everything is evenly combined. Be gentle here – you want to keep the whipped topping light and airy. Folding it in prevents it from deflating.
- Spread over Crust: Remove the chilled graham cracker crust from the refrigerator and spread the cream cheese mixture evenly over the crust. Use a spatula to smooth it out and make sure it reaches all the edges.
- Chill Again: Return the baking dish to the refrigerator and chill for another 30 minutes. This will help the cream cheese layer set up a bit before we add the next layer.
Assembling the Banana and Pineapple Layers
Now for the fun part – adding the fruit! The bananas and pineapple bring a burst of fresh, tropical flavor to this cake. The lemon juice is key for keeping the bananas from browning, so don’t skip that step!
- Prepare the Bananas: Slice the bananas into even rounds. In a small bowl, toss the banana slices with the lemon juice. This will help prevent them from turning brown and unappetizing.
- Arrange Bananas on Cream Cheese Layer: Remove the baking dish from the refrigerator and arrange the banana slices evenly over the cream cheese layer. Try to cover the entire surface for maximum banana flavor in every bite!
- Add Pineapple Layer: Spread the well-drained crushed pineapple evenly over the banana layer. Make sure the pineapple is well-drained, or the cake can become soggy. I usually press it in a fine-mesh sieve to remove excess juice.
- Chill Once More: Place the baking dish back in the refrigerator and chill for at least 1 hour. This allows the flavors to meld together and the layers to set up properly.
Adding the Toppings
The final touches are what really make this cake a showstopper! The chocolate sauce, strawberry topping, and whipped cream add layers of flavor and visual appeal. And don’t forget the cherries and nuts for that classic banana split look!
- Prepare the Whipped Cream: In a chilled bowl, beat the heavy cream with an electric mixer until soft peaks form. Gradually add the powdered sugar and vanilla extract, and continue beating until stiff peaks form. Be careful not to overwhip, or the cream will turn into butter!
- Spread Whipped Cream: Remove the baking dish from the refrigerator and spread the whipped cream evenly over the pineapple layer. You can use a spatula or a piping bag for a more decorative look.
- Drizzle Chocolate Sauce: Drizzle the chocolate syrup over the whipped cream. Get creative with your drizzle – you can make swirls, zigzags, or just random patterns.
- Add Strawberry Topping: Spoon the strawberry topping or preserves over the chocolate sauce. Again, feel free to get creative with the placement.
- Garnish: Top with maraschino cherries and chopped nuts (if using). Arrange them artfully for a beautiful presentation.
- Chill Before Serving: Chill the cake for at least 30 minutes before serving. This will help the whipped cream set up and the flavors to meld together even more.
Serving and Storage
Finally, the moment we’ve all been waiting for – serving this masterpiece! Cut into squares and enjoy the layers of creamy, fruity goodness. This cake is best served cold, so keep it refrigerated until you’re ready to dig in.
Storage: Store any leftover cake in the refrigerator, covered tightly, for up to 3 days. The bananas may brown slightly over time, but the cake will still taste delicious!
Enjoy your No-Bake Banana Split Cake! I hope you love it as much as I do!
Conclusion:
This No Bake Banana Split Cake is truly a dessert game-changer, and I’m confident it will become a family favorite in your home, just like it has in mine. It’s the perfect solution for those hot summer days when you crave something sweet and satisfying but don’t want to turn on the oven. The creamy layers, the burst of fruity flavors, and the satisfying crunch of the graham cracker crust all come together in perfect harmony. It’s a guaranteed crowd-pleaser, whether you’re serving it at a backyard barbecue, a potluck, or simply enjoying a sweet treat after dinner.
But what truly sets this recipe apart is its simplicity. Forget complicated baking techniques and hours spent in the kitchen. This No Bake Banana Split Cake comes together in minutes with minimal effort, making it ideal for busy weeknights or when you need a last-minute dessert. Plus, it’s a fantastic recipe to get the kids involved in – they’ll love layering the ingredients and adding their own creative touches!
Beyond its ease and deliciousness, this cake is incredibly versatile. Feel free to experiment with different variations to suit your taste preferences. For a richer, more decadent flavor, try using chocolate graham crackers for the crust. You could also add a layer of chopped nuts, such as pecans or walnuts, for extra crunch and flavor. If you’re a fan of peanut butter, a swirl of peanut butter in the cream cheese layer would be absolutely divine.
Serving Suggestions and Variations:
* Individual Parfaits: Layer the ingredients in individual glasses or jars for a fun and elegant presentation.
* Chocolate Lover’s Dream: Add chocolate shavings or a drizzle of chocolate syrup on top.
* Tropical Twist: Incorporate chunks of pineapple or mango for a tropical flavor profile.
* Berry Bliss: Substitute strawberries with raspberries or blueberries for a different berry flavor.
* Ice Cream Cake Hybrid: Freeze the assembled cake for a few hours for a firmer, ice cream-like texture.
I highly encourage you to give this No Bake Banana Split Cake recipe a try. It’s a guaranteed winner that will impress your friends and family without requiring hours of slaving away in the kitchen. It’s the perfect balance of indulgence and convenience, making it a must-have recipe in your repertoire.
Once you’ve made it, I’d absolutely love to hear about your experience! Did you make any variations? What did your family and friends think? Share your photos and stories in the comments below. I’m always eager to see how you’ve personalized the recipe and made it your own. Happy baking (or rather, no-baking!), and I hope you enjoy every delicious bite of this delightful dessert! Don’t forget to rate the recipe and share it with your friends who are looking for an easy and delicious dessert option. I can’t wait to hear all about your No Bake Banana Split Cake adventures!
No Bake Banana Split Cake: The Easiest Dessert Recipe Ever!
No-bake Banana Split Cake with graham cracker crust, cream cheese filling, bananas, pineapple, chocolate sauce, strawberry topping, and whipped cream. An easy and perfect dessert for any occasion!
Ingredients
Instructions
Recipe Notes
- Make sure the cream cheese is softened for a smooth cream cheese layer.
- Drain the crushed pineapple well to prevent a soggy cake.
- Toss the banana slices with lemon juice to prevent browning.
- Be careful not to overwhip the heavy cream.
- Store leftovers in the refrigerator, covered tightly, for up to 3 days.