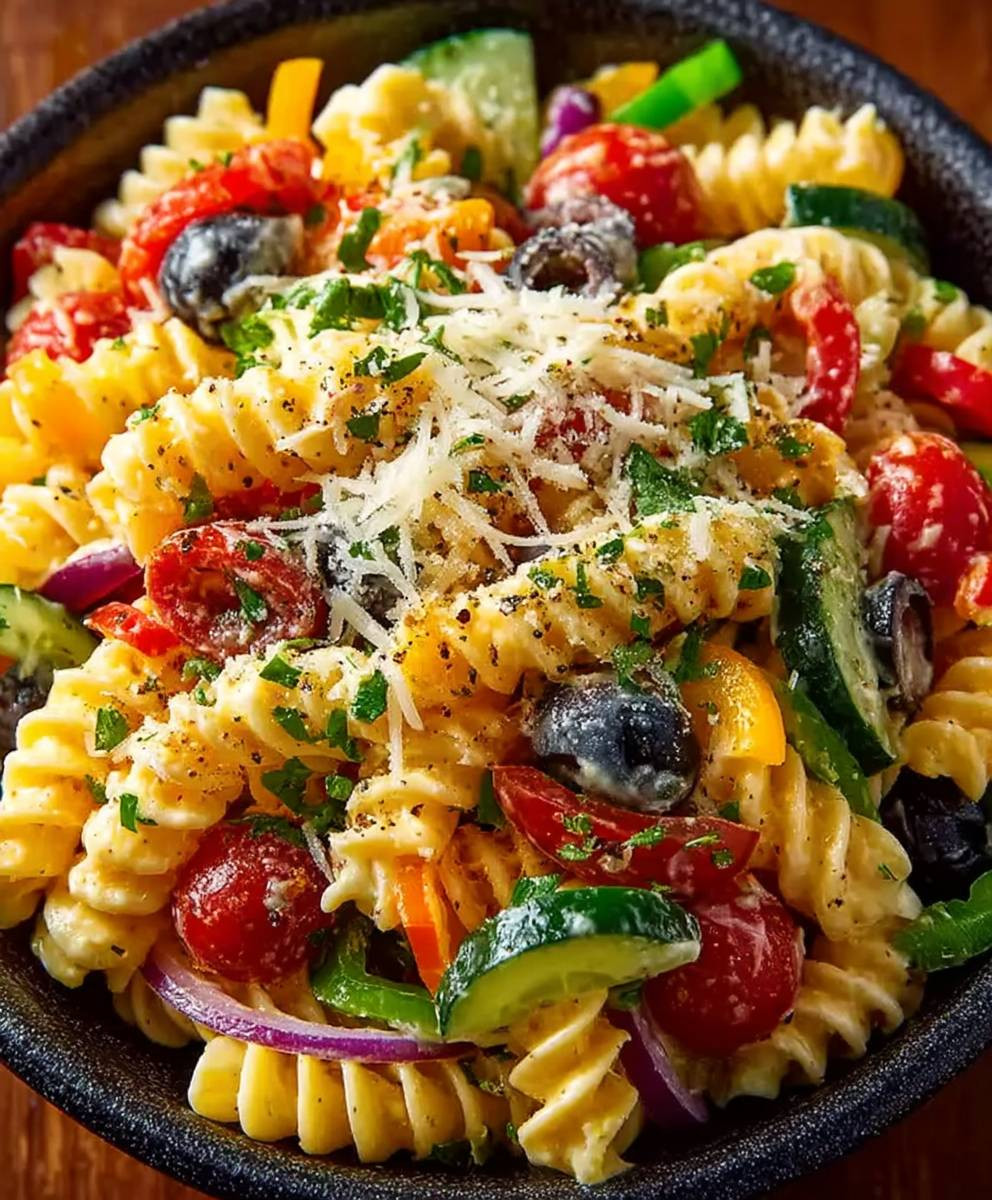
Olive Garden Pasta Salad: craving that iconic salad but don’t want to leave the house? I’ve got you covered! This copycat recipe brings the fresh, vibrant flavors of Olive Garden’s famous pasta salad right to your kitchen. Imagine twirling your fork around perfectly cooked pasta, tossed in a tangy Italian dressing, and studded with juicy tomatoes, crisp black olives, and crunchy red onions. It’s a symphony of textures and tastes that will transport you straight to Italy (or at least, your favorite Olive Garden!).
While the exact origins of pasta salad are debated, its popularity exploded in the United States during the 1980s, becoming a staple at potlucks and summer gatherings. Olive Garden’s version, however, has carved out a special place in our hearts (and stomachs!). It’s more than just a side dish; it’s a nostalgic comfort food that evokes memories of family dinners and celebratory occasions.
What makes this Olive Garden Pasta Salad so irresistible? It’s the perfect balance of flavors – the zesty dressing, the sweetness of the tomatoes, and the salty olives create a harmonious blend that’s simply addictive. Plus, it’s incredibly easy to make and can be prepared ahead of time, making it ideal for busy weeknights or entertaining guests. Whether you’re a long-time fan or a curious newcomer, this recipe is guaranteed to become a new favorite. Let’s get cooking!

Ingredients:
- Pasta: 1 pound rotini pasta (or your favorite short pasta shape)
- Vegetables:
- 1 cup black olives, sliced
- 1 cup red onion, thinly sliced
- 1 cup cherry tomatoes, halved
- 1 cup cucumber, peeled, seeded, and diced
- 1/2 cup bell pepper (green, red, or yellow), diced
- 1/2 cup carrots, shredded
- Cheese: 1 cup provolone cheese, cubed
- Meat (Optional): 1/2 cup salami or pepperoni, sliced or cubed
- Dressing:
- 1 cup mayonnaise
- 1/4 cup red wine vinegar
- 2 tablespoons olive oil
- 1 tablespoon Dijon mustard
- 1 teaspoon garlic powder
- 1 teaspoon Italian seasoning
- 1/2 teaspoon salt (or to taste)
- 1/4 teaspoon black pepper (or to taste)
- Pinch of red pepper flakes (optional, for a little heat)
- Garnish: Fresh parsley, chopped (optional)
Cooking the Pasta
- Boil Water: Fill a large pot with water (about 4-6 quarts) and bring it to a rolling boil over high heat. Add a generous pinch of salt to the boiling water. This seasons the pasta as it cooks.
- Cook Pasta: Add the rotini pasta to the boiling water. Cook according to the package directions, usually around 8-10 minutes, or until the pasta is al dente. Al dente means “to the tooth” in Italian, so the pasta should be firm but cooked through, not mushy.
- Drain and Rinse: Once the pasta is cooked, immediately drain it in a colander. Rinse the pasta thoroughly with cold water. This stops the cooking process and prevents the pasta from sticking together. Make sure all the excess water is drained.
- Cool Completely: Allow the pasta to cool completely. You can spread it out on a baking sheet to speed up the cooling process, or simply let it sit in the colander. This is important because adding warm pasta to the other ingredients will wilt the vegetables and make the dressing runny.
Preparing the Vegetables and Cheese
- Prepare Olives: If you’re using whole black olives, slice them into rounds. If you’re using pre-sliced olives, you can skip this step.
- Slice Red Onion: Thinly slice the red onion. If you find the raw onion flavor too strong, you can soak the sliced onion in cold water for about 10-15 minutes. This helps to mellow out the flavor. Drain the onion well before adding it to the salad.
- Halve Cherry Tomatoes: Wash and halve the cherry tomatoes. This makes them easier to eat and releases their juices into the salad.
- Dice Cucumber: Peel the cucumber (optional, but recommended for a smoother texture). Cut it in half lengthwise, then use a spoon to scoop out the seeds. Dice the cucumber into small, bite-sized pieces.
- Dice Bell Pepper: Remove the seeds and membranes from the bell pepper. Dice the pepper into small, bite-sized pieces.
- Shred Carrots: Shred the carrots using a box grater or a vegetable peeler. You can also buy pre-shredded carrots to save time.
- Cube Provolone Cheese: Cut the provolone cheese into small cubes. You can also use other types of cheese, such as mozzarella or cheddar, if you prefer.
- Prepare Meat (Optional): If you’re using salami or pepperoni, slice it into thin rounds or cut it into small cubes.
Making the Dressing
- Combine Ingredients: In a medium-sized bowl, whisk together the mayonnaise, red wine vinegar, olive oil, Dijon mustard, garlic powder, Italian seasoning, salt, pepper, and red pepper flakes (if using).
- Whisk Until Smooth: Whisk the ingredients together until they are well combined and the dressing is smooth and creamy.
- Taste and Adjust: Taste the dressing and adjust the seasonings as needed. You may want to add more salt, pepper, or red wine vinegar to suit your taste. If the dressing is too thick, you can add a little bit of water or milk to thin it out.
Assembling the Pasta Salad
- Combine Ingredients: In a large bowl, combine the cooled pasta, sliced black olives, sliced red onion, halved cherry tomatoes, diced cucumber, diced bell pepper, shredded carrots, cubed provolone cheese, and salami or pepperoni (if using).
- Pour Dressing: Pour the dressing over the pasta and vegetable mixture.
- Toss Gently: Gently toss all the ingredients together until they are evenly coated with the dressing. Be careful not to overmix, as this can make the pasta mushy.
- Chill: Cover the bowl with plastic wrap or a lid and refrigerate the pasta salad for at least 30 minutes, or preferably 1-2 hours. This allows the flavors to meld together and the salad to chill thoroughly. Chilling is crucial for the best flavor and texture.
- Adjust Seasoning (Again!): Before serving, give the pasta salad another toss and taste it. You may need to add more salt, pepper, or dressing, as the pasta will absorb some of the dressing as it sits.
- Garnish (Optional): Garnish the pasta salad with fresh chopped parsley, if desired.
Tips and Variations
- Pasta Choice: While rotini is a classic choice for pasta salad, you can use other short pasta shapes such as penne, farfalle (bow ties), or fusilli.
- Vegetable Variations: Feel free to add or substitute other vegetables, such as broccoli florets, cauliflower florets, zucchini, or artichoke hearts.
- Cheese Options: Instead of provolone, you can use mozzarella, cheddar, Parmesan, or feta cheese.
- Protein Additions: Add grilled chicken, shrimp, or chickpeas for a heartier pasta salad.
- Dressing Variations: Experiment with different dressings, such as a creamy Italian dressing, a balsamic vinaigrette, or a lemon-herb vinaigrette.
- Make Ahead: Pasta salad is a great make-ahead dish. You can prepare it up to 24 hours in advance and store it in the refrigerator. Just be sure to give it a good toss before serving.
- Storage: Store leftover pasta salad in an airtight container in the refrigerator for up to 3-4 days.
- For a Lighter Version: Use light mayonnaise or Greek yogurt in the dressing to reduce the fat content. You can also increase the amount of vegetables and decrease the amount of pasta.
- Spice it Up: Add a pinch of red pepper flakes to the dressing or a dash of hot sauce to the salad for a little heat.
- Add Some Sweetness: A touch of sugar or honey in the dressing can balance out the acidity of the vinegar and add a hint of sweetness.
- Fresh Herbs: Don’t be afraid to experiment with fresh herbs! Basil, oregano, and thyme are all great additions to pasta salad.
Serving Suggestions
Olive Garden Pasta Salad is a versatile dish that can be served as a side dish, a light lunch, or a potluck favorite. It pairs well with grilled meats, sandwiches, or soups. It’s also a great option for picnics and barbecues.
Enjoy!
Conclusion:
This Olive Garden Pasta Salad recipe isn’t just another pasta salad; it’s a vibrant, flavorful experience that will transport you straight to your favorite Italian restaurant. The combination of perfectly cooked pasta, crisp vegetables, tangy Italian dressing, and those signature black olives creates a symphony of textures and tastes that’s simply irresistible. It’s quick, easy, and endlessly customizable, making it the perfect dish for busy weeknights, potlucks, or summer barbecues.
But what truly sets this recipe apart is its versatility. Feel free to experiment with different types of pasta – rotini, farfalle, or even penne would work beautifully. Want to add a protein boost? Grilled chicken, shrimp, or even chickpeas would be fantastic additions. For a vegetarian twist, consider incorporating marinated artichoke hearts or sun-dried tomatoes. And if you’re feeling adventurous, try adding a sprinkle of red pepper flakes for a touch of heat.
Serving suggestions are endless! This Olive Garden Pasta Salad is a star on its own, perfect as a light lunch or a refreshing side dish. But it also pairs wonderfully with grilled meats, sandwiches, or even a simple bowl of soup. For a more substantial meal, consider adding some crusty bread and a side salad. And don’t forget the Parmesan cheese! A generous grating of fresh Parmesan adds a salty, savory note that perfectly complements the other flavors.
I know you might be thinking, “Another pasta salad recipe? What’s so special about this one?” Trust me, the magic is in the details. It’s the perfect balance of flavors, the satisfying crunch of the vegetables, and the simplicity of the preparation that makes this recipe a true winner. I’ve made this salad countless times, and it’s always a crowd-pleaser. It’s a guaranteed hit, and I’m confident that you and your loved ones will absolutely adore it.
So, what are you waiting for? Gather your ingredients, put on some Italian music, and get ready to create a culinary masterpiece. I promise you won’t be disappointed. This Olive Garden Pasta Salad is a must-try for anyone who loves delicious, easy-to-make food.
I’m so excited for you to try this recipe! Once you’ve had a chance to whip it up, I’d love to hear about your experience. Did you make any modifications? What did you serve it with? What did your family and friends think? Share your thoughts and photos in the comments below. Your feedback is invaluable, and it helps me to continue creating recipes that you’ll love. Happy cooking! Let me know if you have any questions, and I’ll do my best to answer them. Enjoy!
Olive Garden Pasta Salad: The Ultimate Recipe & Guide
A vibrant pasta salad with colorful veggies, cheese, and a tangy dressing. Great for potlucks, picnics, or lunch!
Ingredients
Instructions
Recipe Notes
- Pasta Choice: Use rotini, penne, farfalle (bow ties), or fusilli.
- Vegetable Variations: Add broccoli florets, cauliflower florets, zucchini, or artichoke hearts.
- Cheese Options: Use mozzarella, cheddar, Parmesan, or feta cheese.
- Protein Additions: Add grilled chicken, shrimp, or chickpeas.
- Dressing Variations: Experiment with creamy Italian dressing, balsamic vinaigrette, or lemon-herb vinaigrette.
- Make Ahead: Prepare up to 24 hours in advance.
- Storage: Store leftovers in an airtight container in the refrigerator for up to 3-4 days.
- Lighter Version: Use light mayonnaise or Greek yogurt in the dressing.
- Spice it Up: Add a pinch of red pepper flakes or hot sauce.
- Add Sweetness: A touch of sugar or honey in the dressing.
- Fresh Herbs: Basil, oregano, and thyme are great additions.