• Skip to primary navigation
  • Skip to main content
  • Skip to primary sidebar
Homesmad

Homesmad

  • Home
  • Breakfast & Brunch
  • Appetizers & Snacks
  • Dinner
  • Dessert
  • About
  • Privacy Policy
  • Contact
Homesmad
  • Home
  • Breakfast & Brunch
  • Appetizers & Snacks
  • Dinner
  • Dessert
  • About
  • Privacy Policy
  • Contact

One-Pan Garlic Chicken Gnocchi Skillet | Quick & Delicious

October 9, 2025 by Lily author

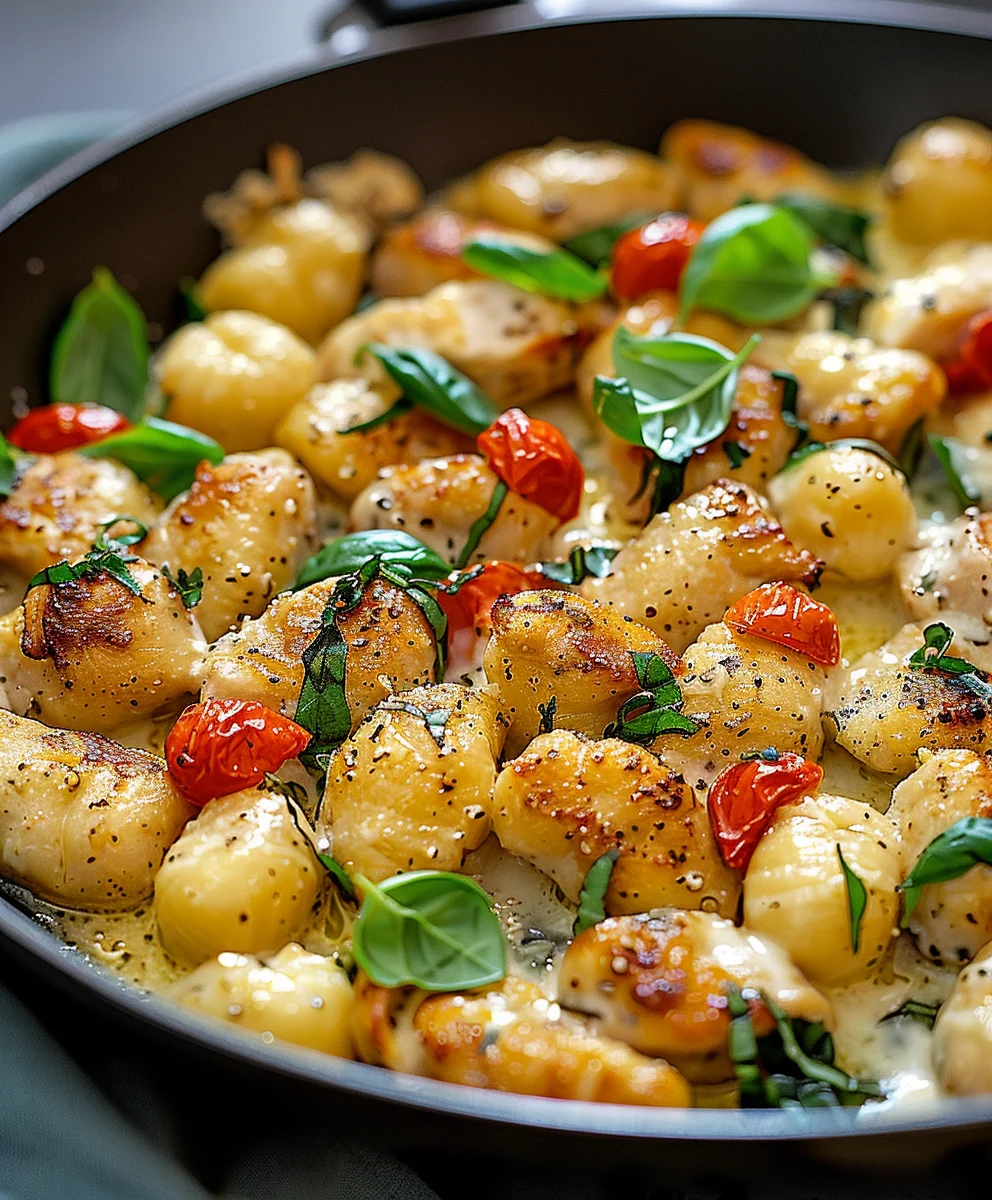
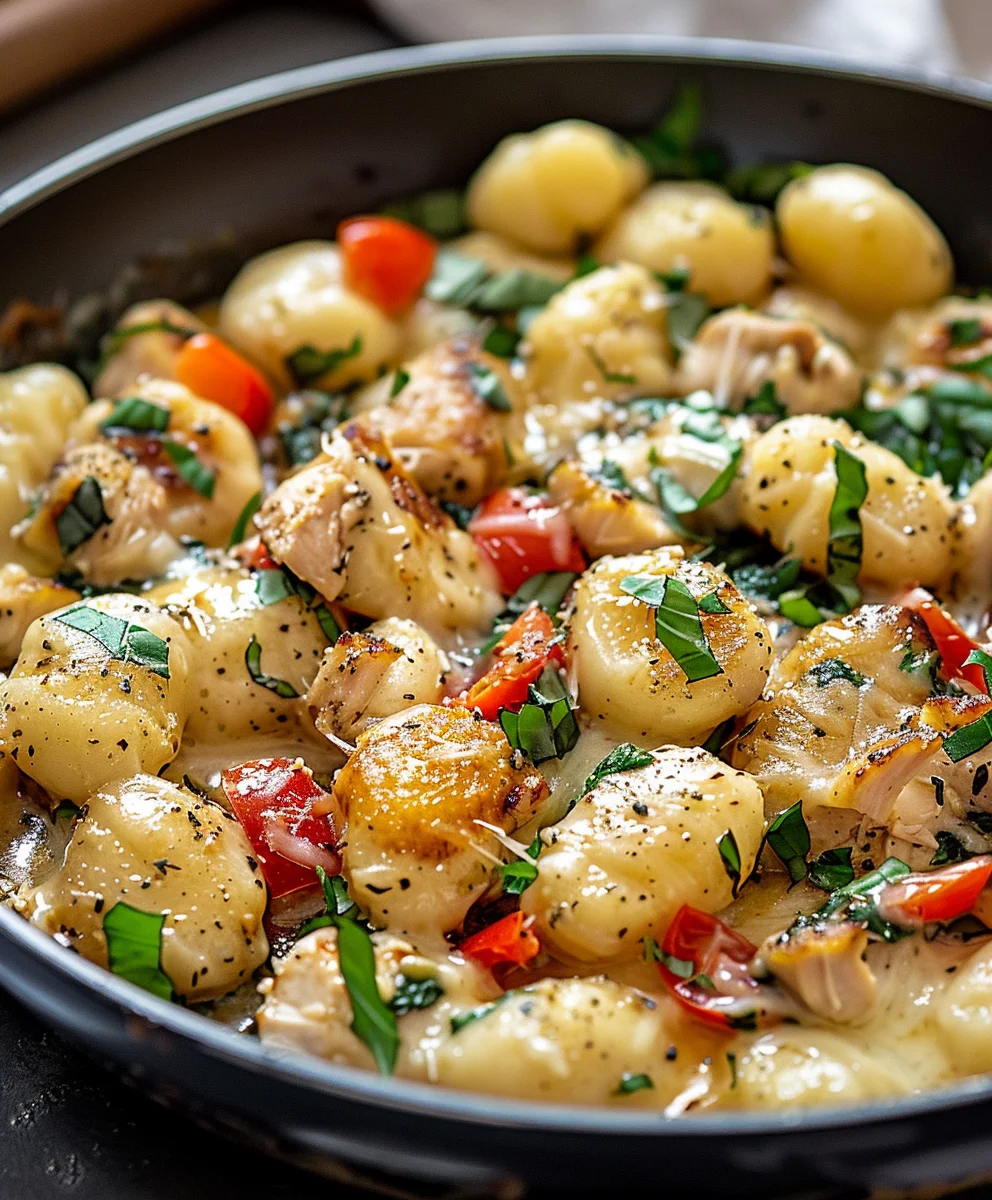
Garlic Chicken Gnocchi Skillet A Minute Wonder is truly more than just a recipe; it’s a culinary revelation for anyone seeking an extraordinary meal without the usual time commitment. I know the struggle of wanting a hearty, flavorful dinner after a long day, without succumbing to takeout or a mountain of dishes. This remarkable dish steps in as your weeknight hero, promising an unbelievably delicious experience cooked entirely in one single skillet, seemingly in a blink of an eye.

Gnocchi, those delightful, pillowy potato dumplings, hold a cherished place in Italian culinary heritage, often associated with comforting, time-honored preparations. This particular recipe beautifully marries that classic ingredient with modern convenience, transforming it into a contemporary marvel perfectly suited for our fast-paced lives. We’re taking the essence of traditional flavors and adapting them for the demands of today, making sophisticated tastes achievable even on your busiest evenings.

Why This Dish Becomes an Instant Favorite

People consistently fall in love with this dish for its undeniable appeal. Imagine tender, perfectly cooked chicken, enveloped in a rich, garlicky, and herbaceous sauce, all mingling with those melt-in-your-mouth gnocchi. It’s the ideal blend of savory, comforting, and incredibly satisfying textures. The sheer ease of preparation, combined with its gourmet-level taste, makes this Garlic Chicken Gnocchi Skillet A Minute Wonder an absolute must-try, delivering an impressive dining experience with minimal fuss and maximum flavor.

One-Pan Garlic Chicken Gnocchi Skillet | Quick & Delicious this RECIPE

Ingredients:

  • For the Chicken:
    • 1.5 lbs boneless, skinless chicken thighs or breasts, cut into 1-inch pieces. I often find thighs lend themselves to a juicier outcome in a skillet meal like this, but breasts work beautifully if you prefer.
    • 1 tablespoon olive oil, plus more if needed for searing. This initial oil is for getting a beautiful sear on our chicken.
    • 1/2 teaspoon salt, or to taste. We’ll be seasoning in layers, so this is just the start for our chicken.
    • 1/4 teaspoon black pepper, freshly ground is always my preference.
    • 1/2 teaspoon garlic powder. While we’re using fresh garlic, a little garlic powder on the chicken helps build a foundational savory flavor.
    • 1/4 teaspoon red pepper flakes, optional but highly recommended for a subtle warmth that elevates the dish without making it spicy.
  • For the Gnocchi & Sauce Base:
    • 1 tablespoon unsalted butter. Butter adds a richness and helps brown our gnocchi.
    • 1 tablespoon olive oil. Combining butter and oil helps prevent the butter from burning at higher heats.
    • 1 (16-ounce) package shelf-stable potato gnocchi. No need to boil beforehand! The magic of this dish is cooking them right in the skillet.
    • 6-8 cloves garlic, minced. Yes, that’s a lot, and yes, it’s essential for our “Garlic Chicken Gnocchi Skillet A Minute Wonder.” Don’t skimp!
    • 1/2 cup chicken broth (low sodium preferred). This will deglaze our pan and start building our sauce.
    • 1 cup heavy cream. This is where the luxurious, creamy texture comes from.
    • 1/2 cup freshly grated Parmesan cheese, plus more for serving. Freshly grated melts beautifully and has superior flavor compared to pre-shredded.
    • 5 ounces fresh spinach. It wilts down to almost nothing, so it’s a great way to sneak in some greens.
    • 2 tablespoons fresh parsley, chopped, for garnish and a burst of freshness.
    • Optional additions: A squeeze of fresh lemon juice at the end for brightness, or a handful of cherry tomatoes halved for a pop of color and acidity.
    • Extra salt and pepper to taste, for final seasoning adjustments.

Prepping for Skillet Success: The Foundation

  1. Prepare Your Chicken: My first step, always, is to get the protein ready. Take your boneless, skinless chicken thighs or breasts and cut them into roughly 1-inch bite-sized pieces. Aim for uniform size so they cook evenly. Once cut, pat the chicken dry very thoroughly with paper towels. This is a critical step for achieving a good sear – excess moisture will steam the chicken instead of browning it. In a medium bowl, toss the dried chicken pieces with 1 tablespoon of olive oil, 1/2 teaspoon of salt, 1/4 teaspoon of black pepper, 1/2 teaspoon of garlic powder, and the optional 1/4 teaspoon of red pepper flakes. Make sure every piece is nicely coated. Set aside while you prepare other ingredients; this gives the seasoning a moment to meld.
  2. Minced Garlic Magic: Next up, the garlic! Peel and mince your 6-8 cloves of garlic. I know it seems like a lot, but this is a “Garlic Chicken Gnocchi” dish, after all! Freshly minced garlic provides an unparalleled aroma and depth of flavor that garlic powder alone cannot replicate. Have it ready to go, as it cooks quickly.
  3. Measure and Assemble: This recipe truly lives up to its “Minute Wonder” name if you have everything ready before you start cooking. This concept, known as “mise en place,” is my secret to stress-free cooking. Measure out your chicken broth, heavy cream, and have your package of gnocchi open and ready. Grate your Parmesan cheese – trust me, it’s worth the extra minute for the superior melt and flavor. Wash and roughly chop your fresh spinach, and have your fresh parsley chopped for garnish. Having all your ingredients prepped and within arm’s reach makes the cooking process smooth, enjoyable, and incredibly fast.

Searing the Star: Perfectly Cooked Chicken

  1. Heat Your Skillet: Grab a large, heavy-bottomed skillet – preferably cast iron or stainless steel – that can accommodate all your ingredients. Place it over medium-high heat. We want a good hot pan for searing. Let it preheat for 2-3 minutes until it’s properly hot. You can test it by flicking a tiny drop of water; if it sizzles and evaporates immediately, it’s ready.
  2. Sear the Chicken: Add 1 tablespoon of olive oil to the hot skillet. Once the oil shimmers, carefully add your seasoned chicken pieces in a single layer. Do not overcrowd the pan! If your skillet isn’t large enough to hold all the chicken in a single layer without overlapping, cook it in two batches. Overcrowding will lower the pan’s temperature and cause the chicken to steam rather than sear, preventing that lovely golden-brown crust we’re after. Let the chicken cook undisturbed for 3-4 minutes per side, until it develops a beautiful golden-brown sear and is cooked through. The internal temperature should reach 165°F (74°C).
  3. Remove and Rest: Once the chicken is perfectly seared and cooked, transfer it to a clean plate. Cover it loosely with foil to keep it warm and allow the juices to redistribute. This resting period helps keep the chicken tender and juicy. Don’t worry about any browned bits stuck to the bottom of the skillet; those are called “fond” and are packed with flavor, which we’ll incorporate into our sauce.

Aromatic Beginnings: Garlic and Gnocchi Glory

  1. Melt Butter and Oil: Reduce the heat to medium. Add 1 tablespoon of unsalted butter and 1 tablespoon of olive oil to the same skillet you used for the chicken. Let the butter melt and combine with the oil. The residual heat from the pan will help the butter melt quickly.
  2. Sauté the Garlic: Add your generous amount of minced garlic to the skillet. Stir constantly for about 30 seconds to 1 minute, until it becomes incredibly fragrant. Be very careful not to let the garlic brown or burn; burnt garlic tastes bitter and can ruin the delicate balance of this dish. We’re looking for aromatic, not crunchy. This step is crucial for infusing the entire dish with a rich garlic flavor.
  3. Introduce the Gnocchi: Now for the gnocchi! Add the entire package of shelf-stable potato gnocchi directly into the skillet with the garlic. Stir gently to coat the gnocchi in the buttery, garlicky oil. Allow the gnocchi to cook for about 3-5 minutes, stirring occasionally. You’ll notice them start to puff up slightly and develop a beautiful, light golden-brown crust in spots. This gives them a wonderful texture that’s soft on the inside and slightly crisp on the outside, far superior to just boiling them.

Sauce Symphony: Creamy, Dreamy Perfection

  1. Deglaze with Broth: Pour in the 1/2 cup of chicken broth. As the broth hits the hot pan, it will create steam and help you scrape up all those flavorful browned bits (the fond) from the bottom of the skillet using a wooden spoon or spatula. Stir vigorously for about 1-2 minutes, allowing the broth to simmer and reduce slightly, intensifying its flavor. These browned bits are pure gold and will add immense depth to our sauce.
  2. Stir in the Cream: Reduce the heat to low. Pour in the 1 cup of heavy cream. Stir it well to combine with the broth and the gnocchi. Let it gently simmer for 2-3 minutes, allowing the sauce to thicken slightly. You’ll notice it start to coat the back of your spoon beautifully. Avoid boiling the cream rapidly, as it can sometimes separate. A gentle simmer is all we need to create a luscious sauce.
  3. Melt in the Parmesan: Remove the skillet from the heat, or keep it on very low. Stir in 1/2 cup of freshly grated Parmesan cheese. Stir continuously until the cheese is completely melted and incorporated into the sauce, making it extra creamy and rich. The residual heat from the skillet and sauce is usually enough to melt the Parmesan perfectly. Using freshly grated Parmesan is key here, as it melts smoothly and contributes a superior nutty, salty flavor compared to pre-shredded varieties, which often contain anti-caking agents.

Bringing it All Together: The Grand Finale

  1. Add the Spinach: Add the 5 ounces of fresh spinach to the skillet. Gently toss and stir the spinach into the warm sauce. The heat from the sauce will quickly wilt the spinach in just 1-2 minutes. It might seem like a lot of spinach at first, but it will dramatically reduce in volume. This adds a lovely pop of color and a touch of freshness to the rich dish.
  2. Return the Chicken: Carefully return the cooked chicken pieces, along with any accumulated juices from the plate, back into the skillet with the gnocchi and sauce. Gently toss everything together to ensure the chicken is well-coated in the creamy garlic sauce and reheated through.
  3. Final Seasoning and Optional Additions: Taste the “Garlic Chicken Gnocchi Skillet A Minute Wonder” and adjust the seasoning as needed. You might want to add a pinch more salt or a grind of black pepper. If you opted for cherry tomatoes, now is the time to stir them in – their warmth will soften them slightly without them turning to mush. For a bright finish, a squeeze of fresh lemon juice can really lift the flavors and cut through the richness of the cream. I often find this a delightful addition, adding that extra layer of complexity.

Serving with Flair: Enjoying Your Creation

  1. Garnish and Serve: Spoon your amazing “Garlic Chicken Gnocchi Skillet A Minute Wonder” into shallow bowls. Sprinkle generously with the chopped fresh parsley for a burst of color and herbaceous freshness. For an extra touch of indulgence, a final dusting of freshly grated Parmesan cheese on top never hurts! This dish is best enjoyed immediately while the gnocchi are perfectly tender and the sauce is hot and creamy.
  2. Serving Suggestions: This skillet meal is quite hearty on its own, making it a complete meal. However, it pairs beautifully with a simple green salad with a light vinaigrette to balance the richness, or a slice of crusty bread to sop up every last drop of that glorious garlic cream sauce. Prepare to be amazed by how quickly and effortlessly this incredibly flavorful dish comes together! It truly is a “minute wonder” in your kitchen. Enjoy every savory, garlicky, creamy bite!

One-Pan Garlic Chicken Gnocchi Skillet | Quick & Delicious

Conclusion:

Well, my friends, we’ve reached the end of our culinary journey, but truly, it’s just the beginning of your delicious adventure. I sincerely hope you’re as excited as I am about this incredible dish. This isn’t just another weeknight meal; it’s a game-changer, a testament to how extraordinary flavors can come together with minimal effort and time. What truly makes this recipe a must-try is its remarkable ability to deliver gourmet satisfaction without the gourmet fuss. Imagine succulent, tender chicken, perfectly cooked gnocchi – soft pillows of potato perfection – all bathed in a rich, aromatic garlic sauce that coats every single bite. The blend of textures, the depth of flavor, and the sheer simplicity of its preparation coalesce into something truly special. It’s the kind of dish that warms your soul, impresses your guests, and yet leaves you with plenty of time to actually enjoy their company, or simply relax after a long day. It’s a true celebration of comfort food reimagined for the modern, busy kitchen. This recipe proves that incredible taste doesn’t have to be complicated, nor does it require hours slaving over a hot stove. It’s an ideal solution for those evenings when you crave something hearty and comforting but are pressed for time, offering a quick escape to a world of deliciousness right in your own kitchen. The magic lies in how effortlessly all the components harmonize, creating a symphony of flavors that is both familiar and excitingly new.

But the beauty of a truly great recipe often lies in its versatility, and this one is no exception. While I adore the classic version, I always encourage you to make it your own! For a burst of freshness and color, try folding in a generous handful of fresh baby spinach or chopped kale right at the end; the residual heat will wilt it perfectly, adding a lovely nutrient boost and a vibrant green hue. Cherry tomatoes, halved and added in the last few minutes, will burst with sweet acidity, cutting through the richness beautifully. If you’re a mushroom lover, sautéing some sliced cremini or button mushrooms with the chicken adds an earthy dimension that’s absolutely divine. Don’t be afraid to play with your cheeses either! While Parmesan is classic, a sprinkle of fresh mozzarella melted in at the end would make it extra gooey and decadent, or perhaps a sharp provolone for a more robust flavor. For those who enjoy a little kick, a pinch of red pepper flakes stirred into the sauce during cooking will add a subtle warmth that elevates the whole experience. Fresh herbs are another fantastic way to customize; a shower of freshly chopped parsley or basil just before serving adds an undeniable freshness and aroma that brightens every mouthful. Consider serving it with a simple, crisp green salad dressed with a light vinaigrette to balance the richness, or some warm, crusty bread to sop up every last drop of that incredible sauce. You could even experiment with different types of gnocchi – sweet potato gnocchi would add a lovely subtle sweetness and vibrant color, or even cauliflower gnocchi for a lighter twist. For protein variations, while chicken is king here, cooked Italian sausage or even some pan-seared shrimp could make for interesting alternatives if you’re feeling adventurous one night. The possibilities are truly endless, and that’s what makes cooking such a joyful, creative process.

So, my dear fellow food enthusiasts, I implore you: don’t just read about this incredible dish – go make it! Clear your schedule for one evening this week, gather your ingredients, and immerse yourself in the delightful experience of creating what I affectionately call the Garlic Chicken Gnocchi Skillet A Minute Wonder. I promise you won’t regret it. This isn’t just a meal; it’s an experience waiting to happen, a culinary triumph that will surely earn a permanent spot in your weekly rotation. Imagine the aroma filling your kitchen, the first forkful melting in your mouth, and the satisfied smiles around your dinner table. It’s a testament to simple ingredients coming together to create something truly spectacular and memorable. Once you’ve had a chance to whip up this amazing skillet, I would absolutely love to hear about your experience. Did you add any unique twists? What was your favorite part? Please, share your stories, your triumphs, and even your creative variations in the comments below, or tag me on social media. Your feedback and personal touches inspire me and our entire community of home cooks. Let’s build a shared space of delicious discoveries and celebrate the joy of home cooking together. Happy cooking, and I can’t wait to hear all about your adventures with this sensational skillet!


Garlic Chicken Gnocchi Skillet A Minute Wonder

Garlic Chicken Gnocchi Skillet A Minute Wonder

An unbelievably delicious one-pan garlic chicken gnocchi skillet meal, cooked entirely in one skillet for a quick, flavorful weeknight dinner. Tender chicken and pillowy gnocchi in a rich, garlicky cream sauce.

Prep Time
15 Minutes

Cook Time
20 Minutes

Total Time
35 Minutes

Servings
4 servings

Ingredients

  • 1 lb boneless skinless chicken breasts, cut into bite-sized pieces
  • 1 lb potato gnocchi (shelf-stable)
  • 6 cloves garlic, minced
  • 1 cup heavy cream
  • 1 cup chicken broth
  • ½ cup grated Parmesan cheese
  • 2 tbsp olive oil
  • 1 tsp dried Italian herbs
  • Salt and freshly ground black pepper to taste
  • Fresh basil leaves for garnish

Instructions

  1. Step 1
    Cut 1 lb chicken breasts into bite-sized pieces. Season with salt, black pepper, and 1 tsp dried Italian herbs. Heat 1 tbsp olive oil in a large skillet over medium-high heat. Sear chicken for 3-4 minutes per side until golden brown and cooked through (165°F). Remove chicken from skillet and set aside.
  2. Step 2
    Add remaining 1 tbsp olive oil to the same skillet. Add 6 cloves minced garlic and sauté for 30 seconds until fragrant. Add 1 lb potato gnocchi and cook for 3-5 minutes, stirring occasionally, until lightly golden and puffed.
  3. Step 3
    Pour in 1 cup chicken broth, scraping up any browned bits from the pan. Bring to a simmer. Stir in 1 cup heavy cream and ½ cup grated Parmesan cheese. Simmer gently for 2-3 minutes until the sauce thickens and cheese is melted.
  4. Step 4
    Return the cooked chicken to the skillet, tossing to coat in the sauce. Taste and adjust seasoning with salt and pepper. Garnish generously with fresh basil leaves. Serve immediately while hot and creamy.

Important Information

Nutrition Facts (Per Serving)

It is important to consider this information as approximate and not to use it as definitive health advice.

Allergy Information

Please check ingredients for potential allergens and consult a health professional if in doubt.

« Previous Post
Sweet & Spicy Honey Pepper Chicken Mac & Cheese
Next Post »
Festive Cinnamon Apple Cranberry Mimosa Mocktail Recipe

If you enjoyed this…

Peanut Butter & Oatmeal No Bake Dog Treats

Peanut Butter & Oatmeal No Bake Dog Treats: A Simple Healthy Recipe

Amazing Greek Roasted Garlic Spinach White Pizza

Comforting Slow Cooker Fall Chicken Stew – Cozy Autumn Meal

Primary Sidebar

Browse by Diet

BreakfastDinnerLunchDessertAppetizer

Sweet Peach Yogurt Parfait Delight

One of my fondest memories is from a lazy summer afternoon spent at my grandmother’s house. The sun filtered through the kitchen window, casting a warm glow over the table where she would create her culinary magic. It was during one of those blissful moments that I first tasted her Peach Yogurt Parfait with Honey and Granola. The sweet aroma of ripe peaches mingling with creamy yogurt and the crunch of granola was nothing short of heavenly. It felt like summer captured in a bowl, and I still remember the joy of diving in with a spoon, each layer revealing a new burst of flavor.

When I think about that parfait, I can almost hear the gentle hum of the bees outside, reminding me of the floral notes that honey brings to every bite. The vibrant yellows and soft oranges of the peaches contrast beautifully with the creamy white yogurt and the golden crunch of granola. It’s a dish that not only looks delightful but also tastes like a celebration of fresh, wholesome ingredients.

What makes my version of this Peach Yogurt Parfait special is the careful balance of flavors and textures. I use ripe, juicy peaches, drizzled with locally sourced honey, and a homemade granola that’s bursting with nuts and seeds for an extra crunch. It’s a simple dish, but every layer is crafted with love and attention.

Let me show you exactly how to make this delightful parfait, so you can bring a bit of that summer magic into your kitchen!

Sweet Peach Yogurt Parfait Delight

Why You’ll Love This Recipe

  • Delightfully creamy texture from the Greek yogurt, paired with the juicy sweetness of fresh peaches.
  • Ready in under 20 minutes, making it a quick and satisfying breakfast or snack option.
  • Budget-friendly, using common ingredients that you may already have in your pantry.
  • Customizable with your favorite granola and nuts, allowing you to tailor each parfait to your taste.
  • Perfectly balanced flavors with the bright acidity of lemon juice and the sweetness of honey enhancing the peaches.

Ingredients

  • For the Parfait:
  • 2 cups plain Greek yogurt (or vanilla yogurt for a sweeter option)
  • 2 large ripe peaches, diced (about 2 cups)
  • 1 tablespoon fresh lemon juice (to prevent browning of peaches)
  • 2 tablespoons honey (plus more for drizzling)
  • 1 teaspoon vanilla extract (optional for extra flavor)
  • For the Granola:
  • 1 cup granola (store-bought or homemade; see notes for a simple granola recipe)
  • 1/4 cup sliced almonds (optional for added crunch)
  • 1/4 cup shredded coconut (optional for added flavor)

Let’s dive into some key ingredients that make this Peach Yogurt Parfait so delightful! First, the Greek yogurt is not only creamy but also packed with protein, making it a satisfying option for breakfast or a snack. If you’re looking for a sweeter option, you can easily substitute it with vanilla yogurt, though it may alter the overall flavor balance. Next, the ripe peaches are the star of the show; their natural sweetness shines through, so I recommend choosing peaches that yield slightly to pressure, indicating they’re perfectly ripe. If peaches aren’t in season, feel free to use nectarines or even frozen peaches—just thaw them before use. Finally, honey adds a lovely floral sweetness that ties everything together. If you prefer, maple syrup can serve as a delicious substitute.

Step-by-Step Instructions

  1. Start by preparing the peaches. Wash them thoroughly, then slice and dice them into bite-sized pieces. In a medium bowl, toss the diced peaches with 1 tablespoon of fresh lemon juice to prevent browning. Set aside for about 5 minutes while the lemon juice works its magic.
  2. In a separate bowl, combine the Greek yogurt, 2 tablespoons of honey, and 1 teaspoon of vanilla extract if using. Stir the mixture until smooth and thoroughly blended. This should take about a minute. Avoid overmixing to maintain the creaminess of the yogurt.
  3. Now it’s time to layer your parfait. Grab a clear glass or bowl to showcase your beautiful creation. Start with a generous spoonful of the yogurt mixture at the bottom—about 1/4 cup will do. Use a spoon to spread it evenly.
  4. Add a layer of the diced peaches over the yogurt, ensuring they cover the yogurt completely. You might want to use about half of what you have prepared—roughly 1 cup. This layer should be visually appealing, so arrange the peaches neatly.
  5. Sprinkle 1/4 cup of granola over the peaches. This adds a delightful crunch. Make sure to distribute it evenly to ensure every bite has that satisfying texture. Avoid packing it down too tightly, as you want it to maintain its crunch.
  6. Repeat the layers: spoon in another 1/4 cup of yogurt, followed by another cup of peaches, and another sprinkle of granola. You should have at least two layers, but feel free to add more depending on your glass size.
  7. Finish off your parfait with a drizzle of honey on top for added sweetness and a touch of elegance. If you’re using sliced almonds or shredded coconut, sprinkle them on top now. It adds a lovely visual contrast and extra flavor.
  8. Serve immediately or refrigerate for up to 30 minutes before serving to allow the flavors to meld together. However, I recommend enjoying it fresh to maintain the granola’s crunch.

Pro Tips for the Best Peach Yogurt Parfait With Honey And Granola

  • Make sure to choose ripe peaches for the best flavor and texture. A common mistake is using unripe fruit, which can lead to a less enjoyable parfait. Look for peaches that are fragrant and slightly soft to the touch.
  • Use a clear glass to assemble your parfait; this not only makes for a beautiful presentation but also allows you to see the colorful layers, which adds to the enjoyment of eating it.
  • For an even creamier texture, consider whipping the Greek yogurt with a hand mixer for a couple of minutes before layering. This small adjustment makes a huge difference in mouthfeel.
  • Be mindful of the granola-to-yogurt ratio. Too much granola can overwhelm the parfait, while too little can make it feel too creamy. Aim for about 1/4 cup of granola per layer for the perfect balance.
  • If you’re making this for a gathering, consider preparing the yogurt and peaches ahead of time and layering them just before serving. This ensures the granola stays crunchy!

Variations & Serving Ideas

There are so many ways to get creative with your Peach Yogurt Parfait! For a tropical twist, swap out the peaches for mangoes or pineapples and top with coconut flakes. If you prefer a berry flavor, mix in some blueberries or strawberries with the peaches for added color and taste. For a nutty version, incorporate chopped walnuts or pecans instead of almonds.

As for serving ideas, this parfait pairs beautifully with a side of scrambled eggs for a hearty breakfast or fresh fruit salad for a light lunch. You might also enjoy it alongside whole grain toast with almond butter for an energizing snack. The contrast of flavors and textures will elevate your meal experience!

Storage, Make-Ahead & Reheating

The Peach Yogurt Parfait is best enjoyed fresh, but you can prepare some components ahead of time. Store the layered parfait in an airtight container in the refrigerator for up to 24 hours. However, be cautious; the granola may lose its crunch if stored too long. You can freeze the yogurt and peach mixture for up to 2 months; just remember to thaw it in the refrigerator overnight before serving.

If you plan to enjoy this dish the next day, it can taste even better as the flavors meld together. Just remember to add the granola right before serving to keep its delightful crunch!

Frequently Asked Questions

Can I make Peach Yogurt Parfait With Honey And Granola ahead of time?

Yes — in fact, it tastes even better the next day as the flavors meld. However, I recommend waiting to add the granola until just before serving to maintain its crunch.

What can I substitute for Greek yogurt?

If you prefer a lighter option, you can substitute Greek yogurt with regular yogurt or a dairy-free alternative like coconut yogurt. Just remember that this may alter the creaminess and flavor profile slightly.

Can I use frozen peaches for this parfait?

Absolutely! Just make sure to thaw the frozen peaches before using them. They will still add great flavor, though the texture may be slightly softer than fresh peaches.

How do I make the parfait vegan?

To make a vegan version, substitute the Greek yogurt with a plant-based yogurt alternative, and replace honey with maple syrup or agave nectar. This keeps the parfait sweet while adhering to a vegan diet.

What other fruits can I use in this recipe?

You can mix and match fruits based on your preference. Try using strawberries, blueberries, raspberries, or even bananas. Just make sure to adjust the lemon juice as needed to prevent browning.

Sweet Peach Yogurt Parfait Delight

Final Thoughts

The Peach Yogurt Parfait with Honey and Granola is a delightful blend of creamy yogurt, sweet peaches, and crunchy granola that creates a satisfying and nourishing treat. Each layer bursts with flavor, making it a perfect choice for breakfast or a light dessert.

This is the kind of recipe I come back to again and again, especially when I want something refreshing and wholesome to start my day. The harmony of sweet and tart flavors, combined with the delightful crunch, never fails to lift my spirits!

I encourage you to give this parfait a try and indulge in its comforting goodness. Feel free to share your results or even add your own twist—perhaps a sprinkle of cinnamon or a handful of nuts. Enjoy creating your perfect parfait!

Print
clock clock iconcutlery cutlery iconflag flag iconfolder folder iconinstagram instagram iconpinterest pinterest iconfacebook facebook iconprint print iconsquares squares iconheart heart iconheart solid heart solid icon

Peach Yogurt Parfait


  • Author: Lily author
  • Total Time: 15 minutes
  • Yield: 4 servings 1x
Pin Recipe
Print Recipe

Description

This Peach Yogurt Parfait combines creamy Greek yogurt, juicy peaches, and crunchy granola for a delightful treat. It’s a perfect breakfast or snack that captures the essence of summer in every bite.


Ingredients

Scale
  • For the Parfait:
  • 2 cups plain Greek yogurt (or vanilla yogurt for a sweeter option)
  • 2 large ripe peaches, diced (about 2 cups)
  • 1 tablespoon fresh lemon juice (to prevent browning of peaches)
  • 2 tablespoons honey (plus more for drizzling)
  • 1 teaspoon vanilla extract (optional for extra flavor)
  • For the Granola:
  • 1 cup granola (store-bought or homemade; see notes for a simple granola recipe)
  • 1/4 cup sliced almonds (optional for added crunch)
  • 1/4 cup shredded coconut (optional for added flavor)

Instructions

  1. Start by preparing the peaches. Wash them thoroughly, then slice and dice them into bite-sized pieces. In a medium bowl, toss the diced peaches with 1 tablespoon of fresh lemon juice to prevent browning. Set aside for about 5 minutes while the lemon juice works its magic.
  2. In a separate bowl, combine the Greek yogurt, 2 tablespoons of honey, and 1 teaspoon of vanilla extract if using. Stir the mixture until smooth and thoroughly blended. This should take about a minute. Avoid overmixing to maintain the creaminess of the yogurt.
  3. Now it’s time to layer your parfait. Grab a clear glass or bowl to showcase your beautiful creation. Start with a generous spoonful of the yogurt mixture at the bottom—about 1/4 cup will do. Use a spoon to spread it evenly.
  4. Add a layer of the diced peaches over the yogurt, ensuring they cover the yogurt completely. You might want to use about half of what you have prepared—roughly 1 cup. This layer should be visually appealing, so arrange the peaches neatly.
  5. Sprinkle 1/4 cup of granola over the peaches. This adds a delightful crunch. Make sure to distribute it evenly to ensure every bite has that satisfying texture. Avoid packing it down too tightly, as you want it to maintain its crunch.
  6. Repeat the layers: spoon in another 1/4 cup of yogurt, followed by another cup of peaches, and another sprinkle of granola. You should have at least two layers, but feel free to add more depending on your glass size.
  7. Finish off your parfait with a drizzle of honey on top for added sweetness and a touch of elegance. If you’re using sliced almonds or shredded coconut, sprinkle them on top now. It adds a lovely visual contrast and extra flavor.
  8. Serve immediately or refrigerate for up to 30 minutes before serving to allow the flavors to meld together. However, I recommend enjoying it fresh to maintain the granola’s crunch.
  • Prep Time: 15 mins
  • Cook Time: 0 mins
  • Category: Breakfast
  • Method: No-cook
  • Cuisine: American

Nutrition

  • Serving Size: 1 parfait
  • Calories: 250
  • Sugar: 20 g
  • Sodium: 50 mg
  • Fat: 5 g
  • Saturated Fat: 2 g
  • Unsaturated Fat: 3 g
  • Trans Fat: 0 g
  • Carbohydrates: 40 g
  • Fiber: 3 g
  • Protein: 10 g
  • Cholesterol: 10 mg

Keywords: Choose ripe peaches for the best flavor and texture. Use a clear glass for a beautiful presentation. For creaminess, consider whipping the yogurt before layering. Be mindful of the granola-to-yogurt ratio. Prepare yogurt and peaches ahead of time for gatherings, layering just before serving.

Did you make this recipe?

Share a photo and tag us — we can't wait to see what you've made!

Sun-Kissed Frozen Orange Cream Slush

As a child, summer days felt like they lasted forever. I remember the sticky heat wrapping around me as I played outside, my laughter mingling with the sounds of the neighborhood. But nothing could cool me down quite like the moment I’d spot my grandmother, laboring over her blender, whipping up her famous Frozen Orange Creamsicle Slush. That vibrant orange treat, with its frosty texture and sweet citrus aroma, was like a burst of sunshine in a cup. Just one sip, and I could feel the coolness wash over me, sparking pure joy.

This Frozen Orange Creamsicle Slush has a way of making you feel like a kid again. Its creamy, dreamy consistency is a delightful balance of bright orange and soft vanilla, inviting you to dive right in. The refreshing tang of orange dances on your tongue, while the smooth creaminess envelops you in a comforting embrace. It’s a nostalgic treat that’s perfect for hot summer afternoons or anytime you need a little pick-me-up.

What makes my version of this slush stand out is the addition of a hint of vanilla bean, which elevates the flavor and adds an extra layer of richness. Plus, it’s super easy to whip up with just a few simple ingredients that you probably already have on hand! So, if you’re ready to relive those sun-soaked memories, let me show you exactly how to make it.

Sun-Kissed Frozen Orange Cream Slush

Why You’ll Love This Recipe

  • Each slush is a perfect blend of creamy vanilla and zesty orange, creating a nostalgic flavor reminiscent of summer days.
  • This refreshing treat is ready in under 15 minutes, making it an ideal quick dessert for unexpected guests or hot afternoons.
  • With just 8 simple ingredients, it’s budget-friendly, ensuring you don’t have to break the bank to enjoy a delicious slush.
  • The slush has a perfectly smooth texture, thanks to the combination of ice and ice cream, providing a delightful contrast to the bright citrus flavors.
  • It’s highly customizable; you can easily adjust the sweetness and add fresh herbs for a unique twist that suits your taste.

Ingredients

  • 2 cups orange juice (freshly squeezed or store-bought)
  • 1 cup vanilla ice cream
  • 1 cup crushed ice
  • 1/2 cup milk (whole or 2%)
  • 1/4 cup granulated sugar (adjust based on sweetness preference)
  • 1 teaspoon vanilla extract
  • Zest of 1 orange (for added flavor)
  • Fresh orange slices and mint leaves (for garnish)

The star of this Frozen Orange Creamsicle Slush is the orange juice, which provides the vibrant, citrusy base. Freshly squeezed juice will yield the brightest flavor, but store-bought options can be just as convenient. If you’re opting for store-bought, choose 100% pure juice with no added sugars for the best results. Another essential ingredient is the vanilla ice cream; it adds creaminess and sweetness. You can substitute it with dairy-free ice cream if you’re looking for a vegan option. Whole or 2% milk complements the ice cream, creating a smooth blend. If you want a lower-calorie version, almond or oat milk can be good alternatives.

Lastly, the granulated sugar can be adjusted based on your sweetness preference. If you prefer a more natural sweetener, consider using honey or agave syrup. The orange zest enhances the flavor profile, providing an aromatic pop that brings the whole slush together. Don’t skip it! It adds an extra layer of brightness that makes this slush truly special.

Step-by-Step Instructions

  1. Start by preparing your ingredients. Gather 2 cups of orange juice, 1 cup of vanilla ice cream, and 1 cup of crushed ice. Make sure the ice is finely crushed, as larger chunks can make blending difficult.
  2. In a blender, combine the orange juice, vanilla ice cream, crushed ice, and 1/2 cup of milk. Add 1/4 cup of granulated sugar and 1 teaspoon of vanilla extract. If you like a sweeter slush, consider adding a bit more sugar at this stage.
  3. Add the zest of 1 orange to the blender. This step is crucial for enhancing the citrus flavor of your slush. Make sure not to include the bitter white pith—only the flavorful zest.
  4. Blend the mixture on medium-high speed for about 30-45 seconds. Stop once the ingredients are fully combined and the slush has a smooth, even consistency. If you notice large chunks of ice, blend for an additional 10-15 seconds. Avoid over-blending, as this can make the slush too liquidy.
  5. Once blended, taste the slush. If it needs more sweetness, add a little more sugar and blend for a few more seconds. If it’s too thick, you can add a splash of milk to reach your desired consistency.
  6. Pour the slush into glasses. This recipe typically serves 4, but you can easily double it for larger gatherings. Use a spoon to help guide the slush into the glasses if needed.
  7. Garnish each serving with fresh orange slices and mint leaves. The mint not only adds a pop of color but also a refreshing aroma that complements the citrus flavors beautifully.
  8. Serve immediately and enjoy! If you’ve made extra, you can refrigerate it for a short time, but it’s best enjoyed fresh.

Pro Tips for the Best Frozen Orange Creamsicle Slush

  • Don’t skip the orange zest! It’s a game-changer for flavor. Always zest before juicing to make it easier.
  • Use a high-powered blender for the best texture. A standard blender may struggle with ice, leading to uneven consistency. If you have a food processor, that can work too, but ensure the ice is finely crushed.
  • Adjust the ice-to-liquid ratio carefully. If your slush is too thick, it won’t blend well. Start with less ice and add more until you reach your preferred texture.
  • Be cautious with the sugar! Always start with the lower amount, as you can easily add more, but it’s hard to fix an overly sweet slush.
  • For a fun twist, consider adding a splash of coconut milk or a handful of fresh fruit like strawberries or pineapple. This not only enhances the flavor but also adds a beautiful color contrast.

Variations & Serving Ideas

There are countless ways to put a spin on your Frozen Orange Creamsicle Slush. Consider making a tropical version by adding in some pineapple juice or coconut milk for a delightful tropical twist. If you’re feeling adventurous, try incorporating a handful of frozen mango or peach slices for added sweetness. For a lighter version, swap out the vanilla ice cream for Greek yogurt for a creamy yet tangy alternative.

As for serving ideas, this refreshing slush pairs wonderfully with light summer dishes like grilled chicken skewers, fish tacos, or a simple salad topped with citrus vinaigrette. The bright, zesty flavors of the slush complement these dishes perfectly, making them an ideal pairing for a sunny day.

Storage, Make-Ahead & Reheating

This Frozen Orange Creamsicle Slush is best enjoyed fresh, but if you have leftovers, you can store them in an airtight container in the fridge for up to 2 days. Just keep in mind that the slush may lose some of its texture over time as the ice melts. It doesn’t freeze well, as the ice will turn into a solid block. If you must freeze it, blend again after thawing to restore the slushy consistency. This treat is best the day you make it, as the flavors meld together beautifully overnight, enhancing its deliciousness.

Frequently Asked Questions

Can I make Frozen Orange Creamsicle Slush ahead of time?

Yes — in fact, it tastes even better the next day as the flavors meld. However, it’s best to enjoy it fresh, as the texture can change if stored for too long. If you need to prepare it ahead, keep it in the fridge and re-blend before serving.

What kind of orange juice should I use?

For the best flavor, use freshly squeezed orange juice. However, if you’re short on time, opt for 100% pure store-bought juice without added sugars. This will ensure that your slush remains flavorful and refreshing.

Can I substitute the vanilla ice cream?

Absolutely! If you’re looking for a dairy-free option, coconut milk ice cream or a non-dairy vanilla ice cream can work wonderfully. They will still provide the creamy texture and sweetness you desire.

How can I adjust the sweetness of my slush?

You can easily adjust the sweetness by modifying the amount of sugar added. Start with 1/4 cup and taste the mixture before blending. If you prefer it sweeter, add more sugar gradually until it reaches your desired level.

What should I do if my slush is too thick?

If your slush is too thick, simply add a splash of milk or orange juice and blend again. This will help achieve a more drinkable consistency while maintaining the slushy texture. Adjust gradually to reach your preferred thickness.

Sun-Kissed Frozen Orange Cream Slush

Final Thoughts

The Frozen Orange Creamsicle Slush is a delightful blend of refreshing citrus and creamy goodness, making it a perfect treat for warm days or any time you crave a taste of nostalgia. The way the bright orange flavor dances with the creamy texture truly elevates this slush, transforming it into a satisfying escape from the everyday.

This is the kind of recipe I come back to again and again, especially when I’m looking to cool down or impress guests at a summer gathering. It’s simple to make and always brings smiles all around! I encourage you to try this recipe for yourself—don’t hesitate to share your results or even put your own spin on it. Happy slushing!

Print
clock clock iconcutlery cutlery iconflag flag iconfolder folder iconinstagram instagram iconpinterest pinterest iconfacebook facebook iconprint print iconsquares squares iconheart heart iconheart solid heart solid icon

Frozen Orange Creamsicle Slush


  • Author: Lily author
  • Total Time: 15 minutes
  • Yield: 4 servings 1x
Pin Recipe
Print Recipe

Description

This Frozen Orange Creamsicle Slush is a refreshing treat that combines creamy vanilla and zesty orange flavors. Perfect for hot summer days, it brings back nostalgic memories with every sip.


Ingredients

Scale
  • 2 cups orange juice (freshly squeezed or store-bought)
  • 1 cup vanilla ice cream
  • 1 cup crushed ice
  • 1/2 cup milk (whole or 2%)
  • 1/4 cup granulated sugar (adjust based on sweetness preference)
  • 1 teaspoon vanilla extract
  • Zest of 1 orange (for added flavor)
  • Fresh orange slices and mint leaves (for garnish)

Instructions

  1. Start by preparing your ingredients. Gather 2 cups of orange juice, 1 cup of vanilla ice cream, and 1 cup of crushed ice. Make sure the ice is finely crushed, as larger chunks can make blending difficult.
  2. In a blender, combine the orange juice, vanilla ice cream, crushed ice, and 1/2 cup of milk. Add 1/4 cup of granulated sugar and 1 teaspoon of vanilla extract. If you like a sweeter slush, consider adding a bit more sugar at this stage.
  3. Add the zest of 1 orange to the blender. This step is crucial for enhancing the citrus flavor of your slush. Make sure not to include the bitter white pith—only the flavorful zest.
  4. Blend the mixture on medium-high speed for about 30-45 seconds. Stop once the ingredients are fully combined and the slush has a smooth, even consistency. If you notice large chunks of ice, blend for an additional 10-15 seconds. Avoid over-blending, as this can make the slush too liquidy.
  5. Once blended, taste the slush. If it needs more sweetness, add a little more sugar and blend for a few more seconds. If it’s too thick, you can add a splash of milk to reach your desired consistency.
  6. Pour the slush into glasses. This recipe typically serves 4, but you can easily double it for larger gatherings. Use a spoon to help guide the slush into the glasses if needed.
  7. Garnish each serving with fresh orange slices and mint leaves. The mint not only adds a pop of color but also a refreshing aroma that complements the citrus flavors beautifully.
  8. Serve immediately and enjoy! If you’ve made extra, you can refrigerate it for a short time, but it's best enjoyed fresh.
  • Prep Time: 15 min
  • Cook Time: 0 min
  • Category: Dessert
  • Method: Blending
  • Cuisine: American

Nutrition

  • Serving Size: 1 serving
  • Calories: 200
  • Sugar: 30 g
  • Sodium: 50 mg
  • Fat: 5 g
  • Saturated Fat: 3 g
  • Unsaturated Fat: 2 g
  • Trans Fat: 0 g
  • Carbohydrates: 40 g
  • Fiber: 1 g
  • Protein: 2 g
  • Cholesterol: 20 mg

Keywords: Don't skip the orange zest! It's a game-changer for flavor. Always zest before juicing to make it easier.

Did you make this recipe?

Share a photo and tag us — we can't wait to see what you've made!

Zesty Lemon Poppy Seed Delight

One rainy afternoon, I found myself in my grandmother’s cozy kitchen, the kind that always smelled like warmth and love. She was whipping up her famous Lemon Poppy Seed Loaf, a recipe that had been passed down through generations. As the batter came together, the zesty aroma of fresh lemons filled the air, mingling perfectly with the nutty fragrance of poppy seeds. I can still picture her, apron-clad, as she expertly drizzled a vibrant citrus icing over the loaf, creating a glossy, sun-kissed finish that beckoned us to dive in. It was a moment that sparked my own passion for baking, and this recipe has become a cherished staple in my home ever since.

When you take a bite of this Lemon Poppy Seed Loaf, it’s like a burst of sunshine on your palate. The loaf is beautifully golden, with a tender crumb that melts in your mouth. Each slice is speckled with tiny poppy seeds, adding a delightful crunch that contrasts beautifully with the tangy sweetness of the lemon. And that citrus icing? It’s the finishing touch that elevates this loaf from ordinary to extraordinary, with its bright, zesty flavor dancing on your taste buds.

This recipe stands out because it embraces simplicity while delivering on flavor. I’ve added a hint of vanilla to the batter, enhancing the overall taste and making it even more indulgent. Trust me, once you make this Lemon Poppy Seed Loaf With Citrus Icing, it’ll become a go-to in your baking repertoire.

So, let me show you exactly how to make it!

Zesty Lemon Poppy Seed Delight

Why You’ll Love This Recipe

  • Moist and tender crumb that melts in your mouth, thanks to the perfect balance of butter and buttermilk.
  • Bright, zesty lemon flavor paired with crunchy poppy seeds, creating a delightful texture and taste experience.
  • Easy to whip up in just about an hour, perfect for last-minute gatherings or a cozy afternoon treat.
  • Budget-friendly with everyday ingredients, making it an accessible option for all home bakers.
  • The citrus icing adds a sweet tang that elevates the loaf, turning a simple recipe into a showstopper!

Ingredients

  • 1 ½ cups (190g) all-purpose flour
  • 1 teaspoon baking powder
  • ½ teaspoon baking soda
  • ½ teaspoon salt
  • 3 tablespoons poppy seeds
  • ½ cup (115g) unsalted butter, softened to room temperature
  • 1 cup (200g) granulated sugar
  • 2 large eggs
  • 1 teaspoon vanilla extract
  • 1 teaspoon lemon zest (from about 1 medium lemon)
  • ½ cup (120ml) buttermilk
  • 2 tablespoons fresh lemon juice

For the Citrus Icing:

  • 1 cup (120g) powdered sugar
  • 2 tablespoons fresh lemon juice
  • 1 tablespoon orange juice
  • 1 teaspoon lemon zest (for garnish, optional)

Let’s dive into the key ingredients that make this Lemon Poppy Seed Loaf so special. The all-purpose flour provides the structure and base for the loaf, while the baking powder and baking soda ensure it rises perfectly, giving the loaf a light texture. For a gluten-free variation, you could substitute the flour with a gluten-free all-purpose blend. Poppy seeds not only add a delightful crunch but also contribute to the unique flavor profile that pairs well with the citrus notes.

Unsalted butter is crucial for achieving the buttery richness that makes this loaf so moist. If you’re looking for a dairy-free option, coconut oil or a vegan butter can be used instead. The buttermilk is another essential component, providing acidity that activates the baking soda for a fluffy texture. If you don’t have buttermilk on hand, you can easily make a substitute by mixing ½ cup of milk with 1 tablespoon of vinegar or lemon juice and letting it sit for about 5 minutes.

Step-by-Step Instructions

  1. Preheat your oven to 350°F (175°C). Grease a 9×5-inch loaf pan or line it with parchment paper for easy removal later.
  2. In a medium mixing bowl, whisk together 1 ½ cups of all-purpose flour, 1 teaspoon of baking powder, ½ teaspoon of baking soda, ½ teaspoon of salt, and 3 tablespoons of poppy seeds. This helps to evenly distribute the baking agents and ensures a uniform rise.
  3. In a large mixing bowl, cream together ½ cup of softened unsalted butter and 1 cup of granulated sugar using an electric mixer on medium speed for about 3-4 minutes, until the mixture is light and fluffy. Make sure to scrape down the sides of the bowl occasionally.
  4. Add 2 large eggs, 1 teaspoon of vanilla extract, and 1 teaspoon of lemon zest to the creamed butter and sugar, mixing until fully combined. You want a smooth consistency, so ensure there are no lumps of butter.
  5. In a small bowl, combine ½ cup of buttermilk and 2 tablespoons of fresh lemon juice. Alternately add the dry ingredients and buttermilk mixture to the butter mixture, starting and ending with the dry ingredients. Mix just until combined; do not overmix, as this can lead to a dense loaf.
  6. Pour the batter into the prepared loaf pan. Smooth the top with a spatula, ensuring it’s even. Bake in the preheated oven for 50-60 minutes, or until a toothpick inserted in the center comes out clean. The edges should be lightly golden brown, and the center should feel just set.
  7. Once baked, remove the loaf from the oven and allow it to cool in the pan for about 10 minutes. Then, transfer it to a wire rack to cool completely. Resist the urge to slice too soon, as it will be crumbly if it’s still warm.
  8. While the loaf is cooling, prepare the citrus icing. In a medium bowl, whisk together 1 cup of powdered sugar, 2 tablespoons of fresh lemon juice, and 1 tablespoon of orange juice until smooth. If the icing is too thick, you can add a little more juice to reach your desired consistency.
  9. Once the loaf is completely cool, drizzle the citrus icing over the top. If you like, sprinkle with an additional teaspoon of lemon zest for an extra pop of flavor and color.

Pro Tips for the Best Lemon Poppy Seed Loaf With Citrus Icing

  • Be careful not to overmix your batter; this is a common mistake that can lead to a dense loaf. Mix just until the dry ingredients are incorporated for a light and fluffy texture.
  • Use room temperature ingredients, especially the butter and eggs. This helps to create a smoother batter and ensures even baking. Take your eggs out of the fridge about 30 minutes before you start.
  • For a more pronounced lemon flavor, consider adding a little lemon extract in addition to the zest and juice. Just a half teaspoon can elevate the citrus notes significantly.
  • When measuring your flour, spoon it into the measuring cup and level it off with a knife instead of scooping directly from the bag. This prevents packing and ensures you don’t end up with a dry loaf.
  • Invest in a good quality loaf pan; it makes a difference in heat distribution, which ensures even baking. If your pan is dark-coated, reduce the oven temperature by 25°F to prevent over-browning.

Variations & Serving Ideas

For a delightful twist, consider adding blueberries or raspberries to the batter for a fruity burst of flavor. You can also experiment with different citrus fruits—try lime or grapefruit zest and juice for a refreshing change. For a healthier option, substitute half of the all-purpose flour with whole wheat flour for added fiber without compromising too much on texture.

This Lemon Poppy Seed Loaf pairs beautifully with a light salad, such as a mixed greens salad with a vinaigrette, or a cup of tea for a cozy afternoon treat. It also complements a creamy cheese platter, as the acidity of the loaf balances rich cheeses perfectly. Lastly, a scoop of vanilla ice cream on the side creates a delightful contrast of temperatures and flavors!

Storage, Make-Ahead & Reheating

This Lemon Poppy Seed Loaf can be stored at room temperature for up to 3 days if wrapped tightly in plastic wrap. If you want to keep it longer, it freezes well for up to 3 months. To freeze, wrap the loaf tightly in plastic wrap and then in aluminum foil to prevent freezer burn.

When you’re ready to enjoy it again, simply thaw it in the fridge overnight. Reheat individual slices in the microwave for 15-20 seconds or in a toaster oven until warmed through. Interestingly, many people find that this loaf tastes even better the next day, as the flavors have time to meld!

Frequently Asked Questions

Can I make Lemon Poppy Seed Loaf With Citrus Icing ahead of time?

Yes — in fact, it tastes even better the next day! You can make the loaf a day in advance, allowing the flavors to develop. Just be sure to store it in an airtight container to maintain its moisture.

Can I substitute the poppy seeds?

Absolutely! If you don’t have poppy seeds on hand or prefer an alternative, you can use sesame seeds for a similar crunch or omit them entirely for a smooth loaf.

What can I use instead of buttermilk?

If you don’t have buttermilk, you can easily create a substitute by mixing ½ cup of milk (dairy or plant-based) with 1 tablespoon of vinegar or lemon juice. Let it sit for 5 minutes before using in the recipe.

How can I make this recipe gluten-free?

To make a gluten-free version of this Lemon Poppy Seed Loaf, substitute the all-purpose flour with a gluten-free all-purpose flour blend. Just ensure that the blend contains a binding agent like xanthan gum for the best results.

What is the best way to store leftover loaf?

Leftover Lemon Poppy Seed Loaf should be stored in an airtight container at room temperature for up to 3 days. For longer storage, wrap it tightly and freeze for up to 3 months. Thaw it before serving for the best texture.

Zesty Lemon Poppy Seed Delight

Final Thoughts

The Lemon Poppy Seed Loaf with Citrus Icing is truly a delightful treat that brings a burst of brightness to any occasion. The zesty lemon flavor combined with the subtle crunch of poppy seeds creates a satisfying balance, while the citrus icing adds a touch of sweetness that perfectly complements the loaf’s tanginess.

This is the kind of recipe I come back to again and again, especially when I want to brighten up a gloomy day or celebrate a small victory. The aroma that fills the kitchen as it bakes is absolutely heavenly! I encourage you to give this recipe a try; you might just find it becoming a beloved staple in your home. Don’t forget to share your results or even add your own unique twist—I can’t wait to see what you create!

Print
clock clock iconcutlery cutlery iconflag flag iconfolder folder iconinstagram instagram iconpinterest pinterest iconfacebook facebook iconprint print iconsquares squares iconheart heart iconheart solid heart solid icon

Lemon Poppy Seed Loaf


  • Author: Lily author
  • Total Time: 38 minute
  • Yield: 1 loaf 1x
Pin Recipe
Print Recipe

Description

This Lemon Poppy Seed Loaf is a delightful treat that combines zesty lemon flavor with crunchy poppy seeds. Topped with a citrus icing, it’s perfect for any occasion.


Ingredients

Scale
  • 1 ½ cups (190g) all-purpose flour
  • 1 teaspoon baking powder
  • ½ teaspoon baking soda
  • ½ teaspoon salt
  • 3 tablespoons poppy seeds
  • ½ cup (115g) unsalted butter, softened to room temperature
  • 1 cup (200g) granulated sugar
  • 2 large eggs
  • 1 teaspoon vanilla extract
  • 1 teaspoon lemon zest (from about 1 medium lemon)
  • ½ cup (120ml) buttermilk
  • 2 tablespoons fresh lemon juice
  • 1 cup (120g) powdered sugar
  • 2 tablespoons fresh lemon juice
  • 1 tablespoon orange juice
  • 1 teaspoon lemon zest (for garnish, optional)

Instructions

  1. Preheat your oven to 350°F (175°C). Grease a 9×5-inch loaf pan or line it with parchment paper for easy removal later.
  2. In a medium mixing bowl, whisk together 1 ½ cups of all-purpose flour, 1 teaspoon of baking powder, ½ teaspoon of baking soda, ½ teaspoon of salt, and 3 tablespoons of poppy seeds. This helps to evenly distribute the baking agents and ensures a uniform rise.
  3. In a large mixing bowl, cream together ½ cup of softened unsalted butter and 1 cup of granulated sugar using an electric mixer on medium speed for about 3-4 minutes, until the mixture is light and fluffy. Make sure to scrape down the sides of the bowl occasionally.
  4. Add 2 large eggs, 1 teaspoon of vanilla extract, and 1 teaspoon of lemon zest to the creamed butter and sugar, mixing until fully combined. You want a smooth consistency, so ensure there are no lumps of butter.
  5. In a small bowl, combine ½ cup of buttermilk and 2 tablespoons of fresh lemon juice. Alternately add the dry ingredients and buttermilk mixture to the butter mixture, starting and ending with the dry ingredients. Mix just until combined; do not overmix, as this can lead to a dense loaf.
  6. Pour the batter into the prepared loaf pan. Smooth the top with a spatula, ensuring it’s even. Bake in the preheated oven for 50-60 minutes, or until a toothpick inserted in the center comes out clean. The edges should be lightly golden brown, and the center should feel just set.
  7. Once baked, remove the loaf from the oven and allow it to cool in the pan for about 10 minutes. Then, transfer it to a wire rack to cool completely. Resist the urge to slice too soon, as it will be crumbly if it’s still warm.
  8. While the loaf is cooling, prepare the citrus icing. In a medium bowl, whisk together 1 cup of powdered sugar, 2 tablespoons of fresh lemon juice, and 1 tablespoon of orange juice until smooth. If the icing is too thick, you can add a little more juice to reach your desired consistency.
  9. Once the loaf is completely cool, drizzle the citrus icing over the top. If you like, sprinkle with an additional teaspoon of lemon zest for an extra pop of flavor and color.
  • Prep Time: 15 mins
  • Cook Time: 50-60 mins
  • Category: Dessert
  • Method: Baking
  • Cuisine: American

Nutrition

  • Serving Size: 1 slice
  • Calories: 200
  • Sugar: 15 g
  • Sodium: 150 mg
  • Fat: 8 g
  • Saturated Fat: 5 g
  • Unsaturated Fat: 3 g
  • Trans Fat: 0 g
  • Carbohydrates: 30 g
  • Fiber: 1 g
  • Protein: 3 g
  • Cholesterol: 40 mg

Keywords: Be careful not to overmix your batter; this is a common mistake that can lead to a dense loaf. Use room temperature ingredients for a smoother batter and even baking.

Did you make this recipe?

Share a photo and tag us — we can't wait to see what you've made!

  • Privacy Policy
  • Terms Of Service
  • Contact
  • About
  • GDPR

Copyright © 2025 Homesmad