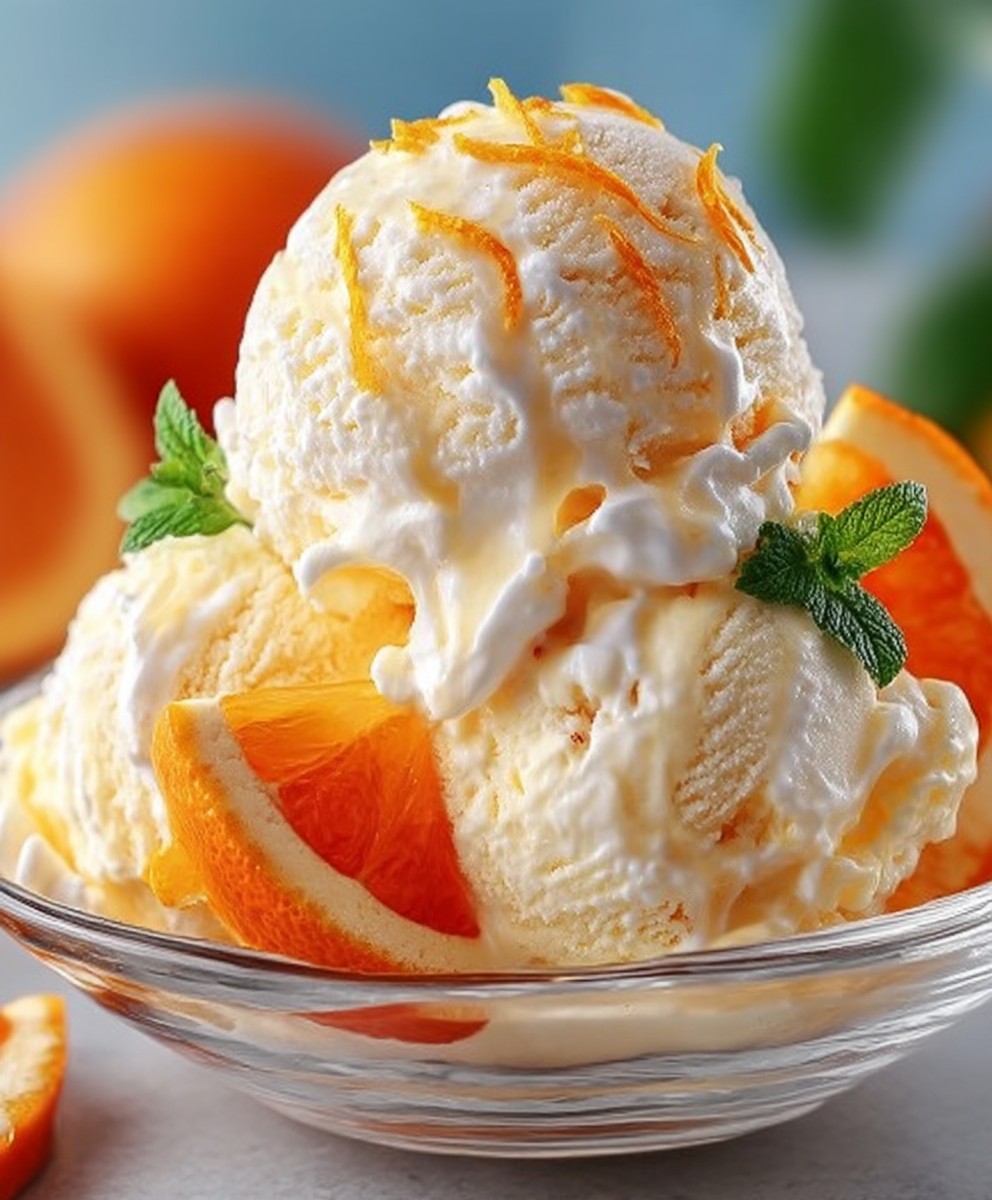
Orange Creamsicle Ice Cream: Prepare to be transported back to carefree summer days with every spoonful of this vibrant and utterly delicious treat! Forget the store-bought pops – we’re about to embark on a journey to create a homemade version that’s bursting with fresh, zesty orange flavor and creamy vanilla goodness. This isn’t just ice cream; it’s a nostalgic experience.
The iconic creamsicle, with its bright orange shell and smooth vanilla center, has been a beloved American classic for generations. While its exact origins are debated, the general consensus points to the early 20th century, when ingenuity and a desire for refreshing treats led to its creation. It quickly became a symbol of summer, a sweet reward after a long day of playing in the sun.
What makes Orange Creamsicle Ice Cream so irresistible? It’s the perfect balance of tangy citrus and rich, creamy sweetness. The bright, refreshing orange cuts through the vanilla’s richness, creating a harmonious flavor profile that dances on your palate. Plus, the smooth, melt-in-your-mouth texture is simply divine. And the best part? Making your own homemade version allows you to control the ingredients, ensuring a healthier and even more flavorful dessert. Get ready to impress your friends and family with this easy-to-make, unforgettable frozen delight!

Ingredients:
- For the Orange Base:
- 4 large oranges, for juice and zest (about 1 ½ cups juice)
- 1 cup granulated sugar
- 1 cup heavy cream
- ½ cup whole milk
- 1 tablespoon orange liqueur (optional, but adds a nice depth of flavor)
- 1 teaspoon vanilla extract
- Pinch of salt
- For the Vanilla Cream Base:
- 1 ½ cups heavy cream
- ¾ cup whole milk
- ¾ cup granulated sugar
- 1 vanilla bean, split lengthwise and seeds scraped (or 2 teaspoons vanilla extract)
- Pinch of salt
Preparing the Orange Base:
- Zest the Oranges: Carefully zest all four oranges, making sure to only get the orange part of the peel and avoid the bitter white pith. You should aim for about 2 tablespoons of zest. The zest is where a lot of the orange flavor resides, so don’t skip this step!
- Juice the Oranges: Juice the oranges. You’ll need about 1 ½ cups of fresh orange juice. If your oranges aren’t very juicy, you might need a few more. Freshly squeezed juice is key for the best flavor. Store-bought juice just won’t have the same vibrant taste.
- Combine Ingredients: In a medium saucepan, combine the orange juice, orange zest, granulated sugar, heavy cream, whole milk, orange liqueur (if using), vanilla extract, and salt.
- Heat and Dissolve: Place the saucepan over medium heat. Stir constantly until the sugar is completely dissolved. You don’t want the mixture to boil, just heat it gently until the sugar is no longer grainy. This usually takes about 5-7 minutes.
- Chill the Mixture: Remove the saucepan from the heat and let the orange mixture cool slightly. Then, pour it into a container with a lid and refrigerate for at least 4 hours, or preferably overnight. This chilling time is crucial! It allows the flavors to meld together and the mixture to properly thicken.
Preparing the Vanilla Cream Base:
- Infuse the Cream (Optional, but Recommended): In a medium saucepan, combine the heavy cream, whole milk, and granulated sugar. If using a vanilla bean, scrape the seeds into the cream mixture and add the pod as well. This will infuse the cream with a rich vanilla flavor. If you’re using vanilla extract, you’ll add it later.
- Heat and Dissolve: Place the saucepan over medium heat. Stir constantly until the sugar is completely dissolved. Again, don’t let the mixture boil. Just heat it gently until the sugar is no longer grainy. This usually takes about 5-7 minutes.
- Remove Vanilla Bean (If Used): If you used a vanilla bean, remove the pod from the cream mixture. You can rinse and dry the pod and save it for another use, like flavoring sugar or coffee.
- Add Vanilla Extract (If Not Using Vanilla Bean): If you’re using vanilla extract instead of a vanilla bean, stir it into the cream mixture now.
- Chill the Mixture: Pour the vanilla cream mixture into a container with a lid and refrigerate for at least 4 hours, or preferably overnight. Just like with the orange base, this chilling time is essential for the best texture and flavor.
Churning the Ice Cream:
- Prepare Your Ice Cream Maker: Make sure your ice cream maker’s bowl is properly frozen according to the manufacturer’s instructions. This usually means freezing it for at least 24 hours. A properly frozen bowl is absolutely essential for making ice cream!
- Churn the Orange Base: Pour the chilled orange base into your ice cream maker. Churn according to the manufacturer’s instructions. This usually takes about 20-25 minutes, or until the mixture has thickened to the consistency of soft-serve ice cream.
- Churn the Vanilla Cream Base: In a separate batch, pour the chilled vanilla cream base into your ice cream maker. Churn according to the manufacturer’s instructions, until it reaches the consistency of soft-serve ice cream. This will also take about 20-25 minutes.
Assembling the Creamsicle Ice Cream:
- Layer the Ice Cream: Have a freezer-safe container ready. Spoon alternating layers of the orange ice cream and the vanilla ice cream into the container. You can swirl them together slightly with a knife or spoon if you like a more marbled effect. Don’t overmix, though, or you’ll lose the distinct orange and vanilla flavors.
- Freeze to Harden: Cover the container tightly with a lid or plastic wrap. Freeze for at least 2-3 hours, or preferably overnight, to allow the ice cream to harden completely. This step is important for achieving that perfect scoopable texture.
Serving and Storage:
- Scoop and Serve: When ready to serve, let the ice cream sit at room temperature for a few minutes to soften slightly. This will make it easier to scoop.
- Enjoy! Scoop the Orange Creamsicle Ice Cream into bowls or cones and enjoy! Garnish with a fresh orange slice or a sprinkle of orange zest for an extra touch.
- Storage: Store any leftover ice cream in the freezer in an airtight container. Homemade ice cream is best enjoyed within 1-2 weeks for optimal flavor and texture. After that, it may start to develop ice crystals.
Tips for Success:
- Use High-Quality Ingredients: The better the ingredients, the better the ice cream! Use fresh, ripe oranges and high-quality heavy cream for the best flavor.
- Don’t Skip the Chilling Time: Chilling both the orange base and the vanilla cream base is crucial for achieving the right texture. It allows the flavors to meld and the mixture to thicken properly.
- Follow Your Ice Cream Maker’s Instructions: Each ice cream maker is a little different, so be sure to follow the manufacturer’s instructions for best results.
- Adjust Sweetness to Taste: If you prefer a less sweet ice cream, you can reduce the amount of sugar slightly. Taste the orange base and vanilla cream base before churning and adjust as needed.
- Get Creative with Add-Ins: While this recipe is delicious as is, you can also add other ingredients to customize it to your liking. Consider adding chocolate chips, chopped nuts, or a swirl of caramel sauce.
Troubleshooting:
- Ice Cream is Too Icy: This can happen if the ice cream wasn’t chilled properly before churning, or if it wasn’t frozen long enough after churning. Make sure to chill both bases thoroughly and freeze the ice cream for at least 2-3 hours after churning.
- Ice Cream is Too Soft: This can happen if your ice cream maker’s bowl wasn’t cold enough, or if the churning time was too short. Make sure your bowl is properly frozen and churn the ice cream until it reaches the consistency of soft-serve.
- Ice Cream is Too Hard: This can happen if the ice cream was frozen for too long. Let it sit at room temperature for a few minutes before scooping to soften it slightly.
Conclusion:
This Orange Creamsicle Ice Cream is more than just a dessert; it’s a trip down memory lane, a burst of sunshine in every spoonful, and a guaranteed crowd-pleaser. The vibrant citrus notes perfectly complement the creamy vanilla base, creating a harmonious blend that’s both refreshing and indulgent. If you’re looking for a homemade ice cream recipe that’s relatively simple to make, requires no fancy equipment beyond a standard ice cream maker, and delivers exceptional flavor, then look no further. This is it!
Why is this a must-try? Because it captures the essence of summer in a bowl. It’s the perfect antidote to a hot day, a delightful treat to share with friends and family, and a fun project to embark on in your kitchen. Forget the store-bought stuff loaded with artificial flavors and preservatives. This homemade version is bursting with fresh, natural goodness that you can taste in every bite. Plus, the satisfaction of creating something so delicious from scratch is simply unmatched.
But the fun doesn’t stop there! This recipe is incredibly versatile, offering endless possibilities for customization. For a richer, more decadent experience, try using full-fat coconut milk instead of regular milk. This will add a subtle coconut flavor that pairs beautifully with the orange. If you’re feeling adventurous, you could even add a splash of orange liqueur to the mix for an extra kick.
Looking for serving suggestions? The possibilities are endless! Serve this Orange Creamsicle Ice Cream in a classic waffle cone for a nostalgic treat. Or, get creative and use it to make ice cream sandwiches with homemade cookies. For a more elegant presentation, scoop it into martini glasses and garnish with fresh orange zest and a sprig of mint. It’s also fantastic as a topping for warm brownies or waffles. And for a truly decadent dessert, try layering it with crumbled graham crackers and whipped cream in a parfait.
Another variation you might enjoy is adding a swirl of homemade orange marmalade to the ice cream as it churns. This will add a delightful texture and intensify the orange flavor. You could also experiment with different citrus fruits, such as mandarin oranges or blood oranges, to create unique and exciting flavor combinations. Don’t be afraid to get creative and experiment with different ingredients and techniques to make this recipe your own.
I truly believe that this Orange Creamsicle Ice Cream will become a new family favorite. It’s a recipe that’s sure to impress, whether you’re serving it at a summer barbecue, a birthday party, or simply enjoying a quiet evening at home.
So, what are you waiting for? Gather your ingredients, dust off your ice cream maker, and get ready to embark on a delicious adventure. I’m confident that you’ll love this recipe as much as I do.
And most importantly, I want to hear about your experience! Once you’ve tried this recipe, please share your thoughts and feedback in the comments below. Let me know what variations you tried, what serving suggestions you enjoyed, and any tips or tricks you discovered along the way. I can’t wait to see what you create! Happy ice cream making!
Orange Creamsicle Ice Cream: The Ultimate Summer Treat
Refreshing homemade ice cream with layers of vibrant orange and creamy vanilla, like a classic creamsicle.
Ingredients
Instructions
Recipe Notes
- Use high-quality ingredients for the best flavor.
- Chilling time is crucial for texture and flavor.
- Follow your ice cream maker’s instructions.
- Adjust sweetness to taste.
- Get creative with add-ins like chocolate chips or nuts.