Peanut Butter Oat Cups: Prepare to meet your new favorite grab-and-go breakfast or guilt-free dessert! Are you tired of the same old boring breakfasts or reaching for unhealthy snacks when that afternoon slump hits? I know I was! That’s why I’m so excited to share this incredibly simple and satisfying recipe with you.
While the exact origins of combining peanut butter and oats in a baked treat are a bit hazy, the pairing itself is a classic for a reason. Peanut butter, a staple in American pantries since the late 19th century, offers a creamy, nutty richness that perfectly complements the wholesome, slightly chewy texture of oats. Think of these Peanut Butter Oat Cups as a modern, healthier take on the traditional peanut butter cookie, but with an added boost of fiber and sustained energy.
What makes these little cups so irresistible? It’s the perfect balance of flavors and textures. The creamy peanut butter melts in your mouth, while the oats provide a satisfying chewiness. Plus, they’re incredibly convenient! Make a batch on Sunday, and you’ll have a delicious and nutritious breakfast or snack ready to go all week long. People love this dish because it is easy to make, packed with protein and fiber, and tastes like a treat without all the guilt. So, let’s get baking and create these delightful Peanut Butter Oat Cups together!

Ingredients:
- 1 cup rolled oats (not instant)
- 1/2 cup peanut butter (creamy or crunchy, your preference!)
- 1/4 cup honey or maple syrup
- 1/4 cup unsweetened applesauce
- 1 teaspoon vanilla extract
- 1/4 teaspoon salt
- 1/4 cup chocolate chips (optional, but highly recommended!)
- 2 tablespoons chopped nuts (optional, for topping – peanuts, almonds, or pecans work well)
Preparing the Oat Mixture
Alright, let’s get started! These Peanut Butter Oat Cups are super easy to make, and I promise they’ll become a new favorite snack. First, we need to get our oat mixture ready. This is where all the magic happens!
- Combine the Oats, Peanut Butter, Honey, Applesauce, Vanilla, and Salt: In a large mixing bowl, add the rolled oats, peanut butter, honey (or maple syrup), applesauce, vanilla extract, and salt. Make sure you’re using a bowl that’s big enough to comfortably mix everything without making a mess. I always seem to underestimate the size of the bowl I need!
- Mix Thoroughly: Now, using a sturdy spoon or spatula, mix all the ingredients together until they are well combined. This might take a little elbow grease, especially with the peanut butter, but keep at it! You want to make sure the oats are evenly coated with the peanut butter mixture. There shouldn’t be any dry oats lurking at the bottom of the bowl. If the mixture seems too dry, you can add a tiny splash more applesauce, a teaspoon at a time, until it reaches the right consistency. It should be moist enough to hold together when pressed.
- Add Chocolate Chips (Optional): If you’re using chocolate chips (and I highly recommend you do!), gently fold them into the oat mixture. I like to use mini chocolate chips because they distribute more evenly, but regular-sized ones work just fine too. Just be careful not to overmix at this stage, or the chocolate chips might melt a little from the friction.
Forming the Oat Cups
Now that our oat mixture is ready, it’s time to form the individual cups. This is where you get to decide how big you want your snacks to be. I usually aim for about 1/4 cup of mixture per cup, but you can adjust this to your liking.
- Prepare the Muffin Tin: Line a muffin tin with paper liners. This will make it much easier to remove the oat cups later. If you don’t have paper liners, you can lightly grease the muffin tin with cooking spray. Just make sure you get into all the nooks and crannies to prevent sticking.
- Scoop the Oat Mixture: Using a spoon or ice cream scoop, scoop the oat mixture into the prepared muffin tin. Fill each liner about 3/4 full. Don’t overfill them, or they might overflow during baking.
- Press Down Firmly: Once you’ve filled all the liners, use the back of a spoon or your fingers to gently press down on the oat mixture in each cup. This will help them hold their shape and prevent them from crumbling. You want them to be compact and even.
- Add Toppings (Optional): If you’re using chopped nuts, sprinkle them evenly over the top of each oat cup. You can also add a few extra chocolate chips for a more decadent treat. Get creative with your toppings! Shredded coconut, dried cranberries, or even a drizzle of melted peanut butter would be delicious.
Baking the Oat Cups
We’re almost there! Now it’s time to bake our Peanut Butter Oat Cups. This step is crucial for setting the mixture and creating that perfect chewy texture.
- Preheat the Oven: Preheat your oven to 350°F (175°C). Make sure your oven is fully preheated before you put the oat cups in. This will ensure that they bake evenly.
- Bake: Place the muffin tin in the preheated oven and bake for 12-15 minutes, or until the edges are lightly golden brown. Keep a close eye on them, as baking times can vary depending on your oven. You want them to be set but still slightly soft in the center.
- Cool: Remove the muffin tin from the oven and let the oat cups cool in the tin for a few minutes before transferring them to a wire rack to cool completely. This will prevent them from sticking to the liners.
No-Bake Option
If you’re short on time or just don’t feel like turning on the oven, you can also make these Peanut Butter Oat Cups as a no-bake treat. The process is slightly different, but the result is just as delicious!
- Follow Steps 1-4 of “Preparing the Oat Mixture” and “Forming the Oat Cups” above. The only difference is that you won’t be baking them.
- Refrigerate: Instead of baking, place the muffin tin in the refrigerator and chill for at least 2 hours, or until the oat cups are firm. This will allow the peanut butter and honey to set and hold the cups together.
- Enjoy: Once the oat cups are firm, remove them from the muffin tin and enjoy!
Storage Instructions
These Peanut Butter Oat Cups are best stored in an airtight container at room temperature for up to 3 days, or in the refrigerator for up to a week. They can also be frozen for longer storage. Just wrap them individually in plastic wrap or place them in a freezer-safe container. When you’re ready to eat them, simply thaw them at room temperature or in the refrigerator.
Tips and Variations
Here are a few tips and variations to help you customize these Peanut Butter Oat Cups to your liking:
- Use Different Nut Butters: If you’re not a fan of peanut butter, you can easily substitute it with almond butter, cashew butter, or sunflower seed butter. Just keep in mind that the flavor and texture might be slightly different.
- Add Dried Fruit: Dried cranberries, raisins, or chopped dates would be a delicious addition to these oat cups. Just add them to the oat mixture along with the chocolate chips.
- Spice it Up: A pinch of cinnamon or nutmeg would add a warm and cozy flavor to these oat cups.
- Make them Vegan: To make these oat cups vegan, simply substitute the honey with maple syrup or agave nectar.
- Add Protein Powder: For an extra boost of protein, add a scoop of your favorite protein powder to the oat mixture. Just be sure to adjust the amount of liquid accordingly, as protein powder can sometimes make the mixture dry.
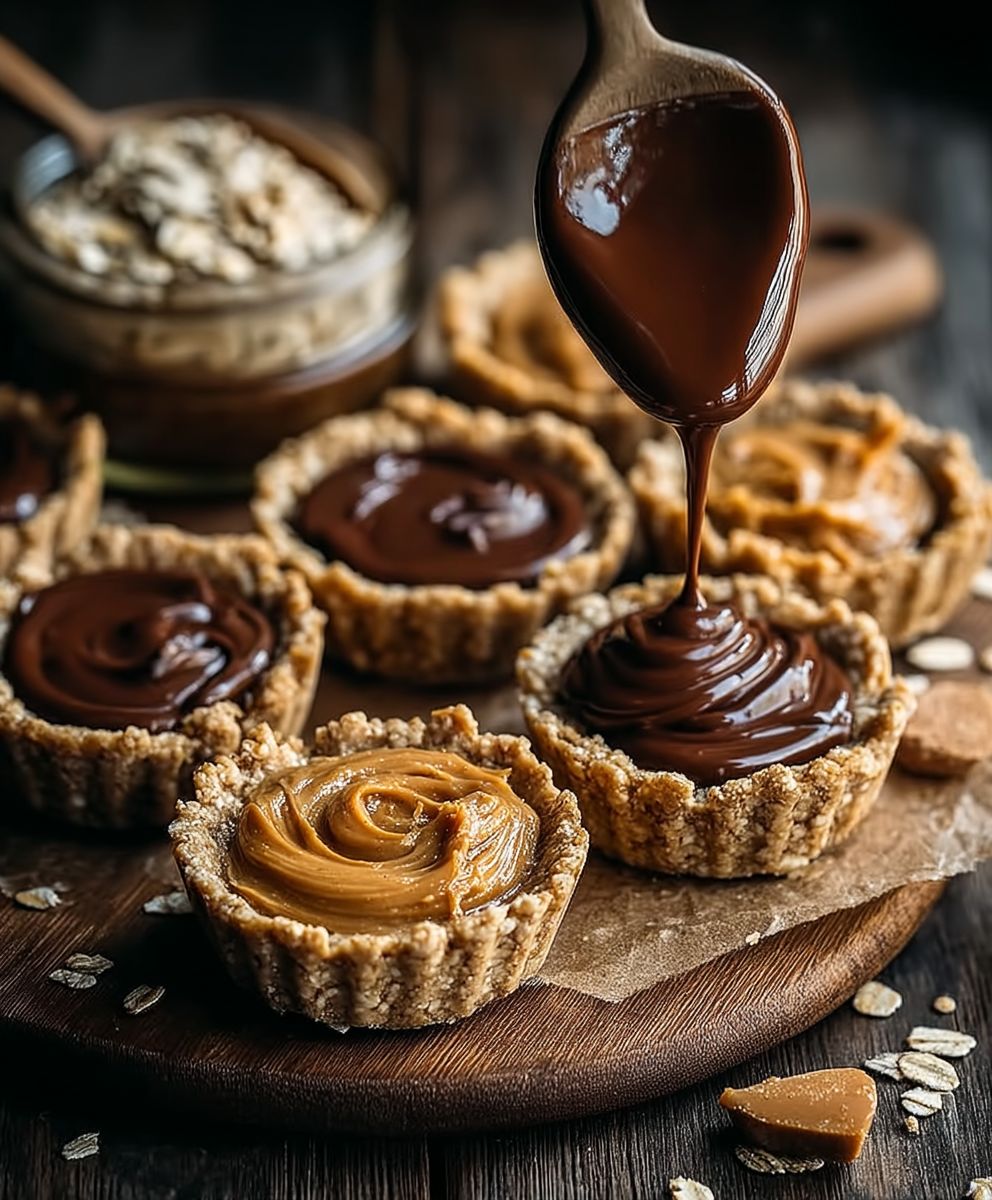
- Drizzle with Chocolate: For an extra decadent treat, drizzle the cooled oat cups with melted chocolate. You can use dark chocolate, milk chocolate, or white chocolate, depending on your preference.
Troubleshooting
Sometimes, things don’t go exactly as planned in the kitchen. Here are a few common problems you might encounter when making these Peanut Butter Oat Cups, and how to fix them:
- Oat Cups are Too Dry: If your oat mixture seems too dry, add a teaspoon of applesauce or honey at a time until it reaches the right consistency.
- Oat Cups are Too Wet: If your oat mixture seems too wet, add a tablespoon of rolled oats at a time until it reaches the right consistency.
- Oat Cups are Crumbly: If your oat cups are crumbly, make sure you’re pressing down firmly on the oat mixture in the muffin tin. You can also try adding a little more peanut butter or honey to help bind the ingredients together.
- Oat Cups are Sticking to the Liners: If your oat cups are sticking to the liners, make sure you’re using paper liners or greasing the muffin tin thoroughly with cooking spray. You can also try letting the oat cups cool completely in the tin before removing them.
Nutritional Information (Approximate)
Please note that the nutritional information is approximate and may vary depending on the specific ingredients you use.
- Calories: Approximately 150-200 per cup
- Fat: 8-12 grams
- Carbohydrates: 15-20 grams
- Protein: 4-6 grams
Enjoy your delicious and healthy Peanut Butter Oat Cups! I hope you love them as much as I do.
Conclusion:
And there you have it! These Peanut Butter Oat Cups are more than just a recipe; they’re a gateway to delicious, guilt-free snacking, a quick breakfast solution, and a customizable treat that fits perfectly into any lifestyle. I truly believe this recipe is a must-try for anyone looking for a healthy, satisfying, and incredibly easy-to-make snack.
Why, you ask? Well, first and foremost, the taste is simply irresistible. The combination of creamy peanut butter, wholesome oats, and a touch of sweetness creates a symphony of flavors that will leave you wanting more. But beyond the taste, these cups are packed with nutrients, providing a good source of fiber, protein, and healthy fats. They’re the perfect way to fuel your body and keep you feeling energized throughout the day. Plus, they’re incredibly convenient. You can whip up a batch in under 30 minutes and store them in the fridge or freezer for whenever a craving strikes.
But the real beauty of this recipe lies in its versatility. Feel free to experiment with different variations to create your own signature Peanut Butter Oat Cups. Want to add a little extra crunch? Throw in some chopped nuts or seeds. Craving something fruity? Mix in some berries or dried fruit. Looking for a chocolatey indulgence? Add a few chocolate chips or a drizzle of melted chocolate on top. The possibilities are endless!
Here are a few serving suggestions to get you started:
* Enjoy them straight from the fridge for a cool and refreshing snack.
* Warm them up in the microwave for a gooey and comforting treat.
* Crumble them over yogurt or oatmeal for added flavor and texture.
* Pack them in your lunchbox for a healthy and satisfying midday snack.
* Serve them as a light and delicious dessert after dinner.
I personally love adding a sprinkle of sea salt on top of mine – it really enhances the peanut butter flavor! Another favorite variation is adding a layer of raspberry jam in the middle for a PB&J inspired treat. Don’t be afraid to get creative and find your own perfect combination.
I’m so confident that you’ll love these Peanut Butter Oat Cups that I urge you to give them a try. They’re simple enough for even the most novice baker, and the results are guaranteed to impress. Once you’ve made your first batch, I’d love to hear about your experience! Did you try any variations? What did you think of the taste and texture? Did your family and friends enjoy them as much as I do?
Please, share your thoughts and photos in the comments below. I’m always eager to learn from your experiences and see how you’ve made this recipe your own. Let’s create a community of Peanut Butter Oat Cup enthusiasts and inspire each other with new and exciting variations. Happy baking, and I can’t wait to hear from you! I know you will love this recipe as much as I do.
Peanut Butter Oat Cups: Easy Recipe & Healthy Snack Idea
Easy and delicious no-bake (or baked!) peanut butter oat cups. A healthy and customizable snack perfect for any time of day.
Ingredients
Instructions
Recipe Notes
- Store in an airtight container at room temperature for up to 3 days, or in the refrigerator for up to a week. Can be frozen for longer storage.
- Almond butter, cashew butter, or sunflower seed butter can be used instead of peanut butter.
- Dried cranberries, raisins, or chopped dates can be added to the oat mixture.
- A pinch of cinnamon or nutmeg can be added for flavor.
- Substitute honey with maple syrup or agave nectar.
- Add a scoop of protein powder, adjusting liquid as needed.
- Drizzle cooled oat cups with melted chocolate.
- Too Dry: Add applesauce or honey, a teaspoon at a time.
- Too Wet: Add rolled oats, a tablespoon at a time.
- Crumbly: Press down firmly, or add more peanut butter or honey.
- Sticking: Use paper liners or grease the muffin tin thoroughly.