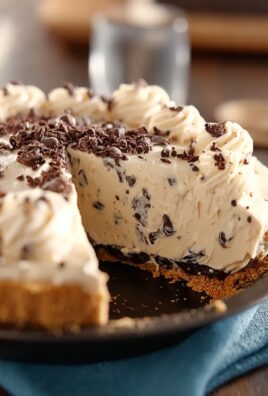
Peanut Butter Pie is a delightful dessert that has captured the hearts of many with its creamy texture and rich flavor. As a lover of all things sweet, I can confidently say that this pie is a true crowd-pleaser, perfect for any occasion. Originating from the classic American dessert scene, Peanut Butter Pie has roots that trace back to the mid-20th century, when peanut butter became a staple in households across the nation. Its combination of smooth peanut butter, fluffy whipped cream, and a crunchy crust creates a harmonious balance that keeps everyone coming back for more.
What I adore about Peanut Butter Pie is not just its taste, but also its convenience. With minimal ingredients and a straightforward preparation process, this pie is perfect for both novice bakers and seasoned chefs alike. The moment you take a bite, the creamy filling melts in your mouth, while the crust adds a satisfying crunch. It’s no wonder that Peanut Butter Pie has become a beloved dessert at family gatherings, potlucks, and celebrations. Join me as we dive into this delicious recipe that is sure to become a favorite in your home!

Ingredients:
- 1 ½ cups graham cracker crumbs
- ½ cup unsalted butter, melted
- 1/3 cup granulated sugar
- 1 cup creamy peanut butter
- 1 cup powdered sugar
- 1 cup heavy whipping cream
- 1 teaspoon vanilla extract
- 1 cup chocolate chips (optional, for topping)
- Chopped peanuts (optional, for garnish)
Preparing the Crust
1. **Preheat the Oven**: Start by preheating your oven to 350°F (175°C). This ensures that your crust will bake evenly and become nice and crispy. 2. **Mix the Crust Ingredients**: In a large mixing bowl, combine the graham cracker crumbs, melted butter, and granulated sugar. Use a fork or your hands to mix everything together until the crumbs are well-coated with butter and the mixture resembles wet sand. 3. **Form the Crust**: Pour the crumb mixture into a 9-inch pie pan. Press the mixture firmly into the bottom and up the sides of the pan. Make sure it’s evenly distributed to create a solid base for your pie. 4. **Bake the Crust**: Place the pie crust in the preheated oven and bake for about 8-10 minutes, or until it’s lightly golden. Keep an eye on it to prevent burning. Once done, remove it from the oven and let it cool completely.Preparing the Peanut Butter Filling
5. **Beat the Peanut Butter**: In a large mixing bowl, add the creamy peanut butter. Using an electric mixer, beat it on medium speed for about 1 minute until it’s smooth and creamy. 6. **Add the Powdered Sugar**: Gradually add the powdered sugar to the peanut butter while continuing to mix. Beat until the mixture is well combined and fluffy. This should take about 2-3 minutes. 7. **Whip the Cream**: In a separate bowl, pour in the heavy whipping cream and add the vanilla extract. Using a clean electric mixer, whip the cream on high speed until stiff peaks form. This usually takes about 3-5 minutes. Be careful not to over-whip, or you’ll end up with butter! 8. **Fold the Cream into the Peanut Butter Mixture**: Gently fold the whipped cream into the peanut butter mixture using a spatula. Start by adding a small amount of whipped cream to lighten the peanut butter mixture, then gradually fold in the rest. This will keep the filling light and airy.Assembling the Pie
9. **Fill the Crust**: Once the crust has cooled completely, pour the peanut butter filling into the crust. Use a spatula to spread it evenly, smoothing the top as you go. 10. **Chill the Pie**: Cover the pie with plastic wrap and place it in the refrigerator. Let it chill for at least 4 hours, or overnight if you have the time. This allows the filling to set properly.Preparing the Chocolate Topping (Optional)
11. **Melt the Chocolate**: If you’re adding a chocolate topping, place the chocolate chips in a microwave-safe bowl. Microwave in 30-second intervals, stirring in between, until the chocolate is completely melted and smooth. 12. **Drizzle the Chocolate**: Once the pie has set, remove it from the refrigerator. Drizzle the melted chocolate over the top of the pie in a decorative pattern. You can use a spoon or a piping bag for more control. 13. **Garnish with Peanuts**: If you like, sprinkle some chopped peanuts over the chocolate drizzle for added texture and flavor. This step is optional but adds a nice crunch!Serving the Pie
14. **Slice the Pie**: Using a sharp knife, slice the pie into wedges. I find that dipping the knife in warm water before cutting helps create clean slices. 15. **Serve and Enjoy**: Serve the pie chilled. You can add a dollop of whipped cream on top of each slice for an extra treat. Enjoy the creamy, rich flavors of this delightful peanut butter pie with family and friends!Storage Tips
16. **Store Leftovers**: If you have any leftovers (which is rare!), cover the pie with plastic wrap or aluminum foil and store it in the refrigerator. It should stay fresh for up to 5 days. 17. **Freezing the Pie**: You can also freeze the pie for longer storage. Just make sure to wrap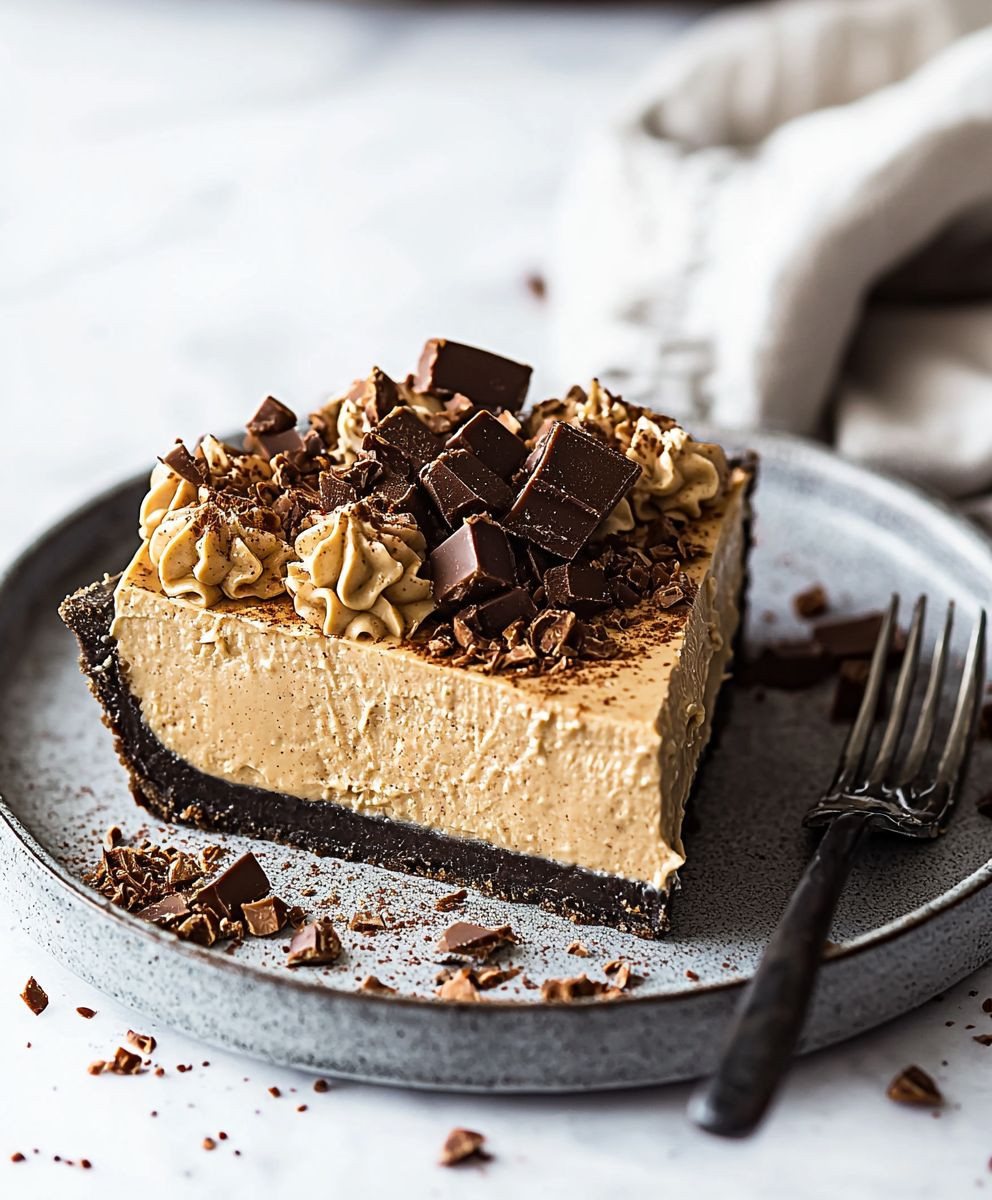
Conclusion:
In summary, this Peanut Butter Pie is an absolute must-try for anyone who loves the rich, creamy goodness of peanut butter combined with a delightful crust. The balance of flavors and textures makes it a standout dessert that is sure to impress your family and friends. Whether you serve it at a special occasion or simply as a sweet treat after dinner, this pie is bound to become a favorite in your household. For serving suggestions, consider topping your Peanut Butter Pie with a dollop of whipped cream, a sprinkle of crushed peanuts, or even a drizzle of chocolate sauce for an extra indulgent touch. If you’re feeling adventurous, you can also experiment with variations by adding a layer of chocolate ganache or incorporating some crushed cookies into the crust for added crunch. I encourage you to give this recipe a try and share your experience with me! I would love to hear how your Peanut Butter Pie turns out and any creative twists you might add. Remember, cooking is all about having fun and making it your own. So roll up your sleeves, gather your ingredients, and enjoy the process of creating this delicious dessert. Happy baking! Print
Peanut Butter Pie: The Ultimate No-Bake Dessert Recipe You Need to Try
- Total Time: 280 minutes
- Yield: 8 servings 1x
Description
Enjoy a delightful Peanut Butter Pie with a buttery graham cracker crust and a light, fluffy peanut butter filling. This creamy dessert can be topped with melted chocolate and chopped peanuts for an extra treat, making it perfect for any occasion!
Ingredients
- 1 ½ cups graham cracker crumbs
- ½ cup unsalted butter, melted
- 1/3 cup granulated sugar
- 1 cup creamy peanut butter
- 1 cup powdered sugar
- 1 cup heavy whipping cream
- 1 teaspoon vanilla extract
- 1 cup chocolate chips (optional, for topping)
- Chopped peanuts (optional, for garnish)
Instructions
- Preheat your oven to 350°F (175°C).
- In a large mixing bowl, combine graham cracker crumbs, melted butter, and granulated sugar. Mix until well-coated and resembles wet sand.
- Pour the mixture into a 9-inch pie pan, pressing it firmly into the bottom and up the sides.
- Bake for 8-10 minutes until lightly golden. Remove from the oven and let cool completely.
- In a large bowl, beat the creamy peanut butter on medium speed until smooth (about 1 minute).
- Gradually mix in the powdered sugar until fluffy (2-3 minutes).
- In a separate bowl, whip the heavy cream and vanilla extract on high speed until stiff peaks form (3-5 minutes).
- Gently fold the whipped cream into the peanut butter mixture until well combined.
- Pour the peanut butter filling into the cooled crust and smooth the top.
- Cover with plastic wrap and refrigerate for at least 4 hours or overnight.
- Microwave chocolate chips in 30-second intervals until melted and smooth.
- Drizzle melted chocolate over the pie in a decorative pattern.
- Sprinkle chopped peanuts over the chocolate drizzle if desired.
- Use a sharp knife to slice the pie into wedges, dipping the knife in warm water for clean cuts.
- Serve chilled, optionally topped with a dollop of whipped cream.
- Cover and refrigerate leftovers for up to 5 days.
- Wrap and freeze for longer storage.
Notes
- For a richer flavor, consider using dark chocolate chips for the topping.
- This pie can be made a day in advance, making it a great option for gatherings.
- Prep Time: 30 minutes
- Cook Time: 10 minutes