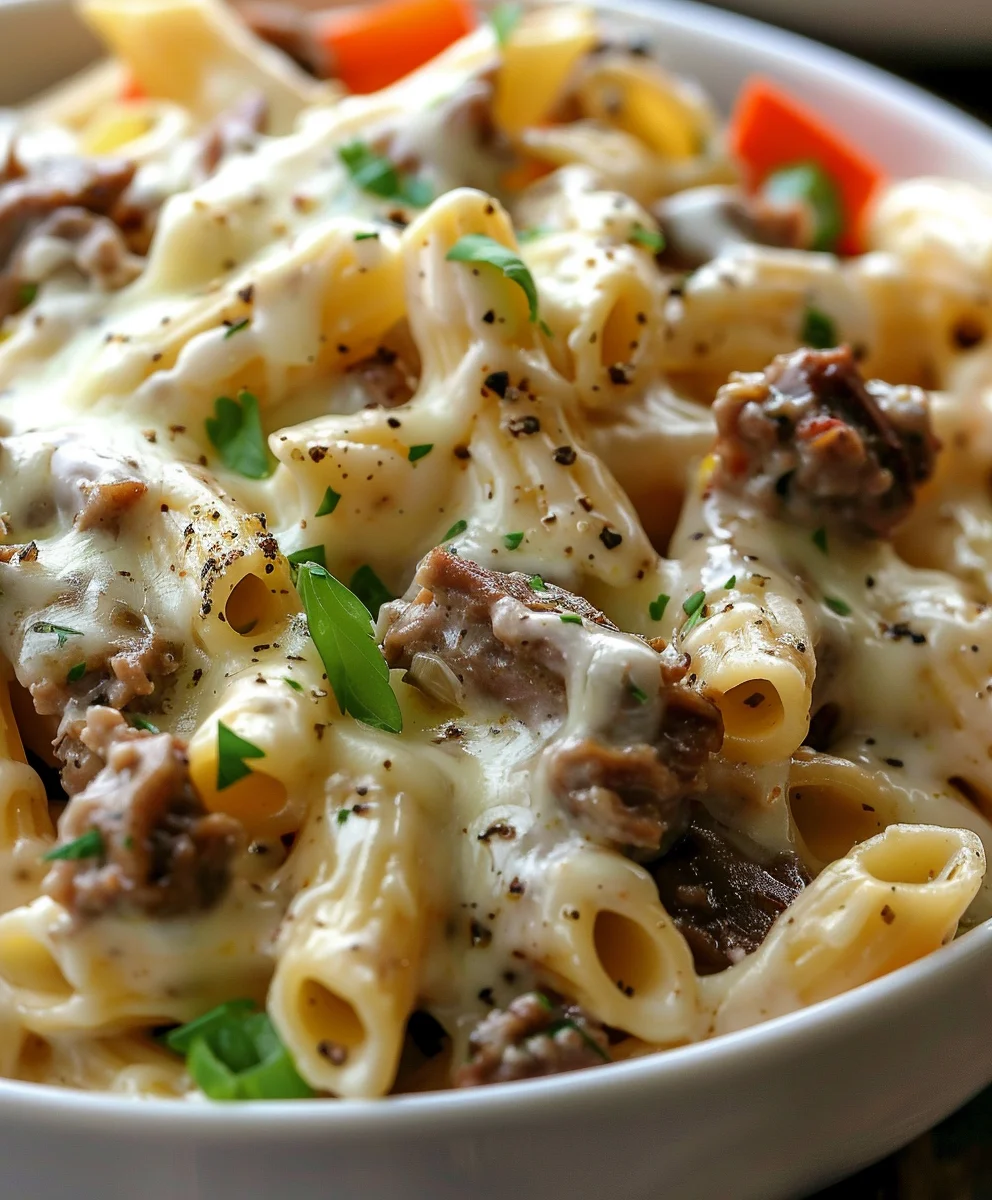
Philly Cheesesteak Pasta – Imagine sinking your fork into a bowl of creamy, savory pasta, each strand coated in a rich, cheesy sauce, studded with tender slivers of beef, caramelized onions, and vibrant bell peppers. It’s the quintessential taste of a beloved American classic, reinvented for your dinner table. The original Philly Cheesesteak sandwich, a culinary icon born in the bustling streets of Philadelphia, has captivated palates for decades with its simple yet profound combination of thinly sliced steak and melted cheese, typically provolone or Cheez Whiz, all nestled in a crusty roll. While we adore the classic, sometimes a delightful twist is exactly what we crave.
That’s where our incredible Philly Cheesesteak Pasta comes in. We’ve taken all the irresistible elements—the succulent beef, the sweet sautéed onions and peppers, and that unmistakable ooey-gooey cheese—and transformed them into a hearty, comforting pasta dish that’s perfect for any night of the week. It offers the same incredible flavor profile but in an entirely new, incredibly satisfying format that’s both convenient and utterly delicious. It’s a hearty meal that brings joy with every forkful, embodying pure comfort food at its finest.
Ingredients:
- For the Pasta:
- 1 pound (450g) short-cut pasta (such as penne, rotini, cavatappi, or medium shells)
- 2 teaspoons salt (for pasta water)
- For the Beef and Vegetables:
- 1 ½ pounds (680g) thinly sliced beef (shaved steak, ribeye, or sirloin, preferably frozen slightly for easier slicing)
- 2 tablespoons olive oil, divided
- 1 large yellow onion, thinly sliced
- 2 medium bell peppers (I love a mix of green and red for color and flavor), thinly sliced
- 4-5 cloves garlic, minced
- 1 teaspoon garlic powder
- 1 teaspoon onion powder
- ½ teaspoon dried oregano
- ¼ teaspoon red pepper flakes (optional, for a hint of heat)
- 1 tablespoon Worcestershire sauce
- Salt and freshly ground black pepper to taste
- For the Creamy Cheese Sauce:
- 3 tablespoons unsalted butter
- 3 tablespoons all-purpose flour
- 2 cups beef broth (low sodium preferred)
- 1 cup whole milk or half-and-half
- 2 cups (about 8 ounces) shredded cheese (a mix of sharp white cheddar, provolone, and Monterey Jack works beautifully; or just use one of your favorites!)
- ½ cup freshly grated Parmesan cheese (for melting into the sauce and a little extra for garnish)
- Salt and freshly ground black pepper to taste
- For Garnish (Optional):
- Fresh chopped parsley or chives
- Extra shredded Parmesan cheese
Equipment You’ll Need:
Before we dive into creating our incredible Philly Cheesesteak Pasta, let’s make sure we have the right tools ready. A well-prepared kitchen makes the cooking process so much smoother and more enjoyable. You’ll want to have on hand:
- A large heavy-bottomed pot or Dutch oven (for cooking the pasta and combining everything)
- A large skillet or cast-iron pan (for searing the beef and sautéing vegetables)
- A sturdy cutting board and a sharp chef’s knife
- A colander for draining the pasta
- Measuring cups and spoons
- A whisk (for our glorious cheese sauce!)
- A wooden spoon or spatula
- Cheese grater (if you’re shredding your own cheese, which I highly recommend for better melting!)
Preparation and Mise en Place:
Friends, the secret to a stress-free and delicious cooking experience, especially when making a dish as multi-layered as this Philly Cheesesteak Pasta, is undoubtedly “mise en place” – everything in its place. Taking the time to prepare all your ingredients beforehand will make the actual cooking feel like a dance, not a race. Trust me on this one; you’ll thank yourself later!
- Thinly Slice the Beef: This is a crucial step for achieving that classic Philly cheesesteak texture in our pasta. If your beef isn’t already shaved, I highly recommend freezing it for about 30-45 minutes. This firms it up just enough to make it incredibly easy to slice against the grain into very thin strips, almost like paper. The thinner, the better, as it cooks quickly and becomes wonderfully tender, melting into our pasta dish. Once sliced, set it aside.
- Prepare the Vegetables: Grab your trusty knife and cutting board. First, peel and thinly slice your large yellow onion. We want nice, long, tender strands of onion to meld with the beef. Next, core and thinly slice your bell peppers. A mix of green and red bell peppers not only adds fantastic color but also depth of flavor. Mince your garlic cloves. Having these prepped and ready will allow you to quickly add them to the pan when the time comes.
- Shred the Cheese: While pre-shredded cheese is convenient, freshly shredded cheese melts much more smoothly and tastes richer. Take a few extra minutes to shred your provolone, sharp white cheddar, or Monterey Jack. Also, grate your Parmesan cheese. Keep these separate for now.
- Measure Dry Seasonings: In a small bowl, combine your garlic powder, onion powder, dried oregano, and optional red pepper flakes. This makes it easy to season the beef uniformly.
- Measure Liquids: Measure out your beef broth, milk, and Worcestershire sauce. Having everything within arm’s reach prevents frantic searching mid-cook.
- Prepare Pasta Water: Fill your large pot with water, leaving enough room for the pasta to boil without overflowing. Add 2 teaspoons of salt to the water. Do not bring it to a boil just yet, but have it ready.
With all our ingredients prepped and ready to go, we’re well on our way to creating a fantastic Philly Cheesesteak Pasta that will surely impress!
Cooking the Philly Cheesesteak Components:
Now that our mise en place is complete, let’s start bringing the delicious flavors of a classic Philly cheesesteak to life, setting the stage for our amazing Philly Cheesesteak Pasta.
Sautéing the Vegetables:
- Heat the Pan: Place your large skillet or cast-iron pan over medium-high heat. Add 1 tablespoon of olive oil. Once shimmering, add your thinly sliced onions and bell peppers to the hot pan.
- Sauté Until Tender: Sauté the vegetables for about 8-10 minutes, stirring occasionally, until they become tender, slightly caramelized, and fragrant. We’re looking for that lovely sweetness from the cooked onions and the softening of the peppers. Don’t rush this step, as developing a good flavor base here is key for our Philly Cheesesteak Pasta. Season lightly with a pinch of salt and pepper as they cook.
- Add Garlic: Once the vegetables are tender, add your minced garlic to the pan. Cook for just 1 minute more, stirring constantly, until the garlic is fragrant. Be careful not to burn it!
- Remove from Pan: Transfer the cooked onion, bell peppers, and garlic to a separate bowl and set aside. We’ll add them back in later, but cooking them separately ensures they reach the perfect tenderness without overcrowding the pan when we cook the beef.
Cooking the Beef:
This is where the “cheesesteak” magic truly begins for our Philly Cheesesteak Pasta. Getting the beef just right is essential!
- Reheat the Pan: Return the same large skillet to high heat. Add the remaining 1 tablespoon of olive oil. We want the pan to be very hot to get a good sear on our thinly sliced beef.
- Sear the Beef in Batches (if necessary): Add the thinly sliced beef to the hot pan. If you have a lot of beef, it’s best to do this in two batches to avoid overcrowding the pan, which would steam the meat instead of searing it. Overcrowding cools the pan too much. Spread the beef out in a single layer.
- Season and Cook Quickly: Immediately sprinkle the beef with your pre-mixed garlic powder, onion powder, dried oregano, and red pepper flakes (if using). Season generously with salt and freshly ground black pepper. Cook for only 2-3 minutes, stirring and breaking up the meat with your spatula, until it’s just browned and cooked through. Remember, because it’s so thin, it cooks very quickly. We want tender, flavorful beef, not tough, overcooked pieces.
- Add Worcestershire: Once the beef is cooked, stir in the tablespoon of Worcestershire sauce. This adds a wonderful savory depth and umami that truly enhances the beefy flavor. Cook for another 30 seconds, just to allow the sauce to coat the meat.
- Combine with Vegetables: Return the sautéed onions, bell peppers, and garlic to the pan with the cooked beef. Stir everything together gently to combine. Remove the pan from the heat for now and set aside. The hard work of the “Philly” part of our Philly Cheesesteak Pasta is almost done!
Preparing the Pasta:
While our beef and veggies are resting, let’s get our pasta cooked perfectly to complement our creamy Philly Cheesesteak Pasta sauce.
- Boil Water: Place your large pot of salted water (which you prepared earlier) over high heat and bring it to a rolling boil.
- Cook the Pasta: Once the water is boiling vigorously, add your pound of short-cut pasta. Stir immediately to prevent the pasta from sticking together. Cook according to the package directions until it is al dente – meaning “to the tooth,” or slightly firm when bitten. It should still have a little bite to it. This usually takes about 8-12 minutes, depending on the pasta shape.
- Reserve Pasta Water: This is a critical step! Before draining, scoop out about 1 to 1 ½ cups of the starchy pasta water. This liquid is pure gold for our sauce. It will help emulsify our cheese sauce, making it silky smooth and ensuring it clings beautifully to every piece of our Philly Cheesesteak Pasta.
- Drain Pasta: Drain the cooked pasta thoroughly in a colander. Do not rinse the pasta, as the starch on its surface helps the sauce adhere. Set aside.
Crafting the Creamy Cheese Sauce for our Philly Cheesesteak Pasta:
This is where the “cheese” in Philly Cheesesteak Pasta really shines! A rich, velvety cheese sauce is what elevates this dish from simply meat and pasta to an unforgettable experience. We’re going to build a beautiful béchamel-based cheese sauce.
- Make the Roux: In your empty large pot or Dutch oven (the one you used for pasta, now drained), melt 3 tablespoons of unsalted butter over medium heat. Once the butter is melted and sizzling, sprinkle in the 3 tablespoons of all-purpose flour. Whisk continuously for 1-2 minutes, creating a smooth paste called a roux. This cooks out the raw flour taste and will thicken our sauce. The roux should be pale yellow, not brown.
- Gradually Add Broth: Slowly, and I mean slowly, pour in the 2 cups of beef broth, whisking constantly to prevent lumps. It will seem very thick at first, but keep whisking until it’s smooth. Bring the mixture to a gentle simmer, still whisking. It will start to thicken beautifully.
- Incorporate Milk/Half-and-Half: Next, gradually whisk in the 1 cup of whole milk or half-and-half. Continue to whisk gently as the sauce comes back to a simmer and continues to thicken. We’re looking for a creamy consistency that coats the back of a spoon.
- Melt the Cheese: Reduce the heat to low. Now for the star of the show! Add your 2 cups of shredded cheese (provolone, cheddar, Monterey Jack – or your preferred blend) and about ¼ cup of the grated Parmesan cheese. Stir constantly with your whisk or a wooden spoon until all the cheese has melted into a smooth, luscious sauce. Resist the urge to turn the heat up too high, as this can make the cheese separate or become grainy. Low and slow is the way to go for a perfectly smooth cheese sauce for our Philly Cheesesteak Pasta.
- Season the Sauce: Taste the cheese sauce and season with salt and freshly ground black pepper as needed. Remember that cheese can be quite salty already, so add a little at a time. The richness of this sauce is absolutely divine!
Combining Everything to Create Your Philly Cheesesteak Pasta:
This is the moment all our hard work comes together! We’re about to transform individual components into a cohesive, incredibly flavorful, and comforting Philly Cheesesteak Pasta dish.
- Add the Cooked Pasta: Gently add the drained, al dente pasta directly into the pot with your creamy cheese sauce. Toss the pasta carefully with tongs or a large spoon, ensuring every single noodle is thoroughly coated in that rich, cheesy goodness.
- Fold in the Beef and Vegetables: Now, add the cooked beef and vegetable mixture from the skillet into the pot with the pasta and sauce. Gently fold everything together. Take your time to distribute the flavorful beef, tender onions, and bell peppers evenly throughout the pasta. You want every bite of our Philly Cheesesteak Pasta to be packed with that authentic flavor.
- Adjust Consistency with Pasta Water: If your Philly Cheesesteak Pasta mixture seems a little too thick or dry, now is the time to add some of that reserved pasta water, a splash at a time. Stir it in thoroughly. The starches in the pasta water will help to loosen the sauce and make it even silkier, ensuring it clings beautifully to all the ingredients. I usually start with about ½ cup and add more if needed until I reach my desired creamy consistency.
- Final Seasoning Check: Taste the Philly Cheesesteak Pasta once more. Adjust any seasonings as necessary. You might want a little more salt, pepper, or perhaps a tiny pinch of garlic powder to really round out the flavors. This is your chance to make it absolutely perfect for your palate.
- Heat Through Gently: Continue to cook over low heat for another 2-3 minutes, stirring occasionally, just to ensure everything is heated through and the flavors have completely melded together. Be careful not to overcook or boil the sauce, as this can cause the cheese to separate. We want a smooth, cohesive Philly Cheesesteak Pasta, ready to be devoured.
Serving Suggestions and Enjoyment:
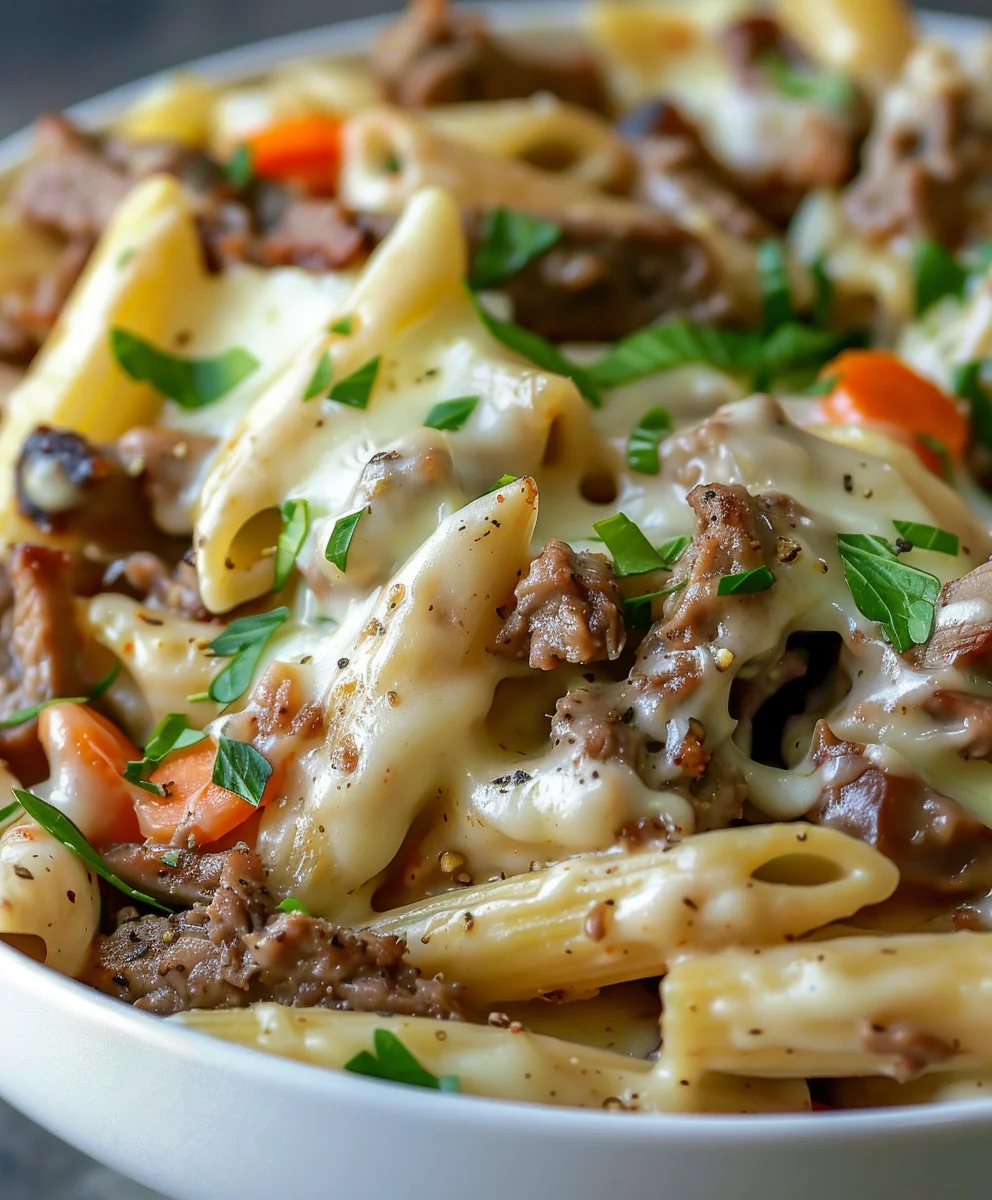
Our magnificent Philly Cheesesteak Pasta is now ready to shine! This dish is a complete meal in itself, a hearty and satisfying blend of savory beef, tender vegetables, and a luscious cheese sauce. It truly brings the iconic flavors of a classic Philly cheesesteak into a comforting, pasta-filled embrace. There’s something incredibly satisfying about transforming a beloved sandwich into a family-style dinner, and this recipe does just that, creating an irresistible Philly Cheesesteak Pasta that will have everyone asking for seconds.
Serve generous portions of your hot and steamy Philly Cheesesteak Pasta immediately. For an extra touch of freshness and color, I love to garnish each serving with a sprinkle of fresh chopped parsley or chives. A little extra grated Parmesan cheese on top never hurt anyone either, adding another layer of cheesy goodness. This Philly Cheesesteak Pasta is perfect on its own, but if you’re looking for a little something on the side, a simple green salad with a light vinaigrette or some crusty garlic bread would be wonderful complements to cut through the richness. Enjoy the fruits of your labor, and savor every single bite of this incredible Philly Cheesesteak Pasta!
Ingredients:
- For the Pasta:
- 1 pound (450g) short-cut pasta (such as penne, rotini, cavatappi, or medium shells)
- 2 teaspoons salt (for pasta water)
- For the Beef and Vegetables:
- 1 ½ pounds (680g) thinly sliced beef (shaved steak, ribeye, or sirloin, preferably frozen slightly for easier slicing)
- 2 tablespoons olive oil, divided
- 1 large yellow onion, thinly sliced
- 2 medium bell peppers (I love a mix of green and red for color and flavor), thinly sliced
- 4-5 cloves garlic, minced
- 1 teaspoon garlic powder
- 1 teaspoon onion powder
- ½ teaspoon dried oregano
- ¼ teaspoon red pepper flakes (optional, for a hint of heat)
- 1 tablespoon Worcestershire sauce
- Salt and freshly ground black pepper to taste
- For the Creamy Cheese Sauce:
- 3 tablespoons unsalted butter
- 3 tablespoons all-purpose flour
- 2 cups beef broth (low sodium preferred)
- 1 cup whole milk or half-and-half
- 2 cups (about 8 ounces) shredded cheese (a mix of sharp white cheddar, provolone, and Monterey Jack works beautifully; or just use one of your favorites!)
- ½ cup freshly grated Parmesan cheese (for melting into the sauce and a little extra for garnish)
- Salt and freshly ground black pepper to taste
- For Garnish (Optional):
- Fresh chopped parsley or chives
- Extra shredded Parmesan cheese
Equipment You’ll Need:
Before we dive into creating our incredible Philly Cheesesteak Pasta, let’s make sure we have the right tools ready. A well-prepared kitchen makes the cooking process so much smoother and more enjoyable. You’ll want to have on hand:
- A large heavy-bottomed pot or Dutch oven (for cooking the pasta and combining everything)
- A large skillet or cast-iron pan (for searing the beef and sautéing vegetables)
- A sturdy cutting board and a sharp chef’s knife
- A colander for draining the pasta
- Measuring cups and spoons
- A whisk (for our glorious cheese sauce!)
- A wooden spoon or spatula
- Cheese grater (if you’re shredding your own cheese, which I highly recommend for better melting!)
Preparation and Mise en Place:
Friends, the secret to a stress-free and delicious cooking experience, especially when making a dish as multi-layered as this Philly Cheesesteak Pasta, is undoubtedly “mise en place” – everything in its place. Taking the time to prepare all your ingredients beforehand will make the actual cooking feel like a dance, not a race. Trust me on this one; you’ll thank yourself later!
- Thinly Slice the Beef: This is a crucial step for achieving that classic Philly cheesesteak texture in our pasta. If your beef isn’t already shaved, I highly recommend freezing it for about 30-45 minutes. This firms it up just enough to make it incredibly easy to slice against the grain into very thin strips, almost like paper. The thinner, the better, as it cooks quickly and becomes wonderfully tender, melting into our pasta dish. Once sliced, set it aside.
- Prepare the Vegetables: Grab your trusty knife and cutting board. First, peel and thinly slice your large yellow onion. We want nice, long, tender strands of onion to melt with the beef. Next, core and thinly slice your bell peppers. A mix of green and red bell peppers not only adds fantastic color but also depth of flavor. Mince your garlic cloves. Having these prepped and ready will allow you to quickly add them to the pan when the time comes.
- Shred the Cheese: While pre-shredded cheese is convenient, freshly shredded cheese melts much more smoothly and tastes richer. Take a few extra minutes to shred your provolone, sharp white cheddar, or Monterey Jack. Also, grate your Parmesan cheese. Keep these separate for now.
- Measure Dry Seasonings: In a small bowl, combine your garlic powder, onion powder, dried oregano, and optional red pepper flakes. This makes it easy to season the beef uniformly.
- Measure Liquids: Measure out your beef broth, milk, and Worcestershire sauce. Having everything within arm’s reach prevents frantic searching mid-cook.
- Prepare Pasta Water: Fill your large pot with water, leaving enough room for the pasta to boil without overflowing. Add 2 teaspoons of salt to the water. Do not bring it to a boil just yet, but have it ready.
With all our ingredients prepped and ready to go, we’re well on our way to creating a fantastic Philly Cheesesteak Pasta that will surely impress!
Cooking the Philly Cheesesteak Components:
Now that our mise en place is complete, let’s start bringing the delicious flavors of a classic Philly cheesesteak to life, setting the stage for our amazing Philly Cheesesteak Pasta.
Sautéing the Vegetables:
- Heat the Pan: Place your large skillet or cast-iron pan over medium-high heat. Add 1 tablespoon of olive oil. Once shimmering, add your thinly sliced onions and bell peppers to the hot pan.
- Sauté Until Tender: Sauté the vegetables for about 8-10 minutes, stirring occasionally, until they become tender, slightly caramelized, and fragrant. We’re looking for that lovely sweetness from the cooked onions and the softening of the peppers. Don’t rush this step, as developing a good flavor base here is key for our Philly Cheesesteak Pasta. Season lightly with a pinch of salt and pepper as they cook.
- Add Garlic: Once the vegetables are tender, add your minced garlic to the pan. Cook for just 1 minute more, stirring constantly, until the garlic is fragrant. Be careful not to burn it!
- Remove from Pan: Transfer the cooked onion, bell peppers, and garlic to a separate bowl and set aside. We’ll add them back in later, but cooking them separately ensures they reach the perfect tenderness without overcrowding the pan when we cook the beef.
Cooking the Beef:
This is where the “cheesesteak” magic truly begins for our Philly Cheesesteak Pasta. Getting the beef just right is essential!
- Reheat the Pan: Return the same large skillet to high heat. Add the remaining 1 tablespoon of olive oil. We want the pan to be very hot to get a good sear on our thinly sliced beef.
- Sear the Beef in Batches (if necessary): Add the thinly sliced beef to the hot pan. If you have a lot of beef, it’s best to do this in two batches to avoid overcrowding the pan, which would steam the meat instead of searing it. Overcrowding cools the pan too much. Spread the beef out in a single layer.
- Season and Cook Quickly: Immediately sprinkle the beef with your pre-mixed garlic powder, onion powder, dried oregano, and red pepper flakes (if using). Season generously with salt and freshly ground black pepper. Cook for only 2-3 minutes, stirring and breaking up the meat with your spatula, until it’s just browned and cooked through. Remember, because it’s so thin, it cooks very quickly. We want tender, flavorful beef, not tough, overcooked pieces.
- Add Worcestershire: Once the beef is cooked, stir in the tablespoon of Worcestershire sauce. This adds a wonderful savory depth and umami that truly enhances the beefy flavor. Cook for another 30 seconds, just to allow the sauce to coat the meat.
- Combine with Vegetables: Return the sautéed onions, bell peppers, and garlic to the pan with the cooked beef. Stir everything together gently to combine. Remove the pan from the heat for now and set aside. The hard work of the “Philly” part of our Philly Cheesesteak Pasta is almost done!
Preparing the Pasta:
While our beef and veggies are resting, let’s get our pasta cooked perfectly to complement our creamy Philly Cheesesteak Pasta sauce.
- Boil Water: Place your large pot of salted water (which you prepared earlier) over high heat and bring it to a rolling boil.
- Cook the Pasta: Once the water is boiling vigorously, add your pound of short-cut pasta. Stir immediately to prevent the pasta from sticking together. Cook according to the package directions until it is al dente – meaning “to the tooth,” or slightly firm when bitten. It should still have a little bite to it. This usually takes about 8-12 minutes, depending on the pasta shape.
- Reserve Pasta Water: This is a critical step! Before draining, scoop out about 1 to 1 ½ cups of the starchy pasta water. This liquid is pure gold for our sauce. It will help emulsify our cheese sauce, making it silky smooth and ensuring it clings beautifully to every piece of our Philly Cheesesteak Pasta.
- Drain Pasta: Drain the cooked pasta thoroughly in a colander. Do not rinse the pasta, as the starch on its surface helps the sauce adhere. Set aside.
Crafting the Creamy Cheese Sauce for our Philly Cheesesteak Pasta:
This is where the “cheese” in Philly Cheesesteak Pasta really shines! A rich, velvety cheese sauce is what elevates this dish from simply meat and pasta to an unforgettable experience. We’re going to build a beautiful béchamel-based cheese sauce.
- Make the Roux: In your empty large pot or Dutch oven (the one you used for pasta, now drained), melt 3 tablespoons of unsalted butter over medium heat. Once the butter is melted and sizzling, sprinkle in the 3 tablespoons of all-purpose flour. Whisk continuously for 1-2 minutes, creating a smooth paste called a roux. This cooks out the raw flour taste and will thicken our sauce. The roux should be pale yellow, not brown.
- Gradually Add Broth: Slowly, and I mean slowly, pour in the 2 cups of beef broth, whisking constantly to prevent lumps. It will seem very thick at first, but keep whisking until it’s smooth. Bring the mixture to a gentle simmer, still whisking. It will start to thicken beautifully.
- Incorporate Milk/Half-and-Half: Next, gradually whisk in the 1 cup of whole milk or half-and-half. Continue to whisk gently as the sauce comes back to a simmer and continues to thicken. We’re looking for a creamy consistency that coats the back of a spoon.
- Melt the Cheese: Reduce the heat to low. Now for the star of the show! Add your 2 cups of shredded cheese (provolone, cheddar, Monterey Jack – or your preferred blend) and about ¼ cup of the grated Parmesan cheese. Stir constantly with your whisk or a wooden spoon until all the cheese has melted into a smooth, luscious sauce. Resist the urge to turn the heat up too high, as this can make the cheese separate or become grainy. Low and slow is the way to go for a perfectly smooth cheese sauce for our Philly Cheesesteak Pasta.
- Season the Sauce: Taste the cheese sauce and season with salt and freshly ground black pepper as needed. Remember that cheese can be quite salty already, so add a little at a time. The richness of this sauce is absolutely divine!
Combining Everything to Create Your Philly Cheesesteak Pasta:
This is the moment all our hard work comes together! We’re about to transform individual components into a cohesive, incredibly flavorful, and comforting Philly Cheesesteak Pasta dish.
- Add the Cooked Pasta: Gently add the drained, al dente pasta directly into the pot with your creamy cheese sauce. Toss the pasta carefully with tongs or a large spoon, ensuring every single noodle is thoroughly coated in that rich, cheesy goodness.
- Fold in the Beef and Vegetables: Now, add the cooked beef and vegetable mixture from the skillet into the pot with the pasta and sauce. Gently fold everything together. Take your time to distribute the flavorful beef, tender onions, and bell peppers evenly throughout the pasta. You want every bite of our Philly Cheesesteak Pasta to be packed with that authentic flavor.
- Adjust Consistency with Pasta Water: If your Philly Cheesesteak Pasta mixture seems a little too thick or dry, now is the time to add some of that reserved pasta water, a splash at a time. Stir it in thoroughly. The starches in the pasta water will help to loosen the sauce and make it even silkier, ensuring it clings beautifully to all the ingredients. I usually start with about ½ cup and add more if needed until I reach my desired creamy consistency.
- Final Seasoning Check: Taste the Philly Cheesesteak Pasta once more. Adjust any seasonings as necessary. You might want a little more salt, pepper, or perhaps a tiny pinch of garlic powder to really round out the flavors. This is your chance to make it absolutely perfect for your palate.
- Heat Through Gently: Continue to cook over low heat for another 2-3 minutes, stirring occasionally, just to ensure everything is heated through and the flavors have completely melded together. Be careful not to overcook or boil the sauce, as this can cause the cheese to separate. We want a smooth, cohesive Philly Cheesesteak Pasta, ready to be devoured.
Serving Suggestions and Enjoyment:
Our magnificent Philly Cheesesteak Pasta is now ready to shine! This dish is a complete meal in itself, a hearty and satisfying blend of savory beef, tender vegetables, and a luscious cheese sauce. It truly brings the iconic flavors of a classic Philly cheesesteak into a comforting, pasta-filled embrace. There’s something incredibly satisfying about transforming a beloved sandwich into a family-style dinner, and this recipe does just that, creating an irresistible Philly Cheesesteak Pasta that will have everyone asking for seconds.
Serve generous portions of your hot and steamy Philly Cheesesteak Pasta immediately. For an extra touch of freshness and color, I love to garnish each serving with a sprinkle of fresh chopped parsley or chives. A little extra grated Parmesan cheese on top never hurt anyone either, adding another layer of cheesy goodness. This Philly Cheesesteak Pasta is perfect on its own, but if you’re looking for a little something on the side, a simple green salad with a light vinaigrette or some crusty garlic bread would be wonderful complements to cut through the richness. Enjoy the fruits of your labor, and savor every single bite of this incredible Philly Cheesesteak Pasta!
Conclusion:
Well, my friends, we’ve reached the end of our culinary journey, and I genuinely hope you’re as excited to whip up this dish as I am every single time I make it. This isn’t just another pasta recipe; it’s a revelation, a heartwarming, flavor-packed experience that brings the iconic tastes of a classic sandwich into a comforting, incredibly satisfying bowl of noodles. I truly believe that once you try this, it will secure a permanent spot in your weeknight dinner rotation, becoming a go-to for those evenings when you crave something truly special without spending hours in the kitchen. It’s the kind of meal that feels indulgent yet surprisingly straightforward to prepare, making it a perfect candidate for busy weeknights or relaxed weekend gatherings. The magic really lies in how effortlessly it combines the rich, savory essence of thinly sliced beef, the sweet whisper of caramelized onions and peppers, and the gooey embrace of melted cheese, all enrobed in a luscious, savory sauce that clings perfectly to every strand of pasta. It’s a symphony of textures and flavors that dances on your palate, offering a delightful twist on familiar comforts. Trust me, the aroma alone as it simmers on your stove will have everyone in your household eagerly asking, “When’s dinner ready?”
What truly sets this particular recipe apart, making our Philly Cheesesteak Pasta a must-try, is its brilliant fusion. We’ve taken the beloved, iconic flavors of a traditional Philly cheesesteak – the perfectly seared, tender steak, the soft, sweet bell peppers and onions, and the irresistible, melted cheese – and ingeniously folded them into a comforting, saucy pasta dish. This isn’t just a gimmick; it’s a thoughtful marriage of two comfort food champions, resulting in a dish that offers the best of both worlds. You get the hearty satisfaction of a steak sandwich without the bread, coupled with the soul-soothing embrace of pasta. It’s incredibly versatile, satisfying a wide array of palates, from the pickiest eaters to the most discerning foodies. The ease with which this dish comes together is another huge selling point. Despite its complex flavor profile, the steps are simple, logical, and designed for success, even for novice cooks. You’re not just making dinner; you’re crafting an experience, a memory-making meal that’s bound to elicit smiles and requests for second helpings. It truly is a celebration of flavor and convenience, promising a delicious outcome every single time you prepare it.
Elevate Your Meal: Serving Suggestions
Now that you’ve created this masterpiece, let’s talk about how to serve it to truly complete the dining experience. While our pasta dish is undeniably a standalone star, a few thoughtful accompaniments can elevate it even further. For a fresh contrast, I love serving it alongside a crisp, vibrant green salad with a light vinaigrette. The bright acidity of the dressing and the fresh crunch of the greens cut through the richness of the pasta beautifully, offering a refreshing counterpoint. Another fantastic option is a simple garlic bread or crusty Italian bread, perfect for soaking up every last bit of that savory, cheesy sauce – trust me, you won’t want to waste a drop! If you’re looking to make it a more substantial meal, consider a side of roasted asparagus or broccoli, seasoned simply with a little olive oil, salt, and pepper. Their earthy notes complement the robust flavors of the beef and cheese. And don’t forget the beverages! A bold red wine, like a Cabernet Sauvignon or Merlot, pairs wonderfully with the savory steak and cheese. For non-alcoholic options, a refreshing iced tea or even a sparkling apple cider can be a delightful accompaniment, providing a clean palate cleanser between bites of this delightful creation. Think about garnishing with a sprinkle of fresh parsley or a dash of red pepper flakes for an extra pop of color and a subtle kick, respectively. These small touches truly transform a great meal into an extraordinary one.
Customizing Your Philly Cheesesteak Pasta Experience
One of the best things about cooking is the freedom to make a recipe truly your own, and this pasta is wonderfully adaptable. Don’t hesitate to experiment with variations to suit your taste or what you have on hand. For a different cheesy twist, instead of provolone, try using a blend of mozzarella and Monterey Jack for an even gooier, milder cheese pull, or a sharp cheddar for a more pronounced flavor. If you’re looking to add more vegetables, sautéed mushrooms, extra bell peppers (perhaps some red or yellow ones for more color!), or even a handful of spinach wilted in at the end can be fantastic additions, boosting both nutrition and flavor. For those who enjoy a bit of heat, a pinch of cayenne pepper or a dash of hot sauce stirred into the sauce will give it a lively kick, or you can top individual servings with pickled jalapeños. While steak is traditional, you could certainly try thinly sliced chicken breast for a “chicken Philly cheesesteak pasta” version, adjusting the cooking time accordingly. Vegetarian? Consider using sliced portobello mushrooms or a plant-based beef substitute, seasoned well, to capture that savory umami. The possibilities are truly endless, allowing you to tailor this comforting dish to your personal preferences, dietary needs, or simply to use up ingredients lurking in your fridge. Feel empowered to get creative – that’s where the real culinary fun begins!
Your Turn to Shine!
Now, it’s your turn to experience the magic of this dish firsthand. I sincerely urge you to gather your ingredients, set aside an evening, and dive into making this incredible Philly Cheesesteak Pasta. Don’t be shy about making it your own with any of the variations we discussed, or even coming up with new ones! The joy of cooking is in the creation and the sharing. Once you’ve made it, I would absolutely love to hear all about your experience. Did you add a secret ingredient? Did you serve it with a surprising side? What did your family and friends think? Please come back and share your thoughts in the comments below! Your insights, tips, and photos inspire not just me, but also countless other home cooks who are looking for their next favorite meal. Nothing makes me happier than seeing your culinary triumphs and hearing how a recipe has brought joy to your kitchen. So, go forth, cook up a storm, and prepare to fall in love with what I believe is one of the most exciting and delicious pasta dishes you’ll ever make. Happy cooking, and I can’t wait to hear from you!
Philly Cheesesteak Pasta: Easy & Cheesy Weeknight Meal
We’ve taken all the irresistible elements—succulent beef, sweet sautéed onions and peppers, and unmistakable ooey-gooey cheese—and transformed them into a hearty, comforting pasta dish that’s perfect for any night of the week.
Ingredients
-
1 lb short-cut pasta (e.g., penne)
-
2 tsp salt (for pasta water)
-
1.5 lbs thinly sliced beef steak
-
2 tbsp olive oil, divided
-
1 large yellow onion, thinly sliced
-
2 medium bell peppers, thinly sliced
-
4-5 cloves garlic, minced
-
1 tsp garlic powder
-
1 tsp onion powder
-
0.5 tsp dried oregano
-
0.25 tsp red pepper flakes (optional)
-
1 tbsp Worcestershire sauce
-
Salt & black pepper to taste
-
3 tbsp unsalted butter
-
3 tbsp all-purpose flour
-
2 cups low-sodium beef broth
-
1 cup whole milk or half-and-half
-
2 cups (8 oz) shredded cheese (cheddar, provolone, Monterey Jack mix)
-
0.5 cup grated Parmesan cheese
-
Fresh parsley or chives (for garnish, optional)
-
Extra Parmesan cheese (for garnish, optional)
Instructions
-
Step 1
Freeze beef for 30-45 minutes for easier slicing; thinly slice against the grain. Thinly slice onion and bell peppers. Mince garlic. Shred cheeses. Measure out dry seasonings, broth, milk, and Worcestershire sauce. Fill a large pot with salted water for pasta. -
Step 2
Heat 1 tbsp olive oil in a large skillet over medium-high heat. Sauté sliced onions and bell peppers for 8-10 minutes until tender and slightly caramelized. Add minced garlic and cook for 1 minute until fragrant. Transfer to a separate bowl. -
Step 3
Reheat the same skillet with 1 tbsp olive oil over high heat. Sear thinly sliced beef in batches for 2-3 minutes per batch until browned, seasoning with garlic powder, onion powder, oregano, red pepper flakes, salt, and pepper. Stir in Worcestershire sauce and cook for 30 seconds. Return sautéed vegetables to the pan with the beef and mix. Remove from heat. -
Step 4
Bring the large pot of salted water to a rolling boil. Cook pasta according to package directions until al dente. Before draining, reserve 1 to 1.5 cups of the starchy pasta water. Drain pasta thoroughly (do not rinse) and set aside. -
Step 5
In the empty pasta pot, melt 3 tbsp unsalted butter over medium heat. Whisk in 3 tbsp all-purpose flour for 1-2 minutes to form a pale roux. Gradually whisk in 2 cups beef broth, then 1 cup whole milk or half-and-half, bringing to a gentle simmer while whisking until thickened. Reduce heat to low, add 2 cups shredded cheese and 1/4 cup Parmesan cheese. Stir constantly until melted into a smooth, luscious sauce. Season with salt and pepper to taste. -
Step 6
Add the drained pasta to the creamy cheese sauce. Toss carefully to coat every noodle. Fold in the cooked beef and vegetable mixture, ensuring even distribution. -
Step 7
If the pasta mixture seems too thick, add reserved pasta water a splash at a time until desired creamy consistency is reached. Heat gently over low heat for another 2-3 minutes, stirring, until heated through and flavors are melded. Taste and adjust seasonings as needed. Serve immediately, garnished with fresh parsley/chives and extra Parmesan cheese, if desired.
Important Information
Nutrition Facts (Per Serving)
It is important to consider this information as approximate and not to use it as definitive health advice.
Allergy Information
Please check ingredients for potential allergens and consult a health professional if in doubt.