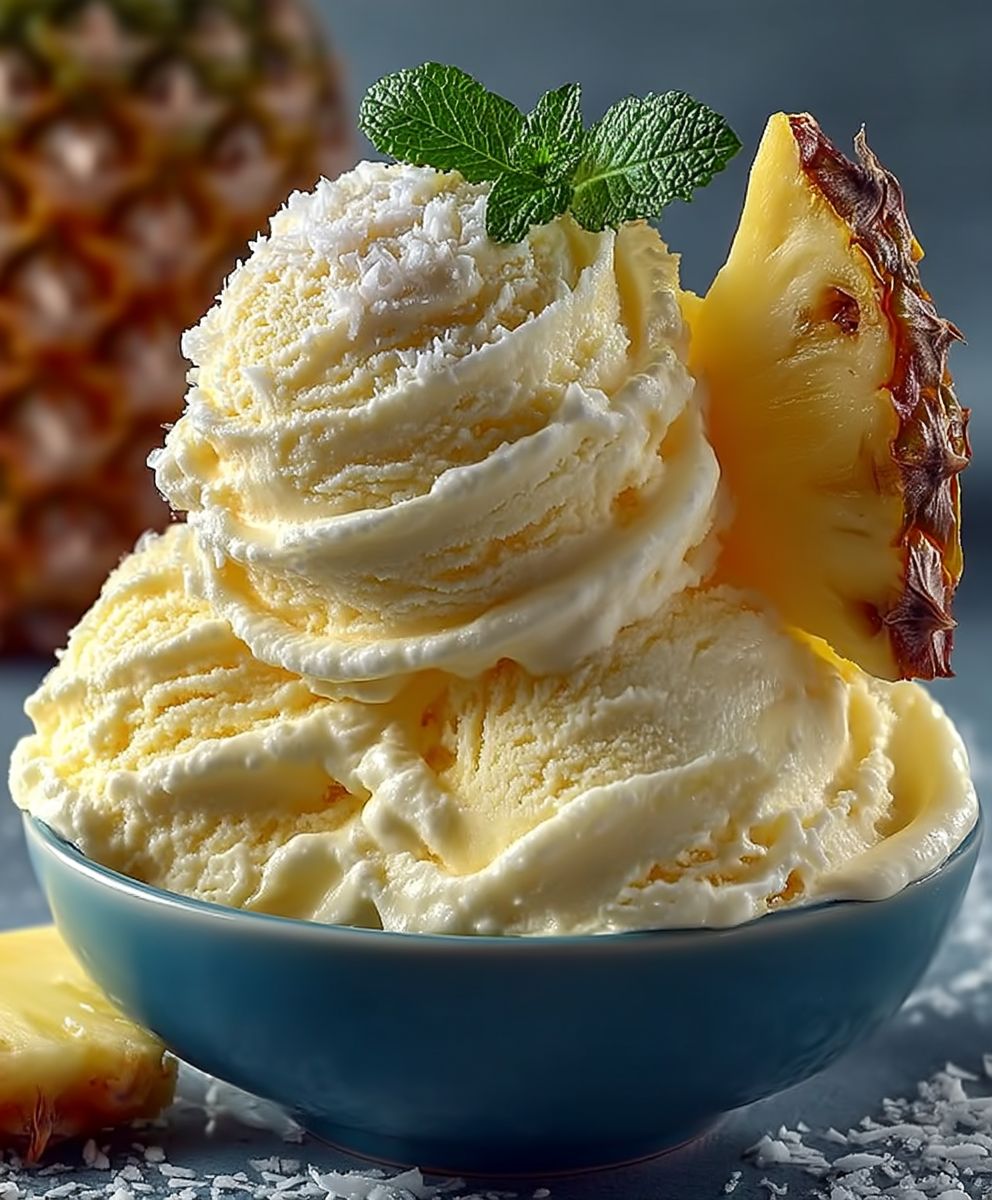
Pineapple ice cream homemade – just the thought conjures up images of sunny beaches, tropical breezes, and the sweet, tangy taste of paradise! Forget the store-bought stuff loaded with artificial flavors; we’re diving headfirst into creating a creamy, dreamy frozen treat that will transport your taste buds to a tropical oasis.
While the exact origins of pineapple ice cream are a bit hazy, the combination of pineapple and frozen desserts has a rich history, particularly in tropical regions where pineapples thrive. Think about the shaved ice desserts of Hawaii or the refreshing pineapple sorbets enjoyed throughout Southeast Asia. These culinary traditions paved the way for the creamy delight we know and love today.
What makes pineapple ice cream homemade so irresistible? It’s the perfect balance of sweet and tart, the creamy texture that melts in your mouth, and the sheer convenience of whipping up a batch in your own kitchen. Plus, there’s something incredibly satisfying about knowing exactly what ingredients are going into your dessert. No artificial colors, no preservatives, just pure, unadulterated pineapple goodness. So, grab your ice cream maker (or don’t, we have a no-churn option too!), and let’s embark on this delicious adventure together!

Ingredients:
- 1 large ripe pineapple (about 3-4 pounds), peeled, cored, and chopped
- 1 cup granulated sugar
- 1/2 cup water
- 2 cups heavy cream
- 1 cup whole milk
- 1/4 cup light corn syrup (optional, for smoother texture)
- 1 tablespoon lemon juice (to brighten the flavor)
- 1/2 teaspoon vanilla extract (optional, for added depth)
- Pinch of salt
Preparing the Pineapple Base:
Okay, let’s get started! The key to amazing pineapple ice cream is, of course, the pineapple. We need to create a flavorful and concentrated pineapple base before we even think about adding the dairy.
- Puree the Pineapple: First, place your chopped pineapple into a blender or food processor. Pulse until it’s completely smooth. You might need to do this in batches depending on the size of your blender. We want a nice, even puree with no large chunks remaining.
- Cook the Pineapple Puree: Pour the pineapple puree into a medium-sized saucepan. Add the granulated sugar and water. Stir well to combine.
- Simmer and Reduce: Place the saucepan over medium heat. Bring the mixture to a gentle simmer, stirring occasionally to prevent sticking. Once simmering, reduce the heat to low and continue to simmer for about 20-30 minutes, or until the mixture has thickened slightly and the volume has reduced by about one-third. This process concentrates the pineapple flavor and helps to prevent the ice cream from becoming too icy. Keep a close eye on it and stir frequently, especially towards the end, to prevent burning.
- Strain the Pineapple Mixture (Optional): This step is optional, but I highly recommend it for a smoother ice cream texture. After simmering, pour the pineapple mixture through a fine-mesh sieve or cheesecloth-lined colander into a bowl. This will remove any remaining fibers or solids, resulting in a silkier final product. Press down on the solids with a spoon or spatula to extract as much liquid as possible. Discard the solids.
- Cool Completely: This is crucial! Allow the pineapple mixture to cool completely. You can speed up the process by placing the bowl in an ice bath or refrigerating it for at least 2 hours, or even better, overnight. The colder the mixture, the better the ice cream will churn.
Creating the Ice Cream Base:
Now that our pineapple base is cool and concentrated, we can move on to creating the creamy ice cream base. This is where the magic really happens!
- Combine Dairy and Sweeteners: In a separate bowl, whisk together the heavy cream, whole milk, light corn syrup (if using), lemon juice, vanilla extract (if using), and salt. The corn syrup helps to prevent ice crystals from forming, resulting in a smoother ice cream. The lemon juice brightens the pineapple flavor, and the vanilla extract adds a subtle depth.
- Combine Pineapple and Dairy: Once the pineapple mixture is completely cool, gently whisk it into the dairy mixture until everything is well combined. Make sure there are no lumps or streaks.
- Chill Thoroughly: Cover the ice cream base with plastic wrap, pressing it directly onto the surface to prevent a skin from forming. Refrigerate for at least 4 hours, or preferably overnight. This allows the flavors to meld together and the base to become thoroughly chilled, which is essential for proper churning.
Churning the Ice Cream:
Alright, the moment we’ve been waiting for! It’s time to churn our pineapple ice cream base into a delicious, frozen treat. Make sure your ice cream maker bowl is properly frozen according to the manufacturer’s instructions (usually at least 24 hours). A properly frozen bowl is absolutely critical for successful ice cream making.
- Prepare the Ice Cream Maker: Remove the frozen ice cream maker bowl from the freezer and place it in the ice cream maker. Assemble the machine according to the manufacturer’s instructions.
- Pour in the Ice Cream Base: Pour the chilled ice cream base into the frozen bowl.
- Churn According to Instructions: Turn on the ice cream maker and churn according to the manufacturer’s instructions. This usually takes about 20-30 minutes, or until the ice cream has reached a soft-serve consistency. The ice cream should be thick and creamy, but still slightly soft.
- Check for Consistency: Keep an eye on the ice cream as it churns. You’ll know it’s ready when it pulls away from the sides of the bowl and forms a soft, creamy mass. Be careful not to over-churn, as this can result in a grainy texture.
Freezing and Serving:
We’re almost there! Now we need to harden the ice cream in the freezer to achieve the perfect scoopable consistency.
- Transfer to a Freezer-Safe Container: Carefully transfer the soft-serve ice cream to a freezer-safe container. I prefer using a loaf pan or a container specifically designed for ice cream.
- Press Plastic Wrap: Press a piece of plastic wrap directly onto the surface of the ice cream to prevent ice crystals from forming.
- Freeze to Harden: Cover the container with a lid and freeze for at least 2-3 hours, or preferably overnight, to allow the ice cream to harden completely.
- Scoop and Serve: Once the ice cream is frozen solid, remove it from the freezer and let it sit at room temperature for a few minutes to soften slightly before scooping. This will make it easier to scoop and create perfect, creamy scoops.
- Enjoy! Serve your homemade pineapple ice cream in bowls or cones. You can also top it with fresh pineapple chunks, toasted coconut flakes, or a drizzle of caramel sauce for an extra special treat.
Tips and Variations:
Want to take your pineapple ice cream to the next level? Here are a few tips and variations to try:
- Roasted Pineapple: For an even more intense pineapple flavor, try roasting the pineapple before pureeing it. Toss the chopped pineapple with a little brown sugar and roast it in a 400°F (200°C) oven for about 20-25 minutes, or until it’s caramelized and slightly softened. Let it cool completely before pureeing.
- Coconut Cream: Replace 1 cup of the heavy cream with 1 cup of full-fat coconut cream for a tropical twist. This will add a rich, coconutty flavor that pairs perfectly with pineapple.
- Rum Infusion: Add a tablespoon or two of dark rum to the ice cream base for a boozy kick. Be careful not to add too much, as alcohol can prevent the ice cream from freezing properly.
- Spiced Pineapple: Add a pinch of ground cinnamon, nutmeg, or ginger to the pineapple puree for a warm and spicy flavor.
- Pineapple Swirl: Reserve a portion of the pineapple puree and swirl it into the ice cream after it’s been churned. This will create a beautiful marbled effect and add bursts of intense pineapple flavor.
- Storage: Homemade ice cream is best enjoyed within a week or two. Store it in an airtight container in the freezer to prevent freezer burn.
Troubleshooting:
Sometimes things don’t go exactly as planned. Here are a few common issues and how to fix them:
- Icy Ice Cream: This is usually caused by not enough fat or sugar in the base, or by not chilling the base thoroughly enough before churning. Make sure to use full-fat dairy and follow the recipe carefully.
- Grainy Ice Cream: This can be caused by over-churning or by ice crystals forming. Avoid over-churning and make sure to store the ice cream properly in an airtight container.
- Soft Ice Cream: This can be caused by a warm ice cream maker bowl or by not freezing the ice cream long enough after churning. Make sure your ice cream maker bowl is properly frozen and freeze the ice cream for at least 2-3 hours after churning.
Enjoy your delicious homemade pineapple ice cream!
Conclusion:
So, there you have it! This pineapple ice cream homemade recipe is truly a game-changer. It’s not just another dessert; it’s a burst of sunshine in every spoonful, a tropical vacation for your taste buds, and a ridiculously easy way to impress your friends and family. I know, I know, I’m gushing, but I genuinely believe this is one of those recipes that everyone should have in their repertoire.
Why is it a must-try? Well, first and foremost, the flavor is incredible. The sweetness of the pineapple is perfectly balanced by the creamy richness of the ice cream, creating a symphony of textures and tastes that will leave you wanting more. Secondly, it’s surprisingly simple to make. You don’t need any fancy equipment or complicated techniques. If you can blend ingredients and operate an ice cream maker (or even just a freezer!), you can nail this recipe. And finally, it’s a guaranteed crowd-pleaser. I’ve served this at countless gatherings, and it’s always the first thing to disappear.
But the fun doesn’t stop there! This recipe is also incredibly versatile. Feel free to experiment with different variations to suit your own preferences. For a richer, more decadent treat, try adding a splash of coconut cream or a handful of toasted coconut flakes. If you’re feeling adventurous, a pinch of chili powder or a squeeze of lime juice can add a delightful kick. And for the adults, a shot of rum or tequila will transform this into a sophisticated dessert cocktail.
Here are a few serving suggestions to get you started:
* Classic Scoop: Simply scoop the ice cream into a bowl or cone and enjoy!
* Pineapple Sundae: Top with whipped cream, chopped pineapple, maraschino cherries, and a drizzle of caramel sauce.
* Ice Cream Sandwich: Sandwich the ice cream between two graham crackers or cookies for a fun and portable treat.
* Affogato: Pour a shot of hot espresso over a scoop of the ice cream for a delightful coffee-infused dessert.
* Smoothie Booster: Add a scoop to your favorite smoothie for a tropical twist.
Don’t be afraid to get creative and come up with your own unique serving ideas! The possibilities are endless.
I truly believe that making your own pineapple ice cream homemade is an experience worth having. It’s a chance to connect with your food, to experiment with flavors, and to create something truly special. So, I urge you to give this recipe a try. Gather your ingredients, dust off your ice cream maker (or clear some space in your freezer), and get ready to embark on a delicious adventure.
And most importantly, I want to hear about your experience! Did you love it? Did you make any modifications? What were your favorite serving suggestions? Share your thoughts, photos, and stories in the comments below. I can’t wait to see what you create! Happy ice cream making! I’m confident you’ll find this homemade version far superior to anything store-bought. It’s the perfect way to cool down on a hot day and enjoy the taste of summer all year round. So go ahead, treat yourself! You deserve it.
Pineapple Ice Cream Homemade: The Ultimate Guide to Making It
Creamy, homemade pineapple ice cream with a concentrated pineapple flavor. A refreshing and tropical treat!
Ingredients
Instructions
Recipe Notes
- For an even more intense pineapple flavor, try roasting the pineapple before pureeing it.
- Replace 1 cup of the heavy cream with 1 cup of full-fat coconut cream for a tropical twist.
- Add a tablespoon or two of dark rum to the ice cream base for a boozy kick.
- Add a pinch of ground cinnamon, nutmeg, or ginger to the pineapple puree for a warm and spicy flavor.
- Reserve a portion of the pineapple puree and swirl it into the ice cream after it’s been churned.
- Homemade ice cream is best enjoyed within a week or two. Store it in an airtight container in the freezer to prevent freezer burn.