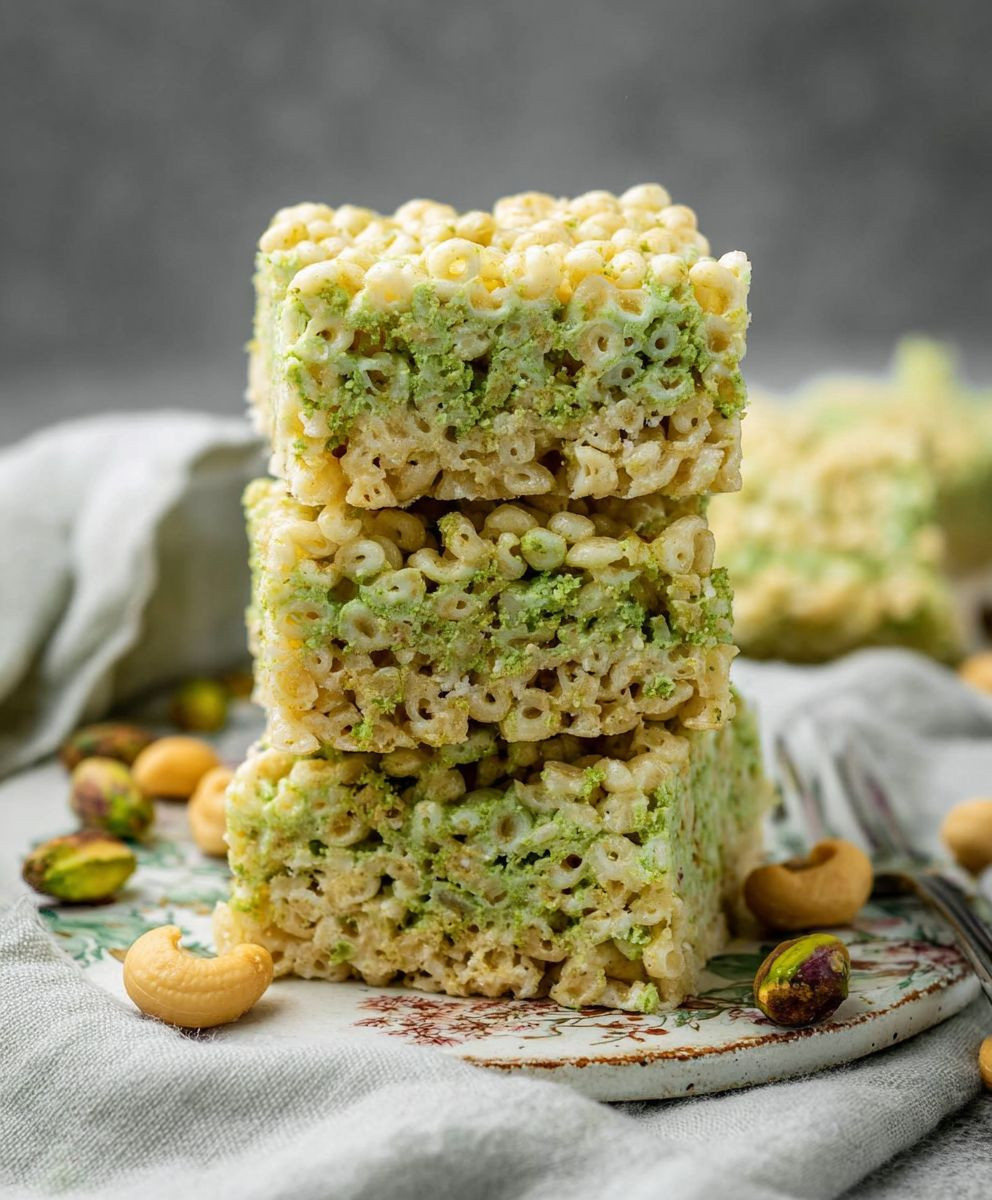
Pistachio Rice Krispie Treats: Prepare to elevate your childhood favorite to a whole new level of sophisticated deliciousness! Forget everything you thought you knew about this classic treat because we’re infusing it with the nutty, vibrant flavor of pistachios, creating a dessert that’s both nostalgic and utterly irresistible.
While Rice Krispie Treats themselves are a relatively modern invention, born in the kitchens of Kellogg’s in the 1930s, the concept of combining cereal with a sweet binder has roots in various cultures. This updated version, however, brings a touch of elegance to the humble square. The addition of pistachios not only enhances the flavor profile but also adds a delightful textural contrast to the chewy, marshmallowy base.
People adore Rice Krispie Treats for their simplicity and satisfying sweetness. They’re quick to make, require minimal ingredients, and are always a crowd-pleaser. But these Pistachio Rice Krispie Treats take it a step further. The subtle saltiness of the pistachios perfectly complements the sweetness of the marshmallows, creating a balanced and addictive flavor combination. Plus, the vibrant green hue makes them visually stunning, perfect for parties, potlucks, or simply a delightful afternoon treat. Get ready to experience a Rice Krispie Treat like never before!

Ingredients:
- 6 cups Rice Krispies cereal
- 10 oz (about 40) large marshmallows
- 4 tablespoons unsalted butter
- 1/2 cup pistachio butter (or pistachio paste)
- 1/4 teaspoon sea salt
- 1/2 cup shelled, unsalted pistachios, roughly chopped
- 2 tablespoons powdered sugar (optional, for dusting)
- 1/4 cup white chocolate chips (optional, for drizzling)
- 1 teaspoon coconut oil (optional, for melting white chocolate)
Preparing the Pistachio Rice Krispie Mixture
Okay, let’s get started! First things first, we need to prep our base. This is where the magic happens, and we transform simple ingredients into a gooey, delicious mixture that will hold our Rice Krispie treats together.
- Melt the Butter: In a large, microwave-safe bowl (or a large saucepan over low heat), melt the 4 tablespoons of unsalted butter. If you’re using the microwave, heat it in 30-second intervals, stirring in between, until completely melted. Be careful not to burn the butter! Burnt butter will give your treats an unpleasant taste. If you’re using a saucepan, keep the heat low and stir constantly to prevent burning.
- Add the Marshmallows: Once the butter is melted, add the 10 ounces of large marshmallows to the bowl (or saucepan). Stir to coat the marshmallows with the melted butter. This will help them melt evenly and prevent sticking.
- Melt the Marshmallows: If you’re using the microwave, heat the marshmallow-butter mixture in 30-second intervals, stirring well after each interval. Continue heating until the marshmallows are completely melted and smooth. This usually takes about 1-2 minutes total. Again, be careful not to overheat the marshmallows, as they can become hard and rubbery. If you’re using a saucepan, cook over low heat, stirring constantly, until the marshmallows are completely melted and smooth. This method takes a bit longer, but it gives you more control over the melting process.
- Incorporate the Pistachio Butter: Now for the star of the show – the pistachio butter! Once the marshmallows are melted and smooth, remove the bowl (or saucepan) from the heat. Add the 1/2 cup of pistachio butter (or pistachio paste) and the 1/4 teaspoon of sea salt. Stir vigorously until the pistachio butter is fully incorporated and the mixture is a uniform color. The pistachio butter will add a wonderful nutty flavor and a beautiful green hue to your Rice Krispie treats. Make sure there are no streaks of pistachio butter remaining.
- Add the Rice Krispies Cereal: This is where things get a little messy, but it’s also the most fun! Add the 6 cups of Rice Krispies cereal to the marshmallow-pistachio mixture. Gently fold the cereal into the mixture until it is evenly coated. Be careful not to crush the cereal, as you want to maintain its crispy texture. Use a large spatula or wooden spoon to gently fold the cereal in, ensuring that every piece is coated with the gooey marshmallow mixture.
- Incorporate the Pistachios: Add the 1/2 cup of roughly chopped pistachios to the mixture. Gently fold them in until they are evenly distributed throughout the Rice Krispie treats. The pistachios will add a delightful crunch and enhance the nutty flavor of the treats. Make sure the pistachios are well distributed so that every bite has a little bit of pistachio goodness.
Pressing and Setting the Treats
Now that we have our delicious pistachio Rice Krispie mixture, it’s time to press it into a pan and let it set. This is a crucial step, as it determines the shape and texture of your treats.
- Prepare the Pan: Grease a 9×13 inch baking pan with butter or cooking spray. You can also line the pan with parchment paper, leaving an overhang on the sides. This will make it easier to remove the treats from the pan later. Make sure the entire pan is well-greased or lined to prevent the treats from sticking.
- Press the Mixture into the Pan: Pour the pistachio Rice Krispie mixture into the prepared pan. Using a spatula or your hands (lightly greased with butter or cooking spray), gently press the mixture evenly into the pan. Be careful not to press too hard, as this can make the treats dense and hard. You want to create a uniform layer that is firm but still slightly soft.
- Let the Treats Set: Once the mixture is pressed into the pan, let the treats set at room temperature for at least 30 minutes, or until they are firm to the touch. This will allow the marshmallows to cool and solidify, holding the treats together. You can also place the pan in the refrigerator for a faster setting time, but be careful not to let them get too cold, as they can become hard.
Cutting and Decorating (Optional)
The final step is to cut the treats into squares and, if you’re feeling fancy, decorate them! This is where you can get creative and add your own personal touch to your pistachio Rice Krispie treats.
- Cut the Treats: Once the treats are set, use a sharp knife to cut them into squares. The size of the squares is up to you, but I usually cut them into 2-inch squares. If you lined the pan with parchment paper, you can simply lift the treats out of the pan using the overhang and then cut them on a cutting board. This makes it much easier to cut clean, even squares.
- Dust with Powdered Sugar (Optional): If you want to add a touch of sweetness and elegance, you can dust the treats with powdered sugar. Simply sprinkle a light layer of powdered sugar over the top of the treats using a sifter or a fine-mesh sieve. This will give them a beautiful, snowy appearance.
- Drizzle with White Chocolate (Optional): For an extra touch of decadence, you can drizzle the treats with melted white chocolate. Place the 1/4 cup of white chocolate chips in a microwave-safe bowl with the 1 teaspoon of coconut oil. Heat in 30-second intervals, stirring in between, until the chocolate is completely melted and smooth. Then, using a spoon or a piping bag, drizzle the melted white chocolate over the top of the treats. The white chocolate will add a creamy sweetness that complements the nutty flavor of the pistachios.
- Enjoy! Now that your pistachio Rice Krispie treats are cut and decorated (if you chose to decorate them), it’s time to enjoy them! These treats are perfect for parties, snacks, or just a little something sweet to brighten your day. Store them in an airtight container at room temperature to keep them fresh. They should last for several days, but I doubt they’ll last that long!
Tips and Tricks for Perfect Pistachio Rice Krispie Treats
Here are a few extra tips and tricks to help you make the best pistachio Rice Krispie treats ever:
- Use Fresh Marshmallows: Fresh marshmallows melt more easily and create a smoother, gooier texture. If your marshmallows are old and stale, they may not melt properly, resulting in hard or lumpy treats.
- Don’t Overheat the Marshmallows: Overheating the marshmallows can cause them to become hard and rubbery. Be sure to heat them in short intervals and stir frequently to prevent burning.
- Use High-Quality Pistachio Butter: The quality of the pistachio butter will greatly affect the flavor of your treats. Look for a pistachio butter that is made with real pistachios and has a smooth, creamy texture.
- Grease Your Hands: When pressing the mixture into the pan, lightly grease your hands with butter or cooking spray to prevent the mixture from sticking. This will make it easier to create a smooth, even layer.
- Let the Treats Set Completely: Be patient and let the treats set completely before cutting them. This will prevent them from being too sticky and messy.
- Experiment with Flavors: Feel free to experiment with different flavors and add-ins. You can try adding other nuts, dried fruits, or even chocolate chips to your Rice Krispie treats.
- Make Them Ahead of Time: Rice Krispie treats are a great make-ahead dessert. You can make them a day or two in advance and store them in an airtight container at room temperature.
Variations on Pistachio Rice Krispie Treats
Want to mix things up a bit? Here are some fun variations you can try:
- Dark Chocolate Pistachio Rice Krispie Treats: Use dark chocolate chips instead of white chocolate chips for a richer, more intense flavor.
- Salted Caramel Pistachio Rice Krispie Treats: Drizzle the treats with salted caramel sauce for a sweet and salty treat.
- Rosewater Pistachio Rice Krispie Treats: Add a teaspoon of rosewater to the marshmallow mixture for a floral and aromatic

Conclusion:
This isn’t your average childhood treat; these Pistachio Rice Krispie Treats are a sophisticated upgrade that will have everyone begging for the recipe. The nutty, slightly salty flavor of the pistachios perfectly complements the sweetness of the marshmallows and the satisfying crunch of the Rice Krispies. It’s a delightful textural and flavor experience that’s surprisingly easy to create. Trust me, once you taste the difference a handful of pistachios makes, you’ll never go back to plain Rice Krispie Treats again!
But the best part? This recipe is incredibly versatile! Feel free to experiment with different variations to suit your taste. For a richer, more decadent treat, try using brown butter instead of regular melted butter. The nutty aroma of brown butter will elevate the pistachio flavor even further. You could also add a sprinkle of sea salt on top for an extra burst of flavor that balances the sweetness beautifully.
Looking for serving suggestions? These Pistachio Rice Krispie Treats are perfect for any occasion. They make a fantastic addition to a dessert platter, a delightful afternoon snack, or even a unique party favor. Cut them into squares, triangles, or even use cookie cutters to create fun shapes for kids. For a more elegant presentation, drizzle them with melted white chocolate and sprinkle with extra chopped pistachios. Imagine serving these at your next gathering – they’re guaranteed to be a hit!
And don’t limit yourself to just pistachios! You can easily adapt this recipe to use other nuts like almonds, walnuts, or even macadamia nuts. Just be sure to adjust the amount of salt accordingly, as some nuts are naturally saltier than others. You could also add dried cranberries or cherries for a festive twist, or a touch of orange zest for a bright, citrusy flavor. The possibilities are endless!
I truly believe that these Pistachio Rice Krispie Treats are a must-try for anyone who loves a good dessert. They’re easy to make, incredibly delicious, and endlessly customizable. Plus, they’re a great way to impress your friends and family with your baking skills without spending hours in the kitchen.
So, what are you waiting for? Gather your ingredients, put on your apron, and get ready to create a batch of these irresistible treats. I’m confident that you’ll love them as much as I do. And once you’ve tried them, I’d love to hear about your experience! Share your photos and comments on social media using #PistachioRiceKrispieTreats and let me know what variations you tried. I’m always looking for new and exciting ways to elevate this classic dessert. Happy baking! I can’t wait to see what you create! Don’t forget to rate the recipe and leave a comment below to let me know what you think. Your feedback is invaluable and helps me create even better recipes for you in the future. Enjoy!
Pistachio Rice Krispie Treats: The Ultimate Guide to Making Them
Gooey, crunchy, and nutty Pistachio Rice Krispie Treats! These easy-to-make treats are elevated with pistachio butter, chopped pistachios, and an optional drizzle of white chocolate for a delightful twist on a classic favorite.
By: LilyCategory: DessertDifficulty: EasyCuisine: AmericanYield: 24 squaresDietary: VegetarianIngredients
Instructions
Recipe Notes
- Use fresh marshmallows for best results.
- Don’t overheat the marshmallows.
- Use high-quality pistachio butter.
- Grease your hands when pressing the mixture into the pan.
- Let the treats set completely before cutting.
- Experiment with flavors and add-ins.
- Make them ahead of time.
Frequently Asked Questions
→ How do I ensure the bread stays moist?Use fresh, ripe ingredients and avoid overmixing the batter. Store in an airtight container.→ Can I substitute ingredients?Yes, you can substitute similar ingredients while maintaining the basic ratios for best results.→ How long does this bread keep?Store tightly wrapped at room temperature for 2-3 days, or refrigerate for up to a week.→ What if I don't have all the spices?You can adjust spices to taste or substitute with similar warming spices.→ Can I freeze this bread?Yes, wrap individual slices and freeze for up to 3 months. Thaw at room temperature before serving.