Potato side dishes: are you ready to elevate your meal from ordinary to extraordinary? Forget the same old boring sides because we’re diving headfirst into a world of spud-tacular possibilities! I’m about to share a recipe that will make your taste buds sing and have everyone begging for seconds.
Potatoes, a humble staple in cuisines worldwide, have a rich and fascinating history. Originating in the Andes Mountains thousands of years ago, they’ve journeyed across continents, becoming a cornerstone of countless cultures. From the simple baked potato to elaborate gratins, their versatility is unmatched. In many cultures, potatoes symbolize sustenance and comfort, bringing people together around the table.
But what is it about potato side dishes that makes them so universally loved? It’s the perfect combination of textures and flavors! Whether creamy and smooth, crispy and golden, or savory and herbaceous, there’s a potato dish to satisfy every craving. Plus, they’re incredibly convenient! Potatoes are readily available, affordable, and can be prepared in countless ways. Get ready to discover a new favorite that will become a regular on your dinner table!

Ingredients:
- For the Garlic Herb Roasted Potatoes:
- 2 lbs Yukon Gold potatoes, cut into 1-inch cubes
- 4 cloves garlic, minced
- 2 tablespoons olive oil
- 1 tablespoon fresh rosemary, chopped
- 1 tablespoon fresh thyme, chopped
- 1 teaspoon dried oregano
- 1/2 teaspoon salt
- 1/4 teaspoon black pepper
- 1/4 cup grated Parmesan cheese (optional)
- For the Creamy Dill Potato Salad:
- 2 lbs red potatoes, cut into 1-inch cubes
- 1/2 cup mayonnaise
- 1/4 cup sour cream
- 2 tablespoons Dijon mustard
- 2 tablespoons fresh dill, chopped
- 1 tablespoon white wine vinegar
- 1/4 cup red onion, finely chopped
- 1 stalk celery, finely chopped
- 1/2 teaspoon salt
- 1/4 teaspoon black pepper
- For the Cheesy Scalloped Potatoes:
- 2 lbs Russet potatoes, peeled and thinly sliced (about 1/8 inch thick)
- 4 tablespoons butter
- 4 tablespoons all-purpose flour
- 3 cups milk
- 1 teaspoon salt
- 1/2 teaspoon black pepper
- 1/4 teaspoon nutmeg
- 2 cups shredded cheddar cheese
- 1/2 cup grated Parmesan cheese
- For the Crispy Smashed Potatoes:
- 2 lbs small Yukon Gold or baby potatoes
- 4 tablespoons olive oil
- 1 teaspoon garlic powder
- 1/2 teaspoon onion powder
- 1/2 teaspoon paprika
- 1/2 teaspoon salt
- 1/4 teaspoon black pepper
- Fresh parsley, chopped (for garnish)
Garlic Herb Roasted Potatoes:
- Preheat the oven: Preheat your oven to 400°F (200°C). This high temperature is key to getting those potatoes nice and crispy on the outside while staying fluffy inside.
- Prepare the potatoes: Wash and cut the Yukon Gold potatoes into 1-inch cubes. I like using Yukon Golds because they have a naturally buttery flavor and hold their shape well during roasting.
- Make the garlic herb mixture: In a large bowl, combine the minced garlic, olive oil, chopped rosemary, chopped thyme, dried oregano, salt, and pepper. Make sure the garlic is finely minced so it distributes evenly.
- Coat the potatoes: Add the cubed potatoes to the bowl with the garlic herb mixture. Toss well to ensure that all the potatoes are evenly coated. Don’t be shy – really get in there and make sure every piece is covered!
- Roast the potatoes: Spread the potatoes in a single layer on a baking sheet. Avoid overcrowding the pan, as this will steam the potatoes instead of roasting them. If necessary, use two baking sheets.
- Cook until golden brown: Roast for 30-40 minutes, or until the potatoes are tender and golden brown, flipping halfway through. Keep an eye on them – ovens can vary, and you want them perfectly roasted, not burnt!
- Add Parmesan cheese (optional): If desired, sprinkle the grated Parmesan cheese over the potatoes during the last 5 minutes of roasting. This adds a lovely cheesy crust.
- Serve: Remove from the oven and serve immediately. These are best served hot!
Creamy Dill Potato Salad:
- Boil the potatoes: Place the red potatoes in a large pot and cover with cold water. Bring to a boil and cook until the potatoes are tender when pierced with a fork, about 15-20 minutes. Don’t overcook them, or they’ll become mushy!
- Drain and cool: Drain the potatoes and let them cool slightly. You can speed up the cooling process by rinsing them with cold water.
- Make the dressing: In a large bowl, whisk together the mayonnaise, sour cream, Dijon mustard, fresh dill, and white wine vinegar. Taste and adjust the seasonings as needed. I sometimes add a pinch of sugar to balance the acidity.
- Add the potatoes and other ingredients: Add the cooled potatoes, red onion, and celery to the bowl with the dressing. Gently toss to combine.
- Season: Season with salt and pepper to taste.
- Chill: Cover and refrigerate for at least 30 minutes to allow the flavors to meld. This is important – the flavors really develop as it sits!
- Serve: Serve chilled. Garnish with extra fresh dill, if desired.
Cheesy Scalloped Potatoes:
- Preheat the oven: Preheat your oven to 350°F (175°C).
- Prepare the potatoes: Peel and thinly slice the Russet potatoes. A mandoline slicer can be helpful for achieving uniform thickness, but a sharp knife works too. Aim for about 1/8 inch thick.
- Make the cheese sauce: In a medium saucepan, melt the butter over medium heat. Whisk in the flour and cook for 1-2 minutes, stirring constantly, to create a roux.
- Add the milk: Gradually whisk in the milk, stirring constantly to prevent lumps from forming.
- Simmer and thicken: Bring the mixture to a simmer and cook until thickened, about 5-7 minutes, stirring frequently.
- Season the sauce: Remove from heat and stir in the salt, pepper, and nutmeg.
- Add the cheese: Stir in 1 1/2 cups of the shredded cheddar cheese until melted and smooth. Reserve the remaining cheddar cheese for topping.
- Assemble the potatoes: Grease a 9×13 inch baking dish. Layer about one-third of the sliced potatoes in the bottom of the dish.
- Pour sauce and repeat: Pour one-third of the cheese sauce over the potatoes. Repeat the layers twice more, ending with the cheese sauce on top.
- Top with cheese: Sprinkle the remaining 1/2 cup of cheddar cheese and the Parmesan cheese over the top.
- Bake: Cover the baking dish with aluminum foil and bake for 45 minutes.
- Remove foil and bake longer: Remove the foil and bake for an additional 15-20 minutes, or until the potatoes are tender and the top is golden brown and bubbly.
- Let rest: Let the scalloped potatoes rest for 10-15 minutes before serving. This allows the sauce to thicken slightly.
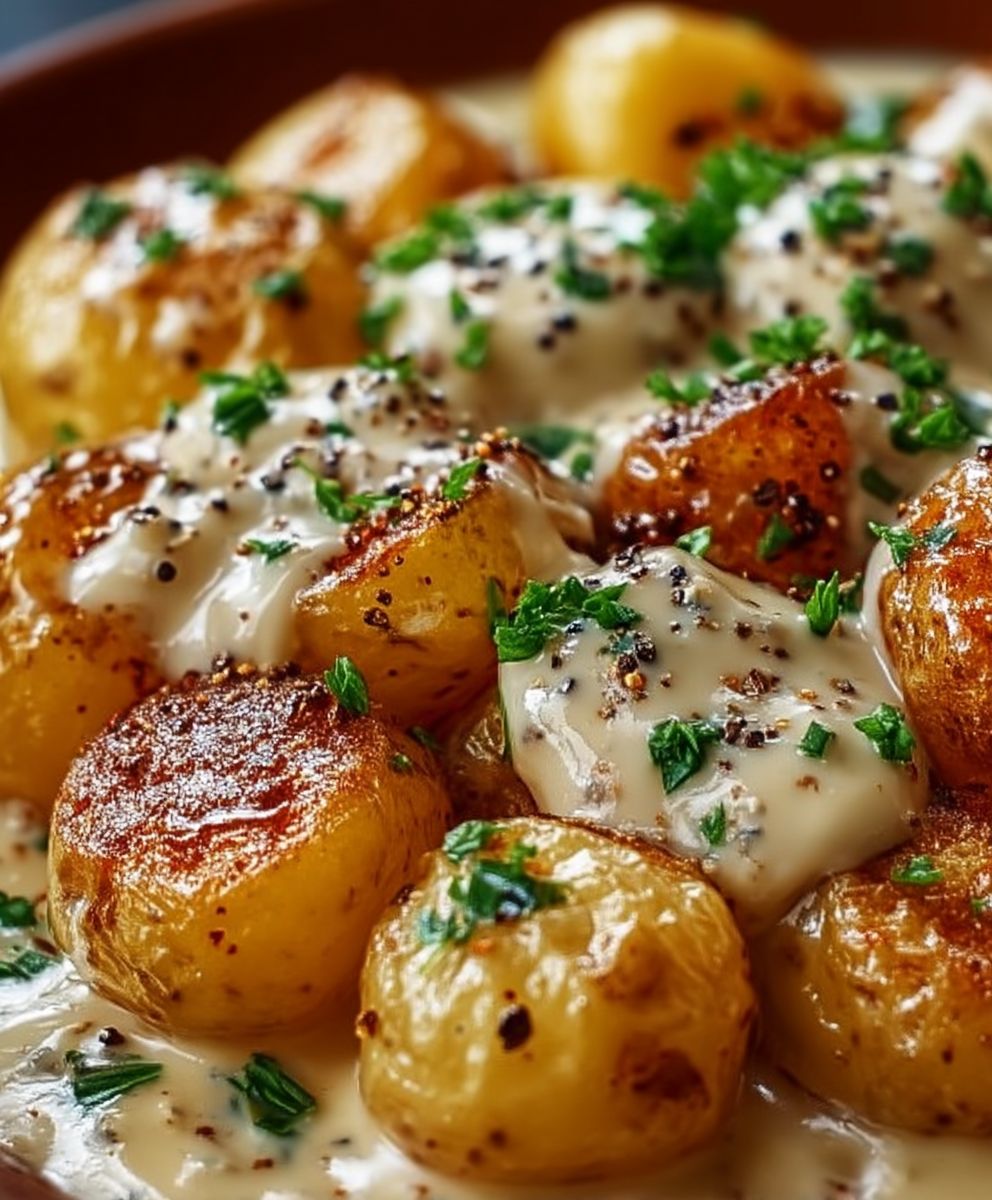
Crispy Smashed Potatoes:
- Boil the potatoes: Place the small Yukon Gold or baby potatoes in a large pot and cover with cold water. Bring to a boil and cook until the potatoes are fork-tender, about 15-20 minutes. Again, don’t overcook them!
- Drain and cool slightly: Drain the potatoes and let them cool slightly until you can handle them without burning yourself.
- Preheat the oven: Preheat your oven to 425°F (220°C).
- Prepare the baking sheet: Line a baking sheet with parchment paper. This will prevent the potatoes from sticking.
- Smash the potatoes: Place the potatoes on the prepared baking sheet. Use the bottom of a glass or a potato masher to gently smash each potato until it is about 1/2 inch thick. Be careful not to smash them too thin, or they’ll fall apart.
- Drizzle with oil and season: Drizzle the smashed potatoes with olive oil. In a small bowl, combine the garlic powder, onion powder, paprika, salt, and pepper. Sprinkle the seasoning mixture evenly over the potatoes.
- Bake until crispy: Bake for 20-25 minutes, or until the potatoes are golden brown and crispy around the edges.
- Garnish and serve: Remove from the oven and garnish with fresh parsley. Serve immediately. These are incredibly addictive!
Conclusion:
This isn’t just another recipe; it’s a gateway to potato perfection! I truly believe this method unlocks the full potential of humble potatoes, transforming them into a side dish that will steal the show. From the crispy, golden-brown exterior to the fluffy, melt-in-your-mouth interior, every bite is an explosion of flavor and texture. If you’re looking for a guaranteed crowd-pleaser, a dish that elevates any meal, or simply a new way to appreciate the versatility of potatoes, then you absolutely must try this recipe.
But the beauty of this recipe lies not only in its deliciousness but also in its adaptability. Feel free to experiment with different herbs and spices to create your own signature flavor profile. A sprinkle of smoked paprika adds a touch of warmth and depth, while a pinch of cayenne pepper brings a subtle kick. For a more Mediterranean twist, try incorporating rosemary, thyme, and a squeeze of lemon juice. And don’t be afraid to play around with different types of potatoes! Yukon Golds will give you an extra creamy texture, while red potatoes hold their shape beautifully.
Serving suggestions are endless! These potatoes are the perfect accompaniment to roasted chicken, grilled steak, or pan-seared fish. They also make a fantastic addition to a vegetarian feast, pairing well with roasted vegetables, hearty salads, or lentil stews. For a more casual meal, serve them alongside burgers or sandwiches. And if you happen to have any leftovers (though I highly doubt you will!), they’re delicious reheated or even added to frittatas or breakfast scrambles.
Variations to consider:
* Cheesy Potatoes: Add shredded cheddar, Gruyere, or Parmesan cheese during the last few minutes of baking for a gooey, cheesy delight.
* Garlic Parmesan Potatoes: Toss the cooked potatoes with melted butter, minced garlic, grated Parmesan cheese, and fresh parsley.
* Spicy Potatoes: Add a pinch of cayenne pepper, chili flakes, or your favorite hot sauce to the potatoes before roasting.
* Herb Roasted Potatoes: Toss the potatoes with fresh rosemary, thyme, oregano, and garlic before roasting.
* Loaded Potatoes: Top the cooked potatoes with sour cream, bacon bits, chives, and shredded cheese for a decadent treat.
I’m so confident that you’ll love this recipe that I can’t wait to hear about your experience. Did you try any variations? What did you serve them with? What did your family and friends think? Please, please, please give this recipe a try and share your thoughts in the comments below. Your feedback is invaluable, and I’m always eager to learn from your culinary adventures.
This recipe for amazing potato side dishes is more than just a set of instructions; it’s an invitation to create something truly special. So, gather your ingredients, preheat your oven, and get ready to experience the magic of perfectly roasted potatoes. Happy cooking! I hope you enjoy this recipe as much as I do. Let me know how it turns out!
Potato Side Dishes: Delicious & Easy Recipes
Four delicious potato recipes: savory roasted, creamy salad, cheesy scalloped, and crispy smashed. Perfect for any occasion!
Ingredients
- 2 lbs Yukon Gold potatoes, cut into 1-inch cubes
- 4 cloves garlic, minced
- 2 tablespoons olive oil
- 1 tablespoon fresh rosemary, chopped
- 1 tablespoon fresh thyme, chopped
- 1 teaspoon dried oregano
- 1/2 teaspoon salt
- 1/4 teaspoon black pepper
- 1/4 cup grated Parmesan cheese (optional)
- 2 lbs red potatoes, cut into 1-inch cubes
- 1/2 cup mayonnaise
- 1/4 cup sour cream
- 2 tablespoons Dijon mustard
- 2 tablespoons fresh dill, chopped
- 1 tablespoon white wine vinegar
- 1/4 cup red onion, finely chopped
- 1 stalk celery, finely chopped
- 1/2 teaspoon salt
- 1/4 teaspoon black pepper
- 2 lbs Russet potatoes, peeled and thinly sliced (about 1/8 inch thick)
- 4 tablespoons butter
- 4 tablespoons all-purpose flour
- 3 cups milk
- 1 teaspoon salt
- 1/2 teaspoon black pepper
- 1/4 teaspoon nutmeg
- 2 cups shredded cheddar cheese
- 1/2 cup grated Parmesan cheese
- 2 lbs small Yukon Gold or baby potatoes
- 4 tablespoons olive oil
- 1 teaspoon garlic powder
- 1/2 teaspoon onion powder
- 1/2 teaspoon paprika
- 1/2 teaspoon salt
- 1/4 teaspoon black pepper
- Fresh parsley, chopped (for garnish)
Instructions
- Preheat the oven to 400°F (200°C).
- Wash and cut the Yukon Gold potatoes into 1-inch cubes.
- In a large bowl, combine the minced garlic, olive oil, chopped rosemary, chopped thyme, dried oregano, salt, and pepper.
- Add the cubed potatoes to the bowl with the garlic herb mixture. Toss well to ensure that all the potatoes are evenly coated.
- Spread the potatoes in a single layer on a baking sheet. Avoid overcrowding the pan, as this will steam the potatoes instead of roasting them. If necessary, use two baking sheets.
- Roast for 30-40 minutes, or until the potatoes are tender and golden brown, flipping halfway through.
- If desired, sprinkle the grated Parmesan cheese over the potatoes during the last 5 minutes of roasting.
- Remove from the oven and serve immediately.
- Place the red potatoes in a large pot and cover with cold water. Bring to a boil and cook until the potatoes are tender when pierced with a fork, about 15-20 minutes.
- Drain the potatoes and let them cool slightly.
- In a large bowl, whisk together the mayonnaise, sour cream, Dijon mustard, fresh dill, and white wine vinegar.
- Add the cooled potatoes, red onion, and celery to the bowl with the dressing. Gently toss to combine.
- Season with salt and pepper to taste.
- Cover and refrigerate for at least 30 minutes to allow the flavors to meld.
- Serve chilled. Garnish with extra fresh dill, if desired.
- Preheat your oven to 350°F (175°C).
- Peel and thinly slice the Russet potatoes.
- In a medium saucepan, melt the butter over medium heat. Whisk in the flour and cook for 1-2 minutes, stirring constantly, to create a roux.
- Gradually whisk in the milk, stirring constantly to prevent lumps from forming.
- Bring the mixture to a simmer and cook until thickened, about 5-7 minutes, stirring frequently.
- Remove from heat and stir in the salt, pepper, and nutmeg.
- Stir in 1 1/2 cups of the shredded cheddar cheese until melted and smooth. Reserve the remaining cheddar cheese for topping.
- Grease a 9×13 inch baking dish. Layer about one-third of the sliced potatoes in the bottom of the dish.
- Pour one-third of the cheese sauce over the potatoes. Repeat the layers twice more, ending with the cheese sauce on top.
- Sprinkle the remaining 1/2 cup of cheddar cheese and the Parmesan cheese over the top.
- Cover the baking dish with aluminum foil and bake for 45 minutes.
- Remove the foil and bake for an additional 15-20 minutes, or until the potatoes are tender and the top is golden brown and bubbly.
- Let the scalloped potatoes rest for 10-15 minutes before serving.
- Place the small Yukon Gold or baby potatoes in a large pot and cover with cold water. Bring to a boil and cook until the potatoes are fork-tender, about 15-20 minutes.
- Drain the potatoes and let them cool slightly until you can handle them without burning yourself.
- Preheat your oven to 425°F (220°C).
- Line a baking sheet with parchment paper.
- Place the potatoes on the prepared baking sheet. Use the bottom of a glass or a potato masher to gently smash each potato until it is about 1/2 inch thick.
- Drizzle the smashed potatoes with olive oil. In a small bowl, combine the garlic powder, onion powder, paprika, salt, and pepper. Sprinkle the seasoning mixture evenly over the potatoes.
- Bake for 20-25 minutes, or until the potatoes are golden brown and crispy around the edges.
- Remove from the oven and garnish with fresh parsley. Serve immediately.
Notes
- High temperature is key to getting those potatoes nice and crispy on the outside while staying fluffy inside.
- Yukon Golds have a naturally buttery flavor and hold their shape well during roasting.
- Make sure the garlic is finely minced so it distributes evenly.
- Avoid overcrowding the pan, as this will steam the potatoes instead of roasting them.
- Ovens can vary, and you want them perfectly roasted, not burnt!
- These are best served hot!
- Don’t overcook them, or they’ll become mushy!
- You can speed up the cooling process by rinsing them with cold water.
- Taste and adjust the seasonings as needed. I sometimes add a pinch of sugar to balance the acidity.
- This is important – the flavors really develop as it sits!
- A mandoline slicer can be helpful for achieving uniform thickness, but a sharp knife works too. Aim for about 1/8 inch thick.
- This allows the sauce to thicken slightly.
- Again, don’t overcook them!
- This will prevent the potatoes from sticking.
- Be careful not to smash them too thin, or they’ll fall apart.
- These are incredibly addictive!