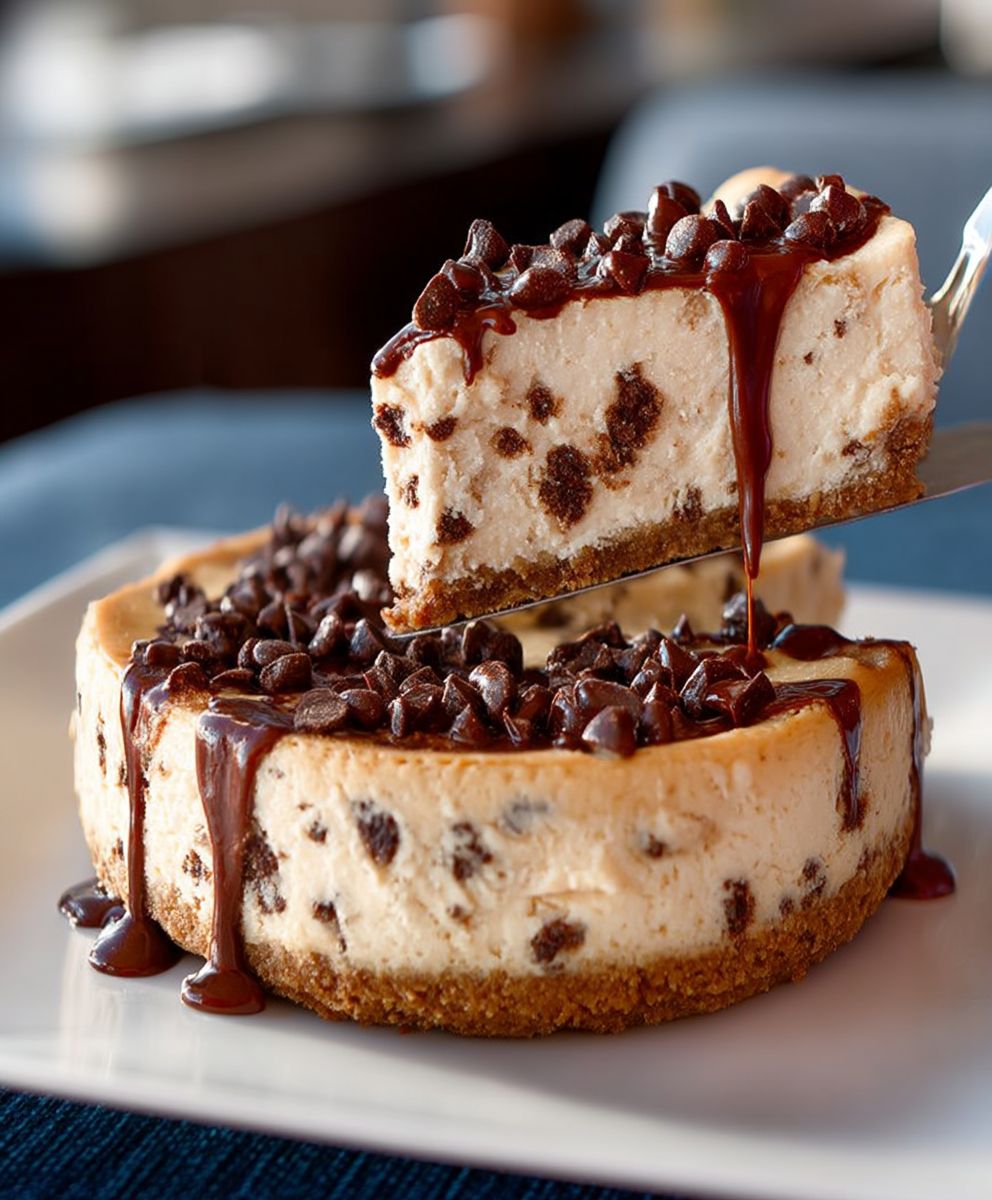
Protein Cheesecake: Prepare to have your dessert expectations redefined! Imagine sinking your fork into a creamy, decadent cheesecake, but without the guilt. That’s right, we’re talking about a high-protein, utterly delicious cheesecake that will satisfy your sweet cravings and support your fitness goals.
Cheesecake, in its various forms, has a rich history dating back to ancient Greece, where it was even served to athletes during the Olympic Games! Over centuries, it has evolved into the beloved dessert we know today, enjoyed worldwide in countless variations. But what if we could take this classic treat and give it a healthy makeover?
That’s precisely what this recipe achieves. People adore cheesecake for its luxurious texture, the perfect balance of sweet and tangy flavors, and its ability to make any occasion feel special. This Protein Cheesecake version retains all those wonderful qualities while packing a protein punch, making it ideal for anyone looking to boost their protein intake without sacrificing taste. It’s the perfect post-workout treat, a satisfying dessert for those watching their macros, or simply a guilt-free indulgence any time of day. Get ready to experience cheesecake in a whole new, healthier light!

Ingredients:
- For the Crust:
- 1 ½ cups almond flour
- ¼ cup coconut flour
- ¼ cup erythritol or your preferred sweetener
- ¼ teaspoon salt
- 6 tablespoons unsalted butter, melted
- 1 teaspoon vanilla extract
- For the Cheesecake Filling:
- 32 ounces (4 packages) cream cheese, softened
- 1 ½ cups erythritol or your preferred sweetener
- 1 cup vanilla protein powder (whey or casein blend works best)
- 4 large eggs
- ½ cup heavy cream
- 2 tablespoons lemon juice
- 1 teaspoon vanilla extract
- Optional Toppings:
- Sugar-free chocolate syrup
- Fresh berries (strawberries, blueberries, raspberries)
- Whipped cream (sugar-free)
- Chopped nuts (almonds, pecans, walnuts)
Preparing the Crust:
- Combine Dry Ingredients: In a large bowl, whisk together the almond flour, coconut flour, erythritol, and salt. Make sure there are no clumps of flour or sweetener. This ensures an even texture for the crust.
- Add Wet Ingredients: Pour the melted butter and vanilla extract into the dry ingredients. Stir until well combined. The mixture should resemble wet sand. If it seems too dry, add a teaspoon of melted butter at a time until it comes together.
- Press into Pan: Press the mixture firmly into the bottom of a 9-inch springform pan. Use the bottom of a measuring cup or your fingers to create an even layer. Make sure to press it firmly so it holds together well during baking and slicing.
- Pre-bake the Crust: Bake the crust in a preheated oven at 350°F (175°C) for 8-10 minutes, or until lightly golden brown. This helps the crust set and prevents it from becoming soggy when the filling is added. Keep a close eye on it to prevent burning.
- Cool the Crust: Remove the crust from the oven and let it cool completely while you prepare the cheesecake filling. This is crucial to prevent the filling from melting the crust.
Making the Cheesecake Filling:
- Cream Cheese Prep: Ensure your cream cheese is completely softened. This is essential for a smooth, lump-free cheesecake. If it’s not soft enough, it will be difficult to incorporate the other ingredients properly. You can leave it at room temperature for a couple of hours or microwave it in 30-second intervals until softened, being careful not to melt it.
- Cream Cream Cheese and Sweetener: In a large mixing bowl, beat the softened cream cheese and erythritol together until smooth and creamy. Use an electric mixer (stand mixer or hand mixer) for best results. Scrape down the sides of the bowl occasionally to ensure everything is evenly mixed.
- Add Protein Powder: Gradually add the vanilla protein powder to the cream cheese mixture, mixing on low speed until just combined. Be careful not to overmix, as this can make the cheesecake dense. Ensure the protein powder is evenly distributed to avoid any pockets of dryness.
- Incorporate Eggs: Add the eggs one at a time, mixing on low speed after each addition until just combined. Again, avoid overmixing. Overmixing can incorporate too much air, causing the cheesecake to puff up during baking and then collapse as it cools.
- Add Heavy Cream, Lemon Juice, and Vanilla: Stir in the heavy cream, lemon juice, and vanilla extract until the mixture is smooth and well combined. The heavy cream adds richness and moisture, while the lemon juice brightens the flavor and helps to balance the sweetness. The vanilla extract enhances the overall flavor profile.
Baking the Cheesecake:
- Pour Filling into Crust: Pour the cheesecake filling over the cooled crust in the springform pan. Spread it evenly to ensure a uniform thickness.
- Water Bath (Optional but Recommended): For a creamy, crack-free cheesecake, bake it in a water bath. Wrap the bottom of the springform pan tightly with heavy-duty aluminum foil to prevent water from seeping in. Place the wrapped pan in a larger roasting pan. Pour hot water into the roasting pan until it reaches about halfway up the sides of the springform pan.
- Bake: Bake in a preheated oven at 325°F (160°C) for 60-75 minutes, or until the edges are set but the center still has a slight jiggle. The baking time may vary depending on your oven, so keep a close eye on it.
- Cooling Process: Turn off the oven and crack the oven door slightly. Let the cheesecake cool in the oven for 1 hour. This gradual cooling process helps prevent cracking.
- Refrigerate: Remove the cheesecake from the oven and water bath (if used). Let it cool completely on a wire rack before refrigerating for at least 4 hours, or preferably overnight. This allows the cheesecake to fully set and develop its flavor.
Serving and Storage:
- Release from Pan: Once the cheesecake is thoroughly chilled, carefully remove it from the springform pan. Run a thin knife around the edges of the cheesecake to loosen it from the pan before releasing the sides.
- Slice and Serve: Slice the cheesecake with a sharp knife, wiping the blade clean between slices for a neat presentation.
- Add Toppings (Optional): Top with your favorite sugar-free toppings, such as sugar-free chocolate syrup, fresh berries, whipped cream, or chopped nuts.
- Storage: Store leftover cheesecake in an airtight container in the refrigerator for up to 5 days.
Tips for Success:
- Softened Cream Cheese is Key: I can’t stress this enough! Using softened cream cheese is crucial for a smooth, lump-free cheesecake.
- Don’t Overmix: Overmixing the batter can incorporate too much air, leading to a cracked cheesecake. Mix until just combined.
- Water Bath for Creaminess: While optional, a water bath helps to create a creamy, evenly baked cheesecake and prevents cracking.
- Cooling is Important: The gradual cooling process in the oven and refrigerator is essential for preventing cracks and allowing the cheesecake to fully set.
- Protein Powder Considerations: The type of protein powder you use can affect the texture of the cheesecake. Whey or a whey/casein blend generally works best. Avoid using pure casein protein, as it can make the cheesecake too dense.
- Sweetener Adjustments: Adjust the amount of sweetener to your liking. Taste the batter before baking and add more sweetener if needed.
- Flavor Variations: Feel free to experiment with different flavor extracts, such as almond extract, lemon extract, or peppermint extract. You can also add sugar-free chocolate chips or cocoa powder to the batter for a chocolate cheesecake.
- Crust Variations: If you don’t have almond flour or coconut flour, you can use other low-carb flours, such as sunflower seed flour or flaxseed meal. You can also add spices like cinnamon or nutmeg to the crust for extra flavor.
Nutritional Information (Approximate):
(Note: Nutritional information is an estimate and may vary based on specific ingredients and serving sizes.)
Per serving (1/12 of the cheesecake):
- Calories: Approximately 300-350
- Protein: Approximately 25-30g
- Fat: Approximately 20-25g
- Net Carbs: Approximately 5-7g
This protein cheesecake is a delicious and satisfying dessert that won’t derail your healthy eating goals. Enjoy!
Conclusion:
So there you have it! This Protein Cheesecake recipe is truly a game-changer. It’s not just about satisfying your sweet tooth; it’s about doing it in a way that aligns with your health and fitness goals. I know, I know, cheesecake and “healthy” in the same sentence might sound too good to be true, but trust me, this recipe delivers. The creamy texture, the delightful sweetness, and the added protein boost make it a guilt-free indulgence you can enjoy any time.
Why is this a must-try? Because it’s incredibly versatile, easy to make, and packed with protein. It’s the perfect post-workout treat, a satisfying dessert after dinner, or even a protein-packed snack to keep you going throughout the day. Forget those store-bought protein bars that taste like chalk; this cheesecake is the real deal. It’s a delicious and nutritious way to get your protein fix.
But the fun doesn’t stop there! Feel free to get creative with your toppings and variations. Want to add a fruity twist? Top it with fresh berries like strawberries, blueberries, or raspberries. Craving something a little more decadent? Drizzle some sugar-free chocolate syrup or sprinkle some chopped nuts on top. You could even swirl in some peanut butter for an extra protein punch and a nutty flavor.
Here are a few serving suggestions to get you started:
Serving Suggestions:
- Classic Berry Topping: A simple mix of fresh berries like strawberries, blueberries, and raspberries.
- Chocolate Drizzle: Sugar-free chocolate syrup for a decadent touch.
- Peanut Butter Swirl: Add a spoonful of peanut butter to the batter before baking for a nutty flavor.
- Crushed Nuts: Sprinkle chopped almonds, walnuts, or pecans on top for added crunch.
- Lemon Zest: Add lemon zest to the batter for a citrusy twist.
And if you’re feeling adventurous, you can experiment with different flavor extracts. Vanilla extract is a classic, but you could also try almond extract, lemon extract, or even coffee extract for a unique flavor profile. The possibilities are endless!
I truly believe that this Protein Cheesecake will become a staple in your recipe repertoire. It’s a delicious, healthy, and satisfying treat that you can enjoy without any guilt. It’s also a fantastic way to impress your friends and family with your baking skills (and your commitment to healthy eating!).
So, what are you waiting for? Grab your ingredients, preheat your oven, and get ready to bake! I’m confident that you’ll love this recipe as much as I do. And once you’ve tried it, I’d love to hear about your experience. Share your photos, your variations, and your thoughts in the comments below. Let me know what toppings you tried, what flavors you experimented with, and how much you enjoyed your delicious and healthy Protein Cheesecake. Happy baking! I can’t wait to see what you create!
Protein Cheesecake: The Ultimate Guide to a Healthy Dessert
Decadent and creamy keto cheesecake, packed with protein and sugar-free. Perfect for satisfying your sweet tooth without the guilt.
Ingredients
- 1 ½ cups almond flour
- ¼ cup coconut flour
- ¼ cup erythritol or your preferred sweetener
- ¼ teaspoon salt
- 6 tablespoons unsalted butter, melted
- 1 teaspoon vanilla extract
- 32 ounces (4 packages) cream cheese, softened
- 1 ½ cups erythritol or your preferred sweetener
- 1 cup vanilla protein powder (whey or casein blend works best)
- 4 large eggs
- ½ cup heavy cream
- 2 tablespoons lemon juice
- 1 teaspoon vanilla extract
- Sugar-free chocolate syrup
- Fresh berries (strawberries, blueberries, raspberries)
- Whipped cream (sugar-free)
- Chopped nuts (almonds, pecans, walnuts)
Instructions
- Combine Dry Ingredients: In a large bowl, whisk together the almond flour, coconut flour, erythritol, and salt. Make sure there are no clumps of flour or sweetener. This ensures an even texture for the crust.
- Add Wet Ingredients: Pour the melted butter and vanilla extract into the dry ingredients. Stir until well combined. The mixture should resemble wet sand. If it seems too dry, add a teaspoon of melted butter at a time until it comes together.
- Press into Pan: Press the mixture firmly into the bottom of a 9-inch springform pan. Use the bottom of a measuring cup or your fingers to create an even layer. Make sure to press it firmly so it holds together well during baking and slicing.
- Pre-bake the Crust: Bake the crust in a preheated oven at 350°F (175°C) for 8-10 minutes, or until lightly golden brown. This helps the crust set and prevents it from becoming soggy when the filling is added. Keep a close eye on it to prevent burning.
- Cool the Crust: Remove the crust from the oven and let it cool completely while you prepare the cheesecake filling. This is crucial to prevent the filling from melting the crust.
- Cream Cheese Prep: Ensure your cream cheese is completely softened. This is essential for a smooth, lump-free cheesecake. If it’s not soft enough, it will be difficult to incorporate the other ingredients properly. You can leave it at room temperature for a couple of hours or microwave it in 30-second intervals until softened, being careful not to melt it.
- Cream Cream Cheese and Sweetener: In a large mixing bowl, beat the softened cream cheese and erythritol together until smooth and creamy. Use an electric mixer (stand mixer or hand mixer) for best results. Scrape down the sides of the bowl occasionally to ensure everything is evenly mixed.
- Add Protein Powder: Gradually add the vanilla protein powder to the cream cheese mixture, mixing on low speed until just combined. Be careful not to overmix, as this can make the cheesecake dense. Ensure the protein powder is evenly distributed to avoid any pockets of dryness.
- Incorporate Eggs: Add the eggs one at a time, mixing on low speed after each addition until just combined. Again, avoid overmixing. Overmixing can incorporate too much air, causing the cheesecake to puff up during baking and then collapse as it cools.
- Add Heavy Cream, Lemon Juice, and Vanilla: Stir in the heavy cream, lemon juice, and vanilla extract until the mixture is smooth and well combined. The heavy cream adds richness and moisture, while the lemon juice brightens the flavor and helps to balance the sweetness. The vanilla extract enhances the overall flavor profile.
- Pour Filling into Crust: Pour the cheesecake filling over the cooled crust in the springform pan. Spread it evenly to ensure a uniform thickness.
- Water Bath (Optional but Recommended): For a creamy, crack-free cheesecake, bake it in a water bath. Wrap the bottom of the springform pan tightly with heavy-duty aluminum foil to prevent water from seeping in. Place the wrapped pan in a larger roasting pan. Pour hot water into the roasting pan until it reaches about halfway up the sides of the springform pan.
- Bake: Bake in a preheated oven at 325°F (160°C) for 60-75 minutes, or until the edges are set but the center still has a slight jiggle. The baking time may vary depending on your oven, so keep a close eye on it.
- Cooling Process: Turn off the oven and crack the oven door slightly. Let the cheesecake cool in the oven for 1 hour. This gradual cooling process helps prevent cracking.
- Refrigerate: Remove the cheesecake from the oven and water bath (if used). Let it cool completely on a wire rack before refrigerating for at least 4 hours, or preferably overnight. This allows the cheesecake to fully set and develop its flavor.
- Release from Pan: Once the cheesecake is thoroughly chilled, carefully remove it from the springform pan. Run a thin knife around the edges of the cheesecake to loosen it from the pan before releasing the sides.
- Slice and Serve: Slice the cheesecake with a sharp knife, wiping the blade clean between slices for a neat presentation.
- Add Toppings (Optional): Top with your favorite sugar-free toppings, such as sugar-free chocolate syrup, fresh berries, whipped cream, or chopped nuts.
- Storage: Store leftover cheesecake in an airtight container in the refrigerator for up to 5 days.
Notes
- Softened cream cheese is key for a smooth, lump-free cheesecake.
- Don’t overmix the batter, as this can incorporate too much air, leading to a cracked cheesecake. Mix until just combined.
- A water bath helps to create a creamy, evenly baked cheesecake and prevents cracking.
- The gradual cooling process in the oven and refrigerator is essential for preventing cracks and allowing the cheesecake to fully set.
- The type of protein powder you use can affect the texture of the cheesecake. Whey or a whey/casein blend generally works best. Avoid using pure casein protein, as it can make the cheesecake too dense.
- Adjust the amount of sweetener to your liking. Taste the batter before baking and add more sweetener if needed.
- Feel free to experiment with different flavor extracts, such as almond extract, lemon extract, or peppermint extract. You can also add sugar-free chocolate chips or cocoa powder to the batter for a chocolate cheesecake.
- If you don’t have almond flour or coconut flour, you can use other low-carb flours, such as sunflower seed flour or flaxseed meal. You can also add spices like cinnamon or nutmeg to the crust for extra flavor.