• Skip to primary navigation
  • Skip to main content
  • Skip to primary sidebar
Homesmad

Homesmad

  • Home
  • Breakfast & Brunch
  • Appetizers & Snacks
  • Dinner
  • Dessert
  • About
  • Privacy Policy
  • Contact
Homesmad
  • Home
  • Breakfast & Brunch
  • Appetizers & Snacks
  • Dinner
  • Dessert
  • About
  • Privacy Policy
  • Contact

Protein Pancake Bowls: The Ultimate Guide to Delicious & Healthy Breakfasts

June 22, 2025 by Lily author

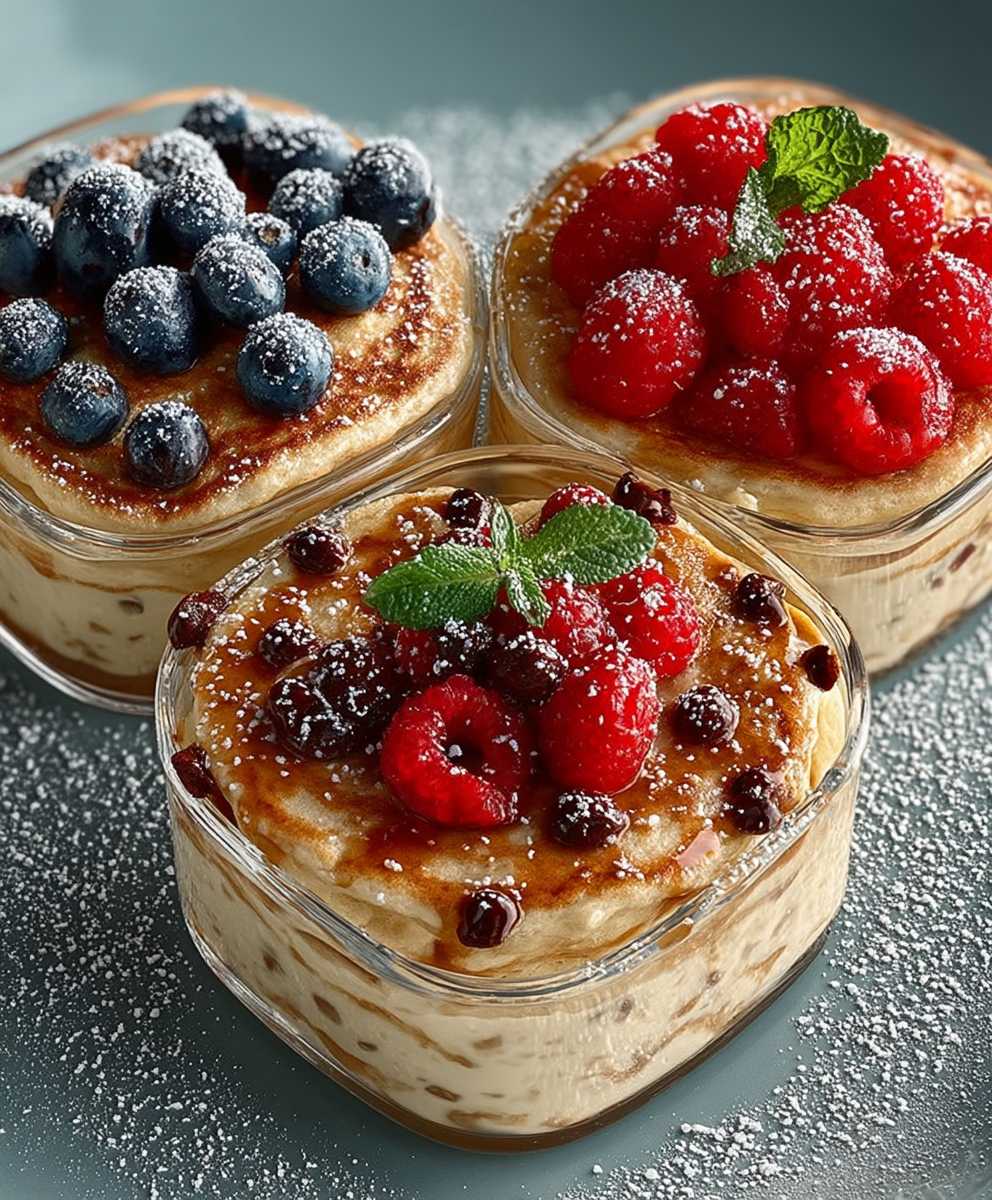
Protein pancake bowls: the breakfast game-changer you didn’t know you needed! Forget flipping and stacking; we’re diving headfirst into a world of fluffy, protein-packed goodness served in a bowl. Imagine waking up to a warm, comforting base of pancake perfection, topped with your favorite fruits, nuts, seeds, and a drizzle of something sweet. Sounds dreamy, right?

While pancakes have been a breakfast staple for centuries, evolving from simple unleavened cakes to the fluffy delights we know today, the protein pancake bowls are a relatively new invention, born from the desire for a healthier, more customizable breakfast option. They’re a modern twist on a classic, perfectly suited for busy mornings or post-workout fuel.

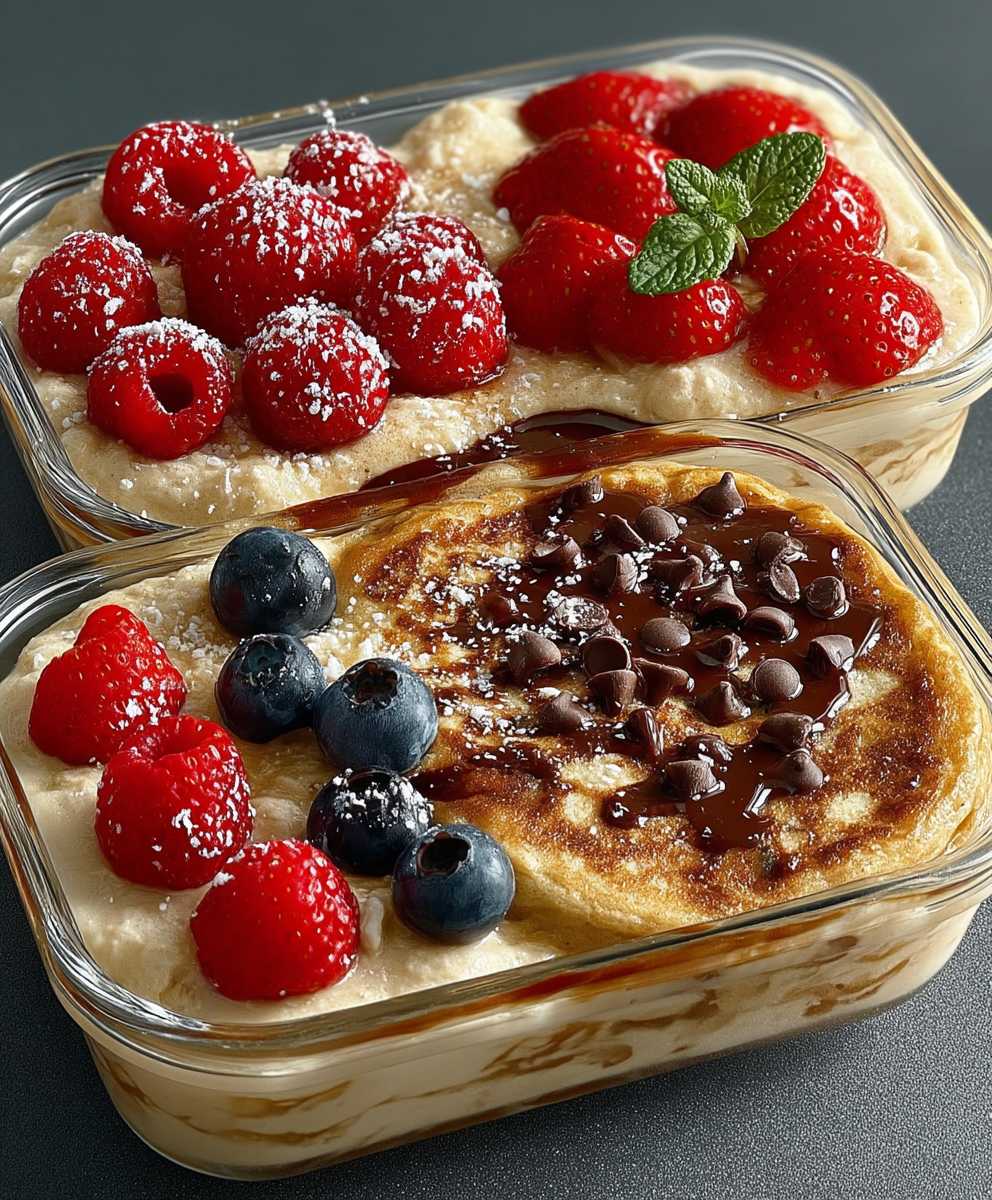
What’s not to love? These bowls are incredibly versatile, allowing you to tailor them to your exact cravings and dietary needs. Craving chocolate chips and bananas? Go for it! Prefer berries and almond butter? The possibilities are endless. Plus, the added protein keeps you feeling full and satisfied for hours, making it the perfect way to start your day strong. Get ready to ditch the traditional stack and embrace the bowl – your breakfast routine will never be the same!

Protein pancake bowls this RECIPE

Ingredients:

  • For the Pancakes:
    • 1 cup rolled oats
    • 1 ripe banana
    • 2 large eggs
    • 1 scoop vanilla protein powder (whey, casein, or plant-based)
    • 1/2 cup milk (dairy or non-dairy)
    • 1 teaspoon baking powder
    • 1/2 teaspoon cinnamon
    • Pinch of salt
    • 1 tablespoon coconut oil or butter, for greasing the pan
  • For the Bowl Assembly:
    • 1/2 cup Greek yogurt (plain or vanilla)
    • 1/4 cup berries (strawberries, blueberries, raspberries – your choice!)
    • 1 tablespoon nut butter (peanut, almond, cashew)
    • 1 tablespoon chia seeds or flax seeds
    • Optional: Drizzle of honey or maple syrup
    • Optional: Sprinkle of shredded coconut

Preparing the Pancake Batter:

  1. Combine the Oats and Banana: In a blender or food processor, add the rolled oats and ripe banana. Blend until the oats are finely ground and the banana is well mashed. This creates a base for our pancakes that’s both nutritious and naturally sweet.
  2. Add the Wet Ingredients: Now, add the eggs and milk to the blender. Blend again until everything is well combined. The mixture should be relatively smooth, but a few small oat pieces are perfectly fine.
  3. Incorporate the Protein Powder and Spices: Add the vanilla protein powder, baking powder, cinnamon, and salt to the blender. Blend one last time until everything is thoroughly mixed and the batter is smooth and consistent. Make sure there are no clumps of protein powder remaining.
  4. Let the Batter Rest (Optional): For a slightly thicker pancake, let the batter rest for about 5-10 minutes. This allows the oats to absorb some of the liquid, resulting in a fluffier pancake. However, this step is optional, and you can proceed directly to cooking if you’re short on time.

Cooking the Pancakes:

  1. Prepare the Pan: Heat a lightly oiled griddle or non-stick frying pan over medium heat. I prefer using coconut oil for its subtle flavor, but butter works great too! Make sure the pan is hot enough; a drop of water should sizzle and evaporate quickly.
  2. Pour the Batter: Pour about 1/4 cup of batter onto the hot griddle for each pancake. You can make them larger or smaller depending on your preference. Leave some space between each pancake to allow for easy flipping.
  3. Cook the First Side: Cook the pancakes for about 2-3 minutes per side, or until golden brown and bubbles start to form on the surface. The edges should look set, and the bottom should be nicely browned.
  4. Flip and Cook the Second Side: Carefully flip the pancakes with a spatula and cook for another 1-2 minutes, or until the second side is golden brown and the pancakes are cooked through. Gently press down on the pancakes with the spatula to ensure even cooking.
  5. Keep Warm (Optional): If you’re making a large batch, you can keep the cooked pancakes warm in a preheated oven (around 200°F or 93°C) while you finish cooking the rest. This will prevent them from getting cold and soggy.

Assembling the Protein Pancake Bowl:

  1. Prepare Your Bowl: Choose your favorite bowl. I like using a wide, shallow bowl for easy access to all the toppings.
  2. Layer the Pancakes: Place the cooked pancakes in the bowl. You can stack them neatly or tear them into smaller pieces for easier eating. I usually tear them into bite-sized pieces.
  3. Add the Greek Yogurt: Spoon the Greek yogurt over the pancakes. The yogurt adds a creamy texture and a boost of protein. You can use plain Greek yogurt for a tangy flavor or vanilla Greek yogurt for a touch of sweetness.
  4. Top with Berries: Sprinkle the berries over the yogurt. Fresh berries add a burst of flavor and antioxidants. Feel free to use a mix of different berries for a variety of colors and tastes.
  5. Drizzle with Nut Butter: Drizzle the nut butter over the berries. Nut butter adds healthy fats and a delicious nutty flavor. Peanut butter, almond butter, and cashew butter are all great options.
  6. Sprinkle with Seeds: Sprinkle the chia seeds or flax seeds over the nut butter. These seeds add fiber and omega-3 fatty acids.
  7. Add Optional Toppings: If desired, drizzle with honey or maple syrup for extra sweetness. You can also sprinkle with shredded coconut for a tropical touch.
  8. Enjoy Immediately: Dig in and enjoy your delicious and nutritious protein pancake bowl!

Tips and Variations:

  • Adjust Sweetness: If you prefer a sweeter pancake, you can add a tablespoon of honey, maple syrup, or stevia to the batter.
  • Add Chocolate Chips: For a chocolatey treat, add 1/4 cup of chocolate chips to the batter.
  • Use Different Fruits: Experiment with different fruits in the batter, such as blueberries, raspberries, or chopped apples.
  • Make it Vegan: To make this recipe vegan, use a plant-based protein powder, non-dairy milk, and a flax egg (1 tablespoon flaxseed meal mixed with 3 tablespoons water) instead of the eggs.
  • Add Spices: Try adding other spices to the batter, such as nutmeg, ginger, or cardamom.
  • Make it Gluten-Free: Ensure your rolled oats are certified gluten-free if you have a gluten intolerance.
  • Protein Powder Alternatives: If you don’t have protein powder, you can substitute it with an equal amount of oat flour or almond flour. You might need to adjust the amount of milk to achieve the desired batter consistency.
  • Yogurt Substitutions: If you don’t have Greek yogurt, you can use skyr, cottage cheese (blended until smooth), or a plant-based yogurt alternative.
  • Nut Butter Alternatives: Sunflower seed butter or tahini are great alternatives if you have nut allergies.
  • Make Ahead: You can prepare the pancake batter the night before and store it in the refrigerator. Just give it a good stir before cooking. You can also cook the pancakes ahead of time and store them in the refrigerator or freezer. Reheat them in the microwave or toaster before assembling your bowl.
  • Controlling the Batter Thickness: If your batter is too thick, add a little more milk until it reaches a pourable consistency. If it’s too thin, add a tablespoon of oat flour or protein powder.
  • Preventing Sticking: Make sure your pan is properly heated and greased to prevent the pancakes from sticking. Use a non-stick pan for best results.
  • Even Cooking: Cook the pancakes over medium heat to ensure they cook evenly without burning. If the pancakes are browning too quickly, reduce the heat.
  • Pancake Size: Adjust the amount of batter you pour onto the griddle to create pancakes of your desired size. Smaller pancakes are easier to flip and cook evenly.
  • Topping Variations: Get creative with your toppings! Try adding granola, chopped nuts, seeds, dried fruit, chocolate shavings, or a dollop of whipped cream.

Nutritional Information (Approximate):

(Note: Nutritional information may vary depending on the specific ingredients used.)

  • Calories: 400-500
  • Protein: 30-40g
  • Carbohydrates: 50-60g
  • Fat: 15-25g

This protein pancake bowl is a fantastic way to start your day with a healthy and delicious meal. It’s packed with protein, fiber, and essential nutrients to keep you feeling full and energized for hours. Plus, it’s customizable to your liking, so you can create a bowl that perfectly suits your taste preferences. Enjoy!

Protein pancake bowls

Conclusion:

So, there you have it! These protein pancake bowls are truly a game-changer for breakfast, brunch, or even a healthy dessert. I know, I know, I might be biased, but trust me on this one. They’re quick, customizable, and packed with protein to keep you feeling full and energized for hours. What more could you ask for?

The beauty of this recipe lies in its simplicity and versatility. It’s not just about following the exact ingredients; it’s about creating something that you genuinely enjoy. Think of the base recipe as a blank canvas, ready to be painted with your favorite flavors and toppings.

Feeling adventurous? Try adding a tablespoon of cocoa powder to the batter for a chocolatey twist. Or, if you’re a fan of warm spices, a dash of cinnamon or nutmeg can elevate the flavor profile beautifully. For those who prefer a bit of tang, a squeeze of lemon juice can brighten up the batter and add a refreshing zing.

When it comes to toppings, the possibilities are endless! Fresh berries are always a classic choice, adding sweetness and antioxidants. Sliced bananas, peaches, or mangoes can also create a tropical vibe. If you’re craving something a bit more decadent, a drizzle of maple syrup, honey, or agave nectar will do the trick.

But don’t stop there! Get creative with your protein sources. A dollop of Greek yogurt adds a creamy texture and a boost of protein. A sprinkle of chopped nuts or seeds provides healthy fats and a satisfying crunch. And for the ultimate protein punch, consider adding a scoop of your favorite protein powder to the batter or as a topping.

These protein pancake bowls are also perfect for meal prepping. You can easily make a batch of pancakes ahead of time and store them in the refrigerator for a quick and easy breakfast throughout the week. Simply reheat them in the microwave or oven and add your favorite toppings.

Serving suggestions? I love enjoying these bowls as a post-workout snack to replenish my energy stores. They’re also a great option for a weekend brunch with friends and family. You can even set up a topping bar and let everyone customize their own bowls.

And if you’re looking for a lighter option, try using unsweetened applesauce or mashed banana as a natural sweetener in the batter. You can also reduce the amount of flour and add more protein powder to lower the carbohydrate content.

I’m so confident that you’ll love these protein pancake bowls as much as I do. They’re a delicious and nutritious way to start your day or satisfy your sweet cravings without feeling guilty.

So, what are you waiting for? Grab your ingredients, fire up your griddle, and get ready to create your own masterpiece. I can’t wait to hear what you think!

Once you’ve tried the recipe, please come back and share your experience in the comments below. Let me know what variations you tried, what toppings you loved, and any tips or tricks you discovered along the way. Your feedback is invaluable and helps me to improve the recipe and provide even more helpful content.

Happy cooking, and enjoy your delicious and healthy protein pancake bowls! I’m excited to see what you create!


Protein Pancake Bowls: The Ultimate Guide to Delicious & Healthy Breakfasts

Fuel your morning with this protein-packed pancake bowl! Made with oats, banana, and protein powder, these pancakes are topped with Greek yogurt, berries, and nut butter for a delicious and nutritious breakfast.

Prep Time5 minutes
Cook Time10 minutes
Total Time15 minutes
Category: Breakfast
Yield: 1 serving
Save This Recipe

Ingredients

  • 1 cup rolled oats
  • 1 ripe banana
  • 2 large eggs
  • 1 scoop vanilla protein powder (whey, casein, or plant-based)
  • 1/2 cup milk (dairy or non-dairy)
  • 1 teaspoon baking powder
  • 1/2 teaspoon cinnamon
  • Pinch of salt
  • 1 tablespoon coconut oil or butter, for greasing the pan
  • 1/2 cup Greek yogurt (plain or vanilla)
  • 1/4 cup berries (strawberries, blueberries, raspberries – your choice!)
  • 1 tablespoon nut butter (peanut, almond, cashew)
  • 1 tablespoon chia seeds or flax seeds
  • Optional: Drizzle of honey or maple syrup
  • Optional: Sprinkle of shredded coconut

Instructions

  1. Combine the Oats and Banana: In a blender or food processor, add the rolled oats and ripe banana. Blend until the oats are finely ground and the banana is well mashed.
  2. Add the Wet Ingredients: Add the eggs and milk to the blender. Blend again until everything is well combined. The mixture should be relatively smooth, but a few small oat pieces are perfectly fine.
  3. Incorporate the Protein Powder and Spices: Add the vanilla protein powder, baking powder, cinnamon, and salt to the blender. Blend one last time until everything is thoroughly mixed and the batter is smooth and consistent.
  4. Let the Batter Rest (Optional): For a slightly thicker pancake, let the batter rest for about 5-10 minutes.
  5. Prepare the Pan: Heat a lightly oiled griddle or non-stick frying pan over medium heat.
  6. Pour the Batter: Pour about 1/4 cup of batter onto the hot griddle for each pancake.
  7. Cook the First Side: Cook the pancakes for about 2-3 minutes per side, or until golden brown and bubbles start to form on the surface.
  8. Flip and Cook the Second Side: Carefully flip the pancakes with a spatula and cook for another 1-2 minutes, or until the second side is golden brown and the pancakes are cooked through.
  9. Keep Warm (Optional): If you’re making a large batch, you can keep the cooked pancakes warm in a preheated oven (around 200°F or 93°C) while you finish cooking the rest.
  10. Prepare Your Bowl: Choose your favorite bowl.
  11. Layer the Pancakes: Place the cooked pancakes in the bowl.
  12. Add the Greek Yogurt: Spoon the Greek yogurt over the pancakes.
  13. Top with Berries: Sprinkle the berries over the yogurt.
  14. Drizzle with Nut Butter: Drizzle the nut butter over the berries.
  15. Sprinkle with Seeds: Sprinkle the chia seeds or flax seeds over the nut butter.
  16. Add Optional Toppings: If desired, drizzle with honey or maple syrup. You can also sprinkle with shredded coconut.
  17. Enjoy Immediately: Dig in and enjoy your delicious and nutritious protein pancake bowl!

Notes

  • Adjust Sweetness: If you prefer a sweeter pancake, you can add a tablespoon of honey, maple syrup, or stevia to the batter.
  • Add Chocolate Chips: For a chocolatey treat, add 1/4 cup of chocolate chips to the batter.
  • Use Different Fruits: Experiment with different fruits in the batter, such as blueberries, raspberries, or chopped apples.
  • Make it Vegan: To make this recipe vegan, use a plant-based protein powder, non-dairy milk, and a flax egg (1 tablespoon flaxseed meal mixed with 3 tablespoons water) instead of the eggs.
  • Add Spices: Try adding other spices to the batter, such as nutmeg, ginger, or cardamom.
  • Make it Gluten-Free: Ensure your rolled oats are certified gluten-free if you have a gluten intolerance.
  • Protein Powder Alternatives: If you don’t have protein powder, you can substitute it with an equal amount of oat flour or almond flour. You might need to adjust the amount of milk to achieve the desired batter consistency.
  • Yogurt Substitutions: If you don’t have Greek yogurt, you can use skyr, cottage cheese (blended until smooth), or a plant-based yogurt alternative.
  • Nut Butter Alternatives: Sunflower seed butter or tahini are great alternatives if you have nut allergies.
  • Make Ahead: You can prepare the pancake batter the night before and store it in the refrigerator. Just give it a good stir before cooking. You can also cook the pancakes ahead of time and store them in the refrigerator or freezer. Reheat them in the microwave or toaster before assembling your bowl.
  • Controlling the Batter Thickness: If your batter is too thick, add a little more milk until it reaches a pourable consistency. If it’s too thin, add a tablespoon of oat flour or protein powder.
  • Preventing Sticking: Make sure your pan is properly heated and greased to prevent the pancakes from sticking. Use a non-stick pan for best results.
  • Even Cooking: Cook the pancakes over medium heat to ensure they cook evenly without burning. If the pancakes are browning too quickly, reduce the heat.
  • Pancake Size: Adjust the amount of batter you pour onto the griddle to create pancakes of your desired size. Smaller pancakes are easier to flip and cook evenly.
  • Topping Variations: Get creative with your toppings! Try adding granola, chopped nuts, seeds, dried fruit, chocolate shavings, or a dollop of whipped cream.

« Previous Post
Black Bean Burger: The Ultimate Guide to Delicious & Healthy Recipes
Next Post »
Lemon Cookies Raspberry Frosting: A Deliciously Tart Treat

If you enjoyed this…

Cinnamon Roll Protein Muffins: A Delicious and Healthy Recipe

Easy Jumbo Blueberry Muffins Recipe: Best Ever Delight!

Quick Savory Breakfast Pop Tarts: Perfect Morning Meal

Primary Sidebar

Browse by Diet

BreakfastDinnerLunchDessertAppetizer

Sweet Peach Yogurt Parfait Delight

One of my fondest memories is from a lazy summer afternoon spent at my grandmother’s house. The sun filtered through the kitchen window, casting a warm glow over the table where she would create her culinary magic. It was during one of those blissful moments that I first tasted her Peach Yogurt Parfait with Honey and Granola. The sweet aroma of ripe peaches mingling with creamy yogurt and the crunch of granola was nothing short of heavenly. It felt like summer captured in a bowl, and I still remember the joy of diving in with a spoon, each layer revealing a new burst of flavor.

When I think about that parfait, I can almost hear the gentle hum of the bees outside, reminding me of the floral notes that honey brings to every bite. The vibrant yellows and soft oranges of the peaches contrast beautifully with the creamy white yogurt and the golden crunch of granola. It’s a dish that not only looks delightful but also tastes like a celebration of fresh, wholesome ingredients.

What makes my version of this Peach Yogurt Parfait special is the careful balance of flavors and textures. I use ripe, juicy peaches, drizzled with locally sourced honey, and a homemade granola that’s bursting with nuts and seeds for an extra crunch. It’s a simple dish, but every layer is crafted with love and attention.

Let me show you exactly how to make this delightful parfait, so you can bring a bit of that summer magic into your kitchen!

Sweet Peach Yogurt Parfait Delight

Why You’ll Love This Recipe

  • Delightfully creamy texture from the Greek yogurt, paired with the juicy sweetness of fresh peaches.
  • Ready in under 20 minutes, making it a quick and satisfying breakfast or snack option.
  • Budget-friendly, using common ingredients that you may already have in your pantry.
  • Customizable with your favorite granola and nuts, allowing you to tailor each parfait to your taste.
  • Perfectly balanced flavors with the bright acidity of lemon juice and the sweetness of honey enhancing the peaches.

Ingredients

  • For the Parfait:
  • 2 cups plain Greek yogurt (or vanilla yogurt for a sweeter option)
  • 2 large ripe peaches, diced (about 2 cups)
  • 1 tablespoon fresh lemon juice (to prevent browning of peaches)
  • 2 tablespoons honey (plus more for drizzling)
  • 1 teaspoon vanilla extract (optional for extra flavor)
  • For the Granola:
  • 1 cup granola (store-bought or homemade; see notes for a simple granola recipe)
  • 1/4 cup sliced almonds (optional for added crunch)
  • 1/4 cup shredded coconut (optional for added flavor)

Let’s dive into some key ingredients that make this Peach Yogurt Parfait so delightful! First, the Greek yogurt is not only creamy but also packed with protein, making it a satisfying option for breakfast or a snack. If you’re looking for a sweeter option, you can easily substitute it with vanilla yogurt, though it may alter the overall flavor balance. Next, the ripe peaches are the star of the show; their natural sweetness shines through, so I recommend choosing peaches that yield slightly to pressure, indicating they’re perfectly ripe. If peaches aren’t in season, feel free to use nectarines or even frozen peaches—just thaw them before use. Finally, honey adds a lovely floral sweetness that ties everything together. If you prefer, maple syrup can serve as a delicious substitute.

Step-by-Step Instructions

  1. Start by preparing the peaches. Wash them thoroughly, then slice and dice them into bite-sized pieces. In a medium bowl, toss the diced peaches with 1 tablespoon of fresh lemon juice to prevent browning. Set aside for about 5 minutes while the lemon juice works its magic.
  2. In a separate bowl, combine the Greek yogurt, 2 tablespoons of honey, and 1 teaspoon of vanilla extract if using. Stir the mixture until smooth and thoroughly blended. This should take about a minute. Avoid overmixing to maintain the creaminess of the yogurt.
  3. Now it’s time to layer your parfait. Grab a clear glass or bowl to showcase your beautiful creation. Start with a generous spoonful of the yogurt mixture at the bottom—about 1/4 cup will do. Use a spoon to spread it evenly.
  4. Add a layer of the diced peaches over the yogurt, ensuring they cover the yogurt completely. You might want to use about half of what you have prepared—roughly 1 cup. This layer should be visually appealing, so arrange the peaches neatly.
  5. Sprinkle 1/4 cup of granola over the peaches. This adds a delightful crunch. Make sure to distribute it evenly to ensure every bite has that satisfying texture. Avoid packing it down too tightly, as you want it to maintain its crunch.
  6. Repeat the layers: spoon in another 1/4 cup of yogurt, followed by another cup of peaches, and another sprinkle of granola. You should have at least two layers, but feel free to add more depending on your glass size.
  7. Finish off your parfait with a drizzle of honey on top for added sweetness and a touch of elegance. If you’re using sliced almonds or shredded coconut, sprinkle them on top now. It adds a lovely visual contrast and extra flavor.
  8. Serve immediately or refrigerate for up to 30 minutes before serving to allow the flavors to meld together. However, I recommend enjoying it fresh to maintain the granola’s crunch.

Pro Tips for the Best Peach Yogurt Parfait With Honey And Granola

  • Make sure to choose ripe peaches for the best flavor and texture. A common mistake is using unripe fruit, which can lead to a less enjoyable parfait. Look for peaches that are fragrant and slightly soft to the touch.
  • Use a clear glass to assemble your parfait; this not only makes for a beautiful presentation but also allows you to see the colorful layers, which adds to the enjoyment of eating it.
  • For an even creamier texture, consider whipping the Greek yogurt with a hand mixer for a couple of minutes before layering. This small adjustment makes a huge difference in mouthfeel.
  • Be mindful of the granola-to-yogurt ratio. Too much granola can overwhelm the parfait, while too little can make it feel too creamy. Aim for about 1/4 cup of granola per layer for the perfect balance.
  • If you’re making this for a gathering, consider preparing the yogurt and peaches ahead of time and layering them just before serving. This ensures the granola stays crunchy!

Variations & Serving Ideas

There are so many ways to get creative with your Peach Yogurt Parfait! For a tropical twist, swap out the peaches for mangoes or pineapples and top with coconut flakes. If you prefer a berry flavor, mix in some blueberries or strawberries with the peaches for added color and taste. For a nutty version, incorporate chopped walnuts or pecans instead of almonds.

As for serving ideas, this parfait pairs beautifully with a side of scrambled eggs for a hearty breakfast or fresh fruit salad for a light lunch. You might also enjoy it alongside whole grain toast with almond butter for an energizing snack. The contrast of flavors and textures will elevate your meal experience!

Storage, Make-Ahead & Reheating

The Peach Yogurt Parfait is best enjoyed fresh, but you can prepare some components ahead of time. Store the layered parfait in an airtight container in the refrigerator for up to 24 hours. However, be cautious; the granola may lose its crunch if stored too long. You can freeze the yogurt and peach mixture for up to 2 months; just remember to thaw it in the refrigerator overnight before serving.

If you plan to enjoy this dish the next day, it can taste even better as the flavors meld together. Just remember to add the granola right before serving to keep its delightful crunch!

Frequently Asked Questions

Can I make Peach Yogurt Parfait With Honey And Granola ahead of time?

Yes — in fact, it tastes even better the next day as the flavors meld. However, I recommend waiting to add the granola until just before serving to maintain its crunch.

What can I substitute for Greek yogurt?

If you prefer a lighter option, you can substitute Greek yogurt with regular yogurt or a dairy-free alternative like coconut yogurt. Just remember that this may alter the creaminess and flavor profile slightly.

Can I use frozen peaches for this parfait?

Absolutely! Just make sure to thaw the frozen peaches before using them. They will still add great flavor, though the texture may be slightly softer than fresh peaches.

How do I make the parfait vegan?

To make a vegan version, substitute the Greek yogurt with a plant-based yogurt alternative, and replace honey with maple syrup or agave nectar. This keeps the parfait sweet while adhering to a vegan diet.

What other fruits can I use in this recipe?

You can mix and match fruits based on your preference. Try using strawberries, blueberries, raspberries, or even bananas. Just make sure to adjust the lemon juice as needed to prevent browning.

Sweet Peach Yogurt Parfait Delight

Final Thoughts

The Peach Yogurt Parfait with Honey and Granola is a delightful blend of creamy yogurt, sweet peaches, and crunchy granola that creates a satisfying and nourishing treat. Each layer bursts with flavor, making it a perfect choice for breakfast or a light dessert.

This is the kind of recipe I come back to again and again, especially when I want something refreshing and wholesome to start my day. The harmony of sweet and tart flavors, combined with the delightful crunch, never fails to lift my spirits!

I encourage you to give this parfait a try and indulge in its comforting goodness. Feel free to share your results or even add your own twist—perhaps a sprinkle of cinnamon or a handful of nuts. Enjoy creating your perfect parfait!

Print
clock clock iconcutlery cutlery iconflag flag iconfolder folder iconinstagram instagram iconpinterest pinterest iconfacebook facebook iconprint print iconsquares squares iconheart heart iconheart solid heart solid icon

Peach Yogurt Parfait


  • Author: Lily author
  • Total Time: 15 minutes
  • Yield: 4 servings 1x
Pin Recipe
Print Recipe

Description

This Peach Yogurt Parfait combines creamy Greek yogurt, juicy peaches, and crunchy granola for a delightful treat. It’s a perfect breakfast or snack that captures the essence of summer in every bite.


Ingredients

Scale
  • For the Parfait:
  • 2 cups plain Greek yogurt (or vanilla yogurt for a sweeter option)
  • 2 large ripe peaches, diced (about 2 cups)
  • 1 tablespoon fresh lemon juice (to prevent browning of peaches)
  • 2 tablespoons honey (plus more for drizzling)
  • 1 teaspoon vanilla extract (optional for extra flavor)
  • For the Granola:
  • 1 cup granola (store-bought or homemade; see notes for a simple granola recipe)
  • 1/4 cup sliced almonds (optional for added crunch)
  • 1/4 cup shredded coconut (optional for added flavor)

Instructions

  1. Start by preparing the peaches. Wash them thoroughly, then slice and dice them into bite-sized pieces. In a medium bowl, toss the diced peaches with 1 tablespoon of fresh lemon juice to prevent browning. Set aside for about 5 minutes while the lemon juice works its magic.
  2. In a separate bowl, combine the Greek yogurt, 2 tablespoons of honey, and 1 teaspoon of vanilla extract if using. Stir the mixture until smooth and thoroughly blended. This should take about a minute. Avoid overmixing to maintain the creaminess of the yogurt.
  3. Now it’s time to layer your parfait. Grab a clear glass or bowl to showcase your beautiful creation. Start with a generous spoonful of the yogurt mixture at the bottom—about 1/4 cup will do. Use a spoon to spread it evenly.
  4. Add a layer of the diced peaches over the yogurt, ensuring they cover the yogurt completely. You might want to use about half of what you have prepared—roughly 1 cup. This layer should be visually appealing, so arrange the peaches neatly.
  5. Sprinkle 1/4 cup of granola over the peaches. This adds a delightful crunch. Make sure to distribute it evenly to ensure every bite has that satisfying texture. Avoid packing it down too tightly, as you want it to maintain its crunch.
  6. Repeat the layers: spoon in another 1/4 cup of yogurt, followed by another cup of peaches, and another sprinkle of granola. You should have at least two layers, but feel free to add more depending on your glass size.
  7. Finish off your parfait with a drizzle of honey on top for added sweetness and a touch of elegance. If you’re using sliced almonds or shredded coconut, sprinkle them on top now. It adds a lovely visual contrast and extra flavor.
  8. Serve immediately or refrigerate for up to 30 minutes before serving to allow the flavors to meld together. However, I recommend enjoying it fresh to maintain the granola’s crunch.
  • Prep Time: 15 mins
  • Cook Time: 0 mins
  • Category: Breakfast
  • Method: No-cook
  • Cuisine: American

Nutrition

  • Serving Size: 1 parfait
  • Calories: 250
  • Sugar: 20 g
  • Sodium: 50 mg
  • Fat: 5 g
  • Saturated Fat: 2 g
  • Unsaturated Fat: 3 g
  • Trans Fat: 0 g
  • Carbohydrates: 40 g
  • Fiber: 3 g
  • Protein: 10 g
  • Cholesterol: 10 mg

Keywords: Choose ripe peaches for the best flavor and texture. Use a clear glass for a beautiful presentation. For creaminess, consider whipping the yogurt before layering. Be mindful of the granola-to-yogurt ratio. Prepare yogurt and peaches ahead of time for gatherings, layering just before serving.

Did you make this recipe?

Share a photo and tag us — we can't wait to see what you've made!

Sun-Kissed Frozen Orange Cream Slush

As a child, summer days felt like they lasted forever. I remember the sticky heat wrapping around me as I played outside, my laughter mingling with the sounds of the neighborhood. But nothing could cool me down quite like the moment I’d spot my grandmother, laboring over her blender, whipping up her famous Frozen Orange Creamsicle Slush. That vibrant orange treat, with its frosty texture and sweet citrus aroma, was like a burst of sunshine in a cup. Just one sip, and I could feel the coolness wash over me, sparking pure joy.

This Frozen Orange Creamsicle Slush has a way of making you feel like a kid again. Its creamy, dreamy consistency is a delightful balance of bright orange and soft vanilla, inviting you to dive right in. The refreshing tang of orange dances on your tongue, while the smooth creaminess envelops you in a comforting embrace. It’s a nostalgic treat that’s perfect for hot summer afternoons or anytime you need a little pick-me-up.

What makes my version of this slush stand out is the addition of a hint of vanilla bean, which elevates the flavor and adds an extra layer of richness. Plus, it’s super easy to whip up with just a few simple ingredients that you probably already have on hand! So, if you’re ready to relive those sun-soaked memories, let me show you exactly how to make it.

Sun-Kissed Frozen Orange Cream Slush

Why You’ll Love This Recipe

  • Each slush is a perfect blend of creamy vanilla and zesty orange, creating a nostalgic flavor reminiscent of summer days.
  • This refreshing treat is ready in under 15 minutes, making it an ideal quick dessert for unexpected guests or hot afternoons.
  • With just 8 simple ingredients, it’s budget-friendly, ensuring you don’t have to break the bank to enjoy a delicious slush.
  • The slush has a perfectly smooth texture, thanks to the combination of ice and ice cream, providing a delightful contrast to the bright citrus flavors.
  • It’s highly customizable; you can easily adjust the sweetness and add fresh herbs for a unique twist that suits your taste.

Ingredients

  • 2 cups orange juice (freshly squeezed or store-bought)
  • 1 cup vanilla ice cream
  • 1 cup crushed ice
  • 1/2 cup milk (whole or 2%)
  • 1/4 cup granulated sugar (adjust based on sweetness preference)
  • 1 teaspoon vanilla extract
  • Zest of 1 orange (for added flavor)
  • Fresh orange slices and mint leaves (for garnish)

The star of this Frozen Orange Creamsicle Slush is the orange juice, which provides the vibrant, citrusy base. Freshly squeezed juice will yield the brightest flavor, but store-bought options can be just as convenient. If you’re opting for store-bought, choose 100% pure juice with no added sugars for the best results. Another essential ingredient is the vanilla ice cream; it adds creaminess and sweetness. You can substitute it with dairy-free ice cream if you’re looking for a vegan option. Whole or 2% milk complements the ice cream, creating a smooth blend. If you want a lower-calorie version, almond or oat milk can be good alternatives.

Lastly, the granulated sugar can be adjusted based on your sweetness preference. If you prefer a more natural sweetener, consider using honey or agave syrup. The orange zest enhances the flavor profile, providing an aromatic pop that brings the whole slush together. Don’t skip it! It adds an extra layer of brightness that makes this slush truly special.

Step-by-Step Instructions

  1. Start by preparing your ingredients. Gather 2 cups of orange juice, 1 cup of vanilla ice cream, and 1 cup of crushed ice. Make sure the ice is finely crushed, as larger chunks can make blending difficult.
  2. In a blender, combine the orange juice, vanilla ice cream, crushed ice, and 1/2 cup of milk. Add 1/4 cup of granulated sugar and 1 teaspoon of vanilla extract. If you like a sweeter slush, consider adding a bit more sugar at this stage.
  3. Add the zest of 1 orange to the blender. This step is crucial for enhancing the citrus flavor of your slush. Make sure not to include the bitter white pith—only the flavorful zest.
  4. Blend the mixture on medium-high speed for about 30-45 seconds. Stop once the ingredients are fully combined and the slush has a smooth, even consistency. If you notice large chunks of ice, blend for an additional 10-15 seconds. Avoid over-blending, as this can make the slush too liquidy.
  5. Once blended, taste the slush. If it needs more sweetness, add a little more sugar and blend for a few more seconds. If it’s too thick, you can add a splash of milk to reach your desired consistency.
  6. Pour the slush into glasses. This recipe typically serves 4, but you can easily double it for larger gatherings. Use a spoon to help guide the slush into the glasses if needed.
  7. Garnish each serving with fresh orange slices and mint leaves. The mint not only adds a pop of color but also a refreshing aroma that complements the citrus flavors beautifully.
  8. Serve immediately and enjoy! If you’ve made extra, you can refrigerate it for a short time, but it’s best enjoyed fresh.

Pro Tips for the Best Frozen Orange Creamsicle Slush

  • Don’t skip the orange zest! It’s a game-changer for flavor. Always zest before juicing to make it easier.
  • Use a high-powered blender for the best texture. A standard blender may struggle with ice, leading to uneven consistency. If you have a food processor, that can work too, but ensure the ice is finely crushed.
  • Adjust the ice-to-liquid ratio carefully. If your slush is too thick, it won’t blend well. Start with less ice and add more until you reach your preferred texture.
  • Be cautious with the sugar! Always start with the lower amount, as you can easily add more, but it’s hard to fix an overly sweet slush.
  • For a fun twist, consider adding a splash of coconut milk or a handful of fresh fruit like strawberries or pineapple. This not only enhances the flavor but also adds a beautiful color contrast.

Variations & Serving Ideas

There are countless ways to put a spin on your Frozen Orange Creamsicle Slush. Consider making a tropical version by adding in some pineapple juice or coconut milk for a delightful tropical twist. If you’re feeling adventurous, try incorporating a handful of frozen mango or peach slices for added sweetness. For a lighter version, swap out the vanilla ice cream for Greek yogurt for a creamy yet tangy alternative.

As for serving ideas, this refreshing slush pairs wonderfully with light summer dishes like grilled chicken skewers, fish tacos, or a simple salad topped with citrus vinaigrette. The bright, zesty flavors of the slush complement these dishes perfectly, making them an ideal pairing for a sunny day.

Storage, Make-Ahead & Reheating

This Frozen Orange Creamsicle Slush is best enjoyed fresh, but if you have leftovers, you can store them in an airtight container in the fridge for up to 2 days. Just keep in mind that the slush may lose some of its texture over time as the ice melts. It doesn’t freeze well, as the ice will turn into a solid block. If you must freeze it, blend again after thawing to restore the slushy consistency. This treat is best the day you make it, as the flavors meld together beautifully overnight, enhancing its deliciousness.

Frequently Asked Questions

Can I make Frozen Orange Creamsicle Slush ahead of time?

Yes — in fact, it tastes even better the next day as the flavors meld. However, it’s best to enjoy it fresh, as the texture can change if stored for too long. If you need to prepare it ahead, keep it in the fridge and re-blend before serving.

What kind of orange juice should I use?

For the best flavor, use freshly squeezed orange juice. However, if you’re short on time, opt for 100% pure store-bought juice without added sugars. This will ensure that your slush remains flavorful and refreshing.

Can I substitute the vanilla ice cream?

Absolutely! If you’re looking for a dairy-free option, coconut milk ice cream or a non-dairy vanilla ice cream can work wonderfully. They will still provide the creamy texture and sweetness you desire.

How can I adjust the sweetness of my slush?

You can easily adjust the sweetness by modifying the amount of sugar added. Start with 1/4 cup and taste the mixture before blending. If you prefer it sweeter, add more sugar gradually until it reaches your desired level.

What should I do if my slush is too thick?

If your slush is too thick, simply add a splash of milk or orange juice and blend again. This will help achieve a more drinkable consistency while maintaining the slushy texture. Adjust gradually to reach your preferred thickness.

Sun-Kissed Frozen Orange Cream Slush

Final Thoughts

The Frozen Orange Creamsicle Slush is a delightful blend of refreshing citrus and creamy goodness, making it a perfect treat for warm days or any time you crave a taste of nostalgia. The way the bright orange flavor dances with the creamy texture truly elevates this slush, transforming it into a satisfying escape from the everyday.

This is the kind of recipe I come back to again and again, especially when I’m looking to cool down or impress guests at a summer gathering. It’s simple to make and always brings smiles all around! I encourage you to try this recipe for yourself—don’t hesitate to share your results or even put your own spin on it. Happy slushing!

Print
clock clock iconcutlery cutlery iconflag flag iconfolder folder iconinstagram instagram iconpinterest pinterest iconfacebook facebook iconprint print iconsquares squares iconheart heart iconheart solid heart solid icon

Frozen Orange Creamsicle Slush


  • Author: Lily author
  • Total Time: 15 minutes
  • Yield: 4 servings 1x
Pin Recipe
Print Recipe

Description

This Frozen Orange Creamsicle Slush is a refreshing treat that combines creamy vanilla and zesty orange flavors. Perfect for hot summer days, it brings back nostalgic memories with every sip.


Ingredients

Scale
  • 2 cups orange juice (freshly squeezed or store-bought)
  • 1 cup vanilla ice cream
  • 1 cup crushed ice
  • 1/2 cup milk (whole or 2%)
  • 1/4 cup granulated sugar (adjust based on sweetness preference)
  • 1 teaspoon vanilla extract
  • Zest of 1 orange (for added flavor)
  • Fresh orange slices and mint leaves (for garnish)

Instructions

  1. Start by preparing your ingredients. Gather 2 cups of orange juice, 1 cup of vanilla ice cream, and 1 cup of crushed ice. Make sure the ice is finely crushed, as larger chunks can make blending difficult.
  2. In a blender, combine the orange juice, vanilla ice cream, crushed ice, and 1/2 cup of milk. Add 1/4 cup of granulated sugar and 1 teaspoon of vanilla extract. If you like a sweeter slush, consider adding a bit more sugar at this stage.
  3. Add the zest of 1 orange to the blender. This step is crucial for enhancing the citrus flavor of your slush. Make sure not to include the bitter white pith—only the flavorful zest.
  4. Blend the mixture on medium-high speed for about 30-45 seconds. Stop once the ingredients are fully combined and the slush has a smooth, even consistency. If you notice large chunks of ice, blend for an additional 10-15 seconds. Avoid over-blending, as this can make the slush too liquidy.
  5. Once blended, taste the slush. If it needs more sweetness, add a little more sugar and blend for a few more seconds. If it’s too thick, you can add a splash of milk to reach your desired consistency.
  6. Pour the slush into glasses. This recipe typically serves 4, but you can easily double it for larger gatherings. Use a spoon to help guide the slush into the glasses if needed.
  7. Garnish each serving with fresh orange slices and mint leaves. The mint not only adds a pop of color but also a refreshing aroma that complements the citrus flavors beautifully.
  8. Serve immediately and enjoy! If you’ve made extra, you can refrigerate it for a short time, but it's best enjoyed fresh.
  • Prep Time: 15 min
  • Cook Time: 0 min
  • Category: Dessert
  • Method: Blending
  • Cuisine: American

Nutrition

  • Serving Size: 1 serving
  • Calories: 200
  • Sugar: 30 g
  • Sodium: 50 mg
  • Fat: 5 g
  • Saturated Fat: 3 g
  • Unsaturated Fat: 2 g
  • Trans Fat: 0 g
  • Carbohydrates: 40 g
  • Fiber: 1 g
  • Protein: 2 g
  • Cholesterol: 20 mg

Keywords: Don't skip the orange zest! It's a game-changer for flavor. Always zest before juicing to make it easier.

Did you make this recipe?

Share a photo and tag us — we can't wait to see what you've made!

Zesty Lemon Poppy Seed Delight

One rainy afternoon, I found myself in my grandmother’s cozy kitchen, the kind that always smelled like warmth and love. She was whipping up her famous Lemon Poppy Seed Loaf, a recipe that had been passed down through generations. As the batter came together, the zesty aroma of fresh lemons filled the air, mingling perfectly with the nutty fragrance of poppy seeds. I can still picture her, apron-clad, as she expertly drizzled a vibrant citrus icing over the loaf, creating a glossy, sun-kissed finish that beckoned us to dive in. It was a moment that sparked my own passion for baking, and this recipe has become a cherished staple in my home ever since.

When you take a bite of this Lemon Poppy Seed Loaf, it’s like a burst of sunshine on your palate. The loaf is beautifully golden, with a tender crumb that melts in your mouth. Each slice is speckled with tiny poppy seeds, adding a delightful crunch that contrasts beautifully with the tangy sweetness of the lemon. And that citrus icing? It’s the finishing touch that elevates this loaf from ordinary to extraordinary, with its bright, zesty flavor dancing on your taste buds.

This recipe stands out because it embraces simplicity while delivering on flavor. I’ve added a hint of vanilla to the batter, enhancing the overall taste and making it even more indulgent. Trust me, once you make this Lemon Poppy Seed Loaf With Citrus Icing, it’ll become a go-to in your baking repertoire.

So, let me show you exactly how to make it!

Zesty Lemon Poppy Seed Delight

Why You’ll Love This Recipe

  • Moist and tender crumb that melts in your mouth, thanks to the perfect balance of butter and buttermilk.
  • Bright, zesty lemon flavor paired with crunchy poppy seeds, creating a delightful texture and taste experience.
  • Easy to whip up in just about an hour, perfect for last-minute gatherings or a cozy afternoon treat.
  • Budget-friendly with everyday ingredients, making it an accessible option for all home bakers.
  • The citrus icing adds a sweet tang that elevates the loaf, turning a simple recipe into a showstopper!

Ingredients

  • 1 ½ cups (190g) all-purpose flour
  • 1 teaspoon baking powder
  • ½ teaspoon baking soda
  • ½ teaspoon salt
  • 3 tablespoons poppy seeds
  • ½ cup (115g) unsalted butter, softened to room temperature
  • 1 cup (200g) granulated sugar
  • 2 large eggs
  • 1 teaspoon vanilla extract
  • 1 teaspoon lemon zest (from about 1 medium lemon)
  • ½ cup (120ml) buttermilk
  • 2 tablespoons fresh lemon juice

For the Citrus Icing:

  • 1 cup (120g) powdered sugar
  • 2 tablespoons fresh lemon juice
  • 1 tablespoon orange juice
  • 1 teaspoon lemon zest (for garnish, optional)

Let’s dive into the key ingredients that make this Lemon Poppy Seed Loaf so special. The all-purpose flour provides the structure and base for the loaf, while the baking powder and baking soda ensure it rises perfectly, giving the loaf a light texture. For a gluten-free variation, you could substitute the flour with a gluten-free all-purpose blend. Poppy seeds not only add a delightful crunch but also contribute to the unique flavor profile that pairs well with the citrus notes.

Unsalted butter is crucial for achieving the buttery richness that makes this loaf so moist. If you’re looking for a dairy-free option, coconut oil or a vegan butter can be used instead. The buttermilk is another essential component, providing acidity that activates the baking soda for a fluffy texture. If you don’t have buttermilk on hand, you can easily make a substitute by mixing ½ cup of milk with 1 tablespoon of vinegar or lemon juice and letting it sit for about 5 minutes.

Step-by-Step Instructions

  1. Preheat your oven to 350°F (175°C). Grease a 9×5-inch loaf pan or line it with parchment paper for easy removal later.
  2. In a medium mixing bowl, whisk together 1 ½ cups of all-purpose flour, 1 teaspoon of baking powder, ½ teaspoon of baking soda, ½ teaspoon of salt, and 3 tablespoons of poppy seeds. This helps to evenly distribute the baking agents and ensures a uniform rise.
  3. In a large mixing bowl, cream together ½ cup of softened unsalted butter and 1 cup of granulated sugar using an electric mixer on medium speed for about 3-4 minutes, until the mixture is light and fluffy. Make sure to scrape down the sides of the bowl occasionally.
  4. Add 2 large eggs, 1 teaspoon of vanilla extract, and 1 teaspoon of lemon zest to the creamed butter and sugar, mixing until fully combined. You want a smooth consistency, so ensure there are no lumps of butter.
  5. In a small bowl, combine ½ cup of buttermilk and 2 tablespoons of fresh lemon juice. Alternately add the dry ingredients and buttermilk mixture to the butter mixture, starting and ending with the dry ingredients. Mix just until combined; do not overmix, as this can lead to a dense loaf.
  6. Pour the batter into the prepared loaf pan. Smooth the top with a spatula, ensuring it’s even. Bake in the preheated oven for 50-60 minutes, or until a toothpick inserted in the center comes out clean. The edges should be lightly golden brown, and the center should feel just set.
  7. Once baked, remove the loaf from the oven and allow it to cool in the pan for about 10 minutes. Then, transfer it to a wire rack to cool completely. Resist the urge to slice too soon, as it will be crumbly if it’s still warm.
  8. While the loaf is cooling, prepare the citrus icing. In a medium bowl, whisk together 1 cup of powdered sugar, 2 tablespoons of fresh lemon juice, and 1 tablespoon of orange juice until smooth. If the icing is too thick, you can add a little more juice to reach your desired consistency.
  9. Once the loaf is completely cool, drizzle the citrus icing over the top. If you like, sprinkle with an additional teaspoon of lemon zest for an extra pop of flavor and color.

Pro Tips for the Best Lemon Poppy Seed Loaf With Citrus Icing

  • Be careful not to overmix your batter; this is a common mistake that can lead to a dense loaf. Mix just until the dry ingredients are incorporated for a light and fluffy texture.
  • Use room temperature ingredients, especially the butter and eggs. This helps to create a smoother batter and ensures even baking. Take your eggs out of the fridge about 30 minutes before you start.
  • For a more pronounced lemon flavor, consider adding a little lemon extract in addition to the zest and juice. Just a half teaspoon can elevate the citrus notes significantly.
  • When measuring your flour, spoon it into the measuring cup and level it off with a knife instead of scooping directly from the bag. This prevents packing and ensures you don’t end up with a dry loaf.
  • Invest in a good quality loaf pan; it makes a difference in heat distribution, which ensures even baking. If your pan is dark-coated, reduce the oven temperature by 25°F to prevent over-browning.

Variations & Serving Ideas

For a delightful twist, consider adding blueberries or raspberries to the batter for a fruity burst of flavor. You can also experiment with different citrus fruits—try lime or grapefruit zest and juice for a refreshing change. For a healthier option, substitute half of the all-purpose flour with whole wheat flour for added fiber without compromising too much on texture.

This Lemon Poppy Seed Loaf pairs beautifully with a light salad, such as a mixed greens salad with a vinaigrette, or a cup of tea for a cozy afternoon treat. It also complements a creamy cheese platter, as the acidity of the loaf balances rich cheeses perfectly. Lastly, a scoop of vanilla ice cream on the side creates a delightful contrast of temperatures and flavors!

Storage, Make-Ahead & Reheating

This Lemon Poppy Seed Loaf can be stored at room temperature for up to 3 days if wrapped tightly in plastic wrap. If you want to keep it longer, it freezes well for up to 3 months. To freeze, wrap the loaf tightly in plastic wrap and then in aluminum foil to prevent freezer burn.

When you’re ready to enjoy it again, simply thaw it in the fridge overnight. Reheat individual slices in the microwave for 15-20 seconds or in a toaster oven until warmed through. Interestingly, many people find that this loaf tastes even better the next day, as the flavors have time to meld!

Frequently Asked Questions

Can I make Lemon Poppy Seed Loaf With Citrus Icing ahead of time?

Yes — in fact, it tastes even better the next day! You can make the loaf a day in advance, allowing the flavors to develop. Just be sure to store it in an airtight container to maintain its moisture.

Can I substitute the poppy seeds?

Absolutely! If you don’t have poppy seeds on hand or prefer an alternative, you can use sesame seeds for a similar crunch or omit them entirely for a smooth loaf.

What can I use instead of buttermilk?

If you don’t have buttermilk, you can easily create a substitute by mixing ½ cup of milk (dairy or plant-based) with 1 tablespoon of vinegar or lemon juice. Let it sit for 5 minutes before using in the recipe.

How can I make this recipe gluten-free?

To make a gluten-free version of this Lemon Poppy Seed Loaf, substitute the all-purpose flour with a gluten-free all-purpose flour blend. Just ensure that the blend contains a binding agent like xanthan gum for the best results.

What is the best way to store leftover loaf?

Leftover Lemon Poppy Seed Loaf should be stored in an airtight container at room temperature for up to 3 days. For longer storage, wrap it tightly and freeze for up to 3 months. Thaw it before serving for the best texture.

Zesty Lemon Poppy Seed Delight

Final Thoughts

The Lemon Poppy Seed Loaf with Citrus Icing is truly a delightful treat that brings a burst of brightness to any occasion. The zesty lemon flavor combined with the subtle crunch of poppy seeds creates a satisfying balance, while the citrus icing adds a touch of sweetness that perfectly complements the loaf’s tanginess.

This is the kind of recipe I come back to again and again, especially when I want to brighten up a gloomy day or celebrate a small victory. The aroma that fills the kitchen as it bakes is absolutely heavenly! I encourage you to give this recipe a try; you might just find it becoming a beloved staple in your home. Don’t forget to share your results or even add your own unique twist—I can’t wait to see what you create!

Print
clock clock iconcutlery cutlery iconflag flag iconfolder folder iconinstagram instagram iconpinterest pinterest iconfacebook facebook iconprint print iconsquares squares iconheart heart iconheart solid heart solid icon

Lemon Poppy Seed Loaf


  • Author: Lily author
  • Total Time: 20 minute
  • Yield: 1 loaf 1x
Pin Recipe
Print Recipe

Description

This Lemon Poppy Seed Loaf is a delightful treat that combines zesty lemon flavor with crunchy poppy seeds. Topped with a citrus icing, it’s perfect for any occasion.


Ingredients

Scale
  • 1 ½ cups (190g) all-purpose flour
  • 1 teaspoon baking powder
  • ½ teaspoon baking soda
  • ½ teaspoon salt
  • 3 tablespoons poppy seeds
  • ½ cup (115g) unsalted butter, softened to room temperature
  • 1 cup (200g) granulated sugar
  • 2 large eggs
  • 1 teaspoon vanilla extract
  • 1 teaspoon lemon zest (from about 1 medium lemon)
  • ½ cup (120ml) buttermilk
  • 2 tablespoons fresh lemon juice
  • 1 cup (120g) powdered sugar
  • 2 tablespoons fresh lemon juice
  • 1 tablespoon orange juice
  • 1 teaspoon lemon zest (for garnish, optional)

Instructions

  1. Preheat your oven to 350°F (175°C). Grease a 9×5-inch loaf pan or line it with parchment paper for easy removal later.
  2. In a medium mixing bowl, whisk together 1 ½ cups of all-purpose flour, 1 teaspoon of baking powder, ½ teaspoon of baking soda, ½ teaspoon of salt, and 3 tablespoons of poppy seeds. This helps to evenly distribute the baking agents and ensures a uniform rise.
  3. In a large mixing bowl, cream together ½ cup of softened unsalted butter and 1 cup of granulated sugar using an electric mixer on medium speed for about 3-4 minutes, until the mixture is light and fluffy. Make sure to scrape down the sides of the bowl occasionally.
  4. Add 2 large eggs, 1 teaspoon of vanilla extract, and 1 teaspoon of lemon zest to the creamed butter and sugar, mixing until fully combined. You want a smooth consistency, so ensure there are no lumps of butter.
  5. In a small bowl, combine ½ cup of buttermilk and 2 tablespoons of fresh lemon juice. Alternately add the dry ingredients and buttermilk mixture to the butter mixture, starting and ending with the dry ingredients. Mix just until combined; do not overmix, as this can lead to a dense loaf.
  6. Pour the batter into the prepared loaf pan. Smooth the top with a spatula, ensuring it’s even. Bake in the preheated oven for 50-60 minutes, or until a toothpick inserted in the center comes out clean. The edges should be lightly golden brown, and the center should feel just set.
  7. Once baked, remove the loaf from the oven and allow it to cool in the pan for about 10 minutes. Then, transfer it to a wire rack to cool completely. Resist the urge to slice too soon, as it will be crumbly if it’s still warm.
  8. While the loaf is cooling, prepare the citrus icing. In a medium bowl, whisk together 1 cup of powdered sugar, 2 tablespoons of fresh lemon juice, and 1 tablespoon of orange juice until smooth. If the icing is too thick, you can add a little more juice to reach your desired consistency.
  9. Once the loaf is completely cool, drizzle the citrus icing over the top. If you like, sprinkle with an additional teaspoon of lemon zest for an extra pop of flavor and color.
  • Prep Time: 15 mins
  • Cook Time: 50-60 mins
  • Category: Dessert
  • Method: Baking
  • Cuisine: American

Nutrition

  • Serving Size: 1 slice
  • Calories: 200
  • Sugar: 15 g
  • Sodium: 150 mg
  • Fat: 8 g
  • Saturated Fat: 5 g
  • Unsaturated Fat: 3 g
  • Trans Fat: 0 g
  • Carbohydrates: 30 g
  • Fiber: 1 g
  • Protein: 3 g
  • Cholesterol: 40 mg

Keywords: Be careful not to overmix your batter; this is a common mistake that can lead to a dense loaf. Use room temperature ingredients for a smoother batter and even baking.

Did you make this recipe?

Share a photo and tag us — we can't wait to see what you've made!

  • Privacy Policy
  • Terms Of Service
  • Contact
  • About
  • GDPR

Copyright © 2025 Homesmad