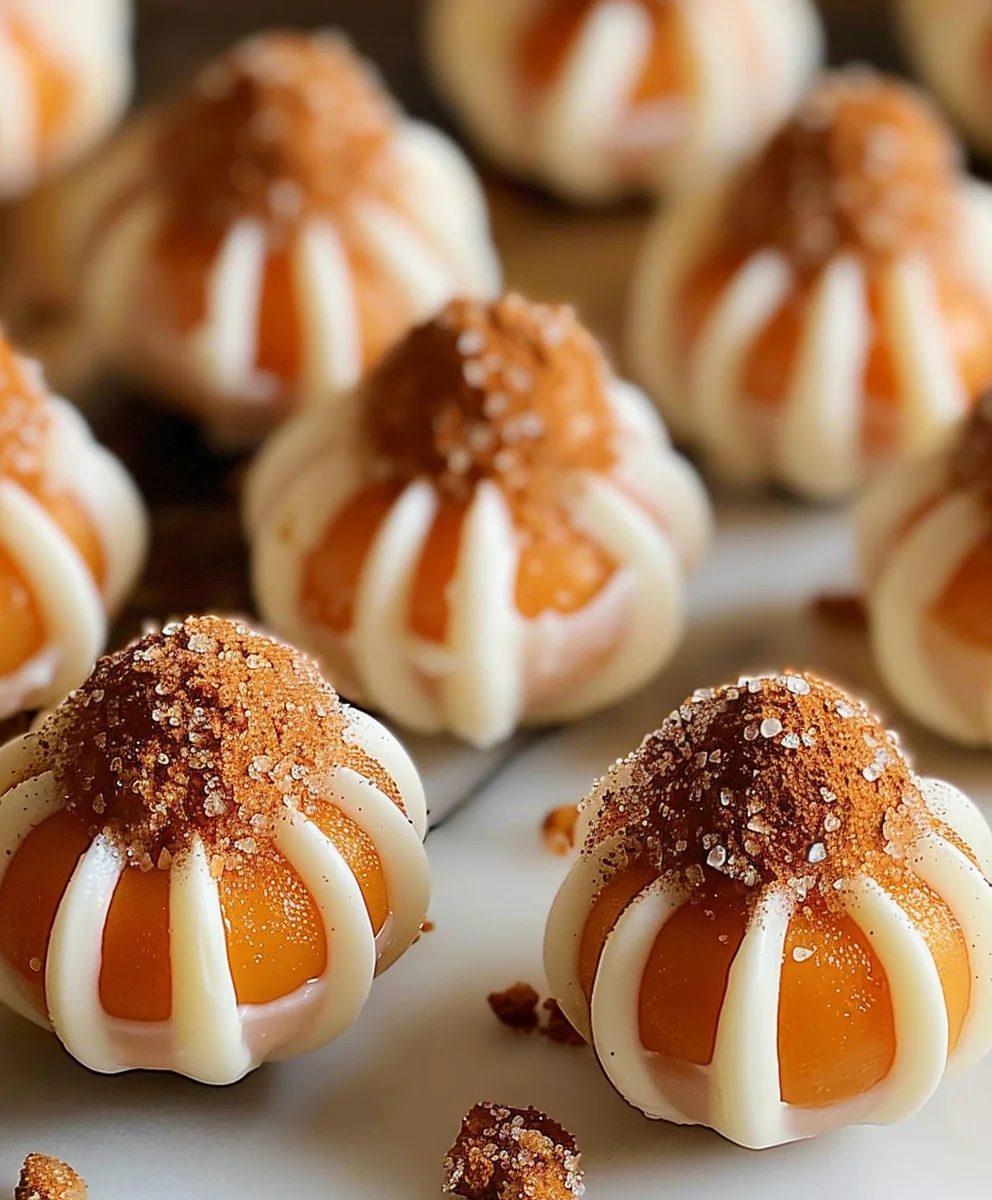
Pumpkin Cheesecake Truffles are an exquisite celebration of autumn’s most cherished flavors, meticulously crafted into a delightful, bite-sized indulgence. Imagine the comforting warmth of spiced pumpkin, a quintessential symbol of harvest seasons and cozy gatherings, harmoniously blended with the sophisticated tang and creamy richness of classic cheesecake. These exquisite little morsels capture the very essence of fall, transforming beloved dessert traditions into an effortlessly elegant treat perfect for any occasion, from intimate family dinners to festive holiday parties.
I find that people absolutely adore these truffles not only for their incredible taste and unbelievably smooth, melt-in-your-mouth texture but also for their sheer convenience. Each truffle offers a perfect symphony of sweet and spicy notes, wrapped in a decadent coating, delivering all the complex flavors of a full-sized pumpkin cheesecake without the fuss of baking. This ingenious no-bake approach makes creating these delightful Pumpkin Cheesecake Truffles a joyful and stress-free experience, ensuring that everyone can savor the ultimate fall dessert sensation in a single, irresistible bite. They are truly a testament to how simple ingredients can create extraordinary magic.

Ingredients:
-
For the Pumpkin Cheesecake Base:
- Two (2) 8-ounce packages (16 ounces total) full-fat cream cheese, softened to room temperature
- One (1) cup (about 240g) pure pumpkin puree (not pumpkin pie filling, which is pre-spiced and sweetened)
- Three (3) to four (4) cups (360g to 480g) powdered sugar (also known as confectioners’ sugar), sifted, adjusted to your desired sweetness and consistency
- One (1) teaspoon pure vanilla extract
- Two (2) teaspoons pumpkin pie spice blend
- Half (1/2) teaspoon ground cinnamon (optional, for an extra spice kick)
- One-quarter (1/4) teaspoon fine sea salt
- One (1) cup (about 100g) finely crushed graham cracker crumbs (or digestive biscuit crumbs), optional but highly recommended for better texture and stability
-
For the White Chocolate Coating:
- Sixteen (16) ounces high-quality white chocolate melting wafers, candy melts, or baking bars, finely chopped for easier melting
- One (1) to two (2) teaspoons coconut oil or vegetable shortening (optional, helps thin the chocolate for a smoother dip)
-
For Optional Dark Chocolate Drizzle and Decorations:
- Four (4) ounces dark chocolate melting wafers or baking bars, finely chopped
- One (1) teaspoon coconut oil or vegetable shortening (for dark chocolate)
- Assorted sprinkles (autumn-themed, gold, or silver)
- Extra pumpkin pie spice or ground cinnamon for dusting
- Finely chopped pecans or walnuts
Preparing the Pumpkin Cheesecake Mixture
-
Soften the Cream Cheese: First things first, you’ll want to ensure your cream cheese is wonderfully soft and at true room temperature. I usually take it out of the fridge at least an hour, or even two, before I plan to start. If you’re in a hurry, you can unwrap it, cut it into smaller pieces, and let it sit for about 30 minutes, or even carefully microwave it in short 10-15 second bursts until pliable but not melted. This step is crucial because cold cream cheese will lead to a lumpy mixture, and we’re aiming for absolute creaminess for our Pumpkin Cheesecake Truffles!
-
Cream the Cream Cheese: In a large mixing bowl, using an electric mixer (either a stand mixer with the paddle attachment or a hand mixer), beat the softened cream cheese on medium speed until it’s light, fluffy, and completely smooth. This usually takes about 2-3 minutes. Scrape down the sides of the bowl periodically to ensure everything is evenly incorporated. We want it airy and free of any lumps.
-
Incorporate the Pumpkin and Flavorings: To the creamed cream cheese, add the pure pumpkin puree, vanilla extract, pumpkin pie spice, ground cinnamon (if using), and fine sea salt. Continue to beat on medium speed until all these wonderful ingredients are thoroughly combined. The mixture should be uniform in color and texture. Again, don’t forget to scrape down the sides of the bowl to ensure no dry spots are left behind. You’ll notice the beautiful autumn color starting to develop now!
-
Gradually Add Powdered Sugar: Now for the sweetness and the structure! With the mixer on low speed, gradually add the sifted powdered sugar, one cup at a time. I always recommend sifting powdered sugar to prevent lumps, which can be a real nuisance in a no-bake recipe like this. Once all the sugar is added, increase the speed to medium-high and beat for another 2-3 minutes until the mixture is thick, smooth, and well combined. The consistency is key here; it should be firm enough to hold its shape once chilled, so don’t be shy about adding the full amount of powdered sugar if needed. Taste a tiny bit and adjust to your preferred level of sweetness. Remember, it will firm up more once chilled.
-
Add Graham Cracker Crumbs (Optional, but Recommended): If you’re using graham cracker crumbs, gently fold them into the pumpkin cheesecake mixture using a spatula. These crumbs don’t just add a lovely, subtle texture reminiscent of a cheesecake crust; they also help absorb any excess moisture from the pumpkin and provide additional structure, making the truffles easier to roll and less prone to melting quickly. Mix until just combined; overmixing here isn’t necessary.
-
Prepare for Chilling: Cover the bowl tightly with plastic wrap, ensuring the wrap touches the surface of the mixture to prevent a skin from forming. Place the bowl in the refrigerator to chill for a minimum of 4 hours, but ideally 6 hours or even overnight. This chilling time is absolutely critical. It allows the mixture to firm up properly, making it much easier to scoop and roll into perfect truffle shapes. Patience is a virtue here, I promise it will pay off!
Chilling and Shaping the Truffles
-
Set Up Your Rolling Station: Line a large baking sheet with parchment paper or silicone mats. This will be where your perfectly rolled truffles will rest before their final coating. Having this ready beforehand helps keep things tidy and efficient.
-
Scoop the Mixture: Once your pumpkin cheesecake mixture is thoroughly chilled and firm, remove it from the refrigerator. Using a small cookie scoop (about 1-tablespoon in size is ideal for bite-sized truffles) or two spoons, scoop out portions of the mixture. Try to make them as uniform in size as possible for even dipping and a consistent look. I find a cookie scoop really makes this process so much easier and keeps my hands cleaner.
-
Roll into Balls: Gently roll each scooped portion between the palms of your hands to form smooth, round balls, approximately 1-inch in diameter. If the mixture starts to get too sticky or warm, simply pop it back into the fridge for 10-15 minutes to firm up again. Working quickly is key here to prevent the truffles from softening too much from the heat of your hands. Place the rolled truffles onto your prepared baking sheet, leaving a small space between each one.
-
Second Chill – The Firming Stage: Once all the truffles are rolled, place the baking sheet into the freezer for at least 30-45 minutes. This quick freeze will make them very firm, which is essential for successful dipping in melted chocolate. Truffles that are too soft will likely fall apart or lose their shape when dipped. You could also chill them in the refrigerator for 1-2 hours, but the freezer provides a quicker and firmer result, perfect for coating.
Preparing the Coating
-
Melt the White Chocolate: While your truffles are firming up in the freezer, it’s time to prepare your white chocolate coating. There are a couple of ways to do this effectively:
- Microwave Method: Place the white chocolate melting wafers or finely chopped baking bars into a microwave-safe bowl. Microwave in 30-second intervals, stirring well after each interval, until the chocolate is mostly melted and smooth. Be very careful not to overheat white chocolate, as it can seize or burn easily. This usually takes 1.5 to 3 minutes total.
- Double Boiler Method: Set up a double boiler by placing a heat-proof bowl over a saucepan of simmering water (make sure the bottom of the bowl does not touch the water). Add the white chocolate to the bowl and stir constantly until completely melted and smooth. This method provides more gentle, controlled heat, which is excellent for delicate white chocolate.
-
Add Coconut Oil (Optional, but Recommended): Once the white chocolate is melted and smooth, stir in 1 to 2 teaspoons of coconut oil or vegetable shortening. This isn’t strictly necessary, but it helps to thin the chocolate slightly, making it smoother and easier to dip your truffles in, resulting in a thinner, more elegant coating. It also helps the chocolate set with a lovely sheen.
-
Keep the Chocolate Warm (but not hot!): If you’re working with a large batch of truffles, you might find the chocolate starts to thicken as it cools. If using the microwave method, you can periodically pop it back in for 10-15 seconds to re-soften. If using a double boiler, you can leave it over very low heat on the simmering water. Maintaining the right consistency is key for a beautiful, even coating. You want it fluid enough to dip, but not so hot that it melts your truffles.
-
Prepare Dark Chocolate for Drizzle (Optional): If you plan to add a dark chocolate drizzle, melt the dark chocolate melting wafers or chopped baking bars with 1 teaspoon of coconut oil using either the microwave or double boiler method, just as you did with the white chocolate. Once melted, transfer it to a small piping bag, a Ziploc bag with a tiny corner snipped off, or a squeeze bottle. Set aside until your white chocolate coated truffles are ready.
Dipping and Decorating
-
Retrieve Truffles and Prepare Dipping Station: Take your very firm, chilled Pumpkin Cheesecake Truffles out of the freezer. Have your melted white chocolate, dipping tools (I prefer a dipping fork or a regular dinner fork), and any desired sprinkles or decorations ready. Work quickly, as the truffles will start to soften once out of the freezer.
-
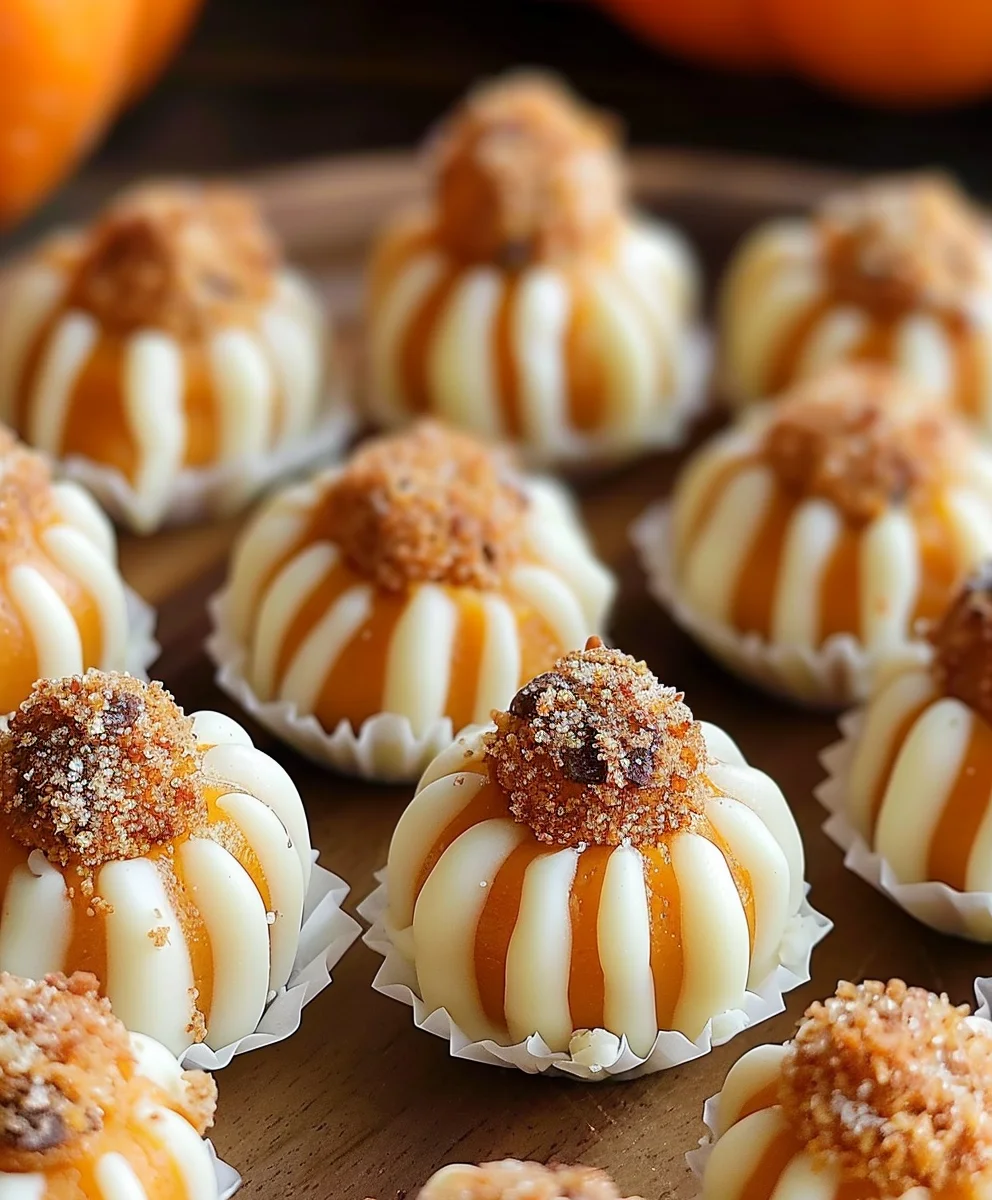
Dip Each Truffle: Drop one truffle at a time into the bowl of melted white chocolate. Using your dipping fork, gently roll the truffle to fully coat it. Lift the truffle out of the chocolate, tapping the fork gently against the rim of the bowl to allow any excess chocolate to drip off. This step is important for a smooth, even, and not-too-thick coating. Allowing the excess to drip is crucial for a professional finish and to prevent “feet” of chocolate from forming around the base.
-
Place and Decorate Immediately: Carefully transfer the dipped truffle onto the parchment-lined baking sheet. While the white chocolate is still wet, immediately sprinkle with your desired decorations (sprinkles, extra pumpkin pie spice, or chopped nuts). This is a race against time, as the cold truffle will cause the chocolate to set very quickly. If you’re doing a dark chocolate drizzle, you’ll want to wait until all the truffles are dipped and the white chocolate has set. I usually do 5-6 truffles, then decorate those, then dip the next batch.
-
Repeat the Process: Continue dipping and decorating the remaining Pumpkin Cheesecake Truffles, working in batches if necessary, especially if you find the white chocolate starts to cool too much or your truffles begin to soften. If your truffles soften too much, place them back in the freezer for 10-15 minutes before continuing.
-
Add Dark Chocolate Drizzle (Optional): Once all your truffles are coated in white chocolate and that coating has set (it should be firm to the touch), take your prepared dark chocolate in the piping bag or squeeze bottle. Drizzle artistic lines or patterns over the truffles. You can go for simple zigzags, concentric circles, or a random splatter effect. The contrast of the dark chocolate against the white is visually stunning and adds another layer of flavor.
Final Chilling and Serving
-
Final Chill for Setting: After all your Pumpkin Cheesecake Truffles are dipped and decorated, return the baking sheet to the refrigerator for at least 30 minutes, or until the chocolate coating is completely set and firm. This ensures the truffles are stable and ready for enjoyment.
-
Store Properly: Store your delightful Pumpkin Cheesecake Truffles in an airtight container in the refrigerator. They will stay fresh and delicious for up to 1 week. If you plan to make them further in advance, they can also be frozen in an airtight container for up to 1 month. Just be sure to let them thaw in the refrigerator for a few hours before serving.
-
Serving Suggestions: These Pumpkin Cheesecake Truffles are truly a perfect autumn treat. I love to serve them chilled, perhaps alongside a warm cup of coffee or a glass of mulled cider. They make a fantastic addition to any holiday dessert platter, a thoughtful homemade gift, or simply a sweet indulgence for yourself and your loved ones. The blend of creamy pumpkin, warm spices, and rich chocolate is simply irresistible. Enjoy every decadent bite!
Conclusion:
And there you have it, my friends! We’ve journeyed through the simple yet incredibly rewarding process of creating a truly show-stopping dessert. I honestly believe that this recipe isn’t just another sweet treat; it’s an experience, a delightful little package of autumn joy that encapsulates everything wonderful about the season in a single, perfect bite. What I love most about these is how they manage to be both sophisticated and utterly comforting all at once. They’re not overly complicated to make, which means even if you’re a novice baker, you’ll feel like a culinary wizard once you present these. Imagine the scent of pumpkin and spices wafting through your kitchen, knowing that soon, you’ll be indulging in something truly special. These morsels are guaranteed to disappear quickly, leaving everyone wishing they had just one more. The creamy texture, the delicate spice blend, and that unmistakable pumpkin essence all come together in a symphony of flavor that’s hard to beat. Trust me when I say, once you try these, they’ll become an instant favorite in your seasonal repertoire.
Now, let’s talk about making these little gems even more spectacular, or how to customize them to your heart’s content. While they are absolutely divine as is, a few tweaks can elevate them further or tailor them to different occasions. For a touch of extra decadence, consider dipping half of each truffle in melted dark chocolate before sprinkling with the graham cracker crumbs – the bittersweet notes would provide a wonderful contrast. Alternatively, instead of just crumbs, you could roll some in finely chopped candied pecans or walnuts for an added crunch and nutty flavor. Another fantastic idea is to drizzle them with a simple caramel sauce just before serving; the combination of pumpkin, cream cheese, and caramel is simply out of this world. For a more adult-friendly version, a tiny splash of spiced rum or bourbon in the pumpkin mixture would add a subtle warmth and depth, perfect for a cozy evening treat. When it comes to serving, these truffles are incredibly versatile. They make an elegant addition to any holiday dessert platter, transforming a simple spread into something truly special. I love to arrange them artfully on a tiered stand for a stunning visual display at gatherings. They also make thoughtful, homemade gifts – package them in a cute box with a ribbon, and you’ll have a present that’s sure to be appreciated. Or, simply enjoy them with a steaming cup of coffee or a spiced chai latte on a quiet afternoon. Their bite-sized nature means they are perfect for portion control, though I warn you, stopping at just one is a challenge!
Your Turn to Create and Share!
So, what are you waiting for? This is your invitation to dive into your kitchen and experience the magic of these incredible treats for yourself. I genuinely believe that making these Pumpkin Cheesecake Truffles will bring a smile to your face and to anyone lucky enough to taste them. They’re a celebration of flavor, texture, and the joy of homemade goodness, all rolled into one delightful package. Don’t be shy, give this recipe a whirl, and allow yourself to be swept away by its charm. Once you’ve whipped up your batch, I would absolutely love to hear about your experience! Did you try any of the variations? What was your favorite part of the process? Did they disappear as quickly as mine always do? Please, don’t keep your culinary triumphs to yourself! Share your creations, your stories, and your tips with our community. Tag me on social media, drop a comment below, or simply tell a friend about the fantastic new recipe you’ve discovered. Your feedback and photos not only inspire me but also encourage others to embark on their own delicious adventures. Happy baking, my friends, and may your days be filled with sweet moments and even sweeter treats!
Pumpkin Cheesecake Truffles
Easy, no-bake Pumpkin Cheesecake Truffles are a delightful, bite-sized indulgence combining spiced pumpkin and creamy cheesecake flavors. These melt-in-your-mouth morsels offer all the complex taste of pumpkin cheesecake without the baking, perfect for any fall occasion.
Ingredients
-
1 tablespoon butter
-
4 ounces cream cheese, softened
-
1/2 cup canned pumpkin puree
-
1 (14-ounce) can sweetened condensed milk
-
1 1/2 teaspoons pumpkin pie spice
-
1/2 cup graham cracker crumbs
-
1/3 cup white chocolate chips
-
Optional: Orange food coloring and granulated sugar for rolling
Instructions
-
Step 1
In a mixing bowl, beat 4 oz softened cream cheese until light and smooth. -
Step 2
Add 1/2 cup pumpkin puree, 1 (14-oz) can sweetened condensed milk, and 1 1/2 tsp pumpkin pie spice; beat until thoroughly combined. -
Step 3
Gently fold in 1/2 cup graham cracker crumbs. (Optional: Stir in a few drops of orange food coloring for vibrant color). -
Step 4
Cover the bowl tightly and chill the mixture in the refrigerator for at least 2 hours, or until it’s firm enough to roll easily. -
Step 5
Line a baking sheet with parchment paper. Scoop and roll the chilled mixture into approximately 1-inch round balls. (Optional: Roll each ball in granulated sugar for an extra sparkle and texture). -
Step 6
Place the rolled truffles onto the prepared baking sheet and transfer to the freezer for 30-45 minutes to firm up completely. This is crucial for successful dipping. -
Step 7
While truffles are freezing, melt 1/3 cup white chocolate chips. (Optional: Melt 1 tbsp butter with the chocolate for a smoother coating consistency and added richness). Use either a microwave (in 30-second intervals, stirring) or a double boiler. -
Step 8
Working quickly, dip each very firm truffle into the melted white chocolate, using a fork to ensure full coverage. Tap off any excess chocolate against the bowl’s rim. -
Step 9
Carefully place the dipped truffles back onto the parchment-lined baking sheet. Allow the chocolate coating to set completely by refrigerating for at least 30 minutes. -
Step 10
Store your finished Pumpkin Cheesecake Truffles in an airtight container in the refrigerator for up to 1 week. Enjoy chilled!
Important Information
Nutrition Facts (Per Serving)
It is important to consider this information as approximate and not to use it as definitive health advice.
Allergy Information
Please check ingredients for potential allergens and consult a health professional if in doubt.