• Skip to primary navigation
  • Skip to main content
  • Skip to primary sidebar
Homesmad

Homesmad

  • Home
  • Breakfast & Brunch
  • Appetizers & Snacks
  • Dinner
  • Dessert
  • About
  • Privacy Policy
  • Contact
Homesmad
  • Home
  • Breakfast & Brunch
  • Appetizers & Snacks
  • Dinner
  • Dessert
  • About
  • Privacy Policy
  • Contact

Quick Caesar Chicken Bowl: Fresh, Flavorful, & Satisfying

September 27, 2025 by Lily author

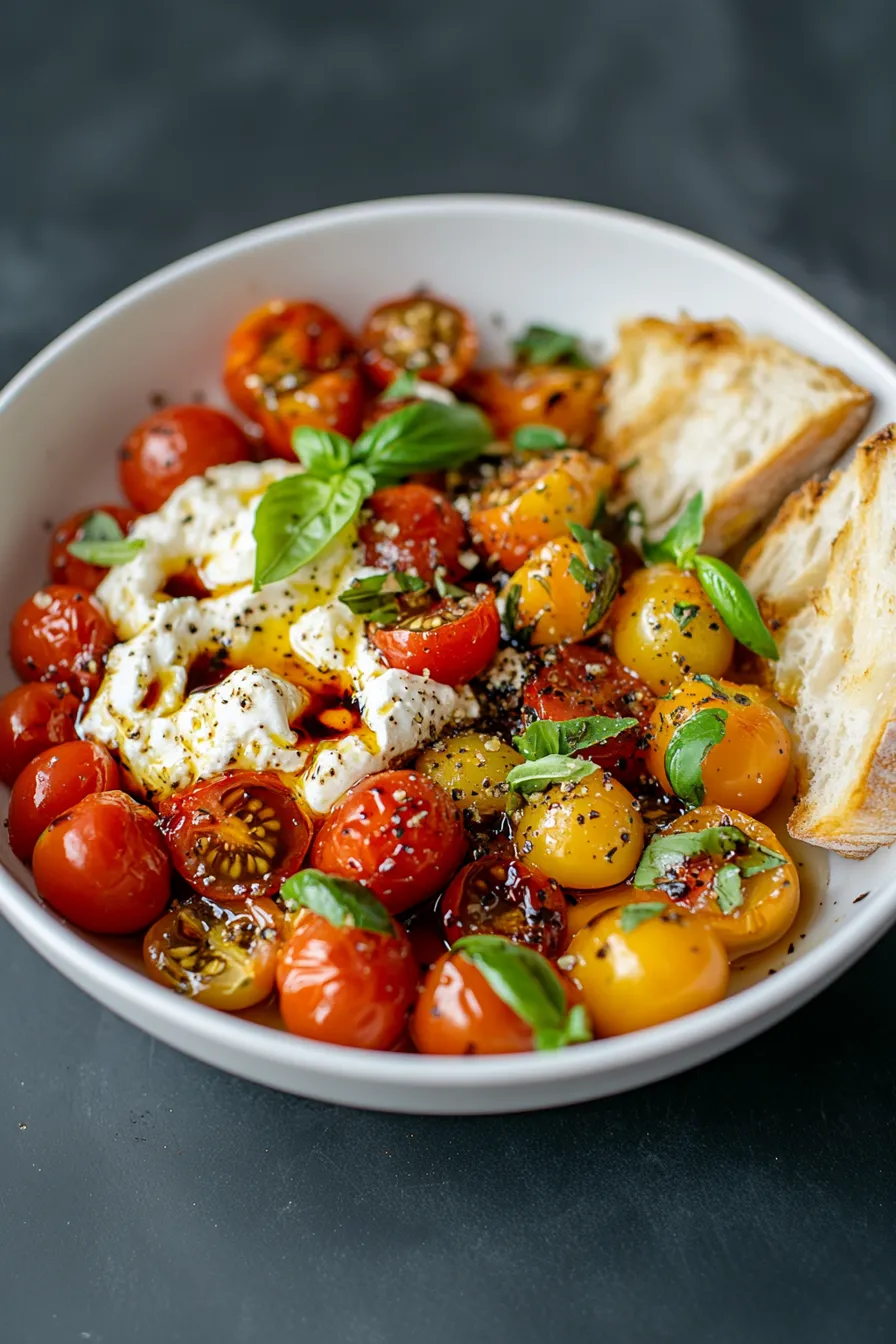
Caesar Haehnchen Bowl – a dish that brings together the timeless elegance of a classic Caesar salad with the satisfying heartiness of perfectly cooked chicken. I find immense joy in creating and sharing recipes that are both universally loved and incredibly versatile, and this particular bowl certainly fits the bill. Originating from the culinary ingenuity of Caesar Cardini in Tijuana, Mexico, in the 1920s, the original Caesar salad quickly captivated palates worldwide with its iconic creamy dressing, crisp romaine lettuce, crunchy croutons, and sharp Parmesan cheese. Over time, resourceful chefs and home cooks, myself included, realized that by simply adding succulent grilled or pan-fried chicken, this beloved side dish could be wonderfully elevated into a complete, incredibly fulfilling meal.

What truly makes the Caesar Haehnchen Bowl so perpetually popular? It’s the delightful symphony of textures and flavors: the refreshing crunch of fresh greens, the tender juiciness of the chicken, the sharp, salty bite of Parmesan, and of course, that unmistakable, tangy, garlicky Caesar dressing that coats every single ingredient. This harmonious blend is both light and satisfying, making it an ideal choice for a quick yet gourmet lunch or a hassle-free weeknight dinner. Join me as we embark on crafting this delicious and wholesome culinary masterpiece together.

Quick Caesar Chicken Bowl: Fresh, Flavorful, & Satisfying this RECIPE

Ingredients:

  • 2 large boneless, skinless chicken breasts (approximately 1.5 lbs total)
  • 1 large head of crisp Romaine lettuce
  • 1 cup grated Parmesan cheese, plus extra for garnish

For the Garlic & Herb Chicken:

  • 2 tablespoons olive oil
  • 1 tablespoon fresh lemon juice
  • 2 cloves garlic, minced
  • 1 teaspoon dried Italian herbs (or a mix of oregano, basil, thyme)
  • ½ teaspoon salt
  • ¼ teaspoon black pepper

For the Homemade Croutons:

  • 4 slices day-old sourdough or rustic bread, ¾-inch thick
  • 2 tablespoons olive oil
  • 1 clove garlic, minced (optional, for garlic croutons)
  • ¼ teaspoon salt
  • Pinch of black pepper
  • Optional: ½ teaspoon dried parsley or Italian seasoning

For the Classic Caesar Dressing:

  • 1 large egg yolk, at room temperature
  • 2 cloves garlic, minced very finely or grated
  • 1 teaspoon Dijon mustard
  • 1 tablespoon fresh lemon juice
  • 1 teaspoon Worcestershire sauce
  • 1 teaspoon anchovy paste (or 2 whole anchovy fillets, minced)
  • ½ cup extra virgin olive oil
  • ¼ cup grated Parmesan cheese (freshly grated is best)
  • Salt and freshly ground black pepper to taste

Preparing the Delectable Caesar Haehnchen for Your Bowl:

Creating the perfect, tender, and flavorful chicken for your Caesar Haehnchen Bowl starts with careful preparation and cooking. I find that a simple marinade goes a long way in infusing the chicken with incredible taste, making it truly stand out in your bowl.

  1. Prepare the Chicken: First, take your boneless, skinless chicken breasts and pat them thoroughly dry with paper towels. This crucial step helps ensure a beautiful sear later. If your chicken breasts are very thick, you might want to slice them horizontally to create two thinner cutlets, or pound them gently to an even ¾-inch thickness. This ensures they cook more evenly and quickly, preventing them from drying out.
  2. Whisk the Marinade: In a medium bowl or a shallow dish, whisk together the 2 tablespoons of olive oil, 1 tablespoon of fresh lemon juice, 2 cloves of minced garlic, 1 teaspoon of dried Italian herbs, ½ teaspoon of salt, and ¼ teaspoon of black pepper. This blend of flavors will transform plain chicken into the star of your Caesar Haehnchen Bowl.
  3. Marinate the Chicken: Add the prepared chicken breasts to the marinade, ensuring they are thoroughly coated. You can use tongs to toss them gently. Cover the dish or place the chicken in a resealable bag. Let it marinate in the refrigerator for at least 30 minutes. For optimal flavor, I recommend marinating for 1 to 2 hours, but avoid marinating for much longer than 4 hours, especially with lemon juice, as it can start to “cook” the chicken and alter its texture.
  4. Cook the Chicken:

    Pan-Frying Method: Heat a large skillet (cast iron works wonderfully) over medium-high heat. Once hot, add a small drizzle of olive oil, just enough to coat the bottom. Carefully place the marinated chicken breasts in the hot pan, ensuring not to overcrowd it. Cook for about 5-7 minutes per side, depending on thickness, until golden brown and cooked through. The internal temperature should reach 165°F (74°C). The sizzle and aroma at this stage are simply irresistible, building anticipation for your Caesar Haehnchen Bowl.

    Grilling Method: Preheat your grill to medium-high heat. Lightly oil the grill grates to prevent sticking. Place the marinated chicken breasts on the hot grill. Grill for 4-6 minutes per side, or until beautiful grill marks appear and the chicken is fully cooked with an internal temperature of 165°F (74°C). Grilling imparts a wonderful smoky flavor that complements the Caesar dressing perfectly.

  5. Rest the Chicken: Once cooked, transfer the chicken breasts to a cutting board and let them rest for 5-10 minutes. This resting period is crucial for juicy chicken! It allows the juices to redistribute throughout the meat, resulting in incredibly tender and moist Haehnchen. After resting, slice the chicken against the grain into ½-inch thick strips or dice it into bite-sized pieces, ready to crown your glorious Caesar Haehnchen Bowl.

Crafting Your Own Crispy, Golden Croutons:

Homemade croutons are an absolute game-changer for any salad, and they are especially vital for the texture and enjoyment of a superior Caesar Haehnchen Bowl. Forget those stale, store-bought boxes; making them yourself is easy and yields incredibly flavorful results.

  1. Prepare the Bread: Start with day-old bread, as it’s slightly drier and will yield crispier croutons. Sourdough, ciabatta, or any rustic loaf works beautifully. Cut the bread into ½ to ¾-inch cubes. Aim for relatively uniform sizes so they cook evenly. This step is more important than you might think for consistent crunch!
  2. Season the Bread: In a large bowl, toss the bread cubes with 2 tablespoons of olive oil. Ensure every piece is lightly coated. Then, add ¼ teaspoon of salt, a pinch of black pepper, and optionally, 1 clove of minced garlic and ½ teaspoon of dried parsley or Italian seasoning. This garlic and herb coating is what makes these croutons truly irresistible in your Caesar Haehnchen Bowl.
  3. Choose Your Cooking Method:

    Oven Method (My favorite for even crispness): Preheat your oven to 375°F (190°C). Spread the seasoned bread cubes in a single layer on a large baking sheet. Bake for 10-15 minutes, tossing them halfway through, until they are golden brown and wonderfully crispy. Keep a close eye on them, as they can go from perfectly golden to burnt very quickly.

    Stovetop Method (Quicker, but requires more attention): Heat 2 tablespoons of olive oil in a large skillet over medium heat. Add the seasoned bread cubes and cook, stirring frequently, for 5-8 minutes until golden brown and crisp. This method is excellent if you’re short on time, but ensure constant stirring to prevent burning. The aroma of these toasting croutons will fill your kitchen with joy, hinting at the deliciousness of your upcoming Caesar Haehnchen Bowl.

  4. Cool the Croutons: Once cooked, remove the croutons from the oven or skillet and let them cool completely on the baking sheet or a wire rack. As they cool, they will become even crispier. Store any leftover croutons in an airtight container at room temperature for up to 3-4 days, although I doubt you’ll have many leftovers once you taste them in your Caesar Haehnchen Bowl!

Whisking Up the Creamy Caesar Dressing:

The heart and soul of any great Caesar salad, and by extension, your magnificent Caesar Haehnchen Bowl, is undoubtedly the dressing. Making it from scratch might seem daunting, but I promise it’s incredibly rewarding and yields a far superior flavor to any store-bought alternative. The key is in the emulsification!

  1. Prepare the Base: In a medium-sized bowl, combine 1 large egg yolk (ensure it’s at room temperature for better emulsification), 2 cloves of finely minced or grated garlic, 1 teaspoon of Dijon mustard, 1 tablespoon of fresh lemon juice, 1 teaspoon of Worcestershire sauce, and 1 teaspoon of anchovy paste. Don’t skip the anchovy paste! It provides that essential umami depth without making the dressing taste overtly fishy. It’s the secret ingredient that truly elevates a classic Caesar dressing for your Caesar Haehnchen Bowl.
  2. Whisk Vigorously: Using a whisk, thoroughly combine these ingredients until they are well integrated and slightly pale. This initial mix is important for building the foundation of your creamy dressing.
  3. Emulsify with Oil: Now, for the magic of emulsification! While continuously whisking vigorously, slowly drizzle in the ½ cup of extra virgin olive oil in a very thin, steady stream. It’s crucial to add the oil slowly at first, as this allows the egg yolk to bind with the oil, creating a thick, creamy emulsion. If you add it too quickly, your dressing might break and separate. Once about half the oil is incorporated and the dressing starts to thicken, you can slightly increase the speed of your pour, but always keep whisking! This slow drizzle is key to achieving that luxurious, thick consistency for your Caesar Haehnchen Bowl dressing.
  4. Incorporate Parmesan and Season: Once all the olive oil has been incorporated and you have a thick, creamy dressing, stir in ¼ cup of freshly grated Parmesan cheese. Then, taste and season generously with salt and freshly ground black pepper. You might find you need a little more lemon juice or anchovy paste to achieve your desired balance of tang and savory notes. Adjust to your personal preference.
  5. Chill and Store: Cover the bowl with plastic wrap and refrigerate the dressing for at least 15-20 minutes. This allows the flavors to meld beautifully and the dressing to thicken further. Homemade Caesar dressing is best used within 2-3 days, storing it in an airtight container in the refrigerator. Having this perfect dressing on hand makes assembling your Caesar Haehnchen Bowl a breeze!

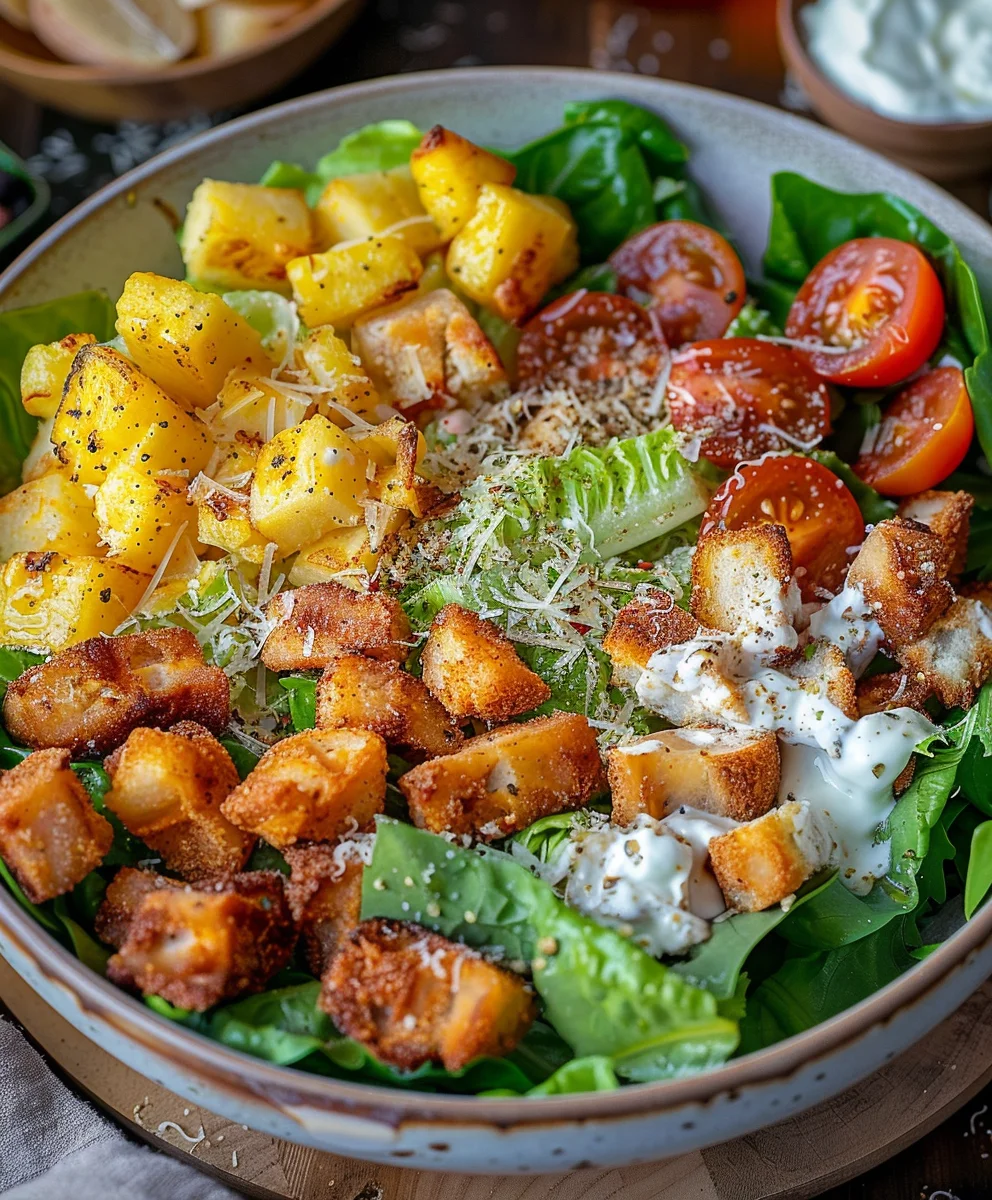
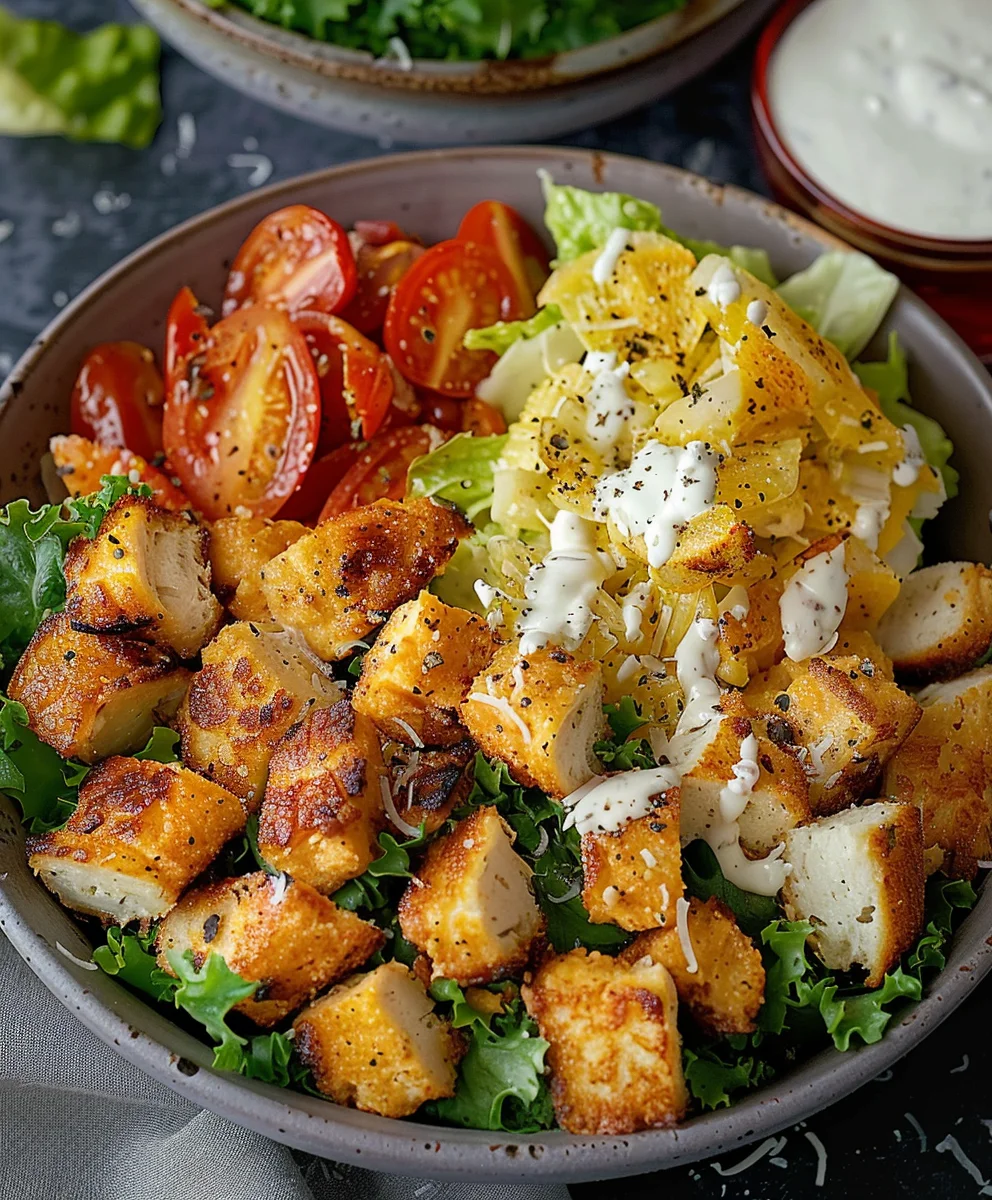
Assembling Your Perfect Caesar Haehnchen Bowl:

Now comes the most satisfying part – bringing all these delicious components together to create your ultimate Caesar Haehnchen Bowl! This is where the freshness of the lettuce, the savory chicken, the crispy croutons, and the rich dressing unite in perfect harmony.

  1. Prepare the Romaine Lettuce: Take your head of Romaine lettuce. Discard any bruised or wilted outer leaves. Wash the remaining leaves thoroughly under cold running water, paying attention to the creases where dirt can hide. For best results, use a salad spinner to dry the lettuce completely. Dry lettuce is paramount; water on the leaves will dilute your delicious dressing and prevent it from clinging properly. Once dry, chop or tear the lettuce into bite-sized pieces. I prefer tearing for a more rustic feel, but chopping works just as well.
  2. Dress the Lettuce: In a large mixing bowl, place the chopped Romaine lettuce. Add a generous amount of your homemade Caesar dressing – I usually start with ¼ to ½ cup, depending on the amount of lettuce and my personal preference. Using tongs, gently toss the lettuce until every leaf is lightly and evenly coated with the dressing. Avoid over-dressing; you want the lettuce to be coated, not swimming. This step ensures every bite of your Caesar Haehnchen Bowl is bursting with flavor.
  3. Add the Haehnchen and Croutons: Arrange the dressed lettuce in your chosen serving bowls. Then, artfully top each bowl with the sliced or diced garlic and herb chicken (your delicious Haehnchen!) and a generous handful of your freshly made, crispy croutons. I love how the warm chicken slightly wilts the lettuce, adding another layer of texture.
  4. Garnish and Serve: Finish each Caesar Haehnchen Bowl with a sprinkle of extra grated Parmesan cheese. For an added touch of freshness and color, you could also add a crack of fresh black pepper. Serve immediately and enjoy the culmination of your culinary efforts. The blend of textures and flavors in this bowl is simply outstanding, making it a satisfying and wholesome meal that I absolutely adore. This truly is a complete and flavorful dish, perfect for lunch or dinner any day of the week!

Quick Caesar Chicken Bowl: Fresh, Flavorful, & Satisfying

<h2>Conclusion:</h2>
<p>Well, my friends, we’ve reached the grand finale of our culinary journey, and I genuinely hope you’re feeling as inspired and ready to cook as I am! This recipe isn’t just another item on your meal plan; it’s truly a game-changer. What makes this particular dish a <strong>must-try</strong> is its impeccable balance of freshness, flavor, and incredible satisfaction, all wrapped up in a package that’s surprisingly easy to assemble. We’re talking about tender, perfectly seasoned chicken, crisp, vibrant greens, and those irresistible homemade croutons that add just the right amount of crunch. But the real star, in my humble opinion, is that lusciously creamy, tangy dressing. It’s what elevates the entire experience, coating every ingredient in a symphony of taste that dances on your palate. It’s light enough to feel healthy but rich enough to be deeply comforting, making it suitable for almost any occasion.</p>

<p>I’ve spent countless hours perfecting this rendition, ensuring that each component contributes to a harmonious whole. You’ll find that it strikes that perfect balance between gourmet restaurant quality and the heartfelt comfort of a home-cooked meal. Forget those sad, limp versions you might have encountered elsewhere; this <strong>Caesar Haehnchen Bowl</strong> is bursting with personality, packed with nutrients, and genuinely exciting to eat. It’s proof that healthy eating doesn’t mean sacrificing flavor or feeling deprived. In fact, you might even find yourself craving this delightful bowl several times a week, and honestly, I wouldn’t blame you one bit! It’s a testament to the power of fresh ingredients and a well-crafted dressing, transforming simple components into something truly extraordinary.</p>

<h4>Elevate Your Experience with These Serving Suggestions & Variations:</h4>
<p>One of the joys of cooking is the ability to personalize, and this dish is wonderfully adaptable. While it’s phenomenal on its own as a hearty lunch or a light, satisfying dinner, consider pairing it with a warm bowl of creamy tomato soup or a slice of crusty garlic bread for an extra layer of comfort. For those busy weekdays, it’s an absolute dream for <strong>meal prepping</strong>; just keep the dressing separate until you’re ready to eat to maintain the crispness of the greens. But let’s talk variations – this is where the fun really begins!</p>

<ul>
<li><strong>Protein Power-Ups:</strong> Not a fan of chicken or looking for alternatives? Grilled shrimp, flaky salmon, pan-seared tofu, or even roasted chickpeas make fantastic substitutes, offering different textures and flavor profiles.</li>
<li><strong>Veggie Ventures:</strong> Boost your nutrient intake and add more color by incorporating cherry tomatoes, thinly sliced cucumber, avocado chunks (which add a wonderful creaminess!), roasted red bell peppers, or even blanched asparagus spears.</li>
<li><strong>Cheese Please:</strong> While Parmesan is classic, don’t hesitate to experiment with crumbled feta for a tangy twist or shavings of aged Pecorino Romano for a sharper bite.</li>
<li><strong>Dressing Delights:</strong> For a lighter touch, you could thin the dressing slightly with a little lemon juice or water. Want a kick? Add a pinch of red pepper flakes to the dressing or a dash of hot sauce.</li>
<li><strong>Heartier Bowls:</strong> Turn it into an even more substantial meal by adding a scoop of cooked quinoa, farro, or even some wild rice to the base. This works particularly well for active individuals or as a post-workout recovery meal.</li>
<li><strong>Gluten-Free Friendly:</strong> Simply use your favorite gluten-free bread for the croutons, or omit them entirely if you prefer.</li>
<li><strong>Dairy-Free Option:</strong> For those avoiding dairy, many excellent plant-based mayonnaise and Parmesan alternatives are available that work beautifully in the dressing and as a topping.</li>
</ul>

<h4>Your Turn!</h4>
<p>Now, it’s your moment to shine in the kitchen! I genuinely can’t wait for you to experience the sheer delight of this recipe. It’s designed to be approachable for cooks of all skill levels, delivering big flavors without big fuss. <strong>Gather your ingredients, put on your favorite tunes, and get cooking!</strong> Once you’ve whipped up your own fantastic bowl, I’d be absolutely thrilled to hear about your experience. Did you add any unique twists? What did your family and friends think? Don’t be shy – your culinary adventures inspire me and fellow home cooks. Share your triumphs, your clever modifications, and any brilliant serving ideas you come up with. Let’s build a community around delicious, home-cooked food. Happy cooking, everyone!</p>


Quick Caesar Chicken Bowl: Fresh, Flavorful, & Satisfying

Quick Caesar Chicken Bowl: Fresh, Flavorful, & Satisfying

A classic Caesar salad elevated with satisfying, crispy chicken, featuring fresh romaine, crunchy croutons, sharp Parmesan, and a tangy homemade dressing. This dish comes together quickly for a delicious and wholesome meal.

Prep Time
15 Minutes

Cook Time
15 Minutes

Total Time
30 Minutes

Servings
2 servings

Ingredients

  • 2 large boneless, skinless chicken breasts (approx. 1.5 lbs total)
  • 1 cup crushed cornflakes
  • ½ cup grated Parmesan cheese (for breading)
  • 2 tbsp olive oil (for cooking chicken)
  • Salt and black pepper to taste
  • 1 large head of crisp Romaine lettuce
  • 1 cup grated Parmesan cheese, plus extra for garnish (for salad)
  • 4 slices day-old sourdough or rustic bread, ¾-inch thick (for croutons)
  • 2 tbsp olive oil (for croutons)
  • 1 clove garlic, minced (optional, for garlic croutons)
  • ¼ teaspoon salt (for croutons)
  • Pinch of black pepper (for croutons)
  • Optional: ½ teaspoon dried parsley or Italian seasoning (for croutons)
  • 1 large egg yolk, at room temperature (for dressing)
  • 2 cloves garlic, minced very finely or grated (for dressing)
  • 1 teaspoon Dijon mustard (for dressing)
  • 1 tablespoon fresh lemon juice (for dressing)
  • 1 teaspoon non-alcoholic Worcestershire sauce (for dressing)
  • 1 teaspoon anchovy paste (or 2 whole anchovy fillets, minced) (for dressing)
  • ½ cup extra virgin olive oil (for dressing)
  • ¼ cup grated Parmesan cheese (freshly grated is best, for dressing)
  • Salt and freshly ground black pepper to taste (for dressing)

Instructions

  1. Step 1
    Pat chicken breasts dry; slice horizontally or pound to ¾-inch thickness. Crush cornflakes. In a shallow dish, combine crushed cornflakes, ½ cup Parmesan, salt, and pepper. Lightly coat chicken in 1 tbsp olive oil, then dredge thoroughly in the cornflake-Parmesan mixture, pressing to adhere.
  2. Step 2
    Heat a large skillet with 1 tbsp olive oil over medium-high heat. Cook breaded chicken 5-7 minutes per side until golden brown and cooked through (internal temp 165°F/74°C). Transfer to a cutting board and let rest 5-10 minutes, then slice. Simultaneously, for croutons: toss bread cubes with 2 tbsp olive oil, optional garlic, ¼ tsp salt, pinch pepper, and optional herbs. Cook in a separate skillet over medium heat, stirring frequently, for 5-8 minutes until golden and crisp (or bake at 375°F/190°C for 10-15 mins).
  3. Step 3
    In a medium bowl, whisk egg yolk, 2 minced garlic cloves, Dijon mustard, 1 tbsp lemon juice, non-alcoholic Worcestershire, and anchovy paste. Slowly drizzle in ½ cup extra virgin olive oil while whisking vigorously until a thick emulsion forms. Stir in ¼ cup freshly grated Parmesan. Season generously with salt and pepper to taste.
  4. Step 4
    Wash and thoroughly dry Romaine lettuce; chop into bite-sized pieces. In a large mixing bowl, toss lettuce with desired amount of homemade Caesar dressing until lightly coated. Arrange dressed lettuce in serving bowls. Top each bowl with sliced crispy chicken and a generous handful of homemade croutons. Garnish with extra grated Parmesan cheese and a crack of fresh black pepper. Serve immediately.

Important Information

Nutrition Facts (Per Serving)

It is important to consider this information as approximate and not to use it as definitive health advice.

Allergy Information

Please check ingredients for potential allergens and consult a health professional if in doubt.

« Previous Post
Easy Pesto Chicken Flatbread Recipe: Quick Dinner Idea!
Next Post »
Delicious Rice with Veggies & Cream Cheese Sauce

If you enjoyed this…

Mouthwatering One Pot Lasagna Soup: Dinner’s Never Been Easier!

Trader Joe’s Lemon Ricotta Pasta w/ Asparagus – Quick & Easy

Sun-Dried Tomato Bacon Pesto Grilled Cheese

Sun-Dried Tomato Bacon Pesto Grilled Cheese Recipe

Primary Sidebar

Browse by Diet

BreakfastDinnerLunchDessertAppetizer

Sweet Peach Yogurt Parfait Delight

One of my fondest memories is from a lazy summer afternoon spent at my grandmother’s house. The sun filtered through the kitchen window, casting a warm glow over the table where she would create her culinary magic. It was during one of those blissful moments that I first tasted her Peach Yogurt Parfait with Honey and Granola. The sweet aroma of ripe peaches mingling with creamy yogurt and the crunch of granola was nothing short of heavenly. It felt like summer captured in a bowl, and I still remember the joy of diving in with a spoon, each layer revealing a new burst of flavor.

When I think about that parfait, I can almost hear the gentle hum of the bees outside, reminding me of the floral notes that honey brings to every bite. The vibrant yellows and soft oranges of the peaches contrast beautifully with the creamy white yogurt and the golden crunch of granola. It’s a dish that not only looks delightful but also tastes like a celebration of fresh, wholesome ingredients.

What makes my version of this Peach Yogurt Parfait special is the careful balance of flavors and textures. I use ripe, juicy peaches, drizzled with locally sourced honey, and a homemade granola that’s bursting with nuts and seeds for an extra crunch. It’s a simple dish, but every layer is crafted with love and attention.

Let me show you exactly how to make this delightful parfait, so you can bring a bit of that summer magic into your kitchen!

Sweet Peach Yogurt Parfait Delight

Why You’ll Love This Recipe

  • Delightfully creamy texture from the Greek yogurt, paired with the juicy sweetness of fresh peaches.
  • Ready in under 20 minutes, making it a quick and satisfying breakfast or snack option.
  • Budget-friendly, using common ingredients that you may already have in your pantry.
  • Customizable with your favorite granola and nuts, allowing you to tailor each parfait to your taste.
  • Perfectly balanced flavors with the bright acidity of lemon juice and the sweetness of honey enhancing the peaches.

Ingredients

  • For the Parfait:
  • 2 cups plain Greek yogurt (or vanilla yogurt for a sweeter option)
  • 2 large ripe peaches, diced (about 2 cups)
  • 1 tablespoon fresh lemon juice (to prevent browning of peaches)
  • 2 tablespoons honey (plus more for drizzling)
  • 1 teaspoon vanilla extract (optional for extra flavor)
  • For the Granola:
  • 1 cup granola (store-bought or homemade; see notes for a simple granola recipe)
  • 1/4 cup sliced almonds (optional for added crunch)
  • 1/4 cup shredded coconut (optional for added flavor)

Let’s dive into some key ingredients that make this Peach Yogurt Parfait so delightful! First, the Greek yogurt is not only creamy but also packed with protein, making it a satisfying option for breakfast or a snack. If you’re looking for a sweeter option, you can easily substitute it with vanilla yogurt, though it may alter the overall flavor balance. Next, the ripe peaches are the star of the show; their natural sweetness shines through, so I recommend choosing peaches that yield slightly to pressure, indicating they’re perfectly ripe. If peaches aren’t in season, feel free to use nectarines or even frozen peaches—just thaw them before use. Finally, honey adds a lovely floral sweetness that ties everything together. If you prefer, maple syrup can serve as a delicious substitute.

Step-by-Step Instructions

  1. Start by preparing the peaches. Wash them thoroughly, then slice and dice them into bite-sized pieces. In a medium bowl, toss the diced peaches with 1 tablespoon of fresh lemon juice to prevent browning. Set aside for about 5 minutes while the lemon juice works its magic.
  2. In a separate bowl, combine the Greek yogurt, 2 tablespoons of honey, and 1 teaspoon of vanilla extract if using. Stir the mixture until smooth and thoroughly blended. This should take about a minute. Avoid overmixing to maintain the creaminess of the yogurt.
  3. Now it’s time to layer your parfait. Grab a clear glass or bowl to showcase your beautiful creation. Start with a generous spoonful of the yogurt mixture at the bottom—about 1/4 cup will do. Use a spoon to spread it evenly.
  4. Add a layer of the diced peaches over the yogurt, ensuring they cover the yogurt completely. You might want to use about half of what you have prepared—roughly 1 cup. This layer should be visually appealing, so arrange the peaches neatly.
  5. Sprinkle 1/4 cup of granola over the peaches. This adds a delightful crunch. Make sure to distribute it evenly to ensure every bite has that satisfying texture. Avoid packing it down too tightly, as you want it to maintain its crunch.
  6. Repeat the layers: spoon in another 1/4 cup of yogurt, followed by another cup of peaches, and another sprinkle of granola. You should have at least two layers, but feel free to add more depending on your glass size.
  7. Finish off your parfait with a drizzle of honey on top for added sweetness and a touch of elegance. If you’re using sliced almonds or shredded coconut, sprinkle them on top now. It adds a lovely visual contrast and extra flavor.
  8. Serve immediately or refrigerate for up to 30 minutes before serving to allow the flavors to meld together. However, I recommend enjoying it fresh to maintain the granola’s crunch.

Pro Tips for the Best Peach Yogurt Parfait With Honey And Granola

  • Make sure to choose ripe peaches for the best flavor and texture. A common mistake is using unripe fruit, which can lead to a less enjoyable parfait. Look for peaches that are fragrant and slightly soft to the touch.
  • Use a clear glass to assemble your parfait; this not only makes for a beautiful presentation but also allows you to see the colorful layers, which adds to the enjoyment of eating it.
  • For an even creamier texture, consider whipping the Greek yogurt with a hand mixer for a couple of minutes before layering. This small adjustment makes a huge difference in mouthfeel.
  • Be mindful of the granola-to-yogurt ratio. Too much granola can overwhelm the parfait, while too little can make it feel too creamy. Aim for about 1/4 cup of granola per layer for the perfect balance.
  • If you’re making this for a gathering, consider preparing the yogurt and peaches ahead of time and layering them just before serving. This ensures the granola stays crunchy!

Variations & Serving Ideas

There are so many ways to get creative with your Peach Yogurt Parfait! For a tropical twist, swap out the peaches for mangoes or pineapples and top with coconut flakes. If you prefer a berry flavor, mix in some blueberries or strawberries with the peaches for added color and taste. For a nutty version, incorporate chopped walnuts or pecans instead of almonds.

As for serving ideas, this parfait pairs beautifully with a side of scrambled eggs for a hearty breakfast or fresh fruit salad for a light lunch. You might also enjoy it alongside whole grain toast with almond butter for an energizing snack. The contrast of flavors and textures will elevate your meal experience!

Storage, Make-Ahead & Reheating

The Peach Yogurt Parfait is best enjoyed fresh, but you can prepare some components ahead of time. Store the layered parfait in an airtight container in the refrigerator for up to 24 hours. However, be cautious; the granola may lose its crunch if stored too long. You can freeze the yogurt and peach mixture for up to 2 months; just remember to thaw it in the refrigerator overnight before serving.

If you plan to enjoy this dish the next day, it can taste even better as the flavors meld together. Just remember to add the granola right before serving to keep its delightful crunch!

Frequently Asked Questions

Can I make Peach Yogurt Parfait With Honey And Granola ahead of time?

Yes — in fact, it tastes even better the next day as the flavors meld. However, I recommend waiting to add the granola until just before serving to maintain its crunch.

What can I substitute for Greek yogurt?

If you prefer a lighter option, you can substitute Greek yogurt with regular yogurt or a dairy-free alternative like coconut yogurt. Just remember that this may alter the creaminess and flavor profile slightly.

Can I use frozen peaches for this parfait?

Absolutely! Just make sure to thaw the frozen peaches before using them. They will still add great flavor, though the texture may be slightly softer than fresh peaches.

How do I make the parfait vegan?

To make a vegan version, substitute the Greek yogurt with a plant-based yogurt alternative, and replace honey with maple syrup or agave nectar. This keeps the parfait sweet while adhering to a vegan diet.

What other fruits can I use in this recipe?

You can mix and match fruits based on your preference. Try using strawberries, blueberries, raspberries, or even bananas. Just make sure to adjust the lemon juice as needed to prevent browning.

Sweet Peach Yogurt Parfait Delight

Final Thoughts

The Peach Yogurt Parfait with Honey and Granola is a delightful blend of creamy yogurt, sweet peaches, and crunchy granola that creates a satisfying and nourishing treat. Each layer bursts with flavor, making it a perfect choice for breakfast or a light dessert.

This is the kind of recipe I come back to again and again, especially when I want something refreshing and wholesome to start my day. The harmony of sweet and tart flavors, combined with the delightful crunch, never fails to lift my spirits!

I encourage you to give this parfait a try and indulge in its comforting goodness. Feel free to share your results or even add your own twist—perhaps a sprinkle of cinnamon or a handful of nuts. Enjoy creating your perfect parfait!

Print
clock clock iconcutlery cutlery iconflag flag iconfolder folder iconinstagram instagram iconpinterest pinterest iconfacebook facebook iconprint print iconsquares squares iconheart heart iconheart solid heart solid icon

Peach Yogurt Parfait


  • Author: Lily author
  • Total Time: 15 minutes
  • Yield: 4 servings 1x
Pin Recipe
Print Recipe

Description

This Peach Yogurt Parfait combines creamy Greek yogurt, juicy peaches, and crunchy granola for a delightful treat. It’s a perfect breakfast or snack that captures the essence of summer in every bite.


Ingredients

Scale
  • For the Parfait:
  • 2 cups plain Greek yogurt (or vanilla yogurt for a sweeter option)
  • 2 large ripe peaches, diced (about 2 cups)
  • 1 tablespoon fresh lemon juice (to prevent browning of peaches)
  • 2 tablespoons honey (plus more for drizzling)
  • 1 teaspoon vanilla extract (optional for extra flavor)
  • For the Granola:
  • 1 cup granola (store-bought or homemade; see notes for a simple granola recipe)
  • 1/4 cup sliced almonds (optional for added crunch)
  • 1/4 cup shredded coconut (optional for added flavor)

Instructions

  1. Start by preparing the peaches. Wash them thoroughly, then slice and dice them into bite-sized pieces. In a medium bowl, toss the diced peaches with 1 tablespoon of fresh lemon juice to prevent browning. Set aside for about 5 minutes while the lemon juice works its magic.
  2. In a separate bowl, combine the Greek yogurt, 2 tablespoons of honey, and 1 teaspoon of vanilla extract if using. Stir the mixture until smooth and thoroughly blended. This should take about a minute. Avoid overmixing to maintain the creaminess of the yogurt.
  3. Now it’s time to layer your parfait. Grab a clear glass or bowl to showcase your beautiful creation. Start with a generous spoonful of the yogurt mixture at the bottom—about 1/4 cup will do. Use a spoon to spread it evenly.
  4. Add a layer of the diced peaches over the yogurt, ensuring they cover the yogurt completely. You might want to use about half of what you have prepared—roughly 1 cup. This layer should be visually appealing, so arrange the peaches neatly.
  5. Sprinkle 1/4 cup of granola over the peaches. This adds a delightful crunch. Make sure to distribute it evenly to ensure every bite has that satisfying texture. Avoid packing it down too tightly, as you want it to maintain its crunch.
  6. Repeat the layers: spoon in another 1/4 cup of yogurt, followed by another cup of peaches, and another sprinkle of granola. You should have at least two layers, but feel free to add more depending on your glass size.
  7. Finish off your parfait with a drizzle of honey on top for added sweetness and a touch of elegance. If you’re using sliced almonds or shredded coconut, sprinkle them on top now. It adds a lovely visual contrast and extra flavor.
  8. Serve immediately or refrigerate for up to 30 minutes before serving to allow the flavors to meld together. However, I recommend enjoying it fresh to maintain the granola’s crunch.
  • Prep Time: 15 mins
  • Cook Time: 0 mins
  • Category: Breakfast
  • Method: No-cook
  • Cuisine: American

Nutrition

  • Serving Size: 1 parfait
  • Calories: 250
  • Sugar: 20 g
  • Sodium: 50 mg
  • Fat: 5 g
  • Saturated Fat: 2 g
  • Unsaturated Fat: 3 g
  • Trans Fat: 0 g
  • Carbohydrates: 40 g
  • Fiber: 3 g
  • Protein: 10 g
  • Cholesterol: 10 mg

Keywords: Choose ripe peaches for the best flavor and texture. Use a clear glass for a beautiful presentation. For creaminess, consider whipping the yogurt before layering. Be mindful of the granola-to-yogurt ratio. Prepare yogurt and peaches ahead of time for gatherings, layering just before serving.

Did you make this recipe?

Share a photo and tag us — we can't wait to see what you've made!

Sun-Kissed Frozen Orange Cream Slush

As a child, summer days felt like they lasted forever. I remember the sticky heat wrapping around me as I played outside, my laughter mingling with the sounds of the neighborhood. But nothing could cool me down quite like the moment I’d spot my grandmother, laboring over her blender, whipping up her famous Frozen Orange Creamsicle Slush. That vibrant orange treat, with its frosty texture and sweet citrus aroma, was like a burst of sunshine in a cup. Just one sip, and I could feel the coolness wash over me, sparking pure joy.

This Frozen Orange Creamsicle Slush has a way of making you feel like a kid again. Its creamy, dreamy consistency is a delightful balance of bright orange and soft vanilla, inviting you to dive right in. The refreshing tang of orange dances on your tongue, while the smooth creaminess envelops you in a comforting embrace. It’s a nostalgic treat that’s perfect for hot summer afternoons or anytime you need a little pick-me-up.

What makes my version of this slush stand out is the addition of a hint of vanilla bean, which elevates the flavor and adds an extra layer of richness. Plus, it’s super easy to whip up with just a few simple ingredients that you probably already have on hand! So, if you’re ready to relive those sun-soaked memories, let me show you exactly how to make it.

Sun-Kissed Frozen Orange Cream Slush

Why You’ll Love This Recipe

  • Each slush is a perfect blend of creamy vanilla and zesty orange, creating a nostalgic flavor reminiscent of summer days.
  • This refreshing treat is ready in under 15 minutes, making it an ideal quick dessert for unexpected guests or hot afternoons.
  • With just 8 simple ingredients, it’s budget-friendly, ensuring you don’t have to break the bank to enjoy a delicious slush.
  • The slush has a perfectly smooth texture, thanks to the combination of ice and ice cream, providing a delightful contrast to the bright citrus flavors.
  • It’s highly customizable; you can easily adjust the sweetness and add fresh herbs for a unique twist that suits your taste.

Ingredients

  • 2 cups orange juice (freshly squeezed or store-bought)
  • 1 cup vanilla ice cream
  • 1 cup crushed ice
  • 1/2 cup milk (whole or 2%)
  • 1/4 cup granulated sugar (adjust based on sweetness preference)
  • 1 teaspoon vanilla extract
  • Zest of 1 orange (for added flavor)
  • Fresh orange slices and mint leaves (for garnish)

The star of this Frozen Orange Creamsicle Slush is the orange juice, which provides the vibrant, citrusy base. Freshly squeezed juice will yield the brightest flavor, but store-bought options can be just as convenient. If you’re opting for store-bought, choose 100% pure juice with no added sugars for the best results. Another essential ingredient is the vanilla ice cream; it adds creaminess and sweetness. You can substitute it with dairy-free ice cream if you’re looking for a vegan option. Whole or 2% milk complements the ice cream, creating a smooth blend. If you want a lower-calorie version, almond or oat milk can be good alternatives.

Lastly, the granulated sugar can be adjusted based on your sweetness preference. If you prefer a more natural sweetener, consider using honey or agave syrup. The orange zest enhances the flavor profile, providing an aromatic pop that brings the whole slush together. Don’t skip it! It adds an extra layer of brightness that makes this slush truly special.

Step-by-Step Instructions

  1. Start by preparing your ingredients. Gather 2 cups of orange juice, 1 cup of vanilla ice cream, and 1 cup of crushed ice. Make sure the ice is finely crushed, as larger chunks can make blending difficult.
  2. In a blender, combine the orange juice, vanilla ice cream, crushed ice, and 1/2 cup of milk. Add 1/4 cup of granulated sugar and 1 teaspoon of vanilla extract. If you like a sweeter slush, consider adding a bit more sugar at this stage.
  3. Add the zest of 1 orange to the blender. This step is crucial for enhancing the citrus flavor of your slush. Make sure not to include the bitter white pith—only the flavorful zest.
  4. Blend the mixture on medium-high speed for about 30-45 seconds. Stop once the ingredients are fully combined and the slush has a smooth, even consistency. If you notice large chunks of ice, blend for an additional 10-15 seconds. Avoid over-blending, as this can make the slush too liquidy.
  5. Once blended, taste the slush. If it needs more sweetness, add a little more sugar and blend for a few more seconds. If it’s too thick, you can add a splash of milk to reach your desired consistency.
  6. Pour the slush into glasses. This recipe typically serves 4, but you can easily double it for larger gatherings. Use a spoon to help guide the slush into the glasses if needed.
  7. Garnish each serving with fresh orange slices and mint leaves. The mint not only adds a pop of color but also a refreshing aroma that complements the citrus flavors beautifully.
  8. Serve immediately and enjoy! If you’ve made extra, you can refrigerate it for a short time, but it’s best enjoyed fresh.

Pro Tips for the Best Frozen Orange Creamsicle Slush

  • Don’t skip the orange zest! It’s a game-changer for flavor. Always zest before juicing to make it easier.
  • Use a high-powered blender for the best texture. A standard blender may struggle with ice, leading to uneven consistency. If you have a food processor, that can work too, but ensure the ice is finely crushed.
  • Adjust the ice-to-liquid ratio carefully. If your slush is too thick, it won’t blend well. Start with less ice and add more until you reach your preferred texture.
  • Be cautious with the sugar! Always start with the lower amount, as you can easily add more, but it’s hard to fix an overly sweet slush.
  • For a fun twist, consider adding a splash of coconut milk or a handful of fresh fruit like strawberries or pineapple. This not only enhances the flavor but also adds a beautiful color contrast.

Variations & Serving Ideas

There are countless ways to put a spin on your Frozen Orange Creamsicle Slush. Consider making a tropical version by adding in some pineapple juice or coconut milk for a delightful tropical twist. If you’re feeling adventurous, try incorporating a handful of frozen mango or peach slices for added sweetness. For a lighter version, swap out the vanilla ice cream for Greek yogurt for a creamy yet tangy alternative.

As for serving ideas, this refreshing slush pairs wonderfully with light summer dishes like grilled chicken skewers, fish tacos, or a simple salad topped with citrus vinaigrette. The bright, zesty flavors of the slush complement these dishes perfectly, making them an ideal pairing for a sunny day.

Storage, Make-Ahead & Reheating

This Frozen Orange Creamsicle Slush is best enjoyed fresh, but if you have leftovers, you can store them in an airtight container in the fridge for up to 2 days. Just keep in mind that the slush may lose some of its texture over time as the ice melts. It doesn’t freeze well, as the ice will turn into a solid block. If you must freeze it, blend again after thawing to restore the slushy consistency. This treat is best the day you make it, as the flavors meld together beautifully overnight, enhancing its deliciousness.

Frequently Asked Questions

Can I make Frozen Orange Creamsicle Slush ahead of time?

Yes — in fact, it tastes even better the next day as the flavors meld. However, it’s best to enjoy it fresh, as the texture can change if stored for too long. If you need to prepare it ahead, keep it in the fridge and re-blend before serving.

What kind of orange juice should I use?

For the best flavor, use freshly squeezed orange juice. However, if you’re short on time, opt for 100% pure store-bought juice without added sugars. This will ensure that your slush remains flavorful and refreshing.

Can I substitute the vanilla ice cream?

Absolutely! If you’re looking for a dairy-free option, coconut milk ice cream or a non-dairy vanilla ice cream can work wonderfully. They will still provide the creamy texture and sweetness you desire.

How can I adjust the sweetness of my slush?

You can easily adjust the sweetness by modifying the amount of sugar added. Start with 1/4 cup and taste the mixture before blending. If you prefer it sweeter, add more sugar gradually until it reaches your desired level.

What should I do if my slush is too thick?

If your slush is too thick, simply add a splash of milk or orange juice and blend again. This will help achieve a more drinkable consistency while maintaining the slushy texture. Adjust gradually to reach your preferred thickness.

Sun-Kissed Frozen Orange Cream Slush

Final Thoughts

The Frozen Orange Creamsicle Slush is a delightful blend of refreshing citrus and creamy goodness, making it a perfect treat for warm days or any time you crave a taste of nostalgia. The way the bright orange flavor dances with the creamy texture truly elevates this slush, transforming it into a satisfying escape from the everyday.

This is the kind of recipe I come back to again and again, especially when I’m looking to cool down or impress guests at a summer gathering. It’s simple to make and always brings smiles all around! I encourage you to try this recipe for yourself—don’t hesitate to share your results or even put your own spin on it. Happy slushing!

Print
clock clock iconcutlery cutlery iconflag flag iconfolder folder iconinstagram instagram iconpinterest pinterest iconfacebook facebook iconprint print iconsquares squares iconheart heart iconheart solid heart solid icon

Frozen Orange Creamsicle Slush


  • Author: Lily author
  • Total Time: 15 minutes
  • Yield: 4 servings 1x
Pin Recipe
Print Recipe

Description

This Frozen Orange Creamsicle Slush is a refreshing treat that combines creamy vanilla and zesty orange flavors. Perfect for hot summer days, it brings back nostalgic memories with every sip.


Ingredients

Scale
  • 2 cups orange juice (freshly squeezed or store-bought)
  • 1 cup vanilla ice cream
  • 1 cup crushed ice
  • 1/2 cup milk (whole or 2%)
  • 1/4 cup granulated sugar (adjust based on sweetness preference)
  • 1 teaspoon vanilla extract
  • Zest of 1 orange (for added flavor)
  • Fresh orange slices and mint leaves (for garnish)

Instructions

  1. Start by preparing your ingredients. Gather 2 cups of orange juice, 1 cup of vanilla ice cream, and 1 cup of crushed ice. Make sure the ice is finely crushed, as larger chunks can make blending difficult.
  2. In a blender, combine the orange juice, vanilla ice cream, crushed ice, and 1/2 cup of milk. Add 1/4 cup of granulated sugar and 1 teaspoon of vanilla extract. If you like a sweeter slush, consider adding a bit more sugar at this stage.
  3. Add the zest of 1 orange to the blender. This step is crucial for enhancing the citrus flavor of your slush. Make sure not to include the bitter white pith—only the flavorful zest.
  4. Blend the mixture on medium-high speed for about 30-45 seconds. Stop once the ingredients are fully combined and the slush has a smooth, even consistency. If you notice large chunks of ice, blend for an additional 10-15 seconds. Avoid over-blending, as this can make the slush too liquidy.
  5. Once blended, taste the slush. If it needs more sweetness, add a little more sugar and blend for a few more seconds. If it’s too thick, you can add a splash of milk to reach your desired consistency.
  6. Pour the slush into glasses. This recipe typically serves 4, but you can easily double it for larger gatherings. Use a spoon to help guide the slush into the glasses if needed.
  7. Garnish each serving with fresh orange slices and mint leaves. The mint not only adds a pop of color but also a refreshing aroma that complements the citrus flavors beautifully.
  8. Serve immediately and enjoy! If you’ve made extra, you can refrigerate it for a short time, but it's best enjoyed fresh.
  • Prep Time: 15 min
  • Cook Time: 0 min
  • Category: Dessert
  • Method: Blending
  • Cuisine: American

Nutrition

  • Serving Size: 1 serving
  • Calories: 200
  • Sugar: 30 g
  • Sodium: 50 mg
  • Fat: 5 g
  • Saturated Fat: 3 g
  • Unsaturated Fat: 2 g
  • Trans Fat: 0 g
  • Carbohydrates: 40 g
  • Fiber: 1 g
  • Protein: 2 g
  • Cholesterol: 20 mg

Keywords: Don't skip the orange zest! It's a game-changer for flavor. Always zest before juicing to make it easier.

Did you make this recipe?

Share a photo and tag us — we can't wait to see what you've made!

Zesty Lemon Poppy Seed Delight

One rainy afternoon, I found myself in my grandmother’s cozy kitchen, the kind that always smelled like warmth and love. She was whipping up her famous Lemon Poppy Seed Loaf, a recipe that had been passed down through generations. As the batter came together, the zesty aroma of fresh lemons filled the air, mingling perfectly with the nutty fragrance of poppy seeds. I can still picture her, apron-clad, as she expertly drizzled a vibrant citrus icing over the loaf, creating a glossy, sun-kissed finish that beckoned us to dive in. It was a moment that sparked my own passion for baking, and this recipe has become a cherished staple in my home ever since.

When you take a bite of this Lemon Poppy Seed Loaf, it’s like a burst of sunshine on your palate. The loaf is beautifully golden, with a tender crumb that melts in your mouth. Each slice is speckled with tiny poppy seeds, adding a delightful crunch that contrasts beautifully with the tangy sweetness of the lemon. And that citrus icing? It’s the finishing touch that elevates this loaf from ordinary to extraordinary, with its bright, zesty flavor dancing on your taste buds.

This recipe stands out because it embraces simplicity while delivering on flavor. I’ve added a hint of vanilla to the batter, enhancing the overall taste and making it even more indulgent. Trust me, once you make this Lemon Poppy Seed Loaf With Citrus Icing, it’ll become a go-to in your baking repertoire.

So, let me show you exactly how to make it!

Zesty Lemon Poppy Seed Delight

Why You’ll Love This Recipe

  • Moist and tender crumb that melts in your mouth, thanks to the perfect balance of butter and buttermilk.
  • Bright, zesty lemon flavor paired with crunchy poppy seeds, creating a delightful texture and taste experience.
  • Easy to whip up in just about an hour, perfect for last-minute gatherings or a cozy afternoon treat.
  • Budget-friendly with everyday ingredients, making it an accessible option for all home bakers.
  • The citrus icing adds a sweet tang that elevates the loaf, turning a simple recipe into a showstopper!

Ingredients

  • 1 ½ cups (190g) all-purpose flour
  • 1 teaspoon baking powder
  • ½ teaspoon baking soda
  • ½ teaspoon salt
  • 3 tablespoons poppy seeds
  • ½ cup (115g) unsalted butter, softened to room temperature
  • 1 cup (200g) granulated sugar
  • 2 large eggs
  • 1 teaspoon vanilla extract
  • 1 teaspoon lemon zest (from about 1 medium lemon)
  • ½ cup (120ml) buttermilk
  • 2 tablespoons fresh lemon juice

For the Citrus Icing:

  • 1 cup (120g) powdered sugar
  • 2 tablespoons fresh lemon juice
  • 1 tablespoon orange juice
  • 1 teaspoon lemon zest (for garnish, optional)

Let’s dive into the key ingredients that make this Lemon Poppy Seed Loaf so special. The all-purpose flour provides the structure and base for the loaf, while the baking powder and baking soda ensure it rises perfectly, giving the loaf a light texture. For a gluten-free variation, you could substitute the flour with a gluten-free all-purpose blend. Poppy seeds not only add a delightful crunch but also contribute to the unique flavor profile that pairs well with the citrus notes.

Unsalted butter is crucial for achieving the buttery richness that makes this loaf so moist. If you’re looking for a dairy-free option, coconut oil or a vegan butter can be used instead. The buttermilk is another essential component, providing acidity that activates the baking soda for a fluffy texture. If you don’t have buttermilk on hand, you can easily make a substitute by mixing ½ cup of milk with 1 tablespoon of vinegar or lemon juice and letting it sit for about 5 minutes.

Step-by-Step Instructions

  1. Preheat your oven to 350°F (175°C). Grease a 9×5-inch loaf pan or line it with parchment paper for easy removal later.
  2. In a medium mixing bowl, whisk together 1 ½ cups of all-purpose flour, 1 teaspoon of baking powder, ½ teaspoon of baking soda, ½ teaspoon of salt, and 3 tablespoons of poppy seeds. This helps to evenly distribute the baking agents and ensures a uniform rise.
  3. In a large mixing bowl, cream together ½ cup of softened unsalted butter and 1 cup of granulated sugar using an electric mixer on medium speed for about 3-4 minutes, until the mixture is light and fluffy. Make sure to scrape down the sides of the bowl occasionally.
  4. Add 2 large eggs, 1 teaspoon of vanilla extract, and 1 teaspoon of lemon zest to the creamed butter and sugar, mixing until fully combined. You want a smooth consistency, so ensure there are no lumps of butter.
  5. In a small bowl, combine ½ cup of buttermilk and 2 tablespoons of fresh lemon juice. Alternately add the dry ingredients and buttermilk mixture to the butter mixture, starting and ending with the dry ingredients. Mix just until combined; do not overmix, as this can lead to a dense loaf.
  6. Pour the batter into the prepared loaf pan. Smooth the top with a spatula, ensuring it’s even. Bake in the preheated oven for 50-60 minutes, or until a toothpick inserted in the center comes out clean. The edges should be lightly golden brown, and the center should feel just set.
  7. Once baked, remove the loaf from the oven and allow it to cool in the pan for about 10 minutes. Then, transfer it to a wire rack to cool completely. Resist the urge to slice too soon, as it will be crumbly if it’s still warm.
  8. While the loaf is cooling, prepare the citrus icing. In a medium bowl, whisk together 1 cup of powdered sugar, 2 tablespoons of fresh lemon juice, and 1 tablespoon of orange juice until smooth. If the icing is too thick, you can add a little more juice to reach your desired consistency.
  9. Once the loaf is completely cool, drizzle the citrus icing over the top. If you like, sprinkle with an additional teaspoon of lemon zest for an extra pop of flavor and color.

Pro Tips for the Best Lemon Poppy Seed Loaf With Citrus Icing

  • Be careful not to overmix your batter; this is a common mistake that can lead to a dense loaf. Mix just until the dry ingredients are incorporated for a light and fluffy texture.
  • Use room temperature ingredients, especially the butter and eggs. This helps to create a smoother batter and ensures even baking. Take your eggs out of the fridge about 30 minutes before you start.
  • For a more pronounced lemon flavor, consider adding a little lemon extract in addition to the zest and juice. Just a half teaspoon can elevate the citrus notes significantly.
  • When measuring your flour, spoon it into the measuring cup and level it off with a knife instead of scooping directly from the bag. This prevents packing and ensures you don’t end up with a dry loaf.
  • Invest in a good quality loaf pan; it makes a difference in heat distribution, which ensures even baking. If your pan is dark-coated, reduce the oven temperature by 25°F to prevent over-browning.

Variations & Serving Ideas

For a delightful twist, consider adding blueberries or raspberries to the batter for a fruity burst of flavor. You can also experiment with different citrus fruits—try lime or grapefruit zest and juice for a refreshing change. For a healthier option, substitute half of the all-purpose flour with whole wheat flour for added fiber without compromising too much on texture.

This Lemon Poppy Seed Loaf pairs beautifully with a light salad, such as a mixed greens salad with a vinaigrette, or a cup of tea for a cozy afternoon treat. It also complements a creamy cheese platter, as the acidity of the loaf balances rich cheeses perfectly. Lastly, a scoop of vanilla ice cream on the side creates a delightful contrast of temperatures and flavors!

Storage, Make-Ahead & Reheating

This Lemon Poppy Seed Loaf can be stored at room temperature for up to 3 days if wrapped tightly in plastic wrap. If you want to keep it longer, it freezes well for up to 3 months. To freeze, wrap the loaf tightly in plastic wrap and then in aluminum foil to prevent freezer burn.

When you’re ready to enjoy it again, simply thaw it in the fridge overnight. Reheat individual slices in the microwave for 15-20 seconds or in a toaster oven until warmed through. Interestingly, many people find that this loaf tastes even better the next day, as the flavors have time to meld!

Frequently Asked Questions

Can I make Lemon Poppy Seed Loaf With Citrus Icing ahead of time?

Yes — in fact, it tastes even better the next day! You can make the loaf a day in advance, allowing the flavors to develop. Just be sure to store it in an airtight container to maintain its moisture.

Can I substitute the poppy seeds?

Absolutely! If you don’t have poppy seeds on hand or prefer an alternative, you can use sesame seeds for a similar crunch or omit them entirely for a smooth loaf.

What can I use instead of buttermilk?

If you don’t have buttermilk, you can easily create a substitute by mixing ½ cup of milk (dairy or plant-based) with 1 tablespoon of vinegar or lemon juice. Let it sit for 5 minutes before using in the recipe.

How can I make this recipe gluten-free?

To make a gluten-free version of this Lemon Poppy Seed Loaf, substitute the all-purpose flour with a gluten-free all-purpose flour blend. Just ensure that the blend contains a binding agent like xanthan gum for the best results.

What is the best way to store leftover loaf?

Leftover Lemon Poppy Seed Loaf should be stored in an airtight container at room temperature for up to 3 days. For longer storage, wrap it tightly and freeze for up to 3 months. Thaw it before serving for the best texture.

Zesty Lemon Poppy Seed Delight

Final Thoughts

The Lemon Poppy Seed Loaf with Citrus Icing is truly a delightful treat that brings a burst of brightness to any occasion. The zesty lemon flavor combined with the subtle crunch of poppy seeds creates a satisfying balance, while the citrus icing adds a touch of sweetness that perfectly complements the loaf’s tanginess.

This is the kind of recipe I come back to again and again, especially when I want to brighten up a gloomy day or celebrate a small victory. The aroma that fills the kitchen as it bakes is absolutely heavenly! I encourage you to give this recipe a try; you might just find it becoming a beloved staple in your home. Don’t forget to share your results or even add your own unique twist—I can’t wait to see what you create!

Print
clock clock iconcutlery cutlery iconflag flag iconfolder folder iconinstagram instagram iconpinterest pinterest iconfacebook facebook iconprint print iconsquares squares iconheart heart iconheart solid heart solid icon

Lemon Poppy Seed Loaf


  • Author: Lily author
  • Total Time: 25 minute
  • Yield: 1 loaf 1x
Pin Recipe
Print Recipe

Description

This Lemon Poppy Seed Loaf is a delightful treat that combines zesty lemon flavor with crunchy poppy seeds. Topped with a citrus icing, it’s perfect for any occasion.


Ingredients

Scale
  • 1 ½ cups (190g) all-purpose flour
  • 1 teaspoon baking powder
  • ½ teaspoon baking soda
  • ½ teaspoon salt
  • 3 tablespoons poppy seeds
  • ½ cup (115g) unsalted butter, softened to room temperature
  • 1 cup (200g) granulated sugar
  • 2 large eggs
  • 1 teaspoon vanilla extract
  • 1 teaspoon lemon zest (from about 1 medium lemon)
  • ½ cup (120ml) buttermilk
  • 2 tablespoons fresh lemon juice
  • 1 cup (120g) powdered sugar
  • 2 tablespoons fresh lemon juice
  • 1 tablespoon orange juice
  • 1 teaspoon lemon zest (for garnish, optional)

Instructions

  1. Preheat your oven to 350°F (175°C). Grease a 9×5-inch loaf pan or line it with parchment paper for easy removal later.
  2. In a medium mixing bowl, whisk together 1 ½ cups of all-purpose flour, 1 teaspoon of baking powder, ½ teaspoon of baking soda, ½ teaspoon of salt, and 3 tablespoons of poppy seeds. This helps to evenly distribute the baking agents and ensures a uniform rise.
  3. In a large mixing bowl, cream together ½ cup of softened unsalted butter and 1 cup of granulated sugar using an electric mixer on medium speed for about 3-4 minutes, until the mixture is light and fluffy. Make sure to scrape down the sides of the bowl occasionally.
  4. Add 2 large eggs, 1 teaspoon of vanilla extract, and 1 teaspoon of lemon zest to the creamed butter and sugar, mixing until fully combined. You want a smooth consistency, so ensure there are no lumps of butter.
  5. In a small bowl, combine ½ cup of buttermilk and 2 tablespoons of fresh lemon juice. Alternately add the dry ingredients and buttermilk mixture to the butter mixture, starting and ending with the dry ingredients. Mix just until combined; do not overmix, as this can lead to a dense loaf.
  6. Pour the batter into the prepared loaf pan. Smooth the top with a spatula, ensuring it’s even. Bake in the preheated oven for 50-60 minutes, or until a toothpick inserted in the center comes out clean. The edges should be lightly golden brown, and the center should feel just set.
  7. Once baked, remove the loaf from the oven and allow it to cool in the pan for about 10 minutes. Then, transfer it to a wire rack to cool completely. Resist the urge to slice too soon, as it will be crumbly if it’s still warm.
  8. While the loaf is cooling, prepare the citrus icing. In a medium bowl, whisk together 1 cup of powdered sugar, 2 tablespoons of fresh lemon juice, and 1 tablespoon of orange juice until smooth. If the icing is too thick, you can add a little more juice to reach your desired consistency.
  9. Once the loaf is completely cool, drizzle the citrus icing over the top. If you like, sprinkle with an additional teaspoon of lemon zest for an extra pop of flavor and color.
  • Prep Time: 15 mins
  • Cook Time: 50-60 mins
  • Category: Dessert
  • Method: Baking
  • Cuisine: American

Nutrition

  • Serving Size: 1 slice
  • Calories: 200
  • Sugar: 15 g
  • Sodium: 150 mg
  • Fat: 8 g
  • Saturated Fat: 5 g
  • Unsaturated Fat: 3 g
  • Trans Fat: 0 g
  • Carbohydrates: 30 g
  • Fiber: 1 g
  • Protein: 3 g
  • Cholesterol: 40 mg

Keywords: Be careful not to overmix your batter; this is a common mistake that can lead to a dense loaf. Use room temperature ingredients for a smoother batter and even baking.

Did you make this recipe?

Share a photo and tag us — we can't wait to see what you've made!

  • Privacy Policy
  • Terms Of Service
  • Contact
  • About
  • GDPR

Copyright © 2025 Homesmad