Quick Dinner Rolls
Quick Dinner Rolls: The name itself evokes images of warm, fluffy bread, freshly baked and ready to complement any meal. But what if I told you achieving that picture-perfect, melt-in-your-mouth experience doesn’t require hours of kneading and proofing? That’s the magic of this recipe – a delightful shortcut to homemade happiness without sacrificing flavor or texture.
While the precise origins of dinner rolls are lost to time, their importance in culinary traditions across the globe is undeniable. From the crusty rolls of European bakeries to the softer, sweeter versions found in American kitchens, these humble accompaniments have always played a starring role at the dinner table. They represent comfort, family, and the simple joy of sharing a meal together.
What makes these Quick Dinner Rolls so beloved? It’s the perfect balance of a slightly crisp exterior giving way to a soft, airy interior. The subtle sweetness complements both savory and sweet dishes, making them incredibly versatile. And let’s be honest, the irresistible aroma wafting from your oven as they bake is enough to make anyone’s mouth water. But beyond the taste and texture, the true appeal lies in their speed and simplicity. This recipe is designed for busy weeknights, allowing you to enjoy the satisfaction of homemade bread without the time commitment of traditional methods. You’ll be surprised how quickly you can whip up a batch of these delicious Quick Dinner Rolls.

Ingredients:
- 1 cup warm milk (105-115°F)
- 2 ¼ teaspoons active dry yeast (1 packet)
- 1 large egg, lightly beaten
- ¼ cup granulated sugar
- 1 teaspoon salt
- 4 tablespoons (½ stick) unsalted butter, melted and slightly cooled
- 4 cups all-purpose flour, plus more for dusting
Preparing the Dough
- In a large bowl, combine the warm milk and yeast. Let stand for 5-10 minutes, or until the yeast is foamy. This ensures the yeast is active and will help your rolls rise beautifully.
- Once the yeast is foamy, whisk in the beaten egg, sugar, and salt until well combined. I like to make sure there are no lumps of sugar at this stage.
- Stir in the melted butter until it’s fully incorporated into the wet ingredients. This adds richness and flavor to the rolls.
- Gradually add the flour, one cup at a time, mixing with a wooden spoon or a sturdy spatula until a shaggy dough forms. Don’t worry if it seems a little sticky at this point – that’s normal.
- Turn the dough out onto a lightly floured surface and knead for 5-7 minutes, or until the dough is smooth and elastic. If it’s too sticky, add a little more flour, a tablespoon at a time, until it’s manageable. Kneading develops the gluten, which gives the rolls their soft texture.
- Lightly grease a large bowl with oil or cooking spray. Place the dough in the bowl, turning to coat it evenly. Cover the bowl with plastic wrap or a clean kitchen towel and let it rise in a warm place for 1-1.5 hours, or until doubled in size. A warm oven (with the light on) is a great place for this.
Shaping and Proofing the Rolls
- Once the dough has doubled, gently punch it down to release the air. This is a satisfying part of the process!
- Turn the dough out onto a lightly floured surface. Divide the dough into 12 equal pieces. I find using a kitchen scale helps ensure even-sized rolls.
- Shape each piece of dough into a smooth ball. You can roll them gently in your hands to achieve a nice round shape. This is where you can get creative – you could also shape them into dinner rolls, slider buns, or even small loaves.
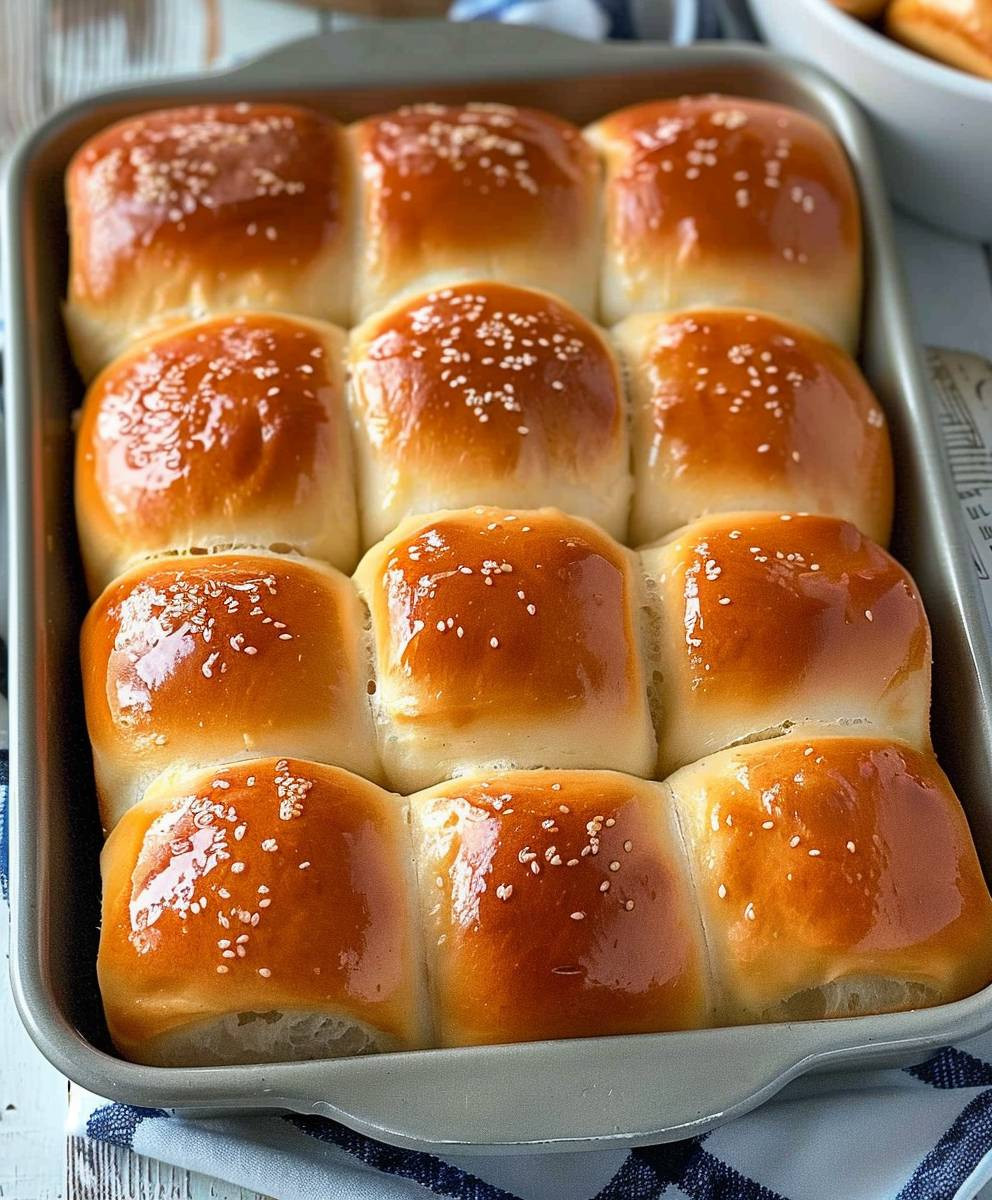
- Lightly grease a 9×13 inch baking pan or a baking sheet. Arrange the rolls in the prepared pan, leaving a little space between each one. They will rise a bit more during the final proofing.
- Cover the pan with plastic wrap or a clean kitchen towel and let the rolls rise for another 30-45 minutes, or until almost doubled in size. This second rise is crucial for achieving a light and fluffy texture.
Baking the Rolls
- Preheat your oven to 375°F (190°C). Make sure your oven is fully preheated before you put the rolls in for even baking.
- Bake the rolls for 18-22 minutes, or until they are golden brown and sound hollow when tapped on the bottom. Keep a close eye on them during the last few minutes of baking to prevent burning.
- Remove the rolls from the oven and let them cool in the pan for a few minutes before transferring them to a wire rack to cool completely. This prevents them from becoming soggy.
Tips for Perfect Rolls
Using Fresh Yeast:
For the best results, always use fresh yeast. Check the expiration date on your yeast packet. If it’s expired, the yeast may not activate properly, resulting in flat rolls.
Adjusting the Flour:
The amount of flour you need may vary slightly depending on the humidity and the type of flour you use. Start with the amount specified in the recipe and add more only if necessary to achieve a dough that is slightly sticky but not overly wet.
Don’t Overknead:
Overkneading the dough can result in tough rolls. Knead the dough until it’s smooth and elastic, but don’t continue kneading beyond that point.
Second Rise is Key:
The second rise is just as important as the first. Allowing the rolls to rise properly before baking will ensure that they are light and fluffy.
Cooling Completely:
Allowing the rolls to cool completely on a wire rack will prevent them from becoming soggy and will allow them to develop their full flavor.
Variations:
Get creative! Add herbs, cheese, or even some sweet additions to the dough for a unique twist. Experiment with different shapes and sizes for fun.
Storage:
Store leftover rolls in an airtight container at room temperature for up to 3 days, or freeze them for longer storage.
Conclusion:
So there you have it – my recipe for Quick Dinner Rolls! I truly believe this recipe is a must-try for anyone, from seasoned bakers to complete beginners. Why? Because it delivers on all fronts: speed, simplicity, and deliciousness. These aren’t your grandma’s yeast-risen rolls that take hours to perfect; these are quick, easy, and unbelievably fluffy, perfect for any weeknight meal. The soft, pillowy texture combined with that slightly sweet, buttery flavor makes them irresistible, and I guarantee they’ll disappear faster than you can say “dinner’s ready!”
I’ve found that these Quick Dinner Rolls are incredibly versatile. They’re the perfect accompaniment to hearty soups, stews, and chili, soaking up every last drop of delicious broth. They’re equally at home alongside a juicy roast chicken or a flavorful pasta dish. Imagine them warm from the oven, slathered with a generous pat of butter – pure comfort food heaven!
But don’t stop there! The beauty of this recipe lies in its adaptability. Feel free to experiment with different flavors. Add some herbs like rosemary or thyme to the dough for a savory twist. A sprinkle of parmesan cheese before baking adds a delightful salty crunch. For a sweeter treat, brush the rolls with melted honey or a simple glaze after baking. You could even incorporate some dried cranberries or chopped nuts into the dough for added texture and flavor. The possibilities are truly endless!
Serving Suggestions:
Here are a few of my favorite ways to serve these Quick Dinner Rolls:
- Alongside a bowl of your favorite tomato soup
- With a hearty pot roast
- Paired with grilled chicken or fish
- As a side to a pasta bake
- Served warm with butter and jam for breakfast
Variations to Try:
To make these rolls even more exciting, consider these variations:
- Garlic Herb Rolls: Add 1 tablespoon of minced garlic and 1 teaspoon of dried Italian herbs to the dough.
- Cheesy Rolls: Mix in ½ cup of shredded cheddar cheese into the dough.
- Sweet Rolls: Add ½ cup of sugar and 1 teaspoon of cinnamon to the dough.
- Mini Rolls: Make smaller rolls for appetizers or snacks.
I genuinely hope you give this recipe a try. These Quick Dinner Rolls are a true testament to the fact that delicious food doesn’t have to be complicated. They’re a simple pleasure that will elevate any meal. Once you’ve made them, I’d love to hear about your experience! Share your photos and feedback on social media using #QuickDinnerRolls – I can’t wait to see your creations!
So, what are you waiting for? Get baking!
Quick Dinner Rolls: Easy Recipe for Homemade Bread
Easy recipe for soft and fluffy dinner rolls, perfect for any occasion. Detailed instructions ensure perfectly risen, golden-brown results.
Ingredients
Instructions
Recipe Notes
- Using Fresh Yeast: Use fresh yeast for best results. Check expiration date.
- Adjusting Flour: Flour amount may vary depending on humidity and flour type. Add more only if necessary.
- Don’t Overknead: Overkneading results in tough rolls. Knead until smooth and elastic.
- Second Rise is Key: The second rise is crucial for light and fluffy rolls.
- Cooling Completely: Cooling completely on a wire rack prevents sogginess and allows full flavor development.
- Variations: Add herbs, cheese, or sweet additions to the dough. Experiment with shapes.
- Storage: Store leftover rolls in an airtight container at room temperature for up to 3 days, or freeze for longer storage.