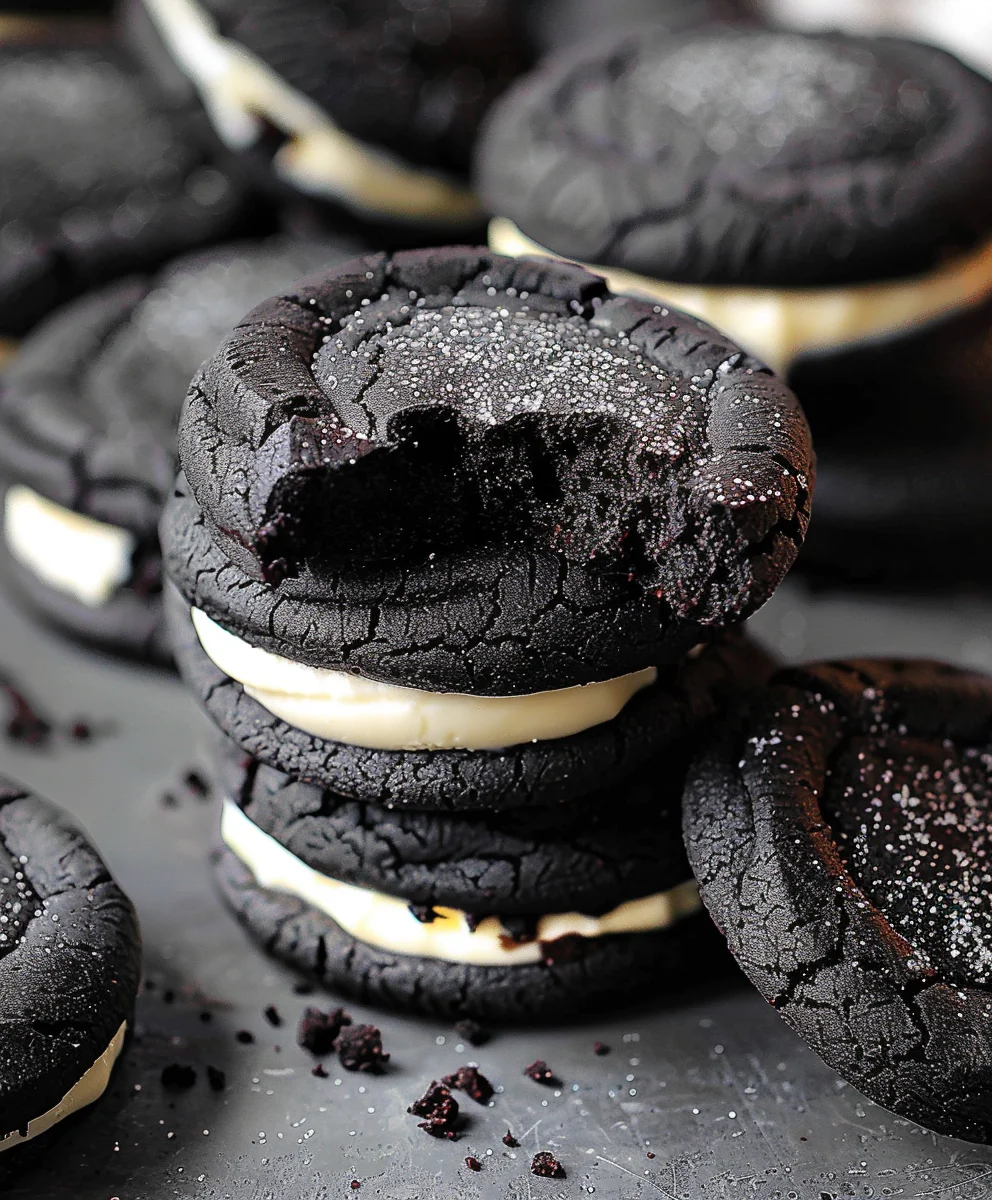
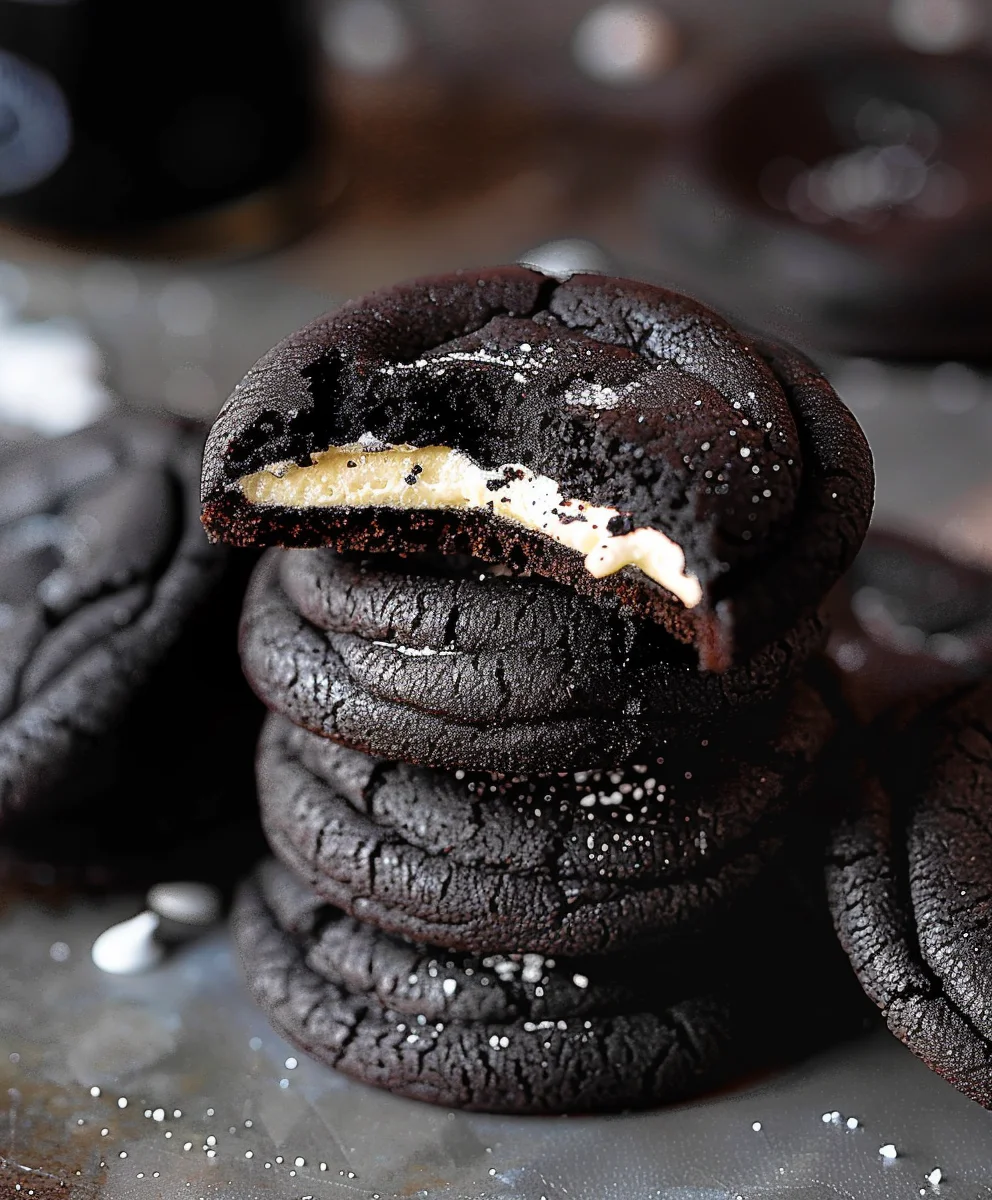
Black Velvet Cheesecake Cookies – just the name itself whispers of indulgence and sophistication. Have you ever wished you could combine the deep, mysterious allure of a rich, velvety chocolate dessert with the tangy, creamy bliss of a classic cheesecake, all in one delightful bite? Well, today, your culinary dreams are about to come true! These exquisite cookies are a testament to the art of fusion baking, offering an unparalleled experience that elevates the humble cookie to a gourmet sensation.
While traditional cheesecake boasts roots stretching back to ancient Greece, and the concept of ‘velvet’ cakes emerged in the early 20th century, celebrating a fine, soft crumb, our unique recipe brings these legacies together in a truly modern marvel.
Why are these cookies an instant favorite?
People absolutely adore them for countless reasons. The initial bite delivers a wonderfully chewy, intensely chocolatey cookie base, reminiscent of the richest velvet cake, which then gives way to a surprise center of smooth, tangy cheesecake filling. It’s this perfect harmony of textures and flavors – the bold chocolate against the bright cream cheese – that makes each Black Velvet Cheesecake Cookie an unforgettable treat. They are not only incredibly delicious but also conveniently portioned, making them ideal for sharing at gatherings or savoring as a personal moment of bliss.

Ingredients:
For the Black Velvet Cookies:
- 2 ¼ cups (270g) all-purpose flour
- ¾ cup (75g) unsweetened cocoa powder (Dutch-processed for a darker color)
- 1 teaspoon baking soda
- ½ teaspoon salt
- 1 cup (226g) unsalted butter, softened
- 1 ½ cups (300g) granulated sugar
- 2 large eggs, at room temperature
- 2 teaspoons pure vanilla extract
- 1-2 tablespoons red liquid or gel food coloring (use gel for a richer color without adding too much liquid, start with 1 tbsp and add more if needed to achieve a deep black velvet hue)
- ½ cup (85g) dark chocolate chips or chopped dark chocolate (optional, but highly recommended for texture)
- ½ cup (60g) powdered sugar, for rolling (plus extra for dusting, if desired)
For the Cheesecake Filling:
- 8 ounces (226g) cream cheese, softened
- ¼ cup (50g) granulated sugar
- 1 large egg yolk
- ½ teaspoon pure vanilla extract
Equipment You’ll Need:
- Stand mixer or hand mixer
- Mixing bowls
- Measuring cups and spoons
- Spatula
- Parchment paper or silicone baking mats
- Baking sheets
- Cookie scoop (1.5-2 tablespoon capacity is ideal)
- Small bowl for powdered sugar
- Plastic wrap
Preparing the Creamy Cheesecake Filling
- Begin with the star of the show, our luscious cheesecake filling. In a medium-sized bowl, combine the softened cream cheese, ¼ cup of granulated sugar, the single egg yolk, and ½ teaspoon of pure vanilla extract. It’s absolutely essential that your cream cheese is at room temperature for this step. If it’s cold, you’ll end up with lumps, and nobody wants lumpy cheesecake filling! I usually take my cream cheese out of the fridge about an hour before I plan to start baking.
- Using an electric mixer (either a stand mixer with the paddle attachment or a hand mixer), beat these ingredients together on medium speed until the mixture is completely smooth and creamy. This should take about 2-3 minutes. Make sure to scrape down the sides of the bowl occasionally with a rubber spatula to ensure everything is fully incorporated. You’re looking for a velvety consistency, free from any sugar granules or cream cheese clumps.
- Once it’s perfectly smooth, cover the bowl tightly with plastic wrap and transfer it to the refrigerator. We need this filling to be nice and firm before we can work with it inside our cookies, so let it chill for at least 30 minutes, or even longer if you have the time. This chilling step is crucial because it prevents the filling from becoming too runny and spreading out during the cookie assembly process. The firmer it is, the easier it will be to scoop and seal within the cookie dough.
Crafting the Rich Black Velvet Cookie Dough
- Now, let’s turn our attention to the magnificent “Black Velvet Cheesecake Cookies” dough. In a medium bowl, whisk together the dry ingredients: the all-purpose flour, unsweetened cocoa powder, baking soda, and salt. Make sure to really whisk them well to combine thoroughly. This step is important for an even distribution of leavening agents and flavor throughout your cookies. I personally love using Dutch-processed cocoa for these cookies because it gives them a darker, more intense black velvet color and a richer chocolate flavor. Set this bowl aside for now.
- In the large bowl of your stand mixer (or using a large bowl and a hand mixer), cream together the softened unsalted butter and 1 ½ cups of granulated sugar on medium-high speed until the mixture is light and fluffy. This usually takes about 3-5 minutes. Again, room temperature butter is key here; it incorporates air much better, leading to a softer, more tender cookie. Scrape down the sides of the bowl as needed to ensure everything is uniformly mixed.
- Next, beat in the two large eggs, one at a time, mixing well after each addition. After the eggs are fully incorporated, stir in the 2 teaspoons of pure vanilla extract. Vanilla plays a surprisingly important role, enhancing the chocolate flavor without overpowering it.
- Now comes the magical part for our “Black Velvet Cheesecake Cookies”: adding the food coloring! Add 1-2 tablespoons of red liquid or gel food coloring to the wet ingredients. I highly recommend using a high-quality gel food coloring, as it provides a much deeper, more vibrant color with less liquid, which is important for cookie dough consistency. Start with 1 tablespoon and mix it in. If you want a truly deep, almost black-red velvet color, add the second tablespoon. The color will intensify during baking. Mix until the color is evenly distributed and the mixture has transformed into a stunning deep red or even a dark burgundy, which will look blacker after baking with the cocoa.
- With the mixer on low speed, gradually add the dry ingredients to the wet ingredients, mixing until just combined. Be careful not to overmix the dough at this stage; overmixing can develop the gluten in the flour too much, leading to tough cookies. Mix only until no dry streaks of flour remain.
- If you’re using them, gently fold in the ½ cup of dark chocolate chips or chopped dark chocolate. These add an extra layer of chocolatey goodness and a delightful textural contrast to the soft cookie.
- Cover the cookie dough bowl with plastic wrap and refrigerate for at least 1 hour. This chilling time is non-negotiable for these “Black Velvet Cheesecake Cookies.” It allows the butter to firm up, preventing the cookies from spreading too much in the oven, and also allows the flavors to meld beautifully. You can chill it for up to 24 hours if you’re planning ahead, which actually enhances the flavor even more!
Assembling the Irresistible Black Velvet Cheesecake Cookies
- Preheat your oven to 375°F (190°C). Line two large baking sheets with parchment paper or silicone baking mats. This ensures your “Black Velvet Cheesecake Cookies” won’t stick and makes for easy cleanup.
- Remove both the chilled cookie dough and the chilled cheesecake filling from the refrigerator. Place the ½ cup of powdered sugar in a small, shallow bowl; this will be used for rolling our cookies to achieve that signature crinkle.
- Using a 1.5 to 2-tablespoon cookie scoop (a standard medium-sized scoop), scoop out a portion of the black velvet cookie dough. Gently flatten this ball of dough in the palm of your hand to create a disc about 2.5-3 inches in diameter. You want it to be thick enough to hold the filling without tearing.
- Now, take about 1 teaspoon of the chilled cheesecake filling. I find it easiest to use a small spoon or even my fingers to shape it into a small disc or ball. Place this little cheesecake disc directly in the center of your flattened cookie dough.
- Carefully bring the edges of the cookie dough up and around the cheesecake filling, pinching and sealing the seams together at the top to completely enclose the filling. Take your time with this step to ensure there are no gaps or cracks where the filling could escape during baking. You want a perfectly sealed package. Once sealed, gently roll the dough into a smooth ball.
- Roll each sealed cookie dough ball generously in the bowl of powdered sugar. Make sure it’s completely coated. This generous coating of powdered sugar is what creates the beautiful crinkly effect on the outside of your “Black Velvet Cheesecake Cookies” as they bake, and it also adds a lovely visual contrast to the dark cookie.
- Place the coated cookie dough balls about 2 inches apart on your prepared baking sheets. Give them enough space to spread slightly without touching. Repeat this process with the remaining cookie dough and cheesecake filling.
Baking and Perfecting Your Black Velvet Cheesecake Cookies
- Bake the “Black Velvet Cheesecake Cookies” for 10-12 minutes. The exact baking time can vary depending on your oven, so keep a close eye on them. You’ll know they are done when the edges are set, but the centers still look soft and slightly puffy. They might not look completely firm in the middle, and that’s okay – they will continue to set as they cool. Overbaking these cookies can make them dry, and we want them to remain wonderfully soft and tender with that perfectly gooey cheesecake center.
- Once baked, remove the baking sheets from the oven and let the cookies cool on the sheets for about 5 minutes. This initial cooling time on the hot baking sheet allows the cookies to firm up enough so they won’t break when you transfer them.
- After 5 minutes, carefully transfer the warm “Black Velvet Cheesecake Cookies” to a wire rack to cool completely. Allowing them to cool on a wire rack ensures air circulation all around the cookies, preventing them from getting soggy bottoms.
- While they are cooling, you’ll notice the powdered sugar coating cracking, creating those beautiful, irresistible crinkles. This is exactly what we want! Once completely cooled, the cheesecake filling inside will be perfectly set and creamy.
- These “Black Velvet Cheesecake Cookies” are truly a treat! For an extra touch of elegance, you can dust them with a little more powdered sugar just before serving, or even drizzle them with a bit of melted white chocolate for a striking visual contrast.
Storage Tips for Your Black Velvet Cheesecake Cookies
- To maintain their deliciousness and keep that cheesecake filling fresh, store your “Black Velvet Cheesecake Cookies” in an airtight container in the refrigerator. They will stay fresh and incredibly soft for up to 3-4 days. While they are delicious cold, I find that letting them come to room temperature for about 15-20 minutes before enjoying them really enhances the soft texture of the cookie and the creaminess of the filling.
- You can also freeze these cookies! Place the cooled “Black Velvet Cheesecake Cookies” in a single layer on a baking sheet and freeze until solid (about 1-2 hours). Once solid, transfer them to a freezer-safe airtight container or zip-top bag, separating layers with parchment paper. They can be frozen for up to 1 month. Thaw them in the refrigerator overnight or on the countertop for a few hours before serving. Enjoy your homemade “Black Velvet Cheesecake Cookies”!
Conclusion:
And so, we arrive at the culmination of our baking journey, and I genuinely hope you’re feeling as excited as I am about the prospect of sinking your teeth into these magnificent treats. If you’ve followed along with my recipe, you now understand the delightful simplicity behind creating something truly spectacular. These aren’t just any cookies; they are a symphony of textures and flavors, a truly decadent experience that elevates the humble cookie to something extraordinary. The initial bite delivers that deep, dark cocoa richness, a flavor so profound it lingers delightfully on the palate, perfectly complemented by the soft, chewy texture of the cookie itself. Then, just when you think you’ve reached peak cookie perfection, the creamy, tangy cheesecake swirl makes its grand entrance, cutting through the chocolatey intensity with a refreshing, smooth counterpoint that will have your taste buds singing. It’s this exquisite balance, this harmonious blend of bold chocolate and luscious cream cheese, that truly makes our Black Velvet Cheesecake Cookies an absolute must-try.
Why You Need to Make These (Again and Again!)
Beyond their incredible taste, what makes these cookies so special is their versatility and the sheer joy they bring. Imagine the gasps of delight when you present a platter of these at your next gathering. They are elegant enough for a sophisticated dessert table, yet comforting enough for a cozy evening in with a cup of hot cocoa or a robust coffee. The visual appeal alone, with their striking dark base and creamy white swirls, is captivating, making them a centerpiece in their own right. And let’s be honest, there’s an immense satisfaction that comes from creating something so beautiful and delicious from scratch. They are surprisingly unfussy to bake, despite their impressive appearance, which means you can achieve bakery-quality results right in your own kitchen without feeling overwhelmed. I’ve poured my heart into perfecting this recipe, ensuring every step is clear and achievable, so you can focus on the pure pleasure of baking and the anticipation of that first glorious bite.
Creative Ways to Enjoy and Share Your Culinary Masterpiece
Once your batch of these delightful treats is ready, the fun doesn’t have to stop at just eating them plain (though that’s perfectly acceptable!). Consider elevating the experience with a few simple serving suggestions. A dusting of powdered sugar just before serving adds a touch of elegance and an extra hint of sweetness. For a truly indulgent dessert, try serving them warm with a scoop of vanilla bean ice cream or a dollop of fresh whipped cream and a sprinkle of mini chocolate chips. They also pair beautifully with a chilled glass of milk, a rich espresso, or even a dessert wine. Don’t be afraid to experiment with variations either. A sprinkle of flaky sea salt on top before baking can enhance the chocolate flavor, while a few drops of peppermint extract in the cheesecake filling could transform them into a festive holiday delight. You could even drizzle them with a contrasting white chocolate or a caramel sauce for an added layer of flavor and visual appeal. These cookies also make truly thoughtful gifts; imagine packaging a few in a beautiful box for a friend or neighbor – a homemade gesture that speaks volumes.
Your Culinary Adventure Awaits!
Now, it’s your turn. I’ve guided you through every step, shared my passion, and hopefully ignited your own culinary spark. I truly encourage you to set aside some time, gather your ingredients, and embark on this wonderful baking adventure. Don’t be intimidated; the process is incredibly rewarding, and the end result is absolutely worth every moment. There’s a unique magic in filling your kitchen with the aroma of freshly baked goods, and even more so when those goods are these irresistible cookies. Once you’ve baked your own batch of Black Velvet Cheesecake Cookies, I would absolutely love to hear about your experience! Did you love them as much as I do? Did you try any exciting variations? Please share your triumphs, your photos, and your feedback. Your insights not only bring me immense joy but also help inspire other home bakers in our wonderful community. So, go ahead, preheat that oven, and prepare to fall in love with your new favorite cookie. Happy baking, my friends!
Black Velvet Cheesecake Cookies
These Black Velvet Cheesecake Cookies combine the deep, mysterious allure of a rich, chewy, intensely chocolatey cookie base with the tangy, creamy bliss of a classic cheesecake filling, all in one delightful bite. An unforgettable fusion baking experience, conveniently portioned.
Ingredients
-
170 g cream cheese, cold
-
38 g granulated white sugar (for filling)
-
0.5 tsp vanilla extract (for filling)
-
1 large egg yolk (for filling)
-
188 g all-purpose flour
-
3 g black cocoa powder
-
40 g black cocoa powder
-
0.5 tsp baking powder
-
0.5 tsp salt
-
168 g unsalted butter, softened
-
165 g light brown sugar, packed
-
50 g granulated white sugar (for cookie dough)
-
2 large egg yolks, at room temperature (for cookie dough)
-
1.5 tsp vanilla extract (for cookie dough)
-
50 g granulated white sugar (for rolling)
Instructions
-
Step 1
In a medium bowl, beat softened 170g cream cheese, 38g granulated sugar, 0.5 tsp vanilla extract, and 1 large egg yolk until completely smooth and creamy. Cover and chill in the refrigerator for at least 30 minutes to firm up. -
Step 2
In a separate medium bowl, whisk together 188g all-purpose flour, 3g black cocoa powder, 40g black cocoa powder, 0.5 tsp baking powder, and 0.5 tsp salt. Set aside. -
Step 3
In the large bowl of a stand mixer, cream 168g softened unsalted butter, 165g light brown sugar, and 50g granulated sugar on medium-high speed until light and fluffy (3-5 minutes). Beat in 2 large egg yolks one at a time, mixing well after each addition. Stir in 1.5 tsp vanilla extract. -
Step 4
With the mixer on low speed, gradually add the dry ingredients to the wet ingredients, mixing until just combined and no dry streaks of flour remain. Be careful not to overmix. -
Step 5
Cover the cookie dough bowl with plastic wrap and refrigerate for at least 1 hour. This chilling time is essential for optimal cookie consistency. -
Step 6
Preheat your oven to 375°F (190°C). Line two large baking sheets with parchment paper. Scoop 1.5-2 tablespoons of chilled cookie dough, gently flatten it into a 2.5-3 inch disc. Place about 1 teaspoon of the chilled cheesecake filling in the center. Carefully bring the edges of the cookie dough up and around the filling, pinching and sealing the seams completely. Gently roll into a smooth ball. -
Step 7
Roll each sealed cookie dough ball generously in the 50g granulated white sugar (for rolling), ensuring it’s completely coated. Place the coated cookie dough balls about 2 inches apart on the prepared baking sheets. Bake for 10-12 minutes, until the edges are set and centers look soft. Avoid overbaking. -
Step 8
Remove baking sheets from the oven and let cookies cool on the sheets for about 5 minutes. Then, carefully transfer the warm cookies to a wire rack to cool completely. Store in an airtight container in the refrigerator for up to 3-4 days, or freeze cooled cookies for up to 1 month. Enjoy!
Important Information
Nutrition Facts (Per Serving)
It is important to consider this information as approximate and not to use it as definitive health advice.
Allergy Information
Please check ingredients for potential allergens and consult a health professional if in doubt.