• Skip to primary navigation
  • Skip to main content
  • Skip to primary sidebar
Homesmad

Homesmad

  • Home
  • Breakfast & Brunch
  • Appetizers & Snacks
  • Dinner
  • Dessert
  • About
  • Privacy Policy
  • Contact
Homesmad
  • Home
  • Breakfast & Brunch
  • Appetizers & Snacks
  • Dinner
  • Dessert
  • About
  • Privacy Policy
  • Contact

Salted Caramel Apple Crumble Bars: Perfect Fall Treat

October 31, 2025 by Lily author

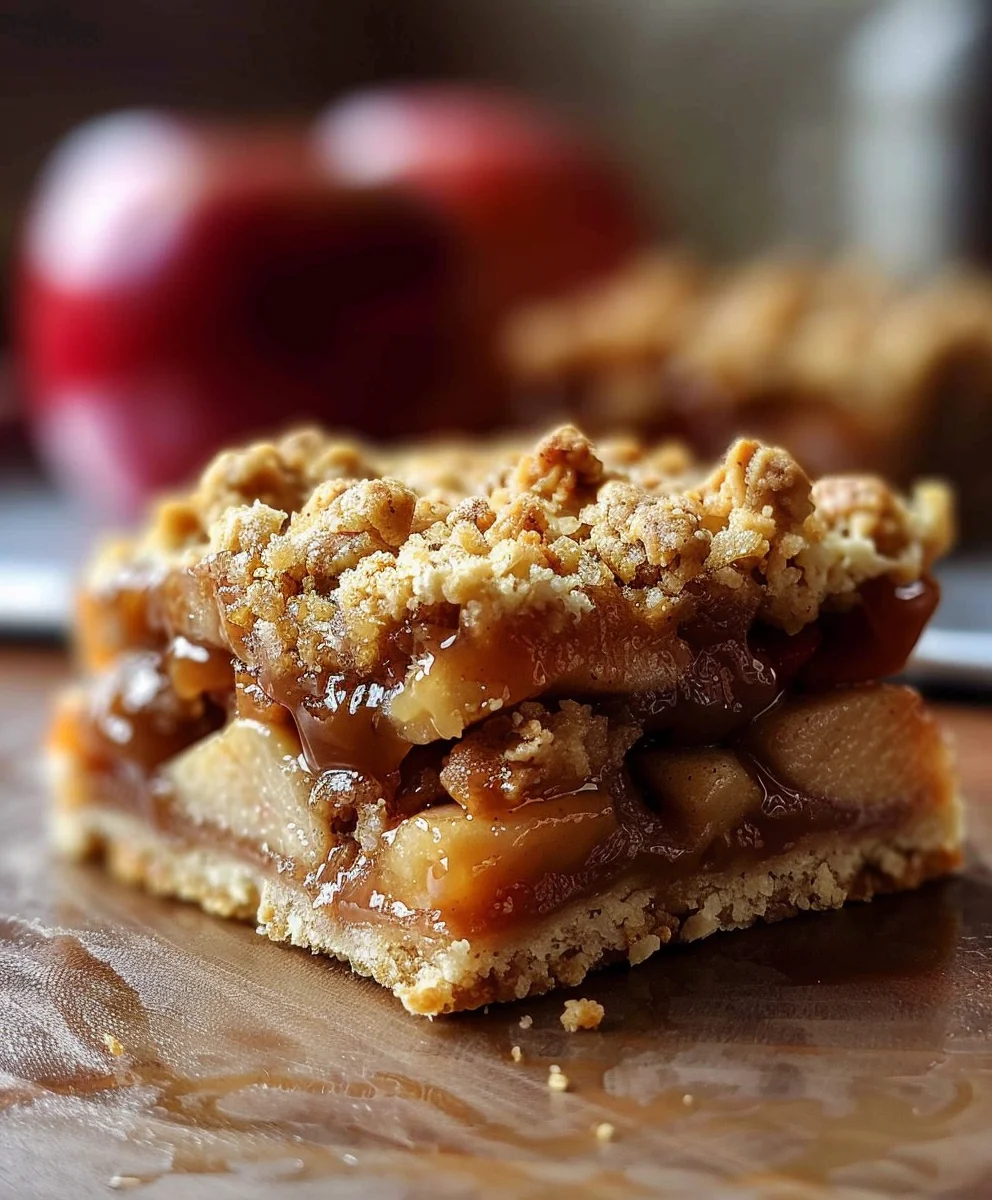
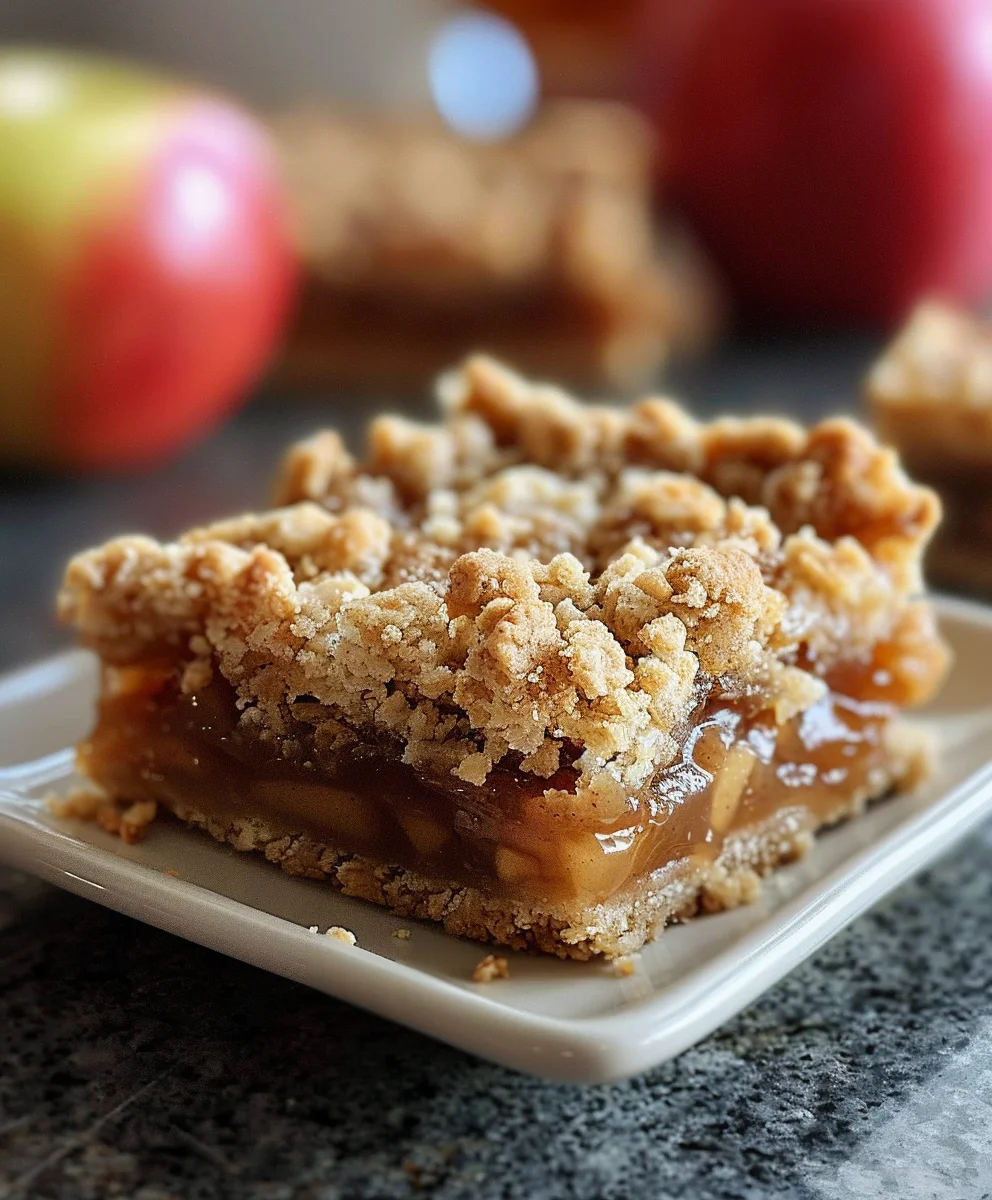
Salted Caramel Apple Crum extractble Bars Fall Treat are more than just a dessert; they are an invitation to experience the very best of autumn in every single bite. I am absolutely thrilled to present a recipe that captures the quintessential flavors of the season – the crisp tartness of fresh apples, the luxurious sweetness of golden caramel, and that irresistible hint of sea salt that elevates every note. Imagine sinking your teeth into a perfectly balanced bar where a buttery, crumbly crust cradles tender, spiced apples, all enrobed in a luscious salted caramel sauce, and crowned with a delightful streusel topping. It’s the kind of treat that instantly transports you to a cozy fireside on a crisp autumn evening, evoking cherished memories and creating new ones.

Embrace the Flavors of Autumn

For centuries, apples have been the star of harvest celebrations, symbolizing abundance and warmth across cultures. Caramel, with its deep, comforting sweetness, has long been a beloved companion to all things autumnal. This particular rendition takes those cherished traditions and ingeniously transforms them into an incredibly convenient and utterly shareable format, making them ideal for gatherings or a thoughtful homemade gift. It’s the perfect harmony of textures – soft apples, gooey caramel, and a delightfully crunchy crumble – making it an undeniable crowd-pleaser. Whether you’re hosting a cozy gathering, preparing for a festive holiday, or simply craving a delightful afternoon treat, these Salted Caramel Apple Crum extractble Bars Fall Treat offer an unparalleled indulgence that will undoubtedly become a treasured addition to your autumnal repertoire. I know you’ll love them as much as I do!

Salted Caramel Apple Crumble Bars: Perfect Fall Treat this RECIPE

Ingredients:

  • For the Irresistible Crumble and Crust:

    • 2 ½ cups (300g) all-purpose flour
    • 1 ½ cups (135g) rolled oats (not instant)
    • 1 cup (200g) granulated sugar
    • ¾ cup (160g) packed light brown sugar
    • 1 teaspoon ground cinnamon
    • ½ teaspoon ground nutmeg
    • ½ teaspoon salt
    • 1 cup (226g) unsalted butter, very cold and cut into small cubes
  • For the Luscious Apple Filling:

    • 6-8 medium apples (about 6-7 cups sliced), a mix of Granny Smith and Honeycrisp works beautifully
    • ½ cup (100g) packed light brown sugar
    • 2 tablespoons cornstarch
    • 1 tablespoon fresh lemon juice
    • 1 teaspoon vanilla extract
    • 1 teaspoon ground cinnamon
    • ½ teaspoon ground nutmeg
    • ¼ teaspoon ground allspice
  • For the Decadent Salted Caramel Sauce:

    • 1 cup (200g) granulated sugar
    • ¼ cup (60ml) water
    • ½ cup (120ml) heavy cream, warmed slightly
    • ¼ cup (56g) unsalted butter, cut into 4 pieces
    • 1 teaspoon sea salt (or more, to taste)
    • ½ teaspoon vanilla extract

Phase 1: Preparing the Crumble and Crust – The Foundation of Your Fall Treat

  1. Preheat and Prepare Your Pan: Begin by preheating your oven to a cozy 375°F (190°C). This ensures your oven is at the perfect temperature when your baking pan is ready. Take a 9×13 inch baking pan and line it meticulously with parchment paper, leaving an overhang on the longer sides. This parchment paper sling is an absolute lifesaver when it comes to lifting your beautiful “Salted Caramel Apple Crumble Bars Fall Treat” out of the pan later on, making cutting and serving a breeze. Lightly grease the exposed sides of the pan or the parchment itself if you prefer.
  2. Combine the Dry Ingredients for the Crumble: In a generously sized mixing bowl, combine the all-purpose flour, rolled oats, granulated sugar, light brown sugar, ground cinnamon, ground nutmeg, and salt. Whisk these dry ingredients together thoroughly. You want to make sure all the spices and sugars are evenly distributed throughout the flour and oats. This initial step is crucial for an even flavor profile in your crumble and crust.
  3. Incorporate the Cold Butter: Now comes the fun part! Add your very cold, cubed unsalted butter directly into the dry ingredient mixture. Using a pastry blender, two forks, or even your fingertips (working quickly so the butter doesn’t warm up too much), cut the butter into the dry ingredients. Continue until the mixture resembles coarse crumbs, with some pea-sized pieces of butter still visible. It’s important not to overmix here. Those small pockets of butter are what will melt during baking, creating an incredibly tender and flaky crust, giving your “Salted Caramel Apple Crumble Bars” that perfect texture.
  4. Form the Crust: Divide the crumble mixture roughly in half. Press one half firmly and evenly into the bottom of your prepared 9×13 inch baking pan. Use the bottom of a flat glass or your clean hands to compact it tightly. A well-pressed crust is key to preventing your bars from falling apart when you cut them. Ensure the crust covers the entire bottom of the pan from edge to edge. This creates a solid base for the delightful apple filling. Set the remaining crumble mixture aside for the topping.
  5. Pre-Bake the Crust (Optional, but Recommended for Robustness): For an extra sturdy and slightly crispier crust, you can pre-bake it for 10-12 minutes, or until it just begins to turn a very light golden brown around the edges. This step is particularly helpful if you prefer a less soggy bottom on your fruit bars and adds an extra layer of structural integrity to your “Salted Caramel Apple Crumble Bars Fall Treat.” Once lightly golden, remove from the oven and set aside while you prepare the apple filling.

Phase 2: Crafting the Apple Filling – The Heart of the Fall Flavor

  1. Prepare the Apples: Wash your apples thoroughly. Then, peel them using a vegetable peeler, core them, and slice them into relatively thin pieces, about ¼-inch thick. You’re aiming for consistency here so that all the apple slices cook evenly. I adore using a combination of Granny Smith for their tartness and Honeycrisp for their crisp texture and sweetness. This duo provides a wonderful balance of flavor and texture that truly elevates these “Salted Caramel Apple Crumble Bars.”
  2. Season the Apples: In a large mixing bowl, gently toss the sliced apples with the light brown sugar, cornstarch, fresh lemon juice, vanilla extract, ground cinnamon, ground nutmeg, and ground allspice. The lemon juice helps prevent the apples from browning too quickly and adds a bright note, while the cornstarch is vital for thickening the juices released by the apples during baking, ensuring your filling isn’t watery. Make sure all the apple slices are well coated with the spice mixture. This ensures every bite of your “Salted Caramel Apple Crumble Bars” is bursting with autumnal spice.

Phase 3: Assembling and Baking the Bars – Bringing it All Together

  1. Layer the Apple Filling: Carefully spread the seasoned apple filling evenly over the pre-baked (or unbaked, if you skipped that step) crust in your prepared baking pan. Try to get an even layer from edge to edge. Don’t worry if the apples pile up a bit; they will cook down considerably as they bake, becoming wonderfully tender and juicy.
  2. Add the Crumble Topping: Now, evenly sprinkle the remaining half of the crumble mixture over the apple filling. You can leave it a bit clumpy for a rustic look, or break it up into smaller pieces. This layer will bake into that signature crunchy, buttery crumble topping that perfectly complements the soft apples below. This crumble topping is what makes these “Salted Caramel Apple Crumble Bars” so utterly satisfying.
  3. Bake to Golden Perfection: Place the baking pan into your preheated oven. Bake for approximately 45-55 minutes, or until the crumble topping is beautifully golden brown, the apples are fork-tender when pierced through the crumble, and the filling is visibly bubbly around the edges. The aroma filling your kitchen will be absolutely incredible – a sure sign that these “Salted Caramel Apple Crumble Bars Fall Treat” are nearly ready! If the topping starts to brown too quickly, you can loosely tent the pan with aluminum foil for the last 15-20 minutes of baking.
  4. Cool Completely: This step requires patience, but it’s absolutely crucial! Once baked, remove the pan from the oven and place it on a wire rack to cool completely. This means letting it cool for at least 2-3 hours, or ideally, even longer, before attempting to cut into the bars. Allowing the bars to cool fully allows the filling to set properly and the crumble to firm up, ensuring clean cuts. Rushing this step will result in a messy, crumbling disaster, and we don’t want that for your perfectly crafted “Salted Caramel Apple Crumble Bars.”

Phase 4: Whipping Up the Salted Caramel Sauce – The Ultimate Indulgence

  1. Prepare for Caramel Making: Before you start, measure out all your caramel ingredients and have them ready. Warm your heavy cream slightly in a separate small saucepan or microwave; this helps prevent the caramel from seizing when added. Have your butter and sea salt ready to go. Caramel making requires your full attention.
  2. Make the Dry Caramel: In a medium-sized, heavy-bottomed saucepan, combine the granulated sugar and water. Stir gently just to combine and moisten all the sugar. Place the saucepan over medium heat. Do not stir once it starts to boil! Allow the sugar mixture to boil undisturbed. The sugar will first dissolve, then boil, then begin to turn light amber around the edges.
  3. Achieve the Perfect Caramel Color: Continue to cook, swirling the pan occasionally (do not stir with a spoon, or you risk crystallization), until the sugar turns a rich, deep amber color. This usually takes about 8-12 minutes. Watch it very carefully, as caramel can go from perfect to burnt in a matter of seconds. The deeper the color, the richer the flavor, but be mindful not to let it get too dark, or it will taste bitter.
  4. Whisk in Cream and Butter (Carefully!): Once you’ve achieved your desired amber color, immediately and very carefully remove the saucepan from the heat. Slowly pour the warm heavy cream into the hot caramel while continuously whisking. Be extremely cautious, as the caramel will bubble up violently and release a lot of steam. Keep whisking until smooth. Then, add the cubed butter, one piece at a time, whisking until each piece is fully incorporated and the sauce is smooth and glossy.
  5. Finish with Salt and Vanilla: Stir in the sea salt and vanilla extract. Whisk until fully combined. The salt is what truly makes this a “Salted Caramel Apple Crumble Bars Fall Treat,” balancing the sweetness beautifully. Taste and add more salt if desired. Pour the finished salted caramel sauce into a heatproof jar or bowl and let it cool slightly until it’s warm but not piping hot, and thick enough to drizzle. It will thicken considerably as it cools.

Phase 5: Finishing and Cooling – The Grand Finale

  1. Drizzle the Salted Caramel: Once your “Salted Caramel Apple Crumble Bars” have completely cooled and set in the pan, carefully drizzle the warm (but not hot) salted caramel sauce generously over the top. You can go for an artistic swirl pattern or just a rustic, bountiful drizzle. The caramel will naturally spread and seep into the crevices of the crumble topping, creating an incredibly moist and flavorful experience.
  2. Allow Caramel to Set: Let the drizzled bars sit for another 30 minutes to an hour, allowing the caramel to set slightly. This makes for cleaner slices and a less sticky eating experience.
  3. Cut and Serve: Using the parchment paper overhang, carefully lift the entire slab of “Salted Caramel Apple Crumble Bars Fall Treat” out of the pan and transfer it to a large cutting board. Using a sharp, non-serrated knife, cut the bars into desired sizes. I usually aim for 24 squares (4×6 cuts) or 12 larger rectangles. Wipe your knife clean between cuts for the neatest edges.
  4. Storage: Store any leftover Salted Caramel Apple Crumble Bars in an airtight container at room temperature for up to 3 days, or in the refrigerator for up to 5 days. They are also fantastic gently warmed in the microwave for a few seconds before serving, perhaps with a scoop of vanilla bean ice cream!

Expert Tips and Variations for Your Salted Caramel Apple Crumble Bars

Creating the perfect “Salted Caramel Apple Crumble Bars Fall Treat” is a delightful journey, and here are some insights to ensure every batch is a resounding success:

Choosing the Best Apples for Your Bars:

While I recommend a mix of Granny Smith and Honeycrisp, don’t be afraid to experiment! Other great apple varieties for baking include Braeburn, Fuji, Golden Delicious, or even a mix of all of them. The key is to use firm apples that hold their shape well when baked, rather than turning into mush. Avoid Red Delicious, as they tend to become too soft. The combination of sweet and tart apples ensures a complex and balanced flavor in your “Salted Caramel Apple Crumble Bars.”

Enhancing the Spice Profile:

The cinnamon, nutmeg, and allspice blend is classic, but feel free to adjust it to your personal preference. A pinch of ground ginger or cardamom can add a wonderful warmth and depth to the apple filling, truly making these “Salted Caramel Apple Crumble Bars Fall Treat” unique. You could even add a tiny hint of clove for a more intense autumnal flavor. Always use fresh spices for the best aroma and taste.

Troubleshooting Your Homemade Salted Caramel:

Making caramel can seem daunting, but practice makes perfect. If your caramel seized when you added the cream, it means the cream was too cold, or you added it too quickly. Don’t despair! Place the saucepan back over low heat and gently whisk until the hardened caramel dissolves back into a smooth sauce. If your caramel is too thin, return it to low heat and simmer gently, stirring occasionally, until it thickens to your desired consistency. If it’s too thick, you can whisk in a tiny bit more warm heavy cream. The beauty of these “Salted Caramel Apple Crumble Bars” is that even if the caramel isn’t absolutely perfect, it will still taste amazing.

Shortcuts for the Salted Caramel Sauce:

If you’re pressed for time or intimidated by making caramel from scratch, don’t let that stop you from enjoying these incredible “Salted Caramel Apple Crumble Bars Fall Treat.” You can absolutely use a good quality store-bought caramel sauce. Simply warm it gently and stir in a teaspoon of sea salt to achieve that crucial salted caramel flavor. It will still provide that essential gooey, sweet, and salty element that makes these bars so special.

Serving Suggestions for an Extra Special Treat:

These “Salted Caramel Apple Crumble Bars” are phenomenal on their own, but if you want to elevate the experience, consider serving them warm with a scoop of premium vanilla bean ice cream or a dollop of freshly whipped cream. The contrast of the warm, spiced apples and cool, creamy additions is simply divine. A sprinkle of extra sea salt flakes on top before serving also adds a gourmet touch and enhances the “Salted Caramel” aspect of your bars.

Making Ahead and Freezing:

These bars are excellent for making ahead! You can bake the bars, cool them completely, and then drizzle with caramel. Store them in an airtight container at room temperature for up to 3 days, or refrigerate for up to a week. For longer storage, you can freeze the uncut, undrizzled bars for up to 3 months. Wrap them tightly in plastic wrap and then in foil. Thaw overnight in the refrigerator, then bring to room temperature and drizzle with freshly made or warmed caramel before serving. This makes them a convenient “Salted Caramel Apple Crumble Bars Fall Treat” to have on hand for unexpected guests or a quick dessert.

Achieving Clean Cuts Every Time:

To get those perfectly clean, bakery-worthy slices of your “Salted Caramel Apple Crumble Bars,” ensure the bars are completely chilled, ideally for several hours or even overnight in the refrigerator, before cutting. Use a large, sharp knife and wipe the blade clean with a damp cloth after each cut to prevent sticking and dragging crumbs. This attention to detail will present your delicious “Salted Caramel Apple Crumble Bars” beautifully.

Enjoy baking and sharing this incredible “Salted Caramel Apple Crumble Bars Fall Treat” with your loved ones!

Salted Caramel Apple Crumble Bars: Perfect Fall Treat

Conclusion:

So there you have it, my friends! We’ve journeyed through the delightful process of creating what I genuinely believe will become your new favorite autumn indulgence. These aren’t just any dessert bars; they are a celebration of everything wonderful about the season, perfectly encapsulated in a single, irresistible bite. The way the sweet, crisp apples mingle with that luscious, slightly salty caramel, all tucked under a buttery, crumbly oat topping, is simply magical. Every layer plays its part, creating a symphony of textures and flavors that will leave you wanting just one more piece. It’s the kind of treat that doesn’t just satisfy your sweet tooth; it warms your soul and fills your home with the most incredible aromas, making every moment feel a little cozier. From the moment the first hint of cinnamon and baked apple wafts from your oven, you’ll know you’re creating something truly special.

One of the many reasons why this recipe is an absolute must-try is its incredible balance. The tartness of the apples cuts through the sweetness of the caramel, preventing it from being overly rich, while the crunchy crumble adds that essential textural contrast. It’s a sophisticated twist on a classic, elevating humble ingredients into something extraordinary. And let’s be honest, who can resist the allure of salted caramel? It’s a flavor profile that has captivated taste buds worldwide, and when combined with the comforting essence of baked apples, it creates an unforgettable experience. This recipe truly embodies the spirit of fall, offering comfort, warmth, and a touch of gourmet sophistication in every single square.

Now, while these bars are absolutely divine served warm, straight from the baking dish, I have a few suggestions to elevate your experience even further. Imagine a generous scoop of vanilla bean ice cream slowly melting over a warm bar, its creamy texture blending with the gooey caramel and tender apples. Or, for a lighter touch, a dollop of freshly whipped cream, perhaps with a whisper of cinnamon or a grating of nutmeg, would be absolutely divine. If you’re feeling extra indulgent, a drizzle of extra homemade caramel sauce never hurt anyone! For variations, consider swapping out some of the traditional baking apples for a mix of different varieties – a Granny Smith for tang, a Honeycrisp for sweetness and crunch. You could also experiment with adding a handful of toasted chopped pecans or walnuts to the crumble topping for an extra layer of nutty flavor and crunch. For those who love a bit of spice, a tiny pinch of ground ginger or allspice alongside the cinnamon in the apple filling would add another dimension of autumnal warmth. These bars are incredibly versatile, making them perfect for any occasion, from a casual family dessert to an elegant offering at a holiday gathering.

Embrace the Joy of Baking This Fall Treat

I truly hope you’re feeling inspired and excited to roll up your sleeves and give these a try. There’s a unique joy that comes from baking something so wonderfully delicious from scratch, especially when it results in such a crowd-pleasing dessert. This is more than just a recipe; it’s an opportunity to create memories, fill your home with incredible scents, and share warmth with those you love. I promise you, the effort is well worth the reward. The moment you take that first bite, you’ll understand exactly why I rave about them so much. These Salted Caramel Apple Crumble Bars Fall Treat are destined to become a beloved staple in your autumn baking repertoire.

Once you’ve experienced the magic of these bars, please, please don’t keep it to yourself! I would absolutely love to hear about your baking adventures. Share your photos on social media, tag me, or leave a comment below telling me how they turned out. Did you try any variations? What did your family think? Your feedback and stories are what make this culinary journey so incredibly rewarding for me, and they inspire other home bakers to give new recipes a try. So go ahead, preheat that oven, gather your ingredients, and get ready to create something truly spectacular. Happy baking, and I can’t wait to hear all about your delicious results!


Salted Caramel Apple Crumble Bars: Perfect Fall Treat

Salted Caramel Apple Crumble Bars: Perfect Fall Treat

These Salted Caramel Apple Crumble Bars are the ultimate fall dessert, combining the crisp tartness of fresh apples, the rich sweetness of caramel, and a hint of sea salt in a convenient, shareable bar format. A buttery, crumbly crust cradles tender, spiced apples, all enrobed in luscious salted caramel and topped with a delightful streusel.

Prep Time
25 Minutes

Cook Time
50 Minutes

Total Time
15 Minutes

Servings
12-24 bars

Ingredients

  • 1 cup (2 sticks) unsalted butter, melted
  • 1 1/2 cups granulated sugar
  • 1 teaspoon vanilla extract
  • 1/2 teaspoon salt
  • 2 1/2 cups all-purpose flour
  • 3 cups peeled and thinly sliced apples (about 3 medium)
  • 1/2 cup salted caramel sauce
  • 1 teaspoon ground cinnamon
  • 1/4 teaspoon ground nutmeg

Instructions

  1. Step 1
    Preheat your oven to 375°F (190°C). Line a 9×13 inch baking pan with parchment paper, leaving an overhang on the sides for easy lifting.
  2. Step 2
    In a large mixing bowl, combine the 2 ½ cups all-purpose flour, 1 ½ cups granulated sugar, ½ teaspoon salt, and 1 teaspoon vanilla extract. Pour in the 1 cup melted unsalted butter and mix with a fork or your hands until the mixture is moist and crumbly.
  3. Step 3
    Press about two-thirds of the crumble mixture firmly and evenly into the bottom of the prepared 9×13 inch baking pan. This forms the base of your bars.
  4. Step 4
    In a separate bowl, gently toss the 3 cups peeled and thinly sliced apples with 1 teaspoon ground cinnamon and ¼ teaspoon ground nutmeg until well coated.
  5. Step 5
    Spread the seasoned apple slices evenly over the prepared crust in the pan. Crumble the remaining one-third of the mixture evenly over the apples to create the topping. Bake for 45-55 minutes, or until the crumble topping is golden brown and the apples are fork-tender.
  6. Step 6
    Remove the pan from the oven and place it on a wire rack to cool completely. This is crucial for the bars to set, taking at least 2-3 hours. Once completely cooled, generously drizzle the ½ cup salted caramel sauce over the top.
  7. Step 7
    Allow the drizzled bars to sit for another 30 minutes to an hour to allow the caramel to set slightly. Use the parchment paper overhang to carefully lift the entire slab of bars out of the pan. Transfer to a cutting board and cut into desired square or rectangular pieces using a sharp knife.
  8. Step 8
    Store leftover bars in an airtight container at room temperature for up to 3 days, or in the refrigerator for up to 5 days. They can also be gently warmed before serving.

Important Information

Nutrition Facts (Per Serving)

It is important to consider this information as approximate and not to use it as definitive health advice.

Allergy Information

Please check ingredients for potential allergens and consult a health professional if in doubt.

« Previous Post
Creamy Reuben Soup Recipe: Classic Beef & Swiss Twist!
Next Post »
Cozy Beef Bacon Cheddar Gnocchi Soup - Dinner Perfection

If you enjoyed this…

Easy Fruit Pizza: A Delicious & Simple Recipe

Key Lime Pound Cake: The Ultimate Recipe for a Tangy Dessert

Homemade Caramel Frappuccino: Easy Recipe & Tips

Primary Sidebar

Browse by Diet

BreakfastDinnerLunchDessertAppetizer

Sweet Peach Yogurt Parfait Delight

One of my fondest memories is from a lazy summer afternoon spent at my grandmother’s house. The sun filtered through the kitchen window, casting a warm glow over the table where she would create her culinary magic. It was during one of those blissful moments that I first tasted her Peach Yogurt Parfait with Honey and Granola. The sweet aroma of ripe peaches mingling with creamy yogurt and the crunch of granola was nothing short of heavenly. It felt like summer captured in a bowl, and I still remember the joy of diving in with a spoon, each layer revealing a new burst of flavor.

When I think about that parfait, I can almost hear the gentle hum of the bees outside, reminding me of the floral notes that honey brings to every bite. The vibrant yellows and soft oranges of the peaches contrast beautifully with the creamy white yogurt and the golden crunch of granola. It’s a dish that not only looks delightful but also tastes like a celebration of fresh, wholesome ingredients.

What makes my version of this Peach Yogurt Parfait special is the careful balance of flavors and textures. I use ripe, juicy peaches, drizzled with locally sourced honey, and a homemade granola that’s bursting with nuts and seeds for an extra crunch. It’s a simple dish, but every layer is crafted with love and attention.

Let me show you exactly how to make this delightful parfait, so you can bring a bit of that summer magic into your kitchen!

Sweet Peach Yogurt Parfait Delight

Why You’ll Love This Recipe

  • Delightfully creamy texture from the Greek yogurt, paired with the juicy sweetness of fresh peaches.
  • Ready in under 20 minutes, making it a quick and satisfying breakfast or snack option.
  • Budget-friendly, using common ingredients that you may already have in your pantry.
  • Customizable with your favorite granola and nuts, allowing you to tailor each parfait to your taste.
  • Perfectly balanced flavors with the bright acidity of lemon juice and the sweetness of honey enhancing the peaches.

Ingredients

  • For the Parfait:
  • 2 cups plain Greek yogurt (or vanilla yogurt for a sweeter option)
  • 2 large ripe peaches, diced (about 2 cups)
  • 1 tablespoon fresh lemon juice (to prevent browning of peaches)
  • 2 tablespoons honey (plus more for drizzling)
  • 1 teaspoon vanilla extract (optional for extra flavor)
  • For the Granola:
  • 1 cup granola (store-bought or homemade; see notes for a simple granola recipe)
  • 1/4 cup sliced almonds (optional for added crunch)
  • 1/4 cup shredded coconut (optional for added flavor)

Let’s dive into some key ingredients that make this Peach Yogurt Parfait so delightful! First, the Greek yogurt is not only creamy but also packed with protein, making it a satisfying option for breakfast or a snack. If you’re looking for a sweeter option, you can easily substitute it with vanilla yogurt, though it may alter the overall flavor balance. Next, the ripe peaches are the star of the show; their natural sweetness shines through, so I recommend choosing peaches that yield slightly to pressure, indicating they’re perfectly ripe. If peaches aren’t in season, feel free to use nectarines or even frozen peaches—just thaw them before use. Finally, honey adds a lovely floral sweetness that ties everything together. If you prefer, maple syrup can serve as a delicious substitute.

Step-by-Step Instructions

  1. Start by preparing the peaches. Wash them thoroughly, then slice and dice them into bite-sized pieces. In a medium bowl, toss the diced peaches with 1 tablespoon of fresh lemon juice to prevent browning. Set aside for about 5 minutes while the lemon juice works its magic.
  2. In a separate bowl, combine the Greek yogurt, 2 tablespoons of honey, and 1 teaspoon of vanilla extract if using. Stir the mixture until smooth and thoroughly blended. This should take about a minute. Avoid overmixing to maintain the creaminess of the yogurt.
  3. Now it’s time to layer your parfait. Grab a clear glass or bowl to showcase your beautiful creation. Start with a generous spoonful of the yogurt mixture at the bottom—about 1/4 cup will do. Use a spoon to spread it evenly.
  4. Add a layer of the diced peaches over the yogurt, ensuring they cover the yogurt completely. You might want to use about half of what you have prepared—roughly 1 cup. This layer should be visually appealing, so arrange the peaches neatly.
  5. Sprinkle 1/4 cup of granola over the peaches. This adds a delightful crunch. Make sure to distribute it evenly to ensure every bite has that satisfying texture. Avoid packing it down too tightly, as you want it to maintain its crunch.
  6. Repeat the layers: spoon in another 1/4 cup of yogurt, followed by another cup of peaches, and another sprinkle of granola. You should have at least two layers, but feel free to add more depending on your glass size.
  7. Finish off your parfait with a drizzle of honey on top for added sweetness and a touch of elegance. If you’re using sliced almonds or shredded coconut, sprinkle them on top now. It adds a lovely visual contrast and extra flavor.
  8. Serve immediately or refrigerate for up to 30 minutes before serving to allow the flavors to meld together. However, I recommend enjoying it fresh to maintain the granola’s crunch.

Pro Tips for the Best Peach Yogurt Parfait With Honey And Granola

  • Make sure to choose ripe peaches for the best flavor and texture. A common mistake is using unripe fruit, which can lead to a less enjoyable parfait. Look for peaches that are fragrant and slightly soft to the touch.
  • Use a clear glass to assemble your parfait; this not only makes for a beautiful presentation but also allows you to see the colorful layers, which adds to the enjoyment of eating it.
  • For an even creamier texture, consider whipping the Greek yogurt with a hand mixer for a couple of minutes before layering. This small adjustment makes a huge difference in mouthfeel.
  • Be mindful of the granola-to-yogurt ratio. Too much granola can overwhelm the parfait, while too little can make it feel too creamy. Aim for about 1/4 cup of granola per layer for the perfect balance.
  • If you’re making this for a gathering, consider preparing the yogurt and peaches ahead of time and layering them just before serving. This ensures the granola stays crunchy!

Variations & Serving Ideas

There are so many ways to get creative with your Peach Yogurt Parfait! For a tropical twist, swap out the peaches for mangoes or pineapples and top with coconut flakes. If you prefer a berry flavor, mix in some blueberries or strawberries with the peaches for added color and taste. For a nutty version, incorporate chopped walnuts or pecans instead of almonds.

As for serving ideas, this parfait pairs beautifully with a side of scrambled eggs for a hearty breakfast or fresh fruit salad for a light lunch. You might also enjoy it alongside whole grain toast with almond butter for an energizing snack. The contrast of flavors and textures will elevate your meal experience!

Storage, Make-Ahead & Reheating

The Peach Yogurt Parfait is best enjoyed fresh, but you can prepare some components ahead of time. Store the layered parfait in an airtight container in the refrigerator for up to 24 hours. However, be cautious; the granola may lose its crunch if stored too long. You can freeze the yogurt and peach mixture for up to 2 months; just remember to thaw it in the refrigerator overnight before serving.

If you plan to enjoy this dish the next day, it can taste even better as the flavors meld together. Just remember to add the granola right before serving to keep its delightful crunch!

Frequently Asked Questions

Can I make Peach Yogurt Parfait With Honey And Granola ahead of time?

Yes — in fact, it tastes even better the next day as the flavors meld. However, I recommend waiting to add the granola until just before serving to maintain its crunch.

What can I substitute for Greek yogurt?

If you prefer a lighter option, you can substitute Greek yogurt with regular yogurt or a dairy-free alternative like coconut yogurt. Just remember that this may alter the creaminess and flavor profile slightly.

Can I use frozen peaches for this parfait?

Absolutely! Just make sure to thaw the frozen peaches before using them. They will still add great flavor, though the texture may be slightly softer than fresh peaches.

How do I make the parfait vegan?

To make a vegan version, substitute the Greek yogurt with a plant-based yogurt alternative, and replace honey with maple syrup or agave nectar. This keeps the parfait sweet while adhering to a vegan diet.

What other fruits can I use in this recipe?

You can mix and match fruits based on your preference. Try using strawberries, blueberries, raspberries, or even bananas. Just make sure to adjust the lemon juice as needed to prevent browning.

Sweet Peach Yogurt Parfait Delight

Final Thoughts

The Peach Yogurt Parfait with Honey and Granola is a delightful blend of creamy yogurt, sweet peaches, and crunchy granola that creates a satisfying and nourishing treat. Each layer bursts with flavor, making it a perfect choice for breakfast or a light dessert.

This is the kind of recipe I come back to again and again, especially when I want something refreshing and wholesome to start my day. The harmony of sweet and tart flavors, combined with the delightful crunch, never fails to lift my spirits!

I encourage you to give this parfait a try and indulge in its comforting goodness. Feel free to share your results or even add your own twist—perhaps a sprinkle of cinnamon or a handful of nuts. Enjoy creating your perfect parfait!

Print
clock clock iconcutlery cutlery iconflag flag iconfolder folder iconinstagram instagram iconpinterest pinterest iconfacebook facebook iconprint print iconsquares squares iconheart heart iconheart solid heart solid icon

Peach Yogurt Parfait


  • Author: Lily author
  • Total Time: 15 minutes
  • Yield: 4 servings 1x
Pin Recipe
Print Recipe

Description

This Peach Yogurt Parfait combines creamy Greek yogurt, juicy peaches, and crunchy granola for a delightful treat. It’s a perfect breakfast or snack that captures the essence of summer in every bite.


Ingredients

Scale
  • For the Parfait:
  • 2 cups plain Greek yogurt (or vanilla yogurt for a sweeter option)
  • 2 large ripe peaches, diced (about 2 cups)
  • 1 tablespoon fresh lemon juice (to prevent browning of peaches)
  • 2 tablespoons honey (plus more for drizzling)
  • 1 teaspoon vanilla extract (optional for extra flavor)
  • For the Granola:
  • 1 cup granola (store-bought or homemade; see notes for a simple granola recipe)
  • 1/4 cup sliced almonds (optional for added crunch)
  • 1/4 cup shredded coconut (optional for added flavor)

Instructions

  1. Start by preparing the peaches. Wash them thoroughly, then slice and dice them into bite-sized pieces. In a medium bowl, toss the diced peaches with 1 tablespoon of fresh lemon juice to prevent browning. Set aside for about 5 minutes while the lemon juice works its magic.
  2. In a separate bowl, combine the Greek yogurt, 2 tablespoons of honey, and 1 teaspoon of vanilla extract if using. Stir the mixture until smooth and thoroughly blended. This should take about a minute. Avoid overmixing to maintain the creaminess of the yogurt.
  3. Now it’s time to layer your parfait. Grab a clear glass or bowl to showcase your beautiful creation. Start with a generous spoonful of the yogurt mixture at the bottom—about 1/4 cup will do. Use a spoon to spread it evenly.
  4. Add a layer of the diced peaches over the yogurt, ensuring they cover the yogurt completely. You might want to use about half of what you have prepared—roughly 1 cup. This layer should be visually appealing, so arrange the peaches neatly.
  5. Sprinkle 1/4 cup of granola over the peaches. This adds a delightful crunch. Make sure to distribute it evenly to ensure every bite has that satisfying texture. Avoid packing it down too tightly, as you want it to maintain its crunch.
  6. Repeat the layers: spoon in another 1/4 cup of yogurt, followed by another cup of peaches, and another sprinkle of granola. You should have at least two layers, but feel free to add more depending on your glass size.
  7. Finish off your parfait with a drizzle of honey on top for added sweetness and a touch of elegance. If you’re using sliced almonds or shredded coconut, sprinkle them on top now. It adds a lovely visual contrast and extra flavor.
  8. Serve immediately or refrigerate for up to 30 minutes before serving to allow the flavors to meld together. However, I recommend enjoying it fresh to maintain the granola’s crunch.
  • Prep Time: 15 mins
  • Cook Time: 0 mins
  • Category: Breakfast
  • Method: No-cook
  • Cuisine: American

Nutrition

  • Serving Size: 1 parfait
  • Calories: 250
  • Sugar: 20 g
  • Sodium: 50 mg
  • Fat: 5 g
  • Saturated Fat: 2 g
  • Unsaturated Fat: 3 g
  • Trans Fat: 0 g
  • Carbohydrates: 40 g
  • Fiber: 3 g
  • Protein: 10 g
  • Cholesterol: 10 mg

Keywords: Choose ripe peaches for the best flavor and texture. Use a clear glass for a beautiful presentation. For creaminess, consider whipping the yogurt before layering. Be mindful of the granola-to-yogurt ratio. Prepare yogurt and peaches ahead of time for gatherings, layering just before serving.

Did you make this recipe?

Share a photo and tag us — we can't wait to see what you've made!

Sun-Kissed Frozen Orange Cream Slush

As a child, summer days felt like they lasted forever. I remember the sticky heat wrapping around me as I played outside, my laughter mingling with the sounds of the neighborhood. But nothing could cool me down quite like the moment I’d spot my grandmother, laboring over her blender, whipping up her famous Frozen Orange Creamsicle Slush. That vibrant orange treat, with its frosty texture and sweet citrus aroma, was like a burst of sunshine in a cup. Just one sip, and I could feel the coolness wash over me, sparking pure joy.

This Frozen Orange Creamsicle Slush has a way of making you feel like a kid again. Its creamy, dreamy consistency is a delightful balance of bright orange and soft vanilla, inviting you to dive right in. The refreshing tang of orange dances on your tongue, while the smooth creaminess envelops you in a comforting embrace. It’s a nostalgic treat that’s perfect for hot summer afternoons or anytime you need a little pick-me-up.

What makes my version of this slush stand out is the addition of a hint of vanilla bean, which elevates the flavor and adds an extra layer of richness. Plus, it’s super easy to whip up with just a few simple ingredients that you probably already have on hand! So, if you’re ready to relive those sun-soaked memories, let me show you exactly how to make it.

Sun-Kissed Frozen Orange Cream Slush

Why You’ll Love This Recipe

  • Each slush is a perfect blend of creamy vanilla and zesty orange, creating a nostalgic flavor reminiscent of summer days.
  • This refreshing treat is ready in under 15 minutes, making it an ideal quick dessert for unexpected guests or hot afternoons.
  • With just 8 simple ingredients, it’s budget-friendly, ensuring you don’t have to break the bank to enjoy a delicious slush.
  • The slush has a perfectly smooth texture, thanks to the combination of ice and ice cream, providing a delightful contrast to the bright citrus flavors.
  • It’s highly customizable; you can easily adjust the sweetness and add fresh herbs for a unique twist that suits your taste.

Ingredients

  • 2 cups orange juice (freshly squeezed or store-bought)
  • 1 cup vanilla ice cream
  • 1 cup crushed ice
  • 1/2 cup milk (whole or 2%)
  • 1/4 cup granulated sugar (adjust based on sweetness preference)
  • 1 teaspoon vanilla extract
  • Zest of 1 orange (for added flavor)
  • Fresh orange slices and mint leaves (for garnish)

The star of this Frozen Orange Creamsicle Slush is the orange juice, which provides the vibrant, citrusy base. Freshly squeezed juice will yield the brightest flavor, but store-bought options can be just as convenient. If you’re opting for store-bought, choose 100% pure juice with no added sugars for the best results. Another essential ingredient is the vanilla ice cream; it adds creaminess and sweetness. You can substitute it with dairy-free ice cream if you’re looking for a vegan option. Whole or 2% milk complements the ice cream, creating a smooth blend. If you want a lower-calorie version, almond or oat milk can be good alternatives.

Lastly, the granulated sugar can be adjusted based on your sweetness preference. If you prefer a more natural sweetener, consider using honey or agave syrup. The orange zest enhances the flavor profile, providing an aromatic pop that brings the whole slush together. Don’t skip it! It adds an extra layer of brightness that makes this slush truly special.

Step-by-Step Instructions

  1. Start by preparing your ingredients. Gather 2 cups of orange juice, 1 cup of vanilla ice cream, and 1 cup of crushed ice. Make sure the ice is finely crushed, as larger chunks can make blending difficult.
  2. In a blender, combine the orange juice, vanilla ice cream, crushed ice, and 1/2 cup of milk. Add 1/4 cup of granulated sugar and 1 teaspoon of vanilla extract. If you like a sweeter slush, consider adding a bit more sugar at this stage.
  3. Add the zest of 1 orange to the blender. This step is crucial for enhancing the citrus flavor of your slush. Make sure not to include the bitter white pith—only the flavorful zest.
  4. Blend the mixture on medium-high speed for about 30-45 seconds. Stop once the ingredients are fully combined and the slush has a smooth, even consistency. If you notice large chunks of ice, blend for an additional 10-15 seconds. Avoid over-blending, as this can make the slush too liquidy.
  5. Once blended, taste the slush. If it needs more sweetness, add a little more sugar and blend for a few more seconds. If it’s too thick, you can add a splash of milk to reach your desired consistency.
  6. Pour the slush into glasses. This recipe typically serves 4, but you can easily double it for larger gatherings. Use a spoon to help guide the slush into the glasses if needed.
  7. Garnish each serving with fresh orange slices and mint leaves. The mint not only adds a pop of color but also a refreshing aroma that complements the citrus flavors beautifully.
  8. Serve immediately and enjoy! If you’ve made extra, you can refrigerate it for a short time, but it’s best enjoyed fresh.

Pro Tips for the Best Frozen Orange Creamsicle Slush

  • Don’t skip the orange zest! It’s a game-changer for flavor. Always zest before juicing to make it easier.
  • Use a high-powered blender for the best texture. A standard blender may struggle with ice, leading to uneven consistency. If you have a food processor, that can work too, but ensure the ice is finely crushed.
  • Adjust the ice-to-liquid ratio carefully. If your slush is too thick, it won’t blend well. Start with less ice and add more until you reach your preferred texture.
  • Be cautious with the sugar! Always start with the lower amount, as you can easily add more, but it’s hard to fix an overly sweet slush.
  • For a fun twist, consider adding a splash of coconut milk or a handful of fresh fruit like strawberries or pineapple. This not only enhances the flavor but also adds a beautiful color contrast.

Variations & Serving Ideas

There are countless ways to put a spin on your Frozen Orange Creamsicle Slush. Consider making a tropical version by adding in some pineapple juice or coconut milk for a delightful tropical twist. If you’re feeling adventurous, try incorporating a handful of frozen mango or peach slices for added sweetness. For a lighter version, swap out the vanilla ice cream for Greek yogurt for a creamy yet tangy alternative.

As for serving ideas, this refreshing slush pairs wonderfully with light summer dishes like grilled chicken skewers, fish tacos, or a simple salad topped with citrus vinaigrette. The bright, zesty flavors of the slush complement these dishes perfectly, making them an ideal pairing for a sunny day.

Storage, Make-Ahead & Reheating

This Frozen Orange Creamsicle Slush is best enjoyed fresh, but if you have leftovers, you can store them in an airtight container in the fridge for up to 2 days. Just keep in mind that the slush may lose some of its texture over time as the ice melts. It doesn’t freeze well, as the ice will turn into a solid block. If you must freeze it, blend again after thawing to restore the slushy consistency. This treat is best the day you make it, as the flavors meld together beautifully overnight, enhancing its deliciousness.

Frequently Asked Questions

Can I make Frozen Orange Creamsicle Slush ahead of time?

Yes — in fact, it tastes even better the next day as the flavors meld. However, it’s best to enjoy it fresh, as the texture can change if stored for too long. If you need to prepare it ahead, keep it in the fridge and re-blend before serving.

What kind of orange juice should I use?

For the best flavor, use freshly squeezed orange juice. However, if you’re short on time, opt for 100% pure store-bought juice without added sugars. This will ensure that your slush remains flavorful and refreshing.

Can I substitute the vanilla ice cream?

Absolutely! If you’re looking for a dairy-free option, coconut milk ice cream or a non-dairy vanilla ice cream can work wonderfully. They will still provide the creamy texture and sweetness you desire.

How can I adjust the sweetness of my slush?

You can easily adjust the sweetness by modifying the amount of sugar added. Start with 1/4 cup and taste the mixture before blending. If you prefer it sweeter, add more sugar gradually until it reaches your desired level.

What should I do if my slush is too thick?

If your slush is too thick, simply add a splash of milk or orange juice and blend again. This will help achieve a more drinkable consistency while maintaining the slushy texture. Adjust gradually to reach your preferred thickness.

Sun-Kissed Frozen Orange Cream Slush

Final Thoughts

The Frozen Orange Creamsicle Slush is a delightful blend of refreshing citrus and creamy goodness, making it a perfect treat for warm days or any time you crave a taste of nostalgia. The way the bright orange flavor dances with the creamy texture truly elevates this slush, transforming it into a satisfying escape from the everyday.

This is the kind of recipe I come back to again and again, especially when I’m looking to cool down or impress guests at a summer gathering. It’s simple to make and always brings smiles all around! I encourage you to try this recipe for yourself—don’t hesitate to share your results or even put your own spin on it. Happy slushing!

Print
clock clock iconcutlery cutlery iconflag flag iconfolder folder iconinstagram instagram iconpinterest pinterest iconfacebook facebook iconprint print iconsquares squares iconheart heart iconheart solid heart solid icon

Frozen Orange Creamsicle Slush


  • Author: Lily author
  • Total Time: 15 minutes
  • Yield: 4 servings 1x
Pin Recipe
Print Recipe

Description

This Frozen Orange Creamsicle Slush is a refreshing treat that combines creamy vanilla and zesty orange flavors. Perfect for hot summer days, it brings back nostalgic memories with every sip.


Ingredients

Scale
  • 2 cups orange juice (freshly squeezed or store-bought)
  • 1 cup vanilla ice cream
  • 1 cup crushed ice
  • 1/2 cup milk (whole or 2%)
  • 1/4 cup granulated sugar (adjust based on sweetness preference)
  • 1 teaspoon vanilla extract
  • Zest of 1 orange (for added flavor)
  • Fresh orange slices and mint leaves (for garnish)

Instructions

  1. Start by preparing your ingredients. Gather 2 cups of orange juice, 1 cup of vanilla ice cream, and 1 cup of crushed ice. Make sure the ice is finely crushed, as larger chunks can make blending difficult.
  2. In a blender, combine the orange juice, vanilla ice cream, crushed ice, and 1/2 cup of milk. Add 1/4 cup of granulated sugar and 1 teaspoon of vanilla extract. If you like a sweeter slush, consider adding a bit more sugar at this stage.
  3. Add the zest of 1 orange to the blender. This step is crucial for enhancing the citrus flavor of your slush. Make sure not to include the bitter white pith—only the flavorful zest.
  4. Blend the mixture on medium-high speed for about 30-45 seconds. Stop once the ingredients are fully combined and the slush has a smooth, even consistency. If you notice large chunks of ice, blend for an additional 10-15 seconds. Avoid over-blending, as this can make the slush too liquidy.
  5. Once blended, taste the slush. If it needs more sweetness, add a little more sugar and blend for a few more seconds. If it’s too thick, you can add a splash of milk to reach your desired consistency.
  6. Pour the slush into glasses. This recipe typically serves 4, but you can easily double it for larger gatherings. Use a spoon to help guide the slush into the glasses if needed.
  7. Garnish each serving with fresh orange slices and mint leaves. The mint not only adds a pop of color but also a refreshing aroma that complements the citrus flavors beautifully.
  8. Serve immediately and enjoy! If you’ve made extra, you can refrigerate it for a short time, but it's best enjoyed fresh.
  • Prep Time: 15 min
  • Cook Time: 0 min
  • Category: Dessert
  • Method: Blending
  • Cuisine: American

Nutrition

  • Serving Size: 1 serving
  • Calories: 200
  • Sugar: 30 g
  • Sodium: 50 mg
  • Fat: 5 g
  • Saturated Fat: 3 g
  • Unsaturated Fat: 2 g
  • Trans Fat: 0 g
  • Carbohydrates: 40 g
  • Fiber: 1 g
  • Protein: 2 g
  • Cholesterol: 20 mg

Keywords: Don't skip the orange zest! It's a game-changer for flavor. Always zest before juicing to make it easier.

Did you make this recipe?

Share a photo and tag us — we can't wait to see what you've made!

Zesty Lemon Poppy Seed Delight

One rainy afternoon, I found myself in my grandmother’s cozy kitchen, the kind that always smelled like warmth and love. She was whipping up her famous Lemon Poppy Seed Loaf, a recipe that had been passed down through generations. As the batter came together, the zesty aroma of fresh lemons filled the air, mingling perfectly with the nutty fragrance of poppy seeds. I can still picture her, apron-clad, as she expertly drizzled a vibrant citrus icing over the loaf, creating a glossy, sun-kissed finish that beckoned us to dive in. It was a moment that sparked my own passion for baking, and this recipe has become a cherished staple in my home ever since.

When you take a bite of this Lemon Poppy Seed Loaf, it’s like a burst of sunshine on your palate. The loaf is beautifully golden, with a tender crumb that melts in your mouth. Each slice is speckled with tiny poppy seeds, adding a delightful crunch that contrasts beautifully with the tangy sweetness of the lemon. And that citrus icing? It’s the finishing touch that elevates this loaf from ordinary to extraordinary, with its bright, zesty flavor dancing on your taste buds.

This recipe stands out because it embraces simplicity while delivering on flavor. I’ve added a hint of vanilla to the batter, enhancing the overall taste and making it even more indulgent. Trust me, once you make this Lemon Poppy Seed Loaf With Citrus Icing, it’ll become a go-to in your baking repertoire.

So, let me show you exactly how to make it!

Zesty Lemon Poppy Seed Delight

Why You’ll Love This Recipe

  • Moist and tender crumb that melts in your mouth, thanks to the perfect balance of butter and buttermilk.
  • Bright, zesty lemon flavor paired with crunchy poppy seeds, creating a delightful texture and taste experience.
  • Easy to whip up in just about an hour, perfect for last-minute gatherings or a cozy afternoon treat.
  • Budget-friendly with everyday ingredients, making it an accessible option for all home bakers.
  • The citrus icing adds a sweet tang that elevates the loaf, turning a simple recipe into a showstopper!

Ingredients

  • 1 ½ cups (190g) all-purpose flour
  • 1 teaspoon baking powder
  • ½ teaspoon baking soda
  • ½ teaspoon salt
  • 3 tablespoons poppy seeds
  • ½ cup (115g) unsalted butter, softened to room temperature
  • 1 cup (200g) granulated sugar
  • 2 large eggs
  • 1 teaspoon vanilla extract
  • 1 teaspoon lemon zest (from about 1 medium lemon)
  • ½ cup (120ml) buttermilk
  • 2 tablespoons fresh lemon juice

For the Citrus Icing:

  • 1 cup (120g) powdered sugar
  • 2 tablespoons fresh lemon juice
  • 1 tablespoon orange juice
  • 1 teaspoon lemon zest (for garnish, optional)

Let’s dive into the key ingredients that make this Lemon Poppy Seed Loaf so special. The all-purpose flour provides the structure and base for the loaf, while the baking powder and baking soda ensure it rises perfectly, giving the loaf a light texture. For a gluten-free variation, you could substitute the flour with a gluten-free all-purpose blend. Poppy seeds not only add a delightful crunch but also contribute to the unique flavor profile that pairs well with the citrus notes.

Unsalted butter is crucial for achieving the buttery richness that makes this loaf so moist. If you’re looking for a dairy-free option, coconut oil or a vegan butter can be used instead. The buttermilk is another essential component, providing acidity that activates the baking soda for a fluffy texture. If you don’t have buttermilk on hand, you can easily make a substitute by mixing ½ cup of milk with 1 tablespoon of vinegar or lemon juice and letting it sit for about 5 minutes.

Step-by-Step Instructions

  1. Preheat your oven to 350°F (175°C). Grease a 9×5-inch loaf pan or line it with parchment paper for easy removal later.
  2. In a medium mixing bowl, whisk together 1 ½ cups of all-purpose flour, 1 teaspoon of baking powder, ½ teaspoon of baking soda, ½ teaspoon of salt, and 3 tablespoons of poppy seeds. This helps to evenly distribute the baking agents and ensures a uniform rise.
  3. In a large mixing bowl, cream together ½ cup of softened unsalted butter and 1 cup of granulated sugar using an electric mixer on medium speed for about 3-4 minutes, until the mixture is light and fluffy. Make sure to scrape down the sides of the bowl occasionally.
  4. Add 2 large eggs, 1 teaspoon of vanilla extract, and 1 teaspoon of lemon zest to the creamed butter and sugar, mixing until fully combined. You want a smooth consistency, so ensure there are no lumps of butter.
  5. In a small bowl, combine ½ cup of buttermilk and 2 tablespoons of fresh lemon juice. Alternately add the dry ingredients and buttermilk mixture to the butter mixture, starting and ending with the dry ingredients. Mix just until combined; do not overmix, as this can lead to a dense loaf.
  6. Pour the batter into the prepared loaf pan. Smooth the top with a spatula, ensuring it’s even. Bake in the preheated oven for 50-60 minutes, or until a toothpick inserted in the center comes out clean. The edges should be lightly golden brown, and the center should feel just set.
  7. Once baked, remove the loaf from the oven and allow it to cool in the pan for about 10 minutes. Then, transfer it to a wire rack to cool completely. Resist the urge to slice too soon, as it will be crumbly if it’s still warm.
  8. While the loaf is cooling, prepare the citrus icing. In a medium bowl, whisk together 1 cup of powdered sugar, 2 tablespoons of fresh lemon juice, and 1 tablespoon of orange juice until smooth. If the icing is too thick, you can add a little more juice to reach your desired consistency.
  9. Once the loaf is completely cool, drizzle the citrus icing over the top. If you like, sprinkle with an additional teaspoon of lemon zest for an extra pop of flavor and color.

Pro Tips for the Best Lemon Poppy Seed Loaf With Citrus Icing

  • Be careful not to overmix your batter; this is a common mistake that can lead to a dense loaf. Mix just until the dry ingredients are incorporated for a light and fluffy texture.
  • Use room temperature ingredients, especially the butter and eggs. This helps to create a smoother batter and ensures even baking. Take your eggs out of the fridge about 30 minutes before you start.
  • For a more pronounced lemon flavor, consider adding a little lemon extract in addition to the zest and juice. Just a half teaspoon can elevate the citrus notes significantly.
  • When measuring your flour, spoon it into the measuring cup and level it off with a knife instead of scooping directly from the bag. This prevents packing and ensures you don’t end up with a dry loaf.
  • Invest in a good quality loaf pan; it makes a difference in heat distribution, which ensures even baking. If your pan is dark-coated, reduce the oven temperature by 25°F to prevent over-browning.

Variations & Serving Ideas

For a delightful twist, consider adding blueberries or raspberries to the batter for a fruity burst of flavor. You can also experiment with different citrus fruits—try lime or grapefruit zest and juice for a refreshing change. For a healthier option, substitute half of the all-purpose flour with whole wheat flour for added fiber without compromising too much on texture.

This Lemon Poppy Seed Loaf pairs beautifully with a light salad, such as a mixed greens salad with a vinaigrette, or a cup of tea for a cozy afternoon treat. It also complements a creamy cheese platter, as the acidity of the loaf balances rich cheeses perfectly. Lastly, a scoop of vanilla ice cream on the side creates a delightful contrast of temperatures and flavors!

Storage, Make-Ahead & Reheating

This Lemon Poppy Seed Loaf can be stored at room temperature for up to 3 days if wrapped tightly in plastic wrap. If you want to keep it longer, it freezes well for up to 3 months. To freeze, wrap the loaf tightly in plastic wrap and then in aluminum foil to prevent freezer burn.

When you’re ready to enjoy it again, simply thaw it in the fridge overnight. Reheat individual slices in the microwave for 15-20 seconds or in a toaster oven until warmed through. Interestingly, many people find that this loaf tastes even better the next day, as the flavors have time to meld!

Frequently Asked Questions

Can I make Lemon Poppy Seed Loaf With Citrus Icing ahead of time?

Yes — in fact, it tastes even better the next day! You can make the loaf a day in advance, allowing the flavors to develop. Just be sure to store it in an airtight container to maintain its moisture.

Can I substitute the poppy seeds?

Absolutely! If you don’t have poppy seeds on hand or prefer an alternative, you can use sesame seeds for a similar crunch or omit them entirely for a smooth loaf.

What can I use instead of buttermilk?

If you don’t have buttermilk, you can easily create a substitute by mixing ½ cup of milk (dairy or plant-based) with 1 tablespoon of vinegar or lemon juice. Let it sit for 5 minutes before using in the recipe.

How can I make this recipe gluten-free?

To make a gluten-free version of this Lemon Poppy Seed Loaf, substitute the all-purpose flour with a gluten-free all-purpose flour blend. Just ensure that the blend contains a binding agent like xanthan gum for the best results.

What is the best way to store leftover loaf?

Leftover Lemon Poppy Seed Loaf should be stored in an airtight container at room temperature for up to 3 days. For longer storage, wrap it tightly and freeze for up to 3 months. Thaw it before serving for the best texture.

Zesty Lemon Poppy Seed Delight

Final Thoughts

The Lemon Poppy Seed Loaf with Citrus Icing is truly a delightful treat that brings a burst of brightness to any occasion. The zesty lemon flavor combined with the subtle crunch of poppy seeds creates a satisfying balance, while the citrus icing adds a touch of sweetness that perfectly complements the loaf’s tanginess.

This is the kind of recipe I come back to again and again, especially when I want to brighten up a gloomy day or celebrate a small victory. The aroma that fills the kitchen as it bakes is absolutely heavenly! I encourage you to give this recipe a try; you might just find it becoming a beloved staple in your home. Don’t forget to share your results or even add your own unique twist—I can’t wait to see what you create!

Print
clock clock iconcutlery cutlery iconflag flag iconfolder folder iconinstagram instagram iconpinterest pinterest iconfacebook facebook iconprint print iconsquares squares iconheart heart iconheart solid heart solid icon

Lemon Poppy Seed Loaf


  • Author: Lily author
  • Total Time: 18 minute
  • Yield: 1 loaf 1x
Pin Recipe
Print Recipe

Description

This Lemon Poppy Seed Loaf is a delightful treat that combines zesty lemon flavor with crunchy poppy seeds. Topped with a citrus icing, it’s perfect for any occasion.


Ingredients

Scale
  • 1 ½ cups (190g) all-purpose flour
  • 1 teaspoon baking powder
  • ½ teaspoon baking soda
  • ½ teaspoon salt
  • 3 tablespoons poppy seeds
  • ½ cup (115g) unsalted butter, softened to room temperature
  • 1 cup (200g) granulated sugar
  • 2 large eggs
  • 1 teaspoon vanilla extract
  • 1 teaspoon lemon zest (from about 1 medium lemon)
  • ½ cup (120ml) buttermilk
  • 2 tablespoons fresh lemon juice
  • 1 cup (120g) powdered sugar
  • 2 tablespoons fresh lemon juice
  • 1 tablespoon orange juice
  • 1 teaspoon lemon zest (for garnish, optional)

Instructions

  1. Preheat your oven to 350°F (175°C). Grease a 9×5-inch loaf pan or line it with parchment paper for easy removal later.
  2. In a medium mixing bowl, whisk together 1 ½ cups of all-purpose flour, 1 teaspoon of baking powder, ½ teaspoon of baking soda, ½ teaspoon of salt, and 3 tablespoons of poppy seeds. This helps to evenly distribute the baking agents and ensures a uniform rise.
  3. In a large mixing bowl, cream together ½ cup of softened unsalted butter and 1 cup of granulated sugar using an electric mixer on medium speed for about 3-4 minutes, until the mixture is light and fluffy. Make sure to scrape down the sides of the bowl occasionally.
  4. Add 2 large eggs, 1 teaspoon of vanilla extract, and 1 teaspoon of lemon zest to the creamed butter and sugar, mixing until fully combined. You want a smooth consistency, so ensure there are no lumps of butter.
  5. In a small bowl, combine ½ cup of buttermilk and 2 tablespoons of fresh lemon juice. Alternately add the dry ingredients and buttermilk mixture to the butter mixture, starting and ending with the dry ingredients. Mix just until combined; do not overmix, as this can lead to a dense loaf.
  6. Pour the batter into the prepared loaf pan. Smooth the top with a spatula, ensuring it’s even. Bake in the preheated oven for 50-60 minutes, or until a toothpick inserted in the center comes out clean. The edges should be lightly golden brown, and the center should feel just set.
  7. Once baked, remove the loaf from the oven and allow it to cool in the pan for about 10 minutes. Then, transfer it to a wire rack to cool completely. Resist the urge to slice too soon, as it will be crumbly if it’s still warm.
  8. While the loaf is cooling, prepare the citrus icing. In a medium bowl, whisk together 1 cup of powdered sugar, 2 tablespoons of fresh lemon juice, and 1 tablespoon of orange juice until smooth. If the icing is too thick, you can add a little more juice to reach your desired consistency.
  9. Once the loaf is completely cool, drizzle the citrus icing over the top. If you like, sprinkle with an additional teaspoon of lemon zest for an extra pop of flavor and color.
  • Prep Time: 15 mins
  • Cook Time: 50-60 mins
  • Category: Dessert
  • Method: Baking
  • Cuisine: American

Nutrition

  • Serving Size: 1 slice
  • Calories: 200
  • Sugar: 15 g
  • Sodium: 150 mg
  • Fat: 8 g
  • Saturated Fat: 5 g
  • Unsaturated Fat: 3 g
  • Trans Fat: 0 g
  • Carbohydrates: 30 g
  • Fiber: 1 g
  • Protein: 3 g
  • Cholesterol: 40 mg

Keywords: Be careful not to overmix your batter; this is a common mistake that can lead to a dense loaf. Use room temperature ingredients for a smoother batter and even baking.

Did you make this recipe?

Share a photo and tag us — we can't wait to see what you've made!

  • Privacy Policy
  • Terms Of Service
  • Contact
  • About
  • GDPR

Copyright © 2025 Homesmad