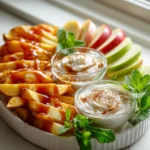
Salted Caramel Apple Fries Board
Salted Caramel Apple Fries Board – just reading that name gets my taste buds tingling! I’ve been so excited to share this recipe with you because it’s truly a game-changer when it comes to fall desserts and entertaining. What makes this dish so incredibly special, you ask? Well, it takes all the cozy, comforting flavors of classic apple pie and transforms them into a fun, dippable, and utterly irresistible experience. Imagine crisp, tender apple “fries” – yes, apple fries! – perfectly cut and ready to be dipped into the most luscious, homemade salted caramel sauce you’ve ever tasted. But it doesn’t stop there! We’re not just serving them on a plate; we’re creating a stunning, interactive “board” complete with all sorts of delightful toppings and accompaniments. It’s the ultimate dessert experience that’s as beautiful to look at as it is delicious to devour, making it absolutely perfect for a relaxed family night, a cozy gathering with friends, or just when you’re craving something delightfully different. Get ready to fall in love with your new favorite way to enjoy apples and caramel!

Ingredient Notes
Creating a spectacular Salted Caramel Apple Fries Board starts with selecting the right components and understanding how they work together. I find that focusing on quality ingredients makes all the difference for this delightful treat.
Apples: The Star of Our “Fries”
For the “apple fries,” the type of apple you choose is paramount. You want apples that are firm, crisp, and have a good balance of sweet and tart, so they hold their shape beautifully when baked or air-fried and complement the rich caramel. My go-to varieties are Honeycrisp, Gala, Fuji, or Granny Smith (if you prefer a tangier bite). Avoid apples that are too soft or mealy, as they won’t yield that satisfying “fry” texture. When preparing them, I like to wash, core, and then slice them into uniform sticks, roughly 1/2-inch thick, resembling classic French fries. A quick soak in a bowl of cold water with a squeeze of lemon juice helps prevent browning while you prepare the rest of your board.
Salted Caramel: The Decadent Dip
The salted caramel is truly the heart of this board. You have two excellent options here: store-bought or homemade. If you’re short on time, a high-quality, thick store-bought caramel sauce works wonderfully. Look for one that’s designed for dipping or topping. If you’re feeling adventurous, making your own salted caramel from scratch is incredibly rewarding and allows you to control the sweetness and saltiness precisely. Regardless of your choice, ensure it’s warmed gently before serving so it’s smooth and dippable. For the “salted” part, a good sprinkle of flaky sea salt (like Maldon) over the caramel and even directly onto some of the apple fries is crucial for that perfect sweet-savory balance. Regular table salt won’t give you the same burst of flavor or texture.
Board Enhancements: Toppings and Other Dippers
To really make this a “board,” we need an array of delicious accompaniments. Think about textures and complementary flavors.
- Chocolates: Mini chocolate chips (milk, dark, or white), chopped chocolate bars, or even chocolate shavings.
- Nuts: Toasted chopped pecans, walnuts, almonds, or even candied nuts add a lovely crunch.
- Crunchy Bits: Crushed pretzels, granola, or even a handful of mini marshmallows.
- Creams: A dollop of whipped cream or a small bowl of cream cheese dip can add another layer of indulgence.
- Spices: A light dusting of cinnamon sugar on some of the apple fries can provide an extra cozy flavor.
- Other Dippers: While apple fries are the star, consider adding a few other complementary dippers like graham cracker sticks, wafer cookies, or even some fresh banana slices for variety.
Remember, the beauty of a board is customization! Feel free to include your family’s favorite treats.
Step-by-Step Instructions
Let’s get down to assembling this beautiful and delicious Salted Caramel Apple Fries Board. It’s a fun and relatively simple process!
Step 1: Prepare Your Apple Fries
First, wash your chosen apples thoroughly. Using an apple corer, remove the core from each apple. Next, carefully slice each apple into uniform “fry” shapes, about 1/2-inch thick. I find that slicing the apple into rounds first, then cutting those rounds into sticks, works best. To prevent browning, immediately transfer the sliced apples to a bowl of cold water with a squeeze of lemon juice while you work on the rest. After a few minutes, drain them well and pat them completely dry with a paper towel. This is an important step to ensure they crisp up nicely when cooked.
Step 2: Cook the Apple Fries
Now it’s time to cook our apple fries. My preferred method for a slightly soft interior and gently crisped exterior is baking or air frying, as it keeps them healthier and perfectly suited for dipping.
- For Baking: Preheat your oven to 400°F (200°C). Arrange the dried apple fries in a single layer on a baking sheet lined with parchment paper. You can lightly toss them with a tablespoon of olive oil or melted unsalted butter and a pinch of cinnamon if desired, but it’s optional. Bake for 15-20 minutes, flipping them halfway through, until they are tender-crisp and lightly golden. Keep an eye on them, as cooking times can vary.
- For Air Frying: Preheat your air fryer to 375°F (190°C). Place the dried apple fries in a single layer in the air fryer basket, working in batches if necessary to avoid overcrowding. Air fry for 10-15 minutes, shaking the basket halfway through, until they are tender and slightly caramelized.
Once cooked, immediately transfer the apple fries to a serving platter or board.
Step 3: Prepare the Salted Caramel
While your apple fries are cooking or cooling slightly, gently warm your salted caramel sauce. If using store-bought, transfer it to a microwave-safe bowl and heat in 30-second intervals, stirring after each, until it’s warm and pourable. Be careful not to overheat it, as it can become too thin or burn. If you’ve made homemade caramel, gently reheat it over low heat on the stovetop, stirring constantly, until it reaches the desired dipping consistency.
Step 4: Assemble Your Board
This is where the magic happens! Choose a large serving board, platter, or even a clean cutting board.
- Arrange the Apple Fries: Artfully arrange the warm apple fries on one side of your board, or spread them across it in an inviting pile.
- Place the Caramel: Pour the warmed salted caramel into a small, attractive bowl or ramekin and place it prominently on the board, ideally within easy reach of the apple fries.
- Add the Toppings: Arrange your chosen toppings around the caramel bowl and apple fries. Use small bowls or simply create little piles directly on the board for a more rustic look. Think about color and texture as you place them.
- The Salt Finish: Just before serving, sprinkle a generous amount of flaky sea salt over the caramel sauce and a few of the apple fries. This is critical for that balanced sweet and savory kick!
Serve immediately and watch it disappear!
Tips & Suggestions
To make your Salted Caramel Apple Fries Board truly unforgettable, I’ve gathered some of my favorite tips and suggestions. These small details can elevate your board from good to absolutely amazing!
Choosing the Right Apples
As I mentioned in the ingredients, apple choice is key. Beyond the varieties, ensure your apples are firm to the touch with no soft spots. A slightly crisp apple will hold up better to baking/air frying and provide a satisfying contrast to the soft caramel. Mixing a slightly tart apple (like Granny Smith) with a sweeter one (like Honeycrisp) can offer a fantastic flavor dimension to your board, appealing to different palates.
Preventing Apple Browning
Nobody likes brown apples! My go-to trick is the lemon water bath. After slicing your apples, immediately immerse them in a bowl of cold water with a tablespoon of lemon juice for about 5-10 minutes. This acidulation slows down oxidation. Just be sure to drain them thoroughly and pat them bone-dry before cooking; excess moisture will steam them rather than give them that lovely tender-crisp texture.
Perfecting Your Caramel Consistency
The ideal caramel for dipping should be warm, smooth, and easily pourable but still thick enough to cling to an apple fry. If your store-bought caramel seems too thick, a tiny splash of milk or even a non-alcohol alternative like apple cider can help thin it out while warming, just be sure to add it slowly, a teaspoon at a time. If it becomes too thin, let it cool slightly, and it will thicken as it cools. For homemade caramel, ensure it’s cooked to the proper temperature (around 350°F or 175°C) for the right consistency and rich flavor.
Creative Board Presentation
Think of your board as a canvas!
- Vary Your Bowls: Use different-sized and shaped ramekins or small bowls for your caramel and other sauces. This adds visual interest.
- Texture Contrast: Arrange toppings strategically to create visual texture. Place crunchy nuts next to smooth chocolate chips, or soft whipped cream next to crisp pretzels.
- Color Pop: Incorporate elements that add pops of color, such as fresh berries (raspberries or blueberries) or colorful sprinkles.
- Warm vs. Cool: Serve the apple fries warm, but feel free to have some of your toppings at room temperature or even slightly chilled (like whipped cream) for a delightful temperature contrast.
- Labeling: If you have a particularly exotic nut or unique topping, small labels can be a fun and helpful touch for your guests.
Serving for a Crowd
This board is fantastic for gatherings! If you’re hosting, consider preparing your apple fries in batches to ensure they are warm when served. You can also have extra caramel and topping bowls ready for replenishment. A large board can easily become the centerpiece of your dessert table. If you want to offer additional savory elements, you could even include some small cheese cubes or beef jerky sticks (as a non-pork alternative) on a separate part of the board, allowing guests to balance their sweet indulgence.
Storage
While the Salted Caramel Apple Fries Board is undoubtedly best enjoyed fresh, you might find yourself with leftovers. Here’s how I recommend storing the individual components to maintain their quality as much as possible.
Apple Fries
Cooked apple fries are truly at their peak when warm and just off the oven or air fryer. As they sit, they tend to soften and can become a bit mushy, losing their desired “fry” texture. For this reason, I highly recommend only cooking as many apple fries as you anticipate being eaten immediately. If you do have leftovers, store them in an airtight container in the refrigerator for up to 1-2 days. Reheating them isn’t ideal for texture; they will likely be softer. If you must reheat, a quick stint in the air fryer or oven at 350°F (175°C) for 5-7 minutes might bring back a slight crispness, but manage your expectations for the original texture.
Salted Caramel Sauce
This is the component that stores the best! Any leftover salted caramel sauce can be transferred to an airtight container and stored in the refrigerator for up to 2-3 weeks. When you’re ready to use it again, simply reheat it gently. For small amounts, the microwave in 15-30 second bursts, stirring in between, works well. For larger quantities, a saucepan over low heat, stirring constantly, will bring it back to a smooth, dippable consistency. If it’s too thick after reheating, a tiny splash of milk or even a non-alcohol alternative like apple cider can help thin it out.
Toppings
The storage for your various toppings will depend on their type:
- Nuts, Chocolate Chips, Sprinkles: These dry toppings can be stored in their original packaging or in airtight containers at room temperature for several weeks, or even months, depending on their best-by dates.
- Whipped Cream or Cream Cheese Dips: Any dairy-based toppings should be stored in an airtight container in the refrigerator and consumed within 1-2 days.
- Other Fresh Fruits: If you added any other fresh fruit to your board, it’s best to consume those immediately. Sliced fruit browns quickly and doesn’t store well once cut.
My best advice for this board is to prepare slightly less than you think you’ll need for the fresh components like apple fries and other fresh fruits, as they are truly best enjoyed right away!

Final Thoughts
And there you have it! I truly hope you’ll give this incredible
Salted Caramel Apple Fries Board a try. It’s more than just a dessert; it’s an experience waiting to happen. Imagine crisp, tender apple “fries” perfectly paired with the luxurious sweetness and savory kick of homemade salted caramel, all artfully arranged for sharing. I find that the interactive nature of the board makes it an instant hit for any gathering, from a casual family night to a festive party with friends.
The combination of warm, spiced apples and that decadent caramel is simply irresistible, a true celebration of comforting flavors presented in such a fun and unique way. It’s the kind of dish that sparks conversation and brings smiles to everyone’s faces. Trust me, once you dive into the delightful world of the Salted Caramel Apple Fries Board, you’ll understand why it’s destined to become a beloved staple in your recipe collection. Happy creating, and even happier eating!
Salted Caramel Apple Fries Board: Your Ultimate Dessert!
- Total Time: 45 minutes
- Yield: 4 servings
Description
This Salted Caramel Apple Fries Board transforms classic apple pie flavors into a fun, dippable dessert experience. Perfect for gatherings, it features crisp apple ‘fries’ paired with luscious homemade salted caramel and delightful toppings.
Ingredients
- Honeycrisp apples
- Gala apples
- Fuji apples
- Granny Smith apples
- Lemon juice
- Olive oil or melted unsalted butter
- Cinnamon
- Store-bought or homemade salted caramel sauce
- Flaky sea salt
- Mini chocolate chips (milk, dark, or white)
- Chopped chocolate bars
- Chocolate shavings
- Toasted chopped pecans
- Walnuts
- Almonds
- Candied nuts
- Crushed pretzels
- Granola
- Mini marshmallows
- Whipped cream
- Cream cheese dip
- Cinnamon sugar
- Graham cracker sticks
- Wafer cookies
- Fresh banana slices
Instructions
- Wash your chosen apples thoroughly. Using an apple corer, remove the core from each apple. Slice each apple into uniform 'fry' shapes, about 1/2-inch thick. Soak the sliced apples in a bowl of cold water with a squeeze of lemon juice to prevent browning.
- For Baking: Preheat your oven to 400°F (200°C). Arrange the dried apple fries in a single layer on a baking sheet lined with parchment paper. Optionally, toss them with a tablespoon of olive oil or melted unsalted butter and a pinch of cinnamon. Bake for 15-20 minutes, flipping halfway through, until tender-crisp and lightly golden.
- For Air Frying: Preheat your air fryer to 375°F (190°C). Place the dried apple fries in a single layer in the air fryer basket. Air fry for 10-15 minutes, shaking the basket halfway through, until tender and slightly caramelized. Transfer the cooked apple fries to a serving platter or board.
- While the apple fries are cooking, gently warm your salted caramel sauce. If using store-bought, heat in a microwave-safe bowl in 30-second intervals, stirring after each until warm and pourable. If homemade, gently reheat over low heat on the stovetop, stirring constantly.
- Choose a large serving board or platter. Arrange the warm apple fries on one side of the board. Pour the warmed salted caramel into a small bowl and place it on the board. Arrange your chosen toppings around the caramel bowl and apple fries. Just before serving, sprinkle flaky sea salt over the caramel and some apple fries.
- Prep Time: 15 mins
- Cook Time: 30 mins
- Category: Dessert
- Method: Baking or Air Frying
- Cuisine: American
Nutrition
- Serving Size: 1 bowl
- Calories: 350
- Sugar: 25 g
- Sodium: 150 mg
- Fat: 10 g
- Saturated Fat: 5 g
- Unsaturated Fat: 3 g
- Trans Fat: 0 g
- Carbohydrates: 60 g
- Fiber: 5 g
- Protein: 2 g
- Cholesterol: 15 mg
Keywords: Choose firm, crisp apples for the best texture. Prevent browning by soaking sliced apples in lemon water. Adjust caramel consistency with a splash of milk if too thick.