• Skip to primary navigation
  • Skip to main content
  • Skip to primary sidebar
Homesmad

Homesmad

  • Home
  • Breakfast & Brunch
  • Appetizers & Snacks
  • Dinner
  • Dessert
  • About
  • Privacy Policy
  • Contact
Homesmad
  • Home
  • Breakfast & Brunch
  • Appetizers & Snacks
  • Dinner
  • Dessert
  • About
  • Privacy Policy
  • Contact

Skellington Cheese Ball: Easy Halloween Appetizer Recipe

September 29, 2025 by Lily author

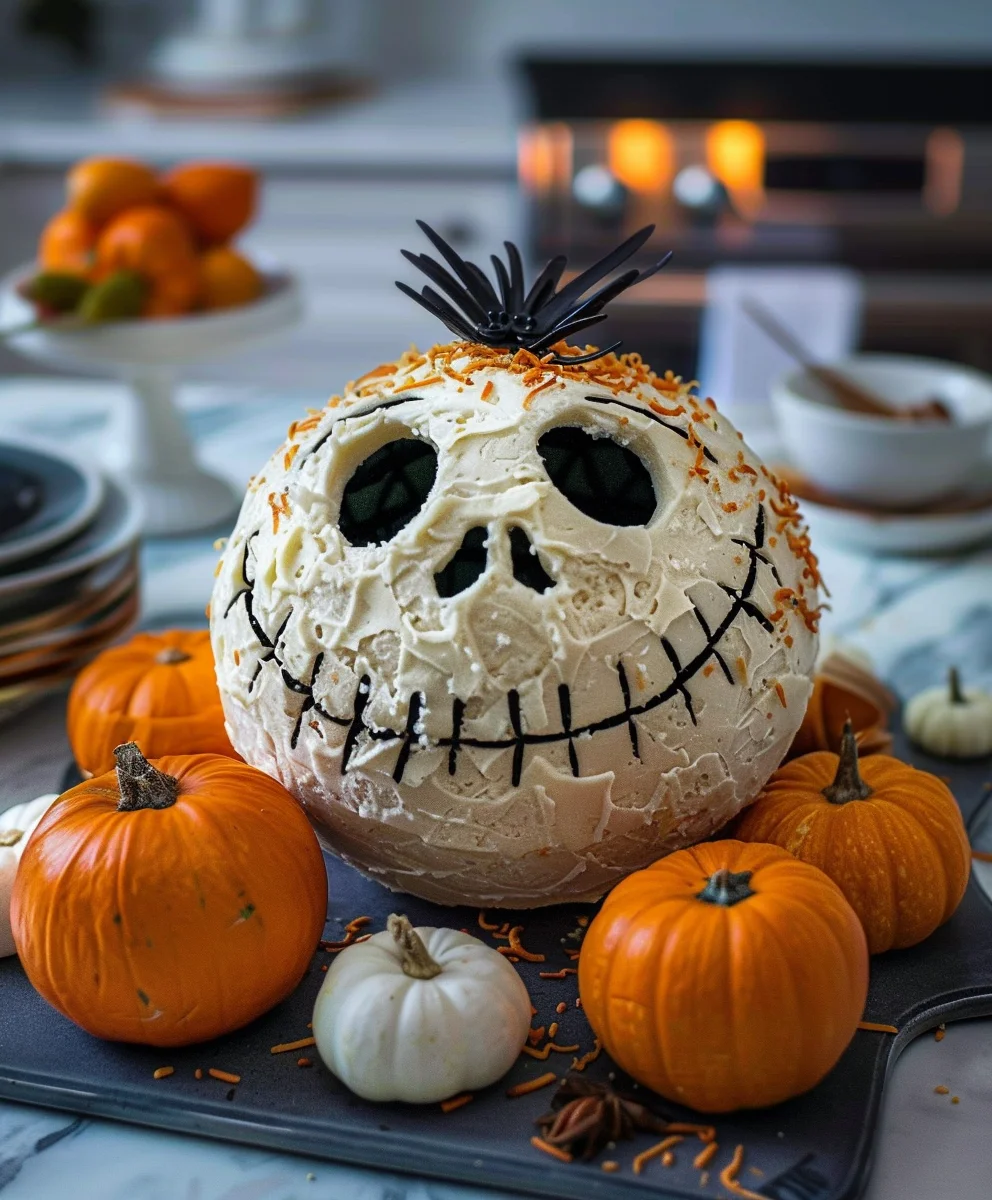
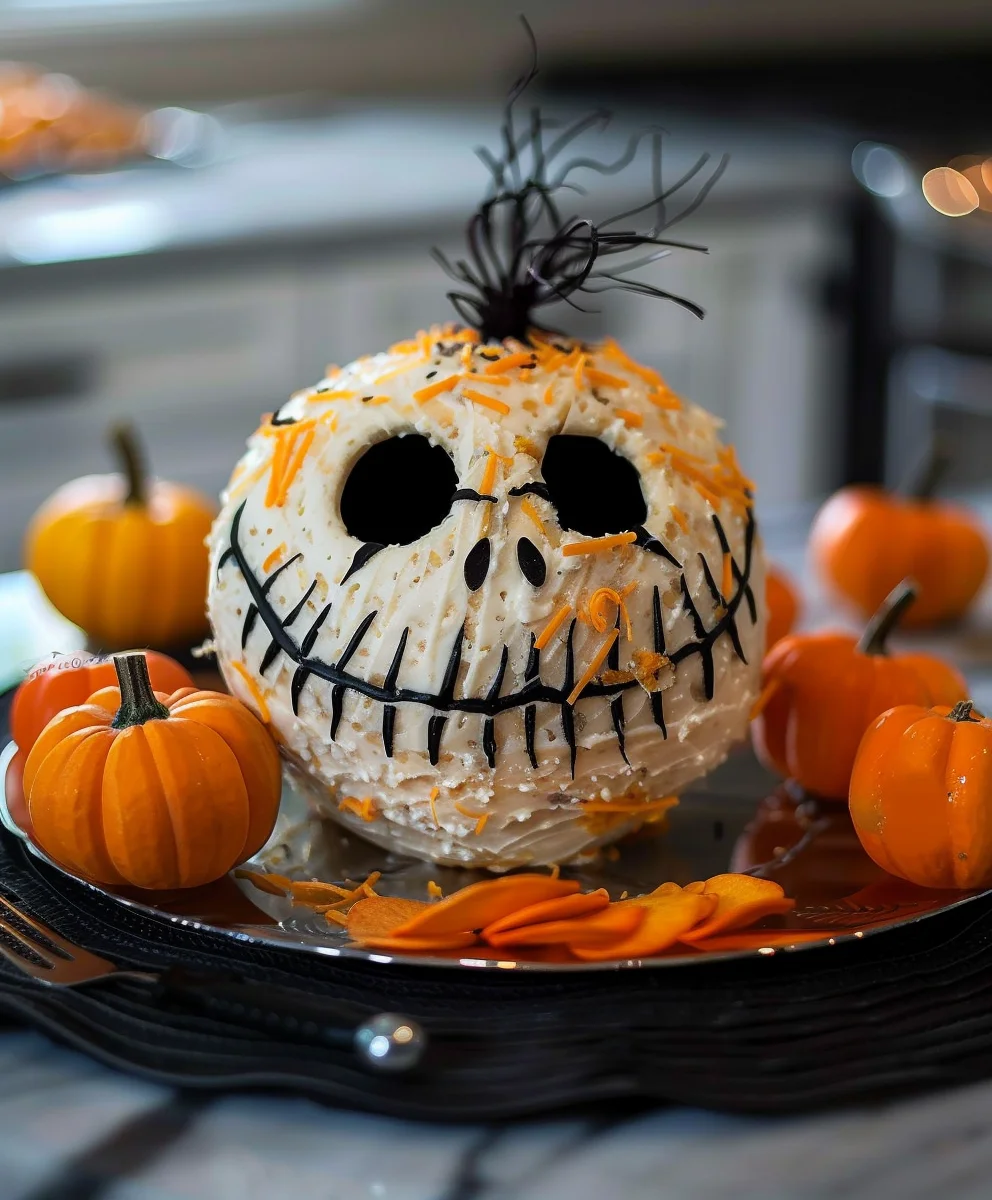
Skellington Cheese Ball Appetizer Recipe is more than just a dish; it’s a centerpiece of spooky delight that captures the essence of festive gatherings. Imagine a show-stopping appetizer that not only tantalizes taste buds but also draws gasps of admiration from your guests – that’s precisely what I’m thrilled to bring to your table today. While the classic cheese ball has graced party tables for decades, this particular iteration takes its whimsical inspiration from the beloved Halloween and Christmas classic, The Nightmare Before Christmas.

A Whimsical Nod to Holiday Cheer

This creative twist transforms a traditional party staple into an icon of themed holiday cheer, making it particularly perfect for October festivities, spooky movie nights, or any event where a touch of ghoulish charm is appreciated. It’s my absolute favorite way to combine deliciousness with delightful decor!

Guests adore this Skellington Cheese Ball Appetizer Recipe for countless reasons. First, the incredible flavor profile – a rich, creamy blend of cheeses and seasonings that creates an irresistible savory experience. Its smooth, spreadable texture pairs perfectly with a variety of crackers and crudités, ensuring there’s something for everyone. But beyond the delightful taste, the sheer convenience is a game-changer. It’s a make-ahead marvel, allowing you to prepare it hours, or even a day, in advance, freeing you up to enjoy your party. And, of course, the visual appeal is unmatched. The playful skellington design elevates it from a simple appetizer to a memorable decorative element, sparking conversations and smiles.

Skellington Cheese Ball: Easy Halloween Appetizer Recipe this RECIPE

Ingredients:

Creating a spectacular Skellington Cheese Ball Appetizer Recipe starts with gathering the freshest and most flavorful ingredients. This isn’t just a list; it’s the foundation of a truly memorable Halloween treat that combines creamy indulgence with a playful, spooky aesthetic. I’ve carefully selected each component to ensure a balance of rich flavor, delightful texture, and ease of shaping for our bony friend.

  • Two (8-ounce) packages cream cheese, full-fat, softened to room temperature
  • One (8-ounce) package sharp cheddar cheese, freshly shredded (or a cheddar-jack blend for extra creaminess)
  • One (4-ounce) log goat cheese, crumbled (optional, but I find it adds a lovely tang and depth)
  • Two tablespoons unsalted butter, softened
  • One tablespoon Worcestershire sauce
  • One teaspoon garlic powder
  • One teaspoon onion powder
  • One-half teaspoon smoked paprika (for a subtle warmth and color)
  • One-quarter teaspoon cayenne pepper (adjust to your preference for heat, or omit for a milder flavor)
  • Salt and freshly ground black pepper to taste
  • One-half cup finely chopped fresh chives
  • One-quarter cup finely chopped fresh parsley
  • One and a half cups finely chopped pecans or walnuts, toasted (for coating)
  • One (3.8-ounce) can pitted black olives, drained and patted dry (for facial features)
  • Assorted crackers, pretzel crisps, breadsticks, or fresh vegetable sticks for serving

Preparation of the Cheese Ball Base

The heart of our Skellington Cheese Ball Appetizer Recipe lies in its creamy, flavorful base. This is where we combine all those wonderful cheeses and seasonings to create a harmonious blend that will delight your taste buds. Patience and proper technique here will ensure a smooth, lump-free cheese ball that holds its shape beautifully.

  1. Soften the Cream Cheese and Butter: First things first, ensure your two packages of cream cheese and the two tablespoons of unsalted butter are at true room temperature. I usually take them out of the refrigerator at least an hour, sometimes two, before I plan to start. This is a critical step because trying to mix cold cream cheese will result in a lumpy base and make it incredibly difficult to achieve that smooth, pliable consistency we need for shaping. You want it soft enough that a finger leaves an easy indentation, but not so warm that it’s melted.
  2. Combine the Creamy Elements: In a large mixing bowl, combine the softened cream cheese, softened butter, and the crumbled goat cheese (if you’re using it). I prefer to use an electric mixer with the paddle attachment for this step, as it makes quick work of thoroughly blending these ingredients until they are light, fluffy, and completely smooth. Scrape down the sides of the bowl frequently to ensure everything is incorporated. You’re aiming for a consistency similar to soft frosting – utterly uniform with no visible lumps of cream cheese. This is the canvas for our flavor profile!
  3. Introduce the Shredded Cheese: Now, add the freshly shredded sharp cheddar cheese (or cheddar-jack blend) to the cream cheese mixture. I always recommend shredding your own cheese for this recipe. Pre-shredded cheeses often contain anti-caking agents that can slightly alter the texture and melt of your cheese ball, making it less creamy. Gently fold the shredded cheese into the mixture until it’s evenly distributed. You don’t want to overmix at this stage, just enough to combine.
  4. Layer in the Flavor: Next, it’s time to add the seasonings that give our Skellington Cheese Ball its irresistible depth. Sprinkle in the Worcestershire sauce, garlic powder, onion powder, smoked paprika, and cayenne pepper. Start with a generous pinch of salt and a few grinds of fresh black pepper. Mix these seasonings into the cheese mixture until they are thoroughly incorporated.
  5. Taste and Adjust: This is my favorite part! Take a small spoonful of the mixture and taste it. This is your chance to adjust the seasonings to your personal preference. Do you want more garlic? A bit more heat from the cayenne? Perhaps a touch more salt? Don’t be shy; make it perfect for your palate. Remember, we want a bold flavor that stands up to the crackers and vegetables it will be served with.
  6. Fold in the Fresh Herbs: Finally, gently fold in the finely chopped fresh chives and parsley. These not only add a lovely fresh counterpoint to the rich cheese but also introduce flecks of vibrant green that will peek through the coating, adding visual interest. I usually save a tiny bit of chives for garnish later, but the bulk goes into the base. Ensure they are evenly distributed throughout the mixture.
  7. Prepare for Chilling: At this point, your cheese ball base should be well-mixed, incredibly fragrant, and possess a soft, pliable consistency. Cover the bowl with plastic wrap and refrigerate it for at least 30 minutes to an hour. This short chill time will firm up the mixture just enough to make it easier to handle and shape into our skellington. If you’re not planning to shape it right away, you can leave it in the fridge for several hours, or even overnight; just let it sit out for 15-20 minutes before shaping to soften slightly.

Shaping the Skellington

This is where the fun truly begins, transforming a simple cheese ball into an eye-catching, spooky Skellington Cheese Ball Appetizer. Don’t be intimidated by the shaping; it’s more forgiving than you might think, and a little imperfection only adds to the homemade charm of our ghastly gourmet. Think of it as sculpting a delicious piece of art!

  1. Prepare Your Workspace: Before you even touch the cheese mixture, get your pecans or walnuts ready. Spread the one and a half cups of finely chopped, toasted nuts onto a clean, flat surface. I like to use a large plate or a shallow baking dish for this. Having them spread out makes it much easier to roll and coat the cheese ball evenly. Ensure the nuts are very finely chopped; this helps them adhere better and creates a smoother “skin” for our skellington.
  2. Initial Shaping of the Head: Remove the chilled cheese mixture from the refrigerator. With clean hands, scoop out the entire mixture. You’ll notice it’s much firmer now and easier to work with. Begin to gently form it into a round ball in your hands, pressing firmly but not overly aggressively. This initial ball should be relatively smooth. This will be the main part of our skellington’s skull.
  3. Refining the Skull Shape: Now, let’s start defining the skull features. First, gently flatten one side of the ball slightly to create a stable base for it to sit on. This will prevent your skellington from rolling around on the serving platter. Next, using your thumbs, gently press two indentations into the upper-middle portion of the ball – these will become the eye sockets. Don’t go too deep, just enough to create a hollow.
  4. Building the Cheekbones and Jawline: Take small amounts of the cheese mixture from the areas around the eye sockets or from the back of the head (if you have excess) and gently pat them onto the sides, just below and to the outside of the eye sockets. This will create the illusion of prominent cheekbones. Below the cheekbones, gently pull and shape the lower portion of the cheese ball to create a slightly narrower, elongated section for the jaw. You want the jaw to look distinct from the main skull but still flow seamlessly. You can use the side of your hand or a butter knife to refine the line where the jaw meets the upper skull.
  5. Creating the Nose Bridge: Between the two eye sockets, gently pinch and pull up a very subtle ridge of cheese to represent the bridge of the nose. This doesn’t need to be dramatic, just enough to give a hint of structure for where the nose will eventually be placed.
  6. Smooth and Even: Once you’re happy with the basic skull shape – don’t worry about perfection, character is key! – gently smooth out any major seams or cracks with your fingertips. A little unevenness is fine, as it adds to the organic, somewhat weathered look of a skull. The goal is a recognizable skull shape that looks like it’s ready for its nutty coating.
  7. Coating with Toasted Nuts: Carefully transfer your shaped skellington to the plate of finely chopped, toasted pecans or walnuts. Gently roll the entire cheese ball, pressing the nuts firmly onto the surface with your hands. Ensure every inch of the skellington is completely covered in nuts. The nuts serve as the “bone” texture and provide a fantastic crunch that contrasts beautifully with the creamy interior. Pay extra attention to pressing the nuts into the eye sockets and around the jawline to define those features even further. Once fully coated, gently re-examine the shape and make any final subtle adjustments to the skull features, pressing the nuts firmly to ensure they adhere.

Decorating the Skellington Face

Now for the artistic touch that truly brings our Skellington Cheese Ball Appetizer to life – or rather, to death! This is where we transform the nutty skull into a recognizable, spooky face using simple black olives. This part allows for a lot of creativity, so have fun with it!

  1. Prepare the Olives: Take your drained and patted-dry pitted black olives. We’ll be using these to craft the eyes, nose, and mouth of our skellington. Having them dry is important so they adhere better to the cheese ball.
  2. Crafting the Eye Sockets: For the eyes, I find that cutting an olive in half lengthwise and then shaping each half into an almond or oval shape works best. You can trim the edges with a small, sharp knife (a paring knife is ideal) to get the desired look. Place these two olive pieces into the indentations you created for the eye sockets. Gently press them into the nutty surface so they stick well. You can make them hollow, menacing, or even slightly goofy – it’s your skellington!
  3. Creating the Nose: For the nose, take another black olive and slice off a small, thin, triangular piece. This will be inverted and placed point-down just below the bridge of the nose, between the eyes. Press it gently to secure it. This inverted triangle gives the classic skull nose cavity look.
  4. Designing the Mouth: The mouth is perhaps the most fun and expressive part. You have a few options here:

    • The Stitched Smile: This is my personal favorite for a truly “skellington” look. Take several thin slices of black olive. Arrange them in a slightly curved line across the lower jaw area to form a smile. Then, cut very small, thin slivers of olive to place vertically across the horizontal line, creating the “stitches” or individual teeth. This gives a great stitched-mouth effect that’s both spooky and charming.
    • The Grin: Alternatively, you can slice a whole olive into very thin rings. Take a few of these rings and arrange them in a curved line to represent the open mouth of a grinning skull. You can then add small pieces of olive as teeth within this opening if you wish.
    • The Empty Cavity: For a more abstract or minimalist look, simply use a larger, curved piece of olive to represent an empty mouth cavity.

    Whichever style you choose, ensure the olive pieces are pressed firmly into the nut coating so they don’t fall off during serving or transport.

  5. Adding Fine Details (Optional): If you’re feeling extra creative, you can use very tiny slivers of olives to add forehead cracks or even small “stitches” elsewhere on the skull, though I find keeping it simple often has the biggest impact. The beauty of this Skellington Cheese Ball Appetizer Recipe is that it encourages a bit of artistic flair.

Chilling and Serving

Once your Skellington Cheese Ball Appetizer is fully shaped and decorated, it’s crucial to give it adequate chilling time. This step not only allows the flavors to meld and deepen beautifully but also ensures the cheese ball firms up perfectly, making it easy to slice or spread without losing its spooky form. A well-chilled cheese ball is a happy cheese ball, and a delightful host!

  1. Final Chill: Carefully transfer your decorated Skellington Cheese Ball to a serving platter. Cover it loosely with plastic wrap, being careful not to disturb the olive decorations. Refrigerate for at least 2 hours, but preferably 4 hours or even overnight. This prolonged chilling time is essential. It allows the various cheeses and seasonings to fully integrate, deepening the overall flavor profile. More importantly, it firms up the entire structure of the cheese ball, making it much easier to serve cleanly and ensuring it maintains its fantastic skellington shape throughout your gathering. If you’ve made it ahead of time, simply remove it from the refrigerator about 15-20 minutes before you plan to serve it, allowing it to soften just slightly so it’s easier to spread.
  2. Garnish and Presentation: Just before serving, remove the plastic wrap. If you saved any fresh chives or parsley, you can sprinkle a little around the base of the skellington on the platter for a touch of fresh greenery and color. Arrange your chosen dippers artfully around the Skellington Cheese Ball.
  3. Serving Suggestions: The best part of any Skellington Cheese Ball Appetizer Recipe is pairing it with delicious accompaniments.

    • Crackers: A variety of crackers works wonderfully – plain butter crackers, whole grain crackers for a hearty bite, or even artisan crispbreads. I love a good sturdy cracker that won’t break when scooping.
    • Pretzel Crisps or Sticks: These offer a salty, crunchy contrast and are great for dipping. Pretzel sticks can even be playfully arranged to look like bones or used as tools for scooping.
    • Fresh Vegetables: For a lighter, healthier option, offer an array of colorful vegetable sticks. Carrots, celery, cucumber slices, bell pepper strips (especially orange and yellow ones for a Halloween vibe), and even radish slices provide a refreshing crunch.
    • Bread: Thinly sliced baguette rounds, lightly toasted, also make excellent dippers.

    Place a small spreading knife or spoon nearby to encourage guests to dig in.

  4. Storage: Any leftover Skellington Cheese Ball can be stored, covered tightly with plastic wrap, in the refrigerator for up to 3-4 days. While the flavor will remain excellent, the nut coating might soften slightly over time. I doubt you’ll have much leftover though, as this appetizer tends to disappear quickly!
  5. Enjoy Your Creation: Step back and admire your handiwork! This Skellington Cheese Ball Appetizer Recipe is not just a dish; it’s a centerpiece that promises to be a conversation starter and a delicious addition to your festive spread. Enjoy the delighted gasps and happy munching of your guests!

Skellington Cheese Ball: Easy Halloween Appetizer Recipe

Conclusion:

And there you have it, my friends! We’ve reached the grand finale of our culinary adventure, and I truly hope you’re as excited as I am about what we’ve discovered. This isn’t just another recipe; it’s an invitation to elevate your appetizer game to legendary status. What makes this particular creation, the Skellington Cheese Ball Appetizer Recipe, an absolute must-try? It’s the perfect storm of simplicity, spectacular flavor, and undeniable visual charm. Imagine a rich, creamy, and wonderfully seasoned cheese base, molded with just a touch of artistic flair, becoming the centerpiece of your gathering. It’s undeniably delicious, with a texture that melts in your mouth and a savory depth that keeps everyone coming back for more. But beyond its incredible taste, it’s the sheer delight it brings to any table – a conversation starter, a showstopper, and a genuinely memorable treat that you can proudly say you made yourself.

I find immense joy in recipes that deliver maximum impact with minimal fuss, and this one absolutely nails it. The subtle tang of the cream cheese, perfectly balanced with savory spices and the satisfying crunch of its exterior, creates a symphony of textures and tastes that caters to a wide array of palates. Whether you’re a seasoned chef or just starting your culinary journey, you’ll find this recipe forgiving, fun, and profoundly rewarding. It’s robust enough to stand up to bold flavors yet delicate enough to complement lighter accompaniments, making it incredibly versatile for any occasion, not just the spooky season. Seriously, once you taste this, you’ll want to find excuses to make it all year round!

Serving Suggestions & Creative Variations:

Now, let’s talk about taking this masterpiece from great to absolutely unforgettable. While it’s fantastic on its own, a well-chosen accompaniment can truly enhance the experience. For classic pairings, think an assortment of crackers: sturdy water crackers, buttery club crackers, or even a wholesome whole-grain cracker for added texture. Pretzel crisps are another excellent choice, offering a salty crunch that beautifully contrasts the creamy cheese. Don’t shy away from bread options either; toasted baguette slices, thinly sliced pumpernickel bread, or even mini bagel halves can be wonderful vessels for this delightful spread. For a lighter touch, a vibrant selection of vegetable dippers is always a winner. Crisp carrot sticks, refreshing celery stalks, colorful bell pepper strips (red, yellow, orange!), cool cucumber slices, or sweet cherry tomatoes offer a delightful freshness and a satisfying crunch.

Want to get a little more adventurous? Consider adding fruit for a surprising burst of sweetness that complements the savory cheese. Thin slices of crisp green apple or pear can provide a lovely contrast, as can a handful of seedless grapes. For a more sophisticated presentation, try garnishing your platter with fresh herbs like finely chopped chives or parsley, a scattering of extra toasted nuts, or even a drizzle of a good quality balsamic glaze for a touch of acidity and sweetness. Each addition can transform the experience, inviting your guests to explore new flavor combinations with every bite.

Unleash Your Inner Chef with Variations:

And here’s where the fun truly begins – making this recipe uniquely yours! While the core Skellington Cheese Ball Appetizer Recipe is fantastic as written, don’t hesitate to experiment. You could enhance the cheese base by incorporating a bit of sharp white cheddar or smoked Gouda along with the cream cheese for added complexity. For a spicier kick, a pinch of cayenne pepper or a dash of your favorite hot sauce can awaken the palate. Sun-dried tomatoes, finely chopped, or a spoonful of pesto swirled into the mixture could introduce new dimensions of flavor. For the coating, beyond the classic pecans, consider a mix of toasted almonds and dried cranberries for a festive flair, or even an “everything bagel” seasoning for a savory, aromatic crunch. You could also experiment with different shaping ideas – maybe a pumpkin shape for Thanksgiving, or simply a beautifully rustic round for an elegant dinner party. The possibilities are truly endless, limited only by your imagination!

I genuinely encourage you to roll up your sleeves, gather your ingredients, and give this incredible recipe a try. It’s more than just food; it’s an opportunity to create something wonderful, to share joy with others, and to perhaps even discover a new favorite. Once you’ve made your own Skellington Cheese Ball Appetizer, I would absolutely love to hear about your experience! Did you stick to the recipe, or did you put your own unique spin on it? What were your favorite serving combinations? Please, don’t be shy – share your stories, your triumphs, and even your creative adaptations in the comments below. Better yet, snap a photo and share it with us! There’s nothing more rewarding than seeing our community bring these recipes to life. Happy cooking, and may your next gathering be filled with deliciousness and delight!


Skellington Cheese Ball Appetizer Recipe

Skellington Cheese Ball Appetizer Recipe

A delightful and spooky Skellington Cheese Ball, perfect for Halloween, movie nights, or any festive gathering. This show-stopping appetizer combines a rich, creamy blend of cheeses and seasonings, shaped into a whimsical skull and decorated with black olives, making it a flavorful and visually appealing centerpiece, inspired by The Nightmare Before Christmas.

Prep Time
20 Minutes

Cook Time
0 Minutes

Total Time
50 Minutes

Servings
1 cheese ball (serves 8-10)

Ingredients

Instructions

Important Information

Nutrition Facts (Per Serving)

It is important to consider this information as approximate and not to use it as definitive health advice.

Allergy Information

Please check ingredients for potential allergens and consult a health professional if in doubt.

« Previous Post
Spooky Cheesy Halloween Breadstick Bones Recipe
Next Post »
Creepy-Cute Skewered Beef Salami Eyeballs for Halloween Fun!

If you enjoyed this…

Crispy Shrimp & Avocado Taquitos: A Flavorful Treat!

Bruschetta Dip Ideas: Delicious Recipes to Elevate Your Appetizer Game

Pineapple Cowboy Candy: A Sweet & Spicy Homemade Recipe

Primary Sidebar

Browse by Diet

BreakfastDinnerLunchDessertAppetizer

Sweet Peach Yogurt Parfait Delight

One of my fondest memories is from a lazy summer afternoon spent at my grandmother’s house. The sun filtered through the kitchen window, casting a warm glow over the table where she would create her culinary magic. It was during one of those blissful moments that I first tasted her Peach Yogurt Parfait with Honey and Granola. The sweet aroma of ripe peaches mingling with creamy yogurt and the crunch of granola was nothing short of heavenly. It felt like summer captured in a bowl, and I still remember the joy of diving in with a spoon, each layer revealing a new burst of flavor.

When I think about that parfait, I can almost hear the gentle hum of the bees outside, reminding me of the floral notes that honey brings to every bite. The vibrant yellows and soft oranges of the peaches contrast beautifully with the creamy white yogurt and the golden crunch of granola. It’s a dish that not only looks delightful but also tastes like a celebration of fresh, wholesome ingredients.

What makes my version of this Peach Yogurt Parfait special is the careful balance of flavors and textures. I use ripe, juicy peaches, drizzled with locally sourced honey, and a homemade granola that’s bursting with nuts and seeds for an extra crunch. It’s a simple dish, but every layer is crafted with love and attention.

Let me show you exactly how to make this delightful parfait, so you can bring a bit of that summer magic into your kitchen!

Sweet Peach Yogurt Parfait Delight

Why You’ll Love This Recipe

  • Delightfully creamy texture from the Greek yogurt, paired with the juicy sweetness of fresh peaches.
  • Ready in under 20 minutes, making it a quick and satisfying breakfast or snack option.
  • Budget-friendly, using common ingredients that you may already have in your pantry.
  • Customizable with your favorite granola and nuts, allowing you to tailor each parfait to your taste.
  • Perfectly balanced flavors with the bright acidity of lemon juice and the sweetness of honey enhancing the peaches.

Ingredients

  • For the Parfait:
  • 2 cups plain Greek yogurt (or vanilla yogurt for a sweeter option)
  • 2 large ripe peaches, diced (about 2 cups)
  • 1 tablespoon fresh lemon juice (to prevent browning of peaches)
  • 2 tablespoons honey (plus more for drizzling)
  • 1 teaspoon vanilla extract (optional for extra flavor)
  • For the Granola:
  • 1 cup granola (store-bought or homemade; see notes for a simple granola recipe)
  • 1/4 cup sliced almonds (optional for added crunch)
  • 1/4 cup shredded coconut (optional for added flavor)

Let’s dive into some key ingredients that make this Peach Yogurt Parfait so delightful! First, the Greek yogurt is not only creamy but also packed with protein, making it a satisfying option for breakfast or a snack. If you’re looking for a sweeter option, you can easily substitute it with vanilla yogurt, though it may alter the overall flavor balance. Next, the ripe peaches are the star of the show; their natural sweetness shines through, so I recommend choosing peaches that yield slightly to pressure, indicating they’re perfectly ripe. If peaches aren’t in season, feel free to use nectarines or even frozen peaches—just thaw them before use. Finally, honey adds a lovely floral sweetness that ties everything together. If you prefer, maple syrup can serve as a delicious substitute.

Step-by-Step Instructions

  1. Start by preparing the peaches. Wash them thoroughly, then slice and dice them into bite-sized pieces. In a medium bowl, toss the diced peaches with 1 tablespoon of fresh lemon juice to prevent browning. Set aside for about 5 minutes while the lemon juice works its magic.
  2. In a separate bowl, combine the Greek yogurt, 2 tablespoons of honey, and 1 teaspoon of vanilla extract if using. Stir the mixture until smooth and thoroughly blended. This should take about a minute. Avoid overmixing to maintain the creaminess of the yogurt.
  3. Now it’s time to layer your parfait. Grab a clear glass or bowl to showcase your beautiful creation. Start with a generous spoonful of the yogurt mixture at the bottom—about 1/4 cup will do. Use a spoon to spread it evenly.
  4. Add a layer of the diced peaches over the yogurt, ensuring they cover the yogurt completely. You might want to use about half of what you have prepared—roughly 1 cup. This layer should be visually appealing, so arrange the peaches neatly.
  5. Sprinkle 1/4 cup of granola over the peaches. This adds a delightful crunch. Make sure to distribute it evenly to ensure every bite has that satisfying texture. Avoid packing it down too tightly, as you want it to maintain its crunch.
  6. Repeat the layers: spoon in another 1/4 cup of yogurt, followed by another cup of peaches, and another sprinkle of granola. You should have at least two layers, but feel free to add more depending on your glass size.
  7. Finish off your parfait with a drizzle of honey on top for added sweetness and a touch of elegance. If you’re using sliced almonds or shredded coconut, sprinkle them on top now. It adds a lovely visual contrast and extra flavor.
  8. Serve immediately or refrigerate for up to 30 minutes before serving to allow the flavors to meld together. However, I recommend enjoying it fresh to maintain the granola’s crunch.

Pro Tips for the Best Peach Yogurt Parfait With Honey And Granola

  • Make sure to choose ripe peaches for the best flavor and texture. A common mistake is using unripe fruit, which can lead to a less enjoyable parfait. Look for peaches that are fragrant and slightly soft to the touch.
  • Use a clear glass to assemble your parfait; this not only makes for a beautiful presentation but also allows you to see the colorful layers, which adds to the enjoyment of eating it.
  • For an even creamier texture, consider whipping the Greek yogurt with a hand mixer for a couple of minutes before layering. This small adjustment makes a huge difference in mouthfeel.
  • Be mindful of the granola-to-yogurt ratio. Too much granola can overwhelm the parfait, while too little can make it feel too creamy. Aim for about 1/4 cup of granola per layer for the perfect balance.
  • If you’re making this for a gathering, consider preparing the yogurt and peaches ahead of time and layering them just before serving. This ensures the granola stays crunchy!

Variations & Serving Ideas

There are so many ways to get creative with your Peach Yogurt Parfait! For a tropical twist, swap out the peaches for mangoes or pineapples and top with coconut flakes. If you prefer a berry flavor, mix in some blueberries or strawberries with the peaches for added color and taste. For a nutty version, incorporate chopped walnuts or pecans instead of almonds.

As for serving ideas, this parfait pairs beautifully with a side of scrambled eggs for a hearty breakfast or fresh fruit salad for a light lunch. You might also enjoy it alongside whole grain toast with almond butter for an energizing snack. The contrast of flavors and textures will elevate your meal experience!

Storage, Make-Ahead & Reheating

The Peach Yogurt Parfait is best enjoyed fresh, but you can prepare some components ahead of time. Store the layered parfait in an airtight container in the refrigerator for up to 24 hours. However, be cautious; the granola may lose its crunch if stored too long. You can freeze the yogurt and peach mixture for up to 2 months; just remember to thaw it in the refrigerator overnight before serving.

If you plan to enjoy this dish the next day, it can taste even better as the flavors meld together. Just remember to add the granola right before serving to keep its delightful crunch!

Frequently Asked Questions

Can I make Peach Yogurt Parfait With Honey And Granola ahead of time?

Yes — in fact, it tastes even better the next day as the flavors meld. However, I recommend waiting to add the granola until just before serving to maintain its crunch.

What can I substitute for Greek yogurt?

If you prefer a lighter option, you can substitute Greek yogurt with regular yogurt or a dairy-free alternative like coconut yogurt. Just remember that this may alter the creaminess and flavor profile slightly.

Can I use frozen peaches for this parfait?

Absolutely! Just make sure to thaw the frozen peaches before using them. They will still add great flavor, though the texture may be slightly softer than fresh peaches.

How do I make the parfait vegan?

To make a vegan version, substitute the Greek yogurt with a plant-based yogurt alternative, and replace honey with maple syrup or agave nectar. This keeps the parfait sweet while adhering to a vegan diet.

What other fruits can I use in this recipe?

You can mix and match fruits based on your preference. Try using strawberries, blueberries, raspberries, or even bananas. Just make sure to adjust the lemon juice as needed to prevent browning.

Sweet Peach Yogurt Parfait Delight

Final Thoughts

The Peach Yogurt Parfait with Honey and Granola is a delightful blend of creamy yogurt, sweet peaches, and crunchy granola that creates a satisfying and nourishing treat. Each layer bursts with flavor, making it a perfect choice for breakfast or a light dessert.

This is the kind of recipe I come back to again and again, especially when I want something refreshing and wholesome to start my day. The harmony of sweet and tart flavors, combined with the delightful crunch, never fails to lift my spirits!

I encourage you to give this parfait a try and indulge in its comforting goodness. Feel free to share your results or even add your own twist—perhaps a sprinkle of cinnamon or a handful of nuts. Enjoy creating your perfect parfait!

Print
clock clock iconcutlery cutlery iconflag flag iconfolder folder iconinstagram instagram iconpinterest pinterest iconfacebook facebook iconprint print iconsquares squares iconheart heart iconheart solid heart solid icon

Peach Yogurt Parfait


  • Author: Lily author
  • Total Time: 15 minutes
  • Yield: 4 servings 1x
Pin Recipe
Print Recipe

Description

This Peach Yogurt Parfait combines creamy Greek yogurt, juicy peaches, and crunchy granola for a delightful treat. It’s a perfect breakfast or snack that captures the essence of summer in every bite.


Ingredients

Scale
  • For the Parfait:
  • 2 cups plain Greek yogurt (or vanilla yogurt for a sweeter option)
  • 2 large ripe peaches, diced (about 2 cups)
  • 1 tablespoon fresh lemon juice (to prevent browning of peaches)
  • 2 tablespoons honey (plus more for drizzling)
  • 1 teaspoon vanilla extract (optional for extra flavor)
  • For the Granola:
  • 1 cup granola (store-bought or homemade; see notes for a simple granola recipe)
  • 1/4 cup sliced almonds (optional for added crunch)
  • 1/4 cup shredded coconut (optional for added flavor)

Instructions

  1. Start by preparing the peaches. Wash them thoroughly, then slice and dice them into bite-sized pieces. In a medium bowl, toss the diced peaches with 1 tablespoon of fresh lemon juice to prevent browning. Set aside for about 5 minutes while the lemon juice works its magic.
  2. In a separate bowl, combine the Greek yogurt, 2 tablespoons of honey, and 1 teaspoon of vanilla extract if using. Stir the mixture until smooth and thoroughly blended. This should take about a minute. Avoid overmixing to maintain the creaminess of the yogurt.
  3. Now it’s time to layer your parfait. Grab a clear glass or bowl to showcase your beautiful creation. Start with a generous spoonful of the yogurt mixture at the bottom—about 1/4 cup will do. Use a spoon to spread it evenly.
  4. Add a layer of the diced peaches over the yogurt, ensuring they cover the yogurt completely. You might want to use about half of what you have prepared—roughly 1 cup. This layer should be visually appealing, so arrange the peaches neatly.
  5. Sprinkle 1/4 cup of granola over the peaches. This adds a delightful crunch. Make sure to distribute it evenly to ensure every bite has that satisfying texture. Avoid packing it down too tightly, as you want it to maintain its crunch.
  6. Repeat the layers: spoon in another 1/4 cup of yogurt, followed by another cup of peaches, and another sprinkle of granola. You should have at least two layers, but feel free to add more depending on your glass size.
  7. Finish off your parfait with a drizzle of honey on top for added sweetness and a touch of elegance. If you’re using sliced almonds or shredded coconut, sprinkle them on top now. It adds a lovely visual contrast and extra flavor.
  8. Serve immediately or refrigerate for up to 30 minutes before serving to allow the flavors to meld together. However, I recommend enjoying it fresh to maintain the granola’s crunch.
  • Prep Time: 15 mins
  • Cook Time: 0 mins
  • Category: Breakfast
  • Method: No-cook
  • Cuisine: American

Nutrition

  • Serving Size: 1 parfait
  • Calories: 250
  • Sugar: 20 g
  • Sodium: 50 mg
  • Fat: 5 g
  • Saturated Fat: 2 g
  • Unsaturated Fat: 3 g
  • Trans Fat: 0 g
  • Carbohydrates: 40 g
  • Fiber: 3 g
  • Protein: 10 g
  • Cholesterol: 10 mg

Keywords: Choose ripe peaches for the best flavor and texture. Use a clear glass for a beautiful presentation. For creaminess, consider whipping the yogurt before layering. Be mindful of the granola-to-yogurt ratio. Prepare yogurt and peaches ahead of time for gatherings, layering just before serving.

Did you make this recipe?

Share a photo and tag us — we can't wait to see what you've made!

Sun-Kissed Frozen Orange Cream Slush

As a child, summer days felt like they lasted forever. I remember the sticky heat wrapping around me as I played outside, my laughter mingling with the sounds of the neighborhood. But nothing could cool me down quite like the moment I’d spot my grandmother, laboring over her blender, whipping up her famous Frozen Orange Creamsicle Slush. That vibrant orange treat, with its frosty texture and sweet citrus aroma, was like a burst of sunshine in a cup. Just one sip, and I could feel the coolness wash over me, sparking pure joy.

This Frozen Orange Creamsicle Slush has a way of making you feel like a kid again. Its creamy, dreamy consistency is a delightful balance of bright orange and soft vanilla, inviting you to dive right in. The refreshing tang of orange dances on your tongue, while the smooth creaminess envelops you in a comforting embrace. It’s a nostalgic treat that’s perfect for hot summer afternoons or anytime you need a little pick-me-up.

What makes my version of this slush stand out is the addition of a hint of vanilla bean, which elevates the flavor and adds an extra layer of richness. Plus, it’s super easy to whip up with just a few simple ingredients that you probably already have on hand! So, if you’re ready to relive those sun-soaked memories, let me show you exactly how to make it.

Sun-Kissed Frozen Orange Cream Slush

Why You’ll Love This Recipe

  • Each slush is a perfect blend of creamy vanilla and zesty orange, creating a nostalgic flavor reminiscent of summer days.
  • This refreshing treat is ready in under 15 minutes, making it an ideal quick dessert for unexpected guests or hot afternoons.
  • With just 8 simple ingredients, it’s budget-friendly, ensuring you don’t have to break the bank to enjoy a delicious slush.
  • The slush has a perfectly smooth texture, thanks to the combination of ice and ice cream, providing a delightful contrast to the bright citrus flavors.
  • It’s highly customizable; you can easily adjust the sweetness and add fresh herbs for a unique twist that suits your taste.

Ingredients

  • 2 cups orange juice (freshly squeezed or store-bought)
  • 1 cup vanilla ice cream
  • 1 cup crushed ice
  • 1/2 cup milk (whole or 2%)
  • 1/4 cup granulated sugar (adjust based on sweetness preference)
  • 1 teaspoon vanilla extract
  • Zest of 1 orange (for added flavor)
  • Fresh orange slices and mint leaves (for garnish)

The star of this Frozen Orange Creamsicle Slush is the orange juice, which provides the vibrant, citrusy base. Freshly squeezed juice will yield the brightest flavor, but store-bought options can be just as convenient. If you’re opting for store-bought, choose 100% pure juice with no added sugars for the best results. Another essential ingredient is the vanilla ice cream; it adds creaminess and sweetness. You can substitute it with dairy-free ice cream if you’re looking for a vegan option. Whole or 2% milk complements the ice cream, creating a smooth blend. If you want a lower-calorie version, almond or oat milk can be good alternatives.

Lastly, the granulated sugar can be adjusted based on your sweetness preference. If you prefer a more natural sweetener, consider using honey or agave syrup. The orange zest enhances the flavor profile, providing an aromatic pop that brings the whole slush together. Don’t skip it! It adds an extra layer of brightness that makes this slush truly special.

Step-by-Step Instructions

  1. Start by preparing your ingredients. Gather 2 cups of orange juice, 1 cup of vanilla ice cream, and 1 cup of crushed ice. Make sure the ice is finely crushed, as larger chunks can make blending difficult.
  2. In a blender, combine the orange juice, vanilla ice cream, crushed ice, and 1/2 cup of milk. Add 1/4 cup of granulated sugar and 1 teaspoon of vanilla extract. If you like a sweeter slush, consider adding a bit more sugar at this stage.
  3. Add the zest of 1 orange to the blender. This step is crucial for enhancing the citrus flavor of your slush. Make sure not to include the bitter white pith—only the flavorful zest.
  4. Blend the mixture on medium-high speed for about 30-45 seconds. Stop once the ingredients are fully combined and the slush has a smooth, even consistency. If you notice large chunks of ice, blend for an additional 10-15 seconds. Avoid over-blending, as this can make the slush too liquidy.
  5. Once blended, taste the slush. If it needs more sweetness, add a little more sugar and blend for a few more seconds. If it’s too thick, you can add a splash of milk to reach your desired consistency.
  6. Pour the slush into glasses. This recipe typically serves 4, but you can easily double it for larger gatherings. Use a spoon to help guide the slush into the glasses if needed.
  7. Garnish each serving with fresh orange slices and mint leaves. The mint not only adds a pop of color but also a refreshing aroma that complements the citrus flavors beautifully.
  8. Serve immediately and enjoy! If you’ve made extra, you can refrigerate it for a short time, but it’s best enjoyed fresh.

Pro Tips for the Best Frozen Orange Creamsicle Slush

  • Don’t skip the orange zest! It’s a game-changer for flavor. Always zest before juicing to make it easier.
  • Use a high-powered blender for the best texture. A standard blender may struggle with ice, leading to uneven consistency. If you have a food processor, that can work too, but ensure the ice is finely crushed.
  • Adjust the ice-to-liquid ratio carefully. If your slush is too thick, it won’t blend well. Start with less ice and add more until you reach your preferred texture.
  • Be cautious with the sugar! Always start with the lower amount, as you can easily add more, but it’s hard to fix an overly sweet slush.
  • For a fun twist, consider adding a splash of coconut milk or a handful of fresh fruit like strawberries or pineapple. This not only enhances the flavor but also adds a beautiful color contrast.

Variations & Serving Ideas

There are countless ways to put a spin on your Frozen Orange Creamsicle Slush. Consider making a tropical version by adding in some pineapple juice or coconut milk for a delightful tropical twist. If you’re feeling adventurous, try incorporating a handful of frozen mango or peach slices for added sweetness. For a lighter version, swap out the vanilla ice cream for Greek yogurt for a creamy yet tangy alternative.

As for serving ideas, this refreshing slush pairs wonderfully with light summer dishes like grilled chicken skewers, fish tacos, or a simple salad topped with citrus vinaigrette. The bright, zesty flavors of the slush complement these dishes perfectly, making them an ideal pairing for a sunny day.

Storage, Make-Ahead & Reheating

This Frozen Orange Creamsicle Slush is best enjoyed fresh, but if you have leftovers, you can store them in an airtight container in the fridge for up to 2 days. Just keep in mind that the slush may lose some of its texture over time as the ice melts. It doesn’t freeze well, as the ice will turn into a solid block. If you must freeze it, blend again after thawing to restore the slushy consistency. This treat is best the day you make it, as the flavors meld together beautifully overnight, enhancing its deliciousness.

Frequently Asked Questions

Can I make Frozen Orange Creamsicle Slush ahead of time?

Yes — in fact, it tastes even better the next day as the flavors meld. However, it’s best to enjoy it fresh, as the texture can change if stored for too long. If you need to prepare it ahead, keep it in the fridge and re-blend before serving.

What kind of orange juice should I use?

For the best flavor, use freshly squeezed orange juice. However, if you’re short on time, opt for 100% pure store-bought juice without added sugars. This will ensure that your slush remains flavorful and refreshing.

Can I substitute the vanilla ice cream?

Absolutely! If you’re looking for a dairy-free option, coconut milk ice cream or a non-dairy vanilla ice cream can work wonderfully. They will still provide the creamy texture and sweetness you desire.

How can I adjust the sweetness of my slush?

You can easily adjust the sweetness by modifying the amount of sugar added. Start with 1/4 cup and taste the mixture before blending. If you prefer it sweeter, add more sugar gradually until it reaches your desired level.

What should I do if my slush is too thick?

If your slush is too thick, simply add a splash of milk or orange juice and blend again. This will help achieve a more drinkable consistency while maintaining the slushy texture. Adjust gradually to reach your preferred thickness.

Sun-Kissed Frozen Orange Cream Slush

Final Thoughts

The Frozen Orange Creamsicle Slush is a delightful blend of refreshing citrus and creamy goodness, making it a perfect treat for warm days or any time you crave a taste of nostalgia. The way the bright orange flavor dances with the creamy texture truly elevates this slush, transforming it into a satisfying escape from the everyday.

This is the kind of recipe I come back to again and again, especially when I’m looking to cool down or impress guests at a summer gathering. It’s simple to make and always brings smiles all around! I encourage you to try this recipe for yourself—don’t hesitate to share your results or even put your own spin on it. Happy slushing!

Print
clock clock iconcutlery cutlery iconflag flag iconfolder folder iconinstagram instagram iconpinterest pinterest iconfacebook facebook iconprint print iconsquares squares iconheart heart iconheart solid heart solid icon

Frozen Orange Creamsicle Slush


  • Author: Lily author
  • Total Time: 15 minutes
  • Yield: 4 servings 1x
Pin Recipe
Print Recipe

Description

This Frozen Orange Creamsicle Slush is a refreshing treat that combines creamy vanilla and zesty orange flavors. Perfect for hot summer days, it brings back nostalgic memories with every sip.


Ingredients

Scale
  • 2 cups orange juice (freshly squeezed or store-bought)
  • 1 cup vanilla ice cream
  • 1 cup crushed ice
  • 1/2 cup milk (whole or 2%)
  • 1/4 cup granulated sugar (adjust based on sweetness preference)
  • 1 teaspoon vanilla extract
  • Zest of 1 orange (for added flavor)
  • Fresh orange slices and mint leaves (for garnish)

Instructions

  1. Start by preparing your ingredients. Gather 2 cups of orange juice, 1 cup of vanilla ice cream, and 1 cup of crushed ice. Make sure the ice is finely crushed, as larger chunks can make blending difficult.
  2. In a blender, combine the orange juice, vanilla ice cream, crushed ice, and 1/2 cup of milk. Add 1/4 cup of granulated sugar and 1 teaspoon of vanilla extract. If you like a sweeter slush, consider adding a bit more sugar at this stage.
  3. Add the zest of 1 orange to the blender. This step is crucial for enhancing the citrus flavor of your slush. Make sure not to include the bitter white pith—only the flavorful zest.
  4. Blend the mixture on medium-high speed for about 30-45 seconds. Stop once the ingredients are fully combined and the slush has a smooth, even consistency. If you notice large chunks of ice, blend for an additional 10-15 seconds. Avoid over-blending, as this can make the slush too liquidy.
  5. Once blended, taste the slush. If it needs more sweetness, add a little more sugar and blend for a few more seconds. If it’s too thick, you can add a splash of milk to reach your desired consistency.
  6. Pour the slush into glasses. This recipe typically serves 4, but you can easily double it for larger gatherings. Use a spoon to help guide the slush into the glasses if needed.
  7. Garnish each serving with fresh orange slices and mint leaves. The mint not only adds a pop of color but also a refreshing aroma that complements the citrus flavors beautifully.
  8. Serve immediately and enjoy! If you’ve made extra, you can refrigerate it for a short time, but it's best enjoyed fresh.
  • Prep Time: 15 min
  • Cook Time: 0 min
  • Category: Dessert
  • Method: Blending
  • Cuisine: American

Nutrition

  • Serving Size: 1 serving
  • Calories: 200
  • Sugar: 30 g
  • Sodium: 50 mg
  • Fat: 5 g
  • Saturated Fat: 3 g
  • Unsaturated Fat: 2 g
  • Trans Fat: 0 g
  • Carbohydrates: 40 g
  • Fiber: 1 g
  • Protein: 2 g
  • Cholesterol: 20 mg

Keywords: Don't skip the orange zest! It's a game-changer for flavor. Always zest before juicing to make it easier.

Did you make this recipe?

Share a photo and tag us — we can't wait to see what you've made!

Zesty Lemon Poppy Seed Delight

One rainy afternoon, I found myself in my grandmother’s cozy kitchen, the kind that always smelled like warmth and love. She was whipping up her famous Lemon Poppy Seed Loaf, a recipe that had been passed down through generations. As the batter came together, the zesty aroma of fresh lemons filled the air, mingling perfectly with the nutty fragrance of poppy seeds. I can still picture her, apron-clad, as she expertly drizzled a vibrant citrus icing over the loaf, creating a glossy, sun-kissed finish that beckoned us to dive in. It was a moment that sparked my own passion for baking, and this recipe has become a cherished staple in my home ever since.

When you take a bite of this Lemon Poppy Seed Loaf, it’s like a burst of sunshine on your palate. The loaf is beautifully golden, with a tender crumb that melts in your mouth. Each slice is speckled with tiny poppy seeds, adding a delightful crunch that contrasts beautifully with the tangy sweetness of the lemon. And that citrus icing? It’s the finishing touch that elevates this loaf from ordinary to extraordinary, with its bright, zesty flavor dancing on your taste buds.

This recipe stands out because it embraces simplicity while delivering on flavor. I’ve added a hint of vanilla to the batter, enhancing the overall taste and making it even more indulgent. Trust me, once you make this Lemon Poppy Seed Loaf With Citrus Icing, it’ll become a go-to in your baking repertoire.

So, let me show you exactly how to make it!

Zesty Lemon Poppy Seed Delight

Why You’ll Love This Recipe

  • Moist and tender crumb that melts in your mouth, thanks to the perfect balance of butter and buttermilk.
  • Bright, zesty lemon flavor paired with crunchy poppy seeds, creating a delightful texture and taste experience.
  • Easy to whip up in just about an hour, perfect for last-minute gatherings or a cozy afternoon treat.
  • Budget-friendly with everyday ingredients, making it an accessible option for all home bakers.
  • The citrus icing adds a sweet tang that elevates the loaf, turning a simple recipe into a showstopper!

Ingredients

  • 1 ½ cups (190g) all-purpose flour
  • 1 teaspoon baking powder
  • ½ teaspoon baking soda
  • ½ teaspoon salt
  • 3 tablespoons poppy seeds
  • ½ cup (115g) unsalted butter, softened to room temperature
  • 1 cup (200g) granulated sugar
  • 2 large eggs
  • 1 teaspoon vanilla extract
  • 1 teaspoon lemon zest (from about 1 medium lemon)
  • ½ cup (120ml) buttermilk
  • 2 tablespoons fresh lemon juice

For the Citrus Icing:

  • 1 cup (120g) powdered sugar
  • 2 tablespoons fresh lemon juice
  • 1 tablespoon orange juice
  • 1 teaspoon lemon zest (for garnish, optional)

Let’s dive into the key ingredients that make this Lemon Poppy Seed Loaf so special. The all-purpose flour provides the structure and base for the loaf, while the baking powder and baking soda ensure it rises perfectly, giving the loaf a light texture. For a gluten-free variation, you could substitute the flour with a gluten-free all-purpose blend. Poppy seeds not only add a delightful crunch but also contribute to the unique flavor profile that pairs well with the citrus notes.

Unsalted butter is crucial for achieving the buttery richness that makes this loaf so moist. If you’re looking for a dairy-free option, coconut oil or a vegan butter can be used instead. The buttermilk is another essential component, providing acidity that activates the baking soda for a fluffy texture. If you don’t have buttermilk on hand, you can easily make a substitute by mixing ½ cup of milk with 1 tablespoon of vinegar or lemon juice and letting it sit for about 5 minutes.

Step-by-Step Instructions

  1. Preheat your oven to 350°F (175°C). Grease a 9×5-inch loaf pan or line it with parchment paper for easy removal later.
  2. In a medium mixing bowl, whisk together 1 ½ cups of all-purpose flour, 1 teaspoon of baking powder, ½ teaspoon of baking soda, ½ teaspoon of salt, and 3 tablespoons of poppy seeds. This helps to evenly distribute the baking agents and ensures a uniform rise.
  3. In a large mixing bowl, cream together ½ cup of softened unsalted butter and 1 cup of granulated sugar using an electric mixer on medium speed for about 3-4 minutes, until the mixture is light and fluffy. Make sure to scrape down the sides of the bowl occasionally.
  4. Add 2 large eggs, 1 teaspoon of vanilla extract, and 1 teaspoon of lemon zest to the creamed butter and sugar, mixing until fully combined. You want a smooth consistency, so ensure there are no lumps of butter.
  5. In a small bowl, combine ½ cup of buttermilk and 2 tablespoons of fresh lemon juice. Alternately add the dry ingredients and buttermilk mixture to the butter mixture, starting and ending with the dry ingredients. Mix just until combined; do not overmix, as this can lead to a dense loaf.
  6. Pour the batter into the prepared loaf pan. Smooth the top with a spatula, ensuring it’s even. Bake in the preheated oven for 50-60 minutes, or until a toothpick inserted in the center comes out clean. The edges should be lightly golden brown, and the center should feel just set.
  7. Once baked, remove the loaf from the oven and allow it to cool in the pan for about 10 minutes. Then, transfer it to a wire rack to cool completely. Resist the urge to slice too soon, as it will be crumbly if it’s still warm.
  8. While the loaf is cooling, prepare the citrus icing. In a medium bowl, whisk together 1 cup of powdered sugar, 2 tablespoons of fresh lemon juice, and 1 tablespoon of orange juice until smooth. If the icing is too thick, you can add a little more juice to reach your desired consistency.
  9. Once the loaf is completely cool, drizzle the citrus icing over the top. If you like, sprinkle with an additional teaspoon of lemon zest for an extra pop of flavor and color.

Pro Tips for the Best Lemon Poppy Seed Loaf With Citrus Icing

  • Be careful not to overmix your batter; this is a common mistake that can lead to a dense loaf. Mix just until the dry ingredients are incorporated for a light and fluffy texture.
  • Use room temperature ingredients, especially the butter and eggs. This helps to create a smoother batter and ensures even baking. Take your eggs out of the fridge about 30 minutes before you start.
  • For a more pronounced lemon flavor, consider adding a little lemon extract in addition to the zest and juice. Just a half teaspoon can elevate the citrus notes significantly.
  • When measuring your flour, spoon it into the measuring cup and level it off with a knife instead of scooping directly from the bag. This prevents packing and ensures you don’t end up with a dry loaf.
  • Invest in a good quality loaf pan; it makes a difference in heat distribution, which ensures even baking. If your pan is dark-coated, reduce the oven temperature by 25°F to prevent over-browning.

Variations & Serving Ideas

For a delightful twist, consider adding blueberries or raspberries to the batter for a fruity burst of flavor. You can also experiment with different citrus fruits—try lime or grapefruit zest and juice for a refreshing change. For a healthier option, substitute half of the all-purpose flour with whole wheat flour for added fiber without compromising too much on texture.

This Lemon Poppy Seed Loaf pairs beautifully with a light salad, such as a mixed greens salad with a vinaigrette, or a cup of tea for a cozy afternoon treat. It also complements a creamy cheese platter, as the acidity of the loaf balances rich cheeses perfectly. Lastly, a scoop of vanilla ice cream on the side creates a delightful contrast of temperatures and flavors!

Storage, Make-Ahead & Reheating

This Lemon Poppy Seed Loaf can be stored at room temperature for up to 3 days if wrapped tightly in plastic wrap. If you want to keep it longer, it freezes well for up to 3 months. To freeze, wrap the loaf tightly in plastic wrap and then in aluminum foil to prevent freezer burn.

When you’re ready to enjoy it again, simply thaw it in the fridge overnight. Reheat individual slices in the microwave for 15-20 seconds or in a toaster oven until warmed through. Interestingly, many people find that this loaf tastes even better the next day, as the flavors have time to meld!

Frequently Asked Questions

Can I make Lemon Poppy Seed Loaf With Citrus Icing ahead of time?

Yes — in fact, it tastes even better the next day! You can make the loaf a day in advance, allowing the flavors to develop. Just be sure to store it in an airtight container to maintain its moisture.

Can I substitute the poppy seeds?

Absolutely! If you don’t have poppy seeds on hand or prefer an alternative, you can use sesame seeds for a similar crunch or omit them entirely for a smooth loaf.

What can I use instead of buttermilk?

If you don’t have buttermilk, you can easily create a substitute by mixing ½ cup of milk (dairy or plant-based) with 1 tablespoon of vinegar or lemon juice. Let it sit for 5 minutes before using in the recipe.

How can I make this recipe gluten-free?

To make a gluten-free version of this Lemon Poppy Seed Loaf, substitute the all-purpose flour with a gluten-free all-purpose flour blend. Just ensure that the blend contains a binding agent like xanthan gum for the best results.

What is the best way to store leftover loaf?

Leftover Lemon Poppy Seed Loaf should be stored in an airtight container at room temperature for up to 3 days. For longer storage, wrap it tightly and freeze for up to 3 months. Thaw it before serving for the best texture.

Zesty Lemon Poppy Seed Delight

Final Thoughts

The Lemon Poppy Seed Loaf with Citrus Icing is truly a delightful treat that brings a burst of brightness to any occasion. The zesty lemon flavor combined with the subtle crunch of poppy seeds creates a satisfying balance, while the citrus icing adds a touch of sweetness that perfectly complements the loaf’s tanginess.

This is the kind of recipe I come back to again and again, especially when I want to brighten up a gloomy day or celebrate a small victory. The aroma that fills the kitchen as it bakes is absolutely heavenly! I encourage you to give this recipe a try; you might just find it becoming a beloved staple in your home. Don’t forget to share your results or even add your own unique twist—I can’t wait to see what you create!

Print
clock clock iconcutlery cutlery iconflag flag iconfolder folder iconinstagram instagram iconpinterest pinterest iconfacebook facebook iconprint print iconsquares squares iconheart heart iconheart solid heart solid icon

Lemon Poppy Seed Loaf


  • Author: Lily author
  • Total Time: 36 minute
  • Yield: 1 loaf 1x
Pin Recipe
Print Recipe

Description

This Lemon Poppy Seed Loaf is a delightful treat that combines zesty lemon flavor with crunchy poppy seeds. Topped with a citrus icing, it’s perfect for any occasion.


Ingredients

Scale
  • 1 ½ cups (190g) all-purpose flour
  • 1 teaspoon baking powder
  • ½ teaspoon baking soda
  • ½ teaspoon salt
  • 3 tablespoons poppy seeds
  • ½ cup (115g) unsalted butter, softened to room temperature
  • 1 cup (200g) granulated sugar
  • 2 large eggs
  • 1 teaspoon vanilla extract
  • 1 teaspoon lemon zest (from about 1 medium lemon)
  • ½ cup (120ml) buttermilk
  • 2 tablespoons fresh lemon juice
  • 1 cup (120g) powdered sugar
  • 2 tablespoons fresh lemon juice
  • 1 tablespoon orange juice
  • 1 teaspoon lemon zest (for garnish, optional)

Instructions

  1. Preheat your oven to 350°F (175°C). Grease a 9×5-inch loaf pan or line it with parchment paper for easy removal later.
  2. In a medium mixing bowl, whisk together 1 ½ cups of all-purpose flour, 1 teaspoon of baking powder, ½ teaspoon of baking soda, ½ teaspoon of salt, and 3 tablespoons of poppy seeds. This helps to evenly distribute the baking agents and ensures a uniform rise.
  3. In a large mixing bowl, cream together ½ cup of softened unsalted butter and 1 cup of granulated sugar using an electric mixer on medium speed for about 3-4 minutes, until the mixture is light and fluffy. Make sure to scrape down the sides of the bowl occasionally.
  4. Add 2 large eggs, 1 teaspoon of vanilla extract, and 1 teaspoon of lemon zest to the creamed butter and sugar, mixing until fully combined. You want a smooth consistency, so ensure there are no lumps of butter.
  5. In a small bowl, combine ½ cup of buttermilk and 2 tablespoons of fresh lemon juice. Alternately add the dry ingredients and buttermilk mixture to the butter mixture, starting and ending with the dry ingredients. Mix just until combined; do not overmix, as this can lead to a dense loaf.
  6. Pour the batter into the prepared loaf pan. Smooth the top with a spatula, ensuring it’s even. Bake in the preheated oven for 50-60 minutes, or until a toothpick inserted in the center comes out clean. The edges should be lightly golden brown, and the center should feel just set.
  7. Once baked, remove the loaf from the oven and allow it to cool in the pan for about 10 minutes. Then, transfer it to a wire rack to cool completely. Resist the urge to slice too soon, as it will be crumbly if it’s still warm.
  8. While the loaf is cooling, prepare the citrus icing. In a medium bowl, whisk together 1 cup of powdered sugar, 2 tablespoons of fresh lemon juice, and 1 tablespoon of orange juice until smooth. If the icing is too thick, you can add a little more juice to reach your desired consistency.
  9. Once the loaf is completely cool, drizzle the citrus icing over the top. If you like, sprinkle with an additional teaspoon of lemon zest for an extra pop of flavor and color.
  • Prep Time: 15 mins
  • Cook Time: 50-60 mins
  • Category: Dessert
  • Method: Baking
  • Cuisine: American

Nutrition

  • Serving Size: 1 slice
  • Calories: 200
  • Sugar: 15 g
  • Sodium: 150 mg
  • Fat: 8 g
  • Saturated Fat: 5 g
  • Unsaturated Fat: 3 g
  • Trans Fat: 0 g
  • Carbohydrates: 30 g
  • Fiber: 1 g
  • Protein: 3 g
  • Cholesterol: 40 mg

Keywords: Be careful not to overmix your batter; this is a common mistake that can lead to a dense loaf. Use room temperature ingredients for a smoother batter and even baking.

Did you make this recipe?

Share a photo and tag us — we can't wait to see what you've made!

  • Privacy Policy
  • Terms Of Service
  • Contact
  • About
  • GDPR

Copyright © 2025 Homesmad