Soft Baked Maple Donut Bars are about to become your new favorite way to enjoy a classic treat, reimagined! I’ve always been captivated by the comforting aroma and distinct taste of maple syrup, a flavor deeply embedded in the culinary traditions of North America, particularly during the crisp days of autumn. While the history of the fried donut spans centuries and continents, the concept of a baked donut bar offers a delightful modern twist, prioritizing convenience without sacrificing any of the beloved flavors or textures.
People absolutely adore this dish because it elegantly solves the mess and fuss often associated with traditional deep-frying. Imagine getting that same tender, cake-like crumb and sweet, irresistible glaze you crave, but in a simple, sliceable bar format! These bars deliver the perfect balance of soft texture and the rich, warming sweetness of pure maple.
Forget the individual shaping and hot oil; these Soft Baked Maple Donut Bars are wonderfully straightforward to prepare, making them ideal for a relaxed weekend breakfast, a charming brunch contribution, or an effortless dessert that tastes straight out of a cozy bakery. Get ready to fall in love with their incredible flavor and delightful ease!
Ingredients:
For the Soft Baked Maple Donut Bars:
- All-Purpose Flour: 2 cups (240g), meticulously sifted to ensure a light and airy texture in your final donut bars. Trust me, sifting makes all the difference!
- Granulated Sugar: 1 cup (200g), for that perfect touch of sweetness that complements the maple so beautifully.
- Baking Powder: 2 teaspoons, our leavening agent that helps these bars rise to a delightful, cake-like consistency.
- Salt: 1 teaspoon, a crucial ingredient that enhances all the other flavors, making them pop!
- Large Egg: 1, at room temperature. This is important for smooth emulsion and a well-incorporated batter.
- Whole Milk: 1 cup (240ml), also at room temperature. Again, temperature consistency helps with batter uniformity.
- Unsalted Butter: 1/2 cup (113g), which is one stick, melted and then allowed to cool slightly. We don’t want to scramble our egg!
- Vanilla Extract: 1 teaspoon, for that warm, comforting undertone that pairs wonderfully with maple.
For the Irresistible Maple Glaze:
- Powdered Sugar (Confectioners’ Sugar): 2 cups (240g), generously sifted to eliminate any lumps, ensuring a silky-smooth glaze.
- Pure Maple Syrup: 1/4 cup (60ml), please, pure maple syrup is non-negotiable here for authentic flavor. Don’t skimp on this!
- Whole Milk or Heavy Cream: 2-4 tablespoons, adjust as needed to achieve your desired glaze consistency. Cream will yield a richer glaze.
- Vanilla Extract: 1/2 teaspoon, to round out the sweetness and maple notes.
- Pinch of Salt: Just a tiny bit to balance the sweetness.
Instructions:
Phase 1: Preparing the Soft Baked Donut Bar Batter
- Preheat Your Oven and Prepare Your Pan: Let’s get our workspace ready! Begin by preheating your oven to 350°F (175°C). While the oven warms up, prepare a 9×13 inch baking pan. I like to grease it thoroughly with butter or a non-stick baking spray, then lightly dust it with flour, tapping out any excess. For an even easier removal and cleanup, you can line the bottom of the pan with parchment paper, leaving an overhang on the two longer sides to create “handles.” This will make lifting the finished bars out of the pan a breeze once they’re cooled. A well-prepared pan is key to preventing sticking and ensuring beautifully intact Soft Baked Maple Donut Bars.
- Combine the Dry Ingredients: In a large mixing bowl, the kind that gives you plenty of room to whisk, sift together your 2 cups of all-purpose flour, 1 cup of granulated sugar, 2 teaspoons of baking powder, and 1 teaspoon of salt. Sifting isn’t just a fancy step; it aerates the flour, preventing lumps and ensuring your baking powder and salt are evenly distributed. This leads to a much lighter, more consistent crumb in your donut bars. Whisk these dry ingredients together thoroughly for about 30 seconds to a minute, making sure everything is perfectly combined.
- Whisk the Wet Ingredients (Excluding Butter): In a separate, medium-sized bowl, whisk together your 1 large room-temperature egg, 1 cup of room-temperature whole milk, and 1 teaspoon of vanilla extract. Make sure to whisk until the egg is fully incorporated and the mixture is uniformly yellow. Room temperature ingredients are incredibly important here because they emulsify more easily, creating a smoother batter without overmixing, which can lead to tough donut bars. Set this delightful mixture aside for a moment.
- Incorporate the Cooled Melted Butter: Now, let’s bring in our star fat! Gently pour your slightly cooled, melted 1/2 cup of unsalted butter into the wet ingredient mixture you just prepared. Whisk it in until just combined. You don’t want to whisk vigorously here, just enough to ensure the butter is evenly distributed. We’re building layers of flavor and texture, and each step contributes to the ultimate soft, tender texture of our Soft Baked Maple Donut Bars.
- Combine Wet and Dry Ingredients with Care: This is a critical step, so pay close attention! Pour the entire wet ingredient mixture (milk, egg, vanilla, and butter) into the large bowl containing your sifted dry ingredients. Now, with a rubber spatula or a sturdy wooden spoon, gently fold the wet into the dry. The key here is to mix just until combined. You’ll see some small streaks of flour, and that’s perfectly okay – even desirable! Overmixing will develop the gluten in the flour too much, resulting in dense, chewy bars instead of the light, tender, cake-like texture we’re aiming for. It should be a relatively thick, pourable batter, almost like a very thick pancake batter, but definitely not thin and runny. Embrace those tiny lumps; they usually bake out beautifully.
- Fill the Prepared Pan: Carefully pour your beautifully prepared batter into the 9×13 inch baking pan that you prepared earlier. Use your spatula to gently spread the batter evenly across the bottom of the pan, making sure it reaches into all the corners. Give the pan a gentle tap or two on the counter to release any large air bubbles and help the batter settle perfectly flat. This ensures your Soft Baked Maple Donut Bars will have an even thickness and bake consistently.
Phase 2: Baking the Donut Bars
- Bake to Golden Perfection: Place your pan into the preheated 350°F (175°C) oven. The baking time will typically be between 20 to 28 minutes. Keep a watchful eye on them! Every oven is a little different, so yours might take a minute or two more or less. You’re looking for the edges to be lightly golden brown and the center to be set. The aroma filling your kitchen will be absolutely heavenly – a sure sign that deliciousness is on its way!
- Test for Doneness: To confirm your Soft Baked Maple Donut Bars are perfectly baked, insert a clean toothpick into the center of the bars. If it comes out clean or with only a few moist crumbs attached, they are done! If you see wet batter, pop them back in for another 2-3 minutes and test again. You want them cooked through but still wonderfully moist and tender, not dry or crumbly.
- Cooling is Crucial: Once baked, remove the pan from the oven and place it on a wire cooling rack. Allow the bars to cool in the pan for at least 15-20 minutes. This initial cooling period allows the bars to firm up slightly, preventing them from breaking when you attempt to remove them. After this, if you used parchment paper handles, gently lift the entire slab of donut bars out of the pan and transfer them directly onto the wire rack to cool completely. This could take an hour or two. Patience is a virtue here! Glazing warm bars will result in a messy, melted glaze rather than the beautiful, set finish we’re aiming for.
Resist the Urge to Glaze Warm!
Trust me on this one; a completely cool surface is essential for the perfect glaze application.
Phase 3: Preparing the Irresistible Maple Glaze
- Gather Glaze Ingredients: While your donut bars are cooling, it’s the perfect time to whip up our glorious maple glaze. Get out your powdered sugar, pure maple syrup, milk (or cream), vanilla extract, and that tiny pinch of salt. Having everything measured and ready will make the glazing process smooth and enjoyable.
- Sift the Powdered Sugar: In a medium bowl, sift the 2 cups of powdered sugar. Just like with the flour, sifting is non-negotiable for the glaze. It removes any pesky lumps, ensuring your glaze is smooth, uniform, and absolutely delightful. A lumpy glaze is no fun, and we want these Soft Baked Maple Donut Bars to be as perfect as possible!
- Combine Glaze Ingredients: To your sifted powdered sugar, add the 1/4 cup of pure maple syrup, 1/2 teaspoon of vanilla extract, and the tiny pinch of salt. Now, start by adding 2 tablespoons of milk or heavy cream. Whisk everything together thoroughly using a small whisk or a spoon. You’re looking for a consistency that is thick enough to coat the back of a spoon but still pourable.
Consistency is King!
If your glaze is too thick, add more milk or cream, one teaspoon at a time, whisking well after each addition until you reach your desired consistency. If, by some chance, it becomes too thin (it happens to the best of us!), you can whisk in another tablespoon or two of sifted powdered sugar to thicken it up. We want a glaze that sets nicely, creating a delicate, crackly shell on top of our bars.
- Taste and Adjust: Take a tiny taste of your glaze. Does it have that perfect balance of maple sweetness? If you desire a slightly stronger maple flavor, you can gently warm an extra tablespoon of maple syrup in a microwave-safe bowl for 10-15 seconds and stir it into the glaze. This little trick can really make the maple flavor sing without thinning the glaze too much. Just ensure it’s fully incorporated before moving on.
Phase 4: Glazing and Finishing Your Soft Baked Maple Donut Bars
- Ensure Bars Are Completely Cool: I cannot stress this enough – your Soft Baked Maple Donut Bars must be completely and utterly cool before you even think about applying that gorgeous glaze. If they are even slightly warm, the glaze will melt, run right off the sides, and create a sticky, sugary mess rather than a beautiful, set topping. Touch the bars. If they feel cool to the touch all over, you’re good to go! If there’s any residual warmth, walk away, make a cup of tea, and come back in a bit. Patience truly pays off here for that picture-perfect finish.
- Glaze the Bars Generously: Once your donut bars are perfectly cool on the wire rack (make sure to place the wire rack over a sheet of parchment paper or aluminum foil to catch any drips – cleanup will be so much easier!), pour the prepared maple glaze evenly over the entire surface of the bars. Using an offset spatula or the back of a spoon, gently spread the glaze to coat every inch, pushing it slightly towards the edges. Don’t worry if a little drips down the sides; that’s part of the charm! The goal is an even, luscious layer of maple goodness. The aroma alone will have you practically drooling!
- Add Optional Toppings: If you’re feeling fancy, now is the time to add any optional toppings while the glaze is still wet. Chopped pecans or walnuts add a lovely crunch and earthy flavor that complements maple beautifully. A sprinkle of flaky sea salt can also provide a wonderful contrast to the sweetness. Or, for a purely visual delight, some festive sprinkles can make these Soft Baked Maple Donut Bars even more appealing, especially if you’re serving them for a special occasion. Press them gently into the wet glaze so they adhere as it sets.
- Allow the Glaze to Set: Now for the final test of patience! Allow the glazed bars to sit undisturbed on the wire rack for at least 30 minutes, or even up to an hour, to allow the glaze to fully set and harden. This transforms the sticky liquid into a beautiful, slightly firm, sugary crust that provides the perfect contrast to the soft, tender interior of the donut bars. You’ll know it’s set when it’s no longer tacky to the touch. This step is essential for clean slices and easy handling.
- Cut and Serve: Once the glaze is completely set, transfer the entire slab of Soft Baked Maple Donut Bars to a clean cutting board. Using a sharp knife, carefully cut the bars into your desired size and shape. I usually go for 12 or 16 bars, but you can make them smaller for bite-sized treats or larger for a more indulgent portion. You might want to run your knife under hot water and wipe it clean between cuts for the neatest slices, especially through the set glaze. Arrange them beautifully on a platter and watch them disappear! These bars are best enjoyed fresh, but any leftovers can be stored in an airtight container at room temperature for up to 3 days, or in the refrigerator for up to 5 days. Though, honestly, they rarely last that long in my house! Enjoy every single soft, maple-infused bite!
Conclusion:
Well, there you have it, my friends! We’ve journeyed through the simple steps to create a truly remarkable treat, and I honestly can’t wait for you to experience the magic for yourselves. This isn’t just another dessert recipe; it’s an invitation to a moment of pure, unadulterated bliss that truly elevates your baking game without demanding hours of intricate work. I’ve fallen head over heels for these, and I’m confident you will too.
The reason this recipe is an absolute must-try boils down to a few irresistible factors that come together in perfect harmony. First, there’s that incredible texture – imagine a perfectly tender, pillow-soft crumb that practically melts in your mouth with every bite. It’s comforting, familiar, yet utterly luxurious. Then, let’s talk about the flavor profile. The rich, earthy sweetness of maple isn’t just a background note here; it sings, creating a cozy warmth that’s both sophisticated and wonderfully nostalgic. Paired with the subtle “donut” essence, it creates a unique experience that sets it apart from your average brownie or cake. This recipe delivers big on flavor and texture, transforming simple ingredients into something truly extraordinary. It’s also incredibly forgiving, making it perfect for bakers of all skill levels to achieve impressive results. Seriously, the ease with which you can achieve such a gourmet-tasting item is one of its biggest selling points. You don’t need fancy equipment or advanced techniques; just a desire to create something delicious that will impress everyone who tries it.
Elevate Your Enjoyment: Serving Suggestions and Variations
Now that you’re armed with the knowledge to bake these delightful treats, let’s talk about how to make them even more spectacular. While they are undeniably perfect straight from the pan, perhaps still a little warm with that gooey glaze, I have a few suggestions to truly elevate your experience. Imagine serving a square of this delightful creation alongside a steaming mug of strong coffee or a tall, frosty glass of milk – pure perfection. For a more indulgent presentation, consider a dollop of freshly whipped cream, perhaps infused with a hint of vanilla or a dusting of cinnamon, right on top. If you’re feeling adventurous, a scoop of vanilla bean ice cream could turn these into a truly show-stopping dessert for a dinner party, contrasting beautifully with the warm, soft bar. The slight chill of the ice cream against the warmth of the bar creates an absolutely divine temperature and texture contrast.
But why stop there? This recipe is wonderfully adaptable, allowing you to infuse your own creativity. While the maple glaze is iconic, you could experiment with a simple vanilla glaze for a milder sweetness, or even a brown butter glaze for an extra layer of nutty depth. A sprinkle of chopped toasted pecans or walnuts on top of the glaze would add a delightful crunch and complement the maple flavor beautifully. For a festive touch, especially around the holidays, a touch of pumpkin pie spice or apple pie spice mixed into the dry ingredients would transform these into an autumnal dream. You could also swirl in some cinnamon sugar after pouring the batter into the pan for a classic cinnamon roll vibe. Don’t be afraid to experiment with different extracts either; a touch of rum extract could add a sophisticated twist, or a hint of almond extract could bring another dimension to the overall flavor profile. These are incredibly versatile, meaning you can make them your own with just a few small tweaks. And if you’re making them for kids, a scattering of colorful sprinkles on the still-wet glaze always brings a smile and adds a playful touch that everyone will appreciate!
Your Baking Adventure Awaits!
So, there you have it, a comprehensive guide to mastering what I genuinely believe will become a new favorite in your recipe repertoire. I am absolutely thrilled for you to embark on this baking adventure. The sheer joy of pulling a pan of these beauties from the oven, smelling that incredible maple aroma filling your kitchen, is a reward in itself. But that first bite? Oh, that first bite is where the real magic happens. It’s an experience that’s worth every single moment spent in the kitchen, and trust me, it’s not many moments at all!
I wholeheartedly encourage you to give these Soft Baked Maple Donut Bars a try. Don’t hesitate, don’t overthink it – just gather your ingredients and let the delightful process unfold. And once you’ve tasted them, once you’ve savored that perfect blend of soft texture and sweet maple goodness, I would absolutely love to hear about your experience. Did you add a special twist? Did your family rave about them? Share your baking triumphs, your photos, and your thoughts in the comments below. Your feedback and stories are what truly bring these recipes to life for me, and for the entire community. Happy baking, my friends!
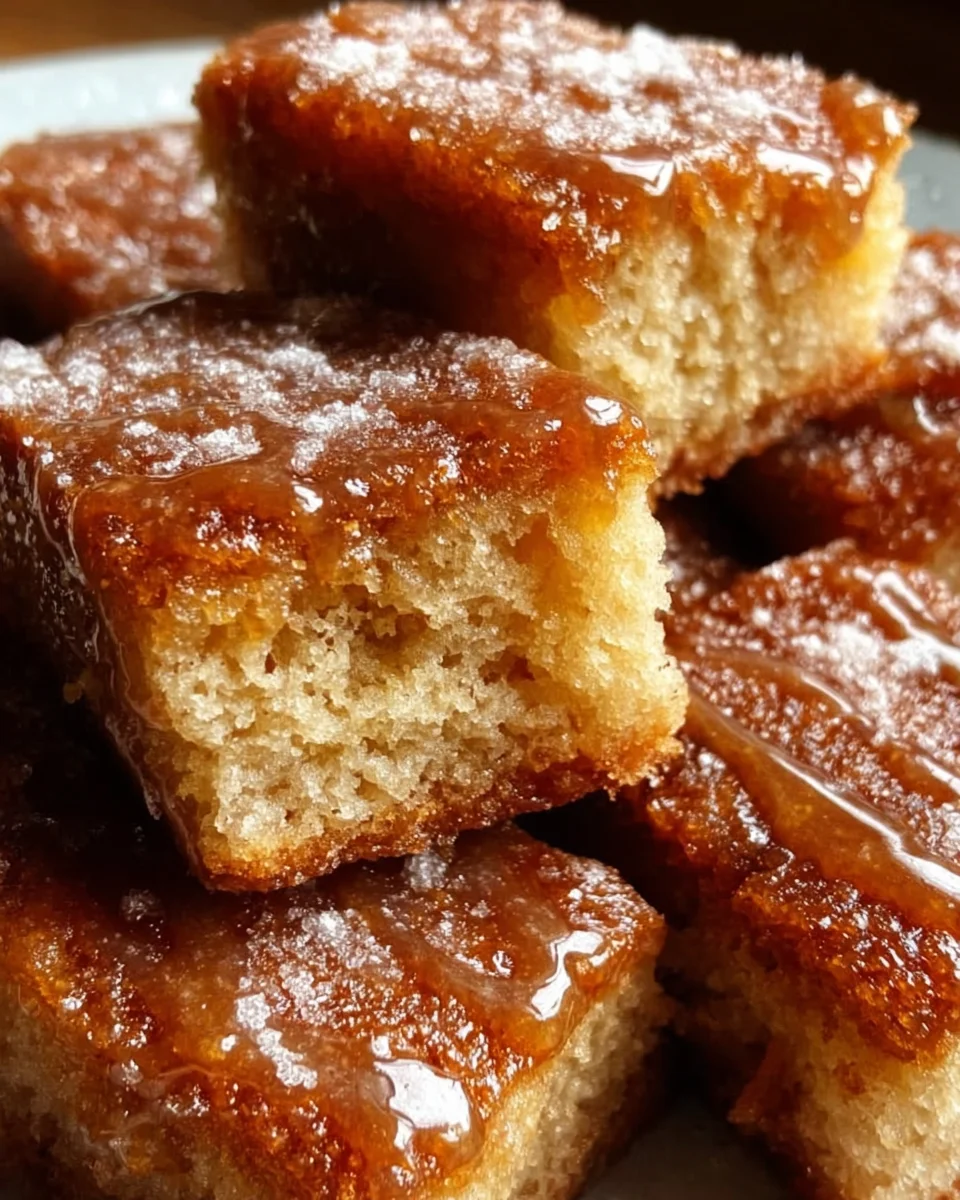
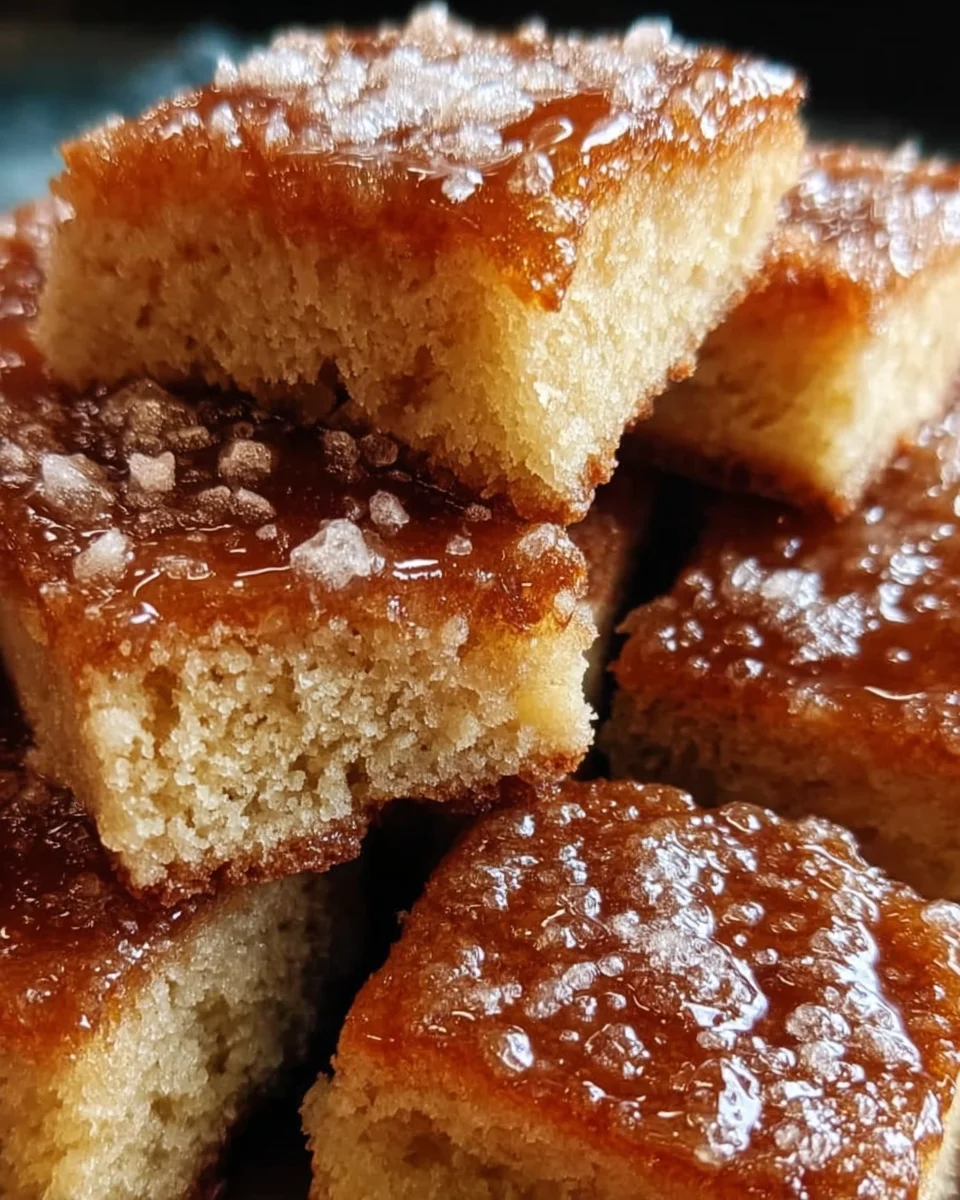
Soft Baked Maple Donut Bars
These Soft Baked Maple Donut Bars offer the comforting flavors of maple syrup in an easy-to-make, sliceable bar format. Enjoy a tender, cake-like crumb and an irresistible maple glaze without the mess of deep-frying, perfect for breakfast, brunch, or dessert.
Ingredients
Instructions
Important Information
Nutrition Facts (Per Serving)
It is important to consider this information as approximate and not to use it as definitive health advice.
Allergy Information
Please check ingredients for potential allergens and consult a health professional if in doubt.