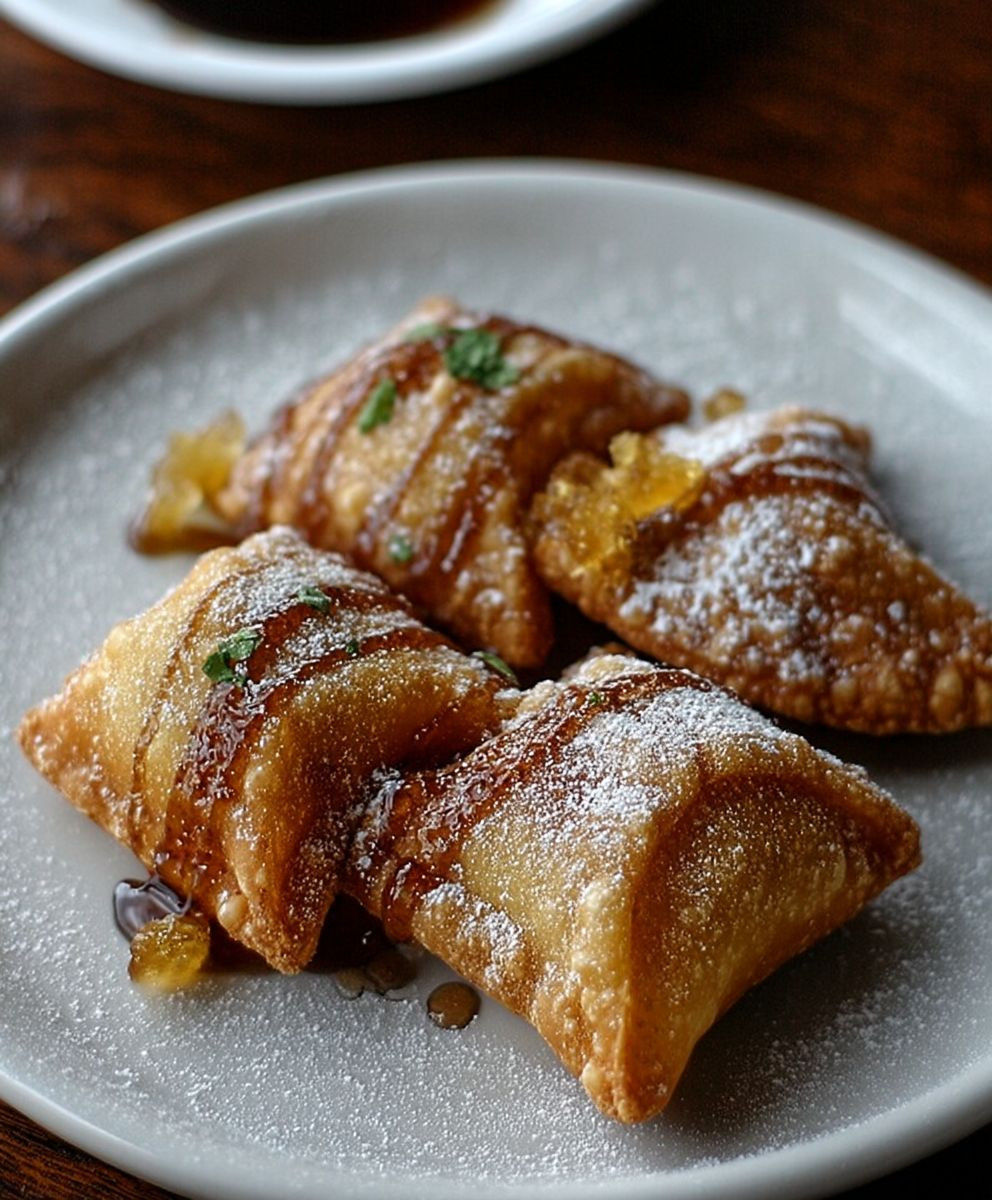
Sopaipillas: These golden, puffy pillows of fried dough are more than just a delicious treat; they’re a warm hug on a plate! Have you ever bitten into something so simple, yet so utterly satisfying? That’s the magic of a perfectly made sopaipilla.
Originating in New Mexico, sopaipillas have a rich history deeply intertwined with the region’s cultural heritage. Some believe they evolved from a similar fried bread brought by Spanish settlers, while others trace their roots back to Native American traditions. Regardless of their exact origins, these delightful pastries have become a beloved staple in Southwestern cuisine.
What makes sopaipillas so irresistible? It’s the combination of textures – the slightly crisp exterior giving way to a soft, airy interior. Then there’s the taste! While often enjoyed drizzled with honey, their mild flavor also makes them a fantastic accompaniment to savory dishes like stews and chili. They’re incredibly versatile, easy to make, and always a crowd-pleaser. Join me as we explore how to make these delightful treats in your own kitchen!

Ingredients:
- 2 cups all-purpose flour, plus more for dusting
- 1 teaspoon baking powder
- 1 teaspoon salt
- 2 tablespoons shortening or lard
- 1 cup warm water
- Vegetable oil, for frying
- Your favorite toppings: honey, powdered sugar, cinnamon sugar, syrup, or savory toppings like salsa or chili
Preparing the Dough: The Foundation of Deliciousness
Okay, let’s get started! Making sopaipillas is easier than you might think, and the reward is a warm, puffy, golden-brown treat. The key is in the dough, so let’s focus on getting that just right.
- Combine Dry Ingredients: In a large bowl, whisk together the 2 cups of all-purpose flour, 1 teaspoon of baking powder, and 1 teaspoon of salt. Make sure everything is evenly distributed. This ensures that the baking powder will work its magic and give us those lovely, airy sopaipillas.
- Cut in the Shortening: Add the 2 tablespoons of shortening (or lard, if you’re feeling traditional!) to the flour mixture. Now, this is where your hands come in handy. Use your fingertips to rub the shortening into the flour until the mixture resembles coarse crumbs. You can also use a pastry blender if you have one, but I find that using my fingers gives me the best control. The goal is to break down the shortening into small pieces so that it’s evenly distributed throughout the flour. This will help create a tender and flaky dough.
- Add Warm Water: Gradually add the 1 cup of warm water to the flour mixture, mixing with a wooden spoon or your hands until a dough forms. Be careful not to add all the water at once! You might need a little more or a little less, depending on the humidity and the type of flour you’re using. The dough should be soft and slightly sticky, but not overly wet.
- Knead the Dough: Turn the dough out onto a lightly floured surface. Knead the dough for about 5-7 minutes, or until it becomes smooth and elastic. Kneading develops the gluten in the flour, which gives the sopaipillas their structure. If the dough is too sticky, add a little more flour, a tablespoon at a time, until it’s manageable. If it’s too dry, add a teaspoon of water at a time.
- Let the Dough Rest: Place the kneaded dough back in the bowl, cover it with a clean kitchen towel or plastic wrap, and let it rest for at least 30 minutes. This allows the gluten to relax, making the dough easier to roll out. You can even let it rest for up to an hour for even better results. Trust me, this resting period is crucial for achieving those light and airy sopaipillas.
Rolling and Cutting: Shaping Your Sopaipillas
Now that our dough has rested, it’s time to roll it out and cut it into those signature sopaipilla shapes. This part is all about precision and consistency, so take your time and enjoy the process.
- Prepare Your Work Surface: Lightly flour your work surface. This will prevent the dough from sticking and make it easier to roll out.
- Divide the Dough: Divide the dough in half. This makes it easier to manage and roll out. Keep the other half covered while you’re working with the first half to prevent it from drying out.
- Roll Out the Dough: Using a rolling pin, roll out the dough to about 1/8-inch thickness. You want it thin enough to puff up nicely when fried, but not so thin that it tears easily. Aim for a consistent thickness throughout the dough.
- Cut into Shapes: Use a pizza cutter or a sharp knife to cut the dough into squares, triangles, or diamonds. Traditionally, sopaipillas are cut into squares or triangles, but feel free to get creative! I usually aim for pieces that are about 2-3 inches in size.
- Repeat with Remaining Dough: Repeat the rolling and cutting process with the remaining dough.
Frying: The Magic of the Puff
This is where the magic happens! Frying the sopaipillas is what gives them their signature puff and golden-brown color. It’s important to maintain the right oil temperature to ensure they cook evenly and don’t get greasy.
- Heat the Oil: Pour about 2-3 inches of vegetable oil into a large, heavy-bottomed pot or deep fryer. Heat the oil over medium-high heat to 350-375°F (175-190°C). Use a thermometer to monitor the oil temperature. If the oil is too hot, the sopaipillas will burn on the outside before they cook through. If it’s not hot enough, they’ll absorb too much oil and become greasy.
- Test the Oil: Before frying a whole batch, test the oil by dropping in a small piece of dough. If it puffs up and turns golden brown in about 1-2 minutes, the oil is ready.
- Fry the Sopaipillas: Carefully drop a few sopaipillas into the hot oil, being careful not to overcrowd the pot. Overcrowding will lower the oil temperature and result in greasy sopaipillas.
- Flip and Cook: Fry the sopaipillas for about 1-2 minutes per side, or until they are golden brown and puffed up. Use a slotted spoon or tongs to flip them over and ensure they cook evenly. You’ll notice them puffing up almost immediately – it’s so satisfying to watch!
- Remove and Drain: Remove the fried sopaipillas from the oil with a slotted spoon or tongs and place them on a wire rack lined with paper towels to drain excess oil.
- Repeat: Repeat the frying process with the remaining sopaipillas.
Serving: The Sweetest Part
Now for the best part – enjoying your freshly made sopaipillas! There are so many ways to serve them, from classic sweet toppings to savory delights. Here are a few of my favorites:
- Sweet Toppings: Drizzle with honey, sprinkle with powdered sugar, or coat in cinnamon sugar. These are the classic toppings for a reason – they’re simple, delicious, and perfectly complement the warm, puffy sopaipillas.
- Savory Toppings: Serve with salsa, chili, or guacamole. Don’t underestimate the savory side of sopaipillas! They make a fantastic base for all sorts of toppings.
- Honey Butter: Mix softened butter with honey and spread on warm sopaipillas. This is a decadent and irresistible treat.
- Syrup: Drizzle with your favorite syrup, like maple syrup or agave nectar.
- Ice Cream: Serve warm sopaipillas with a scoop of vanilla ice cream for a truly indulgent dessert.
Tips for Perfect Sopaipillas:
- Don’t Overwork the Dough: Overworking the dough will result in tough sopaipillas. Knead it just until it’s smooth and elastic.
- Maintain Oil Temperature: Keeping the oil at the right temperature is crucial for achieving perfectly puffed and golden-brown sopaipillas.
- Don’t Overcrowd the Pot: Frying too many sopaipillas at once will lower the oil temperature and result in greasy sopaipillas.
- Serve Immediately: Sopaipillas are best served warm and fresh.
Storage:
If you have any leftover sopaipillas (which is unlikely!), you can store them in an airtight container at room temperature for up to 2 days. Reheat them in the oven or microwave before serving.
Variations:
Feel free to experiment with different flavors and toppings! You can add spices like cinnamon or nutmeg to the dough, or try using different types of flour. The possibilities are endless!
Enjoy your homemade sopaipillas! I hope this recipe helps you create a delicious and memorable treat for yourself and your loved ones.
Conclusion:
Okay, friends, let’s recap why you absolutely *need* to make these sopaipillas. Seriously, stop what you’re doing (after you finish reading this, of course!) and add the ingredients to your grocery list. This isn’t just another fried dough recipe; it’s a warm, comforting hug in the form of a crispy, golden pillow. The slightly chewy interior, the delicate sweetness, and the endless possibilities for toppings make this a truly unforgettable treat. It’s a taste of tradition, a celebration of simple ingredients, and a guaranteed crowd-pleaser.
But beyond the deliciousness, making these sopaipillas is about creating memories. It’s about gathering in the kitchen, laughing as you roll out the dough (don’t worry if they’re not perfect circles!), and sharing the joy of creating something special together. It’s a recipe that’s been passed down through generations, and now it’s your turn to add your own personal touch.
Serving Suggestions and Variations:
The beauty of sopaipillas lies in their versatility. While the classic honey drizzle is always a winner, don’t be afraid to experiment!
* Sweet Sensations: Dust them with powdered sugar, cinnamon sugar, or a combination of both. Drizzle with chocolate sauce, caramel sauce, or even a fruit compote. A scoop of vanilla ice cream on top takes them to a whole new level of indulgence.
* Savory Delights: For a savory twist, try filling them with seasoned ground beef, shredded chicken, or black beans. Top with salsa, guacamole, sour cream, and cheese for a delicious and satisfying meal. You can even use them as a base for mini pizzas!
* Regional Flair: In some regions, sopaipillas are served with a spicy red chile sauce. If you’re feeling adventurous, give it a try! The combination of sweet and spicy is surprisingly addictive.
* Holiday Cheer: During the holidays, add a touch of pumpkin spice to the dough for a festive flavor. Serve with a dollop of whipped cream and a sprinkle of nutmeg.
Don’t Be Afraid to Experiment!
The possibilities are truly endless. Let your creativity run wild and discover your own favorite ways to enjoy these delightful treats. Think about what flavors you love and how you can incorporate them into your sopaipilla creations. Maybe a lemon zest in the dough? Or a sprinkle of sea salt on top? The only limit is your imagination!
I truly believe that everyone should experience the joy of making and eating sopaipillas. It’s a simple recipe, but it’s packed with flavor and tradition. So, gather your ingredients, put on some music, and get ready to have some fun in the kitchen.
I can’t wait to hear about your sopaipilla adventures! Did you try a unique topping? Did you make them for a special occasion? Share your photos and stories in the comments below. Let’s create a community of sopaipilla lovers and inspire each other with our culinary creations. Happy cooking! I know you’ll love this recipe as much as I do. Enjoy!
Sopaipillas: The Ultimate Guide to Making Perfect Fried Dough
Light, airy fried pastries, delicious with sweet or savory toppings.
Ingredients
Instructions
Recipe Notes
- Don’t overwork the dough.
- Maintain oil temperature between 350-375°F (175-190°C).
- Don’t overcrowd the pot when frying.
- Serve immediately for the best taste.
- Leftovers can be stored in an airtight container at room temperature for up to 2 days. Reheat before serving.
- Experiment with different flavors and toppings.