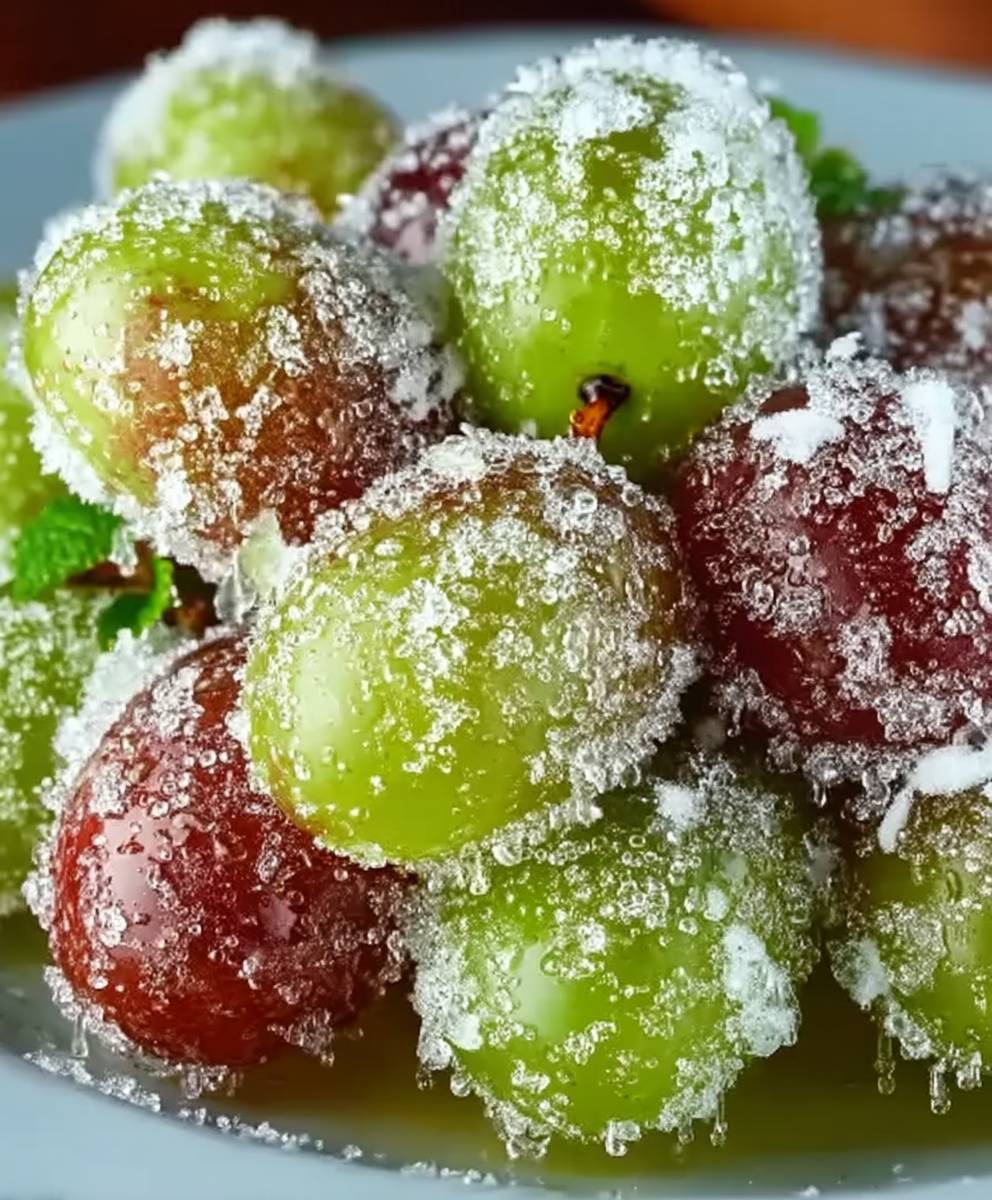
Sour Candy Frozen Grapes: Prepare to experience a taste sensation that will redefine your snacking game! Imagine the crisp, refreshing sweetness of a perfectly ripe grape, now amplified with a tangy, lip-puckering sour candy coating, all transformed into a delightful frozen treat. This isn’t just a snack; it’s an experience.
While the exact origins of this particular frozen delight are shrouded in modern-day culinary experimentation (likely born from a TikTok trend!), the concept of preserving fruit through freezing has been around for centuries. Cultures worldwide have long utilized cold temperatures to extend the shelf life of their harvests, and what better way to enjoy the natural sweetness of grapes than with a playful, contemporary twist?
What makes sour candy frozen grapes so irresistible? It’s the perfect marriage of contrasting flavors and textures. The initial burst of sourness gives way to the juicy sweetness of the grape, while the frozen state provides an incredibly satisfying crunch. They’re incredibly easy to make, requiring minimal ingredients and effort, making them the ideal treat for busy weeknights, summer gatherings, or simply satisfying a sweet and sour craving. Plus, they’re a fun and healthier alternative to traditional candy, allowing you to indulge without the guilt. Get ready to pucker up and enjoy!

Ingredients:
- 2 pounds seedless green grapes, washed and thoroughly dried
- 1 (3 ounce) package of sour gelatin powder (such as Jell-O), any flavor
- 1/4 cup granulated sugar
- 1/4 cup water
- Optional: Additional sour sanding sugar for coating
Preparing the Sour Coating:
Okay, let’s get started with the most important part – the sour coating! This is what gives our frozen grapes that irresistible zing. We’re going to create a sticky, sour mixture that will cling beautifully to the grapes.
- Combine the Sour Gelatin and Sugar: In a medium-sized bowl, whisk together the sour gelatin powder and the granulated sugar. Make sure there are no lumps of gelatin. This ensures an even coating later on. I like to use a whisk for this, but a fork works just fine too. Just be thorough!
- Add Water to Create a Paste: Gradually add the water to the gelatin and sugar mixture, stirring constantly. You want to create a thick paste. Don’t add all the water at once, or you might end up with a runny mixture. Add it slowly and mix until you achieve a consistency similar to a thick syrup or a thin paste. It should be easily spreadable but not watery.
- Adjust Consistency if Needed: If the mixture is too thick, add a tiny bit more water, a teaspoon at a time, until you reach the desired consistency. If it’s too thin, add a little more gelatin powder, about a half-teaspoon at a time. Remember, we want a paste that will stick to the grapes!
- Let the Mixture Sit: Allow the sour mixture to sit for about 5 minutes. This allows the gelatin to fully dissolve and the mixture to thicken slightly. This step is important for ensuring the coating adheres well to the grapes.
Coating the Grapes:
Now for the fun part! We’re going to coat each grape individually with our sour mixture. This can be a little messy, but trust me, it’s worth it!
- Prepare Your Workspace: Line a baking sheet with parchment paper or a silicone baking mat. This will prevent the grapes from sticking to the sheet while they freeze. Trust me, you don’t want to skip this step!
- Dip Each Grape: Take a grape and dip it into the sour gelatin mixture. Use a fork or your fingers (clean hands, of course!) to ensure the grape is completely coated. You want a nice, even layer of the sour mixture all around the grape.
- Place on Baking Sheet: Place the coated grape on the prepared baking sheet. Make sure the grapes aren’t touching each other, or they might freeze together in a big clump.
- Repeat: Repeat steps 2 and 3 for all the remaining grapes. This might take a little while, but be patient! The end result is totally worth it.
- Optional: Add Sour Sanding Sugar: If you want an extra layer of sourness and a bit of texture, sprinkle the coated grapes with sour sanding sugar before freezing. This is totally optional, but I highly recommend it! It adds a fantastic crunch and an extra burst of sour flavor.
Freezing the Grapes:
This is where the magic happens! Freezing the grapes transforms them into little balls of sour, icy goodness. It’s important to freeze them properly to prevent them from sticking together and to ensure they have the perfect texture.
- Flash Freeze: Place the baking sheet with the coated grapes in the freezer for at least 2 hours, or preferably overnight. This “flash freezing” process helps to prevent the grapes from clumping together.
- Transfer to a Freezer Bag: Once the grapes are frozen solid, transfer them to a freezer bag or an airtight container. This will help to prevent freezer burn and keep them fresh for longer.
- Store in the Freezer: Store the frozen grapes in the freezer for at least another 2 hours before serving. This allows them to fully freeze and develop that perfect icy texture.
Serving and Storage:
Finally, the moment we’ve all been waiting for! It’s time to enjoy our sour candy frozen grapes. These are perfect for a hot summer day, a fun snack, or even a party appetizer.
- Serving: Serve the frozen grapes directly from the freezer. They’re best enjoyed when they’re still icy cold. You can serve them in a bowl, on a platter, or even on skewers for a fun presentation.
- Storage: Store any leftover frozen grapes in the freezer bag or airtight container in the freezer. They will keep for several weeks, but they’re best enjoyed within a month for optimal flavor and texture.
- Thawing: I don’t recommend thawing the grapes. They’re best enjoyed frozen. If they thaw, they will become mushy and lose their texture.
Tips and Tricks for Perfect Sour Candy Frozen Grapes:
Here are a few extra tips and tricks to help you make the best sour candy frozen grapes ever!
- Choose the Right Grapes: Use seedless green grapes that are firm and plump. Avoid grapes that are soft or wrinkled. The quality of the grapes will directly impact the final product.
- Dry the Grapes Thoroughly: Make sure the grapes are completely dry before coating them. This will help the sour mixture adhere better. You can use a paper towel to pat them dry.
- Don’t Overcrowd the Baking Sheet: Make sure the grapes aren’t touching each other on the baking sheet. This will prevent them from freezing together.
- Use Different Flavors of Gelatin: Experiment with different flavors of sour gelatin to create a variety of sour candy frozen grapes. Lime, lemon, and green apple are all great options.
- Add a Touch of Sweetness: If you find the sourness too intense, you can add a little bit more sugar to the gelatin mixture.
- Get Creative with Coatings: Try coating the grapes with other things besides sour gelatin, such as crushed freeze-dried fruit or even a thin layer of melted white chocolate.
- Make Them Ahead of Time: These grapes are perfect for making ahead of time. You can prepare them a day or two in advance and store them in the freezer until you’re ready to serve them.
- Perfect for Parties: Sour candy frozen grapes are a fun and unique treat to serve at parties. They’re sure to be a hit with both kids and adults.
- Healthy-ish Treat: While they do contain sugar, these grapes are a relatively healthy treat compared to other candies. They’re packed with vitamins and antioxidants.
Troubleshooting:
Sometimes things don’t go exactly as planned. Here are a few common problems and how to fix them.
- Grapes are Sticking Together: This usually happens if the grapes weren’t frozen quickly enough or if they were touching each other on the baking sheet. Make sure to flash freeze them and space them out properly.
- Sour Mixture is Too Thin: Add a little more gelatin powder to thicken it up.
- Sour Mixture is Too Thick: Add a little more water to thin it out.
- Grapes are Too Sour: Add a little more sugar to the gelatin mixture.
- Grapes are Not Sour Enough: Use a more concentrated sour gelatin or add sour sanding sugar.
Variations:
Want to mix things up? Here are a few variations you can try.
- Spicy Sour Grapes: Add a pinch of cayenne pepper to the sour gelatin mixture for a spicy kick.
- Tropical Sour Grapes: Use a tropical-flavored gelatin, such as pineapple or mango.
- Rainbow Sour Grapes: Use different colors of gelatin to create a rainbow effect.
- Chocolate-Covered Sour Grapes: Dip the frozen sour grapes in melted chocolate for a decadent treat.
Enjoy Your Sour Candy Frozen Grapes!
I hope you enjoy making and eating these sour candy frozen grapes as much as I do! They’re a fun, easy, and delicious treat that’s perfect for any occasion. Let me know in the comments if you try this recipe and what you think!
Conclusion:
So, there you have it! These Sour Candy Frozen Grapes are truly a revelation, and I wholeheartedly believe you need to experience this tangy, sweet, and icy treat for yourself. Why is this recipe a must-try? Because it’s ridiculously easy, requires minimal ingredients, satisfies your sweet and sour cravings in a healthier way than actual sour candy, and is just plain fun to make and eat! Seriously, what’s not to love?
Think of it: you get the natural sweetness of grapes, amplified by the puckering power of your favorite sour candy coating, all transformed into a refreshing frozen bite. It’s the perfect afternoon snack, a delightful dessert alternative, or even a quirky addition to your next party spread. Forget boring fruit platters; bring out a bowl of these vibrant, sour-sweet gems, and watch them disappear!
But the fun doesn’t stop there! The beauty of this recipe lies in its versatility. Feel free to experiment with different types of grapes – green, red, or black all work wonderfully. Each variety offers a slightly different flavor profile that complements the sour candy in its own unique way. Try using seedless grapes for an even smoother eating experience.
And speaking of sour candy, don’t limit yourself to just one kind! Explore the world of sour powders and coatings. From classic sour apple and blue raspberry to more exotic flavors like sour watermelon or even spicy chili lime, the possibilities are endless. You can even create a mix of different sour candies for a truly customized flavor explosion.
For serving suggestions, consider pairing these frozen grapes with a creamy dip like Greek yogurt or whipped cream to balance the tartness. Or, add them to your favorite cocktails or mocktails for a refreshing and flavorful twist. Imagine dropping a few of these into a glass of sparkling water or lemonade – instant upgrade! They’re also fantastic as a topping for ice cream or frozen yogurt.
If you’re feeling adventurous, try dipping the frozen grapes in melted chocolate after they’ve been coated in sour candy. The combination of sweet, sour, and rich is simply divine! You could even sprinkle them with chopped nuts or sprinkles for an extra touch of indulgence.
I’m absolutely confident that you’ll love this recipe as much as I do. It’s a guaranteed crowd-pleaser, and it’s so simple that even the most novice cook can whip up a batch in minutes. Plus, it’s a great way to get kids involved in the kitchen and encourage them to eat more fruit.
So, what are you waiting for? Gather your ingredients, head to the kitchen, and prepare to be amazed by the magic of Sour Candy Frozen Grapes. I promise you won’t be disappointed.
And most importantly, I want to hear about your experience! Once you’ve tried this recipe, please share your photos and comments. Let me know what variations you tried, what your favorite flavor combinations are, and how much you enjoyed them. Your feedback is invaluable, and it helps me create even more delicious and exciting recipes for you to enjoy. Happy snacking!
Sour Candy Frozen Grapes: A Refreshing & Tangy Treat
Tangy frozen grapes coated in a sour gelatin mixture for a refreshing homemade candy.
Ingredients
Instructions
Recipe Notes
- Use firm, plump, seedless green grapes.
- Ensure grapes are completely dry before coating.
- Don’t overcrowd the baking sheet.
- Experiment with different flavors of sour gelatin.
- Add more sugar if the sourness is too intense.
- These grapes are perfect for making ahead of time.
- Do not thaw the grapes.