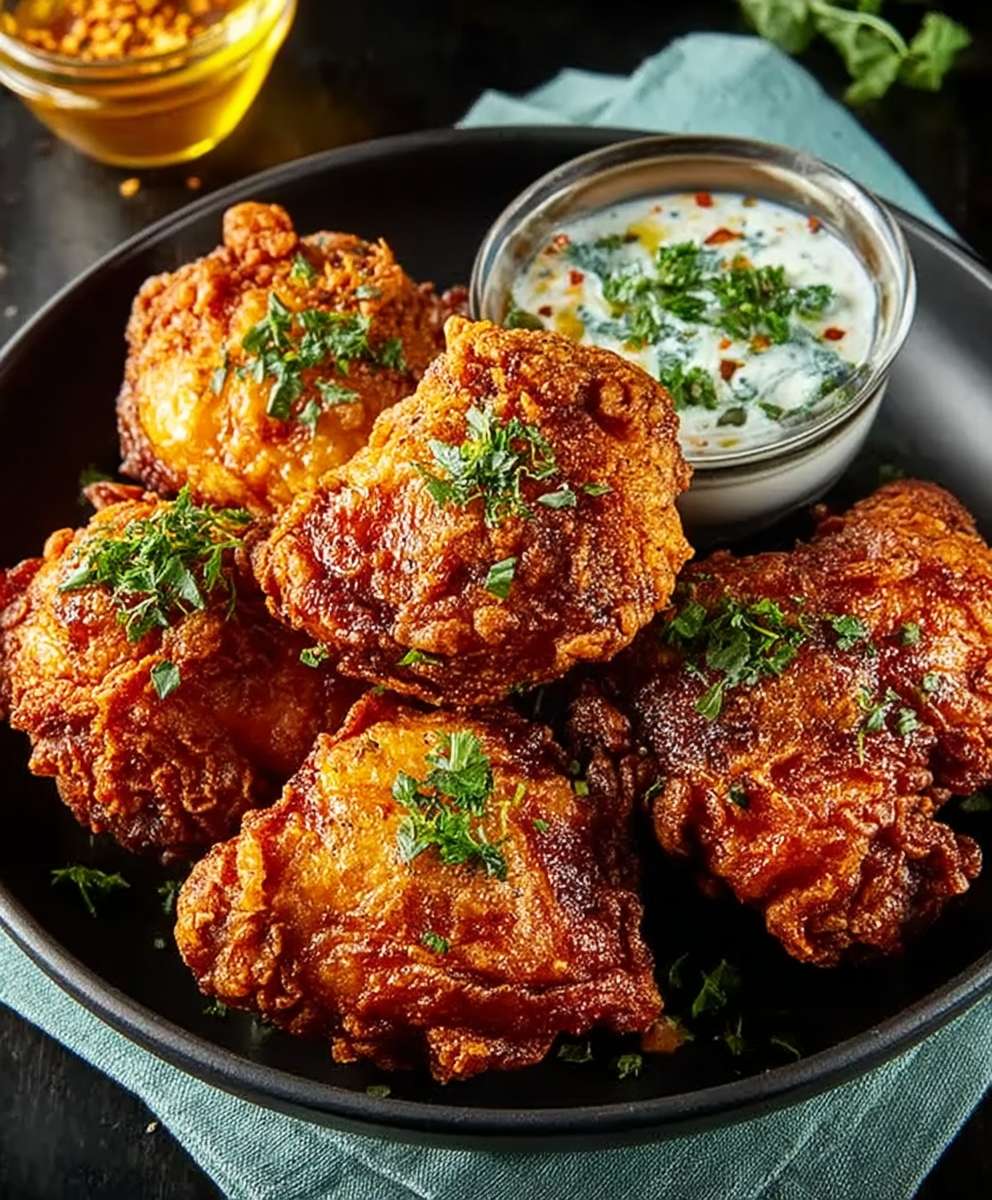
Spicy Buttermilk Fried Chicken, oh, where do I even begin? Imagine sinking your teeth into a piece of perfectly crispy, golden-brown chicken, the initial crunch giving way to a juicy, tender interior bursting with flavor and a delightful kick of heat. That, my friends, is the magic of this recipe, and I’m thrilled to share it with you!
Fried chicken, in its various forms, has a rich and fascinating history, particularly in the American South. It evolved from Scottish and West African culinary traditions, becoming a staple and a symbol of Southern comfort food. But this isn’t just any fried chicken; the buttermilk marinade adds a tangy tenderness, while the blend of spices elevates it to a whole new level of deliciousness.
People adore this dish for so many reasons. The combination of textures – the satisfying crunch of the coating and the succulent juiciness of the chicken – is simply irresistible. The buttermilk tenderizes the chicken, ensuring it’s incredibly moist, and the spices provide a warm, inviting heat that tantalizes the taste buds. Plus, let’s be honest, who can resist the sheer comfort and indulgence of perfectly fried chicken? This Spicy Buttermilk Fried Chicken recipe is guaranteed to be a crowd-pleaser, perfect for family gatherings, potlucks, or simply a satisfying weeknight meal. Get ready to experience fried chicken like never before!

Ingredients:
- For the Brine:
- 4 cups buttermilk
- 1/4 cup kosher salt
- 2 tablespoons sugar
- 1 tablespoon hot sauce (such as Frank’s RedHot)
- 1 tablespoon smoked paprika
- 1 tablespoon garlic powder
- 1 tablespoon onion powder
- 1 teaspoon cayenne pepper
- 1 teaspoon black pepper
- 1 teaspoon dried thyme
- 1 teaspoon dried oregano
- 1 (3-4 pound) chicken, cut into 8 pieces (2 breasts, 2 thighs, 2 drumsticks, 2 wings)
- For the Dredge:
- 3 cups all-purpose flour
- 1/2 cup cornstarch
- 2 tablespoons smoked paprika
- 2 tablespoons garlic powder
- 2 tablespoons onion powder
- 1 tablespoon cayenne pepper
- 1 tablespoon black pepper
- 1 tablespoon dried thyme
- 1 tablespoon dried oregano
- 1 teaspoon baking powder
- 1 teaspoon baking soda
- 1 teaspoon salt
- For Frying:
- 4-6 cups vegetable oil, for frying
Preparing the Chicken and Brine:
- First, let’s get that chicken ready for its spicy buttermilk bath! In a large bowl (or a resealable plastic bag – gallon size works great), whisk together the buttermilk, salt, sugar, hot sauce, smoked paprika, garlic powder, onion powder, cayenne pepper, black pepper, thyme, and oregano. Make sure everything is well combined. This is going to be our flavor bomb!
- Now, add the chicken pieces to the buttermilk mixture. Make sure all the pieces are submerged. If you’re using a bowl, you might need to weigh them down with a plate to keep them under the liquid. This ensures even flavor penetration.
- Cover the bowl (or seal the bag) and refrigerate for at least 4 hours, or preferably overnight. The longer it brines, the more tender and flavorful the chicken will be. I usually aim for 12-24 hours for maximum deliciousness.
Preparing the Dredge:
- While the chicken is brining (or right before you’re ready to fry), let’s prepare the dredge. In a large, shallow dish (a baking dish or a large pie plate works well), whisk together the flour, cornstarch, smoked paprika, garlic powder, onion powder, cayenne pepper, black pepper, thyme, oregano, baking powder, baking soda, and salt.
- Make sure everything is evenly distributed. The cornstarch helps create a crispy crust, while the baking powder and baking soda contribute to a light and airy texture. The spices, of course, are what give it that amazing spicy kick!
Dredging the Chicken:
- Remove the chicken pieces from the buttermilk brine, allowing any excess to drip off. Don’t pat them dry – we want that moisture to help the flour adhere.
- One piece at a time, dredge the chicken in the flour mixture, making sure to coat it thoroughly on all sides. Press the flour into the chicken to ensure a good coating.
- Place the dredged chicken on a wire rack. This allows air to circulate around the chicken, which helps the coating dry out slightly and become even crispier when fried.
- Repeat the dredging process with all the chicken pieces.
- For an extra crispy crust (and I highly recommend this!), you can double-dredge the chicken. Dip each piece back into the buttermilk brine (briefly!), then back into the flour mixture. This creates an even thicker and more flavorful crust.
- Let the dredged chicken rest on the wire rack for about 15-20 minutes before frying. This allows the coating to adhere even better and prevents it from falling off during frying.
Frying the Chicken:
- Pour the vegetable oil into a large, heavy-bottomed pot or Dutch oven. You want enough oil to completely submerge the chicken pieces.
- Heat the oil over medium-high heat to 325-350°F (160-175°C). Use a deep-fry thermometer to monitor the temperature. Maintaining the correct temperature is crucial for perfectly fried chicken. If the oil is too hot, the chicken will burn on the outside before it’s cooked through on the inside. If the oil is too cold, the chicken will absorb too much oil and become greasy.
- Carefully add the chicken pieces to the hot oil, being careful not to overcrowd the pot. Overcrowding will lower the oil temperature and result in soggy chicken. I usually fry 2-3 pieces at a time, depending on the size of my pot.
- Fry the chicken for about 6-8 minutes per side, or until it’s golden brown and cooked through. The internal temperature of the chicken should reach 165°F (74°C). Use a meat thermometer to check the temperature. Insert it into the thickest part of the chicken, avoiding the bone.
- Remove the fried chicken from the oil with a slotted spoon or tongs and place it on a wire rack lined with paper towels to drain excess oil.
- Repeat the frying process with the remaining chicken pieces, making sure to maintain the oil temperature.
Serving:
- Let the chicken cool slightly before serving. This allows the juices to redistribute, resulting in more tender and flavorful chicken.
- Serve the spicy buttermilk fried chicken hot, with your favorite sides. Some great options include mashed potatoes, coleslaw, corn on the cob, biscuits, or mac and cheese.
- You can also serve it with a dipping sauce, such as honey mustard, ranch dressing, or extra hot sauce for those who like it extra spicy!
Tips for the Best Fried Chicken:
- Don’t skip the brine! The buttermilk brine is essential for tenderizing the chicken and infusing it with flavor.
- Use a deep-fry thermometer. Maintaining the correct oil temperature is crucial for perfectly fried chicken.
- Don’t overcrowd the pot. Fry the chicken in batches to prevent the oil temperature from dropping.
- Let the chicken rest before serving. This allows the juices to redistribute, resulting in more tender and flavorful chicken.
- Double-dredge for extra crispiness. Dipping the chicken back into the buttermilk and then back into the flour mixture creates a thicker and crispier crust.
Variations:
- Adjust the spice level. If you prefer a milder flavor, reduce the amount of cayenne pepper. If you like it extra spicy, add more cayenne pepper or a pinch of chili powder.
- Use different cuts of chicken. You can use boneless, skinless chicken breasts or thighs if you prefer. Just adjust the cooking time accordingly.
- Add different herbs and spices. Experiment with different herbs and spices to create your own unique flavor profile. Some great options include rosemary, sage, and thyme.
- Make it gluten-free. Use a gluten-free flour blend instead of all-purpose flour.
This recipe is a labor of love, but trust me, the results are worth it! The combination of the tender, juicy chicken and the crispy, spicy crust is simply irresistible. Enjoy!
Conclusion:
This isn’t just another fried chicken recipe; it’s an experience! The crispy, golden crust, the juicy, flavorful chicken infused with that spicy buttermilk marinade – it’s a symphony of textures and tastes that will have you craving more. Trust me, once you’ve tasted this Spicy Buttermilk Fried Chicken, you’ll never look at fried chicken the same way again. It’s the perfect balance of heat and comfort, a dish that’s both satisfying and exciting.
But why is this recipe a must-try? It’s all about the details. The buttermilk marinade tenderizes the chicken while infusing it with a subtle tang that perfectly complements the spices. The double dredge in seasoned flour ensures an extra crispy coating that stays crunchy even after it cools down slightly. And the blend of spices? It’s a carefully curated combination that delivers a delightful kick without being overwhelmingly hot. It’s a recipe that’s been perfected over time, and I’m so excited to share it with you.
Now, let’s talk serving suggestions! This Spicy Buttermilk Fried Chicken is fantastic on its own, but it’s even better when paired with the right sides. Classic choices like creamy mashed potatoes, coleslaw, and corn on the cob are always a hit. For a lighter option, try serving it with a fresh salad or some grilled vegetables. And don’t forget the dipping sauces! Ranch dressing, honey mustard, or even a spicy mayo are all excellent choices.
Looking for variations? Feel free to experiment with the spice level. If you prefer a milder flavor, reduce the amount of cayenne pepper or chili powder. For those who like it extra hot, add a pinch of ghost pepper powder or a few drops of your favorite hot sauce to the marinade. You can also try using different cuts of chicken, such as boneless, skinless thighs or chicken wings. Just be sure to adjust the cooking time accordingly. Another fun variation is to use gluten-free flour for the dredging, making it accessible to those with dietary restrictions.
And if you’re feeling adventurous, why not try making a Spicy Buttermilk Fried Chicken sandwich? Simply place a piece of chicken between two slices of toasted brioche bread with your favorite toppings, such as lettuce, tomato, and pickles. Add a generous dollop of your favorite sauce, and you’ve got a sandwich that’s sure to impress. Or, shred the chicken and use it as a topping for a salad or in tacos. The possibilities are endless!
I truly believe that this recipe is a winner. It’s relatively easy to make, uses readily available ingredients, and delivers incredible results. It’s perfect for a weeknight dinner, a weekend gathering, or any occasion where you want to impress your friends and family.
So, what are you waiting for? Grab your ingredients, put on your apron, and get ready to make some seriously delicious Spicy Buttermilk Fried Chicken. I’m confident that you’ll love it as much as I do.
And most importantly, I want to hear about your experience! Did you try the recipe? What did you think? Did you make any variations? Share your photos and comments in the comments section below. I can’t wait to see what you create! Happy cooking!
Spicy Buttermilk Fried Chicken: The Ultimate Crispy Recipe
Crispy, juicy, spicy fried chicken! Features a flavorful buttermilk brine and double-dredged coating for the ultimate experience.
Ingredients
Instructions
Recipe Notes
- Don’t skip the brine!
- Use a deep-fry thermometer.
- Don’t overcrowd the pot.
- Let the chicken rest before serving.
- Double-dredge for extra crispiness.
- Adjust the spice level to your preference.
- You can use boneless, skinless chicken breasts or thighs if you prefer. Just adjust the cooking time accordingly.
- Experiment with different herbs and spices to create your own unique flavor profile.
- Make it gluten-free by using a gluten-free flour blend instead of all-purpose flour.