• Skip to primary navigation
  • Skip to main content
  • Skip to primary sidebar
Homesmad

Homesmad

  • Home
  • Breakfast & Brunch
  • Appetizers & Snacks
  • Dinner
  • Dessert
  • About
  • Privacy Policy
  • Contact
Homesmad
  • Home
  • Breakfast & Brunch
  • Appetizers & Snacks
  • Dinner
  • Dessert
  • About
  • Privacy Policy
  • Contact

Spinach Dip Pinwheels: Easy, Delicious Bite-Sized Appetizer

November 10, 2025 by Lily author

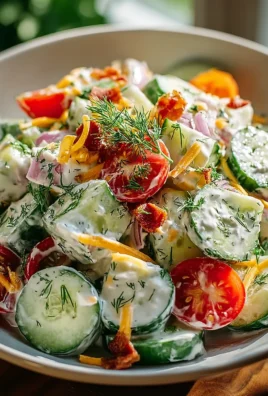
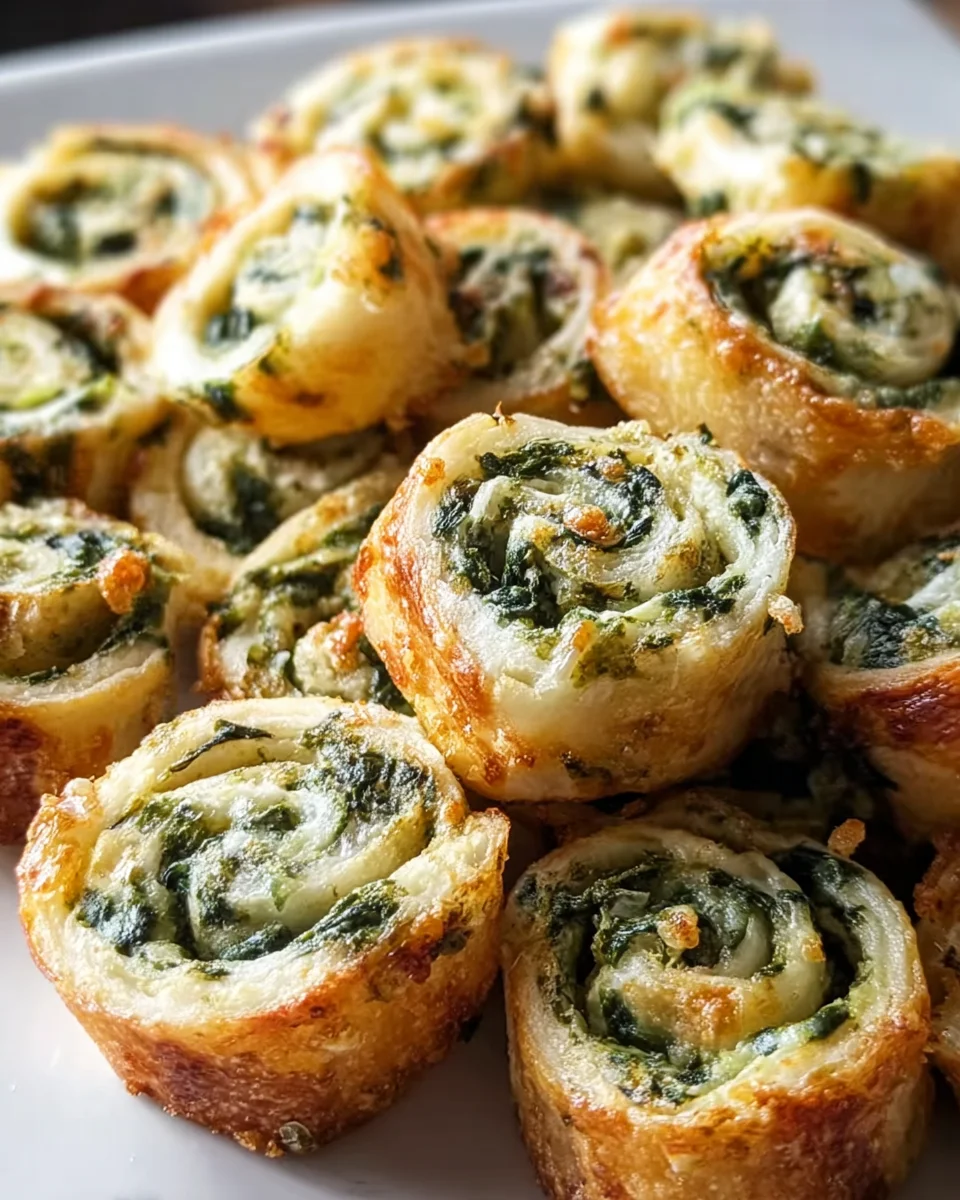
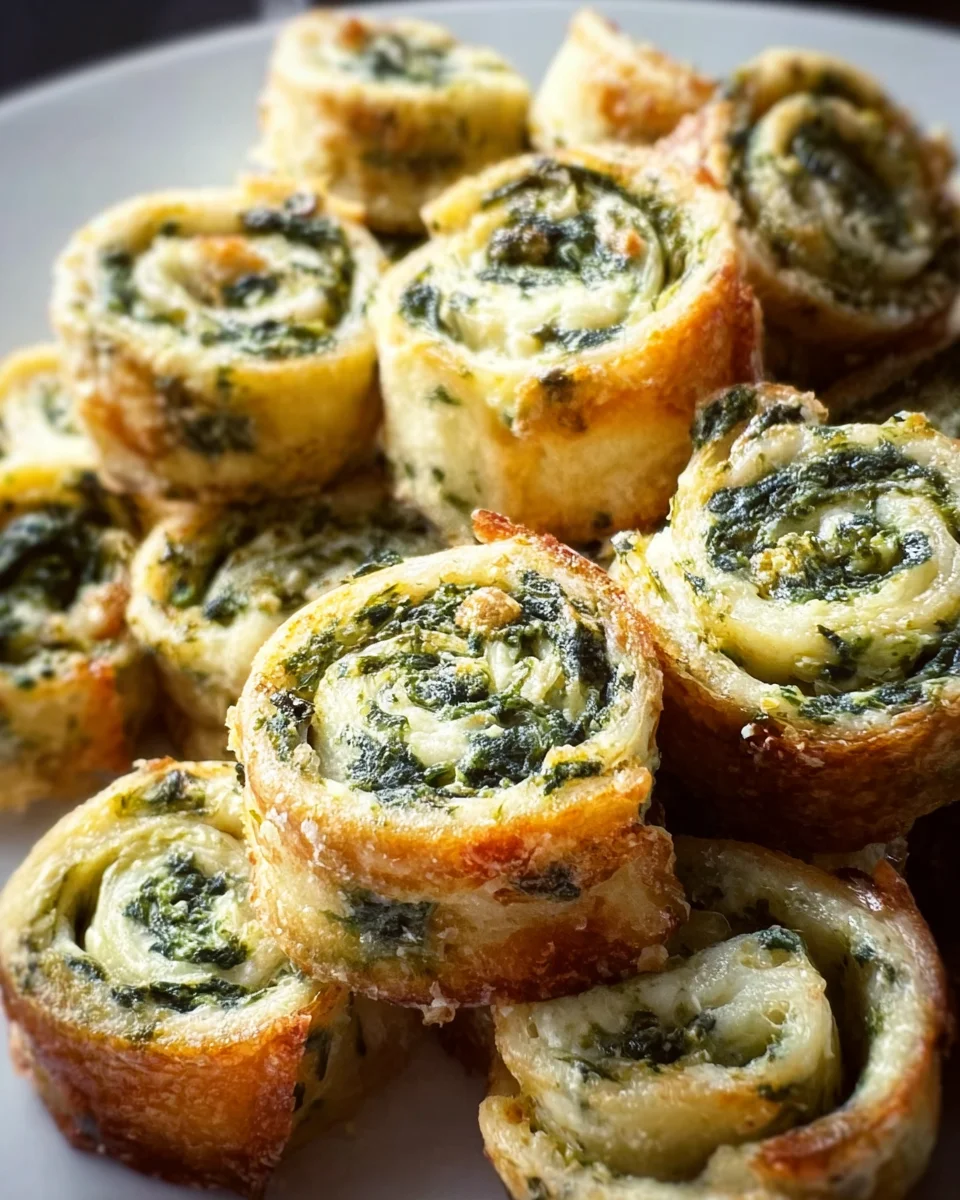
Spinach Dip In Bite Sized Pinwheels are the undisputed champions of easy, impressive entertaining, and I am thrilled to share with you how to master this crowd-pleasing appetizer. Have you ever wished for a party snack that requires no forks, no fuss, and consistently wows every single guest? This recipe is your answer.

A Beloved Classic, Reimagined for Effortless Enjoyment

Spinach dip, in its original creamy, comforting form, has been a staple at gatherings and potlucks across America for decades, cherished for its rich flavor and satisfying texture. What started as a beloved dip often served from a hollowed-out bread bowl, has ingeniously evolved into an even more convenient and delightful format. By wrapping that irresistible, savory goodness into flaky pastry and baking it into perfect little spirals, we elevate a classic into a true finger-food masterpiece.

People absolutely adore this dish because it delivers on every front: the warm, gooey, cheesy spinach filling bursting with flavor, encased in a golden, buttery crust provides an incredible texture contrast. It’s the ultimate grab-and-go snack that eliminates the need for any serving utensils, making it ideal for everything from game nights to elegant holiday parties. I find that these delightful Spinach Dip In Bite Sized Pinwheels offer everything you could want: incredible flavor, ease of eating, and a stunning presentation that looks far more complex than it actually is to prepare.

Spinach Dip Pinwheels: Easy, Delicious Bite-Sized Appetizer this RECIPE

Ingredients:

Creating these delightful Spinach Dip In Bite Sized Pinwheels is a culinary adventure, and choosing the right ingredients is the first step to success. Here’s everything you’ll need to assemble these incredibly flavorful and visually appealing appetizers:

  • 2 sheets (approximately 17.3 ounces total) frozen puff pastry: I always opt for all-butter puff pastry if I can find it, as it delivers a superior flavor and a flakier texture that truly elevates these pinwheels. Make sure to choose standard rectangular sheets, usually found in the freezer aisle.
  • 10 ounces fresh spinach: While frozen spinach can work in a pinch, I personally prefer fresh spinach for its vibrant color and slightly fresher taste. If you do opt for frozen, ensure it’s completely thawed and squeezed dry – I mean, really dry – to prevent a watery filling.
  • 8 ounces cream cheese: Full-fat cream cheese is my secret to a rich, creamy, and decadent filling. It binds everything together beautifully. Make sure it’s softened to room temperature before you start, which will make mixing so much easier and prevent lumps.
  • ½ cup grated Parmesan cheese: Freshly grated Parmesan cheese offers a much more intense and nutty flavor compared to the pre-grated varieties. It adds a wonderful savory depth and a slight saltiness that complements the spinach perfectly.
  • ¼ cup mayonnaise: This is my little trick for an extra creamy and slightly tangy filling. It adds a smoothness that regular cream cheese alone might not achieve, giving that classic spinach dip texture.
  • 2 cloves garlic: Finely minced, of course! Garlic is essential for that unmistakable savory aroma and flavor that defines a good spinach dip. I sometimes even add a third clove if I’m feeling extra garlicky.
  • ¼ teaspoon onion powder: While fresh onion could be used, onion powder provides a consistent background onion flavor without adding extra moisture or texture to the filling.
  • ¼ teaspoon black pepper: Freshly ground black pepper adds a subtle warmth and aromatic bite that’s indispensable. I always recommend grinding it fresh for the best flavor.
  • ¼ teaspoon red pepper flakes (optional): If you like a little kick, a pinch of red pepper flakes adds a fantastic subtle warmth without making the pinwheels overtly spicy. It just gives a little something extra!
  • ½ teaspoon salt: Adjust this to your taste, but start here. Remember that Parmesan cheese also contributes salt, so taste your filling before adding more.
  • 1 large egg: This is for our glorious egg wash, which will give the pinwheels that beautiful golden-brown, shiny finish and help them puff up perfectly in the oven.
  • 1 tablespoon water or milk: To thin out the egg for the egg wash. Water works perfectly fine, but milk can add a slightly richer color.
  • All-purpose flour (for dusting): A light dusting on your work surface is crucial to prevent the puff pastry from sticking, ensuring a smooth rolling process.

Preparing the Delectable Spinach Dip Filling

The heart and soul of our Spinach Dip In Bite Sized Pinwheels lies in its creamy, flavorful filling. Taking the time to prepare it properly will make all the difference in the final taste and texture of your appetizers. I promise, it’s worth every moment!

  1. Prepare the Fresh Spinach: If you’re using fresh spinach like I do, the first step is to thoroughly wash it. Rinse it under cold running water to remove any dirt or grit. Then, you’ll need to blanch it. Bring a large pot of water to a rolling boil. Carefully add the spinach to the boiling water and let it cook for just about 30 seconds to 1 minute, or until it’s wilted and bright green. Immediately transfer the blanched spinach to a bowl of ice water (this is called an ice bath) to stop the cooking process and preserve its vibrant color. Once it’s cooled, grab handfuls of spinach and squeeze out as much excess water as humanly possible. This step is absolutely critical. Any lingering moisture will make your filling watery and can lead to soggy pinwheels, which we definitely want to avoid! After squeezing, finely chop the spinach. I usually aim for pieces no larger than ¼ inch so they integrate smoothly into the dip and don’t create stringy bites. If you opted for frozen spinach, ensure it’s fully thawed and then follow the same rigorous squeezing and chopping process. Seriously, squeeze it until you think you can’t squeeze anymore!
  2. Soften the Cream Cheese: Before you even start mixing, make sure your 8 ounces of cream cheese are at room temperature. This isn’t just a suggestion; it’s a non-negotiable step for a truly smooth and lump-free dip. Cold cream cheese will be hard to mix, and you’ll end up with stubborn little lumps that won’t incorporate properly. I usually take mine out of the fridge at least an hour before I plan to start cooking.
  3. Combine the Base: In a medium-sized mixing bowl, add the softened cream cheese. To this, incorporate the mayonnaise. Using a sturdy rubber spatula or a hand mixer on low speed, beat these two together until they are completely smooth and well combined. This creates a beautifully creamy base that’s ready to absorb all the other wonderful flavors.
  4. Add the Savory Elements: Now it’s time to bring in the stars of the flavor show! To your cream cheese and mayonnaise mixture, add the finely chopped and thoroughly dried spinach. Next, introduce the grated Parmesan cheese – remember, freshly grated is best for maximum flavor impact. Then, add the finely minced garlic. I really can’t stress enough how much a little fresh garlic transforms this dip.
  5. Season to Perfection: Sprinkle in the onion powder, black pepper, and salt. If you’re feeling adventurous and love a little warmth, now is the time to add those optional red pepper flakes. Give everything a good, thorough mix. I usually use my rubber spatula for this, ensuring that all the ingredients are evenly distributed throughout the creamy base. You want every bite of your pinwheel to deliver that full-bodied spinach dip experience.
  6. Taste and Adjust: This is perhaps the most important step for any seasoned cook. Once everything is mixed, take a small taste of your filling. Is it salty enough? Does it need more pepper? Perhaps another pinch of garlic powder or onion powder to boost the savory notes? This is your moment to customize the flavor profile to your liking. I often find I like a tiny bit more salt, but everyone’s palate is different!

Preparing the Puff Pastry for Assembly

Puff pastry is a truly magical ingredient, transforming from a simple sheet into hundreds of delicate, flaky layers in the oven. Handling it correctly is key to achieving those stunning, professional-looking pinwheels that will impress everyone.

  1. Thaw the Puff Pastry Correctly: Take your frozen puff pastry sheets out of the freezer and let them thaw in the refrigerator overnight for best results. If you’re in a hurry, you can thaw them at room temperature for about 30-40 minutes, but be careful not to let them get too warm. If the pastry gets too soft, it will become sticky and difficult to handle, and the butter layers can start to melt, which compromises the flakiness. The ideal temperature is still cool to the touch but pliable enough to unfold without cracking.
  2. Prepare Your Work Surface: Lightly dust a clean, dry work surface with all-purpose flour. I’m talking a light dusting here – just enough to prevent sticking, not so much that it gets incorporated heavily into the pastry. Also, lightly dust your rolling pin.
  3. Unfold and Roll (Carefully!): Gently unfold one sheet of puff pastry onto your floured surface. If it cracks a little at the folds, don’t panic! You can usually press the cracks together gently with your fingers to seal them. Using your lightly floured rolling pin, gently roll the puff pastry sheet into an even rectangle, aiming for dimensions of approximately 10×12 inches, or slightly larger if your original sheet is smaller. The goal is to make it a uniform thickness, about ⅛-inch thick. This evenness is crucial for consistent baking and an appealing final product. Repeat this process with the second sheet of puff pastry.

Assembling and Chilling Your Spinach Dip Pinwheels

This is where the magic really starts to happen! Spreading the filling and rolling the pastry correctly will define the shape and look of your beautiful pinwheels.

  1. Spread the Spinach Dip Filling: With your first rolled-out puff pastry sheet ready, take half of your prepared spinach dip filling and spread it evenly over the entire surface of the pastry. The trick here is to go all the way to the edges. We want every part of the pinwheel to have that delicious filling, right up to the very edge. Use an offset spatula or the back of a spoon to create a smooth, consistent layer. An even layer ensures that each pinwheel has a balanced filling-to-pastry ratio, which is key for both taste and structure.
  2. Roll It Up (Tight and Even!): Starting from one of the longer sides of the rectangle, carefully and slowly begin to roll the pastry sheet inwards. This needs to be a tight roll. The tighter you roll it, the more defined and beautiful your pinwheel spirals will be, and the less likely they are to unravel during baking. Apply gentle, even pressure as you roll, ensuring the log is uniform in thickness from end to end. If it feels like it’s sticking or tearing, you might need to adjust your pressure or give it a moment to firm up slightly. Once rolled, pinch the seam gently to seal it.
  3. Chill for Easy Slicing: This step is non-negotiable for clean, beautiful cuts. Carefully transfer the rolled pastry log to a plate or a baking sheet lined with parchment paper. Cover it loosely with plastic wrap and place it in the refrigerator for at least 30 minutes, or up to an hour. Chilling firms up both the puff pastry and the filling, making it much easier to slice without squishing or distorting the pinwheel shape. Don’t skip this! I promise, your perfectly round pinwheels will thank you. Repeat the entire spreading and rolling process with your second sheet of puff pastry and the remaining filling.

Slicing and Baking Your Golden Pinwheels

We’re on the home stretch! The final steps involve turning those perfectly rolled logs into individual pinwheels and baking them to golden, flaky perfection.

  1. Preheat Your Oven: While your pastry logs are chilling, preheat your oven to 400°F (200°C). Arrange an oven rack in the middle position. This ensures even heat distribution, which is vital for properly baked puff pastry.
  2. Prepare Baking Sheets: Line two large baking sheets with parchment paper. This prevents sticking and makes for easy cleanup. Trust me, you don’t want to be scraping delicious baked cheese off your baking sheets.
  3. Slice the Pinwheels: Once the pastry logs are thoroughly chilled, retrieve one from the refrigerator. Using a very sharp knife (a serrated knife can also work well for a clean cut, almost like sawing rather than pressing), carefully slice the log into ¾-inch to 1-inch thick rounds. I aim for ¾-inch because I find it’s the perfect bite-sized piece. If your knife isn’t sharp enough, you risk squishing the beautiful spirals you worked so hard to create. If you notice the pinwheels slightly misshaping, you can gently reshape them with your fingers to make them perfectly round again. Repeat with the second log.
  4. Arrange on Baking Sheets: Place the sliced pinwheels, cut-side up, onto your prepared baking sheets. Make sure to leave about an inch of space between each pinwheel. They will puff up significantly in the oven, and we want to allow plenty of room for air circulation, which helps them bake evenly and get nice and crispy. Don’t overcrowd the sheets, or you’ll end up with steamed sides rather than beautifully browned ones.
  5. Prepare the Egg Wash: In a small bowl, whisk together the large egg and 1 tablespoon of water (or milk) until well combined. This is your golden ticket to a beautiful, shiny crust.
  6. Brush with Egg Wash: Gently brush the tops and exposed sides of each pinwheel with the egg wash. This serves multiple purposes: it gives them that irresistible golden-brown color, adds a lovely sheen, and helps the pastry layers puff up beautifully. Be careful not to let too much egg wash drip down the sides onto the parchment paper, as it can make the pinwheels stick.
  7. Bake to Golden Perfection: Place the baking sheets in your preheated oven. Bake for 18-22 minutes, or until the pinwheels are gloriously puffed up, deeply golden brown, and cooked through. Keep a close eye on them, as oven temperatures can vary, and puff pastry can go from perfectly golden to over-browned quite quickly. You’ll see the layers separate and become airy, and the filling should be warm and bubbly. If one tray is browning faster, you can rotate the trays halfway through baking, or even switch their positions in the oven.
  8. Cool and Serve: Once baked, carefully remove the pinwheels from the oven. Transfer them to a wire rack to cool for 5-10 minutes before serving. This brief cooling period allows the pastry to set and become even flakier, and the filling to firm up slightly, making them easier to handle. They are absolutely delightful served warm, right out of the oven.

Serving Suggestions for Your Irresistible Pinwheels

These Spinach Dip In Bite Sized Pinwheels are fantastic on their own, a perfect finger food for any gathering, but I often find that a little extra touch can make them even more special. They truly embody comfort and elegance in a single bite.

They are wonderful for brunches, cocktail parties, holiday appetizers, or even a sophisticated snack. The savory filling encased in the flaky, buttery pastry is simply irresistible. For presentation, arrange them artfully on a platter, perhaps garnished with a sprinkle of fresh chopped chives or parsley for a pop of color. I sometimes even like to offer a small bowl of marinara sauce or a simple lemon-herb aioli on the side for dipping, though they certainly don’t need it. The rich flavor of the spinach and cheese filling, combined with the delicate crunch of the puff pastry, creates a texture and taste experience that is both satisfying and incredibly moreish. Be warned: these tend to disappear remarkably fast! Make sure you snag a few for yourself before your guests devour them all.

Spinach Dip Pinwheels: Easy, Delicious Bite-Sized Appetizer

Conclusion:

Okay, my friends, we’ve reached the exciting culmination of our culinary journey with what I truly believe is one of the most brilliant and versatile appetizers you could ever create: our wonderful Spinach Dip In Bite Sized Pinwheels. Think about it: the creamy, savory goodness of classic spinach dip, but elevated into a perfectly portable, endlessly appealing package. No spoons, no double-dipping concerns, just pure, unadulterated flavor in every spiral. I adore this recipe not just for its incredible taste, but for its sheer elegance and surprising simplicity. It’s the kind of dish that looks like you’ve spent hours laboring in the kitchen, when in reality, it’s a beautifully straightforward process. It’s a game-changer for gatherings, a guaranteed crowd-pleaser that consistently vanishes from platters faster than you can say “more please!” Whether you’re hosting a sophisticated dinner party, a casual game night, or simply looking for an elevated snack, these pinwheels hit all the right notes. They are truly a testament to how humble ingredients can transform into something extraordinary with just a little creativity.

Now, let’s talk about making these delightful creations even more dynamic. While our Spinach Dip In Bite Sized Pinwheels are absolutely fantastic on their own, a little pairing can take them to the next level. Imagine serving them warm, fresh from the oven, alongside a vibrant marinara sauce for dipping – a delightful nod to classic Italian flavors. Or, for a cooler, tangier option, a creamy ranch or a homemade tzatziki dip could offer a wonderful contrast. Don’t limit them to just appetizers, either! These pinwheels make an excellent addition to a brunch spread, nestled amongst fresh fruit and pastries. They’re also perfect for school or work lunches, providing a satisfying, flavorful bite that beats a plain sandwich any day. Consider them for a picnic basket or a potluck; they travel incredibly well and retain their charm even at room temperature. For a truly impressive spread, you could arrange them artfully on a large platter, perhaps garnished with a sprinkle of fresh parsley or finely chopped chives, adding a pop of color and freshness.

But the fun doesn’t stop there! One of the things I love most about this recipe is its incredible adaptability. Think of the base recipe as a canvas, ready for your artistic touch. Want to add a little heat? A pinch of red pepper flakes or a dash of cayenne pepper mixed into the spinach filling will give it a fantastic kick. For an extra layer of savory depth, consider folding in some finely chopped, sautéed mushrooms or roasted red peppers. Cheese lovers, this is your moment to shine! While the combination of cheeses we used is tried and true, feel free to experiment. Crumbled feta can add a wonderful salty tang, or a sharp cheddar could provide a bolder flavor profile. Even a touch of smoked gouda could introduce an unexpected but delicious twist. You could also play with herbs beyond the usual. Fresh dill or finely chopped chives would beautifully complement the spinach. For a richer, more decadent version, consider adding a tablespoon or two of cream cheese to the filling mixture – just be sure to adjust the seasoning accordingly. If you’re feeling adventurous with the dough, puff pastry offers an even flakier, buttery texture, creating a slightly different, but equally delightful, experience. The possibilities are truly endless, limited only by your imagination and what you have on hand.

So, what are you waiting for? I genuinely hope you feel inspired and excited to roll up your sleeves and bring these magnificent Spinach Dip In Bite Sized Pinwheels to life in your own kitchen. I promise you, the smiles and compliments you’ll receive will make every moment worthwhile. This isn’t just a recipe; it’s an invitation to create joy, share deliciousness, and perhaps even discover a new go-to appetizer that will grace your table for years to come. Please, when you make them, don’t keep it a secret! I would absolutely love to hear about your experience. Did you add a unique twist? Was there a particular occasion you made them for? How quickly did they disappear? Share your photos, your triumphs, and even your “lessons learned” in the comments below or on your favorite social media platforms. Your feedback and creativity not only inspire me but also help our growing community of home cooks discover new ideas and perfect their own culinary adventures.

Thank you for joining me on this delicious journey. Happy cooking, my friends!


Spinach Dip Pinwheels: Easy, Delicious Bite-Sized Appetizer

These Spinach Dip Pinwheels are a crowd-pleasing appetizer, reimagining the classic creamy spinach dip into an effortless, bite-sized finger food. Encased in flaky, golden puff pastry, these warm, cheesy spirals deliver incredible flavor and stunning presentation with minimal fuss, perfect for any gathering.

Prep Time
10 Minutes
Cook Time
20 Minutes
Total Time
30 Minutes
Servings
10-12 pinwheels

Ingredients


Instructions


Important Information

Nutrition Facts (Per Serving)

It is important to consider this information as approximate and not to use it as definitive health advice.

Allergy Information

Please check ingredients for potential allergens and consult a health professional if in doubt.

« Previous Post
Zesty Pepper Jelly Cream Cheese Dip: Quick Appetizer
Next Post »
Cinnamon Sugar Blondies: Quick, Easy & Sweetly Spiced Perfection

If you enjoyed this…

Mashed Potato Cheese Puffs: The Ultimate Comfort Food Recipe

Spicy Shrimp Sushi Stacks: A Delicious & Easy Recipe

Potato Cheese Sticks: Crispy, Tasty Homemade Snack!

Primary Sidebar

Browse by Diet

BreakfastDinnerLunchDessertAppetizer

Sweet Peach Yogurt Parfait Delight

One of my fondest memories is from a lazy summer afternoon spent at my grandmother’s house. The sun filtered through the kitchen window, casting a warm glow over the table where she would create her culinary magic. It was during one of those blissful moments that I first tasted her Peach Yogurt Parfait with Honey and Granola. The sweet aroma of ripe peaches mingling with creamy yogurt and the crunch of granola was nothing short of heavenly. It felt like summer captured in a bowl, and I still remember the joy of diving in with a spoon, each layer revealing a new burst of flavor.

When I think about that parfait, I can almost hear the gentle hum of the bees outside, reminding me of the floral notes that honey brings to every bite. The vibrant yellows and soft oranges of the peaches contrast beautifully with the creamy white yogurt and the golden crunch of granola. It’s a dish that not only looks delightful but also tastes like a celebration of fresh, wholesome ingredients.

What makes my version of this Peach Yogurt Parfait special is the careful balance of flavors and textures. I use ripe, juicy peaches, drizzled with locally sourced honey, and a homemade granola that’s bursting with nuts and seeds for an extra crunch. It’s a simple dish, but every layer is crafted with love and attention.

Let me show you exactly how to make this delightful parfait, so you can bring a bit of that summer magic into your kitchen!

Sweet Peach Yogurt Parfait Delight

Why You’ll Love This Recipe

  • Delightfully creamy texture from the Greek yogurt, paired with the juicy sweetness of fresh peaches.
  • Ready in under 20 minutes, making it a quick and satisfying breakfast or snack option.
  • Budget-friendly, using common ingredients that you may already have in your pantry.
  • Customizable with your favorite granola and nuts, allowing you to tailor each parfait to your taste.
  • Perfectly balanced flavors with the bright acidity of lemon juice and the sweetness of honey enhancing the peaches.

Ingredients

  • For the Parfait:
  • 2 cups plain Greek yogurt (or vanilla yogurt for a sweeter option)
  • 2 large ripe peaches, diced (about 2 cups)
  • 1 tablespoon fresh lemon juice (to prevent browning of peaches)
  • 2 tablespoons honey (plus more for drizzling)
  • 1 teaspoon vanilla extract (optional for extra flavor)
  • For the Granola:
  • 1 cup granola (store-bought or homemade; see notes for a simple granola recipe)
  • 1/4 cup sliced almonds (optional for added crunch)
  • 1/4 cup shredded coconut (optional for added flavor)

Let’s dive into some key ingredients that make this Peach Yogurt Parfait so delightful! First, the Greek yogurt is not only creamy but also packed with protein, making it a satisfying option for breakfast or a snack. If you’re looking for a sweeter option, you can easily substitute it with vanilla yogurt, though it may alter the overall flavor balance. Next, the ripe peaches are the star of the show; their natural sweetness shines through, so I recommend choosing peaches that yield slightly to pressure, indicating they’re perfectly ripe. If peaches aren’t in season, feel free to use nectarines or even frozen peaches—just thaw them before use. Finally, honey adds a lovely floral sweetness that ties everything together. If you prefer, maple syrup can serve as a delicious substitute.

Step-by-Step Instructions

  1. Start by preparing the peaches. Wash them thoroughly, then slice and dice them into bite-sized pieces. In a medium bowl, toss the diced peaches with 1 tablespoon of fresh lemon juice to prevent browning. Set aside for about 5 minutes while the lemon juice works its magic.
  2. In a separate bowl, combine the Greek yogurt, 2 tablespoons of honey, and 1 teaspoon of vanilla extract if using. Stir the mixture until smooth and thoroughly blended. This should take about a minute. Avoid overmixing to maintain the creaminess of the yogurt.
  3. Now it’s time to layer your parfait. Grab a clear glass or bowl to showcase your beautiful creation. Start with a generous spoonful of the yogurt mixture at the bottom—about 1/4 cup will do. Use a spoon to spread it evenly.
  4. Add a layer of the diced peaches over the yogurt, ensuring they cover the yogurt completely. You might want to use about half of what you have prepared—roughly 1 cup. This layer should be visually appealing, so arrange the peaches neatly.
  5. Sprinkle 1/4 cup of granola over the peaches. This adds a delightful crunch. Make sure to distribute it evenly to ensure every bite has that satisfying texture. Avoid packing it down too tightly, as you want it to maintain its crunch.
  6. Repeat the layers: spoon in another 1/4 cup of yogurt, followed by another cup of peaches, and another sprinkle of granola. You should have at least two layers, but feel free to add more depending on your glass size.
  7. Finish off your parfait with a drizzle of honey on top for added sweetness and a touch of elegance. If you’re using sliced almonds or shredded coconut, sprinkle them on top now. It adds a lovely visual contrast and extra flavor.
  8. Serve immediately or refrigerate for up to 30 minutes before serving to allow the flavors to meld together. However, I recommend enjoying it fresh to maintain the granola’s crunch.

Pro Tips for the Best Peach Yogurt Parfait With Honey And Granola

  • Make sure to choose ripe peaches for the best flavor and texture. A common mistake is using unripe fruit, which can lead to a less enjoyable parfait. Look for peaches that are fragrant and slightly soft to the touch.
  • Use a clear glass to assemble your parfait; this not only makes for a beautiful presentation but also allows you to see the colorful layers, which adds to the enjoyment of eating it.
  • For an even creamier texture, consider whipping the Greek yogurt with a hand mixer for a couple of minutes before layering. This small adjustment makes a huge difference in mouthfeel.
  • Be mindful of the granola-to-yogurt ratio. Too much granola can overwhelm the parfait, while too little can make it feel too creamy. Aim for about 1/4 cup of granola per layer for the perfect balance.
  • If you’re making this for a gathering, consider preparing the yogurt and peaches ahead of time and layering them just before serving. This ensures the granola stays crunchy!

Variations & Serving Ideas

There are so many ways to get creative with your Peach Yogurt Parfait! For a tropical twist, swap out the peaches for mangoes or pineapples and top with coconut flakes. If you prefer a berry flavor, mix in some blueberries or strawberries with the peaches for added color and taste. For a nutty version, incorporate chopped walnuts or pecans instead of almonds.

As for serving ideas, this parfait pairs beautifully with a side of scrambled eggs for a hearty breakfast or fresh fruit salad for a light lunch. You might also enjoy it alongside whole grain toast with almond butter for an energizing snack. The contrast of flavors and textures will elevate your meal experience!

Storage, Make-Ahead & Reheating

The Peach Yogurt Parfait is best enjoyed fresh, but you can prepare some components ahead of time. Store the layered parfait in an airtight container in the refrigerator for up to 24 hours. However, be cautious; the granola may lose its crunch if stored too long. You can freeze the yogurt and peach mixture for up to 2 months; just remember to thaw it in the refrigerator overnight before serving.

If you plan to enjoy this dish the next day, it can taste even better as the flavors meld together. Just remember to add the granola right before serving to keep its delightful crunch!

Frequently Asked Questions

Can I make Peach Yogurt Parfait With Honey And Granola ahead of time?

Yes — in fact, it tastes even better the next day as the flavors meld. However, I recommend waiting to add the granola until just before serving to maintain its crunch.

What can I substitute for Greek yogurt?

If you prefer a lighter option, you can substitute Greek yogurt with regular yogurt or a dairy-free alternative like coconut yogurt. Just remember that this may alter the creaminess and flavor profile slightly.

Can I use frozen peaches for this parfait?

Absolutely! Just make sure to thaw the frozen peaches before using them. They will still add great flavor, though the texture may be slightly softer than fresh peaches.

How do I make the parfait vegan?

To make a vegan version, substitute the Greek yogurt with a plant-based yogurt alternative, and replace honey with maple syrup or agave nectar. This keeps the parfait sweet while adhering to a vegan diet.

What other fruits can I use in this recipe?

You can mix and match fruits based on your preference. Try using strawberries, blueberries, raspberries, or even bananas. Just make sure to adjust the lemon juice as needed to prevent browning.

Sweet Peach Yogurt Parfait Delight

Final Thoughts

The Peach Yogurt Parfait with Honey and Granola is a delightful blend of creamy yogurt, sweet peaches, and crunchy granola that creates a satisfying and nourishing treat. Each layer bursts with flavor, making it a perfect choice for breakfast or a light dessert.

This is the kind of recipe I come back to again and again, especially when I want something refreshing and wholesome to start my day. The harmony of sweet and tart flavors, combined with the delightful crunch, never fails to lift my spirits!

I encourage you to give this parfait a try and indulge in its comforting goodness. Feel free to share your results or even add your own twist—perhaps a sprinkle of cinnamon or a handful of nuts. Enjoy creating your perfect parfait!

Print
clock clock iconcutlery cutlery iconflag flag iconfolder folder iconinstagram instagram iconpinterest pinterest iconfacebook facebook iconprint print iconsquares squares iconheart heart iconheart solid heart solid icon

Peach Yogurt Parfait


  • Author: Lily author
  • Total Time: 15 minutes
  • Yield: 4 servings 1x
Pin Recipe
Print Recipe

Description

This Peach Yogurt Parfait combines creamy Greek yogurt, juicy peaches, and crunchy granola for a delightful treat. It’s a perfect breakfast or snack that captures the essence of summer in every bite.


Ingredients

Scale
  • For the Parfait:
  • 2 cups plain Greek yogurt (or vanilla yogurt for a sweeter option)
  • 2 large ripe peaches, diced (about 2 cups)
  • 1 tablespoon fresh lemon juice (to prevent browning of peaches)
  • 2 tablespoons honey (plus more for drizzling)
  • 1 teaspoon vanilla extract (optional for extra flavor)
  • For the Granola:
  • 1 cup granola (store-bought or homemade; see notes for a simple granola recipe)
  • 1/4 cup sliced almonds (optional for added crunch)
  • 1/4 cup shredded coconut (optional for added flavor)

Instructions

  1. Start by preparing the peaches. Wash them thoroughly, then slice and dice them into bite-sized pieces. In a medium bowl, toss the diced peaches with 1 tablespoon of fresh lemon juice to prevent browning. Set aside for about 5 minutes while the lemon juice works its magic.
  2. In a separate bowl, combine the Greek yogurt, 2 tablespoons of honey, and 1 teaspoon of vanilla extract if using. Stir the mixture until smooth and thoroughly blended. This should take about a minute. Avoid overmixing to maintain the creaminess of the yogurt.
  3. Now it’s time to layer your parfait. Grab a clear glass or bowl to showcase your beautiful creation. Start with a generous spoonful of the yogurt mixture at the bottom—about 1/4 cup will do. Use a spoon to spread it evenly.
  4. Add a layer of the diced peaches over the yogurt, ensuring they cover the yogurt completely. You might want to use about half of what you have prepared—roughly 1 cup. This layer should be visually appealing, so arrange the peaches neatly.
  5. Sprinkle 1/4 cup of granola over the peaches. This adds a delightful crunch. Make sure to distribute it evenly to ensure every bite has that satisfying texture. Avoid packing it down too tightly, as you want it to maintain its crunch.
  6. Repeat the layers: spoon in another 1/4 cup of yogurt, followed by another cup of peaches, and another sprinkle of granola. You should have at least two layers, but feel free to add more depending on your glass size.
  7. Finish off your parfait with a drizzle of honey on top for added sweetness and a touch of elegance. If you’re using sliced almonds or shredded coconut, sprinkle them on top now. It adds a lovely visual contrast and extra flavor.
  8. Serve immediately or refrigerate for up to 30 minutes before serving to allow the flavors to meld together. However, I recommend enjoying it fresh to maintain the granola’s crunch.
  • Prep Time: 15 mins
  • Cook Time: 0 mins
  • Category: Breakfast
  • Method: No-cook
  • Cuisine: American

Nutrition

  • Serving Size: 1 parfait
  • Calories: 250
  • Sugar: 20 g
  • Sodium: 50 mg
  • Fat: 5 g
  • Saturated Fat: 2 g
  • Unsaturated Fat: 3 g
  • Trans Fat: 0 g
  • Carbohydrates: 40 g
  • Fiber: 3 g
  • Protein: 10 g
  • Cholesterol: 10 mg

Keywords: Choose ripe peaches for the best flavor and texture. Use a clear glass for a beautiful presentation. For creaminess, consider whipping the yogurt before layering. Be mindful of the granola-to-yogurt ratio. Prepare yogurt and peaches ahead of time for gatherings, layering just before serving.

Did you make this recipe?

Share a photo and tag us — we can't wait to see what you've made!

Sun-Kissed Frozen Orange Cream Slush

As a child, summer days felt like they lasted forever. I remember the sticky heat wrapping around me as I played outside, my laughter mingling with the sounds of the neighborhood. But nothing could cool me down quite like the moment I’d spot my grandmother, laboring over her blender, whipping up her famous Frozen Orange Creamsicle Slush. That vibrant orange treat, with its frosty texture and sweet citrus aroma, was like a burst of sunshine in a cup. Just one sip, and I could feel the coolness wash over me, sparking pure joy.

This Frozen Orange Creamsicle Slush has a way of making you feel like a kid again. Its creamy, dreamy consistency is a delightful balance of bright orange and soft vanilla, inviting you to dive right in. The refreshing tang of orange dances on your tongue, while the smooth creaminess envelops you in a comforting embrace. It’s a nostalgic treat that’s perfect for hot summer afternoons or anytime you need a little pick-me-up.

What makes my version of this slush stand out is the addition of a hint of vanilla bean, which elevates the flavor and adds an extra layer of richness. Plus, it’s super easy to whip up with just a few simple ingredients that you probably already have on hand! So, if you’re ready to relive those sun-soaked memories, let me show you exactly how to make it.

Sun-Kissed Frozen Orange Cream Slush

Why You’ll Love This Recipe

  • Each slush is a perfect blend of creamy vanilla and zesty orange, creating a nostalgic flavor reminiscent of summer days.
  • This refreshing treat is ready in under 15 minutes, making it an ideal quick dessert for unexpected guests or hot afternoons.
  • With just 8 simple ingredients, it’s budget-friendly, ensuring you don’t have to break the bank to enjoy a delicious slush.
  • The slush has a perfectly smooth texture, thanks to the combination of ice and ice cream, providing a delightful contrast to the bright citrus flavors.
  • It’s highly customizable; you can easily adjust the sweetness and add fresh herbs for a unique twist that suits your taste.

Ingredients

  • 2 cups orange juice (freshly squeezed or store-bought)
  • 1 cup vanilla ice cream
  • 1 cup crushed ice
  • 1/2 cup milk (whole or 2%)
  • 1/4 cup granulated sugar (adjust based on sweetness preference)
  • 1 teaspoon vanilla extract
  • Zest of 1 orange (for added flavor)
  • Fresh orange slices and mint leaves (for garnish)

The star of this Frozen Orange Creamsicle Slush is the orange juice, which provides the vibrant, citrusy base. Freshly squeezed juice will yield the brightest flavor, but store-bought options can be just as convenient. If you’re opting for store-bought, choose 100% pure juice with no added sugars for the best results. Another essential ingredient is the vanilla ice cream; it adds creaminess and sweetness. You can substitute it with dairy-free ice cream if you’re looking for a vegan option. Whole or 2% milk complements the ice cream, creating a smooth blend. If you want a lower-calorie version, almond or oat milk can be good alternatives.

Lastly, the granulated sugar can be adjusted based on your sweetness preference. If you prefer a more natural sweetener, consider using honey or agave syrup. The orange zest enhances the flavor profile, providing an aromatic pop that brings the whole slush together. Don’t skip it! It adds an extra layer of brightness that makes this slush truly special.

Step-by-Step Instructions

  1. Start by preparing your ingredients. Gather 2 cups of orange juice, 1 cup of vanilla ice cream, and 1 cup of crushed ice. Make sure the ice is finely crushed, as larger chunks can make blending difficult.
  2. In a blender, combine the orange juice, vanilla ice cream, crushed ice, and 1/2 cup of milk. Add 1/4 cup of granulated sugar and 1 teaspoon of vanilla extract. If you like a sweeter slush, consider adding a bit more sugar at this stage.
  3. Add the zest of 1 orange to the blender. This step is crucial for enhancing the citrus flavor of your slush. Make sure not to include the bitter white pith—only the flavorful zest.
  4. Blend the mixture on medium-high speed for about 30-45 seconds. Stop once the ingredients are fully combined and the slush has a smooth, even consistency. If you notice large chunks of ice, blend for an additional 10-15 seconds. Avoid over-blending, as this can make the slush too liquidy.
  5. Once blended, taste the slush. If it needs more sweetness, add a little more sugar and blend for a few more seconds. If it’s too thick, you can add a splash of milk to reach your desired consistency.
  6. Pour the slush into glasses. This recipe typically serves 4, but you can easily double it for larger gatherings. Use a spoon to help guide the slush into the glasses if needed.
  7. Garnish each serving with fresh orange slices and mint leaves. The mint not only adds a pop of color but also a refreshing aroma that complements the citrus flavors beautifully.
  8. Serve immediately and enjoy! If you’ve made extra, you can refrigerate it for a short time, but it’s best enjoyed fresh.

Pro Tips for the Best Frozen Orange Creamsicle Slush

  • Don’t skip the orange zest! It’s a game-changer for flavor. Always zest before juicing to make it easier.
  • Use a high-powered blender for the best texture. A standard blender may struggle with ice, leading to uneven consistency. If you have a food processor, that can work too, but ensure the ice is finely crushed.
  • Adjust the ice-to-liquid ratio carefully. If your slush is too thick, it won’t blend well. Start with less ice and add more until you reach your preferred texture.
  • Be cautious with the sugar! Always start with the lower amount, as you can easily add more, but it’s hard to fix an overly sweet slush.
  • For a fun twist, consider adding a splash of coconut milk or a handful of fresh fruit like strawberries or pineapple. This not only enhances the flavor but also adds a beautiful color contrast.

Variations & Serving Ideas

There are countless ways to put a spin on your Frozen Orange Creamsicle Slush. Consider making a tropical version by adding in some pineapple juice or coconut milk for a delightful tropical twist. If you’re feeling adventurous, try incorporating a handful of frozen mango or peach slices for added sweetness. For a lighter version, swap out the vanilla ice cream for Greek yogurt for a creamy yet tangy alternative.

As for serving ideas, this refreshing slush pairs wonderfully with light summer dishes like grilled chicken skewers, fish tacos, or a simple salad topped with citrus vinaigrette. The bright, zesty flavors of the slush complement these dishes perfectly, making them an ideal pairing for a sunny day.

Storage, Make-Ahead & Reheating

This Frozen Orange Creamsicle Slush is best enjoyed fresh, but if you have leftovers, you can store them in an airtight container in the fridge for up to 2 days. Just keep in mind that the slush may lose some of its texture over time as the ice melts. It doesn’t freeze well, as the ice will turn into a solid block. If you must freeze it, blend again after thawing to restore the slushy consistency. This treat is best the day you make it, as the flavors meld together beautifully overnight, enhancing its deliciousness.

Frequently Asked Questions

Can I make Frozen Orange Creamsicle Slush ahead of time?

Yes — in fact, it tastes even better the next day as the flavors meld. However, it’s best to enjoy it fresh, as the texture can change if stored for too long. If you need to prepare it ahead, keep it in the fridge and re-blend before serving.

What kind of orange juice should I use?

For the best flavor, use freshly squeezed orange juice. However, if you’re short on time, opt for 100% pure store-bought juice without added sugars. This will ensure that your slush remains flavorful and refreshing.

Can I substitute the vanilla ice cream?

Absolutely! If you’re looking for a dairy-free option, coconut milk ice cream or a non-dairy vanilla ice cream can work wonderfully. They will still provide the creamy texture and sweetness you desire.

How can I adjust the sweetness of my slush?

You can easily adjust the sweetness by modifying the amount of sugar added. Start with 1/4 cup and taste the mixture before blending. If you prefer it sweeter, add more sugar gradually until it reaches your desired level.

What should I do if my slush is too thick?

If your slush is too thick, simply add a splash of milk or orange juice and blend again. This will help achieve a more drinkable consistency while maintaining the slushy texture. Adjust gradually to reach your preferred thickness.

Sun-Kissed Frozen Orange Cream Slush

Final Thoughts

The Frozen Orange Creamsicle Slush is a delightful blend of refreshing citrus and creamy goodness, making it a perfect treat for warm days or any time you crave a taste of nostalgia. The way the bright orange flavor dances with the creamy texture truly elevates this slush, transforming it into a satisfying escape from the everyday.

This is the kind of recipe I come back to again and again, especially when I’m looking to cool down or impress guests at a summer gathering. It’s simple to make and always brings smiles all around! I encourage you to try this recipe for yourself—don’t hesitate to share your results or even put your own spin on it. Happy slushing!

Print
clock clock iconcutlery cutlery iconflag flag iconfolder folder iconinstagram instagram iconpinterest pinterest iconfacebook facebook iconprint print iconsquares squares iconheart heart iconheart solid heart solid icon

Frozen Orange Creamsicle Slush


  • Author: Lily author
  • Total Time: 15 minutes
  • Yield: 4 servings 1x
Pin Recipe
Print Recipe

Description

This Frozen Orange Creamsicle Slush is a refreshing treat that combines creamy vanilla and zesty orange flavors. Perfect for hot summer days, it brings back nostalgic memories with every sip.


Ingredients

Scale
  • 2 cups orange juice (freshly squeezed or store-bought)
  • 1 cup vanilla ice cream
  • 1 cup crushed ice
  • 1/2 cup milk (whole or 2%)
  • 1/4 cup granulated sugar (adjust based on sweetness preference)
  • 1 teaspoon vanilla extract
  • Zest of 1 orange (for added flavor)
  • Fresh orange slices and mint leaves (for garnish)

Instructions

  1. Start by preparing your ingredients. Gather 2 cups of orange juice, 1 cup of vanilla ice cream, and 1 cup of crushed ice. Make sure the ice is finely crushed, as larger chunks can make blending difficult.
  2. In a blender, combine the orange juice, vanilla ice cream, crushed ice, and 1/2 cup of milk. Add 1/4 cup of granulated sugar and 1 teaspoon of vanilla extract. If you like a sweeter slush, consider adding a bit more sugar at this stage.
  3. Add the zest of 1 orange to the blender. This step is crucial for enhancing the citrus flavor of your slush. Make sure not to include the bitter white pith—only the flavorful zest.
  4. Blend the mixture on medium-high speed for about 30-45 seconds. Stop once the ingredients are fully combined and the slush has a smooth, even consistency. If you notice large chunks of ice, blend for an additional 10-15 seconds. Avoid over-blending, as this can make the slush too liquidy.
  5. Once blended, taste the slush. If it needs more sweetness, add a little more sugar and blend for a few more seconds. If it’s too thick, you can add a splash of milk to reach your desired consistency.
  6. Pour the slush into glasses. This recipe typically serves 4, but you can easily double it for larger gatherings. Use a spoon to help guide the slush into the glasses if needed.
  7. Garnish each serving with fresh orange slices and mint leaves. The mint not only adds a pop of color but also a refreshing aroma that complements the citrus flavors beautifully.
  8. Serve immediately and enjoy! If you’ve made extra, you can refrigerate it for a short time, but it's best enjoyed fresh.
  • Prep Time: 15 min
  • Cook Time: 0 min
  • Category: Dessert
  • Method: Blending
  • Cuisine: American

Nutrition

  • Serving Size: 1 serving
  • Calories: 200
  • Sugar: 30 g
  • Sodium: 50 mg
  • Fat: 5 g
  • Saturated Fat: 3 g
  • Unsaturated Fat: 2 g
  • Trans Fat: 0 g
  • Carbohydrates: 40 g
  • Fiber: 1 g
  • Protein: 2 g
  • Cholesterol: 20 mg

Keywords: Don't skip the orange zest! It's a game-changer for flavor. Always zest before juicing to make it easier.

Did you make this recipe?

Share a photo and tag us — we can't wait to see what you've made!

Zesty Lemon Poppy Seed Delight

One rainy afternoon, I found myself in my grandmother’s cozy kitchen, the kind that always smelled like warmth and love. She was whipping up her famous Lemon Poppy Seed Loaf, a recipe that had been passed down through generations. As the batter came together, the zesty aroma of fresh lemons filled the air, mingling perfectly with the nutty fragrance of poppy seeds. I can still picture her, apron-clad, as she expertly drizzled a vibrant citrus icing over the loaf, creating a glossy, sun-kissed finish that beckoned us to dive in. It was a moment that sparked my own passion for baking, and this recipe has become a cherished staple in my home ever since.

When you take a bite of this Lemon Poppy Seed Loaf, it’s like a burst of sunshine on your palate. The loaf is beautifully golden, with a tender crumb that melts in your mouth. Each slice is speckled with tiny poppy seeds, adding a delightful crunch that contrasts beautifully with the tangy sweetness of the lemon. And that citrus icing? It’s the finishing touch that elevates this loaf from ordinary to extraordinary, with its bright, zesty flavor dancing on your taste buds.

This recipe stands out because it embraces simplicity while delivering on flavor. I’ve added a hint of vanilla to the batter, enhancing the overall taste and making it even more indulgent. Trust me, once you make this Lemon Poppy Seed Loaf With Citrus Icing, it’ll become a go-to in your baking repertoire.

So, let me show you exactly how to make it!

Zesty Lemon Poppy Seed Delight

Why You’ll Love This Recipe

  • Moist and tender crumb that melts in your mouth, thanks to the perfect balance of butter and buttermilk.
  • Bright, zesty lemon flavor paired with crunchy poppy seeds, creating a delightful texture and taste experience.
  • Easy to whip up in just about an hour, perfect for last-minute gatherings or a cozy afternoon treat.
  • Budget-friendly with everyday ingredients, making it an accessible option for all home bakers.
  • The citrus icing adds a sweet tang that elevates the loaf, turning a simple recipe into a showstopper!

Ingredients

  • 1 ½ cups (190g) all-purpose flour
  • 1 teaspoon baking powder
  • ½ teaspoon baking soda
  • ½ teaspoon salt
  • 3 tablespoons poppy seeds
  • ½ cup (115g) unsalted butter, softened to room temperature
  • 1 cup (200g) granulated sugar
  • 2 large eggs
  • 1 teaspoon vanilla extract
  • 1 teaspoon lemon zest (from about 1 medium lemon)
  • ½ cup (120ml) buttermilk
  • 2 tablespoons fresh lemon juice

For the Citrus Icing:

  • 1 cup (120g) powdered sugar
  • 2 tablespoons fresh lemon juice
  • 1 tablespoon orange juice
  • 1 teaspoon lemon zest (for garnish, optional)

Let’s dive into the key ingredients that make this Lemon Poppy Seed Loaf so special. The all-purpose flour provides the structure and base for the loaf, while the baking powder and baking soda ensure it rises perfectly, giving the loaf a light texture. For a gluten-free variation, you could substitute the flour with a gluten-free all-purpose blend. Poppy seeds not only add a delightful crunch but also contribute to the unique flavor profile that pairs well with the citrus notes.

Unsalted butter is crucial for achieving the buttery richness that makes this loaf so moist. If you’re looking for a dairy-free option, coconut oil or a vegan butter can be used instead. The buttermilk is another essential component, providing acidity that activates the baking soda for a fluffy texture. If you don’t have buttermilk on hand, you can easily make a substitute by mixing ½ cup of milk with 1 tablespoon of vinegar or lemon juice and letting it sit for about 5 minutes.

Step-by-Step Instructions

  1. Preheat your oven to 350°F (175°C). Grease a 9×5-inch loaf pan or line it with parchment paper for easy removal later.
  2. In a medium mixing bowl, whisk together 1 ½ cups of all-purpose flour, 1 teaspoon of baking powder, ½ teaspoon of baking soda, ½ teaspoon of salt, and 3 tablespoons of poppy seeds. This helps to evenly distribute the baking agents and ensures a uniform rise.
  3. In a large mixing bowl, cream together ½ cup of softened unsalted butter and 1 cup of granulated sugar using an electric mixer on medium speed for about 3-4 minutes, until the mixture is light and fluffy. Make sure to scrape down the sides of the bowl occasionally.
  4. Add 2 large eggs, 1 teaspoon of vanilla extract, and 1 teaspoon of lemon zest to the creamed butter and sugar, mixing until fully combined. You want a smooth consistency, so ensure there are no lumps of butter.
  5. In a small bowl, combine ½ cup of buttermilk and 2 tablespoons of fresh lemon juice. Alternately add the dry ingredients and buttermilk mixture to the butter mixture, starting and ending with the dry ingredients. Mix just until combined; do not overmix, as this can lead to a dense loaf.
  6. Pour the batter into the prepared loaf pan. Smooth the top with a spatula, ensuring it’s even. Bake in the preheated oven for 50-60 minutes, or until a toothpick inserted in the center comes out clean. The edges should be lightly golden brown, and the center should feel just set.
  7. Once baked, remove the loaf from the oven and allow it to cool in the pan for about 10 minutes. Then, transfer it to a wire rack to cool completely. Resist the urge to slice too soon, as it will be crumbly if it’s still warm.
  8. While the loaf is cooling, prepare the citrus icing. In a medium bowl, whisk together 1 cup of powdered sugar, 2 tablespoons of fresh lemon juice, and 1 tablespoon of orange juice until smooth. If the icing is too thick, you can add a little more juice to reach your desired consistency.
  9. Once the loaf is completely cool, drizzle the citrus icing over the top. If you like, sprinkle with an additional teaspoon of lemon zest for an extra pop of flavor and color.

Pro Tips for the Best Lemon Poppy Seed Loaf With Citrus Icing

  • Be careful not to overmix your batter; this is a common mistake that can lead to a dense loaf. Mix just until the dry ingredients are incorporated for a light and fluffy texture.
  • Use room temperature ingredients, especially the butter and eggs. This helps to create a smoother batter and ensures even baking. Take your eggs out of the fridge about 30 minutes before you start.
  • For a more pronounced lemon flavor, consider adding a little lemon extract in addition to the zest and juice. Just a half teaspoon can elevate the citrus notes significantly.
  • When measuring your flour, spoon it into the measuring cup and level it off with a knife instead of scooping directly from the bag. This prevents packing and ensures you don’t end up with a dry loaf.
  • Invest in a good quality loaf pan; it makes a difference in heat distribution, which ensures even baking. If your pan is dark-coated, reduce the oven temperature by 25°F to prevent over-browning.

Variations & Serving Ideas

For a delightful twist, consider adding blueberries or raspberries to the batter for a fruity burst of flavor. You can also experiment with different citrus fruits—try lime or grapefruit zest and juice for a refreshing change. For a healthier option, substitute half of the all-purpose flour with whole wheat flour for added fiber without compromising too much on texture.

This Lemon Poppy Seed Loaf pairs beautifully with a light salad, such as a mixed greens salad with a vinaigrette, or a cup of tea for a cozy afternoon treat. It also complements a creamy cheese platter, as the acidity of the loaf balances rich cheeses perfectly. Lastly, a scoop of vanilla ice cream on the side creates a delightful contrast of temperatures and flavors!

Storage, Make-Ahead & Reheating

This Lemon Poppy Seed Loaf can be stored at room temperature for up to 3 days if wrapped tightly in plastic wrap. If you want to keep it longer, it freezes well for up to 3 months. To freeze, wrap the loaf tightly in plastic wrap and then in aluminum foil to prevent freezer burn.

When you’re ready to enjoy it again, simply thaw it in the fridge overnight. Reheat individual slices in the microwave for 15-20 seconds or in a toaster oven until warmed through. Interestingly, many people find that this loaf tastes even better the next day, as the flavors have time to meld!

Frequently Asked Questions

Can I make Lemon Poppy Seed Loaf With Citrus Icing ahead of time?

Yes — in fact, it tastes even better the next day! You can make the loaf a day in advance, allowing the flavors to develop. Just be sure to store it in an airtight container to maintain its moisture.

Can I substitute the poppy seeds?

Absolutely! If you don’t have poppy seeds on hand or prefer an alternative, you can use sesame seeds for a similar crunch or omit them entirely for a smooth loaf.

What can I use instead of buttermilk?

If you don’t have buttermilk, you can easily create a substitute by mixing ½ cup of milk (dairy or plant-based) with 1 tablespoon of vinegar or lemon juice. Let it sit for 5 minutes before using in the recipe.

How can I make this recipe gluten-free?

To make a gluten-free version of this Lemon Poppy Seed Loaf, substitute the all-purpose flour with a gluten-free all-purpose flour blend. Just ensure that the blend contains a binding agent like xanthan gum for the best results.

What is the best way to store leftover loaf?

Leftover Lemon Poppy Seed Loaf should be stored in an airtight container at room temperature for up to 3 days. For longer storage, wrap it tightly and freeze for up to 3 months. Thaw it before serving for the best texture.

Zesty Lemon Poppy Seed Delight

Final Thoughts

The Lemon Poppy Seed Loaf with Citrus Icing is truly a delightful treat that brings a burst of brightness to any occasion. The zesty lemon flavor combined with the subtle crunch of poppy seeds creates a satisfying balance, while the citrus icing adds a touch of sweetness that perfectly complements the loaf’s tanginess.

This is the kind of recipe I come back to again and again, especially when I want to brighten up a gloomy day or celebrate a small victory. The aroma that fills the kitchen as it bakes is absolutely heavenly! I encourage you to give this recipe a try; you might just find it becoming a beloved staple in your home. Don’t forget to share your results or even add your own unique twist—I can’t wait to see what you create!

Print
clock clock iconcutlery cutlery iconflag flag iconfolder folder iconinstagram instagram iconpinterest pinterest iconfacebook facebook iconprint print iconsquares squares iconheart heart iconheart solid heart solid icon

Lemon Poppy Seed Loaf


  • Author: Lily author
  • Total Time: 14 minute
  • Yield: 1 loaf 1x
Pin Recipe
Print Recipe

Description

This Lemon Poppy Seed Loaf is a delightful treat that combines zesty lemon flavor with crunchy poppy seeds. Topped with a citrus icing, it’s perfect for any occasion.


Ingredients

Scale
  • 1 ½ cups (190g) all-purpose flour
  • 1 teaspoon baking powder
  • ½ teaspoon baking soda
  • ½ teaspoon salt
  • 3 tablespoons poppy seeds
  • ½ cup (115g) unsalted butter, softened to room temperature
  • 1 cup (200g) granulated sugar
  • 2 large eggs
  • 1 teaspoon vanilla extract
  • 1 teaspoon lemon zest (from about 1 medium lemon)
  • ½ cup (120ml) buttermilk
  • 2 tablespoons fresh lemon juice
  • 1 cup (120g) powdered sugar
  • 2 tablespoons fresh lemon juice
  • 1 tablespoon orange juice
  • 1 teaspoon lemon zest (for garnish, optional)

Instructions

  1. Preheat your oven to 350°F (175°C). Grease a 9×5-inch loaf pan or line it with parchment paper for easy removal later.
  2. In a medium mixing bowl, whisk together 1 ½ cups of all-purpose flour, 1 teaspoon of baking powder, ½ teaspoon of baking soda, ½ teaspoon of salt, and 3 tablespoons of poppy seeds. This helps to evenly distribute the baking agents and ensures a uniform rise.
  3. In a large mixing bowl, cream together ½ cup of softened unsalted butter and 1 cup of granulated sugar using an electric mixer on medium speed for about 3-4 minutes, until the mixture is light and fluffy. Make sure to scrape down the sides of the bowl occasionally.
  4. Add 2 large eggs, 1 teaspoon of vanilla extract, and 1 teaspoon of lemon zest to the creamed butter and sugar, mixing until fully combined. You want a smooth consistency, so ensure there are no lumps of butter.
  5. In a small bowl, combine ½ cup of buttermilk and 2 tablespoons of fresh lemon juice. Alternately add the dry ingredients and buttermilk mixture to the butter mixture, starting and ending with the dry ingredients. Mix just until combined; do not overmix, as this can lead to a dense loaf.
  6. Pour the batter into the prepared loaf pan. Smooth the top with a spatula, ensuring it’s even. Bake in the preheated oven for 50-60 minutes, or until a toothpick inserted in the center comes out clean. The edges should be lightly golden brown, and the center should feel just set.
  7. Once baked, remove the loaf from the oven and allow it to cool in the pan for about 10 minutes. Then, transfer it to a wire rack to cool completely. Resist the urge to slice too soon, as it will be crumbly if it’s still warm.
  8. While the loaf is cooling, prepare the citrus icing. In a medium bowl, whisk together 1 cup of powdered sugar, 2 tablespoons of fresh lemon juice, and 1 tablespoon of orange juice until smooth. If the icing is too thick, you can add a little more juice to reach your desired consistency.
  9. Once the loaf is completely cool, drizzle the citrus icing over the top. If you like, sprinkle with an additional teaspoon of lemon zest for an extra pop of flavor and color.
  • Prep Time: 15 mins
  • Cook Time: 50-60 mins
  • Category: Dessert
  • Method: Baking
  • Cuisine: American

Nutrition

  • Serving Size: 1 slice
  • Calories: 200
  • Sugar: 15 g
  • Sodium: 150 mg
  • Fat: 8 g
  • Saturated Fat: 5 g
  • Unsaturated Fat: 3 g
  • Trans Fat: 0 g
  • Carbohydrates: 30 g
  • Fiber: 1 g
  • Protein: 3 g
  • Cholesterol: 40 mg

Keywords: Be careful not to overmix your batter; this is a common mistake that can lead to a dense loaf. Use room temperature ingredients for a smoother batter and even baking.

Did you make this recipe?

Share a photo and tag us — we can't wait to see what you've made!

  • Privacy Policy
  • Terms Of Service
  • Contact
  • About
  • GDPR

Copyright © 2025 Homesmad