• Skip to primary navigation
  • Skip to main content
  • Skip to primary sidebar
Homesmad

Homesmad

  • Home
  • Breakfast & Brunch
  • Appetizers & Snacks
  • Dinner
  • Dessert
  • About
  • Privacy Policy
  • Contact
Homesmad
  • Home
  • Breakfast & Brunch
  • Appetizers & Snacks
  • Dinner
  • Dessert
  • About
  • Privacy Policy
  • Contact

Spooky Baked Halloween Chips: Fun & Easy Halloween Treat

September 26, 2025 by Lily author

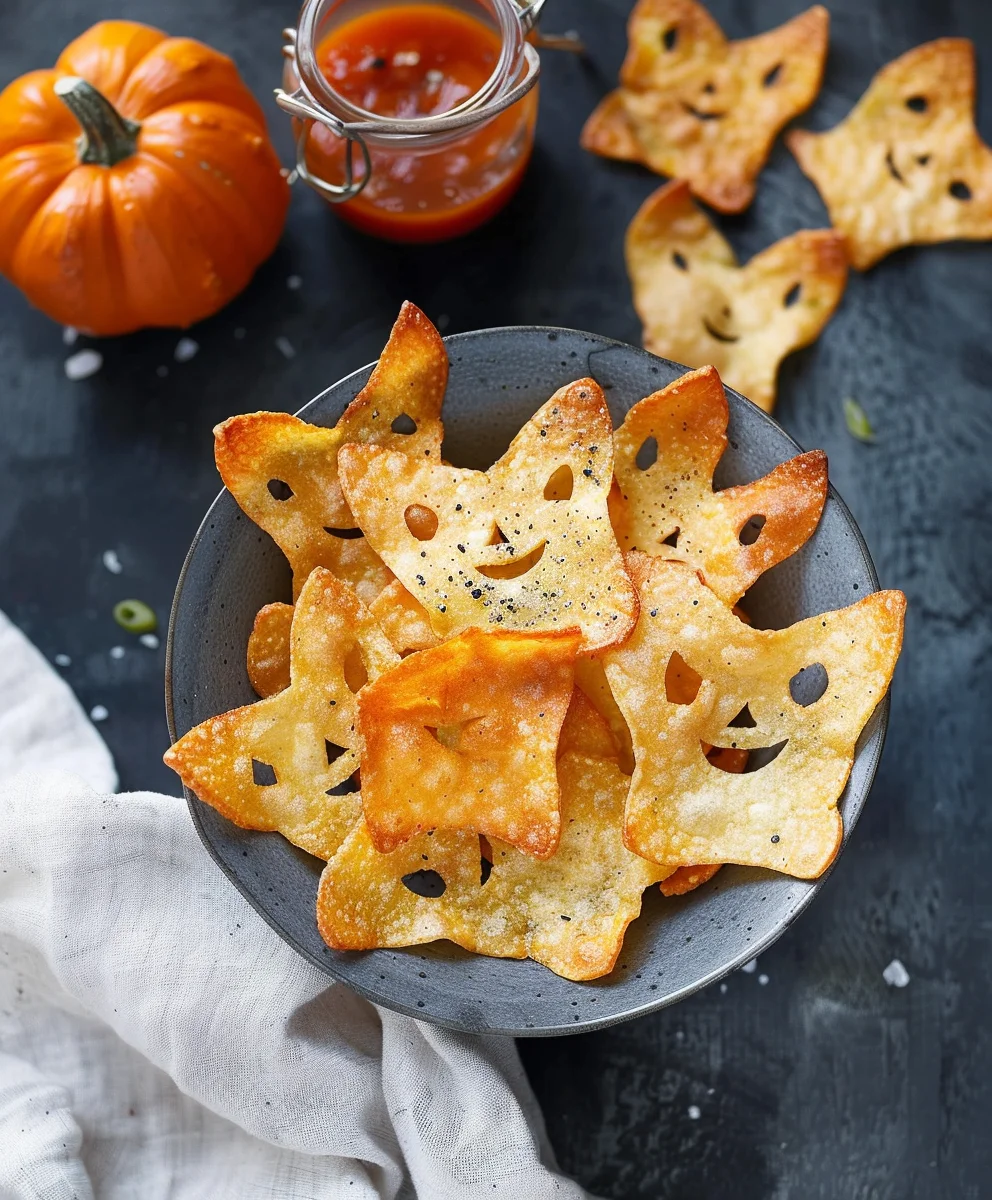
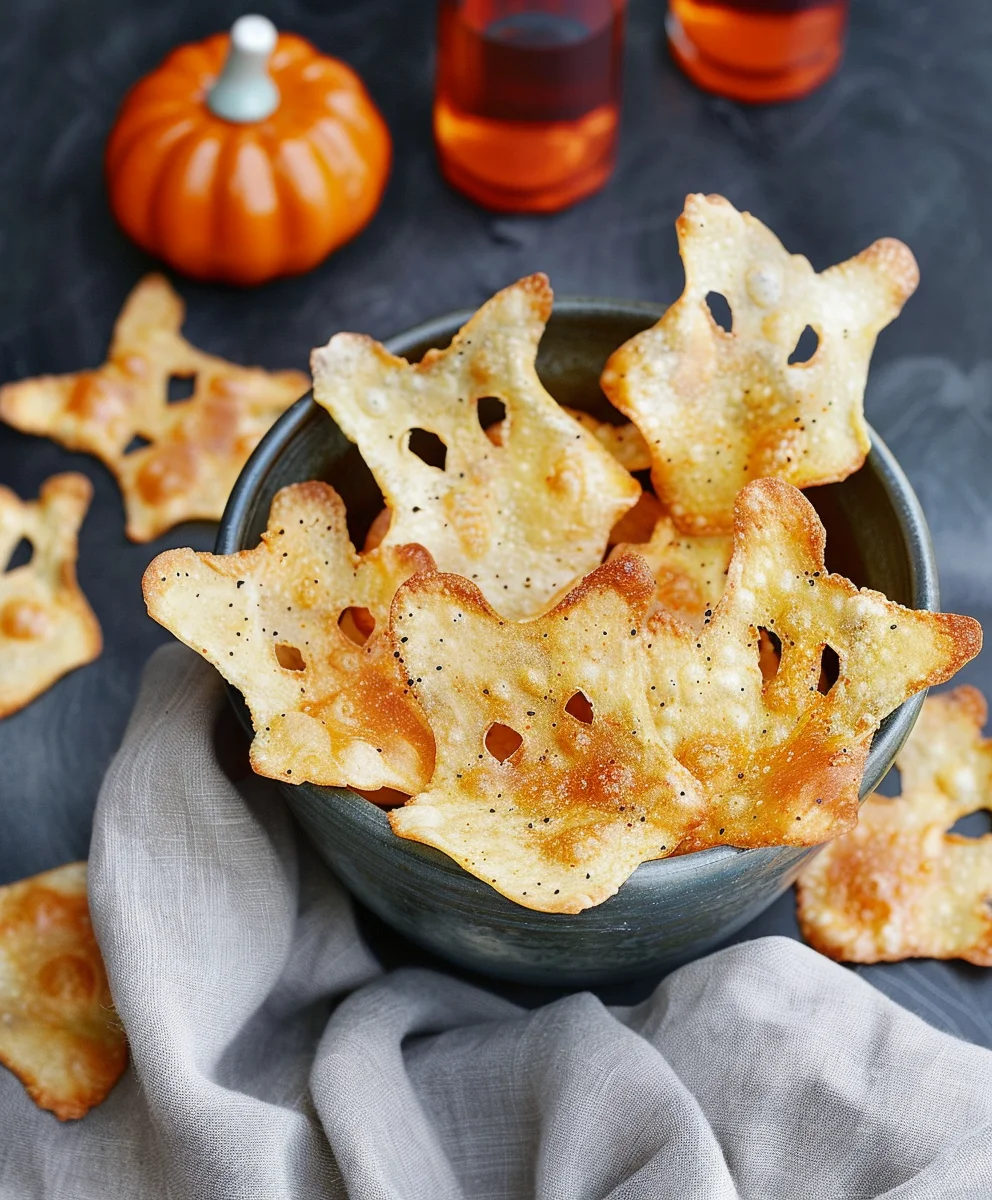
Spooky Baked Halloween Chips are here to transform your festive snacking! As the leaves turn vibrant shades and a crisp chill fills the air, my mind inevitably drifts to one of my favorite holidays: Halloween. It’s a time for imaginative costumes, thrilling decorations, and, of course, delightfully themed treats. While candy often takes center stage, I’ve always believed that savory snacks deserve their moment in the spooky spotlight too. That’s where these incredible homemade chips come in, offering a unique blend of fun and flavor that store-bought options simply can’t match.

There’s a wonderful tradition of crafting special foods for holidays, and Halloween, with its rich tapestry of folklore and celebration, provides the perfect canvas for culinary creativity. These chips aren’t just about delicious taste; they’re about embracing the spirit of the season with every bite. People adore this dish not only for its irresistible crispiness and customizable seasoning but also for its sheer convenience as a party favorite. Imagine serving a platter of uniquely shaped, golden-brown chips that perfectly complement your Halloween spread, all while knowing they’re a healthier, baked alternative to their fried counterparts. I promise you, once you try these Spooky Baked Halloween Chips, they’ll become a cherished part of your annual celebrations, bringing smiles and delicious crunch to ghoulish gatherings.

Spooky Baked Halloween Chips: Fun & Easy Halloween Treat this RECIPE

Ingredients:

  • For the Chips:
    • 12-16 large corn or flour tortillas (8-10 inch diameter): I find that both corn and flour tortillas work beautifully for these "Spooky Baked Halloween Chips," but they offer slightly different textures. Corn tortillas tend to yield a crispier, more traditional chip-like texture, while flour tortillas are a bit lighter and puffier, sometimes puffing up a bit more like pita chips. Feel free to use your favorite! You’ll want large ones to maximize the surface area for cutting your fun Halloween shapes. The bigger the tortilla, the more spooky shapes you can get from each one, minimizing waste and maximizing your creepy creations.
    • 2-3 tablespoons olive oil or avocado oil: These oils have a high smoke point and a neutral flavor that won’t overpower your chips. Olive oil offers a slightly richer taste and a beautiful aroma, while avocado oil is almost undetectable, allowing the carefully selected spices to truly shine. We’ll be brushing or spraying this onto our meticulously cut shapes, ensuring a thin, even coat that promotes crispiness and helps the spices adhere beautifully.
    • 1 teaspoon fine sea salt: Absolutely essential for bringing out all the delicious flavors and providing that satisfying salty crunch we all love in a good chip. I prefer fine sea salt because its tiny granules adhere wonderfully to the chips and provide a consistent, even salty flavor in every bite, rather than uneven pockets of intense saltiness.
    • ½ teaspoon garlic powder: This adds a lovely, aromatic, savory depth that is a cornerstone of any truly great chip seasoning. It contributes a foundational flavor that complements the other spices without being overpowering.
    • ½ teaspoon onion powder: Similar to garlic powder, onion powder contributes another layer of savory deliciousness, rounding out the spice blend with its subtle sweetness and pungent aroma. Together, garlic and onion powder create that classic, irresistible savory base.
    • ½ teaspoon smoked paprika: Oh, this is a game-changer for these "Spooky Baked Halloween Chips"! Smoked paprika not only lends a beautiful, rustic reddish hue that can evoke autumn leaves or dried blood (if you’re going for a really spooky vibe!), but it also imparts a wonderful, subtly smoky, and slightly sweet flavor that elevates these chips beyond just salty. It truly makes them special and adds an unexpected layer of complexity.
    • ¼ teaspoon chili powder (optional, adjust to taste): If you like a little kick to your snacks, a touch of chili powder is fantastic. It adds warmth and a gentle spice without being overwhelmingly hot, perfect for a cozy fall evening. You can certainly omit it if you prefer a milder chip, or increase it if you dare!
    • ⅛ teaspoon ground cumin (optional): Cumin adds an earthy, slightly warm, and subtly smoky note that complements the other spices beautifully, especially if you’re using corn tortillas, which often pair wonderfully with Tex-Mex flavors. It brings a depth of flavor that some might find irresistible.
    • Pinch of cayenne pepper (optional, for extra heat): For those who truly love a spicy snack that makes your taste buds tingle, a tiny pinch of cayenne will deliver a noticeable, zesty heat. Use sparingly at first, as a little goes a long way, but it can certainly elevate the thrill of your "Spooky Baked Halloween Chips"!
  • For the Spooky Colors (Optional but highly recommended for Halloween!):
    • Gel food coloring (black, orange, purple, green): Liquid food coloring can make the tortillas too wet and potentially soggy, so I highly recommend using gel food coloring. Just a tiny dab goes a remarkably long way to transform your chips into a vibrant, festive, and undeniably eerie display. These colors will truly make your "Spooky Baked Halloween Chips" pop!
    • Small brushes or pastry brushes: These are absolutely perfect for evenly applying the colored oil to your intricately cut chip shapes. Having a few on hand, one for each color you plan to use, will prevent any undesirable mixing of your vibrant hues, ensuring each chip maintains its distinct, spooky shade.
  • Equipment You’ll Need:
    • Halloween-themed cookie cutters: This is where the real fun begins and your creativity can shine! Think classic Halloween shapes like bats, ghosts, pumpkins (especially jack-o’-lantern faces!), spiders, witch hats, or even simple circles with jagged edges for a "torn" or "monster bite" look. The more variety, the more exciting your chip platter will be!
    • Large baking sheets: You’ll need at least two, preferably three, large baking sheets to avoid overcrowding your "Spooky Baked Halloween Chips." Overcrowding leads to steaming instead of crisping, which is the enemy of a perfect chip!
    • Parchment paper or silicone baking mats: Absolutely essential for preventing sticking, ensuring easy removal of your delicate chip shapes, and making cleanup an absolute breeze. Don’t skip this crucial step!
    • Pastry brush or spray bottle for oil: A small, clean pastry brush works wonderfully for even oil distribution. If you happen to have an oil mister or spray bottle, that’s even better for achieving a very light, uniform coating without saturating the tortillas.
    • Small bowls for spices and colors: You’ll want a few small bowls for mixing your spice blend and for holding your gel food coloring if you’re going the extra mile for vibrant colors.
    • Wire cooling rack: This is an important piece of equipment for letting the chips cool completely and for maintaining their delightful crispiness after baking. Cooling on a flat surface can lead to soggy spots.

Preparing Your Spooky Workspace

Before we dive into cutting and baking these delightfully spooky snacks, let’s get our kitchen in order. A little bit of meticulous preparation goes a very long way in making the whole process smooth, enjoyable, and free of last-minute stress. Trust me, you don’t want to be scrambling for parchment paper or mixing spices when your oven is already preheated and your charming chip shapes are ready to go!

  1. Preheat the Oven to a Perfect Crisp: First things first, let’s get that oven ready to work its magic. I always preheat my oven to a precise 375°F (190°C). This specific temperature is absolutely ideal for getting our "Spooky Baked Halloween Chips" wonderfully crispy and golden brown without burning them too quickly on the edges. Give your oven at least 15-20 minutes to fully reach and stabilize at this temperature; consistency is a truly key factor for achieving perfectly even baking results.
  2. Line Your Baking Sheets: Next, grab your large baking sheets. I strongly recommend having at least two, and possibly even three, ready to go and lined. Line each one generously with either parchment paper or a reliable silicone baking mat. This step is absolutely crucial for preventing your delicate "Spooky Baked Halloween Chips" from sticking to the pan, and it makes cleanup an absolute breeze afterwards. There’s nothing more frustrating than having perfectly baked chips welded to your baking pan!
  3. Prepare Your Custom Spice Blend: In a small, clean bowl, combine all your carefully chosen dry spices: the fine sea salt, aromatic garlic powder, savory onion powder, the distinctive smoked paprika, and any optional chili powder, earthy ground cumin, or fiery cayenne pepper you’ve decided to incorporate. Give them a really good, thorough stir with a spoon to ensure they are completely and uniformly mixed. This way, you’ll be guaranteed to get a consistent and delicious flavor profile on every single chip, without any bite being too bland or too intense. Having this blend ready saves precious time when you’re in the midst of oiling your chip shapes.
  4. Set Up Your Coloring Station (If Using for Maximum Spookiness!): If you’re truly going all out for Halloween with spectacularly colored chips, now is the perfect time to prepare your food coloring. Get several small, individual bowls or plates, one for each distinct color you plan to use (e.g., eerie black, vibrant orange, mystical purple, wicked green). Add just a tiny dab of concentrated gel food coloring to each bowl. You’ll also want a separate, dedicated small brush for each color to meticulously apply the hues and, most importantly, to avoid muddying your beautiful, vibrant shades. You can either mix a tiny bit of the olive oil directly into each color in these small dishes here for a more pre-mixed colored oil, or you can brush the oil onto the chips first and then carefully dab on the concentrated color. I often prefer mixing the oil and color together in these small dishes for a more even and effortless application.

Crafting the Spooky Shapes

This is arguably the most fun and creative part of the entire process! Transforming plain, unassuming tortillas into ghoulish ghosts, creepy bats, and smiling pumpkins is precisely what makes these "Spooky Baked Halloween Chips" truly special and undeniably festive. So, gather your courage, unleash your inner Halloween artist, and don’t be afraid to experiment with a variety of different shapes and sizes!

  1. Stack and Precisely Cut Your Tortillas: Take 2-3 tortillas and carefully stack them neatly on top of each other. Stacking them allows you to cut multiple identical chip shapes at once, making the process much faster and more efficient, especially if you’re making a large batch. If you attempt to stack too many, the cookie cutters might not be able to cut through all the layers cleanly, resulting in ragged edges, so 2-3 tortillas is usually the absolute sweet spot for clean, defined cuts.
  2. Unleash Your Inner Halloween Artist with Cookie Cutters: Now for the truly creative and exciting bit! Press your chosen Halloween-themed cookie cutters firmly and decisively into the stacked tortillas. Try to get as many shapes as humanly possible from each stack to minimize waste and maximize your spooky output. Wiggle the cutters ever-so-slightly to ensure a perfectly clean and crisp cut, then carefully lift them off. You’ll be left with wonderfully shaped, raw pieces of tortilla, ready for their transformation.
  3. Carefully Gather Your Spooky Shapes: Gently peel the freshly cut tortilla shapes away from the remaining tortilla scraps. Place these delicate shapes directly onto your already prepared baking sheets, ensuring they are arranged in a single, uncrowded layer. It’s incredibly, incredibly important not to overlap them at all. Overlapping will trap steam and prevent them from crisping up evenly, and you’ll sadly end up with chewy, rather than delightfully crispy, spots in your "Spooky Baked Halloween Chips." Make sure to leave a little bit of space between each individual shape for optimal air circulation during baking.
  4. Don’t Waste the Scraps! (Optional, but highly recommended for maximizing treats): Please, whatever you do, do not throw away those perfectly good leftover tortilla scraps! I absolutely love to cut them into smaller, irregular triangles, thin strips, or even just random jagged pieces. These bake up just as deliciously and make for excellent, rustic dippers for your favorite salsas or dips. It’s a fantastic way to ensure zero waste and to get even more chips for your snacking pleasure, adding a charmingly rustic element to your spooky spread. Place these scraps on a separate part of your baking sheet or on another dedicated sheet.
  5. Repeat the Entire Cutting Process: Continue the delightful process of stacking, meticulously cutting, and carefully arranging your tortilla shapes until you’ve successfully used up all your tortillas. By this point, your baking sheets should be looking quite festive, wonderfully arranged, and perfectly ready for their next magical transformation in the oven!

Seasoning for Maximum Flavor and Fright

Now that we have all our delightful spooky shapes meticulously cut out and arranged, it’s time to bestow upon them their irresistible flavor and, if you choose, their vibrant, eerie colors. This step is where the true magic truly happens, transforming simple, plain tortillas into crave-worthy "Spooky Baked Halloween Chips" that are as delicious as they are visually striking.

  1. Lightly Oil Your Chips for Crispiness: There are a couple of highly effective ways to apply the oil, and I’ve found both to be excellent, depending on your preference and tools.
    • Method 1 (Brush/Spray Directly on Baking Sheet): If your carefully cut chip shapes are already perfectly arranged on the baking sheet, lightly brush or mist them with your chosen olive oil or avocado oil. You really don’t want to drench them excessively; just a light, very even coating is absolutely perfect. This thin layer of oil is crucial as it helps the spices adhere wonderfully and significantly promotes that desirable, consistent crisping during baking.
    • Method 2 (Toss Gently in a Bowl – Best for Scraps/Smaller Batches): For the leftover tortilla scraps or if you’re working with smaller, more robust batches of shapes, you can gently toss them in a large mixing bowl with the oil. Be incredibly careful if your shapes are particularly delicate! Just a tablespoon or two of oil for a whole batch of chips is usually more than sufficient; remember, we’re aiming for a light coating, not a deep-fried effect.

    The ultimate goal here is a very thin, perfectly even coat of oil on both sides of each and every chip. I usually oil one side extensively on the baking sheet, then very gently flip them over using tongs to oil the other side, ensuring complete coverage.

  2. Generously Sprinkle with Your Custom Spice Blend: Once your chips are perfectly and lightly oiled, it’s time for the burst of flavor! Generously sprinkle your meticulously prepared spice blend over all the tortilla shapes covering the baking sheets. I often like to lift the parchment paper slightly and gently shake the entire sheet to help distribute the spices as evenly as possible. You can also lightly pat them down with your fingertips to ensure excellent adhesion of the spices. Make absolutely sure every single chip gets a good, thorough dusting of this flavorful blend.
  3. Add Your Spooky Colors (Optional, but SO Much Fun and Highly Recommended!): If you’re making vibrantly colored "Spooky Baked Halloween Chips," this is precisely where your pre-set coloring station comes into play.
    • Option A (Pre-Mixed Oil & Color for Even Hues): If you took the proactive step of mixing the gel food coloring directly into small amounts of oil in separate bowls, now you’ll use your dedicated brushes to lightly and artfully brush the colored oil onto your chips. For example, use a black-oil brush for your bat shapes, a vibrant orange-oil brush for your pumpkins, and a ghostly purple-oil brush for your ghost shapes. This technique provides a very even, brilliantly vibrant color across the entire surface of the chip.
    • Option B (Oil First, Then Dab/Paint Color for Artistic Flair): If you’ve just oiled the chips without pre-mixing color, you can now use your clean brushes to meticulously dab or lightly paint the concentrated gel food coloring directly onto the oiled chips. Remember, a very small amount of gel color goes an incredibly long way. You can even create mesmerizing marbled effects, or paint tiny, expressive faces on your ghost or pumpkin shapes for an extra touch of personalization! For intensely black chips, cover the entire surface for a dramatic and truly eerie look. For orange, just a light, even coat can make them glow like little, cheerful jack-o’-lanterns.

    Be especially mindful not to use too much food coloring, as an excessive amount can potentially make the chips slightly soggy or, in rare cases, impart a subtle bitter taste if overdone. A thin, yet vibrantly colorful layer is absolutely perfect for achieving stunning aesthetics without compromising that desired crunch.

Baking Your Terrifying Treats to Crispy Perfection

With all the precise cutting and flavorful seasoning done, it’s finally time to bring these "Spooky Baked Halloween Chips" to life in the comforting warmth of your oven! This is a relatively quick process, but it absolutely requires a very watchful eye and a little patience to ensure they achieve that perfect, irresistible crispy texture without any dreaded over-baking. Nobody wants a burnt ghost!

  1. Into the Hot Oven They Go: Carefully and confidently slide your prepared baking sheets, laden with their spooky cargo, into your preheated 375°F (190°C) oven. If you’re utilizing multiple sheets, which I highly recommend for even baking, make sure to rotate them halfway through the baking time to ensure consistent cooking. For instance, if you have two sheets, swap their positions from the top to the bottom rack, and simultaneously rotate them from front to back for truly uniform results.
  2. Bake Until Golden and Crisp: The precise baking time will naturally vary depending on the specific quirks of your individual oven, the exact thickness of your chosen tortillas, and whether you used hearty corn or lighter flour tortillas.
    • For Corn Tortillas: These generally bake faster and achieve a more pronounced, satisfying crispness. Start diligently checking them around the 6-8 minute mark. They should appear lightly golden brown around the edges and feel wonderfully firm and rigid to the touch when gently lifted.
    • For Flour Tortillas: These might require a little more time, typically around 8-12 minutes. They tend to puff up slightly in the oven, creating delightful little air pockets, and will become a beautiful, appetizing light golden color.

    I cannot stress this enough: please keep a very, very close eye on them! Tortillas have an uncanny ability to go from perfectly golden and delicious to disappointingly burnt in a matter of mere seconds. Different shapes or varying thicknesses might also bake at slightly different rates, so don’t hesitate to remove any smaller or thinner chips as soon as they reach their desired crispness, allowing the larger ones to continue baking.

  3. Flip for Ultimate Even Crispiness (Optional but Highly Recommended): For the absolute ultimate crispness, especially when working with slightly thicker flour tortillas or larger, more substantial shapes, you might want to gently and carefully flip the chips halfway through their baking time. This simple action helps both sides get equally toasted and ensures a beautifully uniform crunch throughout. Use delicate tongs or a very thin spatula for this task to avoid breaking your fragile, freshly baked creations.
  4. The Critical Check for Doneness: A truly crisp and perfectly baked chip will not bend easily; it should feel quite sturdy and firm. If it still feels soft or pliantly flexible in the center, it definitely needs a little more time in the oven to fully dry out and crisp up. If you take one out and allow it to cool for just a minute or so, it should become delightfully crunchy and shatter easily when broken. If it’s still a bit soft, simply pop it back in for another minute or two, checking frequently. Under-baking will regrettably result in disappointingly chewy chips, and over-baking will lead to tragically burnt ones. You’re aiming for that elusive, perfect sweet spot of golden-brown, audible crunch.
  5. Remove from Oven with Care: Once your "Spooky Baked Halloween Chips" are precisely as crisp and golden as you desire, carefully remove the baking sheets from the hot oven. The aroma that fills your kitchen will be absolutely incredible – a truly rewarding fragrance that signifies your efforts have paid off wonderfully!

The Grand Finale: Cooling, Storing, and Serving Your Spooky Snacks

You’ve done all the hard work of cutting, seasoning, and baking, and now it’s time for the final, crucial touches that will ensure your "Spooky Baked Halloween Chips" are at their absolute, crispy best. A little bit of patience and attention to detail in this final stage will be richly rewarded with maximum crunch, vibrant colors, and unforgettable flavor.

  1. Cool Completely on a Wire Rack: This step is utterly non-negotiable for achieving truly exceptional, truly crispy chips! As soon as the chips come out of the oven, use a thin spatula or tongs to carefully transfer them from the hot baking sheets to a wire cooling rack. Do not, under any circumstances, leave them on the hot baking sheets, as they will continue to cook from residual heat and, more importantly, can become annoyingly soggy from trapped condensation as they cool. Allowing them to cool completely on a wire rack ensures that air circulates freely all around them, preventing any moisture buildup and guaranteeing the ultimate, satisfying crispness.
  2. Be Patient – Let Them Get Cold: Resist that powerful, almost irresistible urge to devour them immediately! While warm chips are undeniably delicious, their true, deep-seated crispness truly develops and intensifies as they cool completely to room temperature. This usually takes about 10-15 minutes, depending on your kitchen’s ambient temperature and humidity levels. I promise you, the short wait is absolutely worth it for that satisfying, unmistakable snap and crunch!
  3. Taste Test and Adjust (If Needed): Once your "Spooky Baked Halloween Chips" are thoroughly cool, pick up a chip (or five, who’s counting?) and give it a discerning taste. Is the seasoning just right for your palate? Do you wish you had added a touch more chili powder for an extra kick? This is a fantastic time to make mental notes for your very next batch of "Spooky Baked Halloween Chips" – practice makes perfect! Sometimes, I’ll even sprinkle a tiny bit more fine sea salt or a pinch of garlic powder if I feel they need it after cooling, as flavors can mellow slightly.
  4. Storing Your Spooky Stash for Prolonged Freshness: If, by some miraculous stroke of willpower, you have any leftover "Spooky Baked Halloween Chips," proper storage is absolutely key to maintaining their delightful crunch and fresh flavor.
    • Once they are completely cool to the touch, store them in an airtight container or a robust re-sealable bag at cool room temperature.
    • Definitely avoid the refrigerator, as the humidity inside can unfortunately make them soft and lose their crisp texture very quickly.
    • They will stay wonderfully crisp and delicious for up to 3-4 days when stored correctly. After that, they might start to lose a tiny bit of their initial, exhilarating crunch, but they’ll still be perfectly edible and undeniably tasty.
    • For a quick refresh: If they do get a little soft or seem to lose their sparkle, don’t despair! You can easily spread them out in a single layer on a baking sheet and pop them back into a preheated 300°F (150°C) oven for just 3-5 minutes, until they are gloriously crisp again. Just remember to let them cool completely on a wire rack once more after reheating.

    This re-crisping trick is a genuine lifesaver for extending their shelf life and ensuring not a single "Spooky Baked Halloween Chip" goes to waste!

  5. Serving Suggestions for Your Halloween Extravaganza: These "Spooky Baked Halloween Chips" are absolutely fantastic and dangerously addictive on their own, but they truly shine and make a statement when paired with a variety of vibrant dips. They instantly elevate any Halloween party spread!
    • Classic Salsa: A vibrant, chunky red salsa makes a perfect, timeless pairing, especially for the dramatically black or wickedly green chips, creating a striking and visually appealing contrast.
    • Creamy Guacamole: Fresh, creamy green guacamole is always an undeniable winner and looks absolutely spectacular with bright orange or mystical purple chips.
    • Warm Cheesy Dips: A warm, gooey, bubbling cheese dip provides a comforting, savory contrast to the delicate crispiness of the chips. Think nacho cheese or a spicy queso!
    • Savory Spinach Artichoke Dip: The rich, savory, and slightly tangy flavors of a classic spinach artichoke dip are a delightful and sophisticated complement to these festive chips.
    • Impressive Layered Dip: Imagine the visual impact of a seven-layer dip where the very top layer is artfully adorned with your festive, spooky chips, standing proud and ready for dipping!
    • As a Crunchy Garnish: Don’t forget the versatility! Crush some of the smaller, irregular pieces or any "scraps" you baked, and use them as an incredible, crunchy topping for hearty chili, a vibrant taco salad, or even sprinkled on top of a delicious, creamy Halloween soup for added texture and visual appeal.

    No matter how you choose to serve them, these homemade "Spooky Baked Halloween Chips" are absolutely sure to be a roaring hit at any Halloween gathering, a delightful and imaginative snack for a spooky movie night, or simply a fun, festive treat for yourself. They’re a truly delightful, homemade alternative to bland store-bought chips and beautifully embody the thrilling spirit of the season with every single, crunchy bite! Enjoy creating and, of course, devouring your terrifyingly tasty, colorful creations!

Spooky Baked Halloween Chips: Fun & Easy Halloween Treat

Conclusion:

And there you have it, my friends! We’ve reached the grand finale of our culinary adventure, and I truly hope you’re as excited as I am about the prospect of bringing these delightful treats to life in your own kitchen. After all, what’s not to love about a recipe that is not only incredibly straightforward and budget-friendly but also delivers a massive punch of fun and flavor? This isn’t just about making a snack; it’s about crafting an experience, a little bit of homemade magic that transforms simple ingredients into something truly special and memorable for the Halloween season. I believe these Spooky Baked Halloween Chips are an absolute must-try for anyone looking to add a unique, festive, and utterly delicious element to their autumnal celebrations, without all the fuss of overly complicated preparations.

The beauty of this recipe lies in its simplicity and versatility. We’re talking about achieving that perfect crispiness, that satisfying crunch, and a flavor profile that’s wonderfully savory and utterly addictive. Imagine the smiles, the oohs and aahs, as your guests or family members discover these creatively shaped, perfectly seasoned chips. They are a conversation starter, a delightful surprise, and a testament to how a little creativity in the kitchen can elevate even the most casual of gatherings. Beyond their undeniable charm, they offer a healthier alternative to many store-bought options, giving you full control over the ingredients and seasonings, which is a massive win in my book!

Now, let’s talk about taking these amazing chips to the next level with some serving suggestions and variations. While they are undeniably fantastic on their own, a good dip can truly elevate the experience. Imagine them alongside a vibrant, chunky “Witches’ Brew” guacamole, brimming with fresh avocado, lime, and cilantro. Or perhaps a bubbling, warm “Cauldron Cheese Dip,” rich and gooey, ready to coat every spectral shape. For those who enjoy a bit of a kick, a “Vampire’s Kiss” spicy salsa, with a hint of smoky chipotle, would be an absolutely divine pairing. Don’t be afraid to think outside the box; a creamy hummus dyed green with a touch of spinach or black with activated charcoal (food-grade, of course!) could also make for an incredibly spooky and delicious accompaniment.

But why stop there? The fun really begins when you start to experiment with variations. While we’ve focused on classic potato chips, think about expanding your horizons to other root vegetables. Imagine ghostly white parsnip chips, delicately sweet and earthy, or vibrant orange sweet potato chips, adding another layer of autumnal color and flavor to your spooky spread. You could even try thinly sliced beet chips for a truly blood-red, dramatic effect! When it comes to seasonings, the sky’s the limit. A sprinkle of smoked paprika can add a campfire ghost flavor, while a dash of garlic powder and dried herbs can mimic a “potion” flavor profile. For a cheesy twist without actual cheese, a dusting of nutritional yeast can provide that savory, umami richness that everyone loves. If you’re feeling adventurous, a touch of cinnamon and sugar could even transform these into a surprisingly delightful sweet treat, perfect for dipping in a pumpkin spice cream cheese dip – now wouldn’t that be an unexpected twist?

I genuinely, truly, cannot wait for you to try this recipe. It’s more than just following instructions; it’s an invitation to infuse joy and creativity into your holiday preparations. Gather your loved ones, crank up some spooky tunes, and get slicing and baking! Once you’ve whipped up your own batch of these incredible chips, I implore you to share your experience. Did you find a new favorite dip? Did you experiment with different shapes or seasonings? I’d absolutely love to hear all about your culinary adventures. Share your photos, tell me about your clever variations, or even recount the reactions of your friends and family. Let’s create a community of spooky snack enthusiasts! Tag your creations and help spread the word about these wonderfully festive, utterly addictive, and truly homemade Spooky Baked Halloween Chips. Here’s to a deliciously spooky season, filled with good food, great company, and plenty of happy munching!


Spooky Baked Halloween Chips

Spooky Baked Halloween Chips

Spooky Baked Halloween Chips are here to transform your festive snacking! These incredible homemade chips offer a unique blend of fun and flavor that store-bought options simply can’t match, embracing the spirit of the season with every bite. They’re a healthier, baked alternative and a perfect party favorite for ghoulish gatherings.

Prep Time
20 Minutes

Cook Time
10 Minutes

Total Time
30 Minutes

Servings
24-32 chips

Ingredients

  • 4 flour tortillas (gluten-free or grain-free, as needed)
  • Avocado or olive oil spray
  • Salt

Instructions

  1. Step 1
    Preheat oven to 375°F (190°C). Line two large baking sheets with parchment paper.
  2. Step 2
    Stack 2-3 tortillas. Using Halloween-themed cookie cutters, press firmly to cut out desired shapes. Carefully place shapes in a single layer on the prepared baking sheets, ensuring no overlap.
  3. Step 3
    Lightly spray both sides of the tortilla shapes with avocado or olive oil. Sprinkle generously and evenly with salt.
  4. Step 4
    Bake for 8-12 minutes, or until the chips are golden brown and crispy. Keep a close eye on them to prevent burning, as baking times can vary. Rotate baking sheets halfway through if using multiple.
  5. Step 5
    Transfer the baked chips immediately to a wire cooling rack and let them cool completely. They will become crispier as they cool. Serve immediately or store in an airtight container at room temperature for up to 3-4 days.

Important Information

Nutrition Facts (Per Serving)

It is important to consider this information as approximate and not to use it as definitive health advice.

Allergy Information

Please check ingredients for potential allergens and consult a health professional if in doubt.

« Previous Post
Halloween Cauldron Cookie Recipe: Easy Spooky Fun Creation
Next Post »
Easy Pesto Chicken Flatbread Recipe: Quick Dinner Idea!

If you enjoyed this…

Strawberry Dirty Sprite Drink: Recipe, Tips, and Refreshing Twists

Refreshing Cranberry Orange Mocktail Recipe for All Occasions

Halloween Candy Crack: The Ultimate Guide to Spooky Sweets

Primary Sidebar

Browse by Diet

BreakfastDinnerLunchDessertAppetizer

Sweet Peach Yogurt Parfait Delight

One of my fondest memories is from a lazy summer afternoon spent at my grandmother’s house. The sun filtered through the kitchen window, casting a warm glow over the table where she would create her culinary magic. It was during one of those blissful moments that I first tasted her Peach Yogurt Parfait with Honey and Granola. The sweet aroma of ripe peaches mingling with creamy yogurt and the crunch of granola was nothing short of heavenly. It felt like summer captured in a bowl, and I still remember the joy of diving in with a spoon, each layer revealing a new burst of flavor.

When I think about that parfait, I can almost hear the gentle hum of the bees outside, reminding me of the floral notes that honey brings to every bite. The vibrant yellows and soft oranges of the peaches contrast beautifully with the creamy white yogurt and the golden crunch of granola. It’s a dish that not only looks delightful but also tastes like a celebration of fresh, wholesome ingredients.

What makes my version of this Peach Yogurt Parfait special is the careful balance of flavors and textures. I use ripe, juicy peaches, drizzled with locally sourced honey, and a homemade granola that’s bursting with nuts and seeds for an extra crunch. It’s a simple dish, but every layer is crafted with love and attention.

Let me show you exactly how to make this delightful parfait, so you can bring a bit of that summer magic into your kitchen!

Sweet Peach Yogurt Parfait Delight

Why You’ll Love This Recipe

  • Delightfully creamy texture from the Greek yogurt, paired with the juicy sweetness of fresh peaches.
  • Ready in under 20 minutes, making it a quick and satisfying breakfast or snack option.
  • Budget-friendly, using common ingredients that you may already have in your pantry.
  • Customizable with your favorite granola and nuts, allowing you to tailor each parfait to your taste.
  • Perfectly balanced flavors with the bright acidity of lemon juice and the sweetness of honey enhancing the peaches.

Ingredients

  • For the Parfait:
  • 2 cups plain Greek yogurt (or vanilla yogurt for a sweeter option)
  • 2 large ripe peaches, diced (about 2 cups)
  • 1 tablespoon fresh lemon juice (to prevent browning of peaches)
  • 2 tablespoons honey (plus more for drizzling)
  • 1 teaspoon vanilla extract (optional for extra flavor)
  • For the Granola:
  • 1 cup granola (store-bought or homemade; see notes for a simple granola recipe)
  • 1/4 cup sliced almonds (optional for added crunch)
  • 1/4 cup shredded coconut (optional for added flavor)

Let’s dive into some key ingredients that make this Peach Yogurt Parfait so delightful! First, the Greek yogurt is not only creamy but also packed with protein, making it a satisfying option for breakfast or a snack. If you’re looking for a sweeter option, you can easily substitute it with vanilla yogurt, though it may alter the overall flavor balance. Next, the ripe peaches are the star of the show; their natural sweetness shines through, so I recommend choosing peaches that yield slightly to pressure, indicating they’re perfectly ripe. If peaches aren’t in season, feel free to use nectarines or even frozen peaches—just thaw them before use. Finally, honey adds a lovely floral sweetness that ties everything together. If you prefer, maple syrup can serve as a delicious substitute.

Step-by-Step Instructions

  1. Start by preparing the peaches. Wash them thoroughly, then slice and dice them into bite-sized pieces. In a medium bowl, toss the diced peaches with 1 tablespoon of fresh lemon juice to prevent browning. Set aside for about 5 minutes while the lemon juice works its magic.
  2. In a separate bowl, combine the Greek yogurt, 2 tablespoons of honey, and 1 teaspoon of vanilla extract if using. Stir the mixture until smooth and thoroughly blended. This should take about a minute. Avoid overmixing to maintain the creaminess of the yogurt.
  3. Now it’s time to layer your parfait. Grab a clear glass or bowl to showcase your beautiful creation. Start with a generous spoonful of the yogurt mixture at the bottom—about 1/4 cup will do. Use a spoon to spread it evenly.
  4. Add a layer of the diced peaches over the yogurt, ensuring they cover the yogurt completely. You might want to use about half of what you have prepared—roughly 1 cup. This layer should be visually appealing, so arrange the peaches neatly.
  5. Sprinkle 1/4 cup of granola over the peaches. This adds a delightful crunch. Make sure to distribute it evenly to ensure every bite has that satisfying texture. Avoid packing it down too tightly, as you want it to maintain its crunch.
  6. Repeat the layers: spoon in another 1/4 cup of yogurt, followed by another cup of peaches, and another sprinkle of granola. You should have at least two layers, but feel free to add more depending on your glass size.
  7. Finish off your parfait with a drizzle of honey on top for added sweetness and a touch of elegance. If you’re using sliced almonds or shredded coconut, sprinkle them on top now. It adds a lovely visual contrast and extra flavor.
  8. Serve immediately or refrigerate for up to 30 minutes before serving to allow the flavors to meld together. However, I recommend enjoying it fresh to maintain the granola’s crunch.

Pro Tips for the Best Peach Yogurt Parfait With Honey And Granola

  • Make sure to choose ripe peaches for the best flavor and texture. A common mistake is using unripe fruit, which can lead to a less enjoyable parfait. Look for peaches that are fragrant and slightly soft to the touch.
  • Use a clear glass to assemble your parfait; this not only makes for a beautiful presentation but also allows you to see the colorful layers, which adds to the enjoyment of eating it.
  • For an even creamier texture, consider whipping the Greek yogurt with a hand mixer for a couple of minutes before layering. This small adjustment makes a huge difference in mouthfeel.
  • Be mindful of the granola-to-yogurt ratio. Too much granola can overwhelm the parfait, while too little can make it feel too creamy. Aim for about 1/4 cup of granola per layer for the perfect balance.
  • If you’re making this for a gathering, consider preparing the yogurt and peaches ahead of time and layering them just before serving. This ensures the granola stays crunchy!

Variations & Serving Ideas

There are so many ways to get creative with your Peach Yogurt Parfait! For a tropical twist, swap out the peaches for mangoes or pineapples and top with coconut flakes. If you prefer a berry flavor, mix in some blueberries or strawberries with the peaches for added color and taste. For a nutty version, incorporate chopped walnuts or pecans instead of almonds.

As for serving ideas, this parfait pairs beautifully with a side of scrambled eggs for a hearty breakfast or fresh fruit salad for a light lunch. You might also enjoy it alongside whole grain toast with almond butter for an energizing snack. The contrast of flavors and textures will elevate your meal experience!

Storage, Make-Ahead & Reheating

The Peach Yogurt Parfait is best enjoyed fresh, but you can prepare some components ahead of time. Store the layered parfait in an airtight container in the refrigerator for up to 24 hours. However, be cautious; the granola may lose its crunch if stored too long. You can freeze the yogurt and peach mixture for up to 2 months; just remember to thaw it in the refrigerator overnight before serving.

If you plan to enjoy this dish the next day, it can taste even better as the flavors meld together. Just remember to add the granola right before serving to keep its delightful crunch!

Frequently Asked Questions

Can I make Peach Yogurt Parfait With Honey And Granola ahead of time?

Yes — in fact, it tastes even better the next day as the flavors meld. However, I recommend waiting to add the granola until just before serving to maintain its crunch.

What can I substitute for Greek yogurt?

If you prefer a lighter option, you can substitute Greek yogurt with regular yogurt or a dairy-free alternative like coconut yogurt. Just remember that this may alter the creaminess and flavor profile slightly.

Can I use frozen peaches for this parfait?

Absolutely! Just make sure to thaw the frozen peaches before using them. They will still add great flavor, though the texture may be slightly softer than fresh peaches.

How do I make the parfait vegan?

To make a vegan version, substitute the Greek yogurt with a plant-based yogurt alternative, and replace honey with maple syrup or agave nectar. This keeps the parfait sweet while adhering to a vegan diet.

What other fruits can I use in this recipe?

You can mix and match fruits based on your preference. Try using strawberries, blueberries, raspberries, or even bananas. Just make sure to adjust the lemon juice as needed to prevent browning.

Sweet Peach Yogurt Parfait Delight

Final Thoughts

The Peach Yogurt Parfait with Honey and Granola is a delightful blend of creamy yogurt, sweet peaches, and crunchy granola that creates a satisfying and nourishing treat. Each layer bursts with flavor, making it a perfect choice for breakfast or a light dessert.

This is the kind of recipe I come back to again and again, especially when I want something refreshing and wholesome to start my day. The harmony of sweet and tart flavors, combined with the delightful crunch, never fails to lift my spirits!

I encourage you to give this parfait a try and indulge in its comforting goodness. Feel free to share your results or even add your own twist—perhaps a sprinkle of cinnamon or a handful of nuts. Enjoy creating your perfect parfait!

Print
clock clock iconcutlery cutlery iconflag flag iconfolder folder iconinstagram instagram iconpinterest pinterest iconfacebook facebook iconprint print iconsquares squares iconheart heart iconheart solid heart solid icon

Peach Yogurt Parfait


  • Author: Lily author
  • Total Time: 15 minutes
  • Yield: 4 servings 1x
Pin Recipe
Print Recipe

Description

This Peach Yogurt Parfait combines creamy Greek yogurt, juicy peaches, and crunchy granola for a delightful treat. It’s a perfect breakfast or snack that captures the essence of summer in every bite.


Ingredients

Scale
  • For the Parfait:
  • 2 cups plain Greek yogurt (or vanilla yogurt for a sweeter option)
  • 2 large ripe peaches, diced (about 2 cups)
  • 1 tablespoon fresh lemon juice (to prevent browning of peaches)
  • 2 tablespoons honey (plus more for drizzling)
  • 1 teaspoon vanilla extract (optional for extra flavor)
  • For the Granola:
  • 1 cup granola (store-bought or homemade; see notes for a simple granola recipe)
  • 1/4 cup sliced almonds (optional for added crunch)
  • 1/4 cup shredded coconut (optional for added flavor)

Instructions

  1. Start by preparing the peaches. Wash them thoroughly, then slice and dice them into bite-sized pieces. In a medium bowl, toss the diced peaches with 1 tablespoon of fresh lemon juice to prevent browning. Set aside for about 5 minutes while the lemon juice works its magic.
  2. In a separate bowl, combine the Greek yogurt, 2 tablespoons of honey, and 1 teaspoon of vanilla extract if using. Stir the mixture until smooth and thoroughly blended. This should take about a minute. Avoid overmixing to maintain the creaminess of the yogurt.
  3. Now it’s time to layer your parfait. Grab a clear glass or bowl to showcase your beautiful creation. Start with a generous spoonful of the yogurt mixture at the bottom—about 1/4 cup will do. Use a spoon to spread it evenly.
  4. Add a layer of the diced peaches over the yogurt, ensuring they cover the yogurt completely. You might want to use about half of what you have prepared—roughly 1 cup. This layer should be visually appealing, so arrange the peaches neatly.
  5. Sprinkle 1/4 cup of granola over the peaches. This adds a delightful crunch. Make sure to distribute it evenly to ensure every bite has that satisfying texture. Avoid packing it down too tightly, as you want it to maintain its crunch.
  6. Repeat the layers: spoon in another 1/4 cup of yogurt, followed by another cup of peaches, and another sprinkle of granola. You should have at least two layers, but feel free to add more depending on your glass size.
  7. Finish off your parfait with a drizzle of honey on top for added sweetness and a touch of elegance. If you’re using sliced almonds or shredded coconut, sprinkle them on top now. It adds a lovely visual contrast and extra flavor.
  8. Serve immediately or refrigerate for up to 30 minutes before serving to allow the flavors to meld together. However, I recommend enjoying it fresh to maintain the granola’s crunch.
  • Prep Time: 15 mins
  • Cook Time: 0 mins
  • Category: Breakfast
  • Method: No-cook
  • Cuisine: American

Nutrition

  • Serving Size: 1 parfait
  • Calories: 250
  • Sugar: 20 g
  • Sodium: 50 mg
  • Fat: 5 g
  • Saturated Fat: 2 g
  • Unsaturated Fat: 3 g
  • Trans Fat: 0 g
  • Carbohydrates: 40 g
  • Fiber: 3 g
  • Protein: 10 g
  • Cholesterol: 10 mg

Keywords: Choose ripe peaches for the best flavor and texture. Use a clear glass for a beautiful presentation. For creaminess, consider whipping the yogurt before layering. Be mindful of the granola-to-yogurt ratio. Prepare yogurt and peaches ahead of time for gatherings, layering just before serving.

Did you make this recipe?

Share a photo and tag us — we can't wait to see what you've made!

Sun-Kissed Frozen Orange Cream Slush

As a child, summer days felt like they lasted forever. I remember the sticky heat wrapping around me as I played outside, my laughter mingling with the sounds of the neighborhood. But nothing could cool me down quite like the moment I’d spot my grandmother, laboring over her blender, whipping up her famous Frozen Orange Creamsicle Slush. That vibrant orange treat, with its frosty texture and sweet citrus aroma, was like a burst of sunshine in a cup. Just one sip, and I could feel the coolness wash over me, sparking pure joy.

This Frozen Orange Creamsicle Slush has a way of making you feel like a kid again. Its creamy, dreamy consistency is a delightful balance of bright orange and soft vanilla, inviting you to dive right in. The refreshing tang of orange dances on your tongue, while the smooth creaminess envelops you in a comforting embrace. It’s a nostalgic treat that’s perfect for hot summer afternoons or anytime you need a little pick-me-up.

What makes my version of this slush stand out is the addition of a hint of vanilla bean, which elevates the flavor and adds an extra layer of richness. Plus, it’s super easy to whip up with just a few simple ingredients that you probably already have on hand! So, if you’re ready to relive those sun-soaked memories, let me show you exactly how to make it.

Sun-Kissed Frozen Orange Cream Slush

Why You’ll Love This Recipe

  • Each slush is a perfect blend of creamy vanilla and zesty orange, creating a nostalgic flavor reminiscent of summer days.
  • This refreshing treat is ready in under 15 minutes, making it an ideal quick dessert for unexpected guests or hot afternoons.
  • With just 8 simple ingredients, it’s budget-friendly, ensuring you don’t have to break the bank to enjoy a delicious slush.
  • The slush has a perfectly smooth texture, thanks to the combination of ice and ice cream, providing a delightful contrast to the bright citrus flavors.
  • It’s highly customizable; you can easily adjust the sweetness and add fresh herbs for a unique twist that suits your taste.

Ingredients

  • 2 cups orange juice (freshly squeezed or store-bought)
  • 1 cup vanilla ice cream
  • 1 cup crushed ice
  • 1/2 cup milk (whole or 2%)
  • 1/4 cup granulated sugar (adjust based on sweetness preference)
  • 1 teaspoon vanilla extract
  • Zest of 1 orange (for added flavor)
  • Fresh orange slices and mint leaves (for garnish)

The star of this Frozen Orange Creamsicle Slush is the orange juice, which provides the vibrant, citrusy base. Freshly squeezed juice will yield the brightest flavor, but store-bought options can be just as convenient. If you’re opting for store-bought, choose 100% pure juice with no added sugars for the best results. Another essential ingredient is the vanilla ice cream; it adds creaminess and sweetness. You can substitute it with dairy-free ice cream if you’re looking for a vegan option. Whole or 2% milk complements the ice cream, creating a smooth blend. If you want a lower-calorie version, almond or oat milk can be good alternatives.

Lastly, the granulated sugar can be adjusted based on your sweetness preference. If you prefer a more natural sweetener, consider using honey or agave syrup. The orange zest enhances the flavor profile, providing an aromatic pop that brings the whole slush together. Don’t skip it! It adds an extra layer of brightness that makes this slush truly special.

Step-by-Step Instructions

  1. Start by preparing your ingredients. Gather 2 cups of orange juice, 1 cup of vanilla ice cream, and 1 cup of crushed ice. Make sure the ice is finely crushed, as larger chunks can make blending difficult.
  2. In a blender, combine the orange juice, vanilla ice cream, crushed ice, and 1/2 cup of milk. Add 1/4 cup of granulated sugar and 1 teaspoon of vanilla extract. If you like a sweeter slush, consider adding a bit more sugar at this stage.
  3. Add the zest of 1 orange to the blender. This step is crucial for enhancing the citrus flavor of your slush. Make sure not to include the bitter white pith—only the flavorful zest.
  4. Blend the mixture on medium-high speed for about 30-45 seconds. Stop once the ingredients are fully combined and the slush has a smooth, even consistency. If you notice large chunks of ice, blend for an additional 10-15 seconds. Avoid over-blending, as this can make the slush too liquidy.
  5. Once blended, taste the slush. If it needs more sweetness, add a little more sugar and blend for a few more seconds. If it’s too thick, you can add a splash of milk to reach your desired consistency.
  6. Pour the slush into glasses. This recipe typically serves 4, but you can easily double it for larger gatherings. Use a spoon to help guide the slush into the glasses if needed.
  7. Garnish each serving with fresh orange slices and mint leaves. The mint not only adds a pop of color but also a refreshing aroma that complements the citrus flavors beautifully.
  8. Serve immediately and enjoy! If you’ve made extra, you can refrigerate it for a short time, but it’s best enjoyed fresh.

Pro Tips for the Best Frozen Orange Creamsicle Slush

  • Don’t skip the orange zest! It’s a game-changer for flavor. Always zest before juicing to make it easier.
  • Use a high-powered blender for the best texture. A standard blender may struggle with ice, leading to uneven consistency. If you have a food processor, that can work too, but ensure the ice is finely crushed.
  • Adjust the ice-to-liquid ratio carefully. If your slush is too thick, it won’t blend well. Start with less ice and add more until you reach your preferred texture.
  • Be cautious with the sugar! Always start with the lower amount, as you can easily add more, but it’s hard to fix an overly sweet slush.
  • For a fun twist, consider adding a splash of coconut milk or a handful of fresh fruit like strawberries or pineapple. This not only enhances the flavor but also adds a beautiful color contrast.

Variations & Serving Ideas

There are countless ways to put a spin on your Frozen Orange Creamsicle Slush. Consider making a tropical version by adding in some pineapple juice or coconut milk for a delightful tropical twist. If you’re feeling adventurous, try incorporating a handful of frozen mango or peach slices for added sweetness. For a lighter version, swap out the vanilla ice cream for Greek yogurt for a creamy yet tangy alternative.

As for serving ideas, this refreshing slush pairs wonderfully with light summer dishes like grilled chicken skewers, fish tacos, or a simple salad topped with citrus vinaigrette. The bright, zesty flavors of the slush complement these dishes perfectly, making them an ideal pairing for a sunny day.

Storage, Make-Ahead & Reheating

This Frozen Orange Creamsicle Slush is best enjoyed fresh, but if you have leftovers, you can store them in an airtight container in the fridge for up to 2 days. Just keep in mind that the slush may lose some of its texture over time as the ice melts. It doesn’t freeze well, as the ice will turn into a solid block. If you must freeze it, blend again after thawing to restore the slushy consistency. This treat is best the day you make it, as the flavors meld together beautifully overnight, enhancing its deliciousness.

Frequently Asked Questions

Can I make Frozen Orange Creamsicle Slush ahead of time?

Yes — in fact, it tastes even better the next day as the flavors meld. However, it’s best to enjoy it fresh, as the texture can change if stored for too long. If you need to prepare it ahead, keep it in the fridge and re-blend before serving.

What kind of orange juice should I use?

For the best flavor, use freshly squeezed orange juice. However, if you’re short on time, opt for 100% pure store-bought juice without added sugars. This will ensure that your slush remains flavorful and refreshing.

Can I substitute the vanilla ice cream?

Absolutely! If you’re looking for a dairy-free option, coconut milk ice cream or a non-dairy vanilla ice cream can work wonderfully. They will still provide the creamy texture and sweetness you desire.

How can I adjust the sweetness of my slush?

You can easily adjust the sweetness by modifying the amount of sugar added. Start with 1/4 cup and taste the mixture before blending. If you prefer it sweeter, add more sugar gradually until it reaches your desired level.

What should I do if my slush is too thick?

If your slush is too thick, simply add a splash of milk or orange juice and blend again. This will help achieve a more drinkable consistency while maintaining the slushy texture. Adjust gradually to reach your preferred thickness.

Sun-Kissed Frozen Orange Cream Slush

Final Thoughts

The Frozen Orange Creamsicle Slush is a delightful blend of refreshing citrus and creamy goodness, making it a perfect treat for warm days or any time you crave a taste of nostalgia. The way the bright orange flavor dances with the creamy texture truly elevates this slush, transforming it into a satisfying escape from the everyday.

This is the kind of recipe I come back to again and again, especially when I’m looking to cool down or impress guests at a summer gathering. It’s simple to make and always brings smiles all around! I encourage you to try this recipe for yourself—don’t hesitate to share your results or even put your own spin on it. Happy slushing!

Print
clock clock iconcutlery cutlery iconflag flag iconfolder folder iconinstagram instagram iconpinterest pinterest iconfacebook facebook iconprint print iconsquares squares iconheart heart iconheart solid heart solid icon

Frozen Orange Creamsicle Slush


  • Author: Lily author
  • Total Time: 15 minutes
  • Yield: 4 servings 1x
Pin Recipe
Print Recipe

Description

This Frozen Orange Creamsicle Slush is a refreshing treat that combines creamy vanilla and zesty orange flavors. Perfect for hot summer days, it brings back nostalgic memories with every sip.


Ingredients

Scale
  • 2 cups orange juice (freshly squeezed or store-bought)
  • 1 cup vanilla ice cream
  • 1 cup crushed ice
  • 1/2 cup milk (whole or 2%)
  • 1/4 cup granulated sugar (adjust based on sweetness preference)
  • 1 teaspoon vanilla extract
  • Zest of 1 orange (for added flavor)
  • Fresh orange slices and mint leaves (for garnish)

Instructions

  1. Start by preparing your ingredients. Gather 2 cups of orange juice, 1 cup of vanilla ice cream, and 1 cup of crushed ice. Make sure the ice is finely crushed, as larger chunks can make blending difficult.
  2. In a blender, combine the orange juice, vanilla ice cream, crushed ice, and 1/2 cup of milk. Add 1/4 cup of granulated sugar and 1 teaspoon of vanilla extract. If you like a sweeter slush, consider adding a bit more sugar at this stage.
  3. Add the zest of 1 orange to the blender. This step is crucial for enhancing the citrus flavor of your slush. Make sure not to include the bitter white pith—only the flavorful zest.
  4. Blend the mixture on medium-high speed for about 30-45 seconds. Stop once the ingredients are fully combined and the slush has a smooth, even consistency. If you notice large chunks of ice, blend for an additional 10-15 seconds. Avoid over-blending, as this can make the slush too liquidy.
  5. Once blended, taste the slush. If it needs more sweetness, add a little more sugar and blend for a few more seconds. If it’s too thick, you can add a splash of milk to reach your desired consistency.
  6. Pour the slush into glasses. This recipe typically serves 4, but you can easily double it for larger gatherings. Use a spoon to help guide the slush into the glasses if needed.
  7. Garnish each serving with fresh orange slices and mint leaves. The mint not only adds a pop of color but also a refreshing aroma that complements the citrus flavors beautifully.
  8. Serve immediately and enjoy! If you’ve made extra, you can refrigerate it for a short time, but it's best enjoyed fresh.
  • Prep Time: 15 min
  • Cook Time: 0 min
  • Category: Dessert
  • Method: Blending
  • Cuisine: American

Nutrition

  • Serving Size: 1 serving
  • Calories: 200
  • Sugar: 30 g
  • Sodium: 50 mg
  • Fat: 5 g
  • Saturated Fat: 3 g
  • Unsaturated Fat: 2 g
  • Trans Fat: 0 g
  • Carbohydrates: 40 g
  • Fiber: 1 g
  • Protein: 2 g
  • Cholesterol: 20 mg

Keywords: Don't skip the orange zest! It's a game-changer for flavor. Always zest before juicing to make it easier.

Did you make this recipe?

Share a photo and tag us — we can't wait to see what you've made!

Zesty Lemon Poppy Seed Delight

One rainy afternoon, I found myself in my grandmother’s cozy kitchen, the kind that always smelled like warmth and love. She was whipping up her famous Lemon Poppy Seed Loaf, a recipe that had been passed down through generations. As the batter came together, the zesty aroma of fresh lemons filled the air, mingling perfectly with the nutty fragrance of poppy seeds. I can still picture her, apron-clad, as she expertly drizzled a vibrant citrus icing over the loaf, creating a glossy, sun-kissed finish that beckoned us to dive in. It was a moment that sparked my own passion for baking, and this recipe has become a cherished staple in my home ever since.

When you take a bite of this Lemon Poppy Seed Loaf, it’s like a burst of sunshine on your palate. The loaf is beautifully golden, with a tender crumb that melts in your mouth. Each slice is speckled with tiny poppy seeds, adding a delightful crunch that contrasts beautifully with the tangy sweetness of the lemon. And that citrus icing? It’s the finishing touch that elevates this loaf from ordinary to extraordinary, with its bright, zesty flavor dancing on your taste buds.

This recipe stands out because it embraces simplicity while delivering on flavor. I’ve added a hint of vanilla to the batter, enhancing the overall taste and making it even more indulgent. Trust me, once you make this Lemon Poppy Seed Loaf With Citrus Icing, it’ll become a go-to in your baking repertoire.

So, let me show you exactly how to make it!

Zesty Lemon Poppy Seed Delight

Why You’ll Love This Recipe

  • Moist and tender crumb that melts in your mouth, thanks to the perfect balance of butter and buttermilk.
  • Bright, zesty lemon flavor paired with crunchy poppy seeds, creating a delightful texture and taste experience.
  • Easy to whip up in just about an hour, perfect for last-minute gatherings or a cozy afternoon treat.
  • Budget-friendly with everyday ingredients, making it an accessible option for all home bakers.
  • The citrus icing adds a sweet tang that elevates the loaf, turning a simple recipe into a showstopper!

Ingredients

  • 1 ½ cups (190g) all-purpose flour
  • 1 teaspoon baking powder
  • ½ teaspoon baking soda
  • ½ teaspoon salt
  • 3 tablespoons poppy seeds
  • ½ cup (115g) unsalted butter, softened to room temperature
  • 1 cup (200g) granulated sugar
  • 2 large eggs
  • 1 teaspoon vanilla extract
  • 1 teaspoon lemon zest (from about 1 medium lemon)
  • ½ cup (120ml) buttermilk
  • 2 tablespoons fresh lemon juice

For the Citrus Icing:

  • 1 cup (120g) powdered sugar
  • 2 tablespoons fresh lemon juice
  • 1 tablespoon orange juice
  • 1 teaspoon lemon zest (for garnish, optional)

Let’s dive into the key ingredients that make this Lemon Poppy Seed Loaf so special. The all-purpose flour provides the structure and base for the loaf, while the baking powder and baking soda ensure it rises perfectly, giving the loaf a light texture. For a gluten-free variation, you could substitute the flour with a gluten-free all-purpose blend. Poppy seeds not only add a delightful crunch but also contribute to the unique flavor profile that pairs well with the citrus notes.

Unsalted butter is crucial for achieving the buttery richness that makes this loaf so moist. If you’re looking for a dairy-free option, coconut oil or a vegan butter can be used instead. The buttermilk is another essential component, providing acidity that activates the baking soda for a fluffy texture. If you don’t have buttermilk on hand, you can easily make a substitute by mixing ½ cup of milk with 1 tablespoon of vinegar or lemon juice and letting it sit for about 5 minutes.

Step-by-Step Instructions

  1. Preheat your oven to 350°F (175°C). Grease a 9×5-inch loaf pan or line it with parchment paper for easy removal later.
  2. In a medium mixing bowl, whisk together 1 ½ cups of all-purpose flour, 1 teaspoon of baking powder, ½ teaspoon of baking soda, ½ teaspoon of salt, and 3 tablespoons of poppy seeds. This helps to evenly distribute the baking agents and ensures a uniform rise.
  3. In a large mixing bowl, cream together ½ cup of softened unsalted butter and 1 cup of granulated sugar using an electric mixer on medium speed for about 3-4 minutes, until the mixture is light and fluffy. Make sure to scrape down the sides of the bowl occasionally.
  4. Add 2 large eggs, 1 teaspoon of vanilla extract, and 1 teaspoon of lemon zest to the creamed butter and sugar, mixing until fully combined. You want a smooth consistency, so ensure there are no lumps of butter.
  5. In a small bowl, combine ½ cup of buttermilk and 2 tablespoons of fresh lemon juice. Alternately add the dry ingredients and buttermilk mixture to the butter mixture, starting and ending with the dry ingredients. Mix just until combined; do not overmix, as this can lead to a dense loaf.
  6. Pour the batter into the prepared loaf pan. Smooth the top with a spatula, ensuring it’s even. Bake in the preheated oven for 50-60 minutes, or until a toothpick inserted in the center comes out clean. The edges should be lightly golden brown, and the center should feel just set.
  7. Once baked, remove the loaf from the oven and allow it to cool in the pan for about 10 minutes. Then, transfer it to a wire rack to cool completely. Resist the urge to slice too soon, as it will be crumbly if it’s still warm.
  8. While the loaf is cooling, prepare the citrus icing. In a medium bowl, whisk together 1 cup of powdered sugar, 2 tablespoons of fresh lemon juice, and 1 tablespoon of orange juice until smooth. If the icing is too thick, you can add a little more juice to reach your desired consistency.
  9. Once the loaf is completely cool, drizzle the citrus icing over the top. If you like, sprinkle with an additional teaspoon of lemon zest for an extra pop of flavor and color.

Pro Tips for the Best Lemon Poppy Seed Loaf With Citrus Icing

  • Be careful not to overmix your batter; this is a common mistake that can lead to a dense loaf. Mix just until the dry ingredients are incorporated for a light and fluffy texture.
  • Use room temperature ingredients, especially the butter and eggs. This helps to create a smoother batter and ensures even baking. Take your eggs out of the fridge about 30 minutes before you start.
  • For a more pronounced lemon flavor, consider adding a little lemon extract in addition to the zest and juice. Just a half teaspoon can elevate the citrus notes significantly.
  • When measuring your flour, spoon it into the measuring cup and level it off with a knife instead of scooping directly from the bag. This prevents packing and ensures you don’t end up with a dry loaf.
  • Invest in a good quality loaf pan; it makes a difference in heat distribution, which ensures even baking. If your pan is dark-coated, reduce the oven temperature by 25°F to prevent over-browning.

Variations & Serving Ideas

For a delightful twist, consider adding blueberries or raspberries to the batter for a fruity burst of flavor. You can also experiment with different citrus fruits—try lime or grapefruit zest and juice for a refreshing change. For a healthier option, substitute half of the all-purpose flour with whole wheat flour for added fiber without compromising too much on texture.

This Lemon Poppy Seed Loaf pairs beautifully with a light salad, such as a mixed greens salad with a vinaigrette, or a cup of tea for a cozy afternoon treat. It also complements a creamy cheese platter, as the acidity of the loaf balances rich cheeses perfectly. Lastly, a scoop of vanilla ice cream on the side creates a delightful contrast of temperatures and flavors!

Storage, Make-Ahead & Reheating

This Lemon Poppy Seed Loaf can be stored at room temperature for up to 3 days if wrapped tightly in plastic wrap. If you want to keep it longer, it freezes well for up to 3 months. To freeze, wrap the loaf tightly in plastic wrap and then in aluminum foil to prevent freezer burn.

When you’re ready to enjoy it again, simply thaw it in the fridge overnight. Reheat individual slices in the microwave for 15-20 seconds or in a toaster oven until warmed through. Interestingly, many people find that this loaf tastes even better the next day, as the flavors have time to meld!

Frequently Asked Questions

Can I make Lemon Poppy Seed Loaf With Citrus Icing ahead of time?

Yes — in fact, it tastes even better the next day! You can make the loaf a day in advance, allowing the flavors to develop. Just be sure to store it in an airtight container to maintain its moisture.

Can I substitute the poppy seeds?

Absolutely! If you don’t have poppy seeds on hand or prefer an alternative, you can use sesame seeds for a similar crunch or omit them entirely for a smooth loaf.

What can I use instead of buttermilk?

If you don’t have buttermilk, you can easily create a substitute by mixing ½ cup of milk (dairy or plant-based) with 1 tablespoon of vinegar or lemon juice. Let it sit for 5 minutes before using in the recipe.

How can I make this recipe gluten-free?

To make a gluten-free version of this Lemon Poppy Seed Loaf, substitute the all-purpose flour with a gluten-free all-purpose flour blend. Just ensure that the blend contains a binding agent like xanthan gum for the best results.

What is the best way to store leftover loaf?

Leftover Lemon Poppy Seed Loaf should be stored in an airtight container at room temperature for up to 3 days. For longer storage, wrap it tightly and freeze for up to 3 months. Thaw it before serving for the best texture.

Zesty Lemon Poppy Seed Delight

Final Thoughts

The Lemon Poppy Seed Loaf with Citrus Icing is truly a delightful treat that brings a burst of brightness to any occasion. The zesty lemon flavor combined with the subtle crunch of poppy seeds creates a satisfying balance, while the citrus icing adds a touch of sweetness that perfectly complements the loaf’s tanginess.

This is the kind of recipe I come back to again and again, especially when I want to brighten up a gloomy day or celebrate a small victory. The aroma that fills the kitchen as it bakes is absolutely heavenly! I encourage you to give this recipe a try; you might just find it becoming a beloved staple in your home. Don’t forget to share your results or even add your own unique twist—I can’t wait to see what you create!

Print
clock clock iconcutlery cutlery iconflag flag iconfolder folder iconinstagram instagram iconpinterest pinterest iconfacebook facebook iconprint print iconsquares squares iconheart heart iconheart solid heart solid icon

Lemon Poppy Seed Loaf


  • Author: Lily author
  • Total Time: 36 minute
  • Yield: 1 loaf 1x
Pin Recipe
Print Recipe

Description

This Lemon Poppy Seed Loaf is a delightful treat that combines zesty lemon flavor with crunchy poppy seeds. Topped with a citrus icing, it’s perfect for any occasion.


Ingredients

Scale
  • 1 ½ cups (190g) all-purpose flour
  • 1 teaspoon baking powder
  • ½ teaspoon baking soda
  • ½ teaspoon salt
  • 3 tablespoons poppy seeds
  • ½ cup (115g) unsalted butter, softened to room temperature
  • 1 cup (200g) granulated sugar
  • 2 large eggs
  • 1 teaspoon vanilla extract
  • 1 teaspoon lemon zest (from about 1 medium lemon)
  • ½ cup (120ml) buttermilk
  • 2 tablespoons fresh lemon juice
  • 1 cup (120g) powdered sugar
  • 2 tablespoons fresh lemon juice
  • 1 tablespoon orange juice
  • 1 teaspoon lemon zest (for garnish, optional)

Instructions

  1. Preheat your oven to 350°F (175°C). Grease a 9×5-inch loaf pan or line it with parchment paper for easy removal later.
  2. In a medium mixing bowl, whisk together 1 ½ cups of all-purpose flour, 1 teaspoon of baking powder, ½ teaspoon of baking soda, ½ teaspoon of salt, and 3 tablespoons of poppy seeds. This helps to evenly distribute the baking agents and ensures a uniform rise.
  3. In a large mixing bowl, cream together ½ cup of softened unsalted butter and 1 cup of granulated sugar using an electric mixer on medium speed for about 3-4 minutes, until the mixture is light and fluffy. Make sure to scrape down the sides of the bowl occasionally.
  4. Add 2 large eggs, 1 teaspoon of vanilla extract, and 1 teaspoon of lemon zest to the creamed butter and sugar, mixing until fully combined. You want a smooth consistency, so ensure there are no lumps of butter.
  5. In a small bowl, combine ½ cup of buttermilk and 2 tablespoons of fresh lemon juice. Alternately add the dry ingredients and buttermilk mixture to the butter mixture, starting and ending with the dry ingredients. Mix just until combined; do not overmix, as this can lead to a dense loaf.
  6. Pour the batter into the prepared loaf pan. Smooth the top with a spatula, ensuring it’s even. Bake in the preheated oven for 50-60 minutes, or until a toothpick inserted in the center comes out clean. The edges should be lightly golden brown, and the center should feel just set.
  7. Once baked, remove the loaf from the oven and allow it to cool in the pan for about 10 minutes. Then, transfer it to a wire rack to cool completely. Resist the urge to slice too soon, as it will be crumbly if it’s still warm.
  8. While the loaf is cooling, prepare the citrus icing. In a medium bowl, whisk together 1 cup of powdered sugar, 2 tablespoons of fresh lemon juice, and 1 tablespoon of orange juice until smooth. If the icing is too thick, you can add a little more juice to reach your desired consistency.
  9. Once the loaf is completely cool, drizzle the citrus icing over the top. If you like, sprinkle with an additional teaspoon of lemon zest for an extra pop of flavor and color.
  • Prep Time: 15 mins
  • Cook Time: 50-60 mins
  • Category: Dessert
  • Method: Baking
  • Cuisine: American

Nutrition

  • Serving Size: 1 slice
  • Calories: 200
  • Sugar: 15 g
  • Sodium: 150 mg
  • Fat: 8 g
  • Saturated Fat: 5 g
  • Unsaturated Fat: 3 g
  • Trans Fat: 0 g
  • Carbohydrates: 30 g
  • Fiber: 1 g
  • Protein: 3 g
  • Cholesterol: 40 mg

Keywords: Be careful not to overmix your batter; this is a common mistake that can lead to a dense loaf. Use room temperature ingredients for a smoother batter and even baking.

Did you make this recipe?

Share a photo and tag us — we can't wait to see what you've made!

  • Privacy Policy
  • Terms Of Service
  • Contact
  • About
  • GDPR

Copyright © 2025 Homesmad