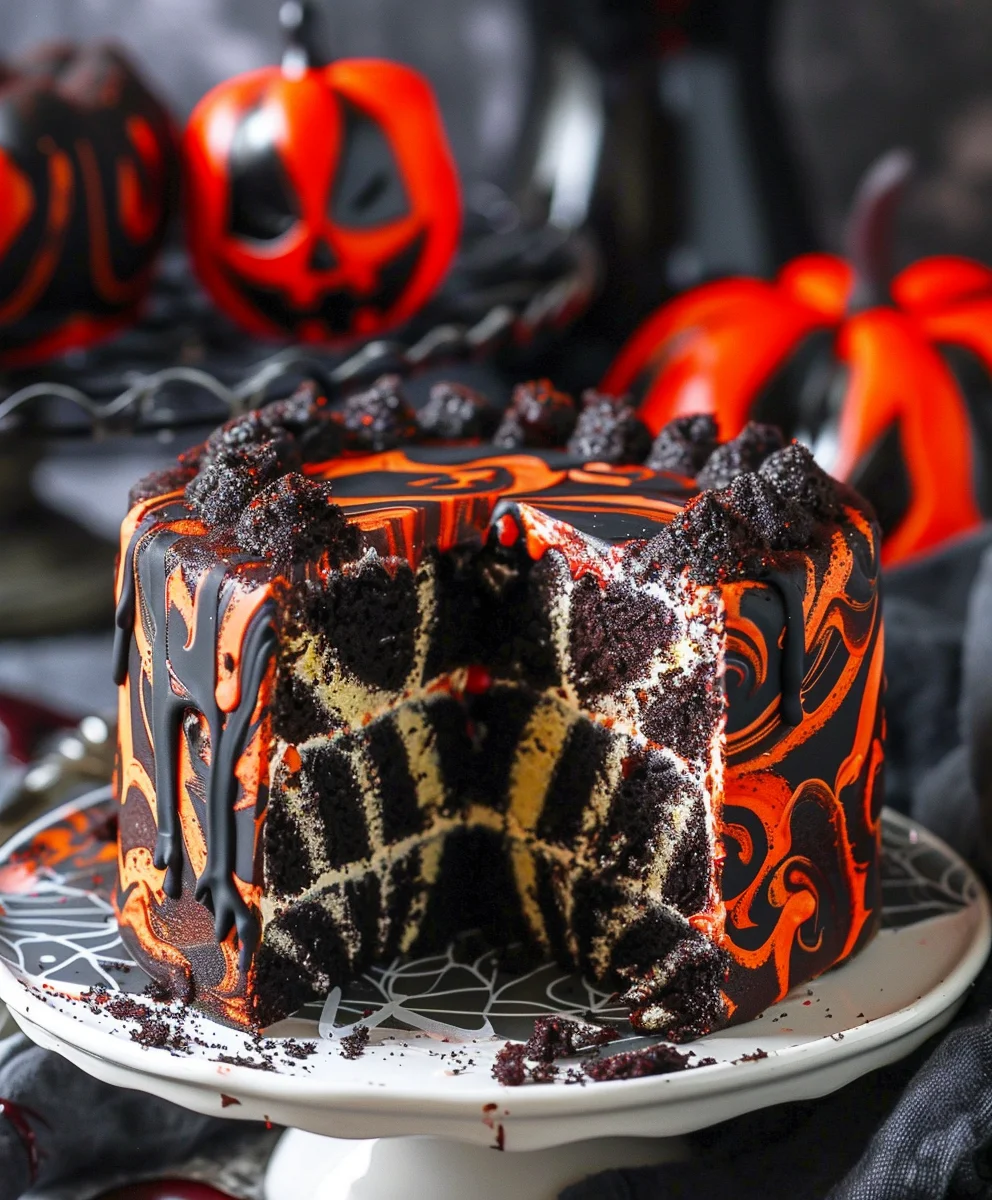
Spooky Halloween Marble Cake is more than just a dessert; it’s an edible centerpiece designed to enchant and delight at your autumnal gatherings. Imagine the gasps of delight on your guests’ faces as you slice into a cake revealing mesmerizing swirls of vibrant, eerie colors – a delightful surprise hidden within every tender bite! Halloween, a time steeped in folklore, playful mystery, and a touch of the macabre, calls for treats that are both delicious and dramatically themed. While traditional marble cake boasts a long-standing history as a beloved, visually appealing dessert, we’ve given it a frightfully fun seasonal twist to perfectly complement the spirit of October 31st.
I find that people absolutely adore this creation not only for its stunning, Instagram-worthy appearance but also for its wonderfully moist texture and balanced, comforting flavor profile. It’s a fantastic way to celebrate the holiday, offering a playful nod to the supernatural while delivering pure culinary joy. Whether you’re hosting a grand costume party or simply enjoying a cozy night in, preparing this Spooky Halloween Marble Cake will undoubtedly elevate your festive spirit and leave a lasting, delicious impression on everyone who tastes it. Get ready to bake a little magic!

Ingredients:
- For the Spooky Marble Cake:
- 3 cups (360g) all-purpose flour, sifted
- 2 teaspoons baking powder
- 1/2 teaspoon salt
- 1 cup (226g) unsalted butter, softened to room temperature
- 2 cups (400g) granulated sugar
- 4 large eggs, at room temperature
- 1 tablespoon vanilla extract (pure vanilla is always best!)
- 1 1/4 cups (300ml) whole milk, at room temperature
- Gel food coloring in orange, purple, and black (or colors of your choosing for a Halloween theme)
- For the Vanilla Buttercream Frosting:
- 2 cups (452g) unsalted butter, softened to room temperature
- 8 cups (960g) powdered sugar, sifted (that’s a lot, but it makes for glorious frosting!)
- 1/2 teaspoon salt
- 2 teaspoons vanilla extract
- 1/2 cup (120ml) heavy cream or whole milk, plus more if needed
- Optional: A few drops of gel food coloring for accents (e.g., black, green, or a touch of orange)
- For the Spooky Decorations (Optional, but highly recommended for the full effect!):
- Halloween-themed sprinkles or sprinkle mix
- Edible candy eyeballs (various sizes work wonderfully)
- 1/4 cup dark chocolate chips or chopped dark chocolate
- 2 tablespoons heavy cream (for simple ganache web)
Part 1: Preparing Our Spooky Halloween Marble Cake Batter
- First things first, let’s get our oven ready. Preheat your oven to 350°F (175°C). Then, prepare two 8-inch round cake pans. I like to grease them really well, line the bottoms with parchment paper, and then grease the parchment paper for extra assurance that our beautiful cakes won’t stick. This small step makes a huge difference when it comes to easy release.
- In a medium bowl, whisk together the dry ingredients: the sifted all-purpose flour, baking powder, and salt. Sifting the flour is a crucial step for achieving a light and airy cake texture, so please don’t skip it! Set this bowl aside for now.
- Now, in a large mixing bowl, using either a stand mixer fitted with the paddle attachment or a handheld electric mixer, cream together the softened unsalted butter and granulated sugar. You’ll want to beat this on medium-high speed for about 3-5 minutes, until the mixture is light, fluffy, and a pale yellow color. This process incorporates air into the butter and sugar, which contributes significantly to the cake’s tenderness.
- Reduce the mixer speed to medium-low and add the large eggs, one at a time. Make sure to mix well after each addition, scraping down the sides of the bowl as needed. This ensures each egg is fully incorporated before the next is added, preventing curdling and creating a smooth batter. Once all the eggs are in, stir in the vanilla extract until just combined. The aroma of vanilla always gets me excited for baking!
- With the mixer on low speed, gradually add the dry ingredients to the wet ingredients, alternating with the whole milk. I usually start and end with the dry ingredients. Begin by adding about one-third of the flour mixture, mix until just combined, then add half of the milk, mix, then another third of the flour, the remaining milk, and finally the last third of the flour. It’s incredibly important not to overmix the batter once the flour is added. Overmixing develops the gluten in the flour too much, which can lead to a tough, dry cake. Mix only until no streaks of flour remain.
Part 2: The Eerie Coloring and Marbling Process for Our Halloween Marble Cake
- Now for the fun, spooky part! Divide your cake batter evenly into four separate bowls. One bowl will remain natural white. In the other three bowls, add your gel food coloring. I typically go for orange, purple, and black to truly capture the Halloween spirit. Add a few drops of gel coloring to each bowl, starting with a little and adding more until you achieve your desired vibrant, spooky shades. Gently fold the color into each portion of batter until it’s uniform. Remember, a little gel coloring goes a long way!
- Prepare your two lined and greased 8-inch cake pans. Now, we’re going to create the marble effect. This is more art than science, and it’s surprisingly easy. Dollop spoonfuls of each colored batter and the plain white batter randomly into the prepared cake pans. Don’t worry about being too precise; the randomness is what gives it that beautiful, swirling look.
- Once you have all the batter dolloped into the pans, take a butter knife or a skewer and gently swirl through the batters a few times. Be careful not to over-swirl! If you mix too much, the colors will blend into a murky brown or grey, and we want distinct, vibrant swirls for our Spooky Halloween Marble Cake. A few gentle passes through the batter are usually sufficient to create that mesmerizing marble effect. Just imagine the surprise on everyone’s faces when they cut into this cake and see the vibrant colors!
Part 3: Baking Our Halloween Masterpiece
- Place the cake pans into your preheated oven. Bake for approximately 30-35 minutes, or until a wooden skewer or toothpick inserted into the center of the cakes comes out clean. Baking times can vary depending on your oven, so keep an eye on them. You might also notice the tops lightly browning and the cakes springing back when gently touched.
- Once baked, carefully remove the cakes from the oven and let them cool in their pans on a wire rack for about 10-15 minutes. This cooling period in the pan helps the cakes firm up before you attempt to remove them.
- After the initial cooling, invert the cakes onto the wire rack to cool completely. Gently peel off the parchment paper. It’s absolutely crucial that the cakes are completely cool before you even think about frosting them. Warm cakes will melt your beautiful buttercream, leading to a frustrating mess. Patience is key here, even if the aroma is incredibly tempting!
Part 4: Crafting the Silky Vanilla Buttercream Frosting
- While our Spooky Halloween Marble Cake layers are cooling, let’s whip up some luscious vanilla buttercream frosting. In a large mixing bowl, using a stand mixer with the paddle attachment or a handheld electric mixer, beat the softened unsalted butter on medium speed for about 3-5 minutes until it’s really light and creamy. This aerates the butter, making for a wonderfully fluffy frosting.
- Gradually add the sifted powdered sugar, about 1-2 cups at a time, mixing on low speed until combined after each addition. The sifting step here is just as important as it was for the flour; it prevents lumps and ensures a super smooth buttercream. Once all the powdered sugar is incorporated, the mixture will be quite thick.
- Add the salt and vanilla extract. Then, slowly pour in the heavy cream (or whole milk), starting with half a cup. Increase the mixer speed to medium-high and beat for another 3-5 minutes. During this time, the buttercream will transform into a wonderfully light, fluffy, and spreadable consistency. If the frosting seems too thick, add more heavy cream, a tablespoon at a time, until it reaches your desired consistency. If it’s too thin, you can add a bit more sifted powdered sugar.
- Optional: If you want to add some accent colors to your frosting, divide a small portion of the buttercream into separate bowls and mix in a drop or two of gel food coloring. Black or a deep green can create some wonderfully eerie details for your Halloween cake!
Part 5: Assembling and Decorating Our Spooky Halloween Marble Cake
- Once your cake layers are completely cool, you might want to level them using a serrated knife or a cake leveler. This creates flat surfaces for stacking and ensures your cake is stable and even.
- Place one cooled cake layer on your serving plate or cake stand. Spread a generous layer of vanilla buttercream over the top. Then, carefully place the second cake layer on top, pressing down gently to secure it.
- Now, we’ll apply a crumb coat. This is a thin layer of frosting spread all over the top and sides of the cake. The purpose of a crumb coat is to trap any loose crumbs, preventing them from mixing into your final, pristine layer of frosting. Once applied, pop the cake into the refrigerator for about 15-20 minutes to allow the crumb coat to firm up.
- After the crumb coat has chilled and firmed, take the cake out of the fridge and apply the final, thicker layer of buttercream all over the top and sides. Use an offset spatula or a bench scraper to smooth the frosting to your liking. Don’t be afraid to experiment with different textures here; sometimes a slightly rustic finish adds to the charm of a spooky cake!
- Time for the Spooky Halloween Decoration Fun! This is where your Spooky Halloween Marble Cake truly comes alive.
- Candy Eyeballs: Affix edible candy eyeballs randomly onto the frosted cake. You can group them in pairs or scatter them for a truly haunting effect. They instantly add character and a touch of silliness to the Halloween theme.
- Halloween Sprinkles: Gently press Halloween-themed sprinkles or a spooky sprinkle mix onto the sides and/or top of the cake. A festive sprinkle blend with bats, ghosts, and pumpkins really enhances the festive feel.
- Chocolate Ganache Spiderweb (Optional, but impressive!):
- To make a quick ganache, place the dark chocolate chips (or chopped chocolate) in a small, heatproof bowl.
- In a separate small saucepan, heat the heavy cream until it just begins to simmer around the edges – don’t let it boil vigorously.
- Pour the hot cream over the chocolate chips. Let it sit undisturbed for 2-3 minutes to allow the chocolate to melt.
- Then, gently whisk the mixture until it’s smooth and glossy. If it’s too thick, you can warm it slightly over a double boiler or in short bursts in the microwave. If it’s too thin, let it sit for a few minutes to cool and thicken slightly.
- Transfer the ganache to a piping bag with a very small round tip, or even just a Ziploc bag with a tiny corner snipped off.
- Pipe concentric circles on top of the frosted cake, starting from the center and working your way outwards. They don’t need to be perfect.
- Then, take a toothpick or skewer and drag it from the center of the cake outwards through the ganache circles, creating lines that resemble a spiderweb. You can alternate directions for a more intricate web pattern.
- Colored Frosting Accents: If you colored any extra frosting, you can pipe small dots, borders, or even ghost shapes onto the cake using a piping bag and a decorative tip.
- Step back and admire your magnificent creation! This Spooky Halloween Marble Cake is not just a treat for the taste buds but also a festive centerpiece for any Halloween gathering. Every slice reveals a colorful surprise, making it an unforgettable dessert. Enjoy the cheers and delighted screams from your guests!

Conclusion:
So, as we reach the end of our baking journey together, I truly hope you’re feeling inspired and excited to get into your kitchen. This isn’t just any cake; it’s a statement piece, a delightful centerpiece that promises to bring gasps of delight and satisfied smiles to anyone who tries it. We’ve explored the simple magic behind creating those captivating swirls, the perfect balance of moist texture, and the rich, comforting flavor that makes every slice an absolute treat. The beauty of this recipe lies not just in its stunning visual appeal, which is undeniably impressive, but also in its surprising simplicity. Don’t let the intricate appearance fool you; achieving that dramatic marble effect is far easier than you might imagine, and the payoff is immense. It’s a recipe designed to be approachable for bakers of all skill levels, ensuring that everyone can experience the joy of presenting such a show-stopping dessert. This cake truly encapsulates the spirit of celebration, making any gathering feel a little more special, a little more memorable. It’s the kind of dessert that sparks conversation, a talking point that brings people together around the table. And let’s not forget the sheer joy of creating something so beautiful with your own hands, transforming simple ingredients into a work of edible art. It’s a truly rewarding experience, transforming simple ingredients into something extraordinary.
Now, when it comes to enjoying your masterpiece, the possibilities are wonderfully endless. Serve a slice simply, perhaps with a dusting of powdered sugar, allowing the cake’s inherent beauty and flavor to shine through. For a more indulgent experience, a dollop of freshly whipped cream or a scoop of vanilla bean ice cream makes an exceptional accompaniment, adding a creamy contrast to the tender crumb. Imagine a warm slice, gently heated, with melting ice cream – pure bliss! But don’t stop there. Think about customising this recipe to suit your mood or occasion. You could experiment with different color combinations; perhaps vibrant reds and deep greens for a festive holiday twist, or pastel blues and pinks for a baby shower. The beauty of the marble technique is its versatility, allowing for endless creative expression. Flavor-wise, consider adding a teaspoon of almond extract alongside the vanilla for a sophisticated note, or a touch of orange zest to brighten things up. For those who love chocolate, folding in a handful of mini chocolate chips into one of the batters before marbling can add an extra layer of texture and decadence. If you’re looking to elevate the presentation even further, a simple lemon glaze (powdered sugar mixed with a little lemon juice) drizzled over the top would add a lovely tang and a glossy finish. For a truly decadent touch, a rich chocolate ganache or a velvety cream cheese frosting would transform this into an even more luxurious dessert. And remember, this batter isn’t just for a bundt or round cake; it can easily be adapted for cupcakes, perfect for individual servings and ideal for parties, especially if you’re looking for an easy-to-distribute treat. Simply adjust the baking time accordingly for smaller portions. You could even bake it in a sheet pan for a straightforward traybake, then cut into squares and decorate each one uniquely. The base recipe is so robust and forgiving, it encourages creative exploration, allowing you to truly make it your own signature creation. Feel free to let your imagination run wild with toppings and serving styles.
So, what are you waiting for? I wholeheartedly encourage you to roll up your sleeves, gather your ingredients, and embark on this delightful baking adventure. You’ll find immense satisfaction in every step, from mixing the batters to witnessing the captivating swirls emerge from the oven. There’s a special kind of magic in creating something so beautiful and delicious, and I can’t wait for you to experience it. Once your magnificent cake is baked and cooled, please don’t keep its beauty to yourself! Snap a photo, share it with your friends and family, and most importantly, share it with me! I absolutely adore seeing your creations. Did you try a unique color combination? Did you add a special frosting? What did your guests think? I’m incredibly eager to hear all about your baking journey and the joy this recipe brings. Drop a comment below, tell me about your experience, and let’s celebrate the art of baking together. This Spooky Halloween Marble Cake is more than just a dessert; it’s an invitation to create, to share, and to make unforgettable memories. Happy baking, my friends, and I look forward to hearing from you!
Spooky Halloween Marble Cake
An enchanting and easy Halloween Marble Cake recipe featuring mesmerizing swirls of vibrant, eerie colors—orange, purple, and black—hidden within a wonderfully moist and tender cake. Topped with luscious vanilla buttercream, candy eyeballs, spooky sprinkles, and an optional chocolate ganache spiderweb, this cake is an edible centerpiece perfect for any autumnal gathering or costume party. It’s a delightful surprise in every slice!
Ingredients
-
2 1/4 cups (293g) all-purpose flour, sifted
-
2 1/2 tsp baking powder
-
1/4 tsp baking soda
-
1/2 tsp salt (for cake)
-
1/2 cup (112g) unsalted butter, softened to room temperature
-
1/2 cup vegetable oil
-
1 1/2 cups (310g) granulated sugar
-
1 tbsp vanilla extract (for cake)
-
4 large eggs, at room temperature
-
1 cup (240ml) buttermilk
-
Orange gel food coloring
-
Purple gel food coloring
-
Black gel food coloring
-
2 1/4 cups (504g) unsalted butter, softened to room temperature (for frosting)
-
8 cups (920g) powdered sugar, sifted
-
1/2 tsp salt (for frosting)
-
2 tsp vanilla extract (for frosting)
-
1/2 cup (120ml) heavy cream, plus more if needed
-
Optional: Gel food coloring for accents (e.g., black, green)
-
Halloween-themed sprinkles or sprinkle mix
-
Edible candy eyeballs (various sizes)
-
5 oz bittersweet chocolate (60% cacao), chopped
-
2 tbsp heavy cream (for ganache web)
Instructions
-
Step 1
Preheat oven to 350°F (175°C). Grease and line two 8-inch round cake pans. In a medium bowl, whisk together sifted flour, baking powder, baking soda, and 1/2 tsp salt. Set aside. -
Step 2
In a large mixing bowl, cream softened butter, vegetable oil, and granulated sugar on medium-high speed for 3-5 minutes until light and fluffy. Add eggs one at a time, mixing well after each. Stir in 1 tbsp vanilla extract. Scrape down the sides of the bowl. -
Step 3
On low speed, gradually add the dry ingredients to the wet, alternating with buttermilk. Start and end with dry ingredients. Mix only until no streaks of flour remain; do not overmix. -
Step 4
Divide the cake batter evenly into four separate bowls. Leave one bowl plain white. Color the other three bowls with orange, purple, and black gel food coloring to desired vibrant shades. Dollop spoonfuls of each colored batter and the plain white batter randomly into the prepared cake pans. Gently swirl through the batters a few times with a butter knife or skewer to create a marble effect; do not over-swirl. -
Step 5
Place cake pans in the preheated oven and bake for 30-35 minutes, or until a wooden skewer inserted into the center comes out clean. Remove cakes from oven and cool in pans on a wire rack for 10-15 minutes, then invert onto the rack to cool completely. Ensure cakes are completely cool before frosting. -
Step 6
While cakes cool, prepare frosting: In a large mixing bowl, beat 2 1/4 cups softened unsalted butter on medium speed for 3-5 minutes until light and creamy. Gradually add 8 cups sifted powdered sugar, 1-2 cups at a time, mixing on low. Add 1/2 tsp salt and 2 tsp vanilla extract. Slowly pour in 1/2 cup heavy cream. Increase speed to medium-high and beat for 3-5 minutes until light, fluffy, and spreadable. Add more cream or powdered sugar if needed for desired consistency. Optional: Color a small portion of frosting for accents (e.g., black, green). -
Step 7
Once cake layers are completely cool, level them if necessary. Place one cake layer on a serving plate. Spread a generous layer of vanilla buttercream over the top, then carefully place the second cake layer on top, pressing gently. Apply a thin crumb coat of frosting over the entire cake to trap loose crumbs. Chill in the refrigerator for 15-20 minutes to firm up. -
Step 8
Remove cake from fridge and apply the final, thicker layer of buttercream all over the top and sides, smoothing to your liking. Affix edible candy eyeballs randomly and gently press Halloween-themed sprinkles onto the sides and/or top of the cake. -
Step 9
For the ganache web: Place 5 oz chopped bittersweet chocolate in a small, heatproof bowl. In a separate saucepan, heat 2 tbsp heavy cream until it just simmers. Pour hot cream over chocolate, let sit 2-3 minutes, then whisk until smooth and glossy. Transfer ganache to a piping bag with a small round tip (or Ziploc with corner snipped). Pipe concentric circles on top of the frosted cake, starting from the center outwards. Use a toothpick or skewer to drag from the center outwards through the ganache circles, creating a spiderweb pattern. Optionally, pipe colored frosting accents.
Important Information
Nutrition Facts (Per Serving)
It is important to consider this information as approximate and not to use it as definitive health advice.
Allergy Information
Please check ingredients for potential allergens and consult a health professional if in doubt.