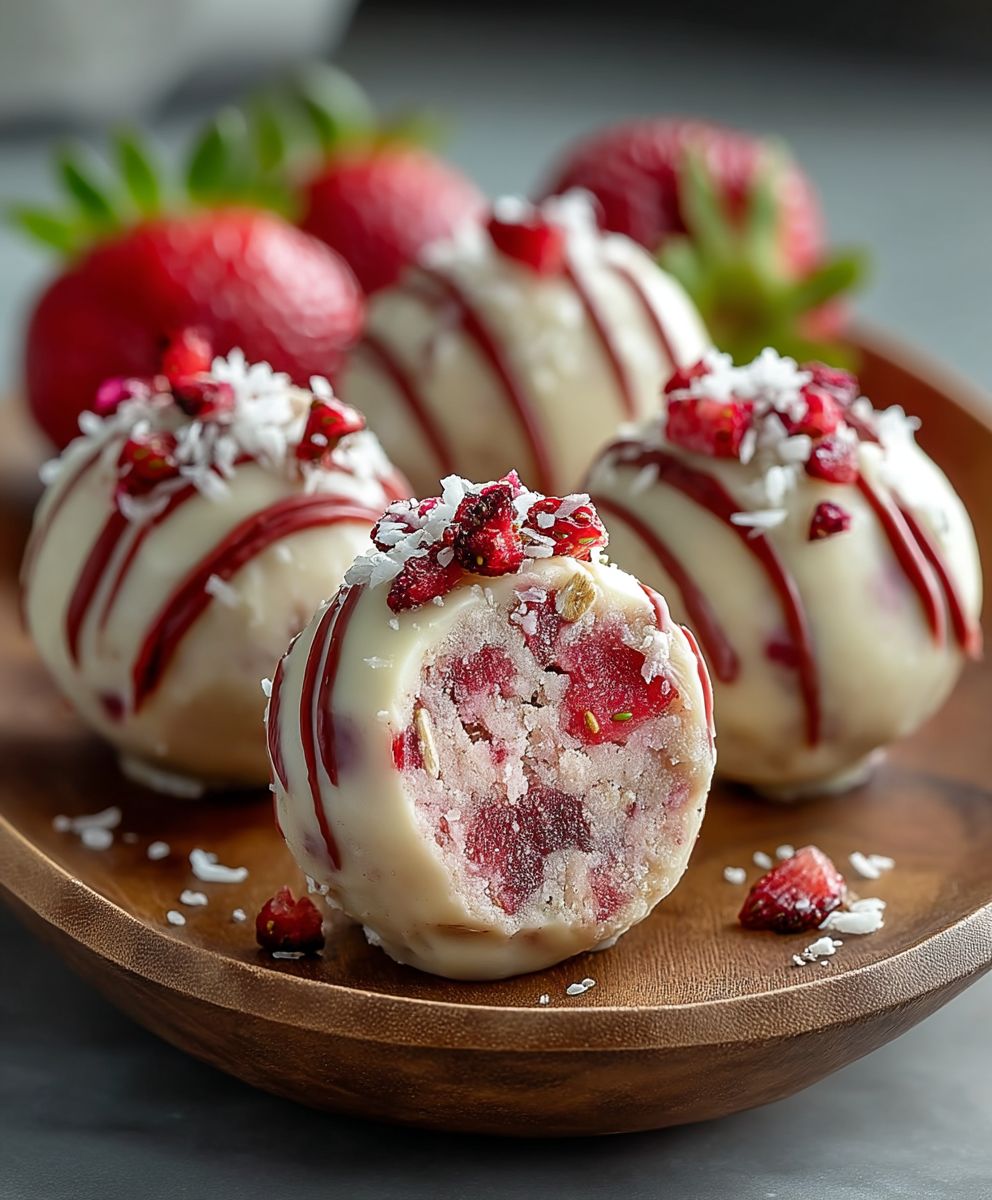
Strawberry Cheesecake Protein Balls: the guilt-free indulgence you’ve been searching for! Imagine sinking your teeth into a bite-sized treat that perfectly captures the creamy, tangy essence of strawberry cheesecake, but without the sugar crash and added calories. These aren’t just any protein balls; they’re a delightful fusion of flavor and function, designed to satisfy your sweet cravings while fueling your body with wholesome goodness.
While the exact origins of combining cheesecake flavors with protein-packed snacks are relatively modern, the inspiration draws from the timeless appeal of cheesecake itself. Cheesecake, with its rich history dating back to ancient Greece, has evolved into countless variations across cultures. This recipe takes that beloved classic and reimagines it for the health-conscious individual.
People adore these Strawberry Cheesecake Protein Balls for several reasons. First, the taste is undeniably addictive – the sweet strawberry perfectly complements the creamy “cheesecake” base. Second, the texture is divine – a soft, chewy center with a slightly firm exterior. But perhaps the biggest draw is the convenience. They’re incredibly easy to make, require no baking, and are perfect for meal prepping or grabbing as a quick and healthy snack on the go. Whether you’re a fitness enthusiast, a busy professional, or simply someone who enjoys delicious and nutritious treats, these protein balls are sure to become a new favorite.

Ingredients:
- 1 cup rolled oats
- 1/2 cup vanilla protein powder (whey or plant-based)
- 1/4 cup freeze-dried strawberries, crushed
- 1/4 cup cream cheese, softened
- 2 tablespoons honey or maple syrup
- 1 tablespoon coconut oil, melted
- 1/4 cup unsweetened almond milk (or any milk)
- 1/4 teaspoon vanilla extract
- Pinch of salt
- Optional: Extra crushed freeze-dried strawberries for rolling
Preparing the Strawberry Cheesecake Protein Ball Mixture
- First, let’s get our oats ready. You can use them straight from the bag, but I like to pulse them in a food processor for a few seconds. This breaks them down a bit and helps the protein balls stick together better. Don’t overdo it – you don’t want oat flour! Just a slightly finer texture. If you don’t have a food processor, no worries, just use them as they are.
- Next, in a large mixing bowl, combine the pulsed (or regular) rolled oats and the vanilla protein powder. Make sure to use a protein powder that you enjoy the taste of, as it will significantly impact the flavor of the final product. I personally love using a vanilla whey protein isolate because it blends well and adds a nice sweetness, but a plant-based option works just as well.
- Now, for the star of the show: the freeze-dried strawberries! These add that amazing strawberry flavor without making the protein balls too wet. Crush them into a fine powder. You can do this in a food processor, blender, or even by placing them in a zip-top bag and crushing them with a rolling pin or the bottom of a glass. Add the crushed strawberries to the bowl with the oats and protein powder.
- In a separate, smaller bowl, let’s get the cream cheese ready. It’s crucial that the cream cheese is softened, otherwise, it will be difficult to incorporate into the mixture and you’ll end up with little clumps. You can soften it by leaving it at room temperature for about 30 minutes, or by microwaving it for a few seconds (be careful not to melt it!). Add the softened cream cheese to the dry ingredients.
- Time for the wet ingredients! Add the honey (or maple syrup), melted coconut oil, almond milk, and vanilla extract to the bowl. The honey or maple syrup acts as a binder and adds sweetness, while the coconut oil helps with the texture and adds a subtle coconut flavor. If you don’t like coconut, you can substitute it with melted butter or another neutral-tasting oil. The almond milk helps to bring everything together, and the vanilla extract enhances the overall flavor.
- Now, for the fun part: mixing! Use a sturdy spoon or your hands to thoroughly combine all the ingredients. At first, it might seem a little dry, but keep mixing! The cream cheese and wet ingredients will eventually incorporate, and you’ll end up with a slightly sticky, dough-like mixture. If the mixture seems too dry and crumbly, add a little more almond milk, one tablespoon at a time, until it reaches the desired consistency. If it’s too wet, add a little more protein powder or oats.
- Once the mixture is well combined, give it a taste! This is your chance to adjust the sweetness or strawberry flavor. If you want it sweeter, add a little more honey or maple syrup. If you want more strawberry flavor, add a little more crushed freeze-dried strawberries.
- Cover the bowl with plastic wrap and place it in the refrigerator for at least 30 minutes. This chilling time is essential! It allows the mixture to firm up, making it much easier to roll into balls. Trust me, you don’t want to skip this step.
Forming and Coating the Protein Balls
- After the mixture has chilled, remove it from the refrigerator. It should be firm enough to handle without being too sticky.
- Prepare a plate or baking sheet lined with parchment paper. This will prevent the protein balls from sticking.
- Now, it’s time to roll the protein balls! I like to use a tablespoon to scoop out even portions of the mixture. Roll each portion between your palms to form a smooth, round ball. The size is up to you, but I find that about 1 inch in diameter is a good size.
- Place each rolled protein ball onto the prepared plate or baking sheet.
- If you want to add an extra touch of strawberry flavor and visual appeal, you can roll the protein balls in extra crushed freeze-dried strawberries. Simply place the crushed strawberries in a shallow bowl and roll each protein ball in them until they are evenly coated. This step is optional, but I highly recommend it!
- Once all the protein balls have been rolled and coated (if desired), place the plate or baking sheet back in the refrigerator for another 15-20 minutes. This will help them firm up even more and prevent them from becoming too soft at room temperature.
Storing and Serving Your Strawberry Cheesecake Protein Balls
- After the second chilling period, your Strawberry Cheesecake Protein Balls are ready to be enjoyed!
- Store the protein balls in an airtight container in the refrigerator. They will keep for up to a week, but they are best consumed within the first few days for optimal freshness and flavor.
- These protein balls are perfect for a quick and healthy snack, a post-workout treat, or even a guilt-free dessert. They are packed with protein, fiber, and delicious strawberry cheesecake flavor.
- Feel free to experiment with different variations! You can add chocolate chips, chopped nuts, or even a drizzle of melted white chocolate for an extra decadent treat.
- Enjoy your homemade Strawberry Cheesecake Protein Balls! I hope you love them as much as I do. They are a delicious and convenient way to satisfy your sweet cravings while staying on track with your health goals.
Conclusion:
So there you have it! These Strawberry Cheesecake Protein Balls are truly a game-changer. They’re not just a snack; they’re a delicious, guilt-free way to fuel your body and satisfy those sweet cravings. I know, I know, “protein balls” don’t always sound that exciting, but trust me on this one. The combination of the creamy “cheesecake” filling, the burst of fresh strawberry flavor, and the satisfying chewiness of the oats creates a texture and taste that’s simply irresistible.
Why is this recipe a must-try? Well, first and foremost, it’s incredibly easy to make. We’re talking minimal ingredients and no baking required! Perfect for busy weeknights or when you need a quick and healthy treat. Second, it’s packed with protein, making it an ideal post-workout snack or a mid-afternoon pick-me-up. And third, let’s be honest, it tastes like dessert! You get all the satisfaction of indulging in a strawberry cheesecake without any of the guilt. It’s a win-win-win!
But the best part? You can totally customize these little bites of heaven to suit your own preferences. Feeling adventurous? Try adding a sprinkle of shredded coconut or a handful of chopped nuts for extra texture and flavor. Want to make them even more decadent? Drizzle them with a little melted dark chocolate. For a vegan option, simply substitute the cream cheese with a plant-based alternative and use a vegan protein powder. The possibilities are endless!
Here are a few serving suggestions to get you started:
* Enjoy them straight from the fridge for a cool and refreshing treat.
* Pack them in your lunchbox for a healthy and satisfying snack at work or school.
* Serve them as a light and healthy dessert after dinner.
* Bring them to your next potluck or gathering – they’re always a crowd-pleaser!
* Pair them with a glass of almond milk or a cup of herbal tea for a complete and balanced snack.
I’m absolutely confident that you’re going to love these Strawberry Cheesecake Protein Balls as much as I do. They’re the perfect combination of healthy, delicious, and convenient. They’re also a great way to get your kids involved in the kitchen – they’ll love helping you roll the balls and decorate them with sprinkles (if you’re feeling extra festive!).
So, what are you waiting for? Gather your ingredients, put on some music, and get ready to whip up a batch of these amazing protein balls. I promise you won’t regret it! And once you’ve tried them, I’d absolutely love to hear what you think. Did you make any variations? What did you like best about the recipe? Share your photos and experiences in the comments below! I can’t wait to see your creations and hear your feedback. Happy snacking! I hope you enjoy this recipe as much as I do, and that it helps you achieve your health and fitness goals while still satisfying your sweet tooth. Remember, healthy eating doesn’t have to be boring – it can be fun, delicious, and totally customizable! Now go forth and conquer your cravings with these delightful Strawberry Cheesecake Protein Balls!
Strawberry Cheesecake Protein Balls: The Ultimate No-Bake Recipe
Delicious, healthy, no-bake Strawberry Cheesecake Protein Balls! Packed with protein and bursting with strawberry flavor, perfect for a quick snack or post-workout boost.
Ingredients
Instructions
Recipe Notes
- Using a food processor to pulse the oats helps the protein balls stick together better.
- Make sure to use a protein powder that you enjoy the taste of.
- Ensure the cream cheese is softened to avoid clumps.
- If you don’t like coconut, you can substitute the coconut oil with melted butter or another neutral-tasting oil.
- Chilling the mixture is essential for easy rolling.
- Feel free to experiment with different variations like adding chocolate chips, chopped nuts, or a drizzle of melted white chocolate.