• Skip to primary navigation
  • Skip to main content
  • Skip to primary sidebar
Homesmad

Homesmad

  • Home
  • Breakfast & Brunch
  • Appetizers & Snacks
  • Dinner
  • Dessert
  • About
  • Privacy Policy
  • Contact
Homesmad
  • Home
  • Breakfast & Brunch
  • Appetizers & Snacks
  • Dinner
  • Dessert
  • About
  • Privacy Policy
  • Contact

Sweet & Spicy Roasted Carrots with Whipped Ricotta

December 10, 2025 by Lily author

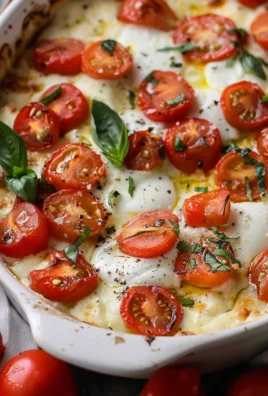
Roasted Carrots With Whipped Ricotta Hot Honey is a dish that truly excites the senses and promises to elevate any meal from ordinary to extraordinary. I’ve discovered few combinations as delightful as the humble carrot, transformed into something remarkable through simple roasting, then paired with unexpected, yet harmonious, companions. While the act of roasting vegetables is as ancient as cooking itself – a timeless method to bring out natural sweetness and caramelization – this particular rendition adds a modern, gourmet twist that is simply irresistible.

Carrots, celebrated across cultures for centuries and a staple in countless cuisines, take center stage here. They offer a natural sweetness that deepens beautifully in the oven, creating a comforting base. But what truly sets this recipe apart is the luxurious addition of creamy, subtly tangy whipped ricotta, a fresh Italian cheese with a rich history, providing a cool counterpoint. Then, we introduce the vibrant kick of hot honey, a contemporary sensation that marries sweet and spicy in an addictively delicious way. People absolutely adore this dish not just for its stunning visual appeal, but for the incredible symphony of flavors and textures: the tender-crisp bite of perfectly roasted carrots, the silken smoothness of the ricotta, and that tantalizing drizzle of sweet heat. It’s an unforgettable side dish or appetizer that’s surprisingly easy to achieve, making this Roasted Carrots With Whipped Ricotta Hot Honey an instant favorite for both weeknight dinners and special gatherings alike.

Sweet & Spicy Roasted Carrots with Whipped Ricotta this RECIPE

Ingredients:

  • For the Roasted Carrots:
    • 2 pounds medium to large carrots, preferably rainbow carrots for visual appeal, but regular orange carrots work beautifully
    • 3 tablespoons extra virgin olive oil, plus more for drizzling
    • 1 teaspoon sea salt, or to taste
    • ½ teaspoon freshly ground black pepper, or to taste
    • 1 tablespoon fresh thyme leaves, picked and roughly chopped (optional, but highly recommended for an earthy aroma)
  • For the Whipped Ricotta:
    • 15 ounces (about 1 ¾ cups) whole milk ricotta cheese, drained if excessively watery (though a good quality whole milk ricotta shouldn’t need much draining)
    • 1 tablespoon fresh lemon juice, plus ½ teaspoon lemon zest (from about ½ a lemon)
    • ¼ teaspoon sea salt, or to taste
    • 1 tablespoon extra virgin olive oil
  • For the Hot Honey:
    • ½ cup good quality honey (local wildflower honey is fantastic if you can find it)
    • 1-2 teaspoons red pepper flakes, depending on your desired level of heat (I like a good kick, so I lean towards 2 teaspoons)
  • Optional Garnishes:
    • Fresh mint or parsley leaves, finely chopped, for a pop of freshness
    • Toasted chopped pistachios or walnuts, for added crunch and richness
    • A final sprinkle of flaky sea salt, for texture and presentation

Preparing Your Carrots for Roasting

Alright, let’s get those beautiful carrots ready for their starring role! This step is all about setting the foundation for deliciousness, ensuring they roast evenly and develop that irresistible sweetness.

  1. First things first, let’s get those carrots clean. Give them a good rinse under cool running water. Even if they look clean, a quick wash helps remove any residual dirt.
  2. Now, for peeling. You have a couple of options here, and it really comes down to preference and the quality of your carrots. If you’re using tender, young carrots, especially those beautiful rainbow varieties with thin skin, you can often get away with just scrubbing them really well and leaving the skin on. The skin adds a lovely rustic touch and some extra fiber. However, for larger, more mature carrots, or if you prefer a smoother texture, grab your vegetable peeler and remove the outer skin. I personally love the look and feel of peeled carrots for this dish, especially when they’re going to be dressed up with creamy ricotta.
  3. Once peeled (or scrubbed), it’s time to chop them up. The key here is uniformity. We want all the carrot pieces to be roughly the same size so they cook at the same rate. This prevents some pieces from being undercooked while others are burnt. For medium-sized carrots, I typically cut them into 1-inch to 1 ½-inch pieces on the bias (diagonally). This gives them a slightly elongated, elegant look. If you have very thick carrots, you might want to halve or quarter them lengthwise first before cutting them into segments. Smaller, thinner carrots can just be cut into 1 ½-inch segments. Aim for consistency; it’s a game-changer for roasting.
  4. Next, grab a large mixing bowl. Add your prepared carrot pieces to the bowl. Drizzle them generously with 3 tablespoons of extra virgin olive oil. Olive oil is crucial here as it helps the carrots caramelize beautifully and prevents them from sticking to the pan.
  5. Now, let’s season them. Sprinkle in the 1 teaspoon of sea salt and ½ teaspoon of freshly ground black pepper. If you’re using fresh thyme, scatter those lovely little leaves over the carrots now.
  6. Toss everything together thoroughly. Use your hands – they’re the best tools for this! Make sure every single piece of carrot is coated evenly with the oil, salt, pepper, and thyme. This ensures maximum flavor distribution and even roasting. Take your time with this step; it truly makes a difference in the final taste of your “Roasted Carrots With Whipped Ricotta Hot Honey”.

Roasting the Carrots to Perfection

This is where the magic happens! Roasting brings out the natural sweetness in carrots, transforming them into tender, slightly caramelized jewels. Pay close attention to these details for the best results.

  1. Preheat your oven to a robust 400°F (200°C). A hot oven is essential for roasting; it helps achieve that beautiful browning and caramelization without drying out the vegetables. While the oven preheats, line a large baking sheet with parchment paper. This makes for super easy cleanup and prevents sticking. If you don’t have parchment, a lightly greased baking sheet will also work, but parchment is my secret weapon for hassle-free cooking.
  2. Carefully spread your seasoned carrots in a single layer on the prepared baking sheet. This is arguably the most crucial step in achieving perfectly roasted vegetables. If the carrots are crowded on the pan, they will steam instead of roast. Steamed carrots are fine, but they won’t develop that incredible caramelized exterior and concentrated sweetness that we’re after for our “Roasted Carrots With Whipped Ricotta Hot Honey”. If you have too many carrots for one sheet to accommodate a single layer, use two baking sheets. Trust me, it’s worth the extra pan.
  3. Once your oven is preheated, slide the baking sheet(s) into the oven. We’re going to roast them for 25-35 minutes.
  4. Around the 15-minute mark, take a moment to gently toss the carrots on the baking sheet. This helps ensure even browning on all sides. You want to see some golden-brown spots forming, which indicates the sugars in the carrots are caramelizing – that’s flavor developing right there!
  5. Continue roasting until the carrots are tender when pierced with a fork and beautifully caramelized around the edges. The exact time will vary slightly depending on the size of your carrot pieces and your oven’s particular quirks, so keep an eye on them. Don’t be afraid of a little char; it adds incredible depth of flavor. Once done, remove them from the oven and set them aside while we prepare the other components. They’ll be happy to hang out at room temperature for a bit.

Crafting the Dreamy Whipped Ricotta

The whipped ricotta is what truly elevates this dish, adding a luxurious, creamy counterpoint to the sweet and spicy carrots. It’s surprisingly simple to make but delivers a huge impact.

  1. Let’s start with the star ingredient: ricotta. For the best results, always opt for whole milk ricotta. It has a richer flavor and a creamier texture than part-skim, which can sometimes be a bit gritty or watery. While some recipes suggest straining ricotta, I find that a good quality whole milk ricotta from a reputable brand usually has a lovely, thick consistency that doesn’t require extra draining. If your ricotta seems particularly wet, you can place it in a fine-mesh sieve lined with cheesecloth over a bowl for 15-30 minutes to drain off excess liquid, but often it’s not necessary.
  2. Now, grab your food processor. This is my preferred tool for whipping ricotta as it creates the smoothest, silkiest texture with minimal effort. If you don’t have a food processor, a hand mixer will also work, or even a whisk and some elbow grease, though it will take a bit longer to get truly smooth.
  3. Transfer the 15 ounces of whole milk ricotta cheese to the bowl of your food processor.
  4. Add the flavor enhancers: 1 tablespoon of fresh lemon juice, ½ teaspoon of lemon zest, and ¼ teaspoon of sea salt. The lemon juice and zest brighten the ricotta, cutting through its richness beautifully, while the salt balances the sweetness from the carrots and honey.
  5. Finally, drizzle in 1 tablespoon of extra virgin olive oil. This adds another layer of richness and helps achieve that incredibly smooth texture we’re aiming for.
  6. Secure the lid on your food processor and process on high for 2-3 minutes. Stop periodically to scrape down the sides of the bowl with a spatula to ensure everything is evenly incorporated. You’re looking for a consistency that is incredibly smooth, airy, and creamy – almost like a light mousse. It should be spreadable and luxurious. If it seems too thick, you can add another tiny drizzle of olive oil or even a tablespoon of cold water, blending until smooth. Taste and adjust seasoning if needed; you might want a tiny pinch more salt depending on your preference.
  7. Once it’s perfectly whipped, transfer the ricotta to a serving bowl or container. You can make this ahead of time and store it in the refrigerator for up to 2 days. Just give it a quick stir before serving.

Infusing the Fiery Hot Honey

The hot honey is the finishing touch that brings everything together, adding a perfect balance of sweetness and spice. Making it yourself means you can customize the heat level exactly to your liking.

  1. Let’s prepare our spicy drizzle. Grab a small saucepan or a microwave-safe bowl.
  2. Pour ½ cup of good quality honey into the saucepan. The type of honey you choose really matters here. A local wildflower honey will offer beautiful floral notes that complement the carrots, but any good quality liquid honey will do.
  3. Add 1 to 2 teaspoons of red pepper flakes to the honey. This is where you control the heat! If you prefer a milder warmth, start with 1 teaspoon. If you, like me, enjoy a fiery kick, go for the full 2 teaspoons, or even a tiny bit more. Remember, you can always add more heat later if it’s not spicy enough, but it’s hard to take it away.
  4. If using a saucepan: Place the saucepan over low heat on your stovetop. We’re not looking to boil the honey, just gently warm it through. This helps the red pepper flakes infuse their heat and flavor into the honey more effectively, and also makes the honey a bit more liquid and easy to drizzle. Stir occasionally until the honey is warmed and the pepper flakes are well distributed, about 3-5 minutes. Once warmed, remove from the heat and let it sit for a few minutes to allow the flavors to deepen.
  5. If using a microwave: Heat the honey and red pepper flakes in the microwave in 15-second intervals, stirring between each, until the honey is warm and easily pourable. Be careful not to overheat it, as honey can scorch quickly. Again, let it sit for a few minutes off the heat.
  6. After warming, give the hot honey a taste. If you want more heat, you can add a few more red pepper flakes and let it steep longer, or even briefly warm it again. If you feel it’s too spicy, you can always dilute it slightly with a tiny bit more plain honey.
  7. You can make this hot honey well in advance and store it at room temperature. Just give it a good stir before drizzling, as the pepper flakes might settle to the bottom.
  8. Safety note: Be cautious when heating honey, as it can get very hot and sticky. Use oven mitts if handling a hot saucepan, and be mindful of splashes.

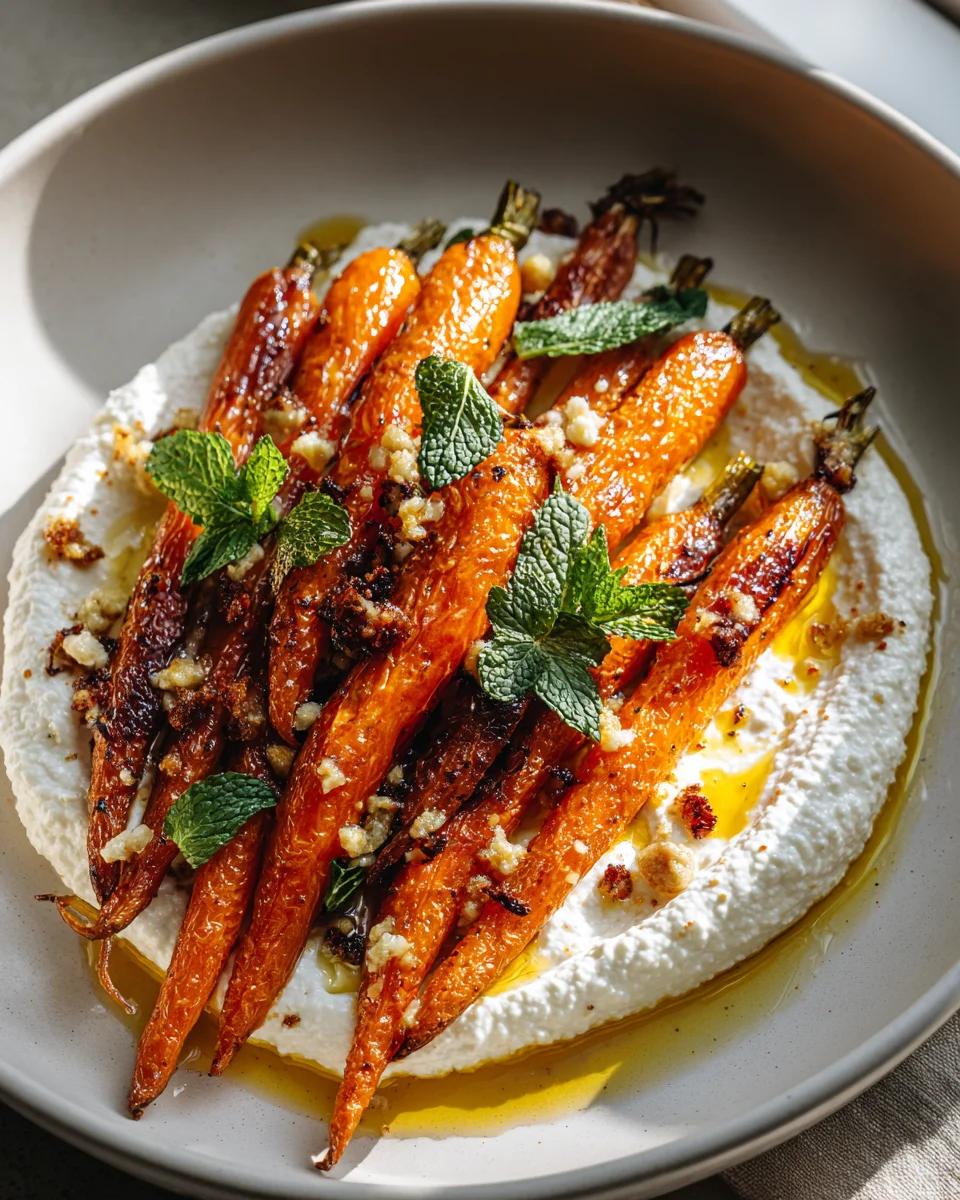
Assembling Your “Roasted Carrots With Whipped Ricotta Hot Honey” Masterpiece

Now for the grand finale! This is where we bring all the delicious components together into a visually stunning and incredibly tasty dish. Presentation really enhances the experience with “Roasted Carrots With Whipped Ricotta Hot Honey”.

  1. Choose your serving platter. I recommend a shallow bowl or a nice flat plate with a slight rim. The colors and textures of this dish are beautiful, so pick something that will let it shine.
  2. First, spoon the whipped ricotta onto the platter. You can spread it out evenly across the bottom, leaving a border around the edges, or create a more organic, swirled base. I like to spread it in a generous, thick layer, creating a creamy bed for the carrots. You can use the back of a spoon to create some pretty swirls or divots in the ricotta.
  3. Next, artfully arrange your perfectly roasted carrots on top of the whipped ricotta. You want to showcase those beautifully caramelized edges. Don’t just dump them; take a moment to place them thoughtfully. Overlap them slightly, pile them higher in the center, or spread them out more widely – whatever looks appealing to you.
  4. Now for the crowning glory: the hot honey. Grab your infused hot honey and, using a spoon, generously drizzle it over the roasted carrots. Don’t be shy! Let it cascade over the carrots and even pool slightly onto the whipped ricotta. The glossy sheen of the hot honey against the matte carrots and ricotta is simply stunning.
  5. This is where our optional garnishes come into play, adding a final flourish of flavor and texture.
    • If you’re using fresh herbs like chopped mint or parsley, sprinkle them generously over the dish. Their vibrant green color provides a beautiful contrast and a burst of freshness that really brightens the entire flavor profile.
    • For an extra layer of crunch and richness, scatter some toasted chopped pistachios or walnuts over the top. The nutty flavor pairs wonderfully with the sweet carrots and creamy ricotta.
    • Finally, for that professional touch and a little textural pop, sprinkle a tiny bit of flaky sea salt (like Maldon) over the entire dish. It catches the light and adds a delightful subtle crunch.
  6. Serve your “Roasted Carrots With Whipped Ricotta Hot Honey” immediately, or at room temperature. This dish is incredibly versatile and shines as a gorgeous appetizer or a vibrant side dish for almost any meal. The warm, sweet, and spicy carrots with the cool, creamy ricotta and the subtle zing of lemon create an unforgettable flavor experience that will have everyone asking for the recipe. Enjoy every delicious bite!

Tips for Success and Delicious Variations

This “Roasted Carrots With Whipped Ricotta Hot Honey” recipe is fantastic as written, but like any good dish, there’s always room for personalization and a few insider tips to ensure your success and inspire future culinary adventures.

Choosing Your Carrots Wisely

While standard orange carrots are perfectly delicious, don’t shy away from rainbow carrots if you can find them. The blend of purple, yellow, and white carrots adds a stunning visual appeal that elevates the dish, making it even more of a showstopper. Look for firm, fresh carrots with vibrant color and no soft spots. Smaller, younger carrots tend to be sweeter and more tender.

Make-Ahead Magic for Effortless Entertaining

One of the best things about this “Roasted Carrots With Whipped Ricotta Hot Honey” recipe is how many components can be prepared in advance, making it perfect for entertaining or busy weeknights:

  • Whipped Ricotta: The whipped ricotta can be made up to 2 days ahead of time. Store it in an airtight container in the refrigerator. Before serving, give it a good stir to restore its creamy texture. You might need to let it sit at room temperature for 15-20 minutes to soften slightly for easier spreading.
  • Hot Honey: The hot honey can be prepared even further in advance, up to a week. Store it in a clean jar or container at room temperature. The flavors will actually deepen over time! Just give it a good shake or stir before drizzling.
  • Carrot Prep: You can wash, peel, and chop the carrots a day in advance. Store them in a sealed container or bag in the refrigerator. On the day of serving, simply toss them with oil and seasonings and roast.

Having these components ready means less stress and more enjoyment when it’s time to assemble.

Flavor Enhancements for Your Roasted Carrots

Beyond thyme, consider other herbs and spices to customize your roasted carrots:

  • Rosemary: A classic pairing with root vegetables, rosemary adds a pungent, piney note.
  • Cumin or Coriander: For an earthier, slightly exotic twist, a pinch of ground cumin or coriander powder tossed with the carrots before roasting is wonderful.
  • Smoked Paprika: A touch of smoked paprika adds a beautiful smoky depth and color.
  • Garlic: Roast a few cloves of garlic with the carrots for a mellow, sweet garlic flavor that melds beautifully with the other ingredients.

Ricotta Riff-Offs: Other Creamy Bases

While whipped ricotta is truly divine, if you’re looking for alternatives or don’t have ricotta on hand, consider:

  • Goat Cheese: Whip soft goat cheese with a little milk or cream and lemon zest for a tangier, more assertive base.
  • Feta Dip: Blend feta cheese with Greek yogurt, olive oil, and lemon for a salty, tangy, and creamy spread.
  • Labneh: This thick, strained yogurt provides a wonderfully tart and creamy foundation.
  • Cashew Cream: For a dairy-free option, blend soaked cashews with lemon juice, water, and salt until super smooth.

Adding Texture and Crunch with Toasted Nuts

Don’t underestimate the power of a good crunch! Toasted nuts like pistachios, walnuts, or even pecans add a lovely textural contrast to the tender carrots and creamy ricotta. To toast nuts, spread them in a single layer on a dry baking sheet and bake at 350°F (175°C) for 5-10 minutes, or until fragrant and lightly browned. Watch them closely as they can burn quickly!

Pairing Perfection

This “Roasted Carrots With Whipped Ricotta Hot Honey” dish is incredibly versatile. It makes:

  • A fantastic appetizer: Serve it on its own with small forks, or alongside some crusty bread for scooping.
  • A vibrant side dish: It pairs beautifully with roasted chicken, grilled fish, or a hearty vegetarian main course like lentil loaf or quinoa patties.
  • A light lunch: Enjoy a larger portion for a satisfying and flavorful vegetarian meal.

The harmony of flavors in this dish is its secret weapon: the earthy sweetness of perfectly roasted carrots, the cool, tangy creaminess of the whipped ricotta, and the exhilarating kick of the hot honey create a symphony on your palate. It’s a balance of sweet, savory, spicy, and fresh that is truly addictive. Experiment with the heat level, try different herbs, and make it your own. Happy cooking!

Sweet & Spicy Roasted Carrots with Whipped Ricotta

Conclusion:

Why This Dish Will Be Your New Favorite

So, there you have it! We’ve journeyed through the simple yet profound magic that transforms humble carrots into something truly extraordinary. I genuinely believe that you absolutely have to try this recipe. It’s more than just a side dish; it’s an experience that awakens your palate and brings a touch of gourmet elegance to your table with minimal effort. What makes it such a standout? For me, it’s the incredible synergy of textures and tastes. You get the earthy sweetness of perfectly roasted carrots, caramelized to perfection, creating those irresistible slightly charred edges. This beautiful foundation is then elevated by the cloud-like creaminess of the whipped ricotta, offering a cool, tangy counterpoint that just melts in your mouth. But the real game-changer, the ingredient that ties it all together with an unforgettable flourish, is that luscious hot honey. The subtle warmth and fiery kick against the sweetness and creaminess is nothing short of culinary genius. It’s a sophisticated blend of sweet, savory, creamy, and spicy all in one glorious bite.

I often find myself craving this dish, not just for its incredible flavor but also for its sheer versatility and the vibrant visual appeal it brings. It’s a testament to how simple, quality ingredients can be combined to create something truly spectacular without requiring hours in the kitchen. The ease of preparation makes it perfect for busy weeknights, yet its impressive presentation ensures it’s equally at home gracing your holiday spread or a special dinner party. It’s a dish that genuinely delights both the chef and the diner, proving that healthy can be utterly delicious and exciting. The way the golden-brown carrots contrast with the pristine white ricotta and the glistening amber of the hot honey creates a picture that’s almost too beautiful to eat… almost! This isn’t just a recipe; it’s a celebration of flavor, texture, and the joy of simple cooking that I am so excited for you to discover.

Serving Suggestions and Creative Twists

Now that you’re hopefully convinced to whip up this amazing creation, let’s talk about how to make it fit perfectly into your meals or even inspire new culinary adventures. This dish shines brightly as a sophisticated side to a myriad of main courses. Imagine it alongside a beautifully seared steak, a tender roast chicken, or even flaky baked salmon. The rich flavors of the carrots and ricotta complement protein-heavy dishes wonderfully, cutting through any richness with their vibrant sweetness and light tang. For my vegetarian friends, it makes an exquisite accompaniment to a hearty lentil loaf, a grilled halloumi salad, or a simple quinoa pilaf. It’s truly a chameleon of a dish, adapting effortlessly to whatever you’re planning for dinner.

But why stop there? This dish can easily be transformed or adapted to suit your mood or pantry. Want to explore other root vegetables? Feel free to swap out some of the carrots for parsnips, sweet potatoes, or even butternut squash cubes – just adjust roasting times accordingly. For an extra layer of crunch and flavor, a sprinkle of toasted pistachios, walnuts, or even candied pecans over the top just before serving would be divine. If you’re a fan of fresh herbs, a scattering of chopped fresh dill, mint, or parsley can add another dimension of freshness and color, truly brightening the profile. And speaking of the ricotta, while I adore its creamy simplicity, you could certainly experiment with a goat cheese whip for a tangier profile, or even a dollop of mascarpone for extra decadence if you’re feeling indulgent. For those who like it even spicier, a pinch of red pepper flakes can be added directly to the hot honey before drizzling. The possibilities are truly endless, allowing you to make this wonderful recipe your very own signature creation.

The Unforgettable “Roasted Carrots With Whipped Ricotta Hot Honey” Experience Awaits!

I am so incredibly excited for you to experience the magic of this recipe firsthand. Seriously, don’t wait! Gather your ingredients, get those carrots roasting, and prepare to fall in love with a dish that is as delightful to make as it is to eat. Once you’ve taken that first glorious bite of Roasted Carrots With Whipped Ricotta Hot Honey, I just know you’ll be hooked. It’s a dish that truly stands out, offering a unique blend of familiar comfort and exciting new flavors that will leave a lasting impression on everyone at your table. It’s a recipe that I constantly return to, and I have no doubt it will become a cherished part of your culinary repertoire as well.

Please, when you do try it, come back and let me know all about your experience! Did you stick to the recipe, or did you put your own creative spin on it? What did you serve it with? Your feedback and culinary adventures are what make this community so special, and I absolutely love hearing from you. Share your thoughts in the comments below, or even better, snap a photo and tag me on social media so I can see your beautiful creations. Happy cooking, and get ready to impress yourself and your loved ones with this truly exceptional dish that marries sweetness, spice, and creamy goodness into perfection!


Roasted Carrots with Whipped Ricotta Hot Honey

A delightful dish featuring sweet, caramelized roasted carrots, luxurious creamy whipped ricotta, and a vibrant kick of hot honey. This easy recipe offers a symphony of flavors and textures, making it an unforgettable side dish or appetizer.

Prep Time
25 Minutes
Cook Time
35 Minutes
Total Time
60 Minutes
Servings
4 servings

Ingredients


Instructions


Important Information

Nutrition Facts (Per Serving)

It is important to consider this information as approximate and not to use it as definitive health advice.

Allergy Information

Please check ingredients for potential allergens and consult a health professional if in doubt.

« Previous Post
Spekulatius Kugeln: Festive Christmas Truffles Recipe
Next Post »
Irresistible Soft Chewy Gingerbread Men Cookies Recipe

If you enjoyed this…

Strawberry Pineapple Salsa: A Refreshing Summer Recipe

Spicy Mexican Corn: A Delicious and Easy Recipe

Nashville Hot Cheese: The Ultimate Guide to Spicy, Cheesy Goodness

Primary Sidebar

Browse by Diet

BreakfastDinnerLunchDessertAppetizer

Sweet Peach Yogurt Parfait Delight

One of my fondest memories is from a lazy summer afternoon spent at my grandmother’s house. The sun filtered through the kitchen window, casting a warm glow over the table where she would create her culinary magic. It was during one of those blissful moments that I first tasted her Peach Yogurt Parfait with Honey and Granola. The sweet aroma of ripe peaches mingling with creamy yogurt and the crunch of granola was nothing short of heavenly. It felt like summer captured in a bowl, and I still remember the joy of diving in with a spoon, each layer revealing a new burst of flavor.

When I think about that parfait, I can almost hear the gentle hum of the bees outside, reminding me of the floral notes that honey brings to every bite. The vibrant yellows and soft oranges of the peaches contrast beautifully with the creamy white yogurt and the golden crunch of granola. It’s a dish that not only looks delightful but also tastes like a celebration of fresh, wholesome ingredients.

What makes my version of this Peach Yogurt Parfait special is the careful balance of flavors and textures. I use ripe, juicy peaches, drizzled with locally sourced honey, and a homemade granola that’s bursting with nuts and seeds for an extra crunch. It’s a simple dish, but every layer is crafted with love and attention.

Let me show you exactly how to make this delightful parfait, so you can bring a bit of that summer magic into your kitchen!

Sweet Peach Yogurt Parfait Delight

Why You’ll Love This Recipe

  • Delightfully creamy texture from the Greek yogurt, paired with the juicy sweetness of fresh peaches.
  • Ready in under 20 minutes, making it a quick and satisfying breakfast or snack option.
  • Budget-friendly, using common ingredients that you may already have in your pantry.
  • Customizable with your favorite granola and nuts, allowing you to tailor each parfait to your taste.
  • Perfectly balanced flavors with the bright acidity of lemon juice and the sweetness of honey enhancing the peaches.

Ingredients

  • For the Parfait:
  • 2 cups plain Greek yogurt (or vanilla yogurt for a sweeter option)
  • 2 large ripe peaches, diced (about 2 cups)
  • 1 tablespoon fresh lemon juice (to prevent browning of peaches)
  • 2 tablespoons honey (plus more for drizzling)
  • 1 teaspoon vanilla extract (optional for extra flavor)
  • For the Granola:
  • 1 cup granola (store-bought or homemade; see notes for a simple granola recipe)
  • 1/4 cup sliced almonds (optional for added crunch)
  • 1/4 cup shredded coconut (optional for added flavor)

Let’s dive into some key ingredients that make this Peach Yogurt Parfait so delightful! First, the Greek yogurt is not only creamy but also packed with protein, making it a satisfying option for breakfast or a snack. If you’re looking for a sweeter option, you can easily substitute it with vanilla yogurt, though it may alter the overall flavor balance. Next, the ripe peaches are the star of the show; their natural sweetness shines through, so I recommend choosing peaches that yield slightly to pressure, indicating they’re perfectly ripe. If peaches aren’t in season, feel free to use nectarines or even frozen peaches—just thaw them before use. Finally, honey adds a lovely floral sweetness that ties everything together. If you prefer, maple syrup can serve as a delicious substitute.

Step-by-Step Instructions

  1. Start by preparing the peaches. Wash them thoroughly, then slice and dice them into bite-sized pieces. In a medium bowl, toss the diced peaches with 1 tablespoon of fresh lemon juice to prevent browning. Set aside for about 5 minutes while the lemon juice works its magic.
  2. In a separate bowl, combine the Greek yogurt, 2 tablespoons of honey, and 1 teaspoon of vanilla extract if using. Stir the mixture until smooth and thoroughly blended. This should take about a minute. Avoid overmixing to maintain the creaminess of the yogurt.
  3. Now it’s time to layer your parfait. Grab a clear glass or bowl to showcase your beautiful creation. Start with a generous spoonful of the yogurt mixture at the bottom—about 1/4 cup will do. Use a spoon to spread it evenly.
  4. Add a layer of the diced peaches over the yogurt, ensuring they cover the yogurt completely. You might want to use about half of what you have prepared—roughly 1 cup. This layer should be visually appealing, so arrange the peaches neatly.
  5. Sprinkle 1/4 cup of granola over the peaches. This adds a delightful crunch. Make sure to distribute it evenly to ensure every bite has that satisfying texture. Avoid packing it down too tightly, as you want it to maintain its crunch.
  6. Repeat the layers: spoon in another 1/4 cup of yogurt, followed by another cup of peaches, and another sprinkle of granola. You should have at least two layers, but feel free to add more depending on your glass size.
  7. Finish off your parfait with a drizzle of honey on top for added sweetness and a touch of elegance. If you’re using sliced almonds or shredded coconut, sprinkle them on top now. It adds a lovely visual contrast and extra flavor.
  8. Serve immediately or refrigerate for up to 30 minutes before serving to allow the flavors to meld together. However, I recommend enjoying it fresh to maintain the granola’s crunch.

Pro Tips for the Best Peach Yogurt Parfait With Honey And Granola

  • Make sure to choose ripe peaches for the best flavor and texture. A common mistake is using unripe fruit, which can lead to a less enjoyable parfait. Look for peaches that are fragrant and slightly soft to the touch.
  • Use a clear glass to assemble your parfait; this not only makes for a beautiful presentation but also allows you to see the colorful layers, which adds to the enjoyment of eating it.
  • For an even creamier texture, consider whipping the Greek yogurt with a hand mixer for a couple of minutes before layering. This small adjustment makes a huge difference in mouthfeel.
  • Be mindful of the granola-to-yogurt ratio. Too much granola can overwhelm the parfait, while too little can make it feel too creamy. Aim for about 1/4 cup of granola per layer for the perfect balance.
  • If you’re making this for a gathering, consider preparing the yogurt and peaches ahead of time and layering them just before serving. This ensures the granola stays crunchy!

Variations & Serving Ideas

There are so many ways to get creative with your Peach Yogurt Parfait! For a tropical twist, swap out the peaches for mangoes or pineapples and top with coconut flakes. If you prefer a berry flavor, mix in some blueberries or strawberries with the peaches for added color and taste. For a nutty version, incorporate chopped walnuts or pecans instead of almonds.

As for serving ideas, this parfait pairs beautifully with a side of scrambled eggs for a hearty breakfast or fresh fruit salad for a light lunch. You might also enjoy it alongside whole grain toast with almond butter for an energizing snack. The contrast of flavors and textures will elevate your meal experience!

Storage, Make-Ahead & Reheating

The Peach Yogurt Parfait is best enjoyed fresh, but you can prepare some components ahead of time. Store the layered parfait in an airtight container in the refrigerator for up to 24 hours. However, be cautious; the granola may lose its crunch if stored too long. You can freeze the yogurt and peach mixture for up to 2 months; just remember to thaw it in the refrigerator overnight before serving.

If you plan to enjoy this dish the next day, it can taste even better as the flavors meld together. Just remember to add the granola right before serving to keep its delightful crunch!

Frequently Asked Questions

Can I make Peach Yogurt Parfait With Honey And Granola ahead of time?

Yes — in fact, it tastes even better the next day as the flavors meld. However, I recommend waiting to add the granola until just before serving to maintain its crunch.

What can I substitute for Greek yogurt?

If you prefer a lighter option, you can substitute Greek yogurt with regular yogurt or a dairy-free alternative like coconut yogurt. Just remember that this may alter the creaminess and flavor profile slightly.

Can I use frozen peaches for this parfait?

Absolutely! Just make sure to thaw the frozen peaches before using them. They will still add great flavor, though the texture may be slightly softer than fresh peaches.

How do I make the parfait vegan?

To make a vegan version, substitute the Greek yogurt with a plant-based yogurt alternative, and replace honey with maple syrup or agave nectar. This keeps the parfait sweet while adhering to a vegan diet.

What other fruits can I use in this recipe?

You can mix and match fruits based on your preference. Try using strawberries, blueberries, raspberries, or even bananas. Just make sure to adjust the lemon juice as needed to prevent browning.

Sweet Peach Yogurt Parfait Delight

Final Thoughts

The Peach Yogurt Parfait with Honey and Granola is a delightful blend of creamy yogurt, sweet peaches, and crunchy granola that creates a satisfying and nourishing treat. Each layer bursts with flavor, making it a perfect choice for breakfast or a light dessert.

This is the kind of recipe I come back to again and again, especially when I want something refreshing and wholesome to start my day. The harmony of sweet and tart flavors, combined with the delightful crunch, never fails to lift my spirits!

I encourage you to give this parfait a try and indulge in its comforting goodness. Feel free to share your results or even add your own twist—perhaps a sprinkle of cinnamon or a handful of nuts. Enjoy creating your perfect parfait!

Print
clock clock iconcutlery cutlery iconflag flag iconfolder folder iconinstagram instagram iconpinterest pinterest iconfacebook facebook iconprint print iconsquares squares iconheart heart iconheart solid heart solid icon

Peach Yogurt Parfait


  • Author: Lily author
  • Total Time: 15 minutes
  • Yield: 4 servings 1x
Pin Recipe
Print Recipe

Description

This Peach Yogurt Parfait combines creamy Greek yogurt, juicy peaches, and crunchy granola for a delightful treat. It’s a perfect breakfast or snack that captures the essence of summer in every bite.


Ingredients

Scale
  • For the Parfait:
  • 2 cups plain Greek yogurt (or vanilla yogurt for a sweeter option)
  • 2 large ripe peaches, diced (about 2 cups)
  • 1 tablespoon fresh lemon juice (to prevent browning of peaches)
  • 2 tablespoons honey (plus more for drizzling)
  • 1 teaspoon vanilla extract (optional for extra flavor)
  • For the Granola:
  • 1 cup granola (store-bought or homemade; see notes for a simple granola recipe)
  • 1/4 cup sliced almonds (optional for added crunch)
  • 1/4 cup shredded coconut (optional for added flavor)

Instructions

  1. Start by preparing the peaches. Wash them thoroughly, then slice and dice them into bite-sized pieces. In a medium bowl, toss the diced peaches with 1 tablespoon of fresh lemon juice to prevent browning. Set aside for about 5 minutes while the lemon juice works its magic.
  2. In a separate bowl, combine the Greek yogurt, 2 tablespoons of honey, and 1 teaspoon of vanilla extract if using. Stir the mixture until smooth and thoroughly blended. This should take about a minute. Avoid overmixing to maintain the creaminess of the yogurt.
  3. Now it’s time to layer your parfait. Grab a clear glass or bowl to showcase your beautiful creation. Start with a generous spoonful of the yogurt mixture at the bottom—about 1/4 cup will do. Use a spoon to spread it evenly.
  4. Add a layer of the diced peaches over the yogurt, ensuring they cover the yogurt completely. You might want to use about half of what you have prepared—roughly 1 cup. This layer should be visually appealing, so arrange the peaches neatly.
  5. Sprinkle 1/4 cup of granola over the peaches. This adds a delightful crunch. Make sure to distribute it evenly to ensure every bite has that satisfying texture. Avoid packing it down too tightly, as you want it to maintain its crunch.
  6. Repeat the layers: spoon in another 1/4 cup of yogurt, followed by another cup of peaches, and another sprinkle of granola. You should have at least two layers, but feel free to add more depending on your glass size.
  7. Finish off your parfait with a drizzle of honey on top for added sweetness and a touch of elegance. If you’re using sliced almonds or shredded coconut, sprinkle them on top now. It adds a lovely visual contrast and extra flavor.
  8. Serve immediately or refrigerate for up to 30 minutes before serving to allow the flavors to meld together. However, I recommend enjoying it fresh to maintain the granola’s crunch.
  • Prep Time: 15 mins
  • Cook Time: 0 mins
  • Category: Breakfast
  • Method: No-cook
  • Cuisine: American

Nutrition

  • Serving Size: 1 parfait
  • Calories: 250
  • Sugar: 20 g
  • Sodium: 50 mg
  • Fat: 5 g
  • Saturated Fat: 2 g
  • Unsaturated Fat: 3 g
  • Trans Fat: 0 g
  • Carbohydrates: 40 g
  • Fiber: 3 g
  • Protein: 10 g
  • Cholesterol: 10 mg

Keywords: Choose ripe peaches for the best flavor and texture. Use a clear glass for a beautiful presentation. For creaminess, consider whipping the yogurt before layering. Be mindful of the granola-to-yogurt ratio. Prepare yogurt and peaches ahead of time for gatherings, layering just before serving.

Did you make this recipe?

Share a photo and tag us — we can't wait to see what you've made!

Sun-Kissed Frozen Orange Cream Slush

As a child, summer days felt like they lasted forever. I remember the sticky heat wrapping around me as I played outside, my laughter mingling with the sounds of the neighborhood. But nothing could cool me down quite like the moment I’d spot my grandmother, laboring over her blender, whipping up her famous Frozen Orange Creamsicle Slush. That vibrant orange treat, with its frosty texture and sweet citrus aroma, was like a burst of sunshine in a cup. Just one sip, and I could feel the coolness wash over me, sparking pure joy.

This Frozen Orange Creamsicle Slush has a way of making you feel like a kid again. Its creamy, dreamy consistency is a delightful balance of bright orange and soft vanilla, inviting you to dive right in. The refreshing tang of orange dances on your tongue, while the smooth creaminess envelops you in a comforting embrace. It’s a nostalgic treat that’s perfect for hot summer afternoons or anytime you need a little pick-me-up.

What makes my version of this slush stand out is the addition of a hint of vanilla bean, which elevates the flavor and adds an extra layer of richness. Plus, it’s super easy to whip up with just a few simple ingredients that you probably already have on hand! So, if you’re ready to relive those sun-soaked memories, let me show you exactly how to make it.

Sun-Kissed Frozen Orange Cream Slush

Why You’ll Love This Recipe

  • Each slush is a perfect blend of creamy vanilla and zesty orange, creating a nostalgic flavor reminiscent of summer days.
  • This refreshing treat is ready in under 15 minutes, making it an ideal quick dessert for unexpected guests or hot afternoons.
  • With just 8 simple ingredients, it’s budget-friendly, ensuring you don’t have to break the bank to enjoy a delicious slush.
  • The slush has a perfectly smooth texture, thanks to the combination of ice and ice cream, providing a delightful contrast to the bright citrus flavors.
  • It’s highly customizable; you can easily adjust the sweetness and add fresh herbs for a unique twist that suits your taste.

Ingredients

  • 2 cups orange juice (freshly squeezed or store-bought)
  • 1 cup vanilla ice cream
  • 1 cup crushed ice
  • 1/2 cup milk (whole or 2%)
  • 1/4 cup granulated sugar (adjust based on sweetness preference)
  • 1 teaspoon vanilla extract
  • Zest of 1 orange (for added flavor)
  • Fresh orange slices and mint leaves (for garnish)

The star of this Frozen Orange Creamsicle Slush is the orange juice, which provides the vibrant, citrusy base. Freshly squeezed juice will yield the brightest flavor, but store-bought options can be just as convenient. If you’re opting for store-bought, choose 100% pure juice with no added sugars for the best results. Another essential ingredient is the vanilla ice cream; it adds creaminess and sweetness. You can substitute it with dairy-free ice cream if you’re looking for a vegan option. Whole or 2% milk complements the ice cream, creating a smooth blend. If you want a lower-calorie version, almond or oat milk can be good alternatives.

Lastly, the granulated sugar can be adjusted based on your sweetness preference. If you prefer a more natural sweetener, consider using honey or agave syrup. The orange zest enhances the flavor profile, providing an aromatic pop that brings the whole slush together. Don’t skip it! It adds an extra layer of brightness that makes this slush truly special.

Step-by-Step Instructions

  1. Start by preparing your ingredients. Gather 2 cups of orange juice, 1 cup of vanilla ice cream, and 1 cup of crushed ice. Make sure the ice is finely crushed, as larger chunks can make blending difficult.
  2. In a blender, combine the orange juice, vanilla ice cream, crushed ice, and 1/2 cup of milk. Add 1/4 cup of granulated sugar and 1 teaspoon of vanilla extract. If you like a sweeter slush, consider adding a bit more sugar at this stage.
  3. Add the zest of 1 orange to the blender. This step is crucial for enhancing the citrus flavor of your slush. Make sure not to include the bitter white pith—only the flavorful zest.
  4. Blend the mixture on medium-high speed for about 30-45 seconds. Stop once the ingredients are fully combined and the slush has a smooth, even consistency. If you notice large chunks of ice, blend for an additional 10-15 seconds. Avoid over-blending, as this can make the slush too liquidy.
  5. Once blended, taste the slush. If it needs more sweetness, add a little more sugar and blend for a few more seconds. If it’s too thick, you can add a splash of milk to reach your desired consistency.
  6. Pour the slush into glasses. This recipe typically serves 4, but you can easily double it for larger gatherings. Use a spoon to help guide the slush into the glasses if needed.
  7. Garnish each serving with fresh orange slices and mint leaves. The mint not only adds a pop of color but also a refreshing aroma that complements the citrus flavors beautifully.
  8. Serve immediately and enjoy! If you’ve made extra, you can refrigerate it for a short time, but it’s best enjoyed fresh.

Pro Tips for the Best Frozen Orange Creamsicle Slush

  • Don’t skip the orange zest! It’s a game-changer for flavor. Always zest before juicing to make it easier.
  • Use a high-powered blender for the best texture. A standard blender may struggle with ice, leading to uneven consistency. If you have a food processor, that can work too, but ensure the ice is finely crushed.
  • Adjust the ice-to-liquid ratio carefully. If your slush is too thick, it won’t blend well. Start with less ice and add more until you reach your preferred texture.
  • Be cautious with the sugar! Always start with the lower amount, as you can easily add more, but it’s hard to fix an overly sweet slush.
  • For a fun twist, consider adding a splash of coconut milk or a handful of fresh fruit like strawberries or pineapple. This not only enhances the flavor but also adds a beautiful color contrast.

Variations & Serving Ideas

There are countless ways to put a spin on your Frozen Orange Creamsicle Slush. Consider making a tropical version by adding in some pineapple juice or coconut milk for a delightful tropical twist. If you’re feeling adventurous, try incorporating a handful of frozen mango or peach slices for added sweetness. For a lighter version, swap out the vanilla ice cream for Greek yogurt for a creamy yet tangy alternative.

As for serving ideas, this refreshing slush pairs wonderfully with light summer dishes like grilled chicken skewers, fish tacos, or a simple salad topped with citrus vinaigrette. The bright, zesty flavors of the slush complement these dishes perfectly, making them an ideal pairing for a sunny day.

Storage, Make-Ahead & Reheating

This Frozen Orange Creamsicle Slush is best enjoyed fresh, but if you have leftovers, you can store them in an airtight container in the fridge for up to 2 days. Just keep in mind that the slush may lose some of its texture over time as the ice melts. It doesn’t freeze well, as the ice will turn into a solid block. If you must freeze it, blend again after thawing to restore the slushy consistency. This treat is best the day you make it, as the flavors meld together beautifully overnight, enhancing its deliciousness.

Frequently Asked Questions

Can I make Frozen Orange Creamsicle Slush ahead of time?

Yes — in fact, it tastes even better the next day as the flavors meld. However, it’s best to enjoy it fresh, as the texture can change if stored for too long. If you need to prepare it ahead, keep it in the fridge and re-blend before serving.

What kind of orange juice should I use?

For the best flavor, use freshly squeezed orange juice. However, if you’re short on time, opt for 100% pure store-bought juice without added sugars. This will ensure that your slush remains flavorful and refreshing.

Can I substitute the vanilla ice cream?

Absolutely! If you’re looking for a dairy-free option, coconut milk ice cream or a non-dairy vanilla ice cream can work wonderfully. They will still provide the creamy texture and sweetness you desire.

How can I adjust the sweetness of my slush?

You can easily adjust the sweetness by modifying the amount of sugar added. Start with 1/4 cup and taste the mixture before blending. If you prefer it sweeter, add more sugar gradually until it reaches your desired level.

What should I do if my slush is too thick?

If your slush is too thick, simply add a splash of milk or orange juice and blend again. This will help achieve a more drinkable consistency while maintaining the slushy texture. Adjust gradually to reach your preferred thickness.

Sun-Kissed Frozen Orange Cream Slush

Final Thoughts

The Frozen Orange Creamsicle Slush is a delightful blend of refreshing citrus and creamy goodness, making it a perfect treat for warm days or any time you crave a taste of nostalgia. The way the bright orange flavor dances with the creamy texture truly elevates this slush, transforming it into a satisfying escape from the everyday.

This is the kind of recipe I come back to again and again, especially when I’m looking to cool down or impress guests at a summer gathering. It’s simple to make and always brings smiles all around! I encourage you to try this recipe for yourself—don’t hesitate to share your results or even put your own spin on it. Happy slushing!

Print
clock clock iconcutlery cutlery iconflag flag iconfolder folder iconinstagram instagram iconpinterest pinterest iconfacebook facebook iconprint print iconsquares squares iconheart heart iconheart solid heart solid icon

Frozen Orange Creamsicle Slush


  • Author: Lily author
  • Total Time: 15 minutes
  • Yield: 4 servings 1x
Pin Recipe
Print Recipe

Description

This Frozen Orange Creamsicle Slush is a refreshing treat that combines creamy vanilla and zesty orange flavors. Perfect for hot summer days, it brings back nostalgic memories with every sip.


Ingredients

Scale
  • 2 cups orange juice (freshly squeezed or store-bought)
  • 1 cup vanilla ice cream
  • 1 cup crushed ice
  • 1/2 cup milk (whole or 2%)
  • 1/4 cup granulated sugar (adjust based on sweetness preference)
  • 1 teaspoon vanilla extract
  • Zest of 1 orange (for added flavor)
  • Fresh orange slices and mint leaves (for garnish)

Instructions

  1. Start by preparing your ingredients. Gather 2 cups of orange juice, 1 cup of vanilla ice cream, and 1 cup of crushed ice. Make sure the ice is finely crushed, as larger chunks can make blending difficult.
  2. In a blender, combine the orange juice, vanilla ice cream, crushed ice, and 1/2 cup of milk. Add 1/4 cup of granulated sugar and 1 teaspoon of vanilla extract. If you like a sweeter slush, consider adding a bit more sugar at this stage.
  3. Add the zest of 1 orange to the blender. This step is crucial for enhancing the citrus flavor of your slush. Make sure not to include the bitter white pith—only the flavorful zest.
  4. Blend the mixture on medium-high speed for about 30-45 seconds. Stop once the ingredients are fully combined and the slush has a smooth, even consistency. If you notice large chunks of ice, blend for an additional 10-15 seconds. Avoid over-blending, as this can make the slush too liquidy.
  5. Once blended, taste the slush. If it needs more sweetness, add a little more sugar and blend for a few more seconds. If it’s too thick, you can add a splash of milk to reach your desired consistency.
  6. Pour the slush into glasses. This recipe typically serves 4, but you can easily double it for larger gatherings. Use a spoon to help guide the slush into the glasses if needed.
  7. Garnish each serving with fresh orange slices and mint leaves. The mint not only adds a pop of color but also a refreshing aroma that complements the citrus flavors beautifully.
  8. Serve immediately and enjoy! If you’ve made extra, you can refrigerate it for a short time, but it's best enjoyed fresh.
  • Prep Time: 15 min
  • Cook Time: 0 min
  • Category: Dessert
  • Method: Blending
  • Cuisine: American

Nutrition

  • Serving Size: 1 serving
  • Calories: 200
  • Sugar: 30 g
  • Sodium: 50 mg
  • Fat: 5 g
  • Saturated Fat: 3 g
  • Unsaturated Fat: 2 g
  • Trans Fat: 0 g
  • Carbohydrates: 40 g
  • Fiber: 1 g
  • Protein: 2 g
  • Cholesterol: 20 mg

Keywords: Don't skip the orange zest! It's a game-changer for flavor. Always zest before juicing to make it easier.

Did you make this recipe?

Share a photo and tag us — we can't wait to see what you've made!

Zesty Lemon Poppy Seed Delight

One rainy afternoon, I found myself in my grandmother’s cozy kitchen, the kind that always smelled like warmth and love. She was whipping up her famous Lemon Poppy Seed Loaf, a recipe that had been passed down through generations. As the batter came together, the zesty aroma of fresh lemons filled the air, mingling perfectly with the nutty fragrance of poppy seeds. I can still picture her, apron-clad, as she expertly drizzled a vibrant citrus icing over the loaf, creating a glossy, sun-kissed finish that beckoned us to dive in. It was a moment that sparked my own passion for baking, and this recipe has become a cherished staple in my home ever since.

When you take a bite of this Lemon Poppy Seed Loaf, it’s like a burst of sunshine on your palate. The loaf is beautifully golden, with a tender crumb that melts in your mouth. Each slice is speckled with tiny poppy seeds, adding a delightful crunch that contrasts beautifully with the tangy sweetness of the lemon. And that citrus icing? It’s the finishing touch that elevates this loaf from ordinary to extraordinary, with its bright, zesty flavor dancing on your taste buds.

This recipe stands out because it embraces simplicity while delivering on flavor. I’ve added a hint of vanilla to the batter, enhancing the overall taste and making it even more indulgent. Trust me, once you make this Lemon Poppy Seed Loaf With Citrus Icing, it’ll become a go-to in your baking repertoire.

So, let me show you exactly how to make it!

Zesty Lemon Poppy Seed Delight

Why You’ll Love This Recipe

  • Moist and tender crumb that melts in your mouth, thanks to the perfect balance of butter and buttermilk.
  • Bright, zesty lemon flavor paired with crunchy poppy seeds, creating a delightful texture and taste experience.
  • Easy to whip up in just about an hour, perfect for last-minute gatherings or a cozy afternoon treat.
  • Budget-friendly with everyday ingredients, making it an accessible option for all home bakers.
  • The citrus icing adds a sweet tang that elevates the loaf, turning a simple recipe into a showstopper!

Ingredients

  • 1 ½ cups (190g) all-purpose flour
  • 1 teaspoon baking powder
  • ½ teaspoon baking soda
  • ½ teaspoon salt
  • 3 tablespoons poppy seeds
  • ½ cup (115g) unsalted butter, softened to room temperature
  • 1 cup (200g) granulated sugar
  • 2 large eggs
  • 1 teaspoon vanilla extract
  • 1 teaspoon lemon zest (from about 1 medium lemon)
  • ½ cup (120ml) buttermilk
  • 2 tablespoons fresh lemon juice

For the Citrus Icing:

  • 1 cup (120g) powdered sugar
  • 2 tablespoons fresh lemon juice
  • 1 tablespoon orange juice
  • 1 teaspoon lemon zest (for garnish, optional)

Let’s dive into the key ingredients that make this Lemon Poppy Seed Loaf so special. The all-purpose flour provides the structure and base for the loaf, while the baking powder and baking soda ensure it rises perfectly, giving the loaf a light texture. For a gluten-free variation, you could substitute the flour with a gluten-free all-purpose blend. Poppy seeds not only add a delightful crunch but also contribute to the unique flavor profile that pairs well with the citrus notes.

Unsalted butter is crucial for achieving the buttery richness that makes this loaf so moist. If you’re looking for a dairy-free option, coconut oil or a vegan butter can be used instead. The buttermilk is another essential component, providing acidity that activates the baking soda for a fluffy texture. If you don’t have buttermilk on hand, you can easily make a substitute by mixing ½ cup of milk with 1 tablespoon of vinegar or lemon juice and letting it sit for about 5 minutes.

Step-by-Step Instructions

  1. Preheat your oven to 350°F (175°C). Grease a 9×5-inch loaf pan or line it with parchment paper for easy removal later.
  2. In a medium mixing bowl, whisk together 1 ½ cups of all-purpose flour, 1 teaspoon of baking powder, ½ teaspoon of baking soda, ½ teaspoon of salt, and 3 tablespoons of poppy seeds. This helps to evenly distribute the baking agents and ensures a uniform rise.
  3. In a large mixing bowl, cream together ½ cup of softened unsalted butter and 1 cup of granulated sugar using an electric mixer on medium speed for about 3-4 minutes, until the mixture is light and fluffy. Make sure to scrape down the sides of the bowl occasionally.
  4. Add 2 large eggs, 1 teaspoon of vanilla extract, and 1 teaspoon of lemon zest to the creamed butter and sugar, mixing until fully combined. You want a smooth consistency, so ensure there are no lumps of butter.
  5. In a small bowl, combine ½ cup of buttermilk and 2 tablespoons of fresh lemon juice. Alternately add the dry ingredients and buttermilk mixture to the butter mixture, starting and ending with the dry ingredients. Mix just until combined; do not overmix, as this can lead to a dense loaf.
  6. Pour the batter into the prepared loaf pan. Smooth the top with a spatula, ensuring it’s even. Bake in the preheated oven for 50-60 minutes, or until a toothpick inserted in the center comes out clean. The edges should be lightly golden brown, and the center should feel just set.
  7. Once baked, remove the loaf from the oven and allow it to cool in the pan for about 10 minutes. Then, transfer it to a wire rack to cool completely. Resist the urge to slice too soon, as it will be crumbly if it’s still warm.
  8. While the loaf is cooling, prepare the citrus icing. In a medium bowl, whisk together 1 cup of powdered sugar, 2 tablespoons of fresh lemon juice, and 1 tablespoon of orange juice until smooth. If the icing is too thick, you can add a little more juice to reach your desired consistency.
  9. Once the loaf is completely cool, drizzle the citrus icing over the top. If you like, sprinkle with an additional teaspoon of lemon zest for an extra pop of flavor and color.

Pro Tips for the Best Lemon Poppy Seed Loaf With Citrus Icing

  • Be careful not to overmix your batter; this is a common mistake that can lead to a dense loaf. Mix just until the dry ingredients are incorporated for a light and fluffy texture.
  • Use room temperature ingredients, especially the butter and eggs. This helps to create a smoother batter and ensures even baking. Take your eggs out of the fridge about 30 minutes before you start.
  • For a more pronounced lemon flavor, consider adding a little lemon extract in addition to the zest and juice. Just a half teaspoon can elevate the citrus notes significantly.
  • When measuring your flour, spoon it into the measuring cup and level it off with a knife instead of scooping directly from the bag. This prevents packing and ensures you don’t end up with a dry loaf.
  • Invest in a good quality loaf pan; it makes a difference in heat distribution, which ensures even baking. If your pan is dark-coated, reduce the oven temperature by 25°F to prevent over-browning.

Variations & Serving Ideas

For a delightful twist, consider adding blueberries or raspberries to the batter for a fruity burst of flavor. You can also experiment with different citrus fruits—try lime or grapefruit zest and juice for a refreshing change. For a healthier option, substitute half of the all-purpose flour with whole wheat flour for added fiber without compromising too much on texture.

This Lemon Poppy Seed Loaf pairs beautifully with a light salad, such as a mixed greens salad with a vinaigrette, or a cup of tea for a cozy afternoon treat. It also complements a creamy cheese platter, as the acidity of the loaf balances rich cheeses perfectly. Lastly, a scoop of vanilla ice cream on the side creates a delightful contrast of temperatures and flavors!

Storage, Make-Ahead & Reheating

This Lemon Poppy Seed Loaf can be stored at room temperature for up to 3 days if wrapped tightly in plastic wrap. If you want to keep it longer, it freezes well for up to 3 months. To freeze, wrap the loaf tightly in plastic wrap and then in aluminum foil to prevent freezer burn.

When you’re ready to enjoy it again, simply thaw it in the fridge overnight. Reheat individual slices in the microwave for 15-20 seconds or in a toaster oven until warmed through. Interestingly, many people find that this loaf tastes even better the next day, as the flavors have time to meld!

Frequently Asked Questions

Can I make Lemon Poppy Seed Loaf With Citrus Icing ahead of time?

Yes — in fact, it tastes even better the next day! You can make the loaf a day in advance, allowing the flavors to develop. Just be sure to store it in an airtight container to maintain its moisture.

Can I substitute the poppy seeds?

Absolutely! If you don’t have poppy seeds on hand or prefer an alternative, you can use sesame seeds for a similar crunch or omit them entirely for a smooth loaf.

What can I use instead of buttermilk?

If you don’t have buttermilk, you can easily create a substitute by mixing ½ cup of milk (dairy or plant-based) with 1 tablespoon of vinegar or lemon juice. Let it sit for 5 minutes before using in the recipe.

How can I make this recipe gluten-free?

To make a gluten-free version of this Lemon Poppy Seed Loaf, substitute the all-purpose flour with a gluten-free all-purpose flour blend. Just ensure that the blend contains a binding agent like xanthan gum for the best results.

What is the best way to store leftover loaf?

Leftover Lemon Poppy Seed Loaf should be stored in an airtight container at room temperature for up to 3 days. For longer storage, wrap it tightly and freeze for up to 3 months. Thaw it before serving for the best texture.

Zesty Lemon Poppy Seed Delight

Final Thoughts

The Lemon Poppy Seed Loaf with Citrus Icing is truly a delightful treat that brings a burst of brightness to any occasion. The zesty lemon flavor combined with the subtle crunch of poppy seeds creates a satisfying balance, while the citrus icing adds a touch of sweetness that perfectly complements the loaf’s tanginess.

This is the kind of recipe I come back to again and again, especially when I want to brighten up a gloomy day or celebrate a small victory. The aroma that fills the kitchen as it bakes is absolutely heavenly! I encourage you to give this recipe a try; you might just find it becoming a beloved staple in your home. Don’t forget to share your results or even add your own unique twist—I can’t wait to see what you create!

Print
clock clock iconcutlery cutlery iconflag flag iconfolder folder iconinstagram instagram iconpinterest pinterest iconfacebook facebook iconprint print iconsquares squares iconheart heart iconheart solid heart solid icon

Lemon Poppy Seed Loaf


  • Author: Lily author
  • Total Time: 49 minute
  • Yield: 1 loaf 1x
Pin Recipe
Print Recipe

Description

This Lemon Poppy Seed Loaf is a delightful treat that combines zesty lemon flavor with crunchy poppy seeds. Topped with a citrus icing, it’s perfect for any occasion.


Ingredients

Scale
  • 1 ½ cups (190g) all-purpose flour
  • 1 teaspoon baking powder
  • ½ teaspoon baking soda
  • ½ teaspoon salt
  • 3 tablespoons poppy seeds
  • ½ cup (115g) unsalted butter, softened to room temperature
  • 1 cup (200g) granulated sugar
  • 2 large eggs
  • 1 teaspoon vanilla extract
  • 1 teaspoon lemon zest (from about 1 medium lemon)
  • ½ cup (120ml) buttermilk
  • 2 tablespoons fresh lemon juice
  • 1 cup (120g) powdered sugar
  • 2 tablespoons fresh lemon juice
  • 1 tablespoon orange juice
  • 1 teaspoon lemon zest (for garnish, optional)

Instructions

  1. Preheat your oven to 350°F (175°C). Grease a 9×5-inch loaf pan or line it with parchment paper for easy removal later.
  2. In a medium mixing bowl, whisk together 1 ½ cups of all-purpose flour, 1 teaspoon of baking powder, ½ teaspoon of baking soda, ½ teaspoon of salt, and 3 tablespoons of poppy seeds. This helps to evenly distribute the baking agents and ensures a uniform rise.
  3. In a large mixing bowl, cream together ½ cup of softened unsalted butter and 1 cup of granulated sugar using an electric mixer on medium speed for about 3-4 minutes, until the mixture is light and fluffy. Make sure to scrape down the sides of the bowl occasionally.
  4. Add 2 large eggs, 1 teaspoon of vanilla extract, and 1 teaspoon of lemon zest to the creamed butter and sugar, mixing until fully combined. You want a smooth consistency, so ensure there are no lumps of butter.
  5. In a small bowl, combine ½ cup of buttermilk and 2 tablespoons of fresh lemon juice. Alternately add the dry ingredients and buttermilk mixture to the butter mixture, starting and ending with the dry ingredients. Mix just until combined; do not overmix, as this can lead to a dense loaf.
  6. Pour the batter into the prepared loaf pan. Smooth the top with a spatula, ensuring it’s even. Bake in the preheated oven for 50-60 minutes, or until a toothpick inserted in the center comes out clean. The edges should be lightly golden brown, and the center should feel just set.
  7. Once baked, remove the loaf from the oven and allow it to cool in the pan for about 10 minutes. Then, transfer it to a wire rack to cool completely. Resist the urge to slice too soon, as it will be crumbly if it’s still warm.
  8. While the loaf is cooling, prepare the citrus icing. In a medium bowl, whisk together 1 cup of powdered sugar, 2 tablespoons of fresh lemon juice, and 1 tablespoon of orange juice until smooth. If the icing is too thick, you can add a little more juice to reach your desired consistency.
  9. Once the loaf is completely cool, drizzle the citrus icing over the top. If you like, sprinkle with an additional teaspoon of lemon zest for an extra pop of flavor and color.
  • Prep Time: 15 mins
  • Cook Time: 50-60 mins
  • Category: Dessert
  • Method: Baking
  • Cuisine: American

Nutrition

  • Serving Size: 1 slice
  • Calories: 200
  • Sugar: 15 g
  • Sodium: 150 mg
  • Fat: 8 g
  • Saturated Fat: 5 g
  • Unsaturated Fat: 3 g
  • Trans Fat: 0 g
  • Carbohydrates: 30 g
  • Fiber: 1 g
  • Protein: 3 g
  • Cholesterol: 40 mg

Keywords: Be careful not to overmix your batter; this is a common mistake that can lead to a dense loaf. Use room temperature ingredients for a smoother batter and even baking.

Did you make this recipe?

Share a photo and tag us — we can't wait to see what you've made!

  • Privacy Policy
  • Terms Of Service
  • Contact
  • About
  • GDPR

Copyright © 2025 Homesmad