Mini Grilled Cheese Hawaiian Rolls: An Incredible Ultimate Recipe
Oh my goodness, let me tell you, if there’s one recipe that has completely stolen my heart and become an absolute go-to for pretty much any occasion, it’s this one right here: Mini Grilled Cheese Hawaiian Rolls: An Incredible Ultimate Recipe. Seriously, forget everything you thought you knew about grilled cheese because we’re taking it to a whole new level of adorable deliciousness! What makes this recipe so incredibly special, you ask? Well, it’s the magical marriage of those wonderfully sweet, fluffy Hawaiian rolls with the ultimate savory, gooey grilled cheese experience. It’s a genius twist on a classic comfort food that transforms it into something truly extraordinary.
You, my friend, are going to absolutely adore these mini marvels because they are everything you want in a snack or appetizer and more. Imagine the irresistible aroma of golden, buttery rolls, perfectly toasted, giving way to a warm, melty core of delicious cheese. They’re perfectly portioned, incredibly easy to whip up, and they have this amazing ability to disappear faster than you can say “more please!” from any platter. Whether you’re hosting a game day, need a fun lunch for the kids (or yourself!), or want an impressive yet simple appetizer for a party, these little bites are guaranteed to be a huge hit with everyone, from the pickiest eaters to the most discerning foodies.
So, what exactly are we diving into? We’re taking those beloved soft, slightly sweet Hawaiian dinner rolls, slicing them open, stuffing them with your favorite cheeses – think gooey cheddar, creamy provolone, or a sharp Monterey Jack – then grilling them to a golden-brown perfection. The result? A bite-sized burst of sweet and salty bliss that’s crispy on the outside and wonderfully warm and cheesy on the inside. Trust me, once you try these, there’s no going back to just any old grilled cheese. Get ready to fall in love!

Ingredient Notes
When it comes to crafting the ultimate Mini Grilled Cheese Hawaiian Rolls, the magic truly begins with selecting the right components. Every ingredient plays a crucial role in achieving that incredible balance of sweet, savory, and perfectly melted goodness. Here’s a breakdown of what I recommend and why, along with some fantastic substitution ideas to make this recipe your own.
- Hawaiian Sweet Rolls: These are non-negotiable for this particular recipe, as they are the star! Their inherent sweetness and soft, fluffy texture are what elevate this grilled cheese from good to utterly irresistible. The slight sweetness beautifully contrasts with the savory cheese. While other slider buns might work in a pinch, you’ll lose that signature “Hawaiian Rolls” flavor that makes this dish so special. I usually buy the 12-pack slab, which makes assembly a breeze.
- Butter (Unsalted is Best): Ah, butter – the unsung hero of any great grilled cheese. I always opt for unsalted butter because it gives me full control over the sodium content, allowing the flavors of the cheese and rolls to shine without being overly salty. However, if salted butter is all you have, feel free to use it; just be mindful of any additional salt you might add elsewhere. For a dairy-free alternative, a high-quality plant-based butter substitute works wonderfully for achieving that golden, crispy exterior.
- Cheese Blend: This is where we unlock serious flavor and melt potential! I find a blend works far better than a single cheese. My ultimate combination includes:
- Sharp Cheddar: For that classic, tangy, savory punch. It provides a fantastic flavor foundation.
- Monterey Jack: This cheese is a melt-master. It offers incredible creaminess and stretch, making for that desirable gooey interior.
- Provolone or Gruyère: A mild Provolone adds a beautiful stretch and a subtle nutty flavor that complements the sweet rolls. If you’re feeling fancy, Gruyère brings an even deeper, more sophisticated nuttiness.
Feel free to experiment with other meltable cheeses like Colby Jack, Fontina, or even a smoked Gouda for a unique twist. The key is to choose cheeses that melt well and offer a good flavor profile.
- Optional Fillings for the “Ultimate” Factor: To truly make these “incredible and ultimate,” especially leaning into the Hawaiian theme, I sometimes add a couple of extra layers:
- Thinly Sliced Cooked Beef: While traditional Hawaiian sliders often feature ham (pork), I prefer using thinly sliced, lean, pre-cooked beef (like a good quality deli roast beef or leftover thinly sliced steak). It adds a satisfying savory, meaty dimension without overpowering the cheese. Make sure it’s very thin so it heats through easily.
- Grilled Pineapple Bits: This might sound unconventional for a grilled cheese, but a very small amount of finely diced, grilled fresh pineapple can introduce a delightful sweet-tart counterpoint. Make sure it’s well-drained and sparingly used to avoid making the rolls soggy. Alternatively, a tiny dollop of pineapple jam can also work wonders!
These additions are truly optional, but they elevate the dish, transforming it from a simple grilled cheese into a gourmet mini slider experience.
Step-by-Step Instructions
Crafting these mini grilled cheese Hawaiian rolls is surprisingly straightforward, and the process is just as enjoyable as the delicious outcome. Follow these steps for perfect golden-brown rolls with a gooey, melted center every time!
- Prepare Your Rolls: If you’re using a slab of Hawaiian sweet rolls (the 12-pack is ideal), carefully slice the entire slab horizontally through the middle, creating a top and bottom half, keeping all the rolls connected. This makes assembly incredibly efficient. If you only have individual rolls, slice each one horizontally almost all the way through, creating a hinge.
- Butter the Bottom Half: Place the bottom half of your sliced rolls (still connected as a slab) onto a clean cutting board or baking sheet. Spread a generous, even layer of softened butter over the cut side of this bottom half. This interior butter layer helps with flavor and prevents the rolls from getting soggy from the cheese.
- Layer the Cheese: Evenly distribute about two-thirds of your chosen cheese blend over the buttered bottom half of the rolls. Make sure to get cheese all the way to the edges for maximum melt!
- Add Optional Fillings (If Using): If you’re adding the thinly sliced cooked beef and/or grilled pineapple bits, layer them now over the cheese. Remember, less is more here, especially with the pineapple, to avoid excessive moisture.
- Top with More Cheese: Sprinkle the remaining one-third of your cheese blend over the optional fillings. This ensures a beautifully cheesy top layer and helps to “glue” everything together.
- Place the Top Half: Carefully position the top half of the Hawaiian rolls back over the layered bottom half, pressing down gently to form a compact slab.
- Butter the Exterior: Now, for that irresistible crispy, golden crust! Generously spread softened butter over the entire top surface of the assembled roll slab. You’ll also butter the bottom exterior just before placing it in the pan.
- Preheat Your Pan or Griddle: Heat a large non-stick skillet or electric griddle over medium-low heat. The key here is low and slow – you want to melt the cheese and toast the bread without burning it.
- Grill the First Side: Once the pan is warm, carefully butter the bottom exterior of your assembled roll slab. Then, using two spatulas, gently transfer the entire slab, butter-side down, into the preheated pan. Cook for about 5-7 minutes, or until the bottom is beautifully golden brown and crispy.
- Cover and Melt: To help the cheese melt perfectly through, place a lid on your skillet or cover the griddle with a heat-safe dome. This traps the heat and creates a steamy environment, ensuring that gooey, melted center. Cook for another 3-5 minutes.
- Flip and Grill the Second Side: Remove the lid. Carefully place another large spatula (or a cutting board) on top of the rolls. Using two hands, flip the entire slab over so the unbuttered top is now facing down. Cook for another 5-7 minutes, or until this side is also golden brown and the cheese is fully melted and ooey-gooey. If needed, re-cover for a minute or two to ensure the cheese is liquid gold.
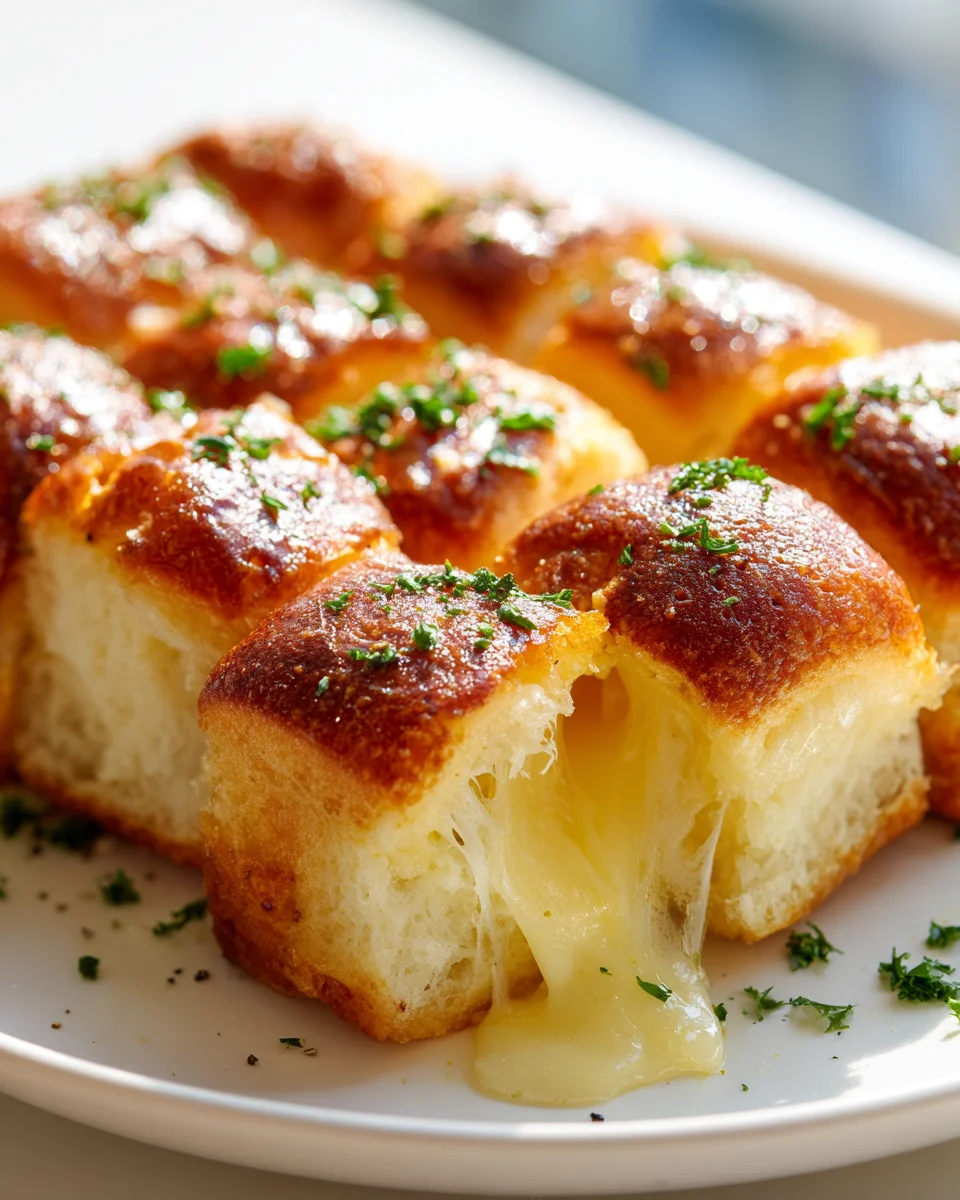
- Slice and Serve: Once both sides are perfectly golden and the cheese is gloriously melted, transfer the entire slab to a cutting board. Using a serrated knife, carefully slice along the perforations to separate the individual mini grilled cheese sandwiches. Serve immediately and enjoy your incredible creations!
Tips & Suggestions
Making these Mini Grilled Cheese Hawaiian Rolls is a joy, and with a few insider tips, you can elevate them from great to truly phenomenal. Here are my go-to suggestions to ensure your grilled cheese experience is nothing short of incredible:
- Low and Slow is the Way to Go: This is perhaps the most crucial tip for any grilled cheese. Cooking over medium-low heat allows the butter to toast the rolls to a perfect golden brown without burning, while giving the cheese ample time to melt into a wonderfully gooey consistency. If your heat is too high, the bread will burn before the cheese has a chance to fully melt. Patience is a virtue here!
- The Lid is Your Friend: Don’t skip covering your skillet or griddle during the cooking process. A lid creates a mini oven effect, trapping heat and steam. This helps the cheese melt more evenly and thoroughly, leading to that ultimate gooey center we all crave. It also speeds up the cooking slightly without increasing the heat.
- Press Gently (But Firmly!): While cooking, I like to gently press down on the rolls with a spatula. This helps ensure maximum contact with the hot pan, promoting even browning and a lovely, compact sandwich. However, don’t press too hard, or you’ll squeeze out all the delicious melted cheese! A gentle, consistent pressure is all you need.
- Don’t Overcrowd the Pan: If you’re making a huge batch, consider working in batches. Overcrowding the pan can lower the temperature and lead to uneven cooking and less crispiness. Give each slab (or individual rolls) enough room to breathe and brown properly.
- Custom Cheese Blends: Don’t be afraid to get creative with your cheese! Beyond my suggested blend, consider adding a touch of cream cheese for extra creaminess, or a sprinkle of Parmesan for a sharper, saltier kick. Smoked cheeses like smoked cheddar or Gouda can add a delightful depth of flavor.
- Serving Suggestions: These mini grilled cheeses are fantastic on their own, but they truly shine with a little accompaniment.
- Classic Tomato Soup: A creamy tomato soup is the quintessential pairing for grilled cheese. The sweetness of the Hawaiian rolls pairs beautifully with the tangy soup.
- Dipping Sauces: A simple honey mustard, a sweet and sour sauce, or even a spicy sriracha mayo can add an exciting dimension.
- Fruity Twist: For an even more “Hawaiian” feel, serve them alongside a small bowl of fresh fruit like mango, pineapple chunks, or mandarin oranges.
- Speedy Assembly Hack: If you’re pressed for time or preparing for a party, you can pre-assemble the rolls (up to step 6) a few hours in advance, cover them tightly with plastic wrap, and refrigerate. Just be sure to allow them to come closer to room temperature before grilling for best results.
Storage
While these Mini Grilled Cheese Hawaiian Rolls are undeniably at their absolute best when enjoyed fresh, straight off the griddle, I understand that sometimes you might have leftovers or want to prepare them slightly ahead of time. Here’s my advice for storage and reheating:
- Best Eaten Fresh: Seriously, these are designed for immediate gratification. The rolls are perfectly crisp, the cheese is gloriously gooey, and all the flavors are vibrant. I always recommend making them just before you plan to serve them if possible.
- Storing Leftovers (Cooked): If you do have leftovers, allow them to cool completely to room temperature. Once cooled, store them in an airtight container in the refrigerator for up to 2-3 days. The rolls will soften and lose their crispiness once refrigerated, which is normal.
- Reheating Cooked Mini Grilled Cheeses:
- Oven/Toaster Oven (Recommended): This is my preferred method for reheating to revive some of that coveted crispiness. Preheat your oven or toaster oven to 300-325°F (150-160°C). Place the grilled cheeses on a baking sheet and heat for about 8-12 minutes, or until warmed through and the cheese is melted again. Keep an eye on them to prevent burning.
- Air Fryer: An air fryer also works wonderfully for reheating! Place the mini grilled cheeses in a single layer in your air fryer basket. Air fry at 300°F (150°C) for 3-5 minutes, checking frequently, until they are hot and crispy again.
- Avoid the Microwave: While the microwave will heat them up quickly, it will unfortunately result in soggy rolls and rubbery cheese. I highly recommend against using it for these.
- Pre-Assembled (Uncooked) Storage: If you want to get a head start on preparation, you can assemble the entire slab of rolls with all the butter and cheese layers (up to step 7 in the instructions), cover them tightly with plastic wrap, and refrigerate for up to 12-24 hours. When ready to cook, let them sit at room temperature for about 15-20 minutes while your pan heats up, then proceed with grilling as usual. This can be a great trick for entertaining!
Final Thoughts
And there you have it! I truly believe that my recipe for Mini Grilled Cheese Hawaiian Rolls: An Incredible Ultimate Recipe is going to become a staple in your kitchen. From the moment you take that first golden, crispy bite, revealing the perfectly melted cheese nestled within the soft, sweet embrace of a Hawaiian roll, you’ll understand why I call it incredible.
This isn’t just a snack; it’s a delightful experience, a perfect marriage of sweet and savory that dances on your palate. It’s incredibly easy to make, yet impressive enough to wow at any gathering, or simply to elevate a quiet afternoon at home. Whether you’re looking for a quick, comforting bite, an irresistible appetizer, or a fun addition to your next party spread, these mini grilled cheese rolls deliver every single time.
So, go ahead and treat yourself, your family, or your friends to the magic of Mini Grilled Cheese Hawaiian Rolls: An Incredible Ultimate Recipe. I promise, you won’t be disappointed!

Ultimate Mini Grilled Cheese Hawaiian Rolls Recipe
- Total Time: 45 minutes
- Yield: 12 mini sandwiches
Description
These Mini Grilled Cheese Hawaiian Rolls are a delightful twist on a classic comfort food, combining sweet Hawaiian rolls with gooey, savory cheese. Perfect for any occasion, they are sure to be a hit with everyone!
Ingredients
- Hawaiian Sweet Rolls
- Butter (Unsalted is Best)
- Sharp Cheddar
- Monterey Jack
- Provolone or Gruyère
- Thinly Sliced Cooked Beef (optional)
- Grilled Pineapple Bits (optional)
Instructions
- Prepare Your Rolls: If you're using a slab of Hawaiian sweet rolls, carefully slice the entire slab horizontally through the middle, creating a top and bottom half, keeping all the rolls connected.
- Butter the Bottom Half: Place the bottom half of your sliced rolls onto a clean cutting board or baking sheet. Spread a generous, even layer of softened butter over the cut side of this bottom half.
- Layer the Cheese: Evenly distribute about two-thirds of your chosen cheese blend over the buttered bottom half of the rolls.
- Add Optional Fillings (If Using): If you're adding the thinly sliced cooked beef and/or grilled pineapple bits, layer them now over the cheese.
- Top with More Cheese: Sprinkle the remaining one-third of your cheese blend over the optional fillings.
- Place the Top Half: Carefully position the top half of the Hawaiian rolls back over the layered bottom half, pressing down gently.
- Butter the Exterior: Generously spread softened butter over the entire top surface of the assembled roll slab.
- Preheat Your Pan or Griddle: Heat a large non-stick skillet or electric griddle over medium-low heat.
- Grill the First Side: Once the pan is warm, carefully butter the bottom exterior of your assembled roll slab. Then, transfer the entire slab, butter-side down, into the preheated pan. Cook for about 5-7 minutes.
- Cover and Melt: Place a lid on your skillet or cover the griddle with a heat-safe dome. Cook for another 3-5 minutes.
- Flip and Grill the Second Side: Carefully place another large spatula on top of the rolls. Flip the entire slab over and cook for another 5-7 minutes.
- Slice and Serve: Once both sides are perfectly golden and the cheese is melted, transfer the entire slab to a cutting board. Using a serrated knife, carefully slice along the perforations to separate the individual mini grilled cheese sandwiches.
- Prep Time: 15 mins
- Cook Time: 30 mins
- Category: Appetizer
- Method: Grilling
- Cuisine: American
Nutrition
- Serving Size: 1 sandwich
- Calories: 250
- Sugar: 2 g
- Sodium: 400 mg
- Fat: 15 g
- Saturated Fat: 8 g
- Unsaturated Fat: 5 g
- Trans Fat: 0 g
- Carbohydrates: 20 g
- Fiber: 1 g
- Protein: 10 g
- Cholesterol: 30 mg
Keywords: Cooking over medium-low heat allows the butter to toast the rolls without burning, while giving the cheese ample time to melt. Consider using a mix of cheeses for a more flavorful experience.