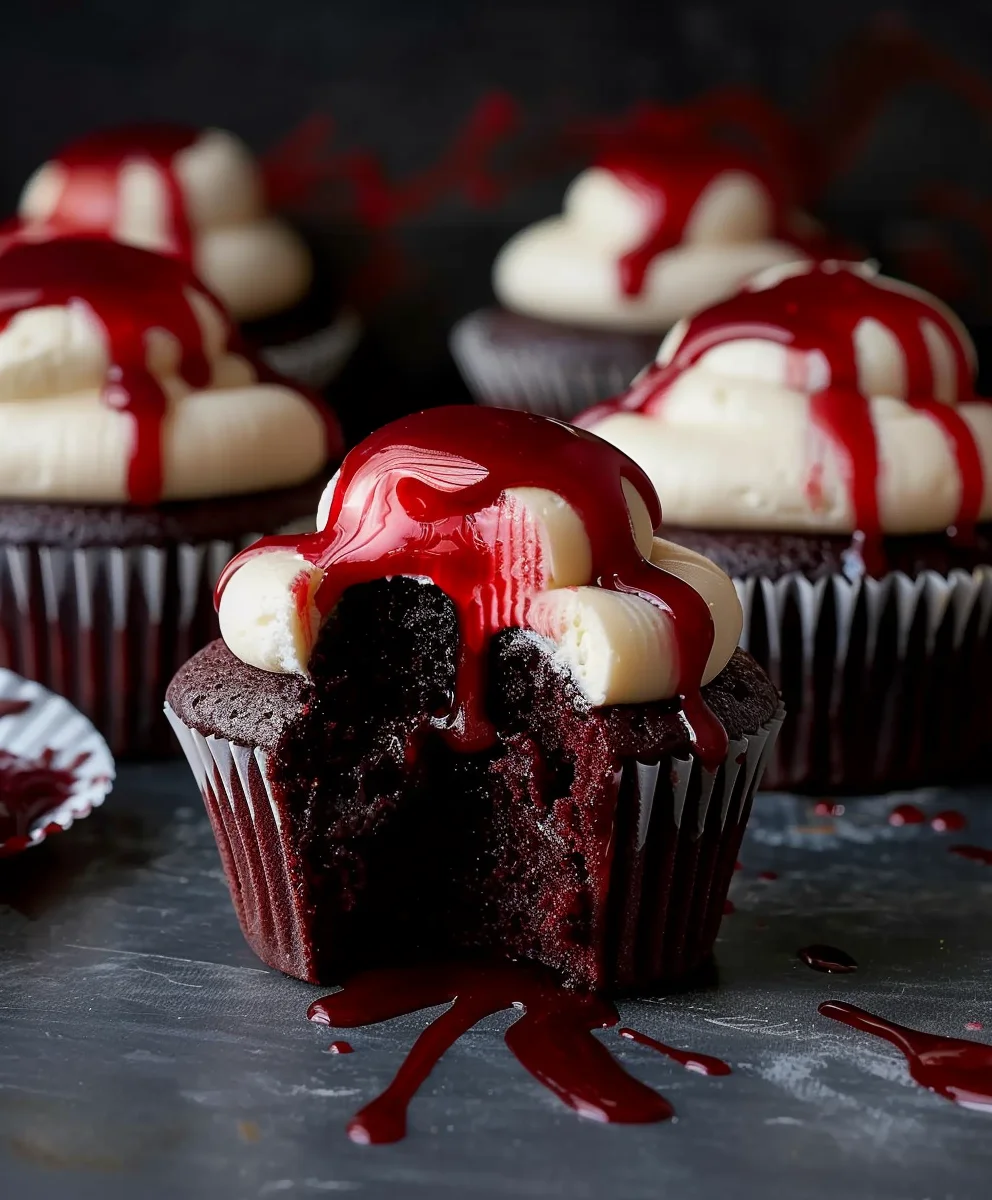
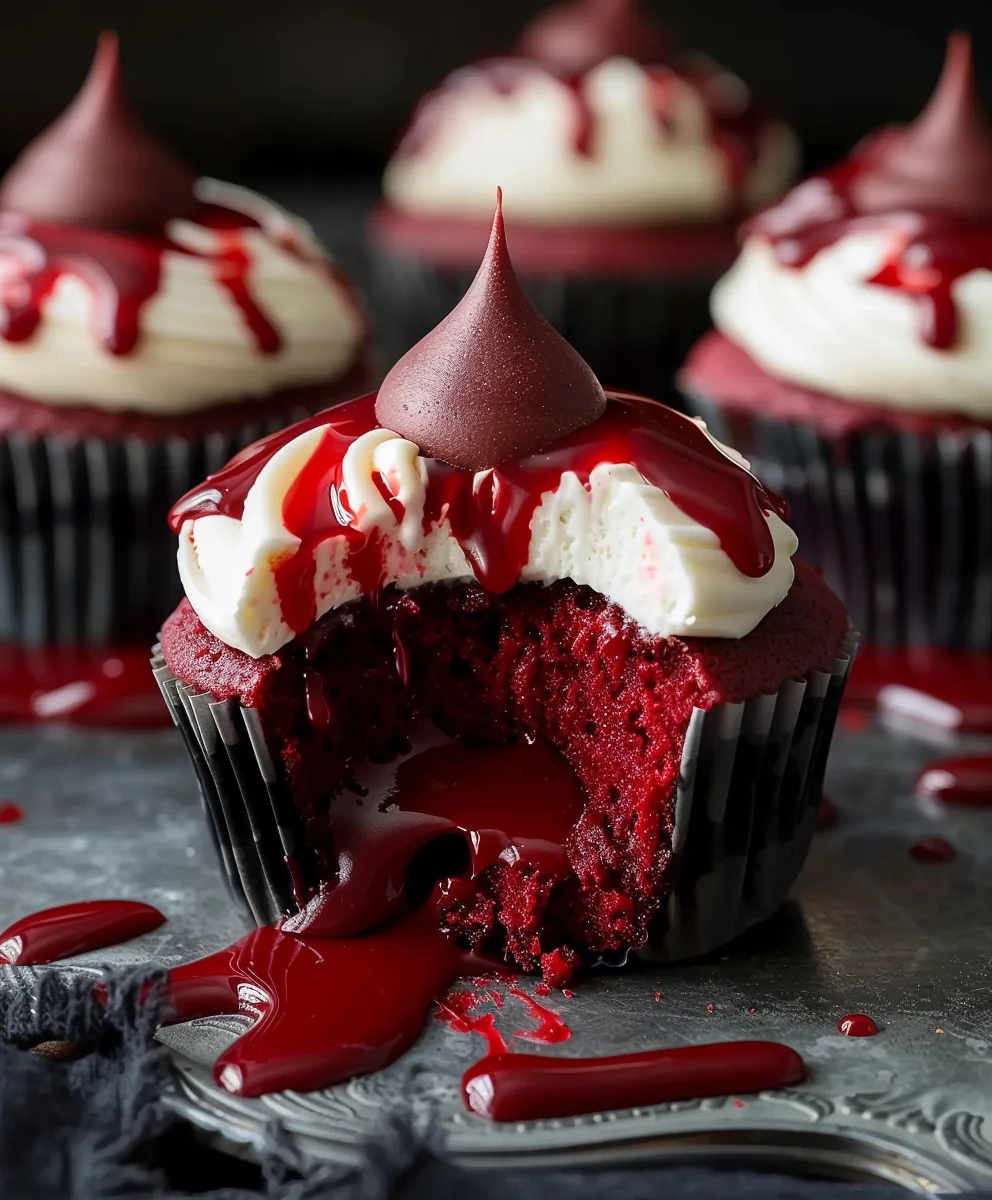
Halloween Vampire Bite Cupcakes – are you ready to sink your teeth into a treat that’s both spooky and delightfully delicious this season? I am absolutely thrilled to share with you a recipe that will transform your Halloween party into an unforgettable feast for the eyes and the palate. Imagine moist, decadent chocolate cupcakes, each crowned with a swirl of rich, creamy frosting, and then, the pièce de résistance – a chillingly realistic ‘vampire bite’ complete with a trickle of edible ‘blood’ that promises to send shivers down your spine in the most delicious way possible. This isn’t just any dessert; it’s a miniature edible masterpiece designed to capture the playful spirit of Halloween.
There’s a special kind of magic that comes with Halloween baking, transforming simple ingredients into ghoulishly delightful creations. Vampires, with their timeless allure and spooky charm, have long been a quintessential part of Halloween lore, and these cupcakes pay a delicious homage to that tradition. People absolutely adore this dish not only for its stunning visual impact but also for the irresistible combination of a tender, flavorful cupcake base and the sweet, smooth frosting. It’s the perfect blend of fun, fright, and fantastic flavor, making these Halloween Vampire Bite Cupcakes an unforgettable addition to any spooky celebration or family gathering. I promise, your guests will be raving about these truly ‘to die for’ treats!

Ingredients:
- For the Red Velvet Cupcakes:
- 2 ½ cups (300g) all-purpose flour, sifted
- 1 ½ cups (300g) granulated sugar
- 1 teaspoon baking soda
- 1 teaspoon cocoa powder (unsweetened, good quality)
- ½ teaspoon salt
- 2 large eggs, at room temperature
- 1 cup (240ml) buttermilk, at room temperature
- 1 cup (240ml) vegetable oil (or canola oil)
- 1 tablespoon white vinegar (distilled)
- 1 teaspoon vanilla extract (pure, not artificial)
- 2 ounces (approx. 4 tablespoons) red food coloring (liquid or gel for intense color)
- For the Cream Cheese Frosting:
- 8 ounces (226g) cream cheese, full-fat, softened but still cool
- ½ cup (113g) unsalted butter, softened
- 4 cups (480g) powdered sugar (confectioners’ sugar), sifted
- 1 teaspoon vanilla extract (pure)
- A pinch of salt
- For the “Vampire Blood” Sauce:
- 1 ½ cups (about 225g) fresh or frozen raspberries (or strawberries for a smoother texture)
- ¼ cup (50g) granulated sugar (adjust to taste)
- 1 tablespoon fresh lemon juice
- 1 tablespoon cornstarch mixed with 2 tablespoons cold water (slurry, optional for thickening)
- A tiny drop of red food coloring (optional, to enhance color)
- For Decoration:
- 12-18 plastic vampire fangs (or edible gummy fangs, if preferred)
- Optional: red sprinkles or edible glitter
Preparing the Red Velvet Cupcakes:
- Preheat and Prepare: My first step, and a crucial one, is to get our oven ready. Go ahead and preheat your oven to 350°F (175°C). While it’s warming up, line two standard 12-cup muffin tins with paper liners. You’re aiming for 18-24 cupcakes, so make sure you have enough liners ready to go. This pre-preparation is key to a smooth baking process, allowing you to focus on the batter without interruptions. I always find that having everything in its place before I start makes the whole experience much more enjoyable and less stressful, ensuring we can dive into making our amazing Halloween Vampire Bite Cupcakes without a hitch!
- Combine Dry Ingredients: In a large mixing bowl, I like to whisk together all our dry ingredients: the sifted all-purpose flour, granulated sugar, baking soda, cocoa powder, and salt. Sifting the flour is really important here; it helps to prevent lumps and ensures a light, airy texture in our final Halloween Vampire Bite Cupcakes. The cocoa powder in red velvet isn’t just for flavor; it reacts with the acid in the buttermilk and vinegar to deepen that gorgeous red hue we’re aiming for. Make sure everything is thoroughly combined – a quick whisk with a balloon whisk usually does the trick! We want a consistent blend of these dry elements to provide the perfect foundation for our tender cupcakes.
- Mix Wet Ingredients (Part 1): In a separate, medium-sized bowl, I’ll combine the buttermilk, vegetable oil, white vinegar, and vanilla extract. Give this a good stir to ensure all these liquids are well integrated. The buttermilk and vinegar are not just for moisture; they are the acidic components that react with the baking soda to give our cupcakes their lift and tender crumb. Plus, the vinegar helps to set that vibrant red color, which is absolutely essential for achieving the dramatic look of our Halloween Vampire Bite Cupcakes. A thorough mix here sets the stage for our liquid components to play their vital roles.
- Introduce the Red Food Coloring: Now for the magic! To the wet ingredient mixture from step 3, I’m going to add the red food coloring. If you’re using liquid, you might need the full 2 ounces for a deep, dramatic red, perfect for our Halloween Vampire Bite Cupcakes. If you opt for gel food coloring, you’ll need significantly less, as it’s much more concentrated. Stir it in thoroughly until the color is evenly distributed and vibrantly red. Don’t be shy with the red here; we want it to scream “vampire!” This vibrant color is what makes these treats truly stand out on your spooky dessert table.
- Combine Wet and Dry: With a stand mixer fitted with the paddle attachment, or using a hand mixer, I’ll first beat the two large eggs into the wet red mixture until they are just combined. Then, gradually add the dry ingredient mixture to the wet ingredients, mixing on low speed until just combined. Be careful not to overmix! Overmixing develops the gluten in the flour too much, which can lead to tough, dense cupcakes. We want them tender and moist, with that characteristic soft red velvet crumb. Scrape down the sides of the bowl with a spatula to ensure everything is incorporated evenly and no dry pockets remain. This gentle mixing ensures the perfect texture for your Halloween Vampire Bite Cupcakes.
- Fill Cupcake Liners: Now that our gorgeous red batter is ready, I’ll divide it evenly among the prepared cupcake liners, filling each about two-thirds full. An ice cream scoop works wonders for this, ensuring consistent sizing and preventing mess, which is a bonus when dealing with bright red batter! This allows room for the cupcakes to rise without overflowing, giving us perfectly domed tops, ready for frosting and those dramatic fangs. Evenly filled liners lead to evenly baked and beautifully presented Halloween Vampire Bite Cupcakes.
- Bake and Cool: Transfer the muffin tins to your preheated oven and bake for 18-22 minutes, or until a wooden skewer or toothpick inserted into the center of a cupcake comes out clean. Baking times can vary depending on your oven, so keep an eye on them; the top should spring back lightly when touched. Once baked, remove the tins from the oven and let the cupcakes cool in the tins for about 5-10 minutes. Then, carefully transfer them to a wire rack to cool completely. It’s absolutely crucial that the cupcakes are completely cool before you even think about frosting them. Warm cupcakes will melt your beautiful cream cheese frosting, and we definitely don’t want that messy outcome! Patience here ensures perfectly frosted Halloween Vampire Bite Cupcakes.
Preparing the “Vampire Blood” Sauce:
- Combine Ingredients: In a small saucepan, I’ll combine the raspberries (fresh or frozen work perfectly here, though frozen should be thawed slightly first), granulated sugar, and fresh lemon juice. The lemon juice isn’t just for tartness; it brightens the flavor of the berries and helps enhance the “blood” color, adding that essential zest that cuts through the sweetness.
- Simmer and Mash: Place the saucepan over medium heat and bring the mixture to a gentle simmer, stirring occasionally. As it heats, the raspberries will start to break down and release their juices, creating a rich, red liquid. Use the back of a spoon or a potato masher to gently mash the berries as they cook, releasing more of their vibrant color and flavor. Continue to simmer for about 5-7 minutes, until the fruit has softened considerably and the sauce has thickened slightly. We’re looking for a rich, deep red color and a consistency that will drizzle nicely but still hold its shape a bit, much like fresh blood (in the most delicious and eerie way possible!), perfect for our Halloween Vampire Bite Cupcakes.
- Thicken (Optional): If you prefer a thicker “blood” sauce that truly clings to the frosting, I highly recommend making a cornstarch slurry. In a tiny bowl, whisk together the cornstarch with 2 tablespoons of cold water until smooth and lump-free. Pour this slurry into the simmering raspberry mixture, stirring constantly to prevent lumps from forming. Continue to cook for another 1-2 minutes, stirring, until the sauce thickens to your desired consistency. It should coat the back of a spoon. If you’re using a tiny drop of red food coloring to make it even more vivid and gruesome, add it now and stir well. This optional step truly elevates the visual impact of the “blood” on your Halloween Vampire Bite Cupcakes.
- Strain for Smoothness: For a truly realistic, glossy “blood” effect, I highly recommend straining the sauce. Place a fine-mesh sieve over a clean bowl and pour the raspberry mixture through it. Use a spoon or spatula to press down on the solids, extracting as much liquid as possible and leaving behind any seeds or coarse pulp. Discard the seeds and pulp, as we want only the smooth, viscous liquid. This extra step yields a beautifully smooth, glistening “vampire blood” that looks incredibly authentic and deliciously frightening on our Halloween Vampire Bite Cupcakes. It’s the secret to that perfectly eerie drip!
- Cool the “Blood”: Let the strained “blood” sauce cool completely to room temperature. This is a critical step for preventing any frosting meltdowns during assembly. You can even chill it in the refrigerator for at least 30 minutes to an hour to ensure it’s nice and cold. A cool sauce will be much easier to handle, will hold its shape better, and most importantly, won’t melt the cream cheese frosting when we go to assemble our terrifyingly tasty treats.
Whipping Up the Cream Cheese Frosting:
- Cream Butter and Cream Cheese: In the bowl of a stand mixer fitted with the paddle attachment, or using a large bowl with a hand mixer, I’ll beat the softened unsalted butter and the slightly cool (but not rock-hard) full-fat cream cheese together on medium speed. Beat them until the mixture is light, fluffy, and completely smooth, with no lumps of cream cheese remaining. This usually takes about 2-3 minutes. Using full-fat cream cheese is crucial here; low-fat versions contain more water and can make your frosting runny and unstable, which is the last thing we want when creating impressive Halloween Vampire Bite Cupcakes. And remember, the cream cheese should be softened but still cool to the touch – if it’s too warm, your frosting might be too soft and difficult to pipe or spread.
- Add Vanilla and Salt: Scrape down the sides of the bowl with a spatula to ensure everything is evenly incorporated, especially any bits that might have clung to the bottom or sides. Then, add the pure vanilla extract and a pinch of salt. Beat again briefly on low speed, just until these are combined. The pinch of salt helps to balance the sweetness of the powdered sugar, preventing the frosting from being cloyingly sweet, and really brings out the rich, tangy flavor of the cream cheese, making it the perfect counterpoint to our red velvet cupcakes.
- Gradually Add Powdered Sugar: With the mixer on low speed, gradually add the sifted powdered sugar, about a cup at a time, allowing each addition to fully incorporate before adding more. Sifting the powdered sugar prevents lumps, ensuring a silky-smooth frosting. Once all the sugar is in, increase the speed to medium-high and beat for another 2-3 minutes, until the frosting is incredibly light, fluffy, and perfectly pipeable. Do not overbeat once the sugar is added, as this can incorporate too much air, which can make the frosting less stable and potentially cause it to weep. We want a firm but spreadable consistency, ideal for holding our “vampire blood” and those dramatic fangs.
- Chill (if needed): If your kitchen is particularly warm, or if, after beating, the frosting seems a little too soft to hold its shape, I recommend popping it into the refrigerator for 15-30 minutes to firm up slightly. This chilling period will make it much easier to work with. Before using, give it a quick whisk by hand or on low speed with the mixer to bring it back to a smooth, creamy, and spreadable consistency without introducing too much air. A firm, stable frosting is your best friend when creating these detailed Halloween Vampire Bite Cupcakes.
Assembling Your Halloween Vampire Bite Cupcakes:
- Frost the Cupcakes: Once your red velvet cupcakes are completely cool and your cream cheese frosting is perfectly prepared, it’s time to get creative! You can spread the frosting onto each cupcake using an offset spatula, creating a smooth, slightly mounded surface that resembles a clean, untainted skin. Or, for a more dramatic and professional-looking effect, I like to use a piping bag fitted with a large round or star tip to pipe a beautiful swirl of frosting onto each cupcake. Aim for a generous amount of frosting, as this forms the ideal, plump “skin” for our vampire bite effect, ensuring there’s plenty of surface area for our spooky additions.
- Create the “Bite Marks”: Now for the iconic vampire bite! Carefully take two plastic vampire fangs (or edible gummy fangs if you prefer an entirely edible treat) and gently press them into the top of the frosting on each cupcake. Position them slightly angled and apart, just as they would appear if they’ve just sunk into the frosting. You want to make two distinct indentations for where the fangs entered; these marks are crucial. Remove the fangs once the indentations are clear. These little divots will soon be filled with our gruesome, yet deliciously sweet, “blood.” This step truly brings the “Halloween Vampire Bite Cupcakes” concept to life, making them instantly recognizable and delightfully spooky!
- Add the “Vampire Blood”: With a small spoon, a pastry bag with a tiny round tip, or a squeeze bottle (which offers the most control), carefully drizzle a small amount of the cooled “vampire blood” sauce directly into the two indentations created by the fangs. Then, let a little bit of the “blood” artfully drip down the sides of the frosting, creating a terrifyingly realistic and freshly bitten effect. A little goes a long way here; you want it to look like a fresh, menacing bite, not an overwhelming flood! This is where the magic truly happens, transforming simple frosted cupcakes into a ghoulish masterpiece and the star of your Halloween party table.
- Final Touches and Serve: If you’re feeling extra spooky and want to enhance the macabre aesthetic, you can add a sprinkle of red edible glitter or a few tiny red sprinkles around the “bite marks” for extra gore and sparkle. Once all your Halloween Vampire Bite Cupcakes are assembled and decorated, carefully place them on a festive serving platter. These are best served fresh, allowing the frosting and blood sauce to be at their prime. However, if you need to store them, keep them in an airtight container in the refrigerator to keep the cream cheese frosting stable. Just remember to bring them back to room temperature for about 15-20 minutes before serving so the frosting is soft, creamy, and utterly delicious.
- Present Your Spooky Delights: Take a moment to admire your handiwork! These Halloween Vampire Bite Cupcakes are not just a treat for the taste buds but also a fantastic, eye-catching conversation starter at any Halloween party. They’re delightfully spooky, incredibly delicious, and surprisingly easy to make, given their impressive presentation. The combination of moist red velvet, tangy cream cheese, and sweet-tart “blood” is simply irresistible. Enjoy the frightful fun of sharing these ghoulish goodies with your friends and family! Happy Halloween baking, and may your celebration be filled with delicious screams!
Conclusion:
And there you have it, my friends! We’ve reached the delicious finale of our culinary journey. I genuinely hope you’ve enjoyed exploring this recipe as much as I’ve enjoyed sharing it with you. After all the measuring, mixing, and decorating, what you’re left with is more than just a sweet treat; it’s an experience, a conversation starter, and a true testament to the fun you can have in the kitchen.
Why These Cupcakes Are an Absolute Must-Try
Let me tell you, these aren’t just any cupcakes. They are, in my humble opinion, the quintessential delight for anyone looking to add a touch of playful ghoulishness to their celebrations. First and foremost, the flavor profile is simply irresistible. We’re talking about a moist, tender chocolate cupcake base, rich and satisfying, perfectly complemented by a creamy, vibrant blood-red frosting that isn’t just visually striking but also delightfully sweet without being cloying. But the real magic, the true show-stopper, lies in the “bite.” That little oozing crimson “blood” filling and the dramatic fangs transform a simple cupcake into a miniature work of edible art that will undoubtedly elicit gasps and giggles from all who behold it. It’s the kind of dessert that doesn’t just taste good; it tells a story, sparks imagination, and truly embodies the spirit of spooky season. Making these is an absolute joy, a creative escape that brings tangible, delicious results. They are surprisingly achievable, even for novice bakers, making the entire process rewarding and stress-free. Trust me when I say, the effort invested in creating these will be repaid tenfold in smiles and compliments. They’re more than just a dessert; they’re a centerpiece, a mood-setter, and a memorable highlight for any gathering.
What I adore most about this recipe is its ability to blend classic comfort with a whimsical, thematic twist. It’s not just about the Halloween factor; it’s about crafting something truly special that stands out. Whether you’re hosting a grand costume party or simply looking for a fun project to do with the kids, these Halloween Vampire Bite Cupcakes are an absolute triumph. They’re visually stunning, incredibly tasty, and a fantastic way to unleash your inner artist in the kitchen. The combination of rich chocolate, velvety frosting, and that unexpected, ghoulish “bite” creates a truly unforgettable experience. Imagine the delighted expressions when your guests realize the true nature of these spooky delights!
Serving Suggestions & Creative Variations
When it comes to serving these beauties, presentation is key! Arrange your finished vampire bite cupcakes on a dark platter or a tiered stand for maximum dramatic effect. You could scatter some fake spiderwebs or plastic spiders around the base for an extra layer of spooky decor. For drinks, consider pairing them with a chilled glass of sparkling cranberry juice (looks like blood, of course!) or a dark, robust coffee for the adults. They also make fantastic additions to a dessert buffet alongside other Halloween-themed treats like ghost meringues or monster cookies, creating a diverse and visually exciting spread.
But don’t stop there – feel free to get creative with variations! If chocolate isn’t your favorite, you could easily swap the chocolate cake mix for a red velvet base, which would further enhance the “blood” theme. For the frosting, while I love the traditional vanilla, consider a cream cheese frosting for a tangy counterpoint, or even a hint of raspberry extract in the red frosting for an extra berry burst. The “blood” filling can also be customized; try raspberry jam, cherry pie filling, or even a mix of red food coloring and corn syrup for a thicker, more realistic ooze. For those with dietary restrictions, don’t fret! Most cake mixes and frosting recipes can be adapted using gluten-free flour blends, dairy-free milk, and vegan butter alternatives, ensuring everyone can enjoy a taste of these spooky treats. You could even play with different “fangs” – white chocolate chips, slivered almonds, or even tiny marshmallow bits cut into points could work in a pinch if you don’t have candy melts. The possibilities are truly endless, allowing you to personalize these cupcakes to suit your taste and dietary needs.
Your Turn!
Now that you’re armed with all the tips and tricks, it’s your turn to unleash your inner baker! I wholeheartedly encourage you to give this recipe a try. Don’t be intimidated by the intricate look – it’s much simpler than it appears, and the results are incredibly rewarding. Gather your ingredients, crank up some spooky tunes, and get ready to create some truly show-stopping desserts. Once you’ve whipped up your batch of these amazing cupcakes, I would absolutely love to hear about your experience. Did you add any fun twists? Were they a hit at your party? Please, share your photos and stories with me! Your feedback and creations inspire me immensely, and I can’t wait to see the delicious vampire bites you bring to life. Happy baking, and happy haunting!
Halloween Vampire Bite Cupcakes: Frightfully Delicious Halloween Fun!
Sink your teeth into spooky and delicious Halloween Vampire Bite Cupcakes! Moist chocolate cupcakes crowned with creamy frosting, featuring a chillingly realistic ‘vampire bite’ and a trickle of edible ‘blood’. These miniature edible masterpieces capture the playful spirit of Halloween, making them an unforgettable addition to any spooky celebration.
Ingredients
-
**For the Cupcakes:**
-
1 ½ cups all-purpose flour
-
1 cup granulated sugar
-
½ cup unsweetened cocoa powder
-
1 teaspoon baking powder
-
½ teaspoon baking soda
-
½ teaspoon salt
-
2 large eggs
-
½ cup vegetable oil
-
1 cup buttermilk
-
1 teaspoon vanilla extract
-
**For the Blood Red Filling:**
-
1 cup raspberry or strawberry jam
-
Optional: Fresh raspberries for garnish
-
**For the Cream Cheese Frosting:**
-
8 ounces (226g) cream cheese, full-fat, softened but still cool
-
½ cup (113g) unsalted butter, softened
-
4 cups (480g) powdered sugar, sifted
-
1 teaspoon vanilla extract
-
A pinch of salt
-
**For Decoration:**
-
12-18 plastic vampire fangs (or edible gummy fangs)
-
Optional: red sprinkles or edible glitter
Instructions
-
Step 1
Preheat your oven to 350°F (175°C) and line 18-24 standard muffin tins with paper liners. In a large bowl, whisk together the all-purpose flour, granulated sugar, unsweetened cocoa powder, baking powder, baking soda, and salt. -
Step 2
In a separate medium-sized bowl, whisk together the eggs, vegetable oil, buttermilk, and vanilla extract. Gradually add the wet ingredients to the dry ingredients, mixing on low speed until just combined. Be careful not to overmix to ensure tender cupcakes. -
Step 3
Divide the batter evenly among the prepared cupcake liners, filling each about two-thirds full. Bake for 18-22 minutes, or until a wooden skewer inserted into the center comes out clean. Let cupcakes cool in the tins for 5-10 minutes, then transfer to a wire rack to cool completely. Ensure they are completely cool before frosting. -
Step 4
Gently warm 1 cup of raspberry or strawberry jam in a small saucepan over low heat until it reaches a pourable consistency. If desired, add a tiny drop of red food coloring to enhance the color. Let the ‘blood’ sauce cool completely to room temperature, or chill for 30 minutes to an hour before use to ensure it’s cold. -
Step 5
In a stand mixer with the paddle attachment (or using a hand mixer), beat the softened unsalted butter and slightly cool full-fat cream cheese on medium speed until light, fluffy, and smooth (about 2-3 minutes). Scrape down the bowl, then add the vanilla extract and a pinch of salt; beat briefly to combine. Gradually add the sifted powdered sugar on low speed, then increase to medium-high and beat for another 2-3 minutes until the frosting is incredibly light, fluffy, and pipeable. If too soft, chill for 15-30 minutes, then whisk before use. -
Step 6
Once cupcakes are completely cool, spread or pipe a generous swirl of cream cheese frosting onto each. Gently press two plastic vampire fangs (or edible gummy fangs) into the frosting to create two distinct indentations for the ‘bite marks’, then carefully remove the fangs. -
Step 7
Using a small spoon or squeeze bottle, carefully drizzle the cooled ‘vampire blood’ (warmed jam) into the indentations and allow a little to artfully drip down the sides of the frosting for a realistic effect. Optionally, garnish with fresh raspberries, red sprinkles, or edible glitter around the bite marks for extra sparkle and gore. -
Step 8
Arrange your Halloween Vampire Bite Cupcakes on a festive platter and serve fresh. If storing, keep them in an airtight container in the refrigerator to maintain frosting stability. Bring to room temperature for 15-20 minutes before serving for optimal flavor and texture. Enjoy your frightfully delicious treats!
Important Information
Nutrition Facts (Per Serving)
It is important to consider this information as approximate and not to use it as definitive health advice.
Allergy Information
Please check ingredients for potential allergens and consult a health professional if in doubt.