• Skip to primary navigation
  • Skip to main content
  • Skip to primary sidebar
Homesmad

Homesmad

  • Home
  • Breakfast & Brunch
  • Appetizers & Snacks
  • Dinner
  • Dessert
  • About
  • Privacy Policy
  • Contact
Homesmad
  • Home
  • Breakfast & Brunch
  • Appetizers & Snacks
  • Dinner
  • Dessert
  • About
  • Privacy Policy
  • Contact

Ultimate Creamy Chicken Broccoli Pasta: A Family Favorite

September 23, 2025 by Lily author

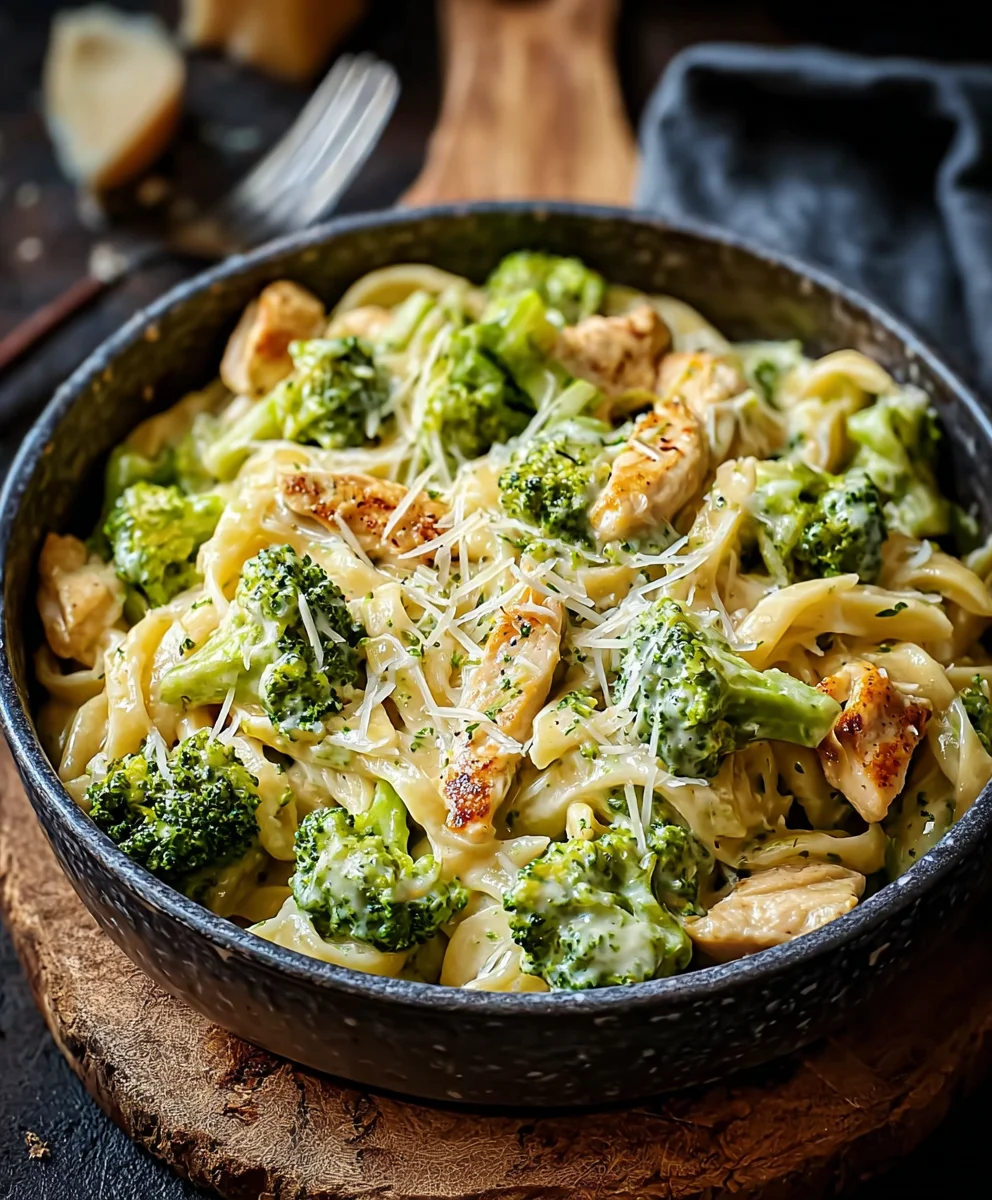
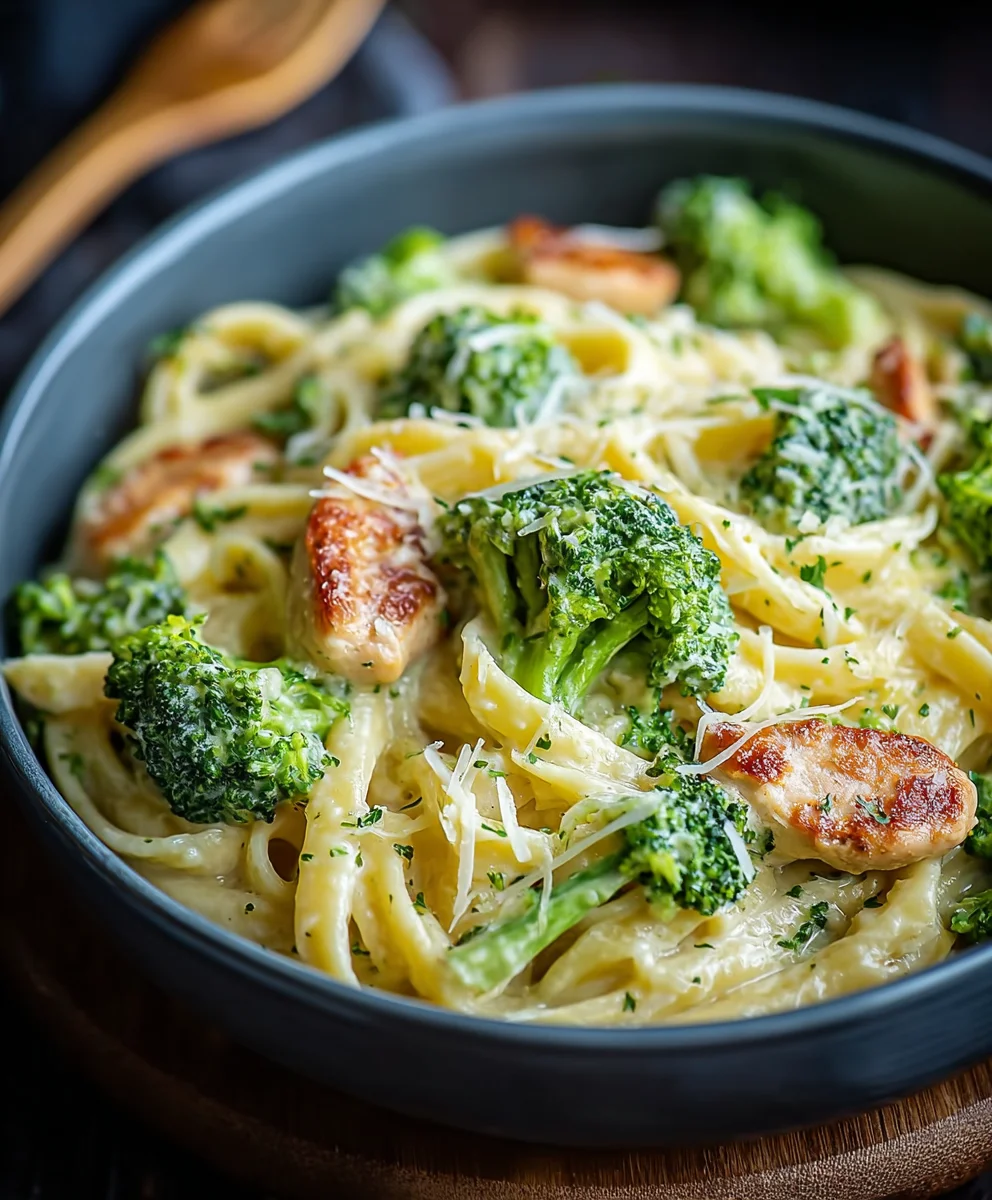
Cremige Haehnchen Brokkoli Pasta – just the name evokes a feeling of ultimate comfort and culinary satisfaction, doesn’t it?

There are some dishes that effortlessly become staples in our busy lives, and for me, a truly satisfying pasta creation always claims a top spot. While the rich origins of pasta proudly lie in Italy, its incredible adaptability has allowed countless variations to blossom worldwide, transforming simple ingredients into cherished family meals. This particular rendition, a delightful fusion of tender chicken, crisp broccoli, and a velvety sauce, embodies modern comfort food at its finest.

Why This Dish Is a Universal Favorite

What makes this dish so universally adored? Firstly, it’s the impeccable balance of flavors and textures: the savory richness of perfectly cooked chicken, the vibrant earthiness of fresh broccoli, all enveloped in a lusciously creamy sauce that clings to every strand of pasta. It’s a meal that feels wonderfully indulgent yet is remarkably quick to prepare, making it a perfect weeknight hero. The sheer convenience combined with its undeniable deliciousness makes Cremige Haehnchen Brokkoli Pasta a go-to for busy individuals and families alike, promising a hearty and heartwarming experience with every single forkful. I am genuinely excited to share this recipe with you, as I believe it holds a special place in the hearts of those who try it.

Ultimate Creamy Chicken Broccoli Pasta: A Family Favorite this RECIPE

Ingredients:

  • 500g Pasta Ihrer Wahl: Ich liebe Rigatoni oder Penne für dieses Gericht, da sie die Soße wunderbar aufnehmen, aber Spaghetti oder Linguine funktionieren genauso gut!
  • 500g Hähnchenbrustfilet: Knochenlos und ohne Haut, in mundgerechte Stücke geschnitten. Achten Sie auf frische, hochwertige Hähnchenbrust für den besten Geschmack.
  • 500g Brokkoli: Ein großer Kopf, in kleine, gleichmäßige Röschen geteilt. Ich mag es, wenn die Röschen nicht zu groß sind, damit sie gut zur Pasta passen.
  • 2 Esslöffel Olivenöl: Für das Anbraten des Hähnchens und das Anschwitzen der Aromen. Verwenden Sie ein gutes natives Olivenöl.
  • 1 große Zwiebel: Fein gewürfelt. Eine gelbe Zwiebel ist hier perfekt.
  • 3-4 Knoblauchzehen: Fein gehackt oder gepresst. Ich persönlich bin ein großer Knoblauchfan, daher darf es bei mir auch mal eine Zehe mehr sein!
  • 60g Butter: Ungesalzen, zum Anschwitzen und für die Basis der cremigen Soße.
  • 60g Allzweckmehl: Für eine leichte Mehlschwitze, die die Soße andickt.
  • 500ml Hühnerbrühe: Gerne selbstgemacht, aber eine gute Bio-Brühe aus dem Glas oder als Konzentrat ist auch wunderbar.
  • 250ml Sahne: Schlagsahne oder Kochsahne mit mindestens 30% Fettgehalt sorgt für die ultimative Cremigkeit.
  • 120g frisch geriebener Parmesan oder Grana Padano: Ein Muss für den herzhaften, umami-reichen Geschmack. Sparen Sie hier nicht an der Qualität!
  • 1 Teelöffel getrocknete italienische Kräuter: Eine Mischung aus Oregano, Basilikum, Thymian und Rosmarin bringt eine wunderbare Würze.
  • Salz und frisch gemahlener schwarzer Pfeffer: Zum Abschmecken der einzelnen Komponenten und der fertigen Soße.
  • Optional: Eine Prise Chiliflocken für einen kleinen Kick, frische Petersilie zum Garnieren.

Vorbereitung der Zutaten – Die Basis für Ihre Cremige Hähnchen Brokkoli Pasta

Bevor wir mit dem Kochen beginnen, ist es unerlässlich, alle Zutaten sorgfältig vorzubereiten. Das macht den Kochprozess später viel entspannter und effizienter, und es hilft ungemein, ein Gericht wie unsere Cremige Hähnchen Brokkoli Pasta stressfrei zuzubereiten. Ich nenne das gerne “mise en place” – alles an seinem Platz!

  1. Zuerst widmen wir uns dem Hähnchenbrustfilet. Nehmen Sie die Filets aus der Verpackung, tupfen Sie sie gründlich mit Küchenpapier trocken. Das ist ein wichtiger Schritt, da trockenes Hähnchen besser anbrät und eine schönere Kruste entwickelt. Schneiden Sie das Hähnchen dann in etwa 2-3 cm große, mundgerechte Stücke. Achten Sie darauf, dass die Stücke ungefähr die gleiche Größe haben, damit sie gleichmäßig garen. Würzen Sie die Hähnchenstücke großzügig mit einer halben Teelöffel Salz, einem halben Teelöffel frisch gemahlenem schwarzem Pfeffer und der Hälfte der getrockneten italienischen Kräuter. Mischen Sie alles gut durch, sodass jedes Stück gleichmäßig gewürzt ist.
  2. Als Nächstes ist der Brokkoli dran. Waschen Sie den Brokkolikopf unter kaltem Wasser. Teilen Sie ihn dann in kleine Röschen. Ich empfehle, die Stiele der Röschen etwas zu kürzen, aber nicht komplett zu entfernen, da sie ebenfalls sehr schmackhaft sind. Versuchen Sie, die Röschen in einer ähnlichen Größe wie die Hähnchenstücke zu halten, damit sie sich später gut mit der Pasta und dem Hähnchen vermischen lassen und ein harmonisches Mundgefühl bieten.
  3. Die Zwiebel schälen Sie und würfeln sie dann so fein wie möglich. Fein gewürfelte Zwiebeln lösen sich beim Kochen fast vollständig auf und geben ihre Süße und ihren Geschmack wunderbar an die Soße ab, ohne dass man große Stücke im Mund hat.
  4. Die Knoblauchzehen schälen Sie ebenfalls. Ich persönlich hacke Knoblauch am liebsten sehr fein, aber Sie können ihn auch pressen, wenn Sie das bevorzugen. Der Knoblauch ist ein Schlüsselaroma in unserer Cremigen Hähnchen Brokkoli Pasta, also sparen Sie nicht daran!
  5. Den Parmesan oder Grana Padano reiben Sie frisch. Frisch geriebener Käse schmilzt viel besser und hat einen intensiveren Geschmack als bereits fertig geriebener Käse aus der Packung. Dieser Schritt macht einen spürbaren Unterschied für die Cremigkeit und den Geschmack Ihrer Soße.
  6. Messen Sie die restlichen Zutaten wie Olivenöl, Butter, Mehl, Hühnerbrühe, Sahne und die restlichen Gewürze ab und stellen Sie sie griffbereit. So haben Sie alles zur Hand, wenn Sie es brauchen, und können sich voll und ganz auf den Kochprozess konzentrieren.

Kochen der Pasta und Blanchieren des Brokkolis

Dieser Schritt ist entscheidend für die Textur unseres Gerichts. Eine perfekt gekochte Pasta und ein knackiger Brokkoli sind das Herzstück unserer Cremigen Hähnchen Brokkoli Pasta.

  1. Stellen Sie einen großen Topf mit reichlich Wasser auf den Herd und bringen Sie es zum Kochen. Sobald das Wasser sprudelnd kocht, salzen Sie es großzügig. Ganz wichtig: Das Wasser sollte so salzig schmecken wie Meerwasser, das gibt der Pasta Geschmack. Geben Sie die Pasta Ihrer Wahl in das kochende Salzwasser. Rühren Sie die Pasta anfangs gut um, damit sie nicht zusammenklebt. Kochen Sie die Pasta gemäß den Anweisungen auf der Packung, bis sie “al dente” ist – das bedeutet, sie sollte noch einen leichten Biss haben und nicht matschig sein.
  2. Ungefähr 2-3 Minuten bevor die Pasta “al dente” ist, geben Sie die vorbereiteten Brokkoliröschen direkt mit in das Nudelwasser. Der Brokkoli soll nur kurz blanchiert werden, damit er seine leuchtend grüne Farbe behält und noch knackig ist. Er wird in der Soße später noch etwas nachgaren.
  3. Bevor Sie die Pasta und den Brokkoli abgießen, reservieren Sie unbedingt etwa 1 bis 1,5 Tassen des stärkehaltigen Nudelwassers! Dieses Nudelwasser ist Ihr Geheimtipp für eine unglaublich cremige Soße. Die Stärke im Wasser hilft, die Soße zu binden und sie noch geschmeidiger zu machen, während sie gleichzeitig dazu beiträgt, dass die Soße besser an der Pasta haftet.
  4. Gießen Sie die Pasta und den Brokkoli in ein Sieb ab und lassen Sie sie kurz abtropfen. Stellen Sie sie beiseite, während wir uns der Soße und dem Hähnchen widmen. Spülen Sie die Pasta nicht mit kaltem Wasser ab, da dies die Stärke entfernt, die wir für die Soßenhaftung brauchen.

Anbraten des Hähnchens – Geschmackstiefe für Ihre Cremige Hähnchen Brokkoli Pasta

Das Anbraten des Hähnchens ist ein entscheidender Schritt, um unserer Cremigen Hähnchen Brokkoli Pasta eine herrliche Geschmackstiefe zu verleihen. Die goldbraune Kruste des Hähnchens sorgt für zusätzliche Aromen, die man nicht missen möchte.

  1. Stellen Sie eine große, tiefe Pfanne oder einen Wok auf mittelhohe Hitze. Geben Sie 2 Esslöffel Olivenöl in die Pfanne. Sobald das Öl heiß ist und leicht zu glänzen beginnt (aber nicht raucht!), geben Sie die gewürzten Hähnchenstücke in die Pfanne. Achten Sie darauf, die Pfanne nicht zu überladen; braten Sie das Hähnchen bei Bedarf in zwei Portionen an. Eine überladene Pfanne führt dazu, dass das Hähnchen eher kocht als brät und keine schöne Kruste entwickelt.
  2. Braten Sie das Hähnchen für etwa 5-7 Minuten an, wenden Sie es dabei gelegentlich, bis es auf allen Seiten schön goldbraun und durchgegart ist. Es sollte innen nicht mehr rosa sein. Die gebräunte Oberfläche ist entscheidend für den Geschmack.
  3. Nehmen Sie das fertig gebratene Hähnchen mit einem Schaumlöffel aus der Pfanne und stellen Sie es beiseite auf einen Teller. Lassen Sie die Bratreste und das restliche Öl in der Pfanne – diese sind die Basis für unsere wunderbare Soße und tragen maßgeblich zum vollen Geschmack bei.

Zubereitung der Cremigen Soße – Das Herzstück der Cremigen Hähnchen Brokkoli Pasta

Jetzt kommen wir zum Kernstück unseres Gerichts: die unwiderstehlich cremige Soße, die unsere Cremige Hähnchen Brokkoli Pasta so besonders macht. Hier entsteht die Magie!

  1. Reduzieren Sie die Hitze auf mittlere Stufe. Geben Sie die 60g Butter in die Pfanne zu den Hähnchen-Bratresten. Lassen Sie die Butter schmelzen. Sobald sie geschmolzen ist und leicht schäumt, geben Sie die fein gewürfelte Zwiebel hinzu. Schwitzen Sie die Zwiebeln für etwa 3-5 Minuten an, bis sie weich und glasig sind. Sie sollten nicht braun werden.
  2. Fügen Sie dann den gehackten Knoblauch hinzu und braten Sie ihn für etwa 1 Minute mit an, bis er duftet. Achten Sie darauf, dass der Knoblauch nicht verbrennt, da er sonst bitter schmeckt.
  3. Streuen Sie das 60g Mehl über die Zwiebeln und den Knoblauch in der Pfanne. Rühren Sie alles gut um und lassen Sie die Mehlschwitze (Roux) für etwa 1-2 Minuten kochen, dabei ständig rühren. Das Mehl sollte leicht goldgelb werden und den “rohen” Mehlgeschmack verlieren. Dies ist unser natürlicher Soßenbinder.
  4. Gießen Sie nun langsam die 500ml Hühnerbrühe in die Pfanne, während Sie kräftig mit einem Schneebesen rühren. Achten Sie darauf, dass sich keine Klümpchen bilden. Bringen Sie die Soße zum Köcheln und lassen Sie sie unter ständigem Rühren für 2-3 Minuten eindicken, bis sie eine leicht sämige Konsistenz hat.
  5. Gießen Sie die 250ml Sahne in die Soße und rühren Sie sie gut ein. Lassen Sie die Soße erneut kurz aufkochen und dann für etwa 2-3 Minuten köcheln, damit sie weiter eindicken kann und die Aromen sich verbinden.
  6. Nehmen Sie die Pfanne vom Herd. Geben Sie den frisch geriebenen Parmesan oder Grana Padano hinzu und rühren Sie ihn unter, bis er vollständig geschmolzen ist und die Soße wunderbar cremig wird. Der Käse verleiht der Soße nicht nur Geschmack, sondern auch eine fantastische Textur.
  7. Schmecken Sie die Soße mit Salz, dem restlichen schwarzen Pfeffer und den restlichen italienischen Kräutern ab. Dies ist Ihre Chance, die Soße perfekt an Ihren Geschmack anzupassen. Falls Sie eine Prise Chiliflocken mögen, ist jetzt der richtige Zeitpunkt, diese hinzuzufügen.

Zusammenführen der Cremigen Hähnchen Brokkoli Pasta – Der krönende Abschluss

Jetzt ist es an der Zeit, alle wunderbaren Komponenten zu einer harmonischen und unglaublich leckeren Cremigen Hähnchen Brokkoli Pasta zu vereinen!

  1. Geben Sie das beiseite gestellte, gebratene Hähnchen und den blanchierten Brokkoli zurück in die cremige Soße in der großen Pfanne. Rühren Sie alles vorsichtig um, sodass Hähnchen und Brokkoli gut mit der Soße überzogen sind.
  2. Fügen Sie nun die gekochte Pasta hinzu. Rühren Sie alles gründlich um, bis die Pasta vollständig mit der cremigen Soße, dem Hähnchen und dem Brokkoli vermischt ist. Es ist wichtig, alles gut zu vermengen, damit jedes Stück Pasta die herrliche Soße aufnimmt.
  3. Wenn die Soße zu dick erscheint oder Sie eine noch cremigere Konsistenz wünschen, geben Sie schluckweise das zuvor reservierte Nudelwasser hinzu. Rühren Sie nach jeder Zugabe um und beobachten Sie die Konsistenz. Das Nudelwasser wird nicht nur die Soße verdünnen, sondern ihr auch helfen, besser an der Pasta zu haften und eine seidige Textur zu entwickeln. Fügen Sie so viel hinzu, bis Ihre gewünschte Cremigkeit erreicht ist.
  4. Lassen Sie die Cremige Hähnchen Brokkoli Pasta nochmals für 1-2 Minuten auf niedriger Hitze sanft köcheln, damit sich alle Aromen wunderbar verbinden und die Pasta die Soße gut aufnehmen kann. Rühren Sie dabei immer wieder um, um ein Anbrennen zu verhindern.
  5. Schmecken Sie das Gericht ein letztes Mal ab. Braucht es noch etwas Salz, Pfeffer oder vielleicht eine Prise mehr italienische Kräuter? Denken Sie daran, dass der Parmesan schon viel Salz mitbringt.
  6. Servieren Sie die Cremige Hähnchen Brokkoli Pasta sofort, frisch aus der Pfanne, am besten garniert mit etwas frischer, gehackter Petersilie und bei Bedarf noch etwas frisch geriebenem Parmesan.

Wichtige Tipps für die perfekte Cremige Hähnchen Brokkoli Pasta

Um sicherzustellen, dass Ihre Cremige Hähnchen Brokkoli Pasta jedes Mal ein voller Erfolg wird und um das Beste aus diesem wunderbaren Gericht herauszuholen, möchte ich Ihnen noch ein paar meiner persönlichen Tipps mit auf den Weg geben:

Qualität der Zutaten macht den Unterschied

Verwenden Sie für dieses Rezept, wo die Aromen so klar im Vordergrund stehen, immer hochwertige Zutaten. Ein gutes Hähnchen, frischer Brokkoli, ein aromatischer Parmesan und eine reichhaltige Sahne sind die Grundlage für ein wirklich herausragendes Geschmackserlebnis. Bei der Hühnerbrühe empfehle ich, wenn möglich, eine selbstgemachte Brühe oder eine hochwertige Bio-Variante. Sie werden den Unterschied schmecken!

Die Macht des Nudelwassers nicht unterschätzen

Ich kann es nicht oft genug betonen: Das reservierte Nudelwasser ist Ihr bester Freund in diesem Rezept. Die Stärke im Wasser hilft nicht nur, die Soße zu emulgieren und sie unglaublich cremig zu machen, sondern es sorgt auch dafür, dass die Soße besser an der Pasta haftet. Beginnen Sie mit 1 Tasse und fügen Sie bei Bedarf mehr hinzu, bis Sie die perfekte Konsistenz erreicht haben. Es ist das Geheimnis vieler italienischer Köche für eine perfekte Pasta-Soßen-Verbindung.

Al Dente ist das A und O

Die Pasta sollte wirklich “al dente” gekocht werden. Das bedeutet, sie hat noch einen leichten Biss. Denken Sie daran, dass die Pasta später in der heißen Soße noch etwas nachgart. Wenn Sie sie zu weich kochen, wird sie am Ende matschig sein, und das möchten wir bei unserer Cremigen Hähnchen Brokkoli Pasta unbedingt vermeiden.

Vorsicht beim Knoblauch

Knoblauch ist fantastisch, aber er verbrennt schnell und wird dann bitter. Achten Sie darauf, ihn nur kurz mit anzuschwitzen, bis er duftet, und nicht braun werden zu lassen. Die mittlere Hitze ist hier Ihr Freund.

Variationen sind erlaubt!

Dieses Rezept für Cremige Hähnchen Brokkoli Pasta ist eine wunderbare Basis, die Sie nach Belieben anpassen können.

  • Gemüse: Fühlen Sie sich frei, andere Gemüsesorten hinzuzufügen. Pilze, Spinat (zum Schluss unterrühren), oder sogar Erbsen passen hervorragend.
  • Proteine: Statt Hähnchen können Sie auch Garnelen oder geräucherten Tofu verwenden. Die Garzeiten müssten Sie dann entsprechend anpassen.
  • Gewürze: Eine Prise Muskatnuss in der Soße kann eine wunderbare zusätzliche Wärme verleihen. Wenn Sie es schärfer mögen, können Sie die Chiliflockenmenge erhöhen.
  • Käse: Experimentieren Sie mit anderen Käsesorten, die gut schmelzen und geschmacklich passen, zum Beispiel einen milden Cheddar oder Gouda für eine etwas andere Note, aber Parmesan ist mein Favorit für diese cremige Variante.

Sofort servieren

Cremige Hähnchen Brokkoli Pasta schmeckt am besten, wenn sie frisch zubereitet und sofort serviert wird. Die Soße kann beim Stehen dicker werden, und die Pasta kann Feuchtigkeit aufnehmen und weicher werden. Wenn Sie Reste haben, können Sie sie am nächsten Tag mit einem Schuss Milch oder Brühe in der Mikrowelle oder in einer Pfanne wieder aufwärmen, um die Cremigkeit wiederherzustellen.

Ich hoffe, diese detaillierten Anweisungen und Tipps helfen Ihnen dabei, eine wirklich unvergessliche Cremige Hähnchen Brokkoli Pasta zuzubereiten. Guten Appetit!

Ultimate Creamy Chicken Broccoli Pasta: A Family Favorite

Conclusion:

So, there you have it – my absolute favorite recipe for a comforting, satisfying, and unbelievably delicious meal that I know you’re going to adore just as much as I do. This dish isn’t just about combining ingredients; it’s about creating a moment, a memory, and a truly heartwarming experience right in your own kitchen. The way the tender, perfectly seasoned chicken pieces, vibrant green broccoli florets, and beautifully al dente pasta are enveloped in that rich, velvety cream sauce… it’s nothing short of culinary magic. Every forkful is a symphony of flavors and textures that dance on your palate, leaving you feeling utterly content and deeply nourished. It’s the kind of meal that silences the dinner table, save for the happy sounds of eating, and ensures everyone asks for seconds.

This recipe is a must-try for so many reasons. For starters, its incredible flavor profile manages to be both profoundly comforting and elegantly sophisticated. It perfectly balances the savory depth of the chicken with the subtle earthiness of the broccoli, all brought together by a lusciously creamy, often cheesy, sauce that you’ll want to lick clean off the plate. Beyond its undeniable taste, it’s also wonderfully practical. It’s a fantastic solution for those busy weeknights when you crave something wholesome, homemade, yet utterly indulgent, without spending hours slaving over the stove. With the lean protein from the chicken and the essential vitamins and fiber from the broccoli, it’s a surprisingly balanced meal that makes healthy eating feel like a treat. Plus, its versatility means it can adapt to your pantry and your preferences, ensuring it’s a recipe you’ll return to again and again.

While this dish is absolutely phenomenal on its own, don’t hesitate to elevate your dining experience with a few simple additions or creative variations. For the ultimate comfort food pairing, imagine serving this with a crisp side salad, perhaps dressed with a light vinaigrette, to offer a refreshing counterpoint to the richness. Or, for those who love to soak up every last drop of that incredible sauce, a warm, crusty slice of homemade garlic bread is simply divine. Feeling adventurous in the kitchen? This recipe is incredibly forgiving and welcomes your personal touch. Why not experiment with different cheeses? While Parmesan is a classic, a touch of smoked Gouda could introduce a delightful depth, or some sharp cheddar might add a bolder, more piquant note. You could also toss in other vegetables – sliced mushrooms, colorful bell peppers, a handful of fresh spinach wilted in at the end, or even some roasted cherry tomatoes would be excellent additions, adding more color, texture, and nutrients.

For those who enjoy a bit of heat, a pinch of red pepper flakes stirred into the sauce can add a fantastic kick, waking up the flavors beautifully. And if chicken isn’t your preference, don’t let that stop you! Succulent shrimp would be a wonderful substitute, cooking quickly and absorbing the sauce’s flavors wonderfully. For a fantastic vegetarian option, you could easily replace the chicken with cannellini beans for protein, or some pan-fried halloumi for a delicious, salty chewiness. The type of pasta you choose also offers another layer of customization; while I adore how fusilli or penne capture every bit of that amazing sauce, feel free to use your favorite – farfalle, rotini, or even a wider fettuccine would work beautifully, each offering a slightly different mouthfeel. This endless adaptability ensures that the Cremige Haehnchen Brokkoli Pasta can truly become a signature dish tailored exactly to your liking.

I genuinely hope that after reading through this recipe, you feel inspired and excited to head into your kitchen and give this incredible dish a try. It’s more than just following steps; it’s an invitation to create joy, gather loved ones around the table, and savor truly delicious, homemade food. There’s something uniquely satisfying about preparing a meal from scratch and seeing the happy faces of those you share it with. Once you’ve whipped up your own batch of this delightful pasta, please, please come back and tell me all about it! Did you make any changes? What secret ingredient did you add? What did your family and friends think? Share your cooking journey, your photos, and your experiences in the comments section below or tag me on social media. Your feedback truly brightens my day and helps others discover the magic of this dish too. Happy cooking, my friends! May your kitchen be filled with wonderful aromas and your table with happy, full hearts.

People Also Ask (FAQs):

1. Can I use frozen broccoli for this recipe?

Absolutely! Frozen broccoli works perfectly. Just add it directly to the pan a few minutes earlier than fresh broccoli, as it might release a bit of extra water that needs to cook off. No need to thaw beforehand!

2. What kind of pasta works best for a creamy chicken and broccoli dish?

I find that medium-sized pasta shapes with grooves or hollows are ideal for catching all that delicious creamy sauce. Penne, fusilli, rotini, and cavatappi are excellent choices. Farfalle (bow-tie pasta) also works wonderfully.

3. How can I make this dish vegetarian?

It’s very easy to adapt! Simply omit the chicken. You can replace it with hearty alternatives like chickpeas, white beans, sliced mushrooms, pan-fried halloumi, or even plant-based chicken substitutes. Increase the amount of broccoli or add other vegetables like bell peppers or spinach for more substance.

4. How do I store leftovers, and how long do they last?

Store any leftover Cremige Haehnchen Brokkoli Pasta in an airtight container in the refrigerator for up to 3-4 days. When reheating, you might want to add a splash of milk or chicken broth to loosen up the sauce, as it can thicken in the fridge.

5. Can I freeze this creamy pasta dish?

While you can freeze it, I generally don’t recommend freezing creamy pasta dishes. The texture of the cream sauce can sometimes change when thawed and reheated, becoming a bit grainy or separating. The broccoli might also become very soft. It’s best enjoyed fresh or from the fridge within a few days.

6. How can I make the sauce thicker or thinner?

To thicken the sauce, you can simply let it simmer gently for a few more minutes, allowing it to reduce. If it’s still not thick enough, you can make a quick slurry of 1 teaspoon of cornstarch mixed with 1 tablespoon of cold water, then stir it into the simmering sauce until it reaches your desired consistency. To thin the sauce, just stir in a little more milk, cream, or chicken broth until it’s just right.

7. What can I substitute for heavy cream if I don’t have it or want a lighter option?

If you don’t have heavy cream, half-and-half can be used, though the sauce won’t be quite as rich. For a lighter alternative, you can try evaporated milk, or even a blend of milk and a small amount of cream cheese for added body and tang. Keep in mind that lighter options might not yield the exact same luxurious texture.

8. Is this dish considered healthy?

This dish offers a good balance of protein from the chicken and vitamins/fiber from the broccoli, making it a fairly wholesome meal. While the creamy sauce adds a rich element, you can make it “healthier” by using whole wheat pasta, increasing the amount of vegetables, or opting for a lighter cream alternative if you’re mindful of calories or fat content. It’s all about balance!


Ultimate Creamy Chicken Broccoli Pasta

Ultimate Creamy Chicken Broccoli Pasta

A delightful fusion of tender chicken, crisp broccoli, and a velvety sauce, this creamy pasta dish is a universal favorite. It offers an impeccable balance of flavors and textures, making it a wonderfully indulgent yet quick-to-prepare weeknight hero for families.

Prep Time
20 Minutes

Cook Time
30 Minutes

Total Time
50 Minutes

Servings
4-6 servings

Ingredients

  • 500g Pasta of your choice
  • 500g Boneless, skinless chicken breast, cut into bite-sized pieces
  • 500g Broccoli, a large head, divided into small florets
  • 2 tbsp Olive oil
  • 1 large Onion, finely diced
  • 3-4 Garlic cloves, minced or pressed
  • 60g Unsalted butter
  • 60g All-purpose flour
  • 500ml Chicken broth
  • 250ml Heavy cream (at least 30% fat)
  • 120g Freshly grated Parmesan or Grana Padano
  • 1 tsp Dried Italian herbs
  • Salt to taste
  • Freshly ground black pepper to taste
  • Optional: A pinch of chili flakes
  • Optional: Fresh parsley, chopped, for garnish
  • About 1/2 cup reserved pasta water

Instructions

  1. Step 1
    Pat chicken breast dry, cut into 2-3 cm pieces. Season with 1/2 tsp salt, 1/2 tsp black pepper, and half of the dried Italian herbs. Mix well. Wash broccoli and cut into small florets. Finely dice the onion and mince/press the garlic. Grate Parmesan cheese fresh. Measure and prepare all remaining ingredients.
  2. Step 2
    Bring a large pot of generously salted water to a boil. Add pasta and cook until al dente according to package directions. Approximately 2-3 minutes before the pasta is done, add the broccoli florets to the boiling pasta water. Before draining, reserve about 1/2 cup of the starchy pasta water. Drain the pasta and broccoli and set aside. Do not rinse.
  3. Step 3
    Heat 2 tablespoons of olive oil in a large pan or wok over medium-high heat. Add the seasoned chicken pieces, searing in batches if necessary, for 5-7 minutes until golden brown and cooked through. Remove the cooked chicken and set aside, leaving the drippings in the pan.
  4. Step 4
    Reduce heat to medium. Add 60g butter to the pan; once melted, add the diced onion and sauté for 3-5 minutes until soft. Add the minced garlic and cook for 1 minute until fragrant. Sprinkle 60g all-purpose flour over the mixture. Stir well and cook for 1-2 minutes, constantly stirring, until lightly golden. Gradually whisk in 500ml chicken broth until no lumps remain. Bring to a simmer and cook for 2-3 minutes until slightly thickened. Stir in 250ml heavy cream. Bring to a boil, then simmer for 2-3 minutes. Remove from heat. Add 120g freshly grated Parmesan cheese and stir until fully melted and creamy. Season the sauce with salt, the remaining black pepper, and the remaining Italian herbs. Add optional chili flakes.
  5. Step 5
    Return the cooked chicken and blanched broccoli to the creamy sauce. Stir gently to coat. Add the cooked pasta and mix thoroughly until all ingredients are well combined. If the sauce is too thick, gradually add the reserved pasta water, stirring until the desired creamy consistency is achieved. Gently simmer the pasta on low heat for 1-2 minutes, stirring frequently, to allow the flavors to meld and the pasta to absorb the sauce. Taste and adjust seasonings as needed. Serve immediately, garnished with fresh chopped parsley and extra Parmesan if desired.

Important Information

Nutrition Facts (Per Serving)

It is important to consider this information as approximate and not to use it as definitive health advice.

Allergy Information

Please check ingredients for potential allergens and consult a health professional if in doubt.

« Previous Post
Pesto Chicken Flatbread: A Simple & Delicious Recipe
Next Post »
Quick Weeknight High Protein Creamy Beef Pasta Recipe

If you enjoyed this…

Delicious Creamy Chicken Enchilada Soup Recipe to Savor!

Creamy Pumpkin Soup Recipe: Easy, Healthy & Delicious!

Chicken Broccoli Rice Casserole: Easy Weeknight Meal

Primary Sidebar

Browse by Diet

BreakfastDinnerLunchDessertAppetizer

Sweet Peach Yogurt Parfait Delight

One of my fondest memories is from a lazy summer afternoon spent at my grandmother’s house. The sun filtered through the kitchen window, casting a warm glow over the table where she would create her culinary magic. It was during one of those blissful moments that I first tasted her Peach Yogurt Parfait with Honey and Granola. The sweet aroma of ripe peaches mingling with creamy yogurt and the crunch of granola was nothing short of heavenly. It felt like summer captured in a bowl, and I still remember the joy of diving in with a spoon, each layer revealing a new burst of flavor.

When I think about that parfait, I can almost hear the gentle hum of the bees outside, reminding me of the floral notes that honey brings to every bite. The vibrant yellows and soft oranges of the peaches contrast beautifully with the creamy white yogurt and the golden crunch of granola. It’s a dish that not only looks delightful but also tastes like a celebration of fresh, wholesome ingredients.

What makes my version of this Peach Yogurt Parfait special is the careful balance of flavors and textures. I use ripe, juicy peaches, drizzled with locally sourced honey, and a homemade granola that’s bursting with nuts and seeds for an extra crunch. It’s a simple dish, but every layer is crafted with love and attention.

Let me show you exactly how to make this delightful parfait, so you can bring a bit of that summer magic into your kitchen!

Sweet Peach Yogurt Parfait Delight

Why You’ll Love This Recipe

  • Delightfully creamy texture from the Greek yogurt, paired with the juicy sweetness of fresh peaches.
  • Ready in under 20 minutes, making it a quick and satisfying breakfast or snack option.
  • Budget-friendly, using common ingredients that you may already have in your pantry.
  • Customizable with your favorite granola and nuts, allowing you to tailor each parfait to your taste.
  • Perfectly balanced flavors with the bright acidity of lemon juice and the sweetness of honey enhancing the peaches.

Ingredients

  • For the Parfait:
  • 2 cups plain Greek yogurt (or vanilla yogurt for a sweeter option)
  • 2 large ripe peaches, diced (about 2 cups)
  • 1 tablespoon fresh lemon juice (to prevent browning of peaches)
  • 2 tablespoons honey (plus more for drizzling)
  • 1 teaspoon vanilla extract (optional for extra flavor)
  • For the Granola:
  • 1 cup granola (store-bought or homemade; see notes for a simple granola recipe)
  • 1/4 cup sliced almonds (optional for added crunch)
  • 1/4 cup shredded coconut (optional for added flavor)

Let’s dive into some key ingredients that make this Peach Yogurt Parfait so delightful! First, the Greek yogurt is not only creamy but also packed with protein, making it a satisfying option for breakfast or a snack. If you’re looking for a sweeter option, you can easily substitute it with vanilla yogurt, though it may alter the overall flavor balance. Next, the ripe peaches are the star of the show; their natural sweetness shines through, so I recommend choosing peaches that yield slightly to pressure, indicating they’re perfectly ripe. If peaches aren’t in season, feel free to use nectarines or even frozen peaches—just thaw them before use. Finally, honey adds a lovely floral sweetness that ties everything together. If you prefer, maple syrup can serve as a delicious substitute.

Step-by-Step Instructions

  1. Start by preparing the peaches. Wash them thoroughly, then slice and dice them into bite-sized pieces. In a medium bowl, toss the diced peaches with 1 tablespoon of fresh lemon juice to prevent browning. Set aside for about 5 minutes while the lemon juice works its magic.
  2. In a separate bowl, combine the Greek yogurt, 2 tablespoons of honey, and 1 teaspoon of vanilla extract if using. Stir the mixture until smooth and thoroughly blended. This should take about a minute. Avoid overmixing to maintain the creaminess of the yogurt.
  3. Now it’s time to layer your parfait. Grab a clear glass or bowl to showcase your beautiful creation. Start with a generous spoonful of the yogurt mixture at the bottom—about 1/4 cup will do. Use a spoon to spread it evenly.
  4. Add a layer of the diced peaches over the yogurt, ensuring they cover the yogurt completely. You might want to use about half of what you have prepared—roughly 1 cup. This layer should be visually appealing, so arrange the peaches neatly.
  5. Sprinkle 1/4 cup of granola over the peaches. This adds a delightful crunch. Make sure to distribute it evenly to ensure every bite has that satisfying texture. Avoid packing it down too tightly, as you want it to maintain its crunch.
  6. Repeat the layers: spoon in another 1/4 cup of yogurt, followed by another cup of peaches, and another sprinkle of granola. You should have at least two layers, but feel free to add more depending on your glass size.
  7. Finish off your parfait with a drizzle of honey on top for added sweetness and a touch of elegance. If you’re using sliced almonds or shredded coconut, sprinkle them on top now. It adds a lovely visual contrast and extra flavor.
  8. Serve immediately or refrigerate for up to 30 minutes before serving to allow the flavors to meld together. However, I recommend enjoying it fresh to maintain the granola’s crunch.

Pro Tips for the Best Peach Yogurt Parfait With Honey And Granola

  • Make sure to choose ripe peaches for the best flavor and texture. A common mistake is using unripe fruit, which can lead to a less enjoyable parfait. Look for peaches that are fragrant and slightly soft to the touch.
  • Use a clear glass to assemble your parfait; this not only makes for a beautiful presentation but also allows you to see the colorful layers, which adds to the enjoyment of eating it.
  • For an even creamier texture, consider whipping the Greek yogurt with a hand mixer for a couple of minutes before layering. This small adjustment makes a huge difference in mouthfeel.
  • Be mindful of the granola-to-yogurt ratio. Too much granola can overwhelm the parfait, while too little can make it feel too creamy. Aim for about 1/4 cup of granola per layer for the perfect balance.
  • If you’re making this for a gathering, consider preparing the yogurt and peaches ahead of time and layering them just before serving. This ensures the granola stays crunchy!

Variations & Serving Ideas

There are so many ways to get creative with your Peach Yogurt Parfait! For a tropical twist, swap out the peaches for mangoes or pineapples and top with coconut flakes. If you prefer a berry flavor, mix in some blueberries or strawberries with the peaches for added color and taste. For a nutty version, incorporate chopped walnuts or pecans instead of almonds.

As for serving ideas, this parfait pairs beautifully with a side of scrambled eggs for a hearty breakfast or fresh fruit salad for a light lunch. You might also enjoy it alongside whole grain toast with almond butter for an energizing snack. The contrast of flavors and textures will elevate your meal experience!

Storage, Make-Ahead & Reheating

The Peach Yogurt Parfait is best enjoyed fresh, but you can prepare some components ahead of time. Store the layered parfait in an airtight container in the refrigerator for up to 24 hours. However, be cautious; the granola may lose its crunch if stored too long. You can freeze the yogurt and peach mixture for up to 2 months; just remember to thaw it in the refrigerator overnight before serving.

If you plan to enjoy this dish the next day, it can taste even better as the flavors meld together. Just remember to add the granola right before serving to keep its delightful crunch!

Frequently Asked Questions

Can I make Peach Yogurt Parfait With Honey And Granola ahead of time?

Yes — in fact, it tastes even better the next day as the flavors meld. However, I recommend waiting to add the granola until just before serving to maintain its crunch.

What can I substitute for Greek yogurt?

If you prefer a lighter option, you can substitute Greek yogurt with regular yogurt or a dairy-free alternative like coconut yogurt. Just remember that this may alter the creaminess and flavor profile slightly.

Can I use frozen peaches for this parfait?

Absolutely! Just make sure to thaw the frozen peaches before using them. They will still add great flavor, though the texture may be slightly softer than fresh peaches.

How do I make the parfait vegan?

To make a vegan version, substitute the Greek yogurt with a plant-based yogurt alternative, and replace honey with maple syrup or agave nectar. This keeps the parfait sweet while adhering to a vegan diet.

What other fruits can I use in this recipe?

You can mix and match fruits based on your preference. Try using strawberries, blueberries, raspberries, or even bananas. Just make sure to adjust the lemon juice as needed to prevent browning.

Sweet Peach Yogurt Parfait Delight

Final Thoughts

The Peach Yogurt Parfait with Honey and Granola is a delightful blend of creamy yogurt, sweet peaches, and crunchy granola that creates a satisfying and nourishing treat. Each layer bursts with flavor, making it a perfect choice for breakfast or a light dessert.

This is the kind of recipe I come back to again and again, especially when I want something refreshing and wholesome to start my day. The harmony of sweet and tart flavors, combined with the delightful crunch, never fails to lift my spirits!

I encourage you to give this parfait a try and indulge in its comforting goodness. Feel free to share your results or even add your own twist—perhaps a sprinkle of cinnamon or a handful of nuts. Enjoy creating your perfect parfait!

Print
clock clock iconcutlery cutlery iconflag flag iconfolder folder iconinstagram instagram iconpinterest pinterest iconfacebook facebook iconprint print iconsquares squares iconheart heart iconheart solid heart solid icon

Peach Yogurt Parfait


  • Author: Lily author
  • Total Time: 15 minutes
  • Yield: 4 servings 1x
Pin Recipe
Print Recipe

Description

This Peach Yogurt Parfait combines creamy Greek yogurt, juicy peaches, and crunchy granola for a delightful treat. It’s a perfect breakfast or snack that captures the essence of summer in every bite.


Ingredients

Scale
  • For the Parfait:
  • 2 cups plain Greek yogurt (or vanilla yogurt for a sweeter option)
  • 2 large ripe peaches, diced (about 2 cups)
  • 1 tablespoon fresh lemon juice (to prevent browning of peaches)
  • 2 tablespoons honey (plus more for drizzling)
  • 1 teaspoon vanilla extract (optional for extra flavor)
  • For the Granola:
  • 1 cup granola (store-bought or homemade; see notes for a simple granola recipe)
  • 1/4 cup sliced almonds (optional for added crunch)
  • 1/4 cup shredded coconut (optional for added flavor)

Instructions

  1. Start by preparing the peaches. Wash them thoroughly, then slice and dice them into bite-sized pieces. In a medium bowl, toss the diced peaches with 1 tablespoon of fresh lemon juice to prevent browning. Set aside for about 5 minutes while the lemon juice works its magic.
  2. In a separate bowl, combine the Greek yogurt, 2 tablespoons of honey, and 1 teaspoon of vanilla extract if using. Stir the mixture until smooth and thoroughly blended. This should take about a minute. Avoid overmixing to maintain the creaminess of the yogurt.
  3. Now it’s time to layer your parfait. Grab a clear glass or bowl to showcase your beautiful creation. Start with a generous spoonful of the yogurt mixture at the bottom—about 1/4 cup will do. Use a spoon to spread it evenly.
  4. Add a layer of the diced peaches over the yogurt, ensuring they cover the yogurt completely. You might want to use about half of what you have prepared—roughly 1 cup. This layer should be visually appealing, so arrange the peaches neatly.
  5. Sprinkle 1/4 cup of granola over the peaches. This adds a delightful crunch. Make sure to distribute it evenly to ensure every bite has that satisfying texture. Avoid packing it down too tightly, as you want it to maintain its crunch.
  6. Repeat the layers: spoon in another 1/4 cup of yogurt, followed by another cup of peaches, and another sprinkle of granola. You should have at least two layers, but feel free to add more depending on your glass size.
  7. Finish off your parfait with a drizzle of honey on top for added sweetness and a touch of elegance. If you’re using sliced almonds or shredded coconut, sprinkle them on top now. It adds a lovely visual contrast and extra flavor.
  8. Serve immediately or refrigerate for up to 30 minutes before serving to allow the flavors to meld together. However, I recommend enjoying it fresh to maintain the granola’s crunch.
  • Prep Time: 15 mins
  • Cook Time: 0 mins
  • Category: Breakfast
  • Method: No-cook
  • Cuisine: American

Nutrition

  • Serving Size: 1 parfait
  • Calories: 250
  • Sugar: 20 g
  • Sodium: 50 mg
  • Fat: 5 g
  • Saturated Fat: 2 g
  • Unsaturated Fat: 3 g
  • Trans Fat: 0 g
  • Carbohydrates: 40 g
  • Fiber: 3 g
  • Protein: 10 g
  • Cholesterol: 10 mg

Keywords: Choose ripe peaches for the best flavor and texture. Use a clear glass for a beautiful presentation. For creaminess, consider whipping the yogurt before layering. Be mindful of the granola-to-yogurt ratio. Prepare yogurt and peaches ahead of time for gatherings, layering just before serving.

Did you make this recipe?

Share a photo and tag us — we can't wait to see what you've made!

Sun-Kissed Frozen Orange Cream Slush

As a child, summer days felt like they lasted forever. I remember the sticky heat wrapping around me as I played outside, my laughter mingling with the sounds of the neighborhood. But nothing could cool me down quite like the moment I’d spot my grandmother, laboring over her blender, whipping up her famous Frozen Orange Creamsicle Slush. That vibrant orange treat, with its frosty texture and sweet citrus aroma, was like a burst of sunshine in a cup. Just one sip, and I could feel the coolness wash over me, sparking pure joy.

This Frozen Orange Creamsicle Slush has a way of making you feel like a kid again. Its creamy, dreamy consistency is a delightful balance of bright orange and soft vanilla, inviting you to dive right in. The refreshing tang of orange dances on your tongue, while the smooth creaminess envelops you in a comforting embrace. It’s a nostalgic treat that’s perfect for hot summer afternoons or anytime you need a little pick-me-up.

What makes my version of this slush stand out is the addition of a hint of vanilla bean, which elevates the flavor and adds an extra layer of richness. Plus, it’s super easy to whip up with just a few simple ingredients that you probably already have on hand! So, if you’re ready to relive those sun-soaked memories, let me show you exactly how to make it.

Sun-Kissed Frozen Orange Cream Slush

Why You’ll Love This Recipe

  • Each slush is a perfect blend of creamy vanilla and zesty orange, creating a nostalgic flavor reminiscent of summer days.
  • This refreshing treat is ready in under 15 minutes, making it an ideal quick dessert for unexpected guests or hot afternoons.
  • With just 8 simple ingredients, it’s budget-friendly, ensuring you don’t have to break the bank to enjoy a delicious slush.
  • The slush has a perfectly smooth texture, thanks to the combination of ice and ice cream, providing a delightful contrast to the bright citrus flavors.
  • It’s highly customizable; you can easily adjust the sweetness and add fresh herbs for a unique twist that suits your taste.

Ingredients

  • 2 cups orange juice (freshly squeezed or store-bought)
  • 1 cup vanilla ice cream
  • 1 cup crushed ice
  • 1/2 cup milk (whole or 2%)
  • 1/4 cup granulated sugar (adjust based on sweetness preference)
  • 1 teaspoon vanilla extract
  • Zest of 1 orange (for added flavor)
  • Fresh orange slices and mint leaves (for garnish)

The star of this Frozen Orange Creamsicle Slush is the orange juice, which provides the vibrant, citrusy base. Freshly squeezed juice will yield the brightest flavor, but store-bought options can be just as convenient. If you’re opting for store-bought, choose 100% pure juice with no added sugars for the best results. Another essential ingredient is the vanilla ice cream; it adds creaminess and sweetness. You can substitute it with dairy-free ice cream if you’re looking for a vegan option. Whole or 2% milk complements the ice cream, creating a smooth blend. If you want a lower-calorie version, almond or oat milk can be good alternatives.

Lastly, the granulated sugar can be adjusted based on your sweetness preference. If you prefer a more natural sweetener, consider using honey or agave syrup. The orange zest enhances the flavor profile, providing an aromatic pop that brings the whole slush together. Don’t skip it! It adds an extra layer of brightness that makes this slush truly special.

Step-by-Step Instructions

  1. Start by preparing your ingredients. Gather 2 cups of orange juice, 1 cup of vanilla ice cream, and 1 cup of crushed ice. Make sure the ice is finely crushed, as larger chunks can make blending difficult.
  2. In a blender, combine the orange juice, vanilla ice cream, crushed ice, and 1/2 cup of milk. Add 1/4 cup of granulated sugar and 1 teaspoon of vanilla extract. If you like a sweeter slush, consider adding a bit more sugar at this stage.
  3. Add the zest of 1 orange to the blender. This step is crucial for enhancing the citrus flavor of your slush. Make sure not to include the bitter white pith—only the flavorful zest.
  4. Blend the mixture on medium-high speed for about 30-45 seconds. Stop once the ingredients are fully combined and the slush has a smooth, even consistency. If you notice large chunks of ice, blend for an additional 10-15 seconds. Avoid over-blending, as this can make the slush too liquidy.
  5. Once blended, taste the slush. If it needs more sweetness, add a little more sugar and blend for a few more seconds. If it’s too thick, you can add a splash of milk to reach your desired consistency.
  6. Pour the slush into glasses. This recipe typically serves 4, but you can easily double it for larger gatherings. Use a spoon to help guide the slush into the glasses if needed.
  7. Garnish each serving with fresh orange slices and mint leaves. The mint not only adds a pop of color but also a refreshing aroma that complements the citrus flavors beautifully.
  8. Serve immediately and enjoy! If you’ve made extra, you can refrigerate it for a short time, but it’s best enjoyed fresh.

Pro Tips for the Best Frozen Orange Creamsicle Slush

  • Don’t skip the orange zest! It’s a game-changer for flavor. Always zest before juicing to make it easier.
  • Use a high-powered blender for the best texture. A standard blender may struggle with ice, leading to uneven consistency. If you have a food processor, that can work too, but ensure the ice is finely crushed.
  • Adjust the ice-to-liquid ratio carefully. If your slush is too thick, it won’t blend well. Start with less ice and add more until you reach your preferred texture.
  • Be cautious with the sugar! Always start with the lower amount, as you can easily add more, but it’s hard to fix an overly sweet slush.
  • For a fun twist, consider adding a splash of coconut milk or a handful of fresh fruit like strawberries or pineapple. This not only enhances the flavor but also adds a beautiful color contrast.

Variations & Serving Ideas

There are countless ways to put a spin on your Frozen Orange Creamsicle Slush. Consider making a tropical version by adding in some pineapple juice or coconut milk for a delightful tropical twist. If you’re feeling adventurous, try incorporating a handful of frozen mango or peach slices for added sweetness. For a lighter version, swap out the vanilla ice cream for Greek yogurt for a creamy yet tangy alternative.

As for serving ideas, this refreshing slush pairs wonderfully with light summer dishes like grilled chicken skewers, fish tacos, or a simple salad topped with citrus vinaigrette. The bright, zesty flavors of the slush complement these dishes perfectly, making them an ideal pairing for a sunny day.

Storage, Make-Ahead & Reheating

This Frozen Orange Creamsicle Slush is best enjoyed fresh, but if you have leftovers, you can store them in an airtight container in the fridge for up to 2 days. Just keep in mind that the slush may lose some of its texture over time as the ice melts. It doesn’t freeze well, as the ice will turn into a solid block. If you must freeze it, blend again after thawing to restore the slushy consistency. This treat is best the day you make it, as the flavors meld together beautifully overnight, enhancing its deliciousness.

Frequently Asked Questions

Can I make Frozen Orange Creamsicle Slush ahead of time?

Yes — in fact, it tastes even better the next day as the flavors meld. However, it’s best to enjoy it fresh, as the texture can change if stored for too long. If you need to prepare it ahead, keep it in the fridge and re-blend before serving.

What kind of orange juice should I use?

For the best flavor, use freshly squeezed orange juice. However, if you’re short on time, opt for 100% pure store-bought juice without added sugars. This will ensure that your slush remains flavorful and refreshing.

Can I substitute the vanilla ice cream?

Absolutely! If you’re looking for a dairy-free option, coconut milk ice cream or a non-dairy vanilla ice cream can work wonderfully. They will still provide the creamy texture and sweetness you desire.

How can I adjust the sweetness of my slush?

You can easily adjust the sweetness by modifying the amount of sugar added. Start with 1/4 cup and taste the mixture before blending. If you prefer it sweeter, add more sugar gradually until it reaches your desired level.

What should I do if my slush is too thick?

If your slush is too thick, simply add a splash of milk or orange juice and blend again. This will help achieve a more drinkable consistency while maintaining the slushy texture. Adjust gradually to reach your preferred thickness.

Sun-Kissed Frozen Orange Cream Slush

Final Thoughts

The Frozen Orange Creamsicle Slush is a delightful blend of refreshing citrus and creamy goodness, making it a perfect treat for warm days or any time you crave a taste of nostalgia. The way the bright orange flavor dances with the creamy texture truly elevates this slush, transforming it into a satisfying escape from the everyday.

This is the kind of recipe I come back to again and again, especially when I’m looking to cool down or impress guests at a summer gathering. It’s simple to make and always brings smiles all around! I encourage you to try this recipe for yourself—don’t hesitate to share your results or even put your own spin on it. Happy slushing!

Print
clock clock iconcutlery cutlery iconflag flag iconfolder folder iconinstagram instagram iconpinterest pinterest iconfacebook facebook iconprint print iconsquares squares iconheart heart iconheart solid heart solid icon

Frozen Orange Creamsicle Slush


  • Author: Lily author
  • Total Time: 15 minutes
  • Yield: 4 servings 1x
Pin Recipe
Print Recipe

Description

This Frozen Orange Creamsicle Slush is a refreshing treat that combines creamy vanilla and zesty orange flavors. Perfect for hot summer days, it brings back nostalgic memories with every sip.


Ingredients

Scale
  • 2 cups orange juice (freshly squeezed or store-bought)
  • 1 cup vanilla ice cream
  • 1 cup crushed ice
  • 1/2 cup milk (whole or 2%)
  • 1/4 cup granulated sugar (adjust based on sweetness preference)
  • 1 teaspoon vanilla extract
  • Zest of 1 orange (for added flavor)
  • Fresh orange slices and mint leaves (for garnish)

Instructions

  1. Start by preparing your ingredients. Gather 2 cups of orange juice, 1 cup of vanilla ice cream, and 1 cup of crushed ice. Make sure the ice is finely crushed, as larger chunks can make blending difficult.
  2. In a blender, combine the orange juice, vanilla ice cream, crushed ice, and 1/2 cup of milk. Add 1/4 cup of granulated sugar and 1 teaspoon of vanilla extract. If you like a sweeter slush, consider adding a bit more sugar at this stage.
  3. Add the zest of 1 orange to the blender. This step is crucial for enhancing the citrus flavor of your slush. Make sure not to include the bitter white pith—only the flavorful zest.
  4. Blend the mixture on medium-high speed for about 30-45 seconds. Stop once the ingredients are fully combined and the slush has a smooth, even consistency. If you notice large chunks of ice, blend for an additional 10-15 seconds. Avoid over-blending, as this can make the slush too liquidy.
  5. Once blended, taste the slush. If it needs more sweetness, add a little more sugar and blend for a few more seconds. If it’s too thick, you can add a splash of milk to reach your desired consistency.
  6. Pour the slush into glasses. This recipe typically serves 4, but you can easily double it for larger gatherings. Use a spoon to help guide the slush into the glasses if needed.
  7. Garnish each serving with fresh orange slices and mint leaves. The mint not only adds a pop of color but also a refreshing aroma that complements the citrus flavors beautifully.
  8. Serve immediately and enjoy! If you’ve made extra, you can refrigerate it for a short time, but it's best enjoyed fresh.
  • Prep Time: 15 min
  • Cook Time: 0 min
  • Category: Dessert
  • Method: Blending
  • Cuisine: American

Nutrition

  • Serving Size: 1 serving
  • Calories: 200
  • Sugar: 30 g
  • Sodium: 50 mg
  • Fat: 5 g
  • Saturated Fat: 3 g
  • Unsaturated Fat: 2 g
  • Trans Fat: 0 g
  • Carbohydrates: 40 g
  • Fiber: 1 g
  • Protein: 2 g
  • Cholesterol: 20 mg

Keywords: Don't skip the orange zest! It's a game-changer for flavor. Always zest before juicing to make it easier.

Did you make this recipe?

Share a photo and tag us — we can't wait to see what you've made!

Zesty Lemon Poppy Seed Delight

One rainy afternoon, I found myself in my grandmother’s cozy kitchen, the kind that always smelled like warmth and love. She was whipping up her famous Lemon Poppy Seed Loaf, a recipe that had been passed down through generations. As the batter came together, the zesty aroma of fresh lemons filled the air, mingling perfectly with the nutty fragrance of poppy seeds. I can still picture her, apron-clad, as she expertly drizzled a vibrant citrus icing over the loaf, creating a glossy, sun-kissed finish that beckoned us to dive in. It was a moment that sparked my own passion for baking, and this recipe has become a cherished staple in my home ever since.

When you take a bite of this Lemon Poppy Seed Loaf, it’s like a burst of sunshine on your palate. The loaf is beautifully golden, with a tender crumb that melts in your mouth. Each slice is speckled with tiny poppy seeds, adding a delightful crunch that contrasts beautifully with the tangy sweetness of the lemon. And that citrus icing? It’s the finishing touch that elevates this loaf from ordinary to extraordinary, with its bright, zesty flavor dancing on your taste buds.

This recipe stands out because it embraces simplicity while delivering on flavor. I’ve added a hint of vanilla to the batter, enhancing the overall taste and making it even more indulgent. Trust me, once you make this Lemon Poppy Seed Loaf With Citrus Icing, it’ll become a go-to in your baking repertoire.

So, let me show you exactly how to make it!

Zesty Lemon Poppy Seed Delight

Why You’ll Love This Recipe

  • Moist and tender crumb that melts in your mouth, thanks to the perfect balance of butter and buttermilk.
  • Bright, zesty lemon flavor paired with crunchy poppy seeds, creating a delightful texture and taste experience.
  • Easy to whip up in just about an hour, perfect for last-minute gatherings or a cozy afternoon treat.
  • Budget-friendly with everyday ingredients, making it an accessible option for all home bakers.
  • The citrus icing adds a sweet tang that elevates the loaf, turning a simple recipe into a showstopper!

Ingredients

  • 1 ½ cups (190g) all-purpose flour
  • 1 teaspoon baking powder
  • ½ teaspoon baking soda
  • ½ teaspoon salt
  • 3 tablespoons poppy seeds
  • ½ cup (115g) unsalted butter, softened to room temperature
  • 1 cup (200g) granulated sugar
  • 2 large eggs
  • 1 teaspoon vanilla extract
  • 1 teaspoon lemon zest (from about 1 medium lemon)
  • ½ cup (120ml) buttermilk
  • 2 tablespoons fresh lemon juice

For the Citrus Icing:

  • 1 cup (120g) powdered sugar
  • 2 tablespoons fresh lemon juice
  • 1 tablespoon orange juice
  • 1 teaspoon lemon zest (for garnish, optional)

Let’s dive into the key ingredients that make this Lemon Poppy Seed Loaf so special. The all-purpose flour provides the structure and base for the loaf, while the baking powder and baking soda ensure it rises perfectly, giving the loaf a light texture. For a gluten-free variation, you could substitute the flour with a gluten-free all-purpose blend. Poppy seeds not only add a delightful crunch but also contribute to the unique flavor profile that pairs well with the citrus notes.

Unsalted butter is crucial for achieving the buttery richness that makes this loaf so moist. If you’re looking for a dairy-free option, coconut oil or a vegan butter can be used instead. The buttermilk is another essential component, providing acidity that activates the baking soda for a fluffy texture. If you don’t have buttermilk on hand, you can easily make a substitute by mixing ½ cup of milk with 1 tablespoon of vinegar or lemon juice and letting it sit for about 5 minutes.

Step-by-Step Instructions

  1. Preheat your oven to 350°F (175°C). Grease a 9×5-inch loaf pan or line it with parchment paper for easy removal later.
  2. In a medium mixing bowl, whisk together 1 ½ cups of all-purpose flour, 1 teaspoon of baking powder, ½ teaspoon of baking soda, ½ teaspoon of salt, and 3 tablespoons of poppy seeds. This helps to evenly distribute the baking agents and ensures a uniform rise.
  3. In a large mixing bowl, cream together ½ cup of softened unsalted butter and 1 cup of granulated sugar using an electric mixer on medium speed for about 3-4 minutes, until the mixture is light and fluffy. Make sure to scrape down the sides of the bowl occasionally.
  4. Add 2 large eggs, 1 teaspoon of vanilla extract, and 1 teaspoon of lemon zest to the creamed butter and sugar, mixing until fully combined. You want a smooth consistency, so ensure there are no lumps of butter.
  5. In a small bowl, combine ½ cup of buttermilk and 2 tablespoons of fresh lemon juice. Alternately add the dry ingredients and buttermilk mixture to the butter mixture, starting and ending with the dry ingredients. Mix just until combined; do not overmix, as this can lead to a dense loaf.
  6. Pour the batter into the prepared loaf pan. Smooth the top with a spatula, ensuring it’s even. Bake in the preheated oven for 50-60 minutes, or until a toothpick inserted in the center comes out clean. The edges should be lightly golden brown, and the center should feel just set.
  7. Once baked, remove the loaf from the oven and allow it to cool in the pan for about 10 minutes. Then, transfer it to a wire rack to cool completely. Resist the urge to slice too soon, as it will be crumbly if it’s still warm.
  8. While the loaf is cooling, prepare the citrus icing. In a medium bowl, whisk together 1 cup of powdered sugar, 2 tablespoons of fresh lemon juice, and 1 tablespoon of orange juice until smooth. If the icing is too thick, you can add a little more juice to reach your desired consistency.
  9. Once the loaf is completely cool, drizzle the citrus icing over the top. If you like, sprinkle with an additional teaspoon of lemon zest for an extra pop of flavor and color.

Pro Tips for the Best Lemon Poppy Seed Loaf With Citrus Icing

  • Be careful not to overmix your batter; this is a common mistake that can lead to a dense loaf. Mix just until the dry ingredients are incorporated for a light and fluffy texture.
  • Use room temperature ingredients, especially the butter and eggs. This helps to create a smoother batter and ensures even baking. Take your eggs out of the fridge about 30 minutes before you start.
  • For a more pronounced lemon flavor, consider adding a little lemon extract in addition to the zest and juice. Just a half teaspoon can elevate the citrus notes significantly.
  • When measuring your flour, spoon it into the measuring cup and level it off with a knife instead of scooping directly from the bag. This prevents packing and ensures you don’t end up with a dry loaf.
  • Invest in a good quality loaf pan; it makes a difference in heat distribution, which ensures even baking. If your pan is dark-coated, reduce the oven temperature by 25°F to prevent over-browning.

Variations & Serving Ideas

For a delightful twist, consider adding blueberries or raspberries to the batter for a fruity burst of flavor. You can also experiment with different citrus fruits—try lime or grapefruit zest and juice for a refreshing change. For a healthier option, substitute half of the all-purpose flour with whole wheat flour for added fiber without compromising too much on texture.

This Lemon Poppy Seed Loaf pairs beautifully with a light salad, such as a mixed greens salad with a vinaigrette, or a cup of tea for a cozy afternoon treat. It also complements a creamy cheese platter, as the acidity of the loaf balances rich cheeses perfectly. Lastly, a scoop of vanilla ice cream on the side creates a delightful contrast of temperatures and flavors!

Storage, Make-Ahead & Reheating

This Lemon Poppy Seed Loaf can be stored at room temperature for up to 3 days if wrapped tightly in plastic wrap. If you want to keep it longer, it freezes well for up to 3 months. To freeze, wrap the loaf tightly in plastic wrap and then in aluminum foil to prevent freezer burn.

When you’re ready to enjoy it again, simply thaw it in the fridge overnight. Reheat individual slices in the microwave for 15-20 seconds or in a toaster oven until warmed through. Interestingly, many people find that this loaf tastes even better the next day, as the flavors have time to meld!

Frequently Asked Questions

Can I make Lemon Poppy Seed Loaf With Citrus Icing ahead of time?

Yes — in fact, it tastes even better the next day! You can make the loaf a day in advance, allowing the flavors to develop. Just be sure to store it in an airtight container to maintain its moisture.

Can I substitute the poppy seeds?

Absolutely! If you don’t have poppy seeds on hand or prefer an alternative, you can use sesame seeds for a similar crunch or omit them entirely for a smooth loaf.

What can I use instead of buttermilk?

If you don’t have buttermilk, you can easily create a substitute by mixing ½ cup of milk (dairy or plant-based) with 1 tablespoon of vinegar or lemon juice. Let it sit for 5 minutes before using in the recipe.

How can I make this recipe gluten-free?

To make a gluten-free version of this Lemon Poppy Seed Loaf, substitute the all-purpose flour with a gluten-free all-purpose flour blend. Just ensure that the blend contains a binding agent like xanthan gum for the best results.

What is the best way to store leftover loaf?

Leftover Lemon Poppy Seed Loaf should be stored in an airtight container at room temperature for up to 3 days. For longer storage, wrap it tightly and freeze for up to 3 months. Thaw it before serving for the best texture.

Zesty Lemon Poppy Seed Delight

Final Thoughts

The Lemon Poppy Seed Loaf with Citrus Icing is truly a delightful treat that brings a burst of brightness to any occasion. The zesty lemon flavor combined with the subtle crunch of poppy seeds creates a satisfying balance, while the citrus icing adds a touch of sweetness that perfectly complements the loaf’s tanginess.

This is the kind of recipe I come back to again and again, especially when I want to brighten up a gloomy day or celebrate a small victory. The aroma that fills the kitchen as it bakes is absolutely heavenly! I encourage you to give this recipe a try; you might just find it becoming a beloved staple in your home. Don’t forget to share your results or even add your own unique twist—I can’t wait to see what you create!

Print
clock clock iconcutlery cutlery iconflag flag iconfolder folder iconinstagram instagram iconpinterest pinterest iconfacebook facebook iconprint print iconsquares squares iconheart heart iconheart solid heart solid icon

Lemon Poppy Seed Loaf


  • Author: Lily author
  • Total Time: 15 minute
  • Yield: 1 loaf 1x
Pin Recipe
Print Recipe

Description

This Lemon Poppy Seed Loaf is a delightful treat that combines zesty lemon flavor with crunchy poppy seeds. Topped with a citrus icing, it’s perfect for any occasion.


Ingredients

Scale
  • 1 ½ cups (190g) all-purpose flour
  • 1 teaspoon baking powder
  • ½ teaspoon baking soda
  • ½ teaspoon salt
  • 3 tablespoons poppy seeds
  • ½ cup (115g) unsalted butter, softened to room temperature
  • 1 cup (200g) granulated sugar
  • 2 large eggs
  • 1 teaspoon vanilla extract
  • 1 teaspoon lemon zest (from about 1 medium lemon)
  • ½ cup (120ml) buttermilk
  • 2 tablespoons fresh lemon juice
  • 1 cup (120g) powdered sugar
  • 2 tablespoons fresh lemon juice
  • 1 tablespoon orange juice
  • 1 teaspoon lemon zest (for garnish, optional)

Instructions

  1. Preheat your oven to 350°F (175°C). Grease a 9×5-inch loaf pan or line it with parchment paper for easy removal later.
  2. In a medium mixing bowl, whisk together 1 ½ cups of all-purpose flour, 1 teaspoon of baking powder, ½ teaspoon of baking soda, ½ teaspoon of salt, and 3 tablespoons of poppy seeds. This helps to evenly distribute the baking agents and ensures a uniform rise.
  3. In a large mixing bowl, cream together ½ cup of softened unsalted butter and 1 cup of granulated sugar using an electric mixer on medium speed for about 3-4 minutes, until the mixture is light and fluffy. Make sure to scrape down the sides of the bowl occasionally.
  4. Add 2 large eggs, 1 teaspoon of vanilla extract, and 1 teaspoon of lemon zest to the creamed butter and sugar, mixing until fully combined. You want a smooth consistency, so ensure there are no lumps of butter.
  5. In a small bowl, combine ½ cup of buttermilk and 2 tablespoons of fresh lemon juice. Alternately add the dry ingredients and buttermilk mixture to the butter mixture, starting and ending with the dry ingredients. Mix just until combined; do not overmix, as this can lead to a dense loaf.
  6. Pour the batter into the prepared loaf pan. Smooth the top with a spatula, ensuring it’s even. Bake in the preheated oven for 50-60 minutes, or until a toothpick inserted in the center comes out clean. The edges should be lightly golden brown, and the center should feel just set.
  7. Once baked, remove the loaf from the oven and allow it to cool in the pan for about 10 minutes. Then, transfer it to a wire rack to cool completely. Resist the urge to slice too soon, as it will be crumbly if it’s still warm.
  8. While the loaf is cooling, prepare the citrus icing. In a medium bowl, whisk together 1 cup of powdered sugar, 2 tablespoons of fresh lemon juice, and 1 tablespoon of orange juice until smooth. If the icing is too thick, you can add a little more juice to reach your desired consistency.
  9. Once the loaf is completely cool, drizzle the citrus icing over the top. If you like, sprinkle with an additional teaspoon of lemon zest for an extra pop of flavor and color.
  • Prep Time: 15 mins
  • Cook Time: 50-60 mins
  • Category: Dessert
  • Method: Baking
  • Cuisine: American

Nutrition

  • Serving Size: 1 slice
  • Calories: 200
  • Sugar: 15 g
  • Sodium: 150 mg
  • Fat: 8 g
  • Saturated Fat: 5 g
  • Unsaturated Fat: 3 g
  • Trans Fat: 0 g
  • Carbohydrates: 30 g
  • Fiber: 1 g
  • Protein: 3 g
  • Cholesterol: 40 mg

Keywords: Be careful not to overmix your batter; this is a common mistake that can lead to a dense loaf. Use room temperature ingredients for a smoother batter and even baking.

Did you make this recipe?

Share a photo and tag us — we can't wait to see what you've made!

  • Privacy Policy
  • Terms Of Service
  • Contact
  • About
  • GDPR

Copyright © 2025 Homesmad