• Skip to primary navigation
  • Skip to main content
  • Skip to primary sidebar
Homesmad

Homesmad

  • Home
  • Breakfast & Brunch
  • Appetizers & Snacks
  • Dinner
  • Dessert
  • About
  • Privacy Policy
  • Contact
Homesmad
  • Home
  • Breakfast & Brunch
  • Appetizers & Snacks
  • Dinner
  • Dessert
  • About
  • Privacy Policy
  • Contact

Delicious Rice with Veggies & Cream Cheese Sauce

September 27, 2025 by Lily author

Reis Mit Gemuse Frischkase Sauce is more than just a dish; it’s a culinary hug in a bowl, a delightful fusion of wholesome ingredients and creamy indulgence that promises to satisfy both your palate and your soul. I find there’s something truly special about a meal that manages to be both incredibly comforting and remarkably versatile, and this recipe perfectly embodies that ideal. While this precise combination might not boast centuries of singular heritage, its components—tender rice, vibrant garden vegetables, and a rich, creamy sauce—are deeply rooted in global comfort food traditions. Rice has nourished populations for millennia across diverse cultures, providing a comforting base, while the the addition of a luxurious Frischkäse (cream cheese) sauce lends a distinctly European touch, reminiscent of the satisfying, creamy dishes often enjoyed in German-speaking regions.

Why This Dish Steals Hearts: Taste, Texture, and Pure Comfort

People absolutely adore this dish, and I understand why. It offers a wonderful interplay of textures – the fluffy rice, the slight bite of perfectly cooked vegetables, all enveloped in a velvety smooth sauce that’s both tangy and savory. It’s the kind of meal that feels wholesome and indulgent all at once, making it a perfect weeknight solution or a lovely centerpiece for a relaxed weekend lunch. The convenience factor is also a huge draw; it’s surprisingly quick to prepare, yet tastes like something far more elaborate. Ultimately, the simple elegance of Reis Mit Gemuse Frischkase Sauce lies in its ability to deliver profound satisfaction with every single bite.

Delicious Rice with Veggies & Cream Cheese Sauce this RECIPE

Ingredients:

  • For the Fluffy Rice:

    • 300g (approximately 1.5 cups) long-grain rice (Basmati or Jasmine work wonderfully)
    • 600ml (approximately 2.5 cups) cold water
    • 1 teaspoon salt
    • 1 tablespoon olive oil (optional, for separate grains)
  • For the Vibrant Vegetables:

    • 1 large onion, preferably yellow or white
    • 2 cloves garlic, fresh and aromatic
    • 1 tablespoon olive oil or neutral cooking oil
    • 1 red bell pepper
    • 1 yellow bell pepper
    • 1 medium zucchini
    • 1 medium carrot
    • 100g (approximately 3/4 cup) frozen peas
    • 100g (approximately 3/4 cup) frozen corn kernels
    • Salt and freshly ground black pepper to taste
  • For the Creamy Frischkäse Sauce:

    • 200g (1 tub) plain cream cheese (Frischkäse), full-fat for best results
    • 150ml (approximately 2/3 cup) milk (whole milk for richness, or any milk you prefer)
    • 100ml (approximately 1/2 cup) vegetable broth (low sodium is good)
    • 1 teaspoon mild paprika powder
    • 1/2 teaspoon curry powder (optional, but adds a lovely warmth)
    • Pinch of nutmeg, freshly grated if possible
    • Salt and freshly ground black pepper to taste
  • For Garnishing (Optional but Recommended):

    • Fresh parsley or chives, finely chopped
    • A sprinkle of grated Parmesan or Pecorino cheese
    • A dash of chili flakes for a gentle kick

Prepping Our Ingredients for Success

  1. First, the Onions and Garlic: Let’s start by preparing our aromatic foundation. Carefully peel the outer layers from your large onion. Using a sharp chef’s knife, cut it in half lengthwise, then make thin slices crosswise, followed by small cuts to create a fine dice. Aim for small, even pieces; this ensures the onion will soften beautifully and practically melt into our sauce, releasing all its sweet flavors without being chunky. Next, take your two cloves of garlic. Gently smash them with the flat side of your knife blade – this makes peeling much easier. Once peeled, finely mince the garlic. Remember, the smaller the pieces, the more evenly its wonderful aroma will distribute through our dish.
  2. Next, Our Colorful Bell Peppers: Wash the red and yellow bell peppers thoroughly. Slice them in half lengthwise and carefully remove the core, seeds, and any white membranes inside. These membranes can be a bit bitter, so it’s best to get rid of them. Now, lay the pepper halves flat on your cutting board and slice them into thin strips, then rotate and dice these strips into small, roughly half-inch pieces. The goal here is vibrant, bite-sized pieces that will cook evenly and add beautiful color and texture to our “Reis Mit Gemuse Frischkase Sauce”.
  3. Tackling the Zucchini: Give your zucchini a good wash. You can choose to peel it or leave the skin on for extra fiber and color – I often leave it on. Trim off both ends. Now, slice the zucchini into roughly half-inch thick rounds, then halve or quarter these rounds depending on their size, creating small, crescent-moon shaped pieces. We want them to be substantial enough to hold their shape but small enough to integrate well with the rice and other vegetables.
  4. Don’t Forget the Carrot: Wash and peel your carrot. For this dish, we want the carrot to be tender but not mushy, so fine dicing is key. Slice the carrot into thin rounds, then stack a few rounds and cut them into thin sticks (julienne), and finally, dice these sticks into very small, uniform cubes. This will ensure they cook through at a similar rate to the other vegetables and add a lovely sweetness and earthy depth.
  5. Prepare the Frozen Goods: For the frozen peas and corn, simply measure them out and keep them handy. There’s no need to thaw them beforehand; they’ll cook directly in the pan with the other vegetables, making our life a little easier.

Cooking the Perfect Rice: Our Fluffy Foundation

  1. Rinse the Rice (Crucial Step!): This is a step I never skip, and neither should you for truly fluffy, separate grains. Place your 300g of long-grain rice in a fine-mesh sieve or a bowl. Rinse it under cold running water, gently swirling or agitating the grains with your hand, until the water runs clear. This removes excess starch, which is the main culprit behind sticky, clumpy rice. Rinse, rinse, rinse!
  2. Toast (Optional but Recommended) and Add Water: In a medium-sized saucepan with a tight-fitting lid, add 1 tablespoon of olive oil (if using). Heat it over medium heat. Once shimmering, add the rinsed and drained rice. Stir continuously for 1-2 minutes until the rice grains are lightly toasted and smell slightly nutty. This quick toasting step enhances the flavor and helps the grains stay separate. Now, carefully pour in 600ml of cold water and add 1 teaspoon of salt. Give it a gentle stir just once to combine.
  3. Bring to a Boil, Then Simmer: Turn the heat up to high and bring the water to a rolling boil. As soon as it’s boiling vigorously, immediately reduce the heat to the lowest setting possible. Place the lid tightly on the saucepan. It’s very important not to lift the lid once it’s on!
  4. The “Hands-Off” Cooking Phase: Let the rice simmer undisturbed for exactly 12-15 minutes, depending on your rice type. For Basmati or Jasmine, 12 minutes is often perfect. The key is consistent, low heat and no peeking! The steam inside the pot is doing all the work.
  5. The Essential Resting Period: Once the cooking time is up, remove the saucepan from the heat, but do not lift the lid. Let the rice rest, still covered, for another 10 minutes. This resting period is absolutely crucial; it allows the steam to redistribute and finishes cooking the grains evenly, resulting in perfectly fluffy, tender, and separated rice every single time. It truly makes all the difference.
  6. Fluff and Serve: After the resting period, finally lift the lid. Use a fork to gently fluff the rice. You’ll see beautiful, distinct grains. Set the rice aside, keeping it covered, while we move on to our vegetables and sauce. It’s ready for its starring role in our “Reis Mit Gemuse Frischkase Sauce”.

Sautéing Our Vibrant Vegetables: Building Flavor

  1. Heat the Oil and Sauté Onions: Grab a large, deep skillet or a Dutch oven – something with plenty of space that can comfortably hold all our vegetables. Heat 1 tablespoon of olive oil over medium heat. Once it’s warm and shimmering, add your finely diced onions. Sauté them gently, stirring occasionally, for about 5-7 minutes until they become translucent, soft, and slightly golden. This slow cooking allows the onions to release their natural sweetness and become truly aromatic. Don’t rush this step; it’s the foundation of flavor!
  2. Add Garlic and Carrots: Once the onions are softened, toss in your minced garlic and the diced carrots. Stir well and cook for another 2-3 minutes. The garlic will become incredibly fragrant very quickly, so keep an eye on it to prevent it from burning, as burnt garlic can taste bitter. Adding the carrots now gives them a head start, as they are a bit firmer and take slightly longer to soften than our other vegetables.
  3. Introduce the Bell Peppers and Zucchini: Now it’s time for our colorful bell peppers and the zucchini. Add them to the skillet with the onions, garlic, and carrots. Stir everything together, ensuring the vegetables are well coated with the oil. Continue to sauté for 5-7 minutes. We want these vegetables to become tender-crisp, still retaining a bit of their bite and their vibrant colors. They shouldn’t be mushy. Season generously with a pinch of salt and freshly ground black pepper at this stage.
  4. Incorporate Frozen Peas and Corn: Finally, add the frozen peas and corn kernels to the skillet. Give everything a good stir and cook for an additional 3-4 minutes, or until the peas and corn are heated through and tender. Because they were frozen, they don’t need extensive cooking time. The steam from the pan will quickly bring them up to temperature.
  5. Taste and Adjust: Take a small bite of your sautéed vegetables. Adjust the seasoning with more salt and pepper if needed. Set the skillet aside for a moment while we prepare our creamy sauce. The kitchen should be smelling absolutely wonderful at this point, bursting with fresh vegetable aromas!

Whipping Up the Creamy Frischkäse Sauce: The Heart of Our Dish

  1. Melt the Cream Cheese: In a separate, small to medium saucepan, place your 200g of plain cream cheese (Frischkäse). Set the saucepan over low to medium-low heat. We want to gently warm the cream cheese until it starts to soften and melt, becoming pliable and smooth. Stir it with a whisk or a rubber spatula to help it along. This gentle heating prevents it from splitting or clumping later.
  2. Gradually Whisk in Liquids: Once the cream cheese is softened, slowly start to whisk in the milk, a little bit at a time. After the milk is incorporated and the sauce is smoothing out, gradually add the vegetable broth, whisking continuously until the mixture is completely smooth and free of lumps. Patience here is key; adding liquids too quickly can sometimes make the sauce difficult to combine smoothly. Continue to whisk gently until you have a velvety, uniform sauce.
  3. Season Our Sauce: Now for the flavor! Add the 1 teaspoon of mild paprika powder, 1/2 teaspoon of curry powder (if using), and a small pinch of freshly grated nutmeg. Nutmeg adds a subtle, warm depth that complements creamy sauces beautifully. Stir all the spices into the sauce until they are fully incorporated and the sauce takes on a lovely, inviting color.
  4. Season to Perfection: Taste the sauce. This is your chance to make it perfect. Season with salt and freshly ground black pepper to your liking. Remember that the cream cheese itself can be a little salty, and the vegetable broth also contributes salt, so start with a little and add more as needed. You want the sauce to be rich, creamy, and wonderfully balanced in flavor. If you feel it needs a tiny bit more tang, a very small squeeze of lemon juice (about half a teaspoon) can brighten it up, though it’s usually not necessary.
  5. Adjust Consistency: If the sauce seems too thick for your preference, you can thin it out with a little extra milk or vegetable broth, adding just a tablespoon at a time until you reach your desired consistency. It should be thick enough to coat the back of a spoon but still pourable and creamy. Keep the sauce warm on very low heat, stirring occasionally, while we get ready for the final step.

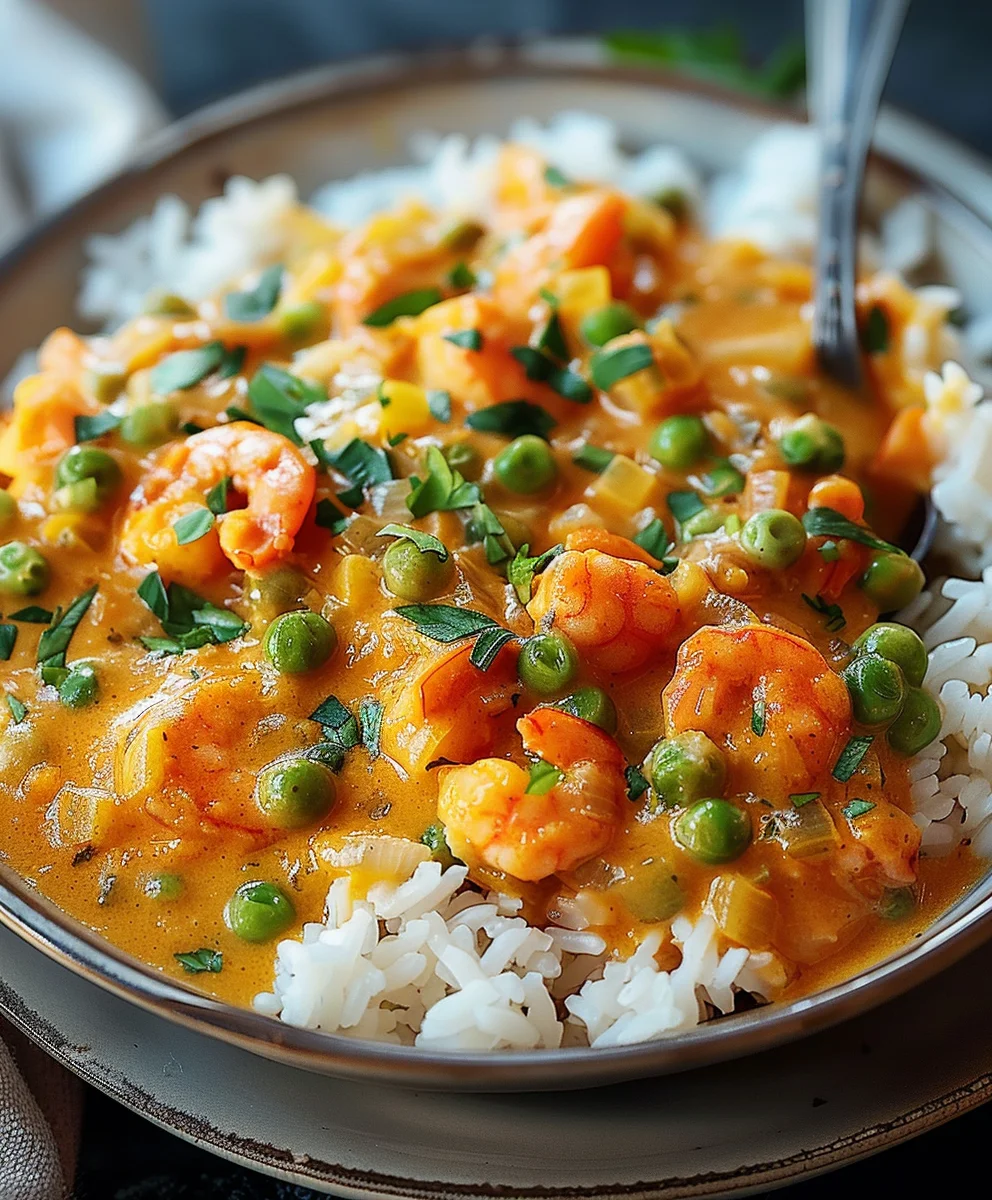
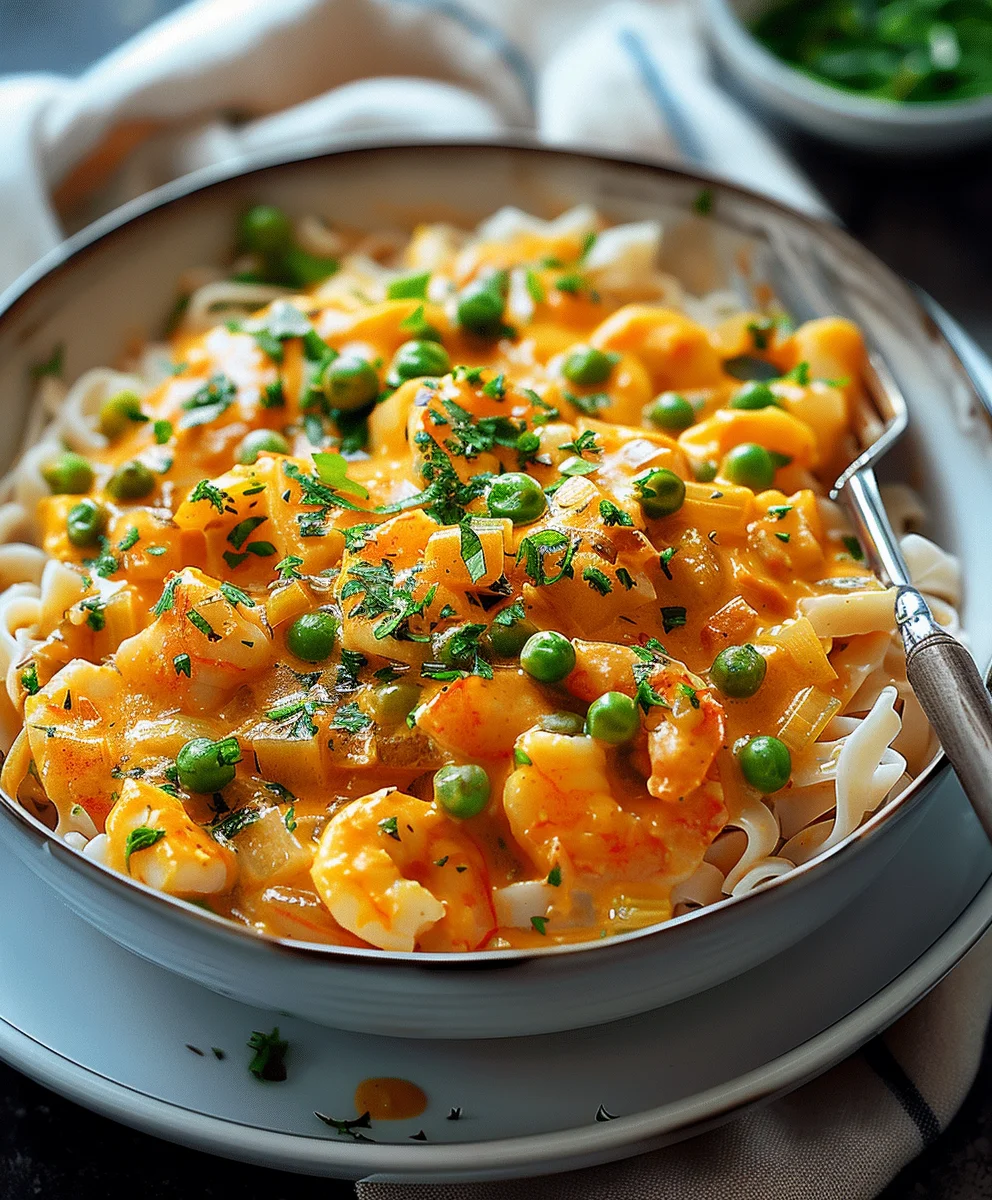
Bringing It All Together: The Grand Assembly of Reis Mit Gemuse Frischkase Sauce

  1. Combine Vegetables and Sauce: Take your skillet of beautifully sautéed vegetables. Pour the warm, creamy Frischkäse sauce directly over the vegetables. Using a spatula or large spoon, gently fold the sauce into the vegetables until everything is thoroughly combined and coated. Be careful not to mash the vegetables; we want them to retain their individual shapes and textures.
  2. Introduce the Fluffy Rice: Now for the star – our perfectly cooked, fluffy rice! Add the cooked and fluffed rice directly into the skillet with the saucy vegetables. Again, with a light hand, gently fold the rice into the mixture. The goal is to evenly distribute the vegetables and sauce throughout the rice without mashing the grains or turning everything into a homogenous paste. You want to see distinct grains of rice and colorful pieces of vegetables peeking through the creamy sauce.
  3. Gentle Heating and Final Seasoning Check: Place the skillet back on very low heat. Stir gently and continuously for just 2-3 minutes, allowing everything to warm through together and for the flavors to meld beautifully. This short heating period also ensures that the rice absorbs some of the sauce’s wonderful flavors. Take one last taste. Does it need a tiny bit more salt? A twist of black pepper? Perhaps a dash more paprika or curry powder to truly sing? This is your final chance to adjust the seasonings to your ultimate preference.

Serving Suggestions & Enjoyment

  1. Garnish with Freshness: Once you’re happy with the taste and temperature of your “Reis Mit Gemuse Frischkase Sauce”, remove it from the heat. Transfer generous portions to individual serving plates or bowls. Now, for the finishing touches! Sprinkle generously with freshly chopped parsley or chives. Not only do they add a pop of color, but their fresh, herbaceous notes provide a lovely contrast to the richness of the sauce.
  2. Optional Indulgences: If you’re feeling a little extra, a light sprinkle of grated Parmesan or Pecorino cheese can add another layer of savory depth. For those who appreciate a gentle warmth, a tiny dash of chili flakes over the top can provide a wonderful, subtle kick without overpowering the dish.
  3. Pairing Perfection: This dish is incredibly satisfying and wholesome on its own, making it a complete meal. However, it also pairs beautifully with a simple, crisp green salad dressed with a light vinaigrette. A slice of crusty bread or a warm roll would also be fantastic for soaking up any leftover creamy sauce.
  4. Enjoy the Fruits of Your Labor: Take a moment to appreciate the vibrant colors and the inviting aroma before you dive in. This homemade “Reis Mit Gemuse Frischkase Sauce” is a testament to simple ingredients coming together to create something truly delicious and comforting. I hope you enjoy every single bite as much as I do! It’s a wonderful dish that warms the soul and satisfies the palate, perfect for a cozy weeknight meal or a casual gathering with friends.

Delicious Rice with Veggies & Cream Cheese Sauce

Conclusion:

And there you have it, my dear fellow food enthusiasts! We’ve journeyed through the simple yet profoundly satisfying world of a dish that I genuinely believe deserves a permanent spot in your weekly rotation. This isn’t just a recipe; it’s an invitation to experience comfort, flavor, and culinary ease all wrapped into one glorious meal. What makes this recipe an absolute must-try, you ask? It’s the impeccable balance of textures – the tender, perfectly cooked rice, the vibrant, crisp-tender vegetables, and that lusciously creamy, yet surprisingly light, Frischkäse sauce. It’s a dish that manages to be both incredibly comforting and remarkably fresh, hitting all the right notes for a delightful dining experience. I find it to be a fantastic antidote to busy weeknights, offering a gourmet-level taste with minimal fuss, transforming everyday ingredients into something truly special.

I simply cannot emphasize enough how versatile and forgiving this recipe is. It’s a true chameleon in the kitchen, adapting beautifully to whatever you have on hand or whatever your palate desires. For serving suggestions, while it truly shines as a standalone main course, consider pairing it with a simple, peppery arugula salad dressed lightly with a lemon vinaigrette to add a bright, fresh contrast. A sprinkle of toasted pumpkin seeds or sunflower seeds over the top can also introduce a lovely textural crunch and nutty flavor. If you’re looking to elevate it further, a perfectly seared chicken breast or a delicate pan-fried white fish fillet would complement the creamy richness beautifully, creating a more substantial and elegant meal without overpowering the subtle flavors of the rice and vegetables. For those who enjoy a little heat, a dash of red pepper flakes stirred into the sauce or sprinkled on top before serving can add a delightful kick that awakens the taste buds.

Now, let’s talk about variations – this is where the real fun begins! Don’t feel bound by the specific vegetables I’ve suggested. This dish is your canvas. Swap out broccoli for asparagus spears in the spring, or incorporate sweet corn and bell peppers during the summer for a vibrant, sun-kissed version. In the colder months, roasted root vegetables like carrots, parsnips, or even sweet potatoes can add a hearty depth and natural sweetness. Experiment with different herbs; fresh dill or chives would lend a lovely aromatic twist. For a protein boost, cooked lentils or chickpeas can be stirred in directly, making it an even more wholesome vegetarian option. If you’re feeling adventurous with your cheese, a hint of grated Parmesan or even a touch of smoked Gouda could introduce fascinating new dimensions of flavor to the sauce. And for those adhering to specific dietary needs, dairy-free cream cheese alternatives work wonderfully, and the rice can easily be swapped for quinoa or even cauliflower rice for a lower-carb option. The possibilities are truly endless, making this a recipe you can reinvent time and time again. This delightful Reis Mit Gemuse Frischkase Sauce is truly a blank slate for your culinary imagination.

So, my friends, I urge you, don’t just read about this delightful creation – make it! Clear your kitchen counter, gather your ingredients, and immerse yourself in the joyful process of bringing this recipe to life. I promise you, the moment you take that first bite, you’ll understand the magic I’ve been talking about. And once you’ve savored every mouthful, please, do me a huge favor: come back and share your experience! What vegetables did you use? Did you add a secret ingredient that transformed it? Perhaps you discovered a serving suggestion I hadn’t even considered. Your stories, your tips, and especially your photos are what make our cooking community so vibrant and inspiring. I can’t wait to hear how this recipe becomes a cherished part of your culinary repertoire. Happy cooking, and bon appétit!


Reis Mit Gemuse Frischkase Sauce

Reis Mit Gemuse Frischkase Sauce

Reis Mit Gemuse Frischkase Sauce is a delightful fusion of wholesome ingredients and creamy indulgence, offering a culinary hug in a bowl that satisfies both palate and soul.

Prep Time
20 Minutes

Cook Time
30 Minutes

Total Time
50 Minutes

Servings
3 servings

Ingredients

  • 1 cup rice (white or brown)
  • 1 tbsp olive oil
  • 1 onion, diced
  • 2 garlic cloves, minced
  • 1 bell pepper, diced
  • 1 zucchini, diced
  • 1 carrot, diced
  • 200g cream cheese
  • 200ml vegetable broth
  • 2 tbsp lemon juice
  • Salt and pepper to taste
  • Fresh herbs for garnish (e.g., parsley or basil)

Instructions

  1. Step 1
    Dice onion, bell pepper, zucchini, and carrot. Mince garlic. Keep cream cheese, vegetable broth, and lemon juice ready.
  2. Step 2
    Rinse 1 cup rice under cold water until clear. In a saucepan, combine rinsed rice, 1.7 cups cold water, and 1 teaspoon salt. Bring to a boil, then reduce heat to low, cover, and simmer for 12-15 minutes. Remove from heat and let rest, covered, for 10 minutes. Fluff with a fork.
  3. Step 3
    In a large skillet, heat 1 tbsp olive oil. Sauté diced onion for 5-7 minutes until translucent. Add minced garlic and diced carrot, cook for 2-3 minutes. Add diced bell pepper and zucchini; sauté for 5-7 minutes until tender-crisp. Season with salt and pepper.
  4. Step 4
    In a separate small saucepan, gently melt 200g cream cheese over low heat. Gradually whisk in 200ml vegetable broth and 2 tbsp lemon juice until smooth and lump-free. Season with salt and pepper.
  5. Step 5
    Pour the warm cream cheese sauce over the sautéed vegetables. Gently fold to combine. Add the cooked, fluffed rice to the skillet and gently fold everything together until well distributed. Heat gently for 2-3 minutes until warmed through. Garnish with fresh herbs before serving.

Important Information

Nutrition Facts (Per Serving)

It is important to consider this information as approximate and not to use it as definitive health advice.

Allergy Information

Please check ingredients for potential allergens and consult a health professional if in doubt.

« Previous Post
Quick Caesar Chicken Bowl: Fresh, Flavorful, & Satisfying
Next Post »
Chicken Caesar Sandwich Recipe - Quick & Easy Lunch!

If you enjoyed this…

Creamy Garlic Parmesan Chicken & Cheesy Twisted Pasta Recipe

Parmesan Crusted Chicken with Creamy Garlic Sauce

Creamy Spinach And Ricotta Stuffed Shells Recipe

Primary Sidebar

Browse by Diet

BreakfastDinnerLunchDessertAppetizer

Sweet Peach Yogurt Parfait Delight

One of my fondest memories is from a lazy summer afternoon spent at my grandmother’s house. The sun filtered through the kitchen window, casting a warm glow over the table where she would create her culinary magic. It was during one of those blissful moments that I first tasted her Peach Yogurt Parfait with Honey and Granola. The sweet aroma of ripe peaches mingling with creamy yogurt and the crunch of granola was nothing short of heavenly. It felt like summer captured in a bowl, and I still remember the joy of diving in with a spoon, each layer revealing a new burst of flavor.

When I think about that parfait, I can almost hear the gentle hum of the bees outside, reminding me of the floral notes that honey brings to every bite. The vibrant yellows and soft oranges of the peaches contrast beautifully with the creamy white yogurt and the golden crunch of granola. It’s a dish that not only looks delightful but also tastes like a celebration of fresh, wholesome ingredients.

What makes my version of this Peach Yogurt Parfait special is the careful balance of flavors and textures. I use ripe, juicy peaches, drizzled with locally sourced honey, and a homemade granola that’s bursting with nuts and seeds for an extra crunch. It’s a simple dish, but every layer is crafted with love and attention.

Let me show you exactly how to make this delightful parfait, so you can bring a bit of that summer magic into your kitchen!

Sweet Peach Yogurt Parfait Delight

Why You’ll Love This Recipe

  • Delightfully creamy texture from the Greek yogurt, paired with the juicy sweetness of fresh peaches.
  • Ready in under 20 minutes, making it a quick and satisfying breakfast or snack option.
  • Budget-friendly, using common ingredients that you may already have in your pantry.
  • Customizable with your favorite granola and nuts, allowing you to tailor each parfait to your taste.
  • Perfectly balanced flavors with the bright acidity of lemon juice and the sweetness of honey enhancing the peaches.

Ingredients

  • For the Parfait:
  • 2 cups plain Greek yogurt (or vanilla yogurt for a sweeter option)
  • 2 large ripe peaches, diced (about 2 cups)
  • 1 tablespoon fresh lemon juice (to prevent browning of peaches)
  • 2 tablespoons honey (plus more for drizzling)
  • 1 teaspoon vanilla extract (optional for extra flavor)
  • For the Granola:
  • 1 cup granola (store-bought or homemade; see notes for a simple granola recipe)
  • 1/4 cup sliced almonds (optional for added crunch)
  • 1/4 cup shredded coconut (optional for added flavor)

Let’s dive into some key ingredients that make this Peach Yogurt Parfait so delightful! First, the Greek yogurt is not only creamy but also packed with protein, making it a satisfying option for breakfast or a snack. If you’re looking for a sweeter option, you can easily substitute it with vanilla yogurt, though it may alter the overall flavor balance. Next, the ripe peaches are the star of the show; their natural sweetness shines through, so I recommend choosing peaches that yield slightly to pressure, indicating they’re perfectly ripe. If peaches aren’t in season, feel free to use nectarines or even frozen peaches—just thaw them before use. Finally, honey adds a lovely floral sweetness that ties everything together. If you prefer, maple syrup can serve as a delicious substitute.

Step-by-Step Instructions

  1. Start by preparing the peaches. Wash them thoroughly, then slice and dice them into bite-sized pieces. In a medium bowl, toss the diced peaches with 1 tablespoon of fresh lemon juice to prevent browning. Set aside for about 5 minutes while the lemon juice works its magic.
  2. In a separate bowl, combine the Greek yogurt, 2 tablespoons of honey, and 1 teaspoon of vanilla extract if using. Stir the mixture until smooth and thoroughly blended. This should take about a minute. Avoid overmixing to maintain the creaminess of the yogurt.
  3. Now it’s time to layer your parfait. Grab a clear glass or bowl to showcase your beautiful creation. Start with a generous spoonful of the yogurt mixture at the bottom—about 1/4 cup will do. Use a spoon to spread it evenly.
  4. Add a layer of the diced peaches over the yogurt, ensuring they cover the yogurt completely. You might want to use about half of what you have prepared—roughly 1 cup. This layer should be visually appealing, so arrange the peaches neatly.
  5. Sprinkle 1/4 cup of granola over the peaches. This adds a delightful crunch. Make sure to distribute it evenly to ensure every bite has that satisfying texture. Avoid packing it down too tightly, as you want it to maintain its crunch.
  6. Repeat the layers: spoon in another 1/4 cup of yogurt, followed by another cup of peaches, and another sprinkle of granola. You should have at least two layers, but feel free to add more depending on your glass size.
  7. Finish off your parfait with a drizzle of honey on top for added sweetness and a touch of elegance. If you’re using sliced almonds or shredded coconut, sprinkle them on top now. It adds a lovely visual contrast and extra flavor.
  8. Serve immediately or refrigerate for up to 30 minutes before serving to allow the flavors to meld together. However, I recommend enjoying it fresh to maintain the granola’s crunch.

Pro Tips for the Best Peach Yogurt Parfait With Honey And Granola

  • Make sure to choose ripe peaches for the best flavor and texture. A common mistake is using unripe fruit, which can lead to a less enjoyable parfait. Look for peaches that are fragrant and slightly soft to the touch.
  • Use a clear glass to assemble your parfait; this not only makes for a beautiful presentation but also allows you to see the colorful layers, which adds to the enjoyment of eating it.
  • For an even creamier texture, consider whipping the Greek yogurt with a hand mixer for a couple of minutes before layering. This small adjustment makes a huge difference in mouthfeel.
  • Be mindful of the granola-to-yogurt ratio. Too much granola can overwhelm the parfait, while too little can make it feel too creamy. Aim for about 1/4 cup of granola per layer for the perfect balance.
  • If you’re making this for a gathering, consider preparing the yogurt and peaches ahead of time and layering them just before serving. This ensures the granola stays crunchy!

Variations & Serving Ideas

There are so many ways to get creative with your Peach Yogurt Parfait! For a tropical twist, swap out the peaches for mangoes or pineapples and top with coconut flakes. If you prefer a berry flavor, mix in some blueberries or strawberries with the peaches for added color and taste. For a nutty version, incorporate chopped walnuts or pecans instead of almonds.

As for serving ideas, this parfait pairs beautifully with a side of scrambled eggs for a hearty breakfast or fresh fruit salad for a light lunch. You might also enjoy it alongside whole grain toast with almond butter for an energizing snack. The contrast of flavors and textures will elevate your meal experience!

Storage, Make-Ahead & Reheating

The Peach Yogurt Parfait is best enjoyed fresh, but you can prepare some components ahead of time. Store the layered parfait in an airtight container in the refrigerator for up to 24 hours. However, be cautious; the granola may lose its crunch if stored too long. You can freeze the yogurt and peach mixture for up to 2 months; just remember to thaw it in the refrigerator overnight before serving.

If you plan to enjoy this dish the next day, it can taste even better as the flavors meld together. Just remember to add the granola right before serving to keep its delightful crunch!

Frequently Asked Questions

Can I make Peach Yogurt Parfait With Honey And Granola ahead of time?

Yes — in fact, it tastes even better the next day as the flavors meld. However, I recommend waiting to add the granola until just before serving to maintain its crunch.

What can I substitute for Greek yogurt?

If you prefer a lighter option, you can substitute Greek yogurt with regular yogurt or a dairy-free alternative like coconut yogurt. Just remember that this may alter the creaminess and flavor profile slightly.

Can I use frozen peaches for this parfait?

Absolutely! Just make sure to thaw the frozen peaches before using them. They will still add great flavor, though the texture may be slightly softer than fresh peaches.

How do I make the parfait vegan?

To make a vegan version, substitute the Greek yogurt with a plant-based yogurt alternative, and replace honey with maple syrup or agave nectar. This keeps the parfait sweet while adhering to a vegan diet.

What other fruits can I use in this recipe?

You can mix and match fruits based on your preference. Try using strawberries, blueberries, raspberries, or even bananas. Just make sure to adjust the lemon juice as needed to prevent browning.

Sweet Peach Yogurt Parfait Delight

Final Thoughts

The Peach Yogurt Parfait with Honey and Granola is a delightful blend of creamy yogurt, sweet peaches, and crunchy granola that creates a satisfying and nourishing treat. Each layer bursts with flavor, making it a perfect choice for breakfast or a light dessert.

This is the kind of recipe I come back to again and again, especially when I want something refreshing and wholesome to start my day. The harmony of sweet and tart flavors, combined with the delightful crunch, never fails to lift my spirits!

I encourage you to give this parfait a try and indulge in its comforting goodness. Feel free to share your results or even add your own twist—perhaps a sprinkle of cinnamon or a handful of nuts. Enjoy creating your perfect parfait!

Print
clock clock iconcutlery cutlery iconflag flag iconfolder folder iconinstagram instagram iconpinterest pinterest iconfacebook facebook iconprint print iconsquares squares iconheart heart iconheart solid heart solid icon

Peach Yogurt Parfait


  • Author: Lily author
  • Total Time: 15 minutes
  • Yield: 4 servings 1x
Pin Recipe
Print Recipe

Description

This Peach Yogurt Parfait combines creamy Greek yogurt, juicy peaches, and crunchy granola for a delightful treat. It’s a perfect breakfast or snack that captures the essence of summer in every bite.


Ingredients

Scale
  • For the Parfait:
  • 2 cups plain Greek yogurt (or vanilla yogurt for a sweeter option)
  • 2 large ripe peaches, diced (about 2 cups)
  • 1 tablespoon fresh lemon juice (to prevent browning of peaches)
  • 2 tablespoons honey (plus more for drizzling)
  • 1 teaspoon vanilla extract (optional for extra flavor)
  • For the Granola:
  • 1 cup granola (store-bought or homemade; see notes for a simple granola recipe)
  • 1/4 cup sliced almonds (optional for added crunch)
  • 1/4 cup shredded coconut (optional for added flavor)

Instructions

  1. Start by preparing the peaches. Wash them thoroughly, then slice and dice them into bite-sized pieces. In a medium bowl, toss the diced peaches with 1 tablespoon of fresh lemon juice to prevent browning. Set aside for about 5 minutes while the lemon juice works its magic.
  2. In a separate bowl, combine the Greek yogurt, 2 tablespoons of honey, and 1 teaspoon of vanilla extract if using. Stir the mixture until smooth and thoroughly blended. This should take about a minute. Avoid overmixing to maintain the creaminess of the yogurt.
  3. Now it’s time to layer your parfait. Grab a clear glass or bowl to showcase your beautiful creation. Start with a generous spoonful of the yogurt mixture at the bottom—about 1/4 cup will do. Use a spoon to spread it evenly.
  4. Add a layer of the diced peaches over the yogurt, ensuring they cover the yogurt completely. You might want to use about half of what you have prepared—roughly 1 cup. This layer should be visually appealing, so arrange the peaches neatly.
  5. Sprinkle 1/4 cup of granola over the peaches. This adds a delightful crunch. Make sure to distribute it evenly to ensure every bite has that satisfying texture. Avoid packing it down too tightly, as you want it to maintain its crunch.
  6. Repeat the layers: spoon in another 1/4 cup of yogurt, followed by another cup of peaches, and another sprinkle of granola. You should have at least two layers, but feel free to add more depending on your glass size.
  7. Finish off your parfait with a drizzle of honey on top for added sweetness and a touch of elegance. If you’re using sliced almonds or shredded coconut, sprinkle them on top now. It adds a lovely visual contrast and extra flavor.
  8. Serve immediately or refrigerate for up to 30 minutes before serving to allow the flavors to meld together. However, I recommend enjoying it fresh to maintain the granola’s crunch.
  • Prep Time: 15 mins
  • Cook Time: 0 mins
  • Category: Breakfast
  • Method: No-cook
  • Cuisine: American

Nutrition

  • Serving Size: 1 parfait
  • Calories: 250
  • Sugar: 20 g
  • Sodium: 50 mg
  • Fat: 5 g
  • Saturated Fat: 2 g
  • Unsaturated Fat: 3 g
  • Trans Fat: 0 g
  • Carbohydrates: 40 g
  • Fiber: 3 g
  • Protein: 10 g
  • Cholesterol: 10 mg

Keywords: Choose ripe peaches for the best flavor and texture. Use a clear glass for a beautiful presentation. For creaminess, consider whipping the yogurt before layering. Be mindful of the granola-to-yogurt ratio. Prepare yogurt and peaches ahead of time for gatherings, layering just before serving.

Did you make this recipe?

Share a photo and tag us — we can't wait to see what you've made!

Sun-Kissed Frozen Orange Cream Slush

As a child, summer days felt like they lasted forever. I remember the sticky heat wrapping around me as I played outside, my laughter mingling with the sounds of the neighborhood. But nothing could cool me down quite like the moment I’d spot my grandmother, laboring over her blender, whipping up her famous Frozen Orange Creamsicle Slush. That vibrant orange treat, with its frosty texture and sweet citrus aroma, was like a burst of sunshine in a cup. Just one sip, and I could feel the coolness wash over me, sparking pure joy.

This Frozen Orange Creamsicle Slush has a way of making you feel like a kid again. Its creamy, dreamy consistency is a delightful balance of bright orange and soft vanilla, inviting you to dive right in. The refreshing tang of orange dances on your tongue, while the smooth creaminess envelops you in a comforting embrace. It’s a nostalgic treat that’s perfect for hot summer afternoons or anytime you need a little pick-me-up.

What makes my version of this slush stand out is the addition of a hint of vanilla bean, which elevates the flavor and adds an extra layer of richness. Plus, it’s super easy to whip up with just a few simple ingredients that you probably already have on hand! So, if you’re ready to relive those sun-soaked memories, let me show you exactly how to make it.

Sun-Kissed Frozen Orange Cream Slush

Why You’ll Love This Recipe

  • Each slush is a perfect blend of creamy vanilla and zesty orange, creating a nostalgic flavor reminiscent of summer days.
  • This refreshing treat is ready in under 15 minutes, making it an ideal quick dessert for unexpected guests or hot afternoons.
  • With just 8 simple ingredients, it’s budget-friendly, ensuring you don’t have to break the bank to enjoy a delicious slush.
  • The slush has a perfectly smooth texture, thanks to the combination of ice and ice cream, providing a delightful contrast to the bright citrus flavors.
  • It’s highly customizable; you can easily adjust the sweetness and add fresh herbs for a unique twist that suits your taste.

Ingredients

  • 2 cups orange juice (freshly squeezed or store-bought)
  • 1 cup vanilla ice cream
  • 1 cup crushed ice
  • 1/2 cup milk (whole or 2%)
  • 1/4 cup granulated sugar (adjust based on sweetness preference)
  • 1 teaspoon vanilla extract
  • Zest of 1 orange (for added flavor)
  • Fresh orange slices and mint leaves (for garnish)

The star of this Frozen Orange Creamsicle Slush is the orange juice, which provides the vibrant, citrusy base. Freshly squeezed juice will yield the brightest flavor, but store-bought options can be just as convenient. If you’re opting for store-bought, choose 100% pure juice with no added sugars for the best results. Another essential ingredient is the vanilla ice cream; it adds creaminess and sweetness. You can substitute it with dairy-free ice cream if you’re looking for a vegan option. Whole or 2% milk complements the ice cream, creating a smooth blend. If you want a lower-calorie version, almond or oat milk can be good alternatives.

Lastly, the granulated sugar can be adjusted based on your sweetness preference. If you prefer a more natural sweetener, consider using honey or agave syrup. The orange zest enhances the flavor profile, providing an aromatic pop that brings the whole slush together. Don’t skip it! It adds an extra layer of brightness that makes this slush truly special.

Step-by-Step Instructions

  1. Start by preparing your ingredients. Gather 2 cups of orange juice, 1 cup of vanilla ice cream, and 1 cup of crushed ice. Make sure the ice is finely crushed, as larger chunks can make blending difficult.
  2. In a blender, combine the orange juice, vanilla ice cream, crushed ice, and 1/2 cup of milk. Add 1/4 cup of granulated sugar and 1 teaspoon of vanilla extract. If you like a sweeter slush, consider adding a bit more sugar at this stage.
  3. Add the zest of 1 orange to the blender. This step is crucial for enhancing the citrus flavor of your slush. Make sure not to include the bitter white pith—only the flavorful zest.
  4. Blend the mixture on medium-high speed for about 30-45 seconds. Stop once the ingredients are fully combined and the slush has a smooth, even consistency. If you notice large chunks of ice, blend for an additional 10-15 seconds. Avoid over-blending, as this can make the slush too liquidy.
  5. Once blended, taste the slush. If it needs more sweetness, add a little more sugar and blend for a few more seconds. If it’s too thick, you can add a splash of milk to reach your desired consistency.
  6. Pour the slush into glasses. This recipe typically serves 4, but you can easily double it for larger gatherings. Use a spoon to help guide the slush into the glasses if needed.
  7. Garnish each serving with fresh orange slices and mint leaves. The mint not only adds a pop of color but also a refreshing aroma that complements the citrus flavors beautifully.
  8. Serve immediately and enjoy! If you’ve made extra, you can refrigerate it for a short time, but it’s best enjoyed fresh.

Pro Tips for the Best Frozen Orange Creamsicle Slush

  • Don’t skip the orange zest! It’s a game-changer for flavor. Always zest before juicing to make it easier.
  • Use a high-powered blender for the best texture. A standard blender may struggle with ice, leading to uneven consistency. If you have a food processor, that can work too, but ensure the ice is finely crushed.
  • Adjust the ice-to-liquid ratio carefully. If your slush is too thick, it won’t blend well. Start with less ice and add more until you reach your preferred texture.
  • Be cautious with the sugar! Always start with the lower amount, as you can easily add more, but it’s hard to fix an overly sweet slush.
  • For a fun twist, consider adding a splash of coconut milk or a handful of fresh fruit like strawberries or pineapple. This not only enhances the flavor but also adds a beautiful color contrast.

Variations & Serving Ideas

There are countless ways to put a spin on your Frozen Orange Creamsicle Slush. Consider making a tropical version by adding in some pineapple juice or coconut milk for a delightful tropical twist. If you’re feeling adventurous, try incorporating a handful of frozen mango or peach slices for added sweetness. For a lighter version, swap out the vanilla ice cream for Greek yogurt for a creamy yet tangy alternative.

As for serving ideas, this refreshing slush pairs wonderfully with light summer dishes like grilled chicken skewers, fish tacos, or a simple salad topped with citrus vinaigrette. The bright, zesty flavors of the slush complement these dishes perfectly, making them an ideal pairing for a sunny day.

Storage, Make-Ahead & Reheating

This Frozen Orange Creamsicle Slush is best enjoyed fresh, but if you have leftovers, you can store them in an airtight container in the fridge for up to 2 days. Just keep in mind that the slush may lose some of its texture over time as the ice melts. It doesn’t freeze well, as the ice will turn into a solid block. If you must freeze it, blend again after thawing to restore the slushy consistency. This treat is best the day you make it, as the flavors meld together beautifully overnight, enhancing its deliciousness.

Frequently Asked Questions

Can I make Frozen Orange Creamsicle Slush ahead of time?

Yes — in fact, it tastes even better the next day as the flavors meld. However, it’s best to enjoy it fresh, as the texture can change if stored for too long. If you need to prepare it ahead, keep it in the fridge and re-blend before serving.

What kind of orange juice should I use?

For the best flavor, use freshly squeezed orange juice. However, if you’re short on time, opt for 100% pure store-bought juice without added sugars. This will ensure that your slush remains flavorful and refreshing.

Can I substitute the vanilla ice cream?

Absolutely! If you’re looking for a dairy-free option, coconut milk ice cream or a non-dairy vanilla ice cream can work wonderfully. They will still provide the creamy texture and sweetness you desire.

How can I adjust the sweetness of my slush?

You can easily adjust the sweetness by modifying the amount of sugar added. Start with 1/4 cup and taste the mixture before blending. If you prefer it sweeter, add more sugar gradually until it reaches your desired level.

What should I do if my slush is too thick?

If your slush is too thick, simply add a splash of milk or orange juice and blend again. This will help achieve a more drinkable consistency while maintaining the slushy texture. Adjust gradually to reach your preferred thickness.

Sun-Kissed Frozen Orange Cream Slush

Final Thoughts

The Frozen Orange Creamsicle Slush is a delightful blend of refreshing citrus and creamy goodness, making it a perfect treat for warm days or any time you crave a taste of nostalgia. The way the bright orange flavor dances with the creamy texture truly elevates this slush, transforming it into a satisfying escape from the everyday.

This is the kind of recipe I come back to again and again, especially when I’m looking to cool down or impress guests at a summer gathering. It’s simple to make and always brings smiles all around! I encourage you to try this recipe for yourself—don’t hesitate to share your results or even put your own spin on it. Happy slushing!

Print
clock clock iconcutlery cutlery iconflag flag iconfolder folder iconinstagram instagram iconpinterest pinterest iconfacebook facebook iconprint print iconsquares squares iconheart heart iconheart solid heart solid icon

Frozen Orange Creamsicle Slush


  • Author: Lily author
  • Total Time: 15 minutes
  • Yield: 4 servings 1x
Pin Recipe
Print Recipe

Description

This Frozen Orange Creamsicle Slush is a refreshing treat that combines creamy vanilla and zesty orange flavors. Perfect for hot summer days, it brings back nostalgic memories with every sip.


Ingredients

Scale
  • 2 cups orange juice (freshly squeezed or store-bought)
  • 1 cup vanilla ice cream
  • 1 cup crushed ice
  • 1/2 cup milk (whole or 2%)
  • 1/4 cup granulated sugar (adjust based on sweetness preference)
  • 1 teaspoon vanilla extract
  • Zest of 1 orange (for added flavor)
  • Fresh orange slices and mint leaves (for garnish)

Instructions

  1. Start by preparing your ingredients. Gather 2 cups of orange juice, 1 cup of vanilla ice cream, and 1 cup of crushed ice. Make sure the ice is finely crushed, as larger chunks can make blending difficult.
  2. In a blender, combine the orange juice, vanilla ice cream, crushed ice, and 1/2 cup of milk. Add 1/4 cup of granulated sugar and 1 teaspoon of vanilla extract. If you like a sweeter slush, consider adding a bit more sugar at this stage.
  3. Add the zest of 1 orange to the blender. This step is crucial for enhancing the citrus flavor of your slush. Make sure not to include the bitter white pith—only the flavorful zest.
  4. Blend the mixture on medium-high speed for about 30-45 seconds. Stop once the ingredients are fully combined and the slush has a smooth, even consistency. If you notice large chunks of ice, blend for an additional 10-15 seconds. Avoid over-blending, as this can make the slush too liquidy.
  5. Once blended, taste the slush. If it needs more sweetness, add a little more sugar and blend for a few more seconds. If it’s too thick, you can add a splash of milk to reach your desired consistency.
  6. Pour the slush into glasses. This recipe typically serves 4, but you can easily double it for larger gatherings. Use a spoon to help guide the slush into the glasses if needed.
  7. Garnish each serving with fresh orange slices and mint leaves. The mint not only adds a pop of color but also a refreshing aroma that complements the citrus flavors beautifully.
  8. Serve immediately and enjoy! If you’ve made extra, you can refrigerate it for a short time, but it's best enjoyed fresh.
  • Prep Time: 15 min
  • Cook Time: 0 min
  • Category: Dessert
  • Method: Blending
  • Cuisine: American

Nutrition

  • Serving Size: 1 serving
  • Calories: 200
  • Sugar: 30 g
  • Sodium: 50 mg
  • Fat: 5 g
  • Saturated Fat: 3 g
  • Unsaturated Fat: 2 g
  • Trans Fat: 0 g
  • Carbohydrates: 40 g
  • Fiber: 1 g
  • Protein: 2 g
  • Cholesterol: 20 mg

Keywords: Don't skip the orange zest! It's a game-changer for flavor. Always zest before juicing to make it easier.

Did you make this recipe?

Share a photo and tag us — we can't wait to see what you've made!

Zesty Lemon Poppy Seed Delight

One rainy afternoon, I found myself in my grandmother’s cozy kitchen, the kind that always smelled like warmth and love. She was whipping up her famous Lemon Poppy Seed Loaf, a recipe that had been passed down through generations. As the batter came together, the zesty aroma of fresh lemons filled the air, mingling perfectly with the nutty fragrance of poppy seeds. I can still picture her, apron-clad, as she expertly drizzled a vibrant citrus icing over the loaf, creating a glossy, sun-kissed finish that beckoned us to dive in. It was a moment that sparked my own passion for baking, and this recipe has become a cherished staple in my home ever since.

When you take a bite of this Lemon Poppy Seed Loaf, it’s like a burst of sunshine on your palate. The loaf is beautifully golden, with a tender crumb that melts in your mouth. Each slice is speckled with tiny poppy seeds, adding a delightful crunch that contrasts beautifully with the tangy sweetness of the lemon. And that citrus icing? It’s the finishing touch that elevates this loaf from ordinary to extraordinary, with its bright, zesty flavor dancing on your taste buds.

This recipe stands out because it embraces simplicity while delivering on flavor. I’ve added a hint of vanilla to the batter, enhancing the overall taste and making it even more indulgent. Trust me, once you make this Lemon Poppy Seed Loaf With Citrus Icing, it’ll become a go-to in your baking repertoire.

So, let me show you exactly how to make it!

Zesty Lemon Poppy Seed Delight

Why You’ll Love This Recipe

  • Moist and tender crumb that melts in your mouth, thanks to the perfect balance of butter and buttermilk.
  • Bright, zesty lemon flavor paired with crunchy poppy seeds, creating a delightful texture and taste experience.
  • Easy to whip up in just about an hour, perfect for last-minute gatherings or a cozy afternoon treat.
  • Budget-friendly with everyday ingredients, making it an accessible option for all home bakers.
  • The citrus icing adds a sweet tang that elevates the loaf, turning a simple recipe into a showstopper!

Ingredients

  • 1 ½ cups (190g) all-purpose flour
  • 1 teaspoon baking powder
  • ½ teaspoon baking soda
  • ½ teaspoon salt
  • 3 tablespoons poppy seeds
  • ½ cup (115g) unsalted butter, softened to room temperature
  • 1 cup (200g) granulated sugar
  • 2 large eggs
  • 1 teaspoon vanilla extract
  • 1 teaspoon lemon zest (from about 1 medium lemon)
  • ½ cup (120ml) buttermilk
  • 2 tablespoons fresh lemon juice

For the Citrus Icing:

  • 1 cup (120g) powdered sugar
  • 2 tablespoons fresh lemon juice
  • 1 tablespoon orange juice
  • 1 teaspoon lemon zest (for garnish, optional)

Let’s dive into the key ingredients that make this Lemon Poppy Seed Loaf so special. The all-purpose flour provides the structure and base for the loaf, while the baking powder and baking soda ensure it rises perfectly, giving the loaf a light texture. For a gluten-free variation, you could substitute the flour with a gluten-free all-purpose blend. Poppy seeds not only add a delightful crunch but also contribute to the unique flavor profile that pairs well with the citrus notes.

Unsalted butter is crucial for achieving the buttery richness that makes this loaf so moist. If you’re looking for a dairy-free option, coconut oil or a vegan butter can be used instead. The buttermilk is another essential component, providing acidity that activates the baking soda for a fluffy texture. If you don’t have buttermilk on hand, you can easily make a substitute by mixing ½ cup of milk with 1 tablespoon of vinegar or lemon juice and letting it sit for about 5 minutes.

Step-by-Step Instructions

  1. Preheat your oven to 350°F (175°C). Grease a 9×5-inch loaf pan or line it with parchment paper for easy removal later.
  2. In a medium mixing bowl, whisk together 1 ½ cups of all-purpose flour, 1 teaspoon of baking powder, ½ teaspoon of baking soda, ½ teaspoon of salt, and 3 tablespoons of poppy seeds. This helps to evenly distribute the baking agents and ensures a uniform rise.
  3. In a large mixing bowl, cream together ½ cup of softened unsalted butter and 1 cup of granulated sugar using an electric mixer on medium speed for about 3-4 minutes, until the mixture is light and fluffy. Make sure to scrape down the sides of the bowl occasionally.
  4. Add 2 large eggs, 1 teaspoon of vanilla extract, and 1 teaspoon of lemon zest to the creamed butter and sugar, mixing until fully combined. You want a smooth consistency, so ensure there are no lumps of butter.
  5. In a small bowl, combine ½ cup of buttermilk and 2 tablespoons of fresh lemon juice. Alternately add the dry ingredients and buttermilk mixture to the butter mixture, starting and ending with the dry ingredients. Mix just until combined; do not overmix, as this can lead to a dense loaf.
  6. Pour the batter into the prepared loaf pan. Smooth the top with a spatula, ensuring it’s even. Bake in the preheated oven for 50-60 minutes, or until a toothpick inserted in the center comes out clean. The edges should be lightly golden brown, and the center should feel just set.
  7. Once baked, remove the loaf from the oven and allow it to cool in the pan for about 10 minutes. Then, transfer it to a wire rack to cool completely. Resist the urge to slice too soon, as it will be crumbly if it’s still warm.
  8. While the loaf is cooling, prepare the citrus icing. In a medium bowl, whisk together 1 cup of powdered sugar, 2 tablespoons of fresh lemon juice, and 1 tablespoon of orange juice until smooth. If the icing is too thick, you can add a little more juice to reach your desired consistency.
  9. Once the loaf is completely cool, drizzle the citrus icing over the top. If you like, sprinkle with an additional teaspoon of lemon zest for an extra pop of flavor and color.

Pro Tips for the Best Lemon Poppy Seed Loaf With Citrus Icing

  • Be careful not to overmix your batter; this is a common mistake that can lead to a dense loaf. Mix just until the dry ingredients are incorporated for a light and fluffy texture.
  • Use room temperature ingredients, especially the butter and eggs. This helps to create a smoother batter and ensures even baking. Take your eggs out of the fridge about 30 minutes before you start.
  • For a more pronounced lemon flavor, consider adding a little lemon extract in addition to the zest and juice. Just a half teaspoon can elevate the citrus notes significantly.
  • When measuring your flour, spoon it into the measuring cup and level it off with a knife instead of scooping directly from the bag. This prevents packing and ensures you don’t end up with a dry loaf.
  • Invest in a good quality loaf pan; it makes a difference in heat distribution, which ensures even baking. If your pan is dark-coated, reduce the oven temperature by 25°F to prevent over-browning.

Variations & Serving Ideas

For a delightful twist, consider adding blueberries or raspberries to the batter for a fruity burst of flavor. You can also experiment with different citrus fruits—try lime or grapefruit zest and juice for a refreshing change. For a healthier option, substitute half of the all-purpose flour with whole wheat flour for added fiber without compromising too much on texture.

This Lemon Poppy Seed Loaf pairs beautifully with a light salad, such as a mixed greens salad with a vinaigrette, or a cup of tea for a cozy afternoon treat. It also complements a creamy cheese platter, as the acidity of the loaf balances rich cheeses perfectly. Lastly, a scoop of vanilla ice cream on the side creates a delightful contrast of temperatures and flavors!

Storage, Make-Ahead & Reheating

This Lemon Poppy Seed Loaf can be stored at room temperature for up to 3 days if wrapped tightly in plastic wrap. If you want to keep it longer, it freezes well for up to 3 months. To freeze, wrap the loaf tightly in plastic wrap and then in aluminum foil to prevent freezer burn.

When you’re ready to enjoy it again, simply thaw it in the fridge overnight. Reheat individual slices in the microwave for 15-20 seconds or in a toaster oven until warmed through. Interestingly, many people find that this loaf tastes even better the next day, as the flavors have time to meld!

Frequently Asked Questions

Can I make Lemon Poppy Seed Loaf With Citrus Icing ahead of time?

Yes — in fact, it tastes even better the next day! You can make the loaf a day in advance, allowing the flavors to develop. Just be sure to store it in an airtight container to maintain its moisture.

Can I substitute the poppy seeds?

Absolutely! If you don’t have poppy seeds on hand or prefer an alternative, you can use sesame seeds for a similar crunch or omit them entirely for a smooth loaf.

What can I use instead of buttermilk?

If you don’t have buttermilk, you can easily create a substitute by mixing ½ cup of milk (dairy or plant-based) with 1 tablespoon of vinegar or lemon juice. Let it sit for 5 minutes before using in the recipe.

How can I make this recipe gluten-free?

To make a gluten-free version of this Lemon Poppy Seed Loaf, substitute the all-purpose flour with a gluten-free all-purpose flour blend. Just ensure that the blend contains a binding agent like xanthan gum for the best results.

What is the best way to store leftover loaf?

Leftover Lemon Poppy Seed Loaf should be stored in an airtight container at room temperature for up to 3 days. For longer storage, wrap it tightly and freeze for up to 3 months. Thaw it before serving for the best texture.

Zesty Lemon Poppy Seed Delight

Final Thoughts

The Lemon Poppy Seed Loaf with Citrus Icing is truly a delightful treat that brings a burst of brightness to any occasion. The zesty lemon flavor combined with the subtle crunch of poppy seeds creates a satisfying balance, while the citrus icing adds a touch of sweetness that perfectly complements the loaf’s tanginess.

This is the kind of recipe I come back to again and again, especially when I want to brighten up a gloomy day or celebrate a small victory. The aroma that fills the kitchen as it bakes is absolutely heavenly! I encourage you to give this recipe a try; you might just find it becoming a beloved staple in your home. Don’t forget to share your results or even add your own unique twist—I can’t wait to see what you create!

Print
clock clock iconcutlery cutlery iconflag flag iconfolder folder iconinstagram instagram iconpinterest pinterest iconfacebook facebook iconprint print iconsquares squares iconheart heart iconheart solid heart solid icon

Lemon Poppy Seed Loaf


  • Author: Lily author
  • Total Time: 16 minute
  • Yield: 1 loaf 1x
Pin Recipe
Print Recipe

Description

This Lemon Poppy Seed Loaf is a delightful treat that combines zesty lemon flavor with crunchy poppy seeds. Topped with a citrus icing, it’s perfect for any occasion.


Ingredients

Scale
  • 1 ½ cups (190g) all-purpose flour
  • 1 teaspoon baking powder
  • ½ teaspoon baking soda
  • ½ teaspoon salt
  • 3 tablespoons poppy seeds
  • ½ cup (115g) unsalted butter, softened to room temperature
  • 1 cup (200g) granulated sugar
  • 2 large eggs
  • 1 teaspoon vanilla extract
  • 1 teaspoon lemon zest (from about 1 medium lemon)
  • ½ cup (120ml) buttermilk
  • 2 tablespoons fresh lemon juice
  • 1 cup (120g) powdered sugar
  • 2 tablespoons fresh lemon juice
  • 1 tablespoon orange juice
  • 1 teaspoon lemon zest (for garnish, optional)

Instructions

  1. Preheat your oven to 350°F (175°C). Grease a 9×5-inch loaf pan or line it with parchment paper for easy removal later.
  2. In a medium mixing bowl, whisk together 1 ½ cups of all-purpose flour, 1 teaspoon of baking powder, ½ teaspoon of baking soda, ½ teaspoon of salt, and 3 tablespoons of poppy seeds. This helps to evenly distribute the baking agents and ensures a uniform rise.
  3. In a large mixing bowl, cream together ½ cup of softened unsalted butter and 1 cup of granulated sugar using an electric mixer on medium speed for about 3-4 minutes, until the mixture is light and fluffy. Make sure to scrape down the sides of the bowl occasionally.
  4. Add 2 large eggs, 1 teaspoon of vanilla extract, and 1 teaspoon of lemon zest to the creamed butter and sugar, mixing until fully combined. You want a smooth consistency, so ensure there are no lumps of butter.
  5. In a small bowl, combine ½ cup of buttermilk and 2 tablespoons of fresh lemon juice. Alternately add the dry ingredients and buttermilk mixture to the butter mixture, starting and ending with the dry ingredients. Mix just until combined; do not overmix, as this can lead to a dense loaf.
  6. Pour the batter into the prepared loaf pan. Smooth the top with a spatula, ensuring it’s even. Bake in the preheated oven for 50-60 minutes, or until a toothpick inserted in the center comes out clean. The edges should be lightly golden brown, and the center should feel just set.
  7. Once baked, remove the loaf from the oven and allow it to cool in the pan for about 10 minutes. Then, transfer it to a wire rack to cool completely. Resist the urge to slice too soon, as it will be crumbly if it’s still warm.
  8. While the loaf is cooling, prepare the citrus icing. In a medium bowl, whisk together 1 cup of powdered sugar, 2 tablespoons of fresh lemon juice, and 1 tablespoon of orange juice until smooth. If the icing is too thick, you can add a little more juice to reach your desired consistency.
  9. Once the loaf is completely cool, drizzle the citrus icing over the top. If you like, sprinkle with an additional teaspoon of lemon zest for an extra pop of flavor and color.
  • Prep Time: 15 mins
  • Cook Time: 50-60 mins
  • Category: Dessert
  • Method: Baking
  • Cuisine: American

Nutrition

  • Serving Size: 1 slice
  • Calories: 200
  • Sugar: 15 g
  • Sodium: 150 mg
  • Fat: 8 g
  • Saturated Fat: 5 g
  • Unsaturated Fat: 3 g
  • Trans Fat: 0 g
  • Carbohydrates: 30 g
  • Fiber: 1 g
  • Protein: 3 g
  • Cholesterol: 40 mg

Keywords: Be careful not to overmix your batter; this is a common mistake that can lead to a dense loaf. Use room temperature ingredients for a smoother batter and even baking.

Did you make this recipe?

Share a photo and tag us — we can't wait to see what you've made!

  • Privacy Policy
  • Terms Of Service
  • Contact
  • About
  • GDPR

Copyright © 2025 Homesmad