• Skip to primary navigation
  • Skip to main content
  • Skip to primary sidebar
Homesmad

Homesmad

  • Home
  • Breakfast & Brunch
  • Appetizers & Snacks
  • Dinner
  • Dessert
  • About
  • Privacy Policy
  • Contact
Homesmad
  • Home
  • Breakfast & Brunch
  • Appetizers & Snacks
  • Dinner
  • Dessert
  • About
  • Privacy Policy
  • Contact

Best Cheesy Chicken & Rice Casserole – Quick Family Meal

September 28, 2025 by Lily author

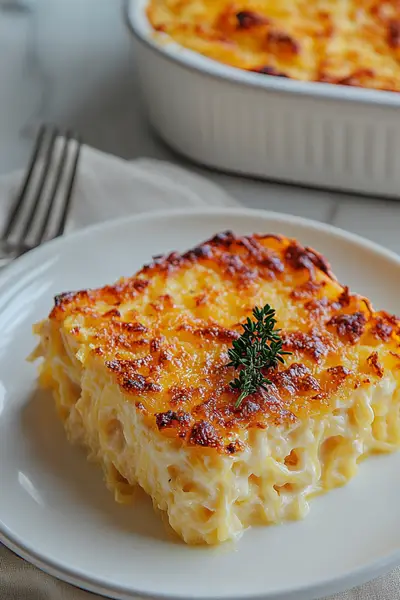
Cheesy Chicken And Rice Casserole is truly a culinary marvel, a dish that effortlessly marries hearty satisfaction with irresistible flavor. Imagine a bustling weeknight, the air filled with the promise of something delicious, something comforting that brings everyone to the table with eager anticipation. That, my friends, is the magic of this particular casserole. It’s not just a recipe; it’s an experience, a warm embrace for your taste buds that promises to become a cherished part of your family’s meal rotation.

Historically, the casserole format gained immense popularity in American kitchens during the mid-20th century, celebrated for its practical, all-in-one approach to feeding families efficiently and deliciously. This enduring legacy continues today, proving that some classics are truly timeless. What makes this dish so universally adored? It’s the delightful combination of tender, succulent chicken, perfectly cooked rice, and, of course, a generous blanket of bubbling, golden cheese that stretches with every forkful. The textures are harmonious – creamy, savory, and utterly satisfying – making it a top contender for both quick family dinners and impressive potluck contributions.

Discover the Ultimate Comfort: Your New Favorite Casserole

I find immense joy in sharing recipes that deliver maximum flavor with minimal fuss, and this Cheesy Chicken And Rice Casserole certainly fits the bill. It’s a dish I rely on when I need something guaranteed to please everyone, offering that coveted balance of convenience and gourmet appeal. Prepare to transform simple ingredients into an extraordinary meal that you’ll want to revisit again and again.

Best Cheesy Chicken & Rice Casserole - Quick Family Meal this RECIPE

Ingredients:

Gathering all your ingredients before you begin is always my go-to tip for a smooth cooking experience. For our delightful Cheesy Chicken And Rice Casserole, here’s what you’ll need:

  • For the Chicken:
    • 2 pounds boneless, skinless chicken breasts or thighs, cut into 1-inch cubes
    • 1 tablespoon olive oil
    • 1 teaspoon smoked paprika
    • ½ teaspoon garlic powder
    • ¼ teaspoon black pepper
    • ½ teaspoon salt, or to taste
  • For the Vegetables:
    • 1 large yellow onion, finely chopped
    • 2 celery stalks, finely chopped
    • 1 red bell pepper, finely chopped
    • 3 cloves garlic, minced
    • 1 cup frozen peas, thawed
    • ½ cup fresh parsley, chopped (for garnish and adding to the casserole)
  • For the Rice:
    • 2 cups uncooked long-grain white rice (such as Basmati or Jasmine)
    • 3 ½ cups chicken broth, low sodium is preferred
  • For the Creamy Cheese Sauce:
    • 4 tablespoons unsalted butter
    • ½ cup all-purpose flour
    • 2 cups milk (whole milk works best for richness)
    • 1 (10.5 ounce) can condensed cream of chicken soup (or homemade equivalent for extra freshness)
    • 1 cup sour cream (full fat for the best texture and flavor)
    • 1 teaspoon Dijon mustard (adds a subtle tang that really elevates the cheese sauce)
    • ¼ teaspoon black pepper
    • ¼ teaspoon salt, or to taste
    • 2 cups shredded sharp cheddar cheese, divided (plus more for topping, if desired)
    • 1 cup shredded Monterey Jack cheese, divided (also for extra melty goodness)
  • Optional Topping:
    • ½ cup panko breadcrumbs, mixed with 1 tablespoon melted butter for a crispy crust

Preparation of Chicken and Vegetables

This phase is all about building the foundational flavors for our incredible Cheesy Chicken And Rice Casserole. Taking a little extra time here will pay off in spades!

  1. Prepare the Chicken: Start by patting your boneless, skinless chicken breasts or thighs dry with paper towels. This is a small but important step, as it helps achieve a better sear. Once dry, cut the chicken into uniform 1-inch cubes. In a medium bowl, toss the chicken cubes with 1 tablespoon of olive oil, 1 teaspoon of smoked paprika, ½ teaspoon of garlic powder, ¼ teaspoon of black pepper, and ½ teaspoon of salt. Make sure every piece of chicken is nicely coated.
  2. Brown the Chicken: Heat a large oven-safe skillet or Dutch oven over medium-high heat. Once hot, add the seasoned chicken in a single layer, making sure not to overcrowd the pan. You might need to do this in two batches. Cook for 3-4 minutes per side, until the chicken is golden brown and cooked through. Browning the chicken is crucial here, as it develops deep, savory flavors that will permeate the entire casserole. Once browned, remove the chicken from the skillet and set aside on a plate. It’s okay if there are some browned bits stuck to the bottom of the pan; these will add even more flavor to our vegetables.
  3. Sauté the Aromatics: Reduce the heat to medium. Add a little more olive oil to the skillet if needed. Add the finely chopped yellow onion, celery stalks, and red bell pepper to the skillet. Cook, stirring occasionally, for about 5-7 minutes until the vegetables have softened and the onion becomes translucent. Scrape up any browned bits from the bottom of the pan as you stir – this is called deglazing and infuses wonderful flavor into your vegetables.
  4. Add the Garlic: Once the vegetables are tender, add the 3 cloves of minced garlic to the skillet. Cook for just 1 minute more, stirring constantly, until fragrant. Be careful not to burn the garlic, as burnt garlic can taste bitter.

Creating the Creamy Sauce and Cooking the Rice

Now, let’s bring the heart of our Cheesy Chicken And Rice Casserole to life: the luscious, creamy cheese sauce and perfectly cooked rice. This is where the magic truly begins to happen!

  1. Cook the Rice: While your vegetables are sautéing, you can start on the rice. In a separate medium saucepan, combine 2 cups of uncooked long-grain white rice with 3 ½ cups of low-sodium chicken broth. Bring it to a boil over high heat, then immediately reduce the heat to low, cover the saucepan tightly, and simmer for 15-18 minutes, or until all the liquid has been absorbed and the rice is tender. Once cooked, remove from heat and let it sit, covered, for another 5 minutes before fluffing with a fork. This step ensures fluffy, separated grains of rice that won’t turn mushy in the casserole.
  2. Prepare the Roux: In the same skillet where you cooked your vegetables (or a clean one if you prefer), melt 4 tablespoons of unsalted butter over medium heat. Once the butter is melted and slightly foamy, sprinkle in ½ cup of all-purpose flour. Whisk continuously for 1-2 minutes to create a smooth paste, or roux. This roux is essential for thickening our sauce, giving our Cheesy Chicken And Rice Casserole its signature creamy texture. Cook the roux until it’s a pale golden color; this cooks out the raw flour taste.
  3. Build the Sauce: Gradually whisk in 2 cups of milk, a little at a time, to the roux. Continue whisking vigorously to prevent lumps. The sauce will begin to thicken as it heats. Once all the milk is incorporated and the sauce is smooth, stir in the 10.5-ounce can of condensed cream of chicken soup, 1 cup of sour cream, and 1 teaspoon of Dijon mustard. The Dijon mustard might seem like an unusual addition, but trust me, it adds a wonderful depth and balances the richness without making the sauce taste overtly musty.
  4. Season and Melt the Cheese: Season the sauce with ¼ teaspoon of black pepper and ¼ teaspoon of salt. Taste and adjust if necessary. Reduce the heat to low and gradually add 1 ½ cups of shredded sharp cheddar cheese and ¾ cup of shredded Monterey Jack cheese to the sauce, stirring until completely melted and smooth. Do not let the sauce boil once the cheese is added, as this can cause the cheese to separate and become oily. This creamy, cheesy sauce is the heart and soul of our Cheesy Chicken And Rice Casserole!

Assembling the Cheesy Chicken And Rice Casserole

We’re getting close! This part is all about bringing together all those delicious components into one harmonious dish ready for the oven. Get ready for some serious comfort food in the making!

  1. Combine Main Components: To the skillet with your creamy cheese sauce, add the cooked chicken cubes, the sautéed onion, celery, and bell pepper mixture, the cooked and fluffed rice, and the thawed frozen peas. Also, stir in about ¼ cup of the fresh chopped parsley. Gently fold everything together until all ingredients are evenly coated with the rich, cheesy sauce. You want to make sure every bite of our Cheesy Chicken And Rice Casserole is infused with flavor.
  2. Prepare Baking Dish: Preheat your oven to 375°F (190°C). Lightly grease a 9×13-inch baking dish with cooking spray or butter.
  3. Transfer to Baking Dish: Carefully spoon the entire mixture into the prepared 9×13-inch baking dish, spreading it out evenly with a spatula.
  4. Top with Remaining Cheese and Optional Topping: Sprinkle the remaining ½ cup of sharp cheddar cheese and ¼ cup of Monterey Jack cheese evenly over the top of the casserole. For an irresistible golden, crispy crust, mix ½ cup of panko breadcrumbs with 1 tablespoon of melted butter in a small bowl, then scatter this mixture over the cheese. This breadcrumb topping adds a delightful texture contrast to the creamy interior of the Cheesy Chicken And Rice Casserole.

Baking the Casserole

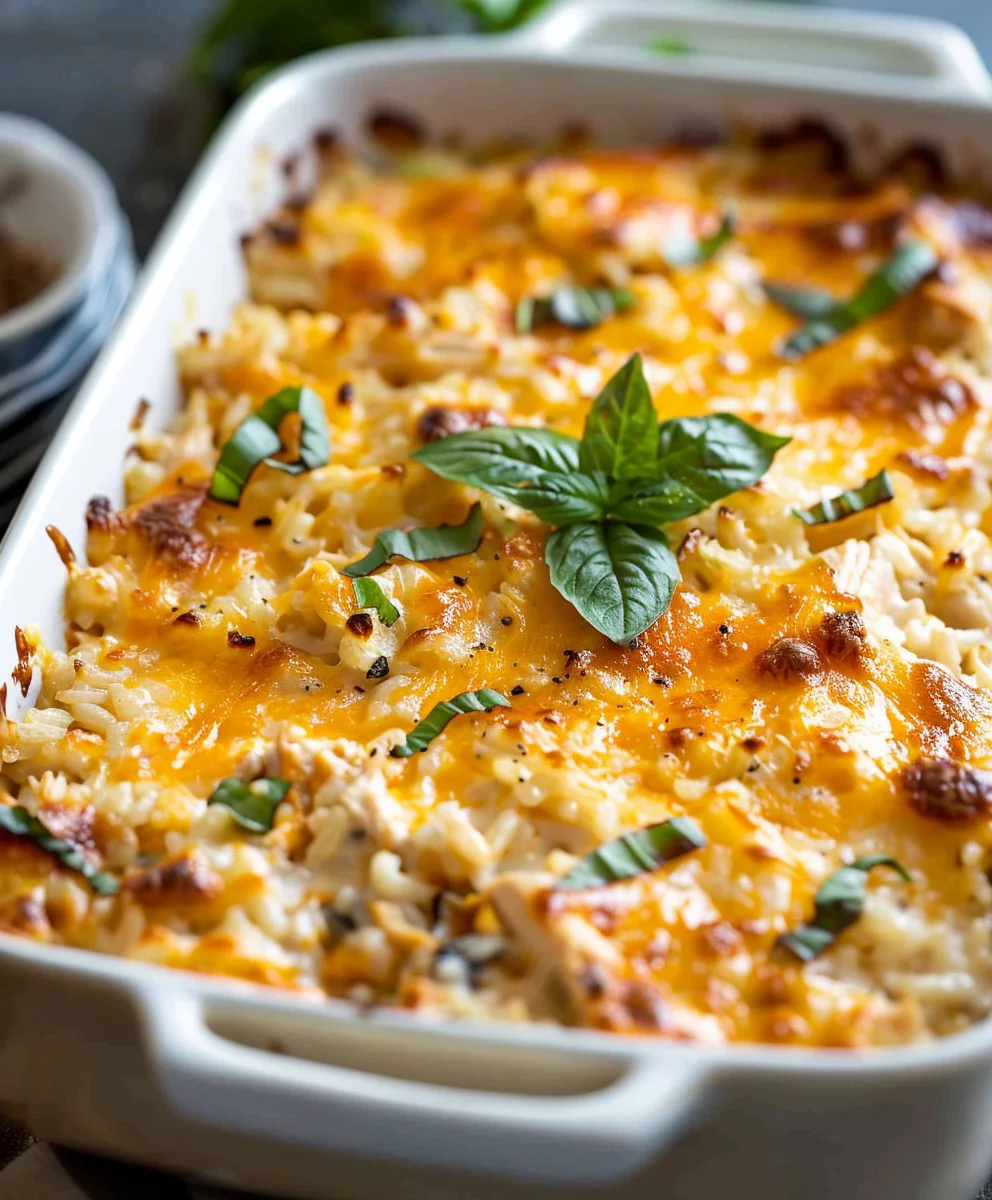
The moment of truth! Into the oven our glorious Cheesy Chicken And Rice Casserole goes, transforming into a bubbly, golden-brown masterpiece.

  1. Bake Until Bubbly: Place the baking dish into the preheated oven. Bake for 25-30 minutes, or until the casserole is hot and bubbly around the edges and the cheese on top is melted and lightly golden. If you used the breadcrumb topping, it should be nicely browned and crispy.
  2. Broil for Extra Crispiness (Optional): If your topping isn’t as golden as you’d like after baking, you can place the casserole under the broiler for 1-2 minutes. Keep a very close eye on it, as broilers can brown things quickly and you don’t want to burn the cheese or breadcrumbs.
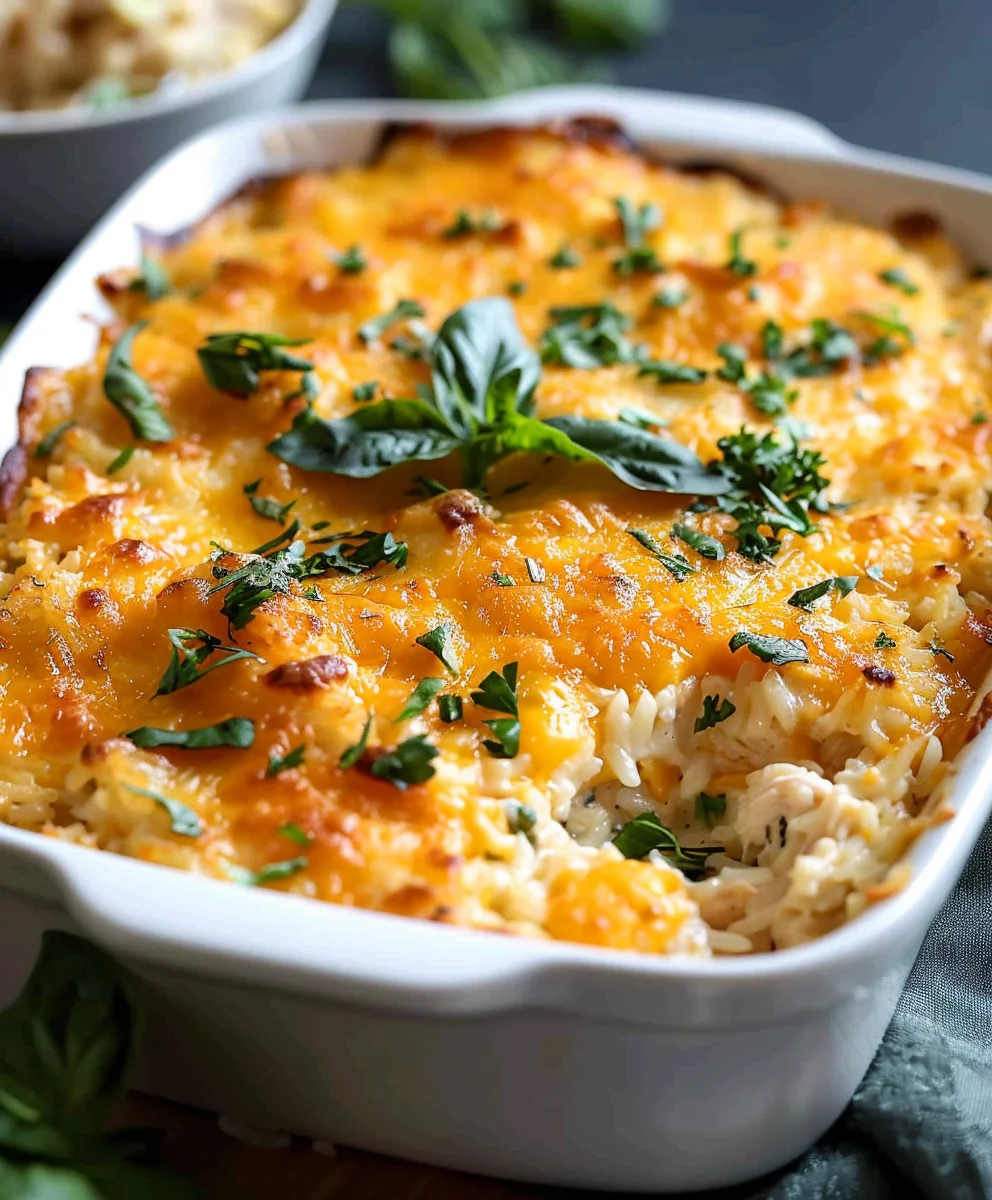
  3. Rest Before Serving: Once removed from the oven, let the Cheesy Chicken And Rice Casserole rest for about 5-10 minutes before serving. This resting period allows the flavors to meld further and the casserole to set slightly, making it easier to serve clean portions. Plus, it cools down slightly so no one burns their tongue on that amazing cheesy goodness!

Serving Suggestions and Storage

Congratulations, you’ve just made a fantastic Cheesy Chicken And Rice Casserole! Now for the best part – enjoying your culinary creation and ensuring any leftovers are kept fresh.

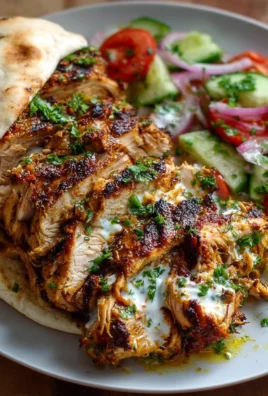
  1. Garnish and Serve: Before serving, sprinkle the remaining fresh chopped parsley over the top for a pop of color and freshness. This casserole is a meal in itself, but it pairs wonderfully with a simple green salad with a light vinaigrette or some steamed green beans. The freshness of the salad cuts through the richness of the casserole beautifully.
  2. Storage: Leftover Cheesy Chicken And Rice Casserole can be stored in an airtight container in the refrigerator for up to 3-4 days.
  3. Reheating: To reheat, simply scoop out a portion onto a microwave-safe plate and heat for 1-2 minutes, or until hot. For best results, you can also reheat larger portions in an oven-safe dish covered with foil at 300°F (150°C) for about 20-25 minutes, or until heated through. If it seems a little dry, you can add a tablespoon or two of milk or chicken broth before reheating to restore some moisture.
  4. Freezing: This casserole freezes quite well! Allow it to cool completely, then transfer it to freezer-safe containers or wrap individual portions tightly in plastic wrap and then aluminum foil. It can be frozen for up to 2-3 months. Thaw overnight in the refrigerator before reheating. When reheating from frozen, it might take a bit longer in the oven, around 45-60 minutes at 350°F (175°C) covered, then uncovered for the last 10 minutes to crisp up.

Best Cheesy Chicken & Rice Casserole - Quick Family Meal

Conclusion:

And there you have it, friends! We’ve journeyed through the simple steps to create a dish that I genuinely believe will become a cherished staple in your home, just as it has in mine. This isn’t just another recipe; it’s an invitation to experience comfort, flavor, and pure, unadulterated joy in every single bite. I’ve poured my heart into perfecting this dish because I truly want you to achieve that same sense of accomplishment and delight when you pull it golden and bubbling from your oven. The combination of tender chicken, perfectly cooked rice, and that irresistible blanket of gooey, melted cheese truly makes this a culinary masterpiece for any occasion.

What makes this particular recipe an absolute must-try? Well, beyond the obvious deliciousness, it’s the sheer versatility and ease. In our busy lives, finding a meal that delivers on both flavor and convenience is like striking gold, and I promise you, this recipe does exactly that. It’s incredibly forgiving, making it perfect for novice cooks, yet sophisticated enough in its taste to impress even the most discerning palate. It’s the kind of dish that warms you from the inside out, making it ideal for chilly evenings, but light enough in its overall feel to be enjoyed year-round. Moreover, it’s a fantastic way to utilize leftover chicken, transforming simple ingredients into something truly extraordinary with minimal fuss. I’ve seen firsthand how this recipe brings smiles to faces, and I’m confident it will do the same for you and your loved ones.

Now, let’s talk about how to elevate your dining experience even further. While a generous scoop of this delightful casserole is undoubtedly satisfying on its own, I have a few suggestions to make it a complete and unforgettable meal. For a touch of freshness and balance, I highly recommend serving it alongside a crisp, vibrant green salad with a light vinaigrette. The bright, tangy notes of the salad beautifully cut through the richness of the cheese. Another fantastic pairing is some warm, crusty bread – think a rustic baguette or a soft dinner roll – perfect for soaking up any lingering cheesy goodness on your plate. For those who enjoy a little extra crunch, a sprinkle of toasted almonds or even some crispy fried onions over the top just before serving can add a wonderful textural dimension. Don’t be afraid to experiment with your favorite herbs either; a fresh sprig of parsley or chives chopped finely and sprinkled on top can add a lovely aromatic finish.

Serving Variations for Every Palate:
  • Make it a Veggie Extravaganza: Don’t hesitate to toss in some of your favorite vegetables! Steamed broccoli florets, frozen peas, diced bell peppers, or sautéed mushrooms can be stirred in during the last 10-15 minutes of baking for added nutrients and color. I often add a bag of mixed frozen vegetables for an even quicker preparation.
  • Cheese Lover’s Paradise: While cheddar is my go-to, feel free to experiment with other cheeses. Monterey Jack for extra meltiness, a touch of smoked gouda for depth, or even a blend of mozzarella and provolone for that classic Italian-American twist can be absolutely divine. For a little kick, some pepper jack cheese would be a fantastic addition.
  • Spice it Up: If you enjoy a bit of heat, consider adding a pinch of red pepper flakes to the sauce, or even a dash of your favorite hot sauce. A sprinkle of finely diced jalapeños before baking can also add a delightful warmth without overwhelming the dish.
  • Herbaceous Touches: Fresh herbs really brighten this dish. Stir in some chopped fresh thyme, rosemary, or even a touch of sage along with the chicken for an aromatic upgrade.
  • Topping Tactics: Beyond the initial cheese, a sprinkle of panko breadcrumbs mixed with a little melted butter can create an incredibly crispy, golden-brown crust. Or, for a truly decadent touch, scatter some crumbled bacon on top for a smoky, salty counterpoint to the creamy casserole.

So, there you have it, my definitive guide to creating the perfect Cheesy Chicken And Rice Casserole. This recipe is more than just a list of ingredients and instructions; it’s a testament to the power of simple, wholesome food to bring people together and create lasting memories. I’ve shared all my tips and tricks, and now it’s your turn to bring this magic to your kitchen!

Your Turn to Shine!

I absolutely cannot wait for you to try this recipe. Imagine the aroma filling your home, the anticipation as you pull it from the oven, and that first glorious bite. I encourage you to embrace the process, make it your own with the variations suggested, and most importantly, enjoy every moment of cooking and sharing. Once you’ve made it, please, please come back and share your experience with me! What did you love most about it? Did you try any variations that became an instant hit? Your feedback and shared joy are what make this culinary journey so incredibly rewarding for me. Snap a photo, leave a comment, or simply tell a friend about your success. Let’s spread the comfort and deliciousness that this amazing dish embodies. Happy cooking, and may your kitchen be filled with warmth and wonderful flavors!


Best Cheesy Chicken And Rice Casserole

Best Cheesy Chicken And Rice Casserole

This Cheesy Chicken And Rice Casserole is a culinary marvel, marrying hearty satisfaction with irresistible flavor. It’s a comforting, all-in-one dish perfect for a quick family meal, featuring tender chicken, perfectly cooked rice, and a generous blanket of bubbling, golden cheese.

Prep Time
40 Minutes

Cook Time
30 Minutes

Total Time
20 Minutes

Servings
8 servings

Ingredients

  • 2 lbs boneless, skinless chicken breasts or thighs, cut into 1-inch cubes
  • 1 tbsp olive oil
  • 1 tsp smoked paprika
  • ½ tsp garlic powder
  • ¼ tsp black pepper
  • ½ tsp salt
  • 1 large yellow onion, finely chopped
  • 2 celery stalks, finely chopped
  • 1 red bell pepper, finely chopped
  • 3 cloves garlic, minced
  • 1 cup frozen peas, thawed
  • ½ cup fresh parsley, chopped
  • 2 cups uncooked long-grain white rice
  • 3 ½ cups chicken broth, low sodium
  • 4 tbsp unsalted butter
  • ½ cup all-purpose flour
  • 2 cups milk (whole milk)
  • 1 (10.5 ounce) can condensed cream of chicken soup
  • 1 cup sour cream (full fat)
  • 1 tsp Dijon mustard
  • ¼ tsp black pepper
  • ¼ tsp salt
  • 2 cups shredded sharp cheddar cheese, divided
  • 1 cup shredded Monterey Jack cheese, divided
  • ½ cup panko breadcrumbs (optional)
  • 1 tbsp melted butter (for topping, optional)

Instructions

  1. Step 1
    Season 2 lbs cubed chicken with 1 tbsp olive oil, 1 tsp smoked paprika, ½ tsp garlic powder, ¼ tsp black pepper, and ½ tsp salt. Brown chicken in an oven-safe skillet 3-4 mins per side until golden; set aside.
  2. Step 2
    In the same skillet, sauté 1 chopped onion, 2 celery stalks, and 1 red bell pepper for 5-7 mins. Add 3 minced garlic cloves; cook for 1 min until fragrant.
  3. Step 3
    Cook rice: Combine 2 cups rice with 3 ½ cups chicken broth in a saucepan. Bring to boil, reduce heat, cover, and simmer for 15-18 mins. Let sit 5 mins, then fluff with a fork.
  4. Step 4
    Prepare sauce: Melt 4 tbsp unsalted butter in the skillet. Whisk in ½ cup all-purpose flour for 1-2 mins to create a roux. Gradually whisk in 2 cups milk until smooth and thickened.
  5. Step 5
    Stir in 10.5 oz cream of chicken soup, 1 cup sour cream, and 1 tsp Dijon mustard. Season with ¼ tsp black pepper and ¼ tsp salt. Reduce heat to low.
  6. Step 6
    Gradually add 1 ½ cups sharp cheddar and ¾ cup Monterey Jack cheese to the sauce, stirring until completely melted and smooth. Do not let the sauce boil once cheese is added.
  7. Step 7
    Combine: Add the cooked chicken, sautéed vegetables, cooked rice, and ¼ cup fresh chopped parsley to the creamy cheese sauce. Gently fold until all ingredients are evenly coated.
  8. Step 8
    Preheat oven to 375°F (190°C). Lightly grease a 9×13-inch baking dish. Transfer the casserole mixture into the prepared dish, spreading evenly.
  9. Step 9
    Top with remaining ½ cup sharp cheddar and ¼ cup Monterey Jack cheese. For a crispy crust, mix ½ cup panko breadcrumbs with 1 tbsp melted butter and sprinkle over the cheese (optional).
  10. Step 10
    Bake for 25-30 mins, or until bubbly and the cheese topping is melted and lightly golden. Broil for 1-2 mins if desired for extra crispiness (watch closely!).
  11. Step 11
    Let the casserole rest for 5-10 mins before serving. Garnish with remaining fresh chopped parsley.

Important Information

Nutrition Facts (Per Serving)

It is important to consider this information as approximate and not to use it as definitive health advice.

Allergy Information

Please check ingredients for potential allergens and consult a health professional if in doubt.

« Previous Post
Cheesy Garlic Chicken Wraps: Easy & Flavorful Recipe!
Next Post »
Creamy Chicken Alfredo Lasagna Rolls Recipe You'll Love

If you enjoyed this…

Delicious Street Corn Chicken Bowl Recipe – Flavorful & Fresh

Christmas Pomegranate Goat Cheese Bites

Christmas Pomegranate Goat Cheese Bites: A Festive and Delicious Holiday Treat

Garlic Butter Baked Salmon

Garlic Butter Baked Salmon – A Simple & Flavorful Dinner

Primary Sidebar

Browse by Diet

BreakfastDinnerLunchDessertAppetizer

Sweet Peach Yogurt Parfait Delight

One of my fondest memories is from a lazy summer afternoon spent at my grandmother’s house. The sun filtered through the kitchen window, casting a warm glow over the table where she would create her culinary magic. It was during one of those blissful moments that I first tasted her Peach Yogurt Parfait with Honey and Granola. The sweet aroma of ripe peaches mingling with creamy yogurt and the crunch of granola was nothing short of heavenly. It felt like summer captured in a bowl, and I still remember the joy of diving in with a spoon, each layer revealing a new burst of flavor.

When I think about that parfait, I can almost hear the gentle hum of the bees outside, reminding me of the floral notes that honey brings to every bite. The vibrant yellows and soft oranges of the peaches contrast beautifully with the creamy white yogurt and the golden crunch of granola. It’s a dish that not only looks delightful but also tastes like a celebration of fresh, wholesome ingredients.

What makes my version of this Peach Yogurt Parfait special is the careful balance of flavors and textures. I use ripe, juicy peaches, drizzled with locally sourced honey, and a homemade granola that’s bursting with nuts and seeds for an extra crunch. It’s a simple dish, but every layer is crafted with love and attention.

Let me show you exactly how to make this delightful parfait, so you can bring a bit of that summer magic into your kitchen!

Sweet Peach Yogurt Parfait Delight

Why You’ll Love This Recipe

  • Delightfully creamy texture from the Greek yogurt, paired with the juicy sweetness of fresh peaches.
  • Ready in under 20 minutes, making it a quick and satisfying breakfast or snack option.
  • Budget-friendly, using common ingredients that you may already have in your pantry.
  • Customizable with your favorite granola and nuts, allowing you to tailor each parfait to your taste.
  • Perfectly balanced flavors with the bright acidity of lemon juice and the sweetness of honey enhancing the peaches.

Ingredients

  • For the Parfait:
  • 2 cups plain Greek yogurt (or vanilla yogurt for a sweeter option)
  • 2 large ripe peaches, diced (about 2 cups)
  • 1 tablespoon fresh lemon juice (to prevent browning of peaches)
  • 2 tablespoons honey (plus more for drizzling)
  • 1 teaspoon vanilla extract (optional for extra flavor)
  • For the Granola:
  • 1 cup granola (store-bought or homemade; see notes for a simple granola recipe)
  • 1/4 cup sliced almonds (optional for added crunch)
  • 1/4 cup shredded coconut (optional for added flavor)

Let’s dive into some key ingredients that make this Peach Yogurt Parfait so delightful! First, the Greek yogurt is not only creamy but also packed with protein, making it a satisfying option for breakfast or a snack. If you’re looking for a sweeter option, you can easily substitute it with vanilla yogurt, though it may alter the overall flavor balance. Next, the ripe peaches are the star of the show; their natural sweetness shines through, so I recommend choosing peaches that yield slightly to pressure, indicating they’re perfectly ripe. If peaches aren’t in season, feel free to use nectarines or even frozen peaches—just thaw them before use. Finally, honey adds a lovely floral sweetness that ties everything together. If you prefer, maple syrup can serve as a delicious substitute.

Step-by-Step Instructions

  1. Start by preparing the peaches. Wash them thoroughly, then slice and dice them into bite-sized pieces. In a medium bowl, toss the diced peaches with 1 tablespoon of fresh lemon juice to prevent browning. Set aside for about 5 minutes while the lemon juice works its magic.
  2. In a separate bowl, combine the Greek yogurt, 2 tablespoons of honey, and 1 teaspoon of vanilla extract if using. Stir the mixture until smooth and thoroughly blended. This should take about a minute. Avoid overmixing to maintain the creaminess of the yogurt.
  3. Now it’s time to layer your parfait. Grab a clear glass or bowl to showcase your beautiful creation. Start with a generous spoonful of the yogurt mixture at the bottom—about 1/4 cup will do. Use a spoon to spread it evenly.
  4. Add a layer of the diced peaches over the yogurt, ensuring they cover the yogurt completely. You might want to use about half of what you have prepared—roughly 1 cup. This layer should be visually appealing, so arrange the peaches neatly.
  5. Sprinkle 1/4 cup of granola over the peaches. This adds a delightful crunch. Make sure to distribute it evenly to ensure every bite has that satisfying texture. Avoid packing it down too tightly, as you want it to maintain its crunch.
  6. Repeat the layers: spoon in another 1/4 cup of yogurt, followed by another cup of peaches, and another sprinkle of granola. You should have at least two layers, but feel free to add more depending on your glass size.
  7. Finish off your parfait with a drizzle of honey on top for added sweetness and a touch of elegance. If you’re using sliced almonds or shredded coconut, sprinkle them on top now. It adds a lovely visual contrast and extra flavor.
  8. Serve immediately or refrigerate for up to 30 minutes before serving to allow the flavors to meld together. However, I recommend enjoying it fresh to maintain the granola’s crunch.

Pro Tips for the Best Peach Yogurt Parfait With Honey And Granola

  • Make sure to choose ripe peaches for the best flavor and texture. A common mistake is using unripe fruit, which can lead to a less enjoyable parfait. Look for peaches that are fragrant and slightly soft to the touch.
  • Use a clear glass to assemble your parfait; this not only makes for a beautiful presentation but also allows you to see the colorful layers, which adds to the enjoyment of eating it.
  • For an even creamier texture, consider whipping the Greek yogurt with a hand mixer for a couple of minutes before layering. This small adjustment makes a huge difference in mouthfeel.
  • Be mindful of the granola-to-yogurt ratio. Too much granola can overwhelm the parfait, while too little can make it feel too creamy. Aim for about 1/4 cup of granola per layer for the perfect balance.
  • If you’re making this for a gathering, consider preparing the yogurt and peaches ahead of time and layering them just before serving. This ensures the granola stays crunchy!

Variations & Serving Ideas

There are so many ways to get creative with your Peach Yogurt Parfait! For a tropical twist, swap out the peaches for mangoes or pineapples and top with coconut flakes. If you prefer a berry flavor, mix in some blueberries or strawberries with the peaches for added color and taste. For a nutty version, incorporate chopped walnuts or pecans instead of almonds.

As for serving ideas, this parfait pairs beautifully with a side of scrambled eggs for a hearty breakfast or fresh fruit salad for a light lunch. You might also enjoy it alongside whole grain toast with almond butter for an energizing snack. The contrast of flavors and textures will elevate your meal experience!

Storage, Make-Ahead & Reheating

The Peach Yogurt Parfait is best enjoyed fresh, but you can prepare some components ahead of time. Store the layered parfait in an airtight container in the refrigerator for up to 24 hours. However, be cautious; the granola may lose its crunch if stored too long. You can freeze the yogurt and peach mixture for up to 2 months; just remember to thaw it in the refrigerator overnight before serving.

If you plan to enjoy this dish the next day, it can taste even better as the flavors meld together. Just remember to add the granola right before serving to keep its delightful crunch!

Frequently Asked Questions

Can I make Peach Yogurt Parfait With Honey And Granola ahead of time?

Yes — in fact, it tastes even better the next day as the flavors meld. However, I recommend waiting to add the granola until just before serving to maintain its crunch.

What can I substitute for Greek yogurt?

If you prefer a lighter option, you can substitute Greek yogurt with regular yogurt or a dairy-free alternative like coconut yogurt. Just remember that this may alter the creaminess and flavor profile slightly.

Can I use frozen peaches for this parfait?

Absolutely! Just make sure to thaw the frozen peaches before using them. They will still add great flavor, though the texture may be slightly softer than fresh peaches.

How do I make the parfait vegan?

To make a vegan version, substitute the Greek yogurt with a plant-based yogurt alternative, and replace honey with maple syrup or agave nectar. This keeps the parfait sweet while adhering to a vegan diet.

What other fruits can I use in this recipe?

You can mix and match fruits based on your preference. Try using strawberries, blueberries, raspberries, or even bananas. Just make sure to adjust the lemon juice as needed to prevent browning.

Sweet Peach Yogurt Parfait Delight

Final Thoughts

The Peach Yogurt Parfait with Honey and Granola is a delightful blend of creamy yogurt, sweet peaches, and crunchy granola that creates a satisfying and nourishing treat. Each layer bursts with flavor, making it a perfect choice for breakfast or a light dessert.

This is the kind of recipe I come back to again and again, especially when I want something refreshing and wholesome to start my day. The harmony of sweet and tart flavors, combined with the delightful crunch, never fails to lift my spirits!

I encourage you to give this parfait a try and indulge in its comforting goodness. Feel free to share your results or even add your own twist—perhaps a sprinkle of cinnamon or a handful of nuts. Enjoy creating your perfect parfait!

Print
clock clock iconcutlery cutlery iconflag flag iconfolder folder iconinstagram instagram iconpinterest pinterest iconfacebook facebook iconprint print iconsquares squares iconheart heart iconheart solid heart solid icon

Peach Yogurt Parfait


  • Author: Lily author
  • Total Time: 15 minutes
  • Yield: 4 servings 1x
Pin Recipe
Print Recipe

Description

This Peach Yogurt Parfait combines creamy Greek yogurt, juicy peaches, and crunchy granola for a delightful treat. It’s a perfect breakfast or snack that captures the essence of summer in every bite.


Ingredients

Scale
  • For the Parfait:
  • 2 cups plain Greek yogurt (or vanilla yogurt for a sweeter option)
  • 2 large ripe peaches, diced (about 2 cups)
  • 1 tablespoon fresh lemon juice (to prevent browning of peaches)
  • 2 tablespoons honey (plus more for drizzling)
  • 1 teaspoon vanilla extract (optional for extra flavor)
  • For the Granola:
  • 1 cup granola (store-bought or homemade; see notes for a simple granola recipe)
  • 1/4 cup sliced almonds (optional for added crunch)
  • 1/4 cup shredded coconut (optional for added flavor)

Instructions

  1. Start by preparing the peaches. Wash them thoroughly, then slice and dice them into bite-sized pieces. In a medium bowl, toss the diced peaches with 1 tablespoon of fresh lemon juice to prevent browning. Set aside for about 5 minutes while the lemon juice works its magic.
  2. In a separate bowl, combine the Greek yogurt, 2 tablespoons of honey, and 1 teaspoon of vanilla extract if using. Stir the mixture until smooth and thoroughly blended. This should take about a minute. Avoid overmixing to maintain the creaminess of the yogurt.
  3. Now it’s time to layer your parfait. Grab a clear glass or bowl to showcase your beautiful creation. Start with a generous spoonful of the yogurt mixture at the bottom—about 1/4 cup will do. Use a spoon to spread it evenly.
  4. Add a layer of the diced peaches over the yogurt, ensuring they cover the yogurt completely. You might want to use about half of what you have prepared—roughly 1 cup. This layer should be visually appealing, so arrange the peaches neatly.
  5. Sprinkle 1/4 cup of granola over the peaches. This adds a delightful crunch. Make sure to distribute it evenly to ensure every bite has that satisfying texture. Avoid packing it down too tightly, as you want it to maintain its crunch.
  6. Repeat the layers: spoon in another 1/4 cup of yogurt, followed by another cup of peaches, and another sprinkle of granola. You should have at least two layers, but feel free to add more depending on your glass size.
  7. Finish off your parfait with a drizzle of honey on top for added sweetness and a touch of elegance. If you’re using sliced almonds or shredded coconut, sprinkle them on top now. It adds a lovely visual contrast and extra flavor.
  8. Serve immediately or refrigerate for up to 30 minutes before serving to allow the flavors to meld together. However, I recommend enjoying it fresh to maintain the granola’s crunch.
  • Prep Time: 15 mins
  • Cook Time: 0 mins
  • Category: Breakfast
  • Method: No-cook
  • Cuisine: American

Nutrition

  • Serving Size: 1 parfait
  • Calories: 250
  • Sugar: 20 g
  • Sodium: 50 mg
  • Fat: 5 g
  • Saturated Fat: 2 g
  • Unsaturated Fat: 3 g
  • Trans Fat: 0 g
  • Carbohydrates: 40 g
  • Fiber: 3 g
  • Protein: 10 g
  • Cholesterol: 10 mg

Keywords: Choose ripe peaches for the best flavor and texture. Use a clear glass for a beautiful presentation. For creaminess, consider whipping the yogurt before layering. Be mindful of the granola-to-yogurt ratio. Prepare yogurt and peaches ahead of time for gatherings, layering just before serving.

Did you make this recipe?

Share a photo and tag us — we can't wait to see what you've made!

Sun-Kissed Frozen Orange Cream Slush

As a child, summer days felt like they lasted forever. I remember the sticky heat wrapping around me as I played outside, my laughter mingling with the sounds of the neighborhood. But nothing could cool me down quite like the moment I’d spot my grandmother, laboring over her blender, whipping up her famous Frozen Orange Creamsicle Slush. That vibrant orange treat, with its frosty texture and sweet citrus aroma, was like a burst of sunshine in a cup. Just one sip, and I could feel the coolness wash over me, sparking pure joy.

This Frozen Orange Creamsicle Slush has a way of making you feel like a kid again. Its creamy, dreamy consistency is a delightful balance of bright orange and soft vanilla, inviting you to dive right in. The refreshing tang of orange dances on your tongue, while the smooth creaminess envelops you in a comforting embrace. It’s a nostalgic treat that’s perfect for hot summer afternoons or anytime you need a little pick-me-up.

What makes my version of this slush stand out is the addition of a hint of vanilla bean, which elevates the flavor and adds an extra layer of richness. Plus, it’s super easy to whip up with just a few simple ingredients that you probably already have on hand! So, if you’re ready to relive those sun-soaked memories, let me show you exactly how to make it.

Sun-Kissed Frozen Orange Cream Slush

Why You’ll Love This Recipe

  • Each slush is a perfect blend of creamy vanilla and zesty orange, creating a nostalgic flavor reminiscent of summer days.
  • This refreshing treat is ready in under 15 minutes, making it an ideal quick dessert for unexpected guests or hot afternoons.
  • With just 8 simple ingredients, it’s budget-friendly, ensuring you don’t have to break the bank to enjoy a delicious slush.
  • The slush has a perfectly smooth texture, thanks to the combination of ice and ice cream, providing a delightful contrast to the bright citrus flavors.
  • It’s highly customizable; you can easily adjust the sweetness and add fresh herbs for a unique twist that suits your taste.

Ingredients

  • 2 cups orange juice (freshly squeezed or store-bought)
  • 1 cup vanilla ice cream
  • 1 cup crushed ice
  • 1/2 cup milk (whole or 2%)
  • 1/4 cup granulated sugar (adjust based on sweetness preference)
  • 1 teaspoon vanilla extract
  • Zest of 1 orange (for added flavor)
  • Fresh orange slices and mint leaves (for garnish)

The star of this Frozen Orange Creamsicle Slush is the orange juice, which provides the vibrant, citrusy base. Freshly squeezed juice will yield the brightest flavor, but store-bought options can be just as convenient. If you’re opting for store-bought, choose 100% pure juice with no added sugars for the best results. Another essential ingredient is the vanilla ice cream; it adds creaminess and sweetness. You can substitute it with dairy-free ice cream if you’re looking for a vegan option. Whole or 2% milk complements the ice cream, creating a smooth blend. If you want a lower-calorie version, almond or oat milk can be good alternatives.

Lastly, the granulated sugar can be adjusted based on your sweetness preference. If you prefer a more natural sweetener, consider using honey or agave syrup. The orange zest enhances the flavor profile, providing an aromatic pop that brings the whole slush together. Don’t skip it! It adds an extra layer of brightness that makes this slush truly special.

Step-by-Step Instructions

  1. Start by preparing your ingredients. Gather 2 cups of orange juice, 1 cup of vanilla ice cream, and 1 cup of crushed ice. Make sure the ice is finely crushed, as larger chunks can make blending difficult.
  2. In a blender, combine the orange juice, vanilla ice cream, crushed ice, and 1/2 cup of milk. Add 1/4 cup of granulated sugar and 1 teaspoon of vanilla extract. If you like a sweeter slush, consider adding a bit more sugar at this stage.
  3. Add the zest of 1 orange to the blender. This step is crucial for enhancing the citrus flavor of your slush. Make sure not to include the bitter white pith—only the flavorful zest.
  4. Blend the mixture on medium-high speed for about 30-45 seconds. Stop once the ingredients are fully combined and the slush has a smooth, even consistency. If you notice large chunks of ice, blend for an additional 10-15 seconds. Avoid over-blending, as this can make the slush too liquidy.
  5. Once blended, taste the slush. If it needs more sweetness, add a little more sugar and blend for a few more seconds. If it’s too thick, you can add a splash of milk to reach your desired consistency.
  6. Pour the slush into glasses. This recipe typically serves 4, but you can easily double it for larger gatherings. Use a spoon to help guide the slush into the glasses if needed.
  7. Garnish each serving with fresh orange slices and mint leaves. The mint not only adds a pop of color but also a refreshing aroma that complements the citrus flavors beautifully.
  8. Serve immediately and enjoy! If you’ve made extra, you can refrigerate it for a short time, but it’s best enjoyed fresh.

Pro Tips for the Best Frozen Orange Creamsicle Slush

  • Don’t skip the orange zest! It’s a game-changer for flavor. Always zest before juicing to make it easier.
  • Use a high-powered blender for the best texture. A standard blender may struggle with ice, leading to uneven consistency. If you have a food processor, that can work too, but ensure the ice is finely crushed.
  • Adjust the ice-to-liquid ratio carefully. If your slush is too thick, it won’t blend well. Start with less ice and add more until you reach your preferred texture.
  • Be cautious with the sugar! Always start with the lower amount, as you can easily add more, but it’s hard to fix an overly sweet slush.
  • For a fun twist, consider adding a splash of coconut milk or a handful of fresh fruit like strawberries or pineapple. This not only enhances the flavor but also adds a beautiful color contrast.

Variations & Serving Ideas

There are countless ways to put a spin on your Frozen Orange Creamsicle Slush. Consider making a tropical version by adding in some pineapple juice or coconut milk for a delightful tropical twist. If you’re feeling adventurous, try incorporating a handful of frozen mango or peach slices for added sweetness. For a lighter version, swap out the vanilla ice cream for Greek yogurt for a creamy yet tangy alternative.

As for serving ideas, this refreshing slush pairs wonderfully with light summer dishes like grilled chicken skewers, fish tacos, or a simple salad topped with citrus vinaigrette. The bright, zesty flavors of the slush complement these dishes perfectly, making them an ideal pairing for a sunny day.

Storage, Make-Ahead & Reheating

This Frozen Orange Creamsicle Slush is best enjoyed fresh, but if you have leftovers, you can store them in an airtight container in the fridge for up to 2 days. Just keep in mind that the slush may lose some of its texture over time as the ice melts. It doesn’t freeze well, as the ice will turn into a solid block. If you must freeze it, blend again after thawing to restore the slushy consistency. This treat is best the day you make it, as the flavors meld together beautifully overnight, enhancing its deliciousness.

Frequently Asked Questions

Can I make Frozen Orange Creamsicle Slush ahead of time?

Yes — in fact, it tastes even better the next day as the flavors meld. However, it’s best to enjoy it fresh, as the texture can change if stored for too long. If you need to prepare it ahead, keep it in the fridge and re-blend before serving.

What kind of orange juice should I use?

For the best flavor, use freshly squeezed orange juice. However, if you’re short on time, opt for 100% pure store-bought juice without added sugars. This will ensure that your slush remains flavorful and refreshing.

Can I substitute the vanilla ice cream?

Absolutely! If you’re looking for a dairy-free option, coconut milk ice cream or a non-dairy vanilla ice cream can work wonderfully. They will still provide the creamy texture and sweetness you desire.

How can I adjust the sweetness of my slush?

You can easily adjust the sweetness by modifying the amount of sugar added. Start with 1/4 cup and taste the mixture before blending. If you prefer it sweeter, add more sugar gradually until it reaches your desired level.

What should I do if my slush is too thick?

If your slush is too thick, simply add a splash of milk or orange juice and blend again. This will help achieve a more drinkable consistency while maintaining the slushy texture. Adjust gradually to reach your preferred thickness.

Sun-Kissed Frozen Orange Cream Slush

Final Thoughts

The Frozen Orange Creamsicle Slush is a delightful blend of refreshing citrus and creamy goodness, making it a perfect treat for warm days or any time you crave a taste of nostalgia. The way the bright orange flavor dances with the creamy texture truly elevates this slush, transforming it into a satisfying escape from the everyday.

This is the kind of recipe I come back to again and again, especially when I’m looking to cool down or impress guests at a summer gathering. It’s simple to make and always brings smiles all around! I encourage you to try this recipe for yourself—don’t hesitate to share your results or even put your own spin on it. Happy slushing!

Print
clock clock iconcutlery cutlery iconflag flag iconfolder folder iconinstagram instagram iconpinterest pinterest iconfacebook facebook iconprint print iconsquares squares iconheart heart iconheart solid heart solid icon

Frozen Orange Creamsicle Slush


  • Author: Lily author
  • Total Time: 15 minutes
  • Yield: 4 servings 1x
Pin Recipe
Print Recipe

Description

This Frozen Orange Creamsicle Slush is a refreshing treat that combines creamy vanilla and zesty orange flavors. Perfect for hot summer days, it brings back nostalgic memories with every sip.


Ingredients

Scale
  • 2 cups orange juice (freshly squeezed or store-bought)
  • 1 cup vanilla ice cream
  • 1 cup crushed ice
  • 1/2 cup milk (whole or 2%)
  • 1/4 cup granulated sugar (adjust based on sweetness preference)
  • 1 teaspoon vanilla extract
  • Zest of 1 orange (for added flavor)
  • Fresh orange slices and mint leaves (for garnish)

Instructions

  1. Start by preparing your ingredients. Gather 2 cups of orange juice, 1 cup of vanilla ice cream, and 1 cup of crushed ice. Make sure the ice is finely crushed, as larger chunks can make blending difficult.
  2. In a blender, combine the orange juice, vanilla ice cream, crushed ice, and 1/2 cup of milk. Add 1/4 cup of granulated sugar and 1 teaspoon of vanilla extract. If you like a sweeter slush, consider adding a bit more sugar at this stage.
  3. Add the zest of 1 orange to the blender. This step is crucial for enhancing the citrus flavor of your slush. Make sure not to include the bitter white pith—only the flavorful zest.
  4. Blend the mixture on medium-high speed for about 30-45 seconds. Stop once the ingredients are fully combined and the slush has a smooth, even consistency. If you notice large chunks of ice, blend for an additional 10-15 seconds. Avoid over-blending, as this can make the slush too liquidy.
  5. Once blended, taste the slush. If it needs more sweetness, add a little more sugar and blend for a few more seconds. If it’s too thick, you can add a splash of milk to reach your desired consistency.
  6. Pour the slush into glasses. This recipe typically serves 4, but you can easily double it for larger gatherings. Use a spoon to help guide the slush into the glasses if needed.
  7. Garnish each serving with fresh orange slices and mint leaves. The mint not only adds a pop of color but also a refreshing aroma that complements the citrus flavors beautifully.
  8. Serve immediately and enjoy! If you’ve made extra, you can refrigerate it for a short time, but it's best enjoyed fresh.
  • Prep Time: 15 min
  • Cook Time: 0 min
  • Category: Dessert
  • Method: Blending
  • Cuisine: American

Nutrition

  • Serving Size: 1 serving
  • Calories: 200
  • Sugar: 30 g
  • Sodium: 50 mg
  • Fat: 5 g
  • Saturated Fat: 3 g
  • Unsaturated Fat: 2 g
  • Trans Fat: 0 g
  • Carbohydrates: 40 g
  • Fiber: 1 g
  • Protein: 2 g
  • Cholesterol: 20 mg

Keywords: Don't skip the orange zest! It's a game-changer for flavor. Always zest before juicing to make it easier.

Did you make this recipe?

Share a photo and tag us — we can't wait to see what you've made!

Zesty Lemon Poppy Seed Delight

One rainy afternoon, I found myself in my grandmother’s cozy kitchen, the kind that always smelled like warmth and love. She was whipping up her famous Lemon Poppy Seed Loaf, a recipe that had been passed down through generations. As the batter came together, the zesty aroma of fresh lemons filled the air, mingling perfectly with the nutty fragrance of poppy seeds. I can still picture her, apron-clad, as she expertly drizzled a vibrant citrus icing over the loaf, creating a glossy, sun-kissed finish that beckoned us to dive in. It was a moment that sparked my own passion for baking, and this recipe has become a cherished staple in my home ever since.

When you take a bite of this Lemon Poppy Seed Loaf, it’s like a burst of sunshine on your palate. The loaf is beautifully golden, with a tender crumb that melts in your mouth. Each slice is speckled with tiny poppy seeds, adding a delightful crunch that contrasts beautifully with the tangy sweetness of the lemon. And that citrus icing? It’s the finishing touch that elevates this loaf from ordinary to extraordinary, with its bright, zesty flavor dancing on your taste buds.

This recipe stands out because it embraces simplicity while delivering on flavor. I’ve added a hint of vanilla to the batter, enhancing the overall taste and making it even more indulgent. Trust me, once you make this Lemon Poppy Seed Loaf With Citrus Icing, it’ll become a go-to in your baking repertoire.

So, let me show you exactly how to make it!

Zesty Lemon Poppy Seed Delight

Why You’ll Love This Recipe

  • Moist and tender crumb that melts in your mouth, thanks to the perfect balance of butter and buttermilk.
  • Bright, zesty lemon flavor paired with crunchy poppy seeds, creating a delightful texture and taste experience.
  • Easy to whip up in just about an hour, perfect for last-minute gatherings or a cozy afternoon treat.
  • Budget-friendly with everyday ingredients, making it an accessible option for all home bakers.
  • The citrus icing adds a sweet tang that elevates the loaf, turning a simple recipe into a showstopper!

Ingredients

  • 1 ½ cups (190g) all-purpose flour
  • 1 teaspoon baking powder
  • ½ teaspoon baking soda
  • ½ teaspoon salt
  • 3 tablespoons poppy seeds
  • ½ cup (115g) unsalted butter, softened to room temperature
  • 1 cup (200g) granulated sugar
  • 2 large eggs
  • 1 teaspoon vanilla extract
  • 1 teaspoon lemon zest (from about 1 medium lemon)
  • ½ cup (120ml) buttermilk
  • 2 tablespoons fresh lemon juice

For the Citrus Icing:

  • 1 cup (120g) powdered sugar
  • 2 tablespoons fresh lemon juice
  • 1 tablespoon orange juice
  • 1 teaspoon lemon zest (for garnish, optional)

Let’s dive into the key ingredients that make this Lemon Poppy Seed Loaf so special. The all-purpose flour provides the structure and base for the loaf, while the baking powder and baking soda ensure it rises perfectly, giving the loaf a light texture. For a gluten-free variation, you could substitute the flour with a gluten-free all-purpose blend. Poppy seeds not only add a delightful crunch but also contribute to the unique flavor profile that pairs well with the citrus notes.

Unsalted butter is crucial for achieving the buttery richness that makes this loaf so moist. If you’re looking for a dairy-free option, coconut oil or a vegan butter can be used instead. The buttermilk is another essential component, providing acidity that activates the baking soda for a fluffy texture. If you don’t have buttermilk on hand, you can easily make a substitute by mixing ½ cup of milk with 1 tablespoon of vinegar or lemon juice and letting it sit for about 5 minutes.

Step-by-Step Instructions

  1. Preheat your oven to 350°F (175°C). Grease a 9×5-inch loaf pan or line it with parchment paper for easy removal later.
  2. In a medium mixing bowl, whisk together 1 ½ cups of all-purpose flour, 1 teaspoon of baking powder, ½ teaspoon of baking soda, ½ teaspoon of salt, and 3 tablespoons of poppy seeds. This helps to evenly distribute the baking agents and ensures a uniform rise.
  3. In a large mixing bowl, cream together ½ cup of softened unsalted butter and 1 cup of granulated sugar using an electric mixer on medium speed for about 3-4 minutes, until the mixture is light and fluffy. Make sure to scrape down the sides of the bowl occasionally.
  4. Add 2 large eggs, 1 teaspoon of vanilla extract, and 1 teaspoon of lemon zest to the creamed butter and sugar, mixing until fully combined. You want a smooth consistency, so ensure there are no lumps of butter.
  5. In a small bowl, combine ½ cup of buttermilk and 2 tablespoons of fresh lemon juice. Alternately add the dry ingredients and buttermilk mixture to the butter mixture, starting and ending with the dry ingredients. Mix just until combined; do not overmix, as this can lead to a dense loaf.
  6. Pour the batter into the prepared loaf pan. Smooth the top with a spatula, ensuring it’s even. Bake in the preheated oven for 50-60 minutes, or until a toothpick inserted in the center comes out clean. The edges should be lightly golden brown, and the center should feel just set.
  7. Once baked, remove the loaf from the oven and allow it to cool in the pan for about 10 minutes. Then, transfer it to a wire rack to cool completely. Resist the urge to slice too soon, as it will be crumbly if it’s still warm.
  8. While the loaf is cooling, prepare the citrus icing. In a medium bowl, whisk together 1 cup of powdered sugar, 2 tablespoons of fresh lemon juice, and 1 tablespoon of orange juice until smooth. If the icing is too thick, you can add a little more juice to reach your desired consistency.
  9. Once the loaf is completely cool, drizzle the citrus icing over the top. If you like, sprinkle with an additional teaspoon of lemon zest for an extra pop of flavor and color.

Pro Tips for the Best Lemon Poppy Seed Loaf With Citrus Icing

  • Be careful not to overmix your batter; this is a common mistake that can lead to a dense loaf. Mix just until the dry ingredients are incorporated for a light and fluffy texture.
  • Use room temperature ingredients, especially the butter and eggs. This helps to create a smoother batter and ensures even baking. Take your eggs out of the fridge about 30 minutes before you start.
  • For a more pronounced lemon flavor, consider adding a little lemon extract in addition to the zest and juice. Just a half teaspoon can elevate the citrus notes significantly.
  • When measuring your flour, spoon it into the measuring cup and level it off with a knife instead of scooping directly from the bag. This prevents packing and ensures you don’t end up with a dry loaf.
  • Invest in a good quality loaf pan; it makes a difference in heat distribution, which ensures even baking. If your pan is dark-coated, reduce the oven temperature by 25°F to prevent over-browning.

Variations & Serving Ideas

For a delightful twist, consider adding blueberries or raspberries to the batter for a fruity burst of flavor. You can also experiment with different citrus fruits—try lime or grapefruit zest and juice for a refreshing change. For a healthier option, substitute half of the all-purpose flour with whole wheat flour for added fiber without compromising too much on texture.

This Lemon Poppy Seed Loaf pairs beautifully with a light salad, such as a mixed greens salad with a vinaigrette, or a cup of tea for a cozy afternoon treat. It also complements a creamy cheese platter, as the acidity of the loaf balances rich cheeses perfectly. Lastly, a scoop of vanilla ice cream on the side creates a delightful contrast of temperatures and flavors!

Storage, Make-Ahead & Reheating

This Lemon Poppy Seed Loaf can be stored at room temperature for up to 3 days if wrapped tightly in plastic wrap. If you want to keep it longer, it freezes well for up to 3 months. To freeze, wrap the loaf tightly in plastic wrap and then in aluminum foil to prevent freezer burn.

When you’re ready to enjoy it again, simply thaw it in the fridge overnight. Reheat individual slices in the microwave for 15-20 seconds or in a toaster oven until warmed through. Interestingly, many people find that this loaf tastes even better the next day, as the flavors have time to meld!

Frequently Asked Questions

Can I make Lemon Poppy Seed Loaf With Citrus Icing ahead of time?

Yes — in fact, it tastes even better the next day! You can make the loaf a day in advance, allowing the flavors to develop. Just be sure to store it in an airtight container to maintain its moisture.

Can I substitute the poppy seeds?

Absolutely! If you don’t have poppy seeds on hand or prefer an alternative, you can use sesame seeds for a similar crunch or omit them entirely for a smooth loaf.

What can I use instead of buttermilk?

If you don’t have buttermilk, you can easily create a substitute by mixing ½ cup of milk (dairy or plant-based) with 1 tablespoon of vinegar or lemon juice. Let it sit for 5 minutes before using in the recipe.

How can I make this recipe gluten-free?

To make a gluten-free version of this Lemon Poppy Seed Loaf, substitute the all-purpose flour with a gluten-free all-purpose flour blend. Just ensure that the blend contains a binding agent like xanthan gum for the best results.

What is the best way to store leftover loaf?

Leftover Lemon Poppy Seed Loaf should be stored in an airtight container at room temperature for up to 3 days. For longer storage, wrap it tightly and freeze for up to 3 months. Thaw it before serving for the best texture.

Zesty Lemon Poppy Seed Delight

Final Thoughts

The Lemon Poppy Seed Loaf with Citrus Icing is truly a delightful treat that brings a burst of brightness to any occasion. The zesty lemon flavor combined with the subtle crunch of poppy seeds creates a satisfying balance, while the citrus icing adds a touch of sweetness that perfectly complements the loaf’s tanginess.

This is the kind of recipe I come back to again and again, especially when I want to brighten up a gloomy day or celebrate a small victory. The aroma that fills the kitchen as it bakes is absolutely heavenly! I encourage you to give this recipe a try; you might just find it becoming a beloved staple in your home. Don’t forget to share your results or even add your own unique twist—I can’t wait to see what you create!

Print
clock clock iconcutlery cutlery iconflag flag iconfolder folder iconinstagram instagram iconpinterest pinterest iconfacebook facebook iconprint print iconsquares squares iconheart heart iconheart solid heart solid icon

Lemon Poppy Seed Loaf


  • Author: Lily author
  • Total Time: 22 minute
  • Yield: 1 loaf 1x
Pin Recipe
Print Recipe

Description

This Lemon Poppy Seed Loaf is a delightful treat that combines zesty lemon flavor with crunchy poppy seeds. Topped with a citrus icing, it’s perfect for any occasion.


Ingredients

Scale
  • 1 ½ cups (190g) all-purpose flour
  • 1 teaspoon baking powder
  • ½ teaspoon baking soda
  • ½ teaspoon salt
  • 3 tablespoons poppy seeds
  • ½ cup (115g) unsalted butter, softened to room temperature
  • 1 cup (200g) granulated sugar
  • 2 large eggs
  • 1 teaspoon vanilla extract
  • 1 teaspoon lemon zest (from about 1 medium lemon)
  • ½ cup (120ml) buttermilk
  • 2 tablespoons fresh lemon juice
  • 1 cup (120g) powdered sugar
  • 2 tablespoons fresh lemon juice
  • 1 tablespoon orange juice
  • 1 teaspoon lemon zest (for garnish, optional)

Instructions

  1. Preheat your oven to 350°F (175°C). Grease a 9×5-inch loaf pan or line it with parchment paper for easy removal later.
  2. In a medium mixing bowl, whisk together 1 ½ cups of all-purpose flour, 1 teaspoon of baking powder, ½ teaspoon of baking soda, ½ teaspoon of salt, and 3 tablespoons of poppy seeds. This helps to evenly distribute the baking agents and ensures a uniform rise.
  3. In a large mixing bowl, cream together ½ cup of softened unsalted butter and 1 cup of granulated sugar using an electric mixer on medium speed for about 3-4 minutes, until the mixture is light and fluffy. Make sure to scrape down the sides of the bowl occasionally.
  4. Add 2 large eggs, 1 teaspoon of vanilla extract, and 1 teaspoon of lemon zest to the creamed butter and sugar, mixing until fully combined. You want a smooth consistency, so ensure there are no lumps of butter.
  5. In a small bowl, combine ½ cup of buttermilk and 2 tablespoons of fresh lemon juice. Alternately add the dry ingredients and buttermilk mixture to the butter mixture, starting and ending with the dry ingredients. Mix just until combined; do not overmix, as this can lead to a dense loaf.
  6. Pour the batter into the prepared loaf pan. Smooth the top with a spatula, ensuring it’s even. Bake in the preheated oven for 50-60 minutes, or until a toothpick inserted in the center comes out clean. The edges should be lightly golden brown, and the center should feel just set.
  7. Once baked, remove the loaf from the oven and allow it to cool in the pan for about 10 minutes. Then, transfer it to a wire rack to cool completely. Resist the urge to slice too soon, as it will be crumbly if it’s still warm.
  8. While the loaf is cooling, prepare the citrus icing. In a medium bowl, whisk together 1 cup of powdered sugar, 2 tablespoons of fresh lemon juice, and 1 tablespoon of orange juice until smooth. If the icing is too thick, you can add a little more juice to reach your desired consistency.
  9. Once the loaf is completely cool, drizzle the citrus icing over the top. If you like, sprinkle with an additional teaspoon of lemon zest for an extra pop of flavor and color.
  • Prep Time: 15 mins
  • Cook Time: 50-60 mins
  • Category: Dessert
  • Method: Baking
  • Cuisine: American

Nutrition

  • Serving Size: 1 slice
  • Calories: 200
  • Sugar: 15 g
  • Sodium: 150 mg
  • Fat: 8 g
  • Saturated Fat: 5 g
  • Unsaturated Fat: 3 g
  • Trans Fat: 0 g
  • Carbohydrates: 30 g
  • Fiber: 1 g
  • Protein: 3 g
  • Cholesterol: 40 mg

Keywords: Be careful not to overmix your batter; this is a common mistake that can lead to a dense loaf. Use room temperature ingredients for a smoother batter and even baking.

Did you make this recipe?

Share a photo and tag us — we can't wait to see what you've made!

  • Privacy Policy
  • Terms Of Service
  • Contact
  • About
  • GDPR

Copyright © 2025 Homesmad