• Skip to primary navigation
  • Skip to main content
  • Skip to primary sidebar
Homesmad

Homesmad

  • Home
  • Breakfast & Brunch
  • Appetizers & Snacks
  • Dinner
  • Dessert
  • About
  • Privacy Policy
  • Contact
Homesmad
  • Home
  • Breakfast & Brunch
  • Appetizers & Snacks
  • Dinner
  • Dessert
  • About
  • Privacy Policy
  • Contact

Simple & Delicious Homemade Butter Chicken Recipe in Minutes

October 2, 2025 by Lily author

Quick Easy Homemade Butter Chicken Recipe is often perceived as a dish reserved for special occasions or the skilled hands of restaurant chefs. However, I’m absolutely thrilled to share with you a culinary revelation that will change your perception: achieving that iconic, rich, and utterly delicious Butter Chicken in your own kitchen is not only possible but surprisingly simple and fast! Say goodbye to complicated steps and hello to a weeknight wonder that tastes like it came from your favorite Indian eatery.

This beloved Indian delicacy, known in its native tongue as Murgh Makhani, traces its delectable roots back to 1950s Delhi, born out of culinary ingenuity. It quickly captured hearts worldwide with its unparalleled creamy tomato gravy, infused with aromatic spices and tender chicken. What makes this dish so universally adored? It’s that perfect harmony of sweet, tangy, and savory notes, the velvety texture of the sauce, and the succulent, perfectly marinated chicken that truly makes it a comfort food masterpiece. My goal today is to demystify this classic, offering you a Quick Easy Homemade Butter Chicken Recipe that delivers authentic flavors without the lengthy fuss. Prepare to impress yourself and your loved ones with this culinary triumph that’s both accessible and incredibly rewarding.

Simple & Delicious Homemade Butter Chicken Recipe in Minutes this RECIPE

Ingredients:

  • For the Chicken Marination:

    • 600-700 grams boneless, skinless chicken thighs or breasts, cut into 1-inch pieces
    • 1/2 cup plain yogurt (full-fat works best for creaminess)
    • 1 tablespoon ginger-garlic paste (freshly made is always superior!)
    • 1/2 teaspoon turmeric powder
    • 1 teaspoon red chili powder (or Kashmiri red chili powder for vibrant color without too much heat)
    • 1 teaspoon garam masala
    • 1/2 teaspoon salt, or to taste
    • 1 tablespoon fresh lemon juice
  • For the Rich Tomato Gravy:

    • 2 tablespoons ghee or unsalted butter (or a combination of both for best flavor)
    • 1 large onion, finely chopped
    • 1 tablespoon ginger-garlic paste
    • 1 teaspoon cumin powder
    • 1 teaspoon coriander powder
    • 1/2 teaspoon turmeric powder
    • 1 teaspoon red chili powder (adjust to your spice preference)
    • 1/2 teaspoon garam masala
    • 1/2 cup raw cashews, soaked in warm water for at least 15 minutes (this is key for a smooth, rich texture!)
    • 1 (28-ounce) can crushed tomatoes or 4-5 large ripe tomatoes, puréed
    • 1/2 cup water or chicken broth, as needed
    • 1 tablespoon sugar (balances the acidity of the tomatoes)
    • 1/2 teaspoon salt, or to taste
  • For Finishing and Garnish:

    • 1/4 cup heavy cream (or more, if you like it extra decadent)
    • 1 tablespoon unsalted butter
    • 1 teaspoon dried fenugreek leaves (Kasuri Methi), gently crushed between your palms (a secret ingredient for authentic flavor!)
    • Fresh cilantro, chopped, for garnish

Phase 1: Marinating the Chicken for Maximum Flavor

  1. Prepare the Chicken: First things first, let’s get our chicken ready. Take your boneless, skinless chicken thighs or breasts and cut them into uniform 1-inch pieces. This ensures even cooking. Give them a quick rinse and then pat them thoroughly dry with paper towels. Removing excess moisture is important for the marinade to adhere well and for the chicken to brown nicely later.
  2. Combine Marinade Ingredients: In a large mixing bowl, we’re going to create our flavorful marinade. Add the plain yogurt, 1 tablespoon of ginger-garlic paste, 1/2 teaspoon of turmeric powder, 1 teaspoon of red chili powder (Kashmiri red chili powder is fantastic here for color without overwhelming heat), 1 teaspoon of garam masala, 1/2 teaspoon of salt, and 1 tablespoon of fresh lemon juice. Give all these ingredients a good stir until they are well combined into a thick, aromatic paste. The lemon juice helps to tenderize the chicken and brightens the flavors.
  3. Marinate the Chicken: Now, add your prepared chicken pieces to the bowl with the marinade. Using your hands (gloves are recommended!), gently massage the marinade into every piece of chicken, ensuring each piece is thoroughly coated. This step is crucial for infusing the chicken with deep flavor.
  4. Chill and Rest: Cover the bowl with plastic wrap and place it in the refrigerator. Let the chicken marinate for at least 30 minutes. However, for the absolute best results and a truly tender, flavorful “Quick Easy Homemade Butter Chicken Recipe,” I highly recommend marinating for at least 2-4 hours, or even overnight if you have the time. The longer it marinates, the more flavor it absorbs, making your dish incredibly delicious.

Phase 2: Building the Rich and Creamy Gravy Base

  1. Soak the Cashews: While your chicken is marinating, let’s get started on the heart of our Butter Chicken – the gravy! Place the 1/2 cup of raw cashews in a small bowl and cover them with warm water. Let them soak for at least 15-20 minutes. This step is a game-changer; it helps the cashews blend into a super smooth paste, contributing significantly to the luxurious, creamy texture of our gravy.
  2. Sauté the Aromatics: In a large, heavy-bottomed pot or Dutch oven, melt 2 tablespoons of ghee or unsalted butter over medium heat. Once shimmering, add the finely chopped onion. Cook, stirring occasionally, until the onion turns soft, translucent, and lightly golden brown. This usually takes about 8-10 minutes. Patience here pays off – properly caramelized onions lay a fantastic flavor foundation.
  3. Add Ginger-Garlic Paste and Spices: Stir in 1 tablespoon of fresh ginger-garlic paste and cook for another minute until fragrant, being careful not to let it burn. Next, it’s time for our dry spices: add 1 teaspoon of cumin powder, 1 teaspoon of coriander powder, 1/2 teaspoon of turmeric powder, 1 teaspoon of red chili powder, and 1/2 teaspoon of garam masala. Stir continuously for about 30-60 seconds. The spices will “bloom” in the hot fat, releasing their incredible aromas. Be mindful not to overcook them, or they can become bitter.
  4. Introduce the Tomatoes: Pour in the 1 (28-ounce) can of crushed tomatoes (or your homemade tomato purée). Stir well to combine all the ingredients. Add 1 tablespoon of sugar and 1/2 teaspoon of salt. The sugar is crucial here to balance the acidity of the tomatoes and round out the flavors beautifully. Bring the mixture to a gentle simmer, then reduce the heat to low, cover the pot, and let it cook for about 15-20 minutes. Stir occasionally to prevent sticking. You’ll know it’s ready when the tomatoes have deepened in color and the oil starts to separate on top.
  5. Blend for Ultimate Smoothness: Drain the soaked cashews and add them to a high-speed blender along with the cooked tomato mixture from the pot. If needed, add about 1/4 cup of water or chicken broth to help with blending. Blend until the mixture is incredibly smooth and creamy, without any discernible cashew pieces or onion bits. This might take a few minutes, so be patient and scrape down the sides of the blender as needed. This step is paramount for achieving that signature, silky-smooth restaurant-quality butter chicken gravy.
  6. Strain (Optional but Recommended): For an absolutely luxurious, velvety gravy, I highly recommend passing the blended mixture through a fine-mesh sieve back into the clean pot. Use the back of a spoon or a spatula to press the purée through, leaving behind any fibrous bits of onion, tomato skins, or unblended cashews. This extra step truly elevates the texture of your “Quick Easy Homemade Butter Chicken Recipe” to professional levels. If you prefer a slightly more rustic texture, you can skip this, but I promise the straining is worth it!

Phase 3: Cooking the Chicken and Uniting with the Gravy

  1. Cook the Marinated Chicken: Now it’s time to cook our flavorful chicken! You have a couple of options here.

    • Option A (Pan-frying for a slight char): In a large skillet or non-stick pan, heat 1 tablespoon of oil or ghee over medium-high heat. Once hot, add the marinated chicken pieces in a single layer, making sure not to overcrowd the pan. You might need to do this in batches. Cook for 3-4 minutes per side, until the chicken is nicely browned and slightly charred at the edges. It doesn’t need to be cooked through at this stage, as it will finish cooking in the gravy. Remove the cooked chicken pieces and set them aside.
    • Option B (Baking for less fuss): Preheat your oven to 400°F (200°C). Arrange the marinated chicken pieces in a single layer on a baking sheet lined with parchment paper. Bake for 15-20 minutes, or until the chicken is cooked through and has a light char. This is a very easy method and yields great results.

    The browning step adds depth of flavor and texture to the chicken, which is a key component of an amazing Butter Chicken.

  2. Combine Chicken and Gravy: Return the smooth, strained gravy to the pot (or if you didn’t strain, use the same pot you cooked the gravy in). Bring it to a gentle simmer over medium-low heat. Add the cooked chicken pieces to the simmering gravy. Stir gently to ensure all the chicken is coated.
  3. Simmer and Let Flavors Mingle: Cover the pot and let the “Quick Easy Homemade Butter Chicken Recipe” simmer on low heat for another 10-15 minutes. This allows the chicken to finish cooking through, absorb the wonderful flavors of the gravy, and for all the spices to meld together beautifully. Stir occasionally to prevent anything from sticking to the bottom of the pot.
  4. Enrich with Cream and Butter: After the simmering, remove the pot from the heat. Stir in 1/4 cup of heavy cream and 1 tablespoon of unsalted butter. The cream adds that quintessential richness and silken texture, while the extra butter gives it that luscious, indulgent finish that Butter Chicken is famous for. If you like your Butter Chicken extra creamy, feel free to add a little more heavy cream.
  5. The Secret Ingredient – Kasuri Methi: This is a non-negotiable step for authentic Butter Chicken flavor! Take 1 teaspoon of dried fenugreek leaves (Kasuri Methi) and crush them gently between your palms before adding them to the gravy. This action releases their unique, slightly bitter, and aromatic flavor, which is absolutely essential for the classic taste of this dish. Stir it in well.
  6. Final Adjustments: Give your “Quick Easy Homemade Butter Chicken Recipe” a taste test. This is your chance to adjust the seasoning. You might want to add a pinch more salt, a tiny bit more sugar if the tomatoes are still too tart, or a touch more red chili powder if you prefer more heat. Remember, a perfectly balanced Butter Chicken has a harmonious blend of sweet, tangy, and savory notes with a mild warmth.

Phase 4: Garnish and Serve Your Homemade Masterpiece

  1. Garnish: Just before serving, sprinkle a generous amount of freshly chopped cilantro over the top. The fresh, bright flavor of cilantro is a wonderful contrast to the rich gravy.
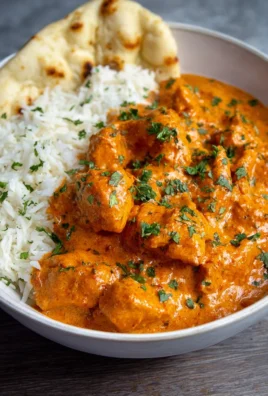
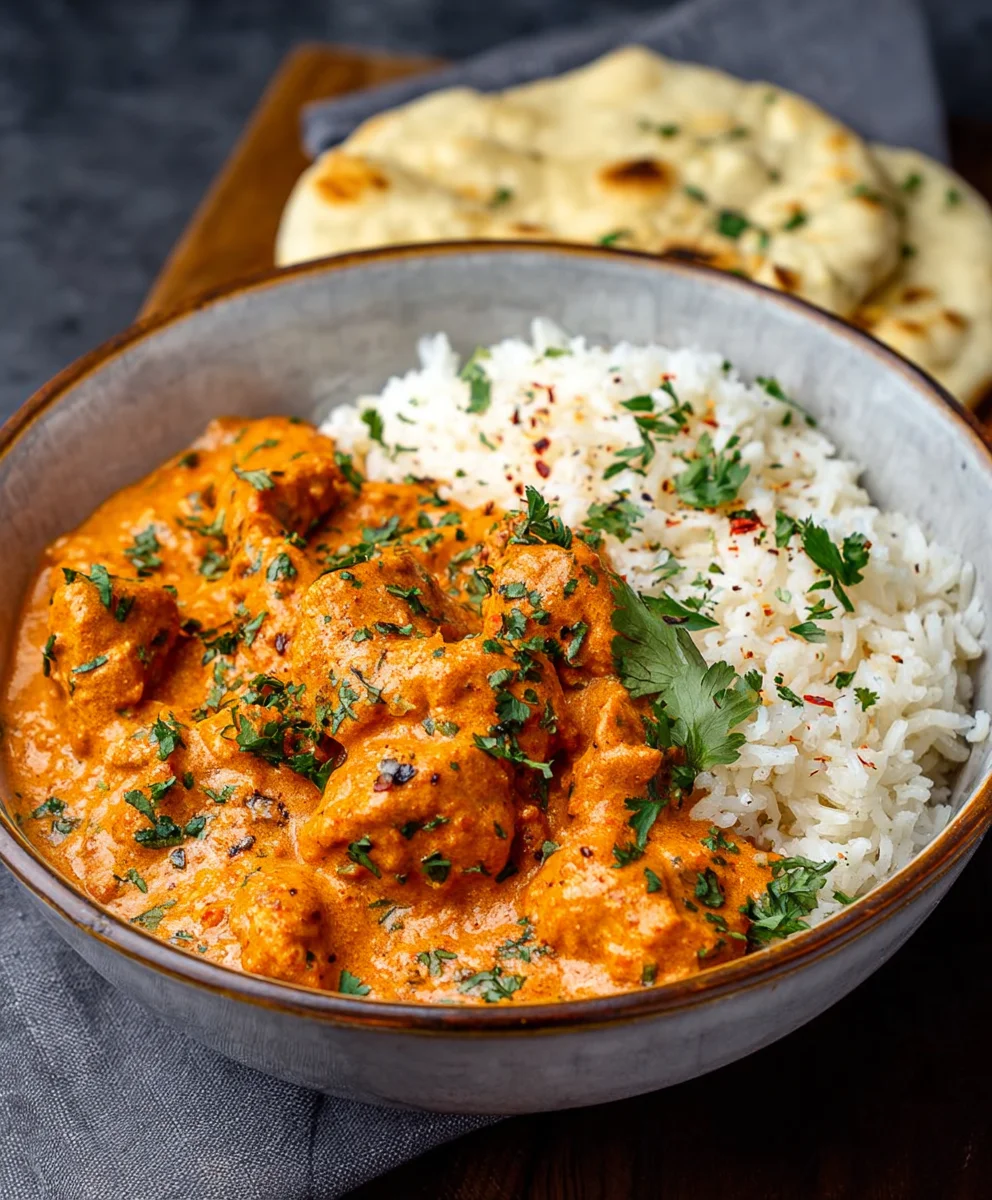
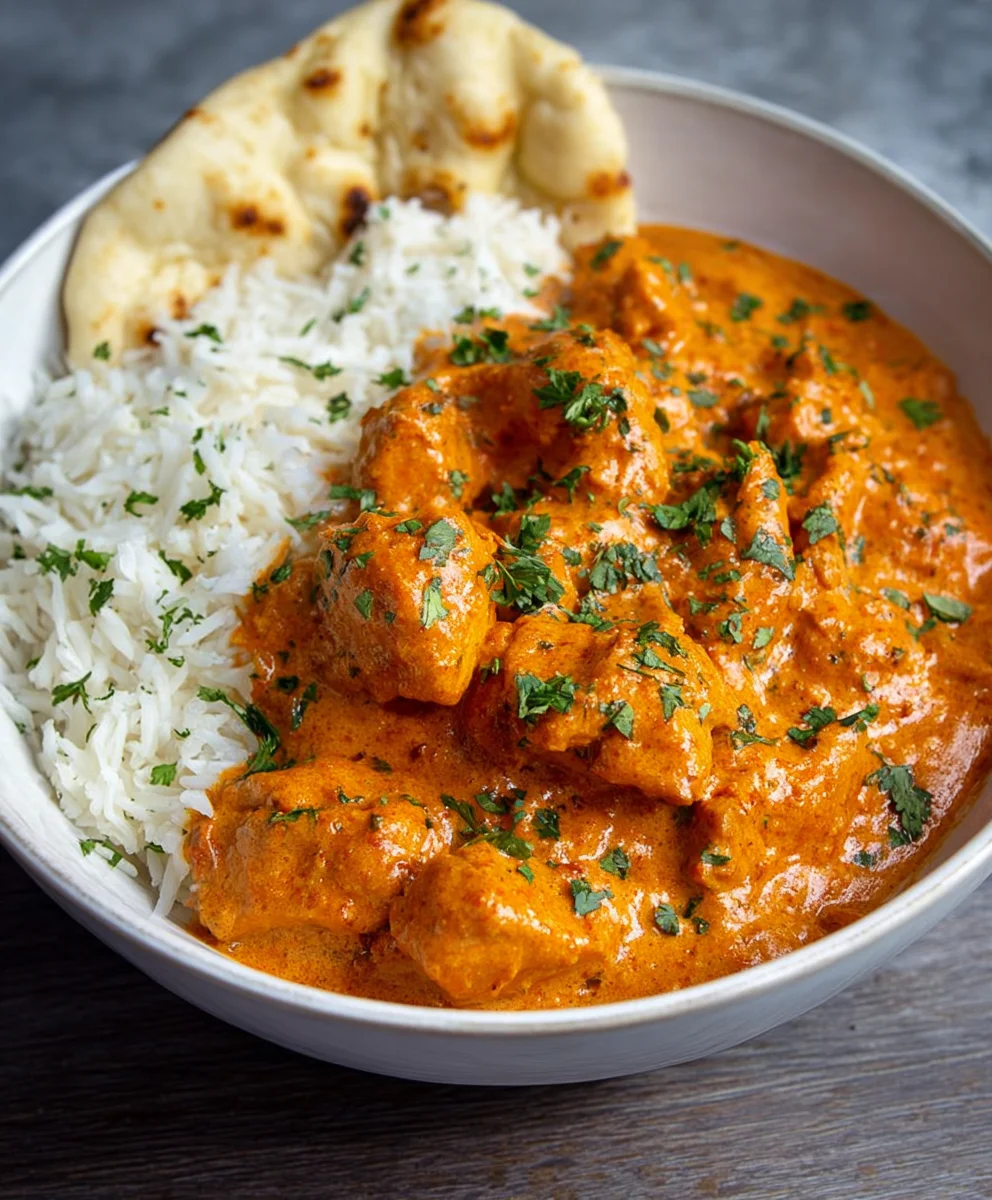
  2. Serve Immediately: Your “Quick Easy Homemade Butter Chicken Recipe” is now ready to be enjoyed! Serve it piping hot with your favorite accompaniments. It pairs wonderfully with fluffy basmati rice, warm garlic naan, butter naan, or plain roti. I particularly love scooping up the creamy gravy with a piece of fresh naan. The vibrant colors and intoxicating aromas are simply irresistible.
  3. Enjoy the Fruits of Your Labor: Take a moment to appreciate the incredible aroma filling your kitchen. You’ve just created a truly exceptional, restaurant-quality Butter Chicken right in your own home. This detailed recipe ensures that every step is covered, resulting in a dish that’s rich, creamy, flavorful, and ultimately incredibly satisfying. Enjoy every single bite of this homemade delight!

Simple & Delicious Homemade Butter Chicken Recipe in Minutes

Conclusion:

If there’s one dish I can wholeheartedly recommend for both its incredible flavor and surprising simplicity, it’s this glorious Butter Chicken. You’ve now been guided through the steps to create a truly authentic-tasting meal right in your own kitchen, one that rivals any restaurant rendition you’ve ever savored. The rich, velvety texture of the sauce, infused with aromatic spices and the subtle tang of tomatoes, beautifully coats the tender, succulent pieces of chicken, creating a symphony of flavors that is utterly irresistible. It’s more than just a meal; it’s an experience, a journey for your taste buds that proves extraordinary culinary delights don’t require hours of complex preparation. I promise you, the joy of smelling those incredible spices wafting through your home as this dish simmers, followed by the first bite, is an unparalleled satisfaction. This recipe truly transforms a seemingly exotic dish into an approachable, delightful cooking adventure, making it a definite must-try for both seasoned chefs and enthusiastic beginners alike. Forget those pre-made jars; once you taste the fresh, vibrant flavors of this homemade version, there’s simply no going back. It’s comfort food at its finest, a heartwarming bowl that promises to become a firm family favorite and a go-to for entertaining guests, leaving them utterly impressed by your culinary prowess.

When it comes to serving this magnificent Butter Chicken, the possibilities are wonderfully diverse, allowing you to tailor the experience to your preference. Traditionally, it’s a match made in heaven with a generous portion of fluffy Basmati rice, which perfectly soaks up every last drop of that incredible sauce. But don’t stop there! Warm, pillowy naan bread, especially garlic naan, is an absolute essential for scooping up the creamy goodness and provides a delightful textural contrast. Alternatively, a simple roti or even plain chapati can work beautifully. For a complete meal, consider adding a cooling side of raita – a yogurt-based dip with cucumber and mint – which offers a refreshing counterpoint to the richness of the curry. A fresh, crisp green salad tossed with a light vinaigrette also provides a lovely balance. If you’re feeling adventurous with variations, you can easily adjust the spice level by adding a finely chopped green chili or a pinch more cayenne pepper for an extra kick. For those who prefer a less creamy consistency, a little more tomato puree and less heavy cream can be used. Vegetarians need not feel left out; this sauce base is incredibly versatile! Simply swap the chicken for pan-fried paneer cubes, chickpeas, or even a mix of roasted vegetables like cauliflower and bell peppers, transforming it into a delicious Paneer Butter Masala or Vegetable Butter Masala. Garnish liberally with fresh cilantro and a swirl of extra cream or a sprinkle of toasted cashews for an elegant finish.

So, there you have it! My sincerest encouragement for you to embark on this delightful cooking journey. Don’t be intimidated by the list of ingredients; once you start, you’ll find the process remarkably straightforward and incredibly rewarding. This Quick Easy Homemade Butter Chicken Recipe is designed to empower you to create a restaurant-quality meal without the fuss, bringing the authentic taste of India right to your dinner table. The sense of accomplishment you’ll feel, coupled with the sheer enjoyment of eating something so incredibly delicious that you’ve made yourself, is truly priceless. I genuinely hope you’ll give this recipe a try very soon. And once you do, I would absolutely love to hear about your experience! Please consider sharing your thoughts, your successes, any adaptations you made, or even photos of your glorious culinary creation. Your feedback and stories inspire me and others in our cooking community. Happy cooking, and prepare to be amazed by the magic you create in your own kitchen!


Quick Easy Homemade Butter Chicken Recipe

Quick Easy Homemade Butter Chicken Recipe

Achieve rich, creamy, and authentic Butter Chicken in your kitchen surprisingly fast. This recipe demystifies the classic Murgh Makhani, offering tender chicken in a velvety tomato gravy with aromatic spices, perfect for a weeknight meal.

Prep Time
30 Minutes

Cook Time
50 Minutes

Total Time
20 Minutes

Servings
4-6 servings

Ingredients

  • 1 ½ pounds skinless boneless chicken thighs, cut into bite-sized chunks
  • 1 teaspoon salt
  • 1 teaspoon garlic powder
  • 1 teaspoon sweet paprika
  • ½ teaspoon curry powder
  • 1 tablespoon Greek yogurt
  • 3 tablespoons vegetable oil
  • 3 tablespoons butter, divided
  • 6 garlic cloves, minced
  • 1 medium onion, diced
  • 1 15-ounce can tomato sauce
  • 1 teaspoon sugar
  • 1 teaspoon salt, adjust to taste
  • ½ teaspoon black pepper
  • 2 cups heavy cream

Instructions

  1. Step 1
    In a bowl, combine 1 ½ lbs chicken thighs with 1 tsp salt, 1 tsp garlic powder, 1 tsp sweet paprika, ½ tsp curry powder, and 1 tbsp Greek yogurt. Mix well and marinate for at least 30 minutes.
  2. Step 2
    Heat 1 tbsp vegetable oil in a large skillet over medium-high heat. Cook marinated chicken in batches until browned and slightly charred, about 3-4 minutes per side. Remove chicken and set aside.
  3. Step 3
    In the same skillet, melt 1 tbsp butter. Add diced onion and cook until soft and translucent (approx. 8-10 minutes). Stir in 6 minced garlic cloves and cook for 1 minute until fragrant.
  4. Step 4
    Pour in 1 15-oz can tomato sauce. Add 1 tsp sugar, 1 tsp salt (adjust to taste), and ½ tsp black pepper. Bring to a gentle simmer, then reduce heat, cover, and cook for 15-20 minutes, stirring occasionally.
  5. Step 5
    Add the cooked chicken back to the gravy. Stir in 2 cups heavy cream and the remaining 1 tbsp butter. Simmer uncovered for 10-15 minutes, allowing flavors to meld and chicken to finish cooking.
  6. Step 6
    Serve hot with preferred accompaniments like rice or naan.

Important Information

Nutrition Facts (Per Serving)

It is important to consider this information as approximate and not to use it as definitive health advice.

Allergy Information

Please check ingredients for potential allergens and consult a health professional if in doubt.

« Previous Post
Apple Brownies Recipe: Chewy, Sweet & Easy Dessert!
Next Post »
Delicious Salted Caramel Apple Crumble Bars Fall Treat

If you enjoyed this…

Creamy Chicken Macaroni Cheese Soup: Your New Favorite Recipe

Delicious Honey Baked Beef Ham Recipe for Perfect Meals

Simple & Delicious Homemade Butter Chicken Recipe in Minutes

Primary Sidebar

Browse by Diet

BreakfastDinnerLunchDessertAppetizer

Sweet Peach Yogurt Parfait Delight

One of my fondest memories is from a lazy summer afternoon spent at my grandmother’s house. The sun filtered through the kitchen window, casting a warm glow over the table where she would create her culinary magic. It was during one of those blissful moments that I first tasted her Peach Yogurt Parfait with Honey and Granola. The sweet aroma of ripe peaches mingling with creamy yogurt and the crunch of granola was nothing short of heavenly. It felt like summer captured in a bowl, and I still remember the joy of diving in with a spoon, each layer revealing a new burst of flavor.

When I think about that parfait, I can almost hear the gentle hum of the bees outside, reminding me of the floral notes that honey brings to every bite. The vibrant yellows and soft oranges of the peaches contrast beautifully with the creamy white yogurt and the golden crunch of granola. It’s a dish that not only looks delightful but also tastes like a celebration of fresh, wholesome ingredients.

What makes my version of this Peach Yogurt Parfait special is the careful balance of flavors and textures. I use ripe, juicy peaches, drizzled with locally sourced honey, and a homemade granola that’s bursting with nuts and seeds for an extra crunch. It’s a simple dish, but every layer is crafted with love and attention.

Let me show you exactly how to make this delightful parfait, so you can bring a bit of that summer magic into your kitchen!

Sweet Peach Yogurt Parfait Delight

Why You’ll Love This Recipe

  • Delightfully creamy texture from the Greek yogurt, paired with the juicy sweetness of fresh peaches.
  • Ready in under 20 minutes, making it a quick and satisfying breakfast or snack option.
  • Budget-friendly, using common ingredients that you may already have in your pantry.
  • Customizable with your favorite granola and nuts, allowing you to tailor each parfait to your taste.
  • Perfectly balanced flavors with the bright acidity of lemon juice and the sweetness of honey enhancing the peaches.

Ingredients

  • For the Parfait:
  • 2 cups plain Greek yogurt (or vanilla yogurt for a sweeter option)
  • 2 large ripe peaches, diced (about 2 cups)
  • 1 tablespoon fresh lemon juice (to prevent browning of peaches)
  • 2 tablespoons honey (plus more for drizzling)
  • 1 teaspoon vanilla extract (optional for extra flavor)
  • For the Granola:
  • 1 cup granola (store-bought or homemade; see notes for a simple granola recipe)
  • 1/4 cup sliced almonds (optional for added crunch)
  • 1/4 cup shredded coconut (optional for added flavor)

Let’s dive into some key ingredients that make this Peach Yogurt Parfait so delightful! First, the Greek yogurt is not only creamy but also packed with protein, making it a satisfying option for breakfast or a snack. If you’re looking for a sweeter option, you can easily substitute it with vanilla yogurt, though it may alter the overall flavor balance. Next, the ripe peaches are the star of the show; their natural sweetness shines through, so I recommend choosing peaches that yield slightly to pressure, indicating they’re perfectly ripe. If peaches aren’t in season, feel free to use nectarines or even frozen peaches—just thaw them before use. Finally, honey adds a lovely floral sweetness that ties everything together. If you prefer, maple syrup can serve as a delicious substitute.

Step-by-Step Instructions

  1. Start by preparing the peaches. Wash them thoroughly, then slice and dice them into bite-sized pieces. In a medium bowl, toss the diced peaches with 1 tablespoon of fresh lemon juice to prevent browning. Set aside for about 5 minutes while the lemon juice works its magic.
  2. In a separate bowl, combine the Greek yogurt, 2 tablespoons of honey, and 1 teaspoon of vanilla extract if using. Stir the mixture until smooth and thoroughly blended. This should take about a minute. Avoid overmixing to maintain the creaminess of the yogurt.
  3. Now it’s time to layer your parfait. Grab a clear glass or bowl to showcase your beautiful creation. Start with a generous spoonful of the yogurt mixture at the bottom—about 1/4 cup will do. Use a spoon to spread it evenly.
  4. Add a layer of the diced peaches over the yogurt, ensuring they cover the yogurt completely. You might want to use about half of what you have prepared—roughly 1 cup. This layer should be visually appealing, so arrange the peaches neatly.
  5. Sprinkle 1/4 cup of granola over the peaches. This adds a delightful crunch. Make sure to distribute it evenly to ensure every bite has that satisfying texture. Avoid packing it down too tightly, as you want it to maintain its crunch.
  6. Repeat the layers: spoon in another 1/4 cup of yogurt, followed by another cup of peaches, and another sprinkle of granola. You should have at least two layers, but feel free to add more depending on your glass size.
  7. Finish off your parfait with a drizzle of honey on top for added sweetness and a touch of elegance. If you’re using sliced almonds or shredded coconut, sprinkle them on top now. It adds a lovely visual contrast and extra flavor.
  8. Serve immediately or refrigerate for up to 30 minutes before serving to allow the flavors to meld together. However, I recommend enjoying it fresh to maintain the granola’s crunch.

Pro Tips for the Best Peach Yogurt Parfait With Honey And Granola

  • Make sure to choose ripe peaches for the best flavor and texture. A common mistake is using unripe fruit, which can lead to a less enjoyable parfait. Look for peaches that are fragrant and slightly soft to the touch.
  • Use a clear glass to assemble your parfait; this not only makes for a beautiful presentation but also allows you to see the colorful layers, which adds to the enjoyment of eating it.
  • For an even creamier texture, consider whipping the Greek yogurt with a hand mixer for a couple of minutes before layering. This small adjustment makes a huge difference in mouthfeel.
  • Be mindful of the granola-to-yogurt ratio. Too much granola can overwhelm the parfait, while too little can make it feel too creamy. Aim for about 1/4 cup of granola per layer for the perfect balance.
  • If you’re making this for a gathering, consider preparing the yogurt and peaches ahead of time and layering them just before serving. This ensures the granola stays crunchy!

Variations & Serving Ideas

There are so many ways to get creative with your Peach Yogurt Parfait! For a tropical twist, swap out the peaches for mangoes or pineapples and top with coconut flakes. If you prefer a berry flavor, mix in some blueberries or strawberries with the peaches for added color and taste. For a nutty version, incorporate chopped walnuts or pecans instead of almonds.

As for serving ideas, this parfait pairs beautifully with a side of scrambled eggs for a hearty breakfast or fresh fruit salad for a light lunch. You might also enjoy it alongside whole grain toast with almond butter for an energizing snack. The contrast of flavors and textures will elevate your meal experience!

Storage, Make-Ahead & Reheating

The Peach Yogurt Parfait is best enjoyed fresh, but you can prepare some components ahead of time. Store the layered parfait in an airtight container in the refrigerator for up to 24 hours. However, be cautious; the granola may lose its crunch if stored too long. You can freeze the yogurt and peach mixture for up to 2 months; just remember to thaw it in the refrigerator overnight before serving.

If you plan to enjoy this dish the next day, it can taste even better as the flavors meld together. Just remember to add the granola right before serving to keep its delightful crunch!

Frequently Asked Questions

Can I make Peach Yogurt Parfait With Honey And Granola ahead of time?

Yes — in fact, it tastes even better the next day as the flavors meld. However, I recommend waiting to add the granola until just before serving to maintain its crunch.

What can I substitute for Greek yogurt?

If you prefer a lighter option, you can substitute Greek yogurt with regular yogurt or a dairy-free alternative like coconut yogurt. Just remember that this may alter the creaminess and flavor profile slightly.

Can I use frozen peaches for this parfait?

Absolutely! Just make sure to thaw the frozen peaches before using them. They will still add great flavor, though the texture may be slightly softer than fresh peaches.

How do I make the parfait vegan?

To make a vegan version, substitute the Greek yogurt with a plant-based yogurt alternative, and replace honey with maple syrup or agave nectar. This keeps the parfait sweet while adhering to a vegan diet.

What other fruits can I use in this recipe?

You can mix and match fruits based on your preference. Try using strawberries, blueberries, raspberries, or even bananas. Just make sure to adjust the lemon juice as needed to prevent browning.

Sweet Peach Yogurt Parfait Delight

Final Thoughts

The Peach Yogurt Parfait with Honey and Granola is a delightful blend of creamy yogurt, sweet peaches, and crunchy granola that creates a satisfying and nourishing treat. Each layer bursts with flavor, making it a perfect choice for breakfast or a light dessert.

This is the kind of recipe I come back to again and again, especially when I want something refreshing and wholesome to start my day. The harmony of sweet and tart flavors, combined with the delightful crunch, never fails to lift my spirits!

I encourage you to give this parfait a try and indulge in its comforting goodness. Feel free to share your results or even add your own twist—perhaps a sprinkle of cinnamon or a handful of nuts. Enjoy creating your perfect parfait!

Print
clock clock iconcutlery cutlery iconflag flag iconfolder folder iconinstagram instagram iconpinterest pinterest iconfacebook facebook iconprint print iconsquares squares iconheart heart iconheart solid heart solid icon

Peach Yogurt Parfait


  • Author: Lily author
  • Total Time: 15 minutes
  • Yield: 4 servings 1x
Pin Recipe
Print Recipe

Description

This Peach Yogurt Parfait combines creamy Greek yogurt, juicy peaches, and crunchy granola for a delightful treat. It’s a perfect breakfast or snack that captures the essence of summer in every bite.


Ingredients

Scale
  • For the Parfait:
  • 2 cups plain Greek yogurt (or vanilla yogurt for a sweeter option)
  • 2 large ripe peaches, diced (about 2 cups)
  • 1 tablespoon fresh lemon juice (to prevent browning of peaches)
  • 2 tablespoons honey (plus more for drizzling)
  • 1 teaspoon vanilla extract (optional for extra flavor)
  • For the Granola:
  • 1 cup granola (store-bought or homemade; see notes for a simple granola recipe)
  • 1/4 cup sliced almonds (optional for added crunch)
  • 1/4 cup shredded coconut (optional for added flavor)

Instructions

  1. Start by preparing the peaches. Wash them thoroughly, then slice and dice them into bite-sized pieces. In a medium bowl, toss the diced peaches with 1 tablespoon of fresh lemon juice to prevent browning. Set aside for about 5 minutes while the lemon juice works its magic.
  2. In a separate bowl, combine the Greek yogurt, 2 tablespoons of honey, and 1 teaspoon of vanilla extract if using. Stir the mixture until smooth and thoroughly blended. This should take about a minute. Avoid overmixing to maintain the creaminess of the yogurt.
  3. Now it’s time to layer your parfait. Grab a clear glass or bowl to showcase your beautiful creation. Start with a generous spoonful of the yogurt mixture at the bottom—about 1/4 cup will do. Use a spoon to spread it evenly.
  4. Add a layer of the diced peaches over the yogurt, ensuring they cover the yogurt completely. You might want to use about half of what you have prepared—roughly 1 cup. This layer should be visually appealing, so arrange the peaches neatly.
  5. Sprinkle 1/4 cup of granola over the peaches. This adds a delightful crunch. Make sure to distribute it evenly to ensure every bite has that satisfying texture. Avoid packing it down too tightly, as you want it to maintain its crunch.
  6. Repeat the layers: spoon in another 1/4 cup of yogurt, followed by another cup of peaches, and another sprinkle of granola. You should have at least two layers, but feel free to add more depending on your glass size.
  7. Finish off your parfait with a drizzle of honey on top for added sweetness and a touch of elegance. If you’re using sliced almonds or shredded coconut, sprinkle them on top now. It adds a lovely visual contrast and extra flavor.
  8. Serve immediately or refrigerate for up to 30 minutes before serving to allow the flavors to meld together. However, I recommend enjoying it fresh to maintain the granola’s crunch.
  • Prep Time: 15 mins
  • Cook Time: 0 mins
  • Category: Breakfast
  • Method: No-cook
  • Cuisine: American

Nutrition

  • Serving Size: 1 parfait
  • Calories: 250
  • Sugar: 20 g
  • Sodium: 50 mg
  • Fat: 5 g
  • Saturated Fat: 2 g
  • Unsaturated Fat: 3 g
  • Trans Fat: 0 g
  • Carbohydrates: 40 g
  • Fiber: 3 g
  • Protein: 10 g
  • Cholesterol: 10 mg

Keywords: Choose ripe peaches for the best flavor and texture. Use a clear glass for a beautiful presentation. For creaminess, consider whipping the yogurt before layering. Be mindful of the granola-to-yogurt ratio. Prepare yogurt and peaches ahead of time for gatherings, layering just before serving.

Did you make this recipe?

Share a photo and tag us — we can't wait to see what you've made!

Sun-Kissed Frozen Orange Cream Slush

As a child, summer days felt like they lasted forever. I remember the sticky heat wrapping around me as I played outside, my laughter mingling with the sounds of the neighborhood. But nothing could cool me down quite like the moment I’d spot my grandmother, laboring over her blender, whipping up her famous Frozen Orange Creamsicle Slush. That vibrant orange treat, with its frosty texture and sweet citrus aroma, was like a burst of sunshine in a cup. Just one sip, and I could feel the coolness wash over me, sparking pure joy.

This Frozen Orange Creamsicle Slush has a way of making you feel like a kid again. Its creamy, dreamy consistency is a delightful balance of bright orange and soft vanilla, inviting you to dive right in. The refreshing tang of orange dances on your tongue, while the smooth creaminess envelops you in a comforting embrace. It’s a nostalgic treat that’s perfect for hot summer afternoons or anytime you need a little pick-me-up.

What makes my version of this slush stand out is the addition of a hint of vanilla bean, which elevates the flavor and adds an extra layer of richness. Plus, it’s super easy to whip up with just a few simple ingredients that you probably already have on hand! So, if you’re ready to relive those sun-soaked memories, let me show you exactly how to make it.

Sun-Kissed Frozen Orange Cream Slush

Why You’ll Love This Recipe

  • Each slush is a perfect blend of creamy vanilla and zesty orange, creating a nostalgic flavor reminiscent of summer days.
  • This refreshing treat is ready in under 15 minutes, making it an ideal quick dessert for unexpected guests or hot afternoons.
  • With just 8 simple ingredients, it’s budget-friendly, ensuring you don’t have to break the bank to enjoy a delicious slush.
  • The slush has a perfectly smooth texture, thanks to the combination of ice and ice cream, providing a delightful contrast to the bright citrus flavors.
  • It’s highly customizable; you can easily adjust the sweetness and add fresh herbs for a unique twist that suits your taste.

Ingredients

  • 2 cups orange juice (freshly squeezed or store-bought)
  • 1 cup vanilla ice cream
  • 1 cup crushed ice
  • 1/2 cup milk (whole or 2%)
  • 1/4 cup granulated sugar (adjust based on sweetness preference)
  • 1 teaspoon vanilla extract
  • Zest of 1 orange (for added flavor)
  • Fresh orange slices and mint leaves (for garnish)

The star of this Frozen Orange Creamsicle Slush is the orange juice, which provides the vibrant, citrusy base. Freshly squeezed juice will yield the brightest flavor, but store-bought options can be just as convenient. If you’re opting for store-bought, choose 100% pure juice with no added sugars for the best results. Another essential ingredient is the vanilla ice cream; it adds creaminess and sweetness. You can substitute it with dairy-free ice cream if you’re looking for a vegan option. Whole or 2% milk complements the ice cream, creating a smooth blend. If you want a lower-calorie version, almond or oat milk can be good alternatives.

Lastly, the granulated sugar can be adjusted based on your sweetness preference. If you prefer a more natural sweetener, consider using honey or agave syrup. The orange zest enhances the flavor profile, providing an aromatic pop that brings the whole slush together. Don’t skip it! It adds an extra layer of brightness that makes this slush truly special.

Step-by-Step Instructions

  1. Start by preparing your ingredients. Gather 2 cups of orange juice, 1 cup of vanilla ice cream, and 1 cup of crushed ice. Make sure the ice is finely crushed, as larger chunks can make blending difficult.
  2. In a blender, combine the orange juice, vanilla ice cream, crushed ice, and 1/2 cup of milk. Add 1/4 cup of granulated sugar and 1 teaspoon of vanilla extract. If you like a sweeter slush, consider adding a bit more sugar at this stage.
  3. Add the zest of 1 orange to the blender. This step is crucial for enhancing the citrus flavor of your slush. Make sure not to include the bitter white pith—only the flavorful zest.
  4. Blend the mixture on medium-high speed for about 30-45 seconds. Stop once the ingredients are fully combined and the slush has a smooth, even consistency. If you notice large chunks of ice, blend for an additional 10-15 seconds. Avoid over-blending, as this can make the slush too liquidy.
  5. Once blended, taste the slush. If it needs more sweetness, add a little more sugar and blend for a few more seconds. If it’s too thick, you can add a splash of milk to reach your desired consistency.
  6. Pour the slush into glasses. This recipe typically serves 4, but you can easily double it for larger gatherings. Use a spoon to help guide the slush into the glasses if needed.
  7. Garnish each serving with fresh orange slices and mint leaves. The mint not only adds a pop of color but also a refreshing aroma that complements the citrus flavors beautifully.
  8. Serve immediately and enjoy! If you’ve made extra, you can refrigerate it for a short time, but it’s best enjoyed fresh.

Pro Tips for the Best Frozen Orange Creamsicle Slush

  • Don’t skip the orange zest! It’s a game-changer for flavor. Always zest before juicing to make it easier.
  • Use a high-powered blender for the best texture. A standard blender may struggle with ice, leading to uneven consistency. If you have a food processor, that can work too, but ensure the ice is finely crushed.
  • Adjust the ice-to-liquid ratio carefully. If your slush is too thick, it won’t blend well. Start with less ice and add more until you reach your preferred texture.
  • Be cautious with the sugar! Always start with the lower amount, as you can easily add more, but it’s hard to fix an overly sweet slush.
  • For a fun twist, consider adding a splash of coconut milk or a handful of fresh fruit like strawberries or pineapple. This not only enhances the flavor but also adds a beautiful color contrast.

Variations & Serving Ideas

There are countless ways to put a spin on your Frozen Orange Creamsicle Slush. Consider making a tropical version by adding in some pineapple juice or coconut milk for a delightful tropical twist. If you’re feeling adventurous, try incorporating a handful of frozen mango or peach slices for added sweetness. For a lighter version, swap out the vanilla ice cream for Greek yogurt for a creamy yet tangy alternative.

As for serving ideas, this refreshing slush pairs wonderfully with light summer dishes like grilled chicken skewers, fish tacos, or a simple salad topped with citrus vinaigrette. The bright, zesty flavors of the slush complement these dishes perfectly, making them an ideal pairing for a sunny day.

Storage, Make-Ahead & Reheating

This Frozen Orange Creamsicle Slush is best enjoyed fresh, but if you have leftovers, you can store them in an airtight container in the fridge for up to 2 days. Just keep in mind that the slush may lose some of its texture over time as the ice melts. It doesn’t freeze well, as the ice will turn into a solid block. If you must freeze it, blend again after thawing to restore the slushy consistency. This treat is best the day you make it, as the flavors meld together beautifully overnight, enhancing its deliciousness.

Frequently Asked Questions

Can I make Frozen Orange Creamsicle Slush ahead of time?

Yes — in fact, it tastes even better the next day as the flavors meld. However, it’s best to enjoy it fresh, as the texture can change if stored for too long. If you need to prepare it ahead, keep it in the fridge and re-blend before serving.

What kind of orange juice should I use?

For the best flavor, use freshly squeezed orange juice. However, if you’re short on time, opt for 100% pure store-bought juice without added sugars. This will ensure that your slush remains flavorful and refreshing.

Can I substitute the vanilla ice cream?

Absolutely! If you’re looking for a dairy-free option, coconut milk ice cream or a non-dairy vanilla ice cream can work wonderfully. They will still provide the creamy texture and sweetness you desire.

How can I adjust the sweetness of my slush?

You can easily adjust the sweetness by modifying the amount of sugar added. Start with 1/4 cup and taste the mixture before blending. If you prefer it sweeter, add more sugar gradually until it reaches your desired level.

What should I do if my slush is too thick?

If your slush is too thick, simply add a splash of milk or orange juice and blend again. This will help achieve a more drinkable consistency while maintaining the slushy texture. Adjust gradually to reach your preferred thickness.

Sun-Kissed Frozen Orange Cream Slush

Final Thoughts

The Frozen Orange Creamsicle Slush is a delightful blend of refreshing citrus and creamy goodness, making it a perfect treat for warm days or any time you crave a taste of nostalgia. The way the bright orange flavor dances with the creamy texture truly elevates this slush, transforming it into a satisfying escape from the everyday.

This is the kind of recipe I come back to again and again, especially when I’m looking to cool down or impress guests at a summer gathering. It’s simple to make and always brings smiles all around! I encourage you to try this recipe for yourself—don’t hesitate to share your results or even put your own spin on it. Happy slushing!

Print
clock clock iconcutlery cutlery iconflag flag iconfolder folder iconinstagram instagram iconpinterest pinterest iconfacebook facebook iconprint print iconsquares squares iconheart heart iconheart solid heart solid icon

Frozen Orange Creamsicle Slush


  • Author: Lily author
  • Total Time: 15 minutes
  • Yield: 4 servings 1x
Pin Recipe
Print Recipe

Description

This Frozen Orange Creamsicle Slush is a refreshing treat that combines creamy vanilla and zesty orange flavors. Perfect for hot summer days, it brings back nostalgic memories with every sip.


Ingredients

Scale
  • 2 cups orange juice (freshly squeezed or store-bought)
  • 1 cup vanilla ice cream
  • 1 cup crushed ice
  • 1/2 cup milk (whole or 2%)
  • 1/4 cup granulated sugar (adjust based on sweetness preference)
  • 1 teaspoon vanilla extract
  • Zest of 1 orange (for added flavor)
  • Fresh orange slices and mint leaves (for garnish)

Instructions

  1. Start by preparing your ingredients. Gather 2 cups of orange juice, 1 cup of vanilla ice cream, and 1 cup of crushed ice. Make sure the ice is finely crushed, as larger chunks can make blending difficult.
  2. In a blender, combine the orange juice, vanilla ice cream, crushed ice, and 1/2 cup of milk. Add 1/4 cup of granulated sugar and 1 teaspoon of vanilla extract. If you like a sweeter slush, consider adding a bit more sugar at this stage.
  3. Add the zest of 1 orange to the blender. This step is crucial for enhancing the citrus flavor of your slush. Make sure not to include the bitter white pith—only the flavorful zest.
  4. Blend the mixture on medium-high speed for about 30-45 seconds. Stop once the ingredients are fully combined and the slush has a smooth, even consistency. If you notice large chunks of ice, blend for an additional 10-15 seconds. Avoid over-blending, as this can make the slush too liquidy.
  5. Once blended, taste the slush. If it needs more sweetness, add a little more sugar and blend for a few more seconds. If it’s too thick, you can add a splash of milk to reach your desired consistency.
  6. Pour the slush into glasses. This recipe typically serves 4, but you can easily double it for larger gatherings. Use a spoon to help guide the slush into the glasses if needed.
  7. Garnish each serving with fresh orange slices and mint leaves. The mint not only adds a pop of color but also a refreshing aroma that complements the citrus flavors beautifully.
  8. Serve immediately and enjoy! If you’ve made extra, you can refrigerate it for a short time, but it's best enjoyed fresh.
  • Prep Time: 15 min
  • Cook Time: 0 min
  • Category: Dessert
  • Method: Blending
  • Cuisine: American

Nutrition

  • Serving Size: 1 serving
  • Calories: 200
  • Sugar: 30 g
  • Sodium: 50 mg
  • Fat: 5 g
  • Saturated Fat: 3 g
  • Unsaturated Fat: 2 g
  • Trans Fat: 0 g
  • Carbohydrates: 40 g
  • Fiber: 1 g
  • Protein: 2 g
  • Cholesterol: 20 mg

Keywords: Don't skip the orange zest! It's a game-changer for flavor. Always zest before juicing to make it easier.

Did you make this recipe?

Share a photo and tag us — we can't wait to see what you've made!

Zesty Lemon Poppy Seed Delight

One rainy afternoon, I found myself in my grandmother’s cozy kitchen, the kind that always smelled like warmth and love. She was whipping up her famous Lemon Poppy Seed Loaf, a recipe that had been passed down through generations. As the batter came together, the zesty aroma of fresh lemons filled the air, mingling perfectly with the nutty fragrance of poppy seeds. I can still picture her, apron-clad, as she expertly drizzled a vibrant citrus icing over the loaf, creating a glossy, sun-kissed finish that beckoned us to dive in. It was a moment that sparked my own passion for baking, and this recipe has become a cherished staple in my home ever since.

When you take a bite of this Lemon Poppy Seed Loaf, it’s like a burst of sunshine on your palate. The loaf is beautifully golden, with a tender crumb that melts in your mouth. Each slice is speckled with tiny poppy seeds, adding a delightful crunch that contrasts beautifully with the tangy sweetness of the lemon. And that citrus icing? It’s the finishing touch that elevates this loaf from ordinary to extraordinary, with its bright, zesty flavor dancing on your taste buds.

This recipe stands out because it embraces simplicity while delivering on flavor. I’ve added a hint of vanilla to the batter, enhancing the overall taste and making it even more indulgent. Trust me, once you make this Lemon Poppy Seed Loaf With Citrus Icing, it’ll become a go-to in your baking repertoire.

So, let me show you exactly how to make it!

Zesty Lemon Poppy Seed Delight

Why You’ll Love This Recipe

  • Moist and tender crumb that melts in your mouth, thanks to the perfect balance of butter and buttermilk.
  • Bright, zesty lemon flavor paired with crunchy poppy seeds, creating a delightful texture and taste experience.
  • Easy to whip up in just about an hour, perfect for last-minute gatherings or a cozy afternoon treat.
  • Budget-friendly with everyday ingredients, making it an accessible option for all home bakers.
  • The citrus icing adds a sweet tang that elevates the loaf, turning a simple recipe into a showstopper!

Ingredients

  • 1 ½ cups (190g) all-purpose flour
  • 1 teaspoon baking powder
  • ½ teaspoon baking soda
  • ½ teaspoon salt
  • 3 tablespoons poppy seeds
  • ½ cup (115g) unsalted butter, softened to room temperature
  • 1 cup (200g) granulated sugar
  • 2 large eggs
  • 1 teaspoon vanilla extract
  • 1 teaspoon lemon zest (from about 1 medium lemon)
  • ½ cup (120ml) buttermilk
  • 2 tablespoons fresh lemon juice

For the Citrus Icing:

  • 1 cup (120g) powdered sugar
  • 2 tablespoons fresh lemon juice
  • 1 tablespoon orange juice
  • 1 teaspoon lemon zest (for garnish, optional)

Let’s dive into the key ingredients that make this Lemon Poppy Seed Loaf so special. The all-purpose flour provides the structure and base for the loaf, while the baking powder and baking soda ensure it rises perfectly, giving the loaf a light texture. For a gluten-free variation, you could substitute the flour with a gluten-free all-purpose blend. Poppy seeds not only add a delightful crunch but also contribute to the unique flavor profile that pairs well with the citrus notes.

Unsalted butter is crucial for achieving the buttery richness that makes this loaf so moist. If you’re looking for a dairy-free option, coconut oil or a vegan butter can be used instead. The buttermilk is another essential component, providing acidity that activates the baking soda for a fluffy texture. If you don’t have buttermilk on hand, you can easily make a substitute by mixing ½ cup of milk with 1 tablespoon of vinegar or lemon juice and letting it sit for about 5 minutes.

Step-by-Step Instructions

  1. Preheat your oven to 350°F (175°C). Grease a 9×5-inch loaf pan or line it with parchment paper for easy removal later.
  2. In a medium mixing bowl, whisk together 1 ½ cups of all-purpose flour, 1 teaspoon of baking powder, ½ teaspoon of baking soda, ½ teaspoon of salt, and 3 tablespoons of poppy seeds. This helps to evenly distribute the baking agents and ensures a uniform rise.
  3. In a large mixing bowl, cream together ½ cup of softened unsalted butter and 1 cup of granulated sugar using an electric mixer on medium speed for about 3-4 minutes, until the mixture is light and fluffy. Make sure to scrape down the sides of the bowl occasionally.
  4. Add 2 large eggs, 1 teaspoon of vanilla extract, and 1 teaspoon of lemon zest to the creamed butter and sugar, mixing until fully combined. You want a smooth consistency, so ensure there are no lumps of butter.
  5. In a small bowl, combine ½ cup of buttermilk and 2 tablespoons of fresh lemon juice. Alternately add the dry ingredients and buttermilk mixture to the butter mixture, starting and ending with the dry ingredients. Mix just until combined; do not overmix, as this can lead to a dense loaf.
  6. Pour the batter into the prepared loaf pan. Smooth the top with a spatula, ensuring it’s even. Bake in the preheated oven for 50-60 minutes, or until a toothpick inserted in the center comes out clean. The edges should be lightly golden brown, and the center should feel just set.
  7. Once baked, remove the loaf from the oven and allow it to cool in the pan for about 10 minutes. Then, transfer it to a wire rack to cool completely. Resist the urge to slice too soon, as it will be crumbly if it’s still warm.
  8. While the loaf is cooling, prepare the citrus icing. In a medium bowl, whisk together 1 cup of powdered sugar, 2 tablespoons of fresh lemon juice, and 1 tablespoon of orange juice until smooth. If the icing is too thick, you can add a little more juice to reach your desired consistency.
  9. Once the loaf is completely cool, drizzle the citrus icing over the top. If you like, sprinkle with an additional teaspoon of lemon zest for an extra pop of flavor and color.

Pro Tips for the Best Lemon Poppy Seed Loaf With Citrus Icing

  • Be careful not to overmix your batter; this is a common mistake that can lead to a dense loaf. Mix just until the dry ingredients are incorporated for a light and fluffy texture.
  • Use room temperature ingredients, especially the butter and eggs. This helps to create a smoother batter and ensures even baking. Take your eggs out of the fridge about 30 minutes before you start.
  • For a more pronounced lemon flavor, consider adding a little lemon extract in addition to the zest and juice. Just a half teaspoon can elevate the citrus notes significantly.
  • When measuring your flour, spoon it into the measuring cup and level it off with a knife instead of scooping directly from the bag. This prevents packing and ensures you don’t end up with a dry loaf.
  • Invest in a good quality loaf pan; it makes a difference in heat distribution, which ensures even baking. If your pan is dark-coated, reduce the oven temperature by 25°F to prevent over-browning.

Variations & Serving Ideas

For a delightful twist, consider adding blueberries or raspberries to the batter for a fruity burst of flavor. You can also experiment with different citrus fruits—try lime or grapefruit zest and juice for a refreshing change. For a healthier option, substitute half of the all-purpose flour with whole wheat flour for added fiber without compromising too much on texture.

This Lemon Poppy Seed Loaf pairs beautifully with a light salad, such as a mixed greens salad with a vinaigrette, or a cup of tea for a cozy afternoon treat. It also complements a creamy cheese platter, as the acidity of the loaf balances rich cheeses perfectly. Lastly, a scoop of vanilla ice cream on the side creates a delightful contrast of temperatures and flavors!

Storage, Make-Ahead & Reheating

This Lemon Poppy Seed Loaf can be stored at room temperature for up to 3 days if wrapped tightly in plastic wrap. If you want to keep it longer, it freezes well for up to 3 months. To freeze, wrap the loaf tightly in plastic wrap and then in aluminum foil to prevent freezer burn.

When you’re ready to enjoy it again, simply thaw it in the fridge overnight. Reheat individual slices in the microwave for 15-20 seconds or in a toaster oven until warmed through. Interestingly, many people find that this loaf tastes even better the next day, as the flavors have time to meld!

Frequently Asked Questions

Can I make Lemon Poppy Seed Loaf With Citrus Icing ahead of time?

Yes — in fact, it tastes even better the next day! You can make the loaf a day in advance, allowing the flavors to develop. Just be sure to store it in an airtight container to maintain its moisture.

Can I substitute the poppy seeds?

Absolutely! If you don’t have poppy seeds on hand or prefer an alternative, you can use sesame seeds for a similar crunch or omit them entirely for a smooth loaf.

What can I use instead of buttermilk?

If you don’t have buttermilk, you can easily create a substitute by mixing ½ cup of milk (dairy or plant-based) with 1 tablespoon of vinegar or lemon juice. Let it sit for 5 minutes before using in the recipe.

How can I make this recipe gluten-free?

To make a gluten-free version of this Lemon Poppy Seed Loaf, substitute the all-purpose flour with a gluten-free all-purpose flour blend. Just ensure that the blend contains a binding agent like xanthan gum for the best results.

What is the best way to store leftover loaf?

Leftover Lemon Poppy Seed Loaf should be stored in an airtight container at room temperature for up to 3 days. For longer storage, wrap it tightly and freeze for up to 3 months. Thaw it before serving for the best texture.

Zesty Lemon Poppy Seed Delight

Final Thoughts

The Lemon Poppy Seed Loaf with Citrus Icing is truly a delightful treat that brings a burst of brightness to any occasion. The zesty lemon flavor combined with the subtle crunch of poppy seeds creates a satisfying balance, while the citrus icing adds a touch of sweetness that perfectly complements the loaf’s tanginess.

This is the kind of recipe I come back to again and again, especially when I want to brighten up a gloomy day or celebrate a small victory. The aroma that fills the kitchen as it bakes is absolutely heavenly! I encourage you to give this recipe a try; you might just find it becoming a beloved staple in your home. Don’t forget to share your results or even add your own unique twist—I can’t wait to see what you create!

Print
clock clock iconcutlery cutlery iconflag flag iconfolder folder iconinstagram instagram iconpinterest pinterest iconfacebook facebook iconprint print iconsquares squares iconheart heart iconheart solid heart solid icon

Lemon Poppy Seed Loaf


  • Author: Lily author
  • Total Time: 13 minute
  • Yield: 1 loaf 1x
Pin Recipe
Print Recipe

Description

This Lemon Poppy Seed Loaf is a delightful treat that combines zesty lemon flavor with crunchy poppy seeds. Topped with a citrus icing, it’s perfect for any occasion.


Ingredients

Scale
  • 1 ½ cups (190g) all-purpose flour
  • 1 teaspoon baking powder
  • ½ teaspoon baking soda
  • ½ teaspoon salt
  • 3 tablespoons poppy seeds
  • ½ cup (115g) unsalted butter, softened to room temperature
  • 1 cup (200g) granulated sugar
  • 2 large eggs
  • 1 teaspoon vanilla extract
  • 1 teaspoon lemon zest (from about 1 medium lemon)
  • ½ cup (120ml) buttermilk
  • 2 tablespoons fresh lemon juice
  • 1 cup (120g) powdered sugar
  • 2 tablespoons fresh lemon juice
  • 1 tablespoon orange juice
  • 1 teaspoon lemon zest (for garnish, optional)

Instructions

  1. Preheat your oven to 350°F (175°C). Grease a 9×5-inch loaf pan or line it with parchment paper for easy removal later.
  2. In a medium mixing bowl, whisk together 1 ½ cups of all-purpose flour, 1 teaspoon of baking powder, ½ teaspoon of baking soda, ½ teaspoon of salt, and 3 tablespoons of poppy seeds. This helps to evenly distribute the baking agents and ensures a uniform rise.
  3. In a large mixing bowl, cream together ½ cup of softened unsalted butter and 1 cup of granulated sugar using an electric mixer on medium speed for about 3-4 minutes, until the mixture is light and fluffy. Make sure to scrape down the sides of the bowl occasionally.
  4. Add 2 large eggs, 1 teaspoon of vanilla extract, and 1 teaspoon of lemon zest to the creamed butter and sugar, mixing until fully combined. You want a smooth consistency, so ensure there are no lumps of butter.
  5. In a small bowl, combine ½ cup of buttermilk and 2 tablespoons of fresh lemon juice. Alternately add the dry ingredients and buttermilk mixture to the butter mixture, starting and ending with the dry ingredients. Mix just until combined; do not overmix, as this can lead to a dense loaf.
  6. Pour the batter into the prepared loaf pan. Smooth the top with a spatula, ensuring it’s even. Bake in the preheated oven for 50-60 minutes, or until a toothpick inserted in the center comes out clean. The edges should be lightly golden brown, and the center should feel just set.
  7. Once baked, remove the loaf from the oven and allow it to cool in the pan for about 10 minutes. Then, transfer it to a wire rack to cool completely. Resist the urge to slice too soon, as it will be crumbly if it’s still warm.
  8. While the loaf is cooling, prepare the citrus icing. In a medium bowl, whisk together 1 cup of powdered sugar, 2 tablespoons of fresh lemon juice, and 1 tablespoon of orange juice until smooth. If the icing is too thick, you can add a little more juice to reach your desired consistency.
  9. Once the loaf is completely cool, drizzle the citrus icing over the top. If you like, sprinkle with an additional teaspoon of lemon zest for an extra pop of flavor and color.
  • Prep Time: 15 mins
  • Cook Time: 50-60 mins
  • Category: Dessert
  • Method: Baking
  • Cuisine: American

Nutrition

  • Serving Size: 1 slice
  • Calories: 200
  • Sugar: 15 g
  • Sodium: 150 mg
  • Fat: 8 g
  • Saturated Fat: 5 g
  • Unsaturated Fat: 3 g
  • Trans Fat: 0 g
  • Carbohydrates: 30 g
  • Fiber: 1 g
  • Protein: 3 g
  • Cholesterol: 40 mg

Keywords: Be careful not to overmix your batter; this is a common mistake that can lead to a dense loaf. Use room temperature ingredients for a smoother batter and even baking.

Did you make this recipe?

Share a photo and tag us — we can't wait to see what you've made!

  • Privacy Policy
  • Terms Of Service
  • Contact
  • About
  • GDPR

Copyright © 2025 Homesmad