• Skip to primary navigation
  • Skip to main content
  • Skip to primary sidebar
Homesmad

Homesmad

  • Home
  • Breakfast & Brunch
  • Appetizers & Snacks
  • Dinner
  • Dessert
  • About
  • Privacy Policy
  • Contact
Homesmad
  • Home
  • Breakfast & Brunch
  • Appetizers & Snacks
  • Dinner
  • Dessert
  • About
  • Privacy Policy
  • Contact

Spooky Halloween Eyeball Jello Treats – Fun & Creepy!

October 3, 2025 by Lily author

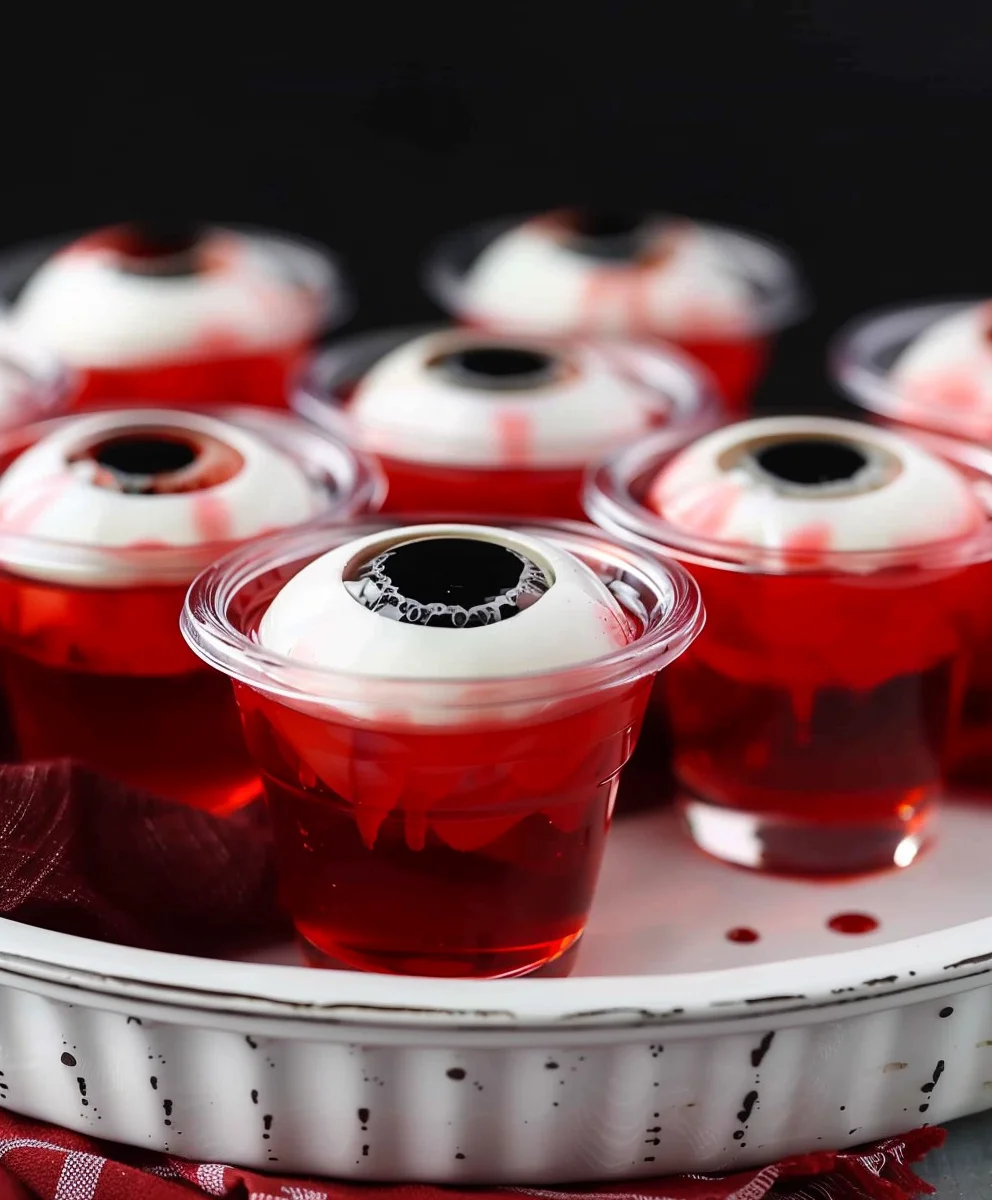
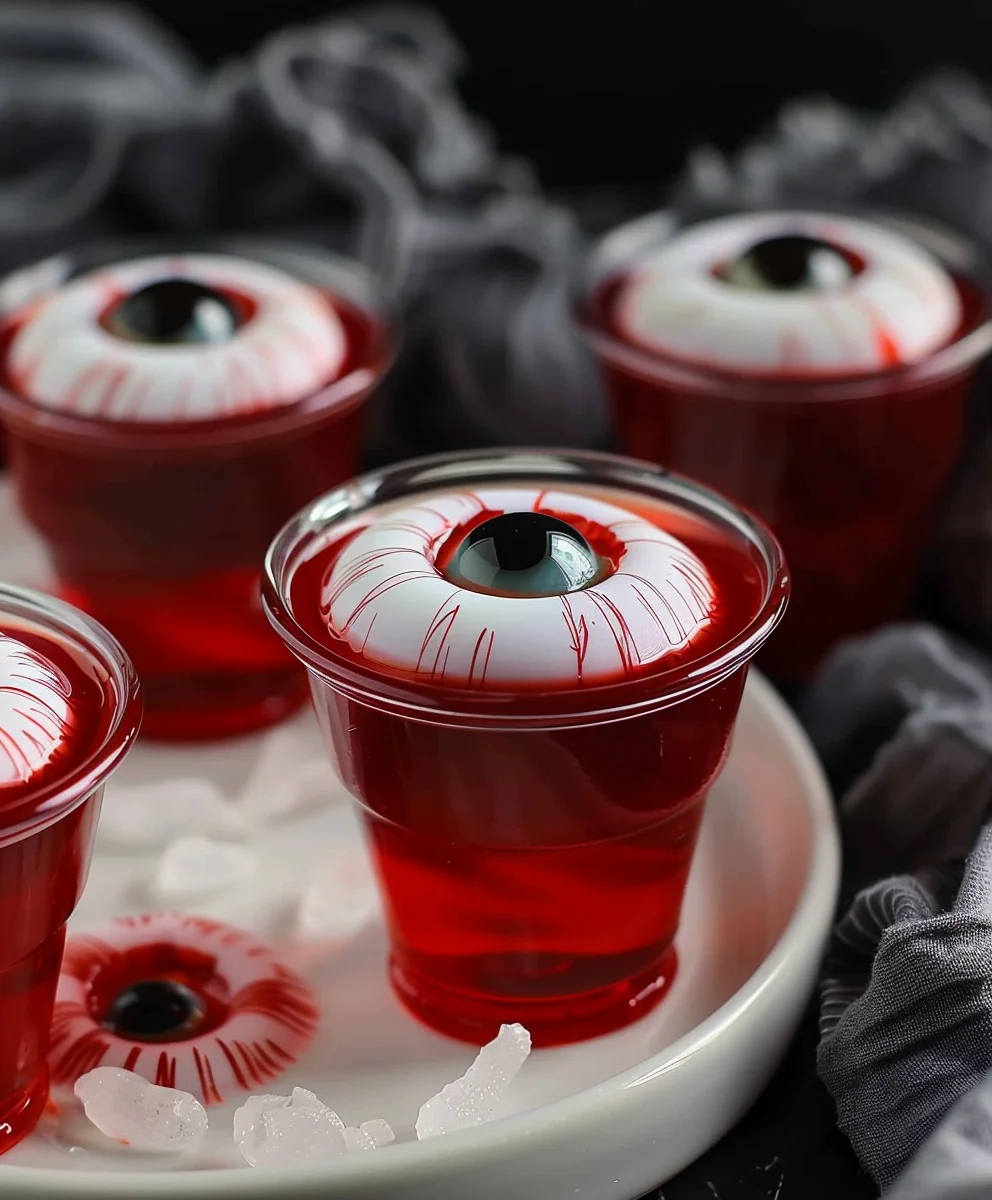
Halloween Eyeball Jello Shots – what an absolutely thrilling and delightfully eerie addition to any spooky celebration!

As the air turns crisp and the nights grow longer, there’s an undeniable magic that descends upon us, calling for costumes, carved pumpkins, and, of course, wonderfully wicked treats. This year, I am beyond excited to share a recipe that perfectly encapsulates the playful spirit of the season while also delivering a memorable burst of flavor and fun. Imagine the delighted gasps and joyful shrieks from your guests as they discover these ghoulishly good, wobbly wonders staring back at them from the party tray. It’s not just a snack; it’s a spectacle!

Why These Eyeball Jello Shots Are a Party Must-Have

While jello shots have long been a vibrant staple at social gatherings, Halloween offers the perfect excuse to infuse them with a unique, macabre charm. This particular concoction taps into the holiday’s tradition of playful horror, transforming a simple dessert into an artful, edible decoration. People absolutely adore this dish not only for its striking visual appeal but also for its surprisingly delicious taste and irresistible texture. The sweet, fruity jello combined with the unexpected “eyeball” element creates a treat that is both a conversation starter and a palate pleaser. They are incredibly convenient to prepare in advance, freeing you up to enjoy your own party. Trust me, these Halloween Eyeball Jello Shots are an absolute must-have for your upcoming spooky soiree, promising smiles, shivers, and satisfying sips.

Spooky Halloween Eyeball Jello Treats - Fun & Creepy! this RECIPE

Ingredients:

  • For the Irises (choose 2-3 colors for variety, e.g., Blue Raspberry, Lime, Cherry/Orange):
    • 3 x 3-ounce packages flavored Jell-O (one package per chosen color for the iris).
    • 3 cups boiling water (1 cup per package of Jell-O).
    • 3 cups cold water (1 cup per package of Jell-O).
    • Optional: 1/4 cup vodka per color if you want to make the irises alcoholic, reducing the cold water by 1/4 cup for each.
  • For the Pupils:
    • Approximately 100-150 small chocolate chips (miniature ones work best for a realistic pupil size).
    • Alternatively, small round dark candies or a small batch of black Jell-O (made with 1/2 of a 3-ounce packet, 1/2 cup boiling water, 1/2 cup cold water, and a few drops of black food coloring for extra intensity).
  • For the Sclera (the White of the Eyeball):
    • 3 packets (0.25 ounces each, approximately 2.25 teaspoons per packet) unflavored gelatin (like Knox brand).
    • 1 can (14 ounces) sweetened condensed milk.
    • 1 cup boiling water.
    • 1 cup cold water.
    • 1 cup high-quality vodka (optional, but essential for “shots” – adjust to taste, but this ratio provides a good balance for setting). If omitting vodka, replace with an additional 1 cup of cold water.
  • For the Bloodshot Veins (Optional, but highly recommended for realism):
    • Red food coloring (gel or liquid).
    • A very fine paintbrush or a clean toothpick.
  • Equipment and Tools:
    • Mini muffin tins or silicone half-sphere molds (preferably 1-inch diameter or similar) for the main eyeball shots. You’ll need enough to make approximately 24-36 shots.
    • A shallow baking dish or tray (e.g., 9×13 inch) for setting the iris layers.
    • Small round cookie cutters (about 0.75-1 inch in diameter) for cutting the irises.
    • Mixing bowls (at least 5-6, or enough to wash and reuse quickly).
    • Whisks.
    • Liquid measuring cups.
    • Measuring spoons.
    • Non-stick cooking spray or a light coating of neutral oil.
    • A small plate or baking sheet lined with parchment paper for holding the iris components.

Preparing Your Workspace and Molds:

Before we dive into the colorful world of Jell-O, let’s get our workspace ready. I always find that having everything prepped and organized makes the whole process so much smoother and more enjoyable. Trust me, with Jell-O, timing and temperature are key, so you don’t want to be scrambling for a mold when your mixture is already starting to set!

  1. Gather Your Tools: Lay out all your mixing bowls, whisks, measuring cups, and spoons. Make sure your mini muffin tins or silicone half-sphere molds are clean and dry.
  2. Grease Your Molds: This is a crucial step for easy demolding later. Lightly spray the cavities of your mini muffin tins or silicone molds with non-stick cooking spray. If you prefer, you can use a tiny bit of neutral oil (like vegetable or canola) and wipe it around with a paper towel. You want a very thin, even layer, not pools of oil. This will ensure your gruesome eyeballs pop out without any tearing or sticking.
  3. Prepare the Iris Setting Dish: For the iris layers, we’ll be using a shallow baking dish, like a 9×13-inch glass dish. You don’t need to grease this one, as we’ll be cutting the Jell-O out later. Just make sure it’s clean and ready to receive your vibrant colored Jell-O mixtures.
  4. Clear Fridge Space: Jell-O requires significant chilling time between layers, so ensure you have ample, flat space in your refrigerator for all your dishes and molds. Wobbly shelves are not your friend here!

Crafting the Irises and Pupils:

This is where the artistic part truly begins! We’re aiming for vibrant, distinct iris colors with a clear, dark pupil. I love how these small details really bring the “eyeball” to life.

Step 1: Preparing the Iris Jell-O Layers

  1. Choose Your Colors: Select your first Jell-O flavor for the iris. I usually start with Blue Raspberry or Lime for a classic, eerie look.
  2. Dissolve the Jell-O: In a medium mixing bowl, empty one 3-ounce package of flavored Jell-O. Carefully pour 1 cup of boiling water over the Jell-O powder. Whisk continuously for about 2-3 minutes until the powder is completely dissolved. You want to make sure there are no undissolved granules at the bottom; this ensures a smooth, even color and texture.
  3. Add Cold Liquid (and Vodka, if using): Now, add 1 cup of cold water to the dissolved Jell-O. If you’re making these alcoholic, this is the time to add 1/4 cup of vodka, reducing the cold water by 1/4 cup to maintain the liquid balance. Whisk well to combine all ingredients thoroughly.
  4. Pour and Chill: Carefully pour this colored Jell-O mixture into your prepared shallow baking dish. You want a layer that’s about 1/4 to 1/2 inch thick – thick enough to cut out circles but not so thick that it becomes clunky. Transfer the dish to the refrigerator and let it chill until firm, which usually takes about 2-3 hours. It needs to be completely set and firm to the touch before you proceed.
  5. Repeat for Each Color: Wash your mixing bowl and repeat steps 1-4 for each additional iris color you’ve chosen. Having multiple colors adds a fun, varied look to your final batch of eyeball shots!

Step 2: Cutting the Irises and Adding the Pupils

  1. Prepare for Cutting: Once all your colored Jell-O layers are completely firm, take one dish out of the refrigerator.
  2. Cut Out Irises: Using your small round cookie cutter (about 0.75-1 inch in diameter), press firmly into the set Jell-O to cut out individual iris discs. Gently lift each disc out and place it onto a parchment-lined plate or baking sheet. Be delicate, as Jell-O can tear easily. You should be able to get quite a few irises from each batch.
  3. Add the Pupils: For each iris disc, carefully place a single miniature chocolate chip in the center. The flat side of the chip can face down or up, depending on the look you prefer. I find that facing the flat side down gives a slightly more embedded look. If you’re using small round dark candies, place one in the center. If you opted for a small batch of black Jell-O, you can use a tiny piping tip or a skewer to drop a small dot of firm black Jell-O into the center.
  4. Chill Again: Once all your irises have pupils, pop them back into the fridge. Keeping them cold and firm is essential for easy handling when we embed them into the white sclera Jell-O.

Mixing the Sclera (White) Jello Base:

Now it’s time to create the eerie white base that will form the main “eyeball” of our Jell-O shots. This mixture needs to be perfectly smooth and creamy, so pay attention to the dissolving process.

  1. Bloom the Gelatin: In a large mixing bowl, sprinkle the three packets of unflavored gelatin over 1 cup of cold water. Allow it to “bloom” for about 5 minutes. This means the gelatin will absorb the water and swell, becoming thick and opaque. This step is critical for proper dissolving later and prevents a grainy texture in your final shots.
  2. Dissolve the Gelatin: Carefully pour 1 cup of boiling water over the bloomed gelatin. Whisk vigorously for about 2-3 minutes until the gelatin is completely dissolved. It’s important to ensure there are no lumps or undissolved granules, as these will affect the clarity and texture of your sclera. The mixture should be clear and smooth.
  3. Add Sweetened Condensed Milk: Pour in the entire can of sweetened condensed milk. Whisk thoroughly until it’s fully incorporated and the mixture is a uniform, opaque white. The sweetness of the condensed milk perfectly balances the plain gelatin and any alcohol you might add.
  4. Add Vodka (or Water): Finally, add 1 cup of cold vodka (or 1 cup of cold water if making them non-alcoholic). Whisk again until everything is perfectly combined. The mixture should now be a smooth, creamy white liquid, ready for assembly.

Assembling the Eyeball Jello Shots:

This is where all our hard work comes together! The key here is working efficiently but carefully, as the sclera Jell-O will start to set relatively quickly.

  1. First Pour of Sclera: Take your prepared mini muffin tins or silicone molds. Carefully pour the white sclera Jell-O mixture into each cavity, filling them approximately halfway. You want enough space to comfortably place an iris, but also enough to cover it fully later.
  2. Partial Chill: Transfer the molds to the refrigerator for about 15-20 minutes, or until the white Jell-O is partially set. It should be firm enough to hold an iris without it sinking, but still slightly tacky on top. This partial set is crucial; if it’s too liquid, the iris will sink; if it’s too firm, it won’t meld properly.
  3. Place the Irises: Retrieve your chilled iris and pupil discs from the refrigerator. Very carefully, using a small spatula, a clean toothpick, or your fingers (make sure they are clean!), place one iris-pupil disc into the center of each partially set sclera Jell-O cavity. Try to position it so the pupil is facing upwards and centered. Don’t press it down too hard, just gently lay it on top.
  4. Second Pour of Sclera: Once all your irises are in place, gently pour the remaining white sclera Jell-O mixture over each cavity, filling them to the top. This will encase the iris, creating a complete eyeball. If your sclera mixture has started to thicken in the bowl, you can gently re-warm it over a double boiler for a minute or two, stirring constantly, to make it pourable again – but don’t let it get hot.
  5. Final Chill: Transfer the filled molds back to the refrigerator. Allow them to chill for at least 4-6 hours, or preferably overnight, until they are completely firm and fully set. Patience here is key for perfectly formed, firm eyeballs!

Adding the Ghoulish Veins (Optional but Highly Recommended!):

To truly elevate these to “Halloween Eyeball Jello Shots,” we absolutely must add some bloodshot veins! This step takes them from simply “eyeballs” to truly gruesome and fun party treats.

  1. Prepare Your Vein “Paint”: Place a very small drop of red food coloring (gel colors work wonderfully for intensity) onto a small plate or piece of parchment paper. If you’re using liquid food coloring, you might want to use it straight, or dilute it with a tiny drop of water if it seems too vibrant.
  2. Get Your Tools Ready: Have your very fine paintbrush or a clean toothpick ready. If using a paintbrush, make sure it’s clean and has a fine point for delicate work.
  3. Demold One Eyeball (Carefully!): Before you add veins to all of them, I recommend demolding just one or two to practice. Gently run a thin knife or spatula around the edge of the Jell-O shot in the mold to loosen it. Then, invert the mold onto your hand or a clean surface. The Jell-O shot should pop out relatively easily thanks to our initial greasing.
  4. Paint the Veins: Dip the tip of your paintbrush or toothpick into the red food coloring. With a very light hand, gently dab and draw thin, squiggly lines radiating outwards from the iris towards the edges of the white sclera. Think of how bloodshot eyes look – thin, uneven, sometimes branching lines. Less is often more here, as you can always add more, but it’s hard to remove!
  5. Repeat for All Eyeballs: Continue this process for all your demolded eyeball Jell-O shots. Once the veins are applied, they are ready to be served. The food coloring will dry relatively quickly on the surface.

Demolding and Serving Your Spooky Creations:

The moment of truth! Getting these beauties out of their molds without damage requires a gentle touch and a little patience. Once they’re out, they’re ready to scare and delight your guests!

  1. Loosen the Edges: Once the Jell-O shots are fully set and you’re ready to serve, gently run a thin, flexible knife or a small offset spatula around the very edge of each Jell-O shot in its mold. This helps to break the suction and loosen the Jell-O from the mold walls.
  2. Gentle Release: If using silicone molds, gently push from the bottom of each cavity to pop out the eyeball shot. If using mini muffin tins, you might need to carefully lift the edge and then flip the tray over onto a clean plate or serving platter, allowing them to fall out. Sometimes a slight twist of the tray helps.
  3. Arrange and Serve: Arrange your “Halloween Eyeball Jello Shots” on a serving platter. You can place them in a bowl of crushed ice to keep them extra chilled, or simply arrange them artfully on a spooky themed tray. They look particularly striking under some mood lighting!
  4. Storage: Any leftover eyeball shots should be stored in an airtight container in the refrigerator. They will typically last for 3-5 days, though I find they are best enjoyed within the first 24-48 hours for optimal texture and flavor.

Tips for Success and Troubleshooting:

Making Jell-O shots, especially intricate ones like these, can sometimes present a few challenges. Here are my top tips and solutions to common issues to ensure your Halloween Eyeball Jello Shots are a screaming success!

Getting Jell-O to Set Properly:

  • Measure Accurately: Precision in liquid measurements is crucial, especially with Jell-O. Too much water, and your Jell-O won’t set firmly; too little, and it might be too rubbery.
  • Hot Water is HOT: Ensure your “boiling water” is truly boiling when dissolving the Jell-O and unflavored gelatin. This is key to a complete dissolution and a smooth, lump-free texture.
  • Chill Time: Don’t rush the chilling process. Jell-O needs ample time in the refrigerator to set completely. If you try to work with it too early, layers can blend or fall apart. When in doubt, give it another hour.
  • Vodka Ratios: Alcohol can interfere with Jell-O’s setting power. The ratios I’ve provided are tried and true for a good set with an alcoholic kick. If you add significantly more vodka than recommended, you risk your Jell-O not setting at all. If you’re worried, a little less vodka or an extra packet of unflavored gelatin can provide insurance.

Preventing Layers from Separating or Blending:

  • Partial Set is Key: For embedding the irises into the sclera, the “partial set” stage is critical. The first layer of white sclera Jell-O should be firm enough to support the iris without it sinking, but still slightly tacky on top so the next layer can adhere to it. If it’s too firm, the layers might separate when served. If it’s too liquid, your iris will just float or sink.
  • Temperature Matching: When pouring subsequent layers (like the second pour of sclera over the irises), ensure the liquid Jell-O is cool, but still pourable. Pouring hot Jell-O onto a set layer will melt it, causing blending and potential separation.

Demolding Challenges:

  • Generous Greasing: I cannot stress this enough – properly greasing your molds is the number one trick to easy demolding. A thin, even layer of non-stick spray or neutral oil makes all the difference.
  • Warm Water Bath (Carefully!): If you’re struggling to demold, you can very briefly (a few seconds!) dip the bottom of your mold in warm water. Be extremely careful not to let water get into the Jell-O shots themselves. This helps loosen the edges, but don’t overdo it, or your shots will melt.
  • Patience and a Gentle Touch: Jell-O is delicate. Don’t force it out. Gently running a knife around the edge to break the seal, and then pushing from the bottom (for silicone molds) or inverting (for metal tins), is the best approach.

Achieving Realistic Veins:

  • Less is More: Start with very small amounts of red food coloring on your brush or toothpick. You can always add more, but you can’t take it away!
  • Practice: If you’re nervous, try practicing on a few “test” eyeballs or even a piece of plain white Jell-O.
  • Irregularity: Remember that real blood vessels are irregular and branching. Don’t aim for perfect, straight lines. embrace the messiness for a more authentic, gory look!

With these tips in your arsenal, you’re well-equipped to create the most deliciously spooky Halloween Eyeball Jello Shots that will be the talk of any Halloween gathering. Happy haunting, and happy Jell-O making!

Spooky Halloween Eyeball Jello Treats - Fun & Creepy!

Conclusion:

Honestly, if you’re looking to elevate your Halloween party game this year, you simply cannot go past this incredible recipe. I’ve spent so much time perfecting it, and I genuinely believe it’s one of the most delightful and surprisingly simple ways to infuse a huge dose of spooky fun into your festivities. This isn’t just about making another dessert; it’s about crafting an experience, a memorable moment that will have your guests talking long after the last bite has been savored. My aim was to create something truly unique that captures the playful eeriness of Halloween, and I truly think we’ve achieved that with these captivating treats.

From the moment these eerie, yet undeniably captivating, treats hit your party table, they become an instant talking point. Imagine the gasps, the smiles, and the delighted shivers from your guests as they encounter these wonderfully wobbly creations. They’re not just a snack; they’re an experience, a miniature work of edible art that perfectly embodies the spirit of Halloween without requiring a culinary degree to pull off. The visual impact alone is worth the small amount of effort, transforming a standard jello shot into a ghoulish masterpiece that screams “Happy Halloween!” in the most charmingly macabre way possible. I always get such a kick out of seeing people’s faces light up with a mix of surprise and amusement when they first lay eyes on them.

Why This Recipe Is an Absolute Must-Try:

What I particularly love about our Halloween Eyeball Jello Shots is their versatility and sheer ‘wow’ factor. They are designed to be a centerpiece, something that guests gravitate towards, both for their appearance and for their delightfully jiggly texture and vibrant, fruity taste. Each one is a little burst of joy, albeit a slightly ghoulish one, that will linger in your guests’ memories long after the last candy corn has been devoured. They strike that perfect balance between being impressively elaborate in appearance and incredibly straightforward to prepare, making them ideal for even the busiest party host. Trust me, the compliments will flow, and you’ll feel like a culinary wizard, even if all you really did was follow a few simple steps.

Serving Suggestions to Elevate Your Presentation:

Now, when it comes to serving these beauties, don’t just plop them on a tray! Think about presentation. A dark, eerie serving platter, perhaps dusted with a little cocoa powder to mimic dirt, or nestled amongst some fake spiderwebs, can really enhance the mood. Consider serving them chilled in clear plastic shot glasses or small decorative cups so the ‘eyeball’ effect is fully visible from all angles. For a fun twist, you could even create a “graveyard” display, with crumbled chocolate cookies as soil and our jello shots poking out like freshly unearthed horrors. You could even use some dry ice (carefully!) for a smoking, mysterious effect around the platter, just imagine the dramatic impact that would have on your partygoers! A sprinkle of edible glitter around the base of the cups can also add a subtle, eerie glow.

Creative Variations for Every Taste:

And don’t be afraid to experiment with variations! While I adore the classic lime and cherry combo for its vivid contrast, imagine blueberry jello with a lychee pupil for an even darker, more mysterious look, or perhaps an orange jello with a green olive pupil for a truly alien vibe. You can swap out the alcohol too; think rum for a tropical zombie eye, or even a spiced whiskey for a warmer, autumnal feel. For those wanting a non-alcoholic, kid-friendly version, simply omit the alcohol! You can make a batch with juice or flavored soda instead of spirits – they’ll still be incredibly fun and visually striking for the younger ghouls and goblins at your gathering. You could even use small gummy eyeballs or candy eyes if lychees are hard to find, adding another layer of playful creepiness that’s especially appealing to children. For a truly gruesome effect, try adding a drop of red food coloring around the ‘iris’ before the jello sets completely, to mimic bloodshot eyes! The possibilities for customization are truly endless.

So, what are you waiting for? I’ve shared all my secrets, tips, and tricks with you, and now it’s your turn to unleash your inner mad scientist in the kitchen! This Halloween, make a statement with these truly unique and unforgettable treats. I promise you, the effort is minimal, but the payoff in terms of smiles, laughter, and Instagram-worthy moments is absolutely huge. Don’t let another spooky season pass without experiencing the sheer delight of bringing these to life. They are more than just a recipe; they are an invitation to embrace the fun and theatricality that Halloween offers, transforming simple ingredients into something truly extraordinary.

Once you’ve conjured up your own batch of these delightful delicacies, I would absolutely love to hear about your experience. Did you stick to the original recipe, or did you get creative with your own spooky twists? Please share your photos and tell us about your guests’ reactions in the comments below! Your feedback not only makes my day but also inspires others in our community to get cooking and experiment. Let’s make this Halloween the most deliciously eerie one yet, together! I can’t wait to see all your fantastic creations and hear how much fun you had making and sharing them.


Halloween Eyeball Jello Shots

Halloween Eyeball Jello Shots

These Halloween Eyeball Jello Shots are a thrilling and delightfully eerie addition to any spooky celebration! Perfect for playful horror, these wobbly treats offer a memorable burst of flavor and fun, sure to delight your guests with their ghoulishly good appearance.

Prep Time
15 Minutes

Cook Time
0 Minutes

Total Time
30 Minutes

Servings
9 shots

Ingredients

  • 1 (3 oz) package strawberry flavored gelatin
  • ¾ cup non-alcoholic red berry flavored liquid
  • 1¼ cups boiling water
  • 9 bloodshot eye candies

Instructions

  1. Step 1
    In a medium mixing bowl, empty the strawberry flavored gelatin package. Carefully pour 1¼ cups of boiling water over the powder. Whisk continuously for about 2-3 minutes until the gelatin is completely dissolved.
  2. Step 2
    Add ¾ cup of non-alcoholic red berry flavored liquid (e.g., juice, flavored syrup mixed with water) to the dissolved gelatin mixture. Whisk well to combine thoroughly.
  3. Step 3
    Lightly grease your mini muffin tins or desired molds. Carefully pour the jello mixture into each cavity. Transfer the molds to the refrigerator and let them chill for at least 2-3 hours, or until completely firm.
  4. Step 4
    Once the jello shots are fully set, gently demold them. Carefully place one bloodshot eye candy on top of each jello shot for a spooky eyeball decoration.
  5. Step 5
    Arrange your Halloween Eyeball Jello Shots on a serving platter and serve chilled. Store any leftovers in an airtight container in the refrigerator for up to 3-5 days.

Important Information

Nutrition Facts (Per Serving)

It is important to consider this information as approximate and not to use it as definitive health advice.

Allergy Information

Please check ingredients for potential allergens and consult a health professional if in doubt.

« Previous Post
Delicious Autumn Beef Sausage Pasta with Roasted Butternut Squash
Next Post »
Mini Halloween Pizzas: Spooky Fun for Kids & Adults!

If you enjoyed this…

Easy Peppermint Swirl Cookies: Deliciously Minty & Swirly

Sprinkle Thumbprint Cookies: A Delicious and Easy Recipe

Delicious Bee Sting Sheet Cake: Caramel Almond Topping

Primary Sidebar

Browse by Diet

BreakfastDinnerLunchDessertAppetizer

Sweet Peach Yogurt Parfait Delight

One of my fondest memories is from a lazy summer afternoon spent at my grandmother’s house. The sun filtered through the kitchen window, casting a warm glow over the table where she would create her culinary magic. It was during one of those blissful moments that I first tasted her Peach Yogurt Parfait with Honey and Granola. The sweet aroma of ripe peaches mingling with creamy yogurt and the crunch of granola was nothing short of heavenly. It felt like summer captured in a bowl, and I still remember the joy of diving in with a spoon, each layer revealing a new burst of flavor.

When I think about that parfait, I can almost hear the gentle hum of the bees outside, reminding me of the floral notes that honey brings to every bite. The vibrant yellows and soft oranges of the peaches contrast beautifully with the creamy white yogurt and the golden crunch of granola. It’s a dish that not only looks delightful but also tastes like a celebration of fresh, wholesome ingredients.

What makes my version of this Peach Yogurt Parfait special is the careful balance of flavors and textures. I use ripe, juicy peaches, drizzled with locally sourced honey, and a homemade granola that’s bursting with nuts and seeds for an extra crunch. It’s a simple dish, but every layer is crafted with love and attention.

Let me show you exactly how to make this delightful parfait, so you can bring a bit of that summer magic into your kitchen!

Sweet Peach Yogurt Parfait Delight

Why You’ll Love This Recipe

  • Delightfully creamy texture from the Greek yogurt, paired with the juicy sweetness of fresh peaches.
  • Ready in under 20 minutes, making it a quick and satisfying breakfast or snack option.
  • Budget-friendly, using common ingredients that you may already have in your pantry.
  • Customizable with your favorite granola and nuts, allowing you to tailor each parfait to your taste.
  • Perfectly balanced flavors with the bright acidity of lemon juice and the sweetness of honey enhancing the peaches.

Ingredients

  • For the Parfait:
  • 2 cups plain Greek yogurt (or vanilla yogurt for a sweeter option)
  • 2 large ripe peaches, diced (about 2 cups)
  • 1 tablespoon fresh lemon juice (to prevent browning of peaches)
  • 2 tablespoons honey (plus more for drizzling)
  • 1 teaspoon vanilla extract (optional for extra flavor)
  • For the Granola:
  • 1 cup granola (store-bought or homemade; see notes for a simple granola recipe)
  • 1/4 cup sliced almonds (optional for added crunch)
  • 1/4 cup shredded coconut (optional for added flavor)

Let’s dive into some key ingredients that make this Peach Yogurt Parfait so delightful! First, the Greek yogurt is not only creamy but also packed with protein, making it a satisfying option for breakfast or a snack. If you’re looking for a sweeter option, you can easily substitute it with vanilla yogurt, though it may alter the overall flavor balance. Next, the ripe peaches are the star of the show; their natural sweetness shines through, so I recommend choosing peaches that yield slightly to pressure, indicating they’re perfectly ripe. If peaches aren’t in season, feel free to use nectarines or even frozen peaches—just thaw them before use. Finally, honey adds a lovely floral sweetness that ties everything together. If you prefer, maple syrup can serve as a delicious substitute.

Step-by-Step Instructions

  1. Start by preparing the peaches. Wash them thoroughly, then slice and dice them into bite-sized pieces. In a medium bowl, toss the diced peaches with 1 tablespoon of fresh lemon juice to prevent browning. Set aside for about 5 minutes while the lemon juice works its magic.
  2. In a separate bowl, combine the Greek yogurt, 2 tablespoons of honey, and 1 teaspoon of vanilla extract if using. Stir the mixture until smooth and thoroughly blended. This should take about a minute. Avoid overmixing to maintain the creaminess of the yogurt.
  3. Now it’s time to layer your parfait. Grab a clear glass or bowl to showcase your beautiful creation. Start with a generous spoonful of the yogurt mixture at the bottom—about 1/4 cup will do. Use a spoon to spread it evenly.
  4. Add a layer of the diced peaches over the yogurt, ensuring they cover the yogurt completely. You might want to use about half of what you have prepared—roughly 1 cup. This layer should be visually appealing, so arrange the peaches neatly.
  5. Sprinkle 1/4 cup of granola over the peaches. This adds a delightful crunch. Make sure to distribute it evenly to ensure every bite has that satisfying texture. Avoid packing it down too tightly, as you want it to maintain its crunch.
  6. Repeat the layers: spoon in another 1/4 cup of yogurt, followed by another cup of peaches, and another sprinkle of granola. You should have at least two layers, but feel free to add more depending on your glass size.
  7. Finish off your parfait with a drizzle of honey on top for added sweetness and a touch of elegance. If you’re using sliced almonds or shredded coconut, sprinkle them on top now. It adds a lovely visual contrast and extra flavor.
  8. Serve immediately or refrigerate for up to 30 minutes before serving to allow the flavors to meld together. However, I recommend enjoying it fresh to maintain the granola’s crunch.

Pro Tips for the Best Peach Yogurt Parfait With Honey And Granola

  • Make sure to choose ripe peaches for the best flavor and texture. A common mistake is using unripe fruit, which can lead to a less enjoyable parfait. Look for peaches that are fragrant and slightly soft to the touch.
  • Use a clear glass to assemble your parfait; this not only makes for a beautiful presentation but also allows you to see the colorful layers, which adds to the enjoyment of eating it.
  • For an even creamier texture, consider whipping the Greek yogurt with a hand mixer for a couple of minutes before layering. This small adjustment makes a huge difference in mouthfeel.
  • Be mindful of the granola-to-yogurt ratio. Too much granola can overwhelm the parfait, while too little can make it feel too creamy. Aim for about 1/4 cup of granola per layer for the perfect balance.
  • If you’re making this for a gathering, consider preparing the yogurt and peaches ahead of time and layering them just before serving. This ensures the granola stays crunchy!

Variations & Serving Ideas

There are so many ways to get creative with your Peach Yogurt Parfait! For a tropical twist, swap out the peaches for mangoes or pineapples and top with coconut flakes. If you prefer a berry flavor, mix in some blueberries or strawberries with the peaches for added color and taste. For a nutty version, incorporate chopped walnuts or pecans instead of almonds.

As for serving ideas, this parfait pairs beautifully with a side of scrambled eggs for a hearty breakfast or fresh fruit salad for a light lunch. You might also enjoy it alongside whole grain toast with almond butter for an energizing snack. The contrast of flavors and textures will elevate your meal experience!

Storage, Make-Ahead & Reheating

The Peach Yogurt Parfait is best enjoyed fresh, but you can prepare some components ahead of time. Store the layered parfait in an airtight container in the refrigerator for up to 24 hours. However, be cautious; the granola may lose its crunch if stored too long. You can freeze the yogurt and peach mixture for up to 2 months; just remember to thaw it in the refrigerator overnight before serving.

If you plan to enjoy this dish the next day, it can taste even better as the flavors meld together. Just remember to add the granola right before serving to keep its delightful crunch!

Frequently Asked Questions

Can I make Peach Yogurt Parfait With Honey And Granola ahead of time?

Yes — in fact, it tastes even better the next day as the flavors meld. However, I recommend waiting to add the granola until just before serving to maintain its crunch.

What can I substitute for Greek yogurt?

If you prefer a lighter option, you can substitute Greek yogurt with regular yogurt or a dairy-free alternative like coconut yogurt. Just remember that this may alter the creaminess and flavor profile slightly.

Can I use frozen peaches for this parfait?

Absolutely! Just make sure to thaw the frozen peaches before using them. They will still add great flavor, though the texture may be slightly softer than fresh peaches.

How do I make the parfait vegan?

To make a vegan version, substitute the Greek yogurt with a plant-based yogurt alternative, and replace honey with maple syrup or agave nectar. This keeps the parfait sweet while adhering to a vegan diet.

What other fruits can I use in this recipe?

You can mix and match fruits based on your preference. Try using strawberries, blueberries, raspberries, or even bananas. Just make sure to adjust the lemon juice as needed to prevent browning.

Sweet Peach Yogurt Parfait Delight

Final Thoughts

The Peach Yogurt Parfait with Honey and Granola is a delightful blend of creamy yogurt, sweet peaches, and crunchy granola that creates a satisfying and nourishing treat. Each layer bursts with flavor, making it a perfect choice for breakfast or a light dessert.

This is the kind of recipe I come back to again and again, especially when I want something refreshing and wholesome to start my day. The harmony of sweet and tart flavors, combined with the delightful crunch, never fails to lift my spirits!

I encourage you to give this parfait a try and indulge in its comforting goodness. Feel free to share your results or even add your own twist—perhaps a sprinkle of cinnamon or a handful of nuts. Enjoy creating your perfect parfait!

Print
clock clock iconcutlery cutlery iconflag flag iconfolder folder iconinstagram instagram iconpinterest pinterest iconfacebook facebook iconprint print iconsquares squares iconheart heart iconheart solid heart solid icon

Peach Yogurt Parfait


  • Author: Lily author
  • Total Time: 15 minutes
  • Yield: 4 servings 1x
Pin Recipe
Print Recipe

Description

This Peach Yogurt Parfait combines creamy Greek yogurt, juicy peaches, and crunchy granola for a delightful treat. It’s a perfect breakfast or snack that captures the essence of summer in every bite.


Ingredients

Scale
  • For the Parfait:
  • 2 cups plain Greek yogurt (or vanilla yogurt for a sweeter option)
  • 2 large ripe peaches, diced (about 2 cups)
  • 1 tablespoon fresh lemon juice (to prevent browning of peaches)
  • 2 tablespoons honey (plus more for drizzling)
  • 1 teaspoon vanilla extract (optional for extra flavor)
  • For the Granola:
  • 1 cup granola (store-bought or homemade; see notes for a simple granola recipe)
  • 1/4 cup sliced almonds (optional for added crunch)
  • 1/4 cup shredded coconut (optional for added flavor)

Instructions

  1. Start by preparing the peaches. Wash them thoroughly, then slice and dice them into bite-sized pieces. In a medium bowl, toss the diced peaches with 1 tablespoon of fresh lemon juice to prevent browning. Set aside for about 5 minutes while the lemon juice works its magic.
  2. In a separate bowl, combine the Greek yogurt, 2 tablespoons of honey, and 1 teaspoon of vanilla extract if using. Stir the mixture until smooth and thoroughly blended. This should take about a minute. Avoid overmixing to maintain the creaminess of the yogurt.
  3. Now it’s time to layer your parfait. Grab a clear glass or bowl to showcase your beautiful creation. Start with a generous spoonful of the yogurt mixture at the bottom—about 1/4 cup will do. Use a spoon to spread it evenly.
  4. Add a layer of the diced peaches over the yogurt, ensuring they cover the yogurt completely. You might want to use about half of what you have prepared—roughly 1 cup. This layer should be visually appealing, so arrange the peaches neatly.
  5. Sprinkle 1/4 cup of granola over the peaches. This adds a delightful crunch. Make sure to distribute it evenly to ensure every bite has that satisfying texture. Avoid packing it down too tightly, as you want it to maintain its crunch.
  6. Repeat the layers: spoon in another 1/4 cup of yogurt, followed by another cup of peaches, and another sprinkle of granola. You should have at least two layers, but feel free to add more depending on your glass size.
  7. Finish off your parfait with a drizzle of honey on top for added sweetness and a touch of elegance. If you’re using sliced almonds or shredded coconut, sprinkle them on top now. It adds a lovely visual contrast and extra flavor.
  8. Serve immediately or refrigerate for up to 30 minutes before serving to allow the flavors to meld together. However, I recommend enjoying it fresh to maintain the granola’s crunch.
  • Prep Time: 15 mins
  • Cook Time: 0 mins
  • Category: Breakfast
  • Method: No-cook
  • Cuisine: American

Nutrition

  • Serving Size: 1 parfait
  • Calories: 250
  • Sugar: 20 g
  • Sodium: 50 mg
  • Fat: 5 g
  • Saturated Fat: 2 g
  • Unsaturated Fat: 3 g
  • Trans Fat: 0 g
  • Carbohydrates: 40 g
  • Fiber: 3 g
  • Protein: 10 g
  • Cholesterol: 10 mg

Keywords: Choose ripe peaches for the best flavor and texture. Use a clear glass for a beautiful presentation. For creaminess, consider whipping the yogurt before layering. Be mindful of the granola-to-yogurt ratio. Prepare yogurt and peaches ahead of time for gatherings, layering just before serving.

Did you make this recipe?

Share a photo and tag us — we can't wait to see what you've made!

Sun-Kissed Frozen Orange Cream Slush

As a child, summer days felt like they lasted forever. I remember the sticky heat wrapping around me as I played outside, my laughter mingling with the sounds of the neighborhood. But nothing could cool me down quite like the moment I’d spot my grandmother, laboring over her blender, whipping up her famous Frozen Orange Creamsicle Slush. That vibrant orange treat, with its frosty texture and sweet citrus aroma, was like a burst of sunshine in a cup. Just one sip, and I could feel the coolness wash over me, sparking pure joy.

This Frozen Orange Creamsicle Slush has a way of making you feel like a kid again. Its creamy, dreamy consistency is a delightful balance of bright orange and soft vanilla, inviting you to dive right in. The refreshing tang of orange dances on your tongue, while the smooth creaminess envelops you in a comforting embrace. It’s a nostalgic treat that’s perfect for hot summer afternoons or anytime you need a little pick-me-up.

What makes my version of this slush stand out is the addition of a hint of vanilla bean, which elevates the flavor and adds an extra layer of richness. Plus, it’s super easy to whip up with just a few simple ingredients that you probably already have on hand! So, if you’re ready to relive those sun-soaked memories, let me show you exactly how to make it.

Sun-Kissed Frozen Orange Cream Slush

Why You’ll Love This Recipe

  • Each slush is a perfect blend of creamy vanilla and zesty orange, creating a nostalgic flavor reminiscent of summer days.
  • This refreshing treat is ready in under 15 minutes, making it an ideal quick dessert for unexpected guests or hot afternoons.
  • With just 8 simple ingredients, it’s budget-friendly, ensuring you don’t have to break the bank to enjoy a delicious slush.
  • The slush has a perfectly smooth texture, thanks to the combination of ice and ice cream, providing a delightful contrast to the bright citrus flavors.
  • It’s highly customizable; you can easily adjust the sweetness and add fresh herbs for a unique twist that suits your taste.

Ingredients

  • 2 cups orange juice (freshly squeezed or store-bought)
  • 1 cup vanilla ice cream
  • 1 cup crushed ice
  • 1/2 cup milk (whole or 2%)
  • 1/4 cup granulated sugar (adjust based on sweetness preference)
  • 1 teaspoon vanilla extract
  • Zest of 1 orange (for added flavor)
  • Fresh orange slices and mint leaves (for garnish)

The star of this Frozen Orange Creamsicle Slush is the orange juice, which provides the vibrant, citrusy base. Freshly squeezed juice will yield the brightest flavor, but store-bought options can be just as convenient. If you’re opting for store-bought, choose 100% pure juice with no added sugars for the best results. Another essential ingredient is the vanilla ice cream; it adds creaminess and sweetness. You can substitute it with dairy-free ice cream if you’re looking for a vegan option. Whole or 2% milk complements the ice cream, creating a smooth blend. If you want a lower-calorie version, almond or oat milk can be good alternatives.

Lastly, the granulated sugar can be adjusted based on your sweetness preference. If you prefer a more natural sweetener, consider using honey or agave syrup. The orange zest enhances the flavor profile, providing an aromatic pop that brings the whole slush together. Don’t skip it! It adds an extra layer of brightness that makes this slush truly special.

Step-by-Step Instructions

  1. Start by preparing your ingredients. Gather 2 cups of orange juice, 1 cup of vanilla ice cream, and 1 cup of crushed ice. Make sure the ice is finely crushed, as larger chunks can make blending difficult.
  2. In a blender, combine the orange juice, vanilla ice cream, crushed ice, and 1/2 cup of milk. Add 1/4 cup of granulated sugar and 1 teaspoon of vanilla extract. If you like a sweeter slush, consider adding a bit more sugar at this stage.
  3. Add the zest of 1 orange to the blender. This step is crucial for enhancing the citrus flavor of your slush. Make sure not to include the bitter white pith—only the flavorful zest.
  4. Blend the mixture on medium-high speed for about 30-45 seconds. Stop once the ingredients are fully combined and the slush has a smooth, even consistency. If you notice large chunks of ice, blend for an additional 10-15 seconds. Avoid over-blending, as this can make the slush too liquidy.
  5. Once blended, taste the slush. If it needs more sweetness, add a little more sugar and blend for a few more seconds. If it’s too thick, you can add a splash of milk to reach your desired consistency.
  6. Pour the slush into glasses. This recipe typically serves 4, but you can easily double it for larger gatherings. Use a spoon to help guide the slush into the glasses if needed.
  7. Garnish each serving with fresh orange slices and mint leaves. The mint not only adds a pop of color but also a refreshing aroma that complements the citrus flavors beautifully.
  8. Serve immediately and enjoy! If you’ve made extra, you can refrigerate it for a short time, but it’s best enjoyed fresh.

Pro Tips for the Best Frozen Orange Creamsicle Slush

  • Don’t skip the orange zest! It’s a game-changer for flavor. Always zest before juicing to make it easier.
  • Use a high-powered blender for the best texture. A standard blender may struggle with ice, leading to uneven consistency. If you have a food processor, that can work too, but ensure the ice is finely crushed.
  • Adjust the ice-to-liquid ratio carefully. If your slush is too thick, it won’t blend well. Start with less ice and add more until you reach your preferred texture.
  • Be cautious with the sugar! Always start with the lower amount, as you can easily add more, but it’s hard to fix an overly sweet slush.
  • For a fun twist, consider adding a splash of coconut milk or a handful of fresh fruit like strawberries or pineapple. This not only enhances the flavor but also adds a beautiful color contrast.

Variations & Serving Ideas

There are countless ways to put a spin on your Frozen Orange Creamsicle Slush. Consider making a tropical version by adding in some pineapple juice or coconut milk for a delightful tropical twist. If you’re feeling adventurous, try incorporating a handful of frozen mango or peach slices for added sweetness. For a lighter version, swap out the vanilla ice cream for Greek yogurt for a creamy yet tangy alternative.

As for serving ideas, this refreshing slush pairs wonderfully with light summer dishes like grilled chicken skewers, fish tacos, or a simple salad topped with citrus vinaigrette. The bright, zesty flavors of the slush complement these dishes perfectly, making them an ideal pairing for a sunny day.

Storage, Make-Ahead & Reheating

This Frozen Orange Creamsicle Slush is best enjoyed fresh, but if you have leftovers, you can store them in an airtight container in the fridge for up to 2 days. Just keep in mind that the slush may lose some of its texture over time as the ice melts. It doesn’t freeze well, as the ice will turn into a solid block. If you must freeze it, blend again after thawing to restore the slushy consistency. This treat is best the day you make it, as the flavors meld together beautifully overnight, enhancing its deliciousness.

Frequently Asked Questions

Can I make Frozen Orange Creamsicle Slush ahead of time?

Yes — in fact, it tastes even better the next day as the flavors meld. However, it’s best to enjoy it fresh, as the texture can change if stored for too long. If you need to prepare it ahead, keep it in the fridge and re-blend before serving.

What kind of orange juice should I use?

For the best flavor, use freshly squeezed orange juice. However, if you’re short on time, opt for 100% pure store-bought juice without added sugars. This will ensure that your slush remains flavorful and refreshing.

Can I substitute the vanilla ice cream?

Absolutely! If you’re looking for a dairy-free option, coconut milk ice cream or a non-dairy vanilla ice cream can work wonderfully. They will still provide the creamy texture and sweetness you desire.

How can I adjust the sweetness of my slush?

You can easily adjust the sweetness by modifying the amount of sugar added. Start with 1/4 cup and taste the mixture before blending. If you prefer it sweeter, add more sugar gradually until it reaches your desired level.

What should I do if my slush is too thick?

If your slush is too thick, simply add a splash of milk or orange juice and blend again. This will help achieve a more drinkable consistency while maintaining the slushy texture. Adjust gradually to reach your preferred thickness.

Sun-Kissed Frozen Orange Cream Slush

Final Thoughts

The Frozen Orange Creamsicle Slush is a delightful blend of refreshing citrus and creamy goodness, making it a perfect treat for warm days or any time you crave a taste of nostalgia. The way the bright orange flavor dances with the creamy texture truly elevates this slush, transforming it into a satisfying escape from the everyday.

This is the kind of recipe I come back to again and again, especially when I’m looking to cool down or impress guests at a summer gathering. It’s simple to make and always brings smiles all around! I encourage you to try this recipe for yourself—don’t hesitate to share your results or even put your own spin on it. Happy slushing!

Print
clock clock iconcutlery cutlery iconflag flag iconfolder folder iconinstagram instagram iconpinterest pinterest iconfacebook facebook iconprint print iconsquares squares iconheart heart iconheart solid heart solid icon

Frozen Orange Creamsicle Slush


  • Author: Lily author
  • Total Time: 15 minutes
  • Yield: 4 servings 1x
Pin Recipe
Print Recipe

Description

This Frozen Orange Creamsicle Slush is a refreshing treat that combines creamy vanilla and zesty orange flavors. Perfect for hot summer days, it brings back nostalgic memories with every sip.


Ingredients

Scale
  • 2 cups orange juice (freshly squeezed or store-bought)
  • 1 cup vanilla ice cream
  • 1 cup crushed ice
  • 1/2 cup milk (whole or 2%)
  • 1/4 cup granulated sugar (adjust based on sweetness preference)
  • 1 teaspoon vanilla extract
  • Zest of 1 orange (for added flavor)
  • Fresh orange slices and mint leaves (for garnish)

Instructions

  1. Start by preparing your ingredients. Gather 2 cups of orange juice, 1 cup of vanilla ice cream, and 1 cup of crushed ice. Make sure the ice is finely crushed, as larger chunks can make blending difficult.
  2. In a blender, combine the orange juice, vanilla ice cream, crushed ice, and 1/2 cup of milk. Add 1/4 cup of granulated sugar and 1 teaspoon of vanilla extract. If you like a sweeter slush, consider adding a bit more sugar at this stage.
  3. Add the zest of 1 orange to the blender. This step is crucial for enhancing the citrus flavor of your slush. Make sure not to include the bitter white pith—only the flavorful zest.
  4. Blend the mixture on medium-high speed for about 30-45 seconds. Stop once the ingredients are fully combined and the slush has a smooth, even consistency. If you notice large chunks of ice, blend for an additional 10-15 seconds. Avoid over-blending, as this can make the slush too liquidy.
  5. Once blended, taste the slush. If it needs more sweetness, add a little more sugar and blend for a few more seconds. If it’s too thick, you can add a splash of milk to reach your desired consistency.
  6. Pour the slush into glasses. This recipe typically serves 4, but you can easily double it for larger gatherings. Use a spoon to help guide the slush into the glasses if needed.
  7. Garnish each serving with fresh orange slices and mint leaves. The mint not only adds a pop of color but also a refreshing aroma that complements the citrus flavors beautifully.
  8. Serve immediately and enjoy! If you’ve made extra, you can refrigerate it for a short time, but it's best enjoyed fresh.
  • Prep Time: 15 min
  • Cook Time: 0 min
  • Category: Dessert
  • Method: Blending
  • Cuisine: American

Nutrition

  • Serving Size: 1 serving
  • Calories: 200
  • Sugar: 30 g
  • Sodium: 50 mg
  • Fat: 5 g
  • Saturated Fat: 3 g
  • Unsaturated Fat: 2 g
  • Trans Fat: 0 g
  • Carbohydrates: 40 g
  • Fiber: 1 g
  • Protein: 2 g
  • Cholesterol: 20 mg

Keywords: Don't skip the orange zest! It's a game-changer for flavor. Always zest before juicing to make it easier.

Did you make this recipe?

Share a photo and tag us — we can't wait to see what you've made!

Zesty Lemon Poppy Seed Delight

One rainy afternoon, I found myself in my grandmother’s cozy kitchen, the kind that always smelled like warmth and love. She was whipping up her famous Lemon Poppy Seed Loaf, a recipe that had been passed down through generations. As the batter came together, the zesty aroma of fresh lemons filled the air, mingling perfectly with the nutty fragrance of poppy seeds. I can still picture her, apron-clad, as she expertly drizzled a vibrant citrus icing over the loaf, creating a glossy, sun-kissed finish that beckoned us to dive in. It was a moment that sparked my own passion for baking, and this recipe has become a cherished staple in my home ever since.

When you take a bite of this Lemon Poppy Seed Loaf, it’s like a burst of sunshine on your palate. The loaf is beautifully golden, with a tender crumb that melts in your mouth. Each slice is speckled with tiny poppy seeds, adding a delightful crunch that contrasts beautifully with the tangy sweetness of the lemon. And that citrus icing? It’s the finishing touch that elevates this loaf from ordinary to extraordinary, with its bright, zesty flavor dancing on your taste buds.

This recipe stands out because it embraces simplicity while delivering on flavor. I’ve added a hint of vanilla to the batter, enhancing the overall taste and making it even more indulgent. Trust me, once you make this Lemon Poppy Seed Loaf With Citrus Icing, it’ll become a go-to in your baking repertoire.

So, let me show you exactly how to make it!

Zesty Lemon Poppy Seed Delight

Why You’ll Love This Recipe

  • Moist and tender crumb that melts in your mouth, thanks to the perfect balance of butter and buttermilk.
  • Bright, zesty lemon flavor paired with crunchy poppy seeds, creating a delightful texture and taste experience.
  • Easy to whip up in just about an hour, perfect for last-minute gatherings or a cozy afternoon treat.
  • Budget-friendly with everyday ingredients, making it an accessible option for all home bakers.
  • The citrus icing adds a sweet tang that elevates the loaf, turning a simple recipe into a showstopper!

Ingredients

  • 1 ½ cups (190g) all-purpose flour
  • 1 teaspoon baking powder
  • ½ teaspoon baking soda
  • ½ teaspoon salt
  • 3 tablespoons poppy seeds
  • ½ cup (115g) unsalted butter, softened to room temperature
  • 1 cup (200g) granulated sugar
  • 2 large eggs
  • 1 teaspoon vanilla extract
  • 1 teaspoon lemon zest (from about 1 medium lemon)
  • ½ cup (120ml) buttermilk
  • 2 tablespoons fresh lemon juice

For the Citrus Icing:

  • 1 cup (120g) powdered sugar
  • 2 tablespoons fresh lemon juice
  • 1 tablespoon orange juice
  • 1 teaspoon lemon zest (for garnish, optional)

Let’s dive into the key ingredients that make this Lemon Poppy Seed Loaf so special. The all-purpose flour provides the structure and base for the loaf, while the baking powder and baking soda ensure it rises perfectly, giving the loaf a light texture. For a gluten-free variation, you could substitute the flour with a gluten-free all-purpose blend. Poppy seeds not only add a delightful crunch but also contribute to the unique flavor profile that pairs well with the citrus notes.

Unsalted butter is crucial for achieving the buttery richness that makes this loaf so moist. If you’re looking for a dairy-free option, coconut oil or a vegan butter can be used instead. The buttermilk is another essential component, providing acidity that activates the baking soda for a fluffy texture. If you don’t have buttermilk on hand, you can easily make a substitute by mixing ½ cup of milk with 1 tablespoon of vinegar or lemon juice and letting it sit for about 5 minutes.

Step-by-Step Instructions

  1. Preheat your oven to 350°F (175°C). Grease a 9×5-inch loaf pan or line it with parchment paper for easy removal later.
  2. In a medium mixing bowl, whisk together 1 ½ cups of all-purpose flour, 1 teaspoon of baking powder, ½ teaspoon of baking soda, ½ teaspoon of salt, and 3 tablespoons of poppy seeds. This helps to evenly distribute the baking agents and ensures a uniform rise.
  3. In a large mixing bowl, cream together ½ cup of softened unsalted butter and 1 cup of granulated sugar using an electric mixer on medium speed for about 3-4 minutes, until the mixture is light and fluffy. Make sure to scrape down the sides of the bowl occasionally.
  4. Add 2 large eggs, 1 teaspoon of vanilla extract, and 1 teaspoon of lemon zest to the creamed butter and sugar, mixing until fully combined. You want a smooth consistency, so ensure there are no lumps of butter.
  5. In a small bowl, combine ½ cup of buttermilk and 2 tablespoons of fresh lemon juice. Alternately add the dry ingredients and buttermilk mixture to the butter mixture, starting and ending with the dry ingredients. Mix just until combined; do not overmix, as this can lead to a dense loaf.
  6. Pour the batter into the prepared loaf pan. Smooth the top with a spatula, ensuring it’s even. Bake in the preheated oven for 50-60 minutes, or until a toothpick inserted in the center comes out clean. The edges should be lightly golden brown, and the center should feel just set.
  7. Once baked, remove the loaf from the oven and allow it to cool in the pan for about 10 minutes. Then, transfer it to a wire rack to cool completely. Resist the urge to slice too soon, as it will be crumbly if it’s still warm.
  8. While the loaf is cooling, prepare the citrus icing. In a medium bowl, whisk together 1 cup of powdered sugar, 2 tablespoons of fresh lemon juice, and 1 tablespoon of orange juice until smooth. If the icing is too thick, you can add a little more juice to reach your desired consistency.
  9. Once the loaf is completely cool, drizzle the citrus icing over the top. If you like, sprinkle with an additional teaspoon of lemon zest for an extra pop of flavor and color.

Pro Tips for the Best Lemon Poppy Seed Loaf With Citrus Icing

  • Be careful not to overmix your batter; this is a common mistake that can lead to a dense loaf. Mix just until the dry ingredients are incorporated for a light and fluffy texture.
  • Use room temperature ingredients, especially the butter and eggs. This helps to create a smoother batter and ensures even baking. Take your eggs out of the fridge about 30 minutes before you start.
  • For a more pronounced lemon flavor, consider adding a little lemon extract in addition to the zest and juice. Just a half teaspoon can elevate the citrus notes significantly.
  • When measuring your flour, spoon it into the measuring cup and level it off with a knife instead of scooping directly from the bag. This prevents packing and ensures you don’t end up with a dry loaf.
  • Invest in a good quality loaf pan; it makes a difference in heat distribution, which ensures even baking. If your pan is dark-coated, reduce the oven temperature by 25°F to prevent over-browning.

Variations & Serving Ideas

For a delightful twist, consider adding blueberries or raspberries to the batter for a fruity burst of flavor. You can also experiment with different citrus fruits—try lime or grapefruit zest and juice for a refreshing change. For a healthier option, substitute half of the all-purpose flour with whole wheat flour for added fiber without compromising too much on texture.

This Lemon Poppy Seed Loaf pairs beautifully with a light salad, such as a mixed greens salad with a vinaigrette, or a cup of tea for a cozy afternoon treat. It also complements a creamy cheese platter, as the acidity of the loaf balances rich cheeses perfectly. Lastly, a scoop of vanilla ice cream on the side creates a delightful contrast of temperatures and flavors!

Storage, Make-Ahead & Reheating

This Lemon Poppy Seed Loaf can be stored at room temperature for up to 3 days if wrapped tightly in plastic wrap. If you want to keep it longer, it freezes well for up to 3 months. To freeze, wrap the loaf tightly in plastic wrap and then in aluminum foil to prevent freezer burn.

When you’re ready to enjoy it again, simply thaw it in the fridge overnight. Reheat individual slices in the microwave for 15-20 seconds or in a toaster oven until warmed through. Interestingly, many people find that this loaf tastes even better the next day, as the flavors have time to meld!

Frequently Asked Questions

Can I make Lemon Poppy Seed Loaf With Citrus Icing ahead of time?

Yes — in fact, it tastes even better the next day! You can make the loaf a day in advance, allowing the flavors to develop. Just be sure to store it in an airtight container to maintain its moisture.

Can I substitute the poppy seeds?

Absolutely! If you don’t have poppy seeds on hand or prefer an alternative, you can use sesame seeds for a similar crunch or omit them entirely for a smooth loaf.

What can I use instead of buttermilk?

If you don’t have buttermilk, you can easily create a substitute by mixing ½ cup of milk (dairy or plant-based) with 1 tablespoon of vinegar or lemon juice. Let it sit for 5 minutes before using in the recipe.

How can I make this recipe gluten-free?

To make a gluten-free version of this Lemon Poppy Seed Loaf, substitute the all-purpose flour with a gluten-free all-purpose flour blend. Just ensure that the blend contains a binding agent like xanthan gum for the best results.

What is the best way to store leftover loaf?

Leftover Lemon Poppy Seed Loaf should be stored in an airtight container at room temperature for up to 3 days. For longer storage, wrap it tightly and freeze for up to 3 months. Thaw it before serving for the best texture.

Zesty Lemon Poppy Seed Delight

Final Thoughts

The Lemon Poppy Seed Loaf with Citrus Icing is truly a delightful treat that brings a burst of brightness to any occasion. The zesty lemon flavor combined with the subtle crunch of poppy seeds creates a satisfying balance, while the citrus icing adds a touch of sweetness that perfectly complements the loaf’s tanginess.

This is the kind of recipe I come back to again and again, especially when I want to brighten up a gloomy day or celebrate a small victory. The aroma that fills the kitchen as it bakes is absolutely heavenly! I encourage you to give this recipe a try; you might just find it becoming a beloved staple in your home. Don’t forget to share your results or even add your own unique twist—I can’t wait to see what you create!

Print
clock clock iconcutlery cutlery iconflag flag iconfolder folder iconinstagram instagram iconpinterest pinterest iconfacebook facebook iconprint print iconsquares squares iconheart heart iconheart solid heart solid icon

Lemon Poppy Seed Loaf


  • Author: Lily author
  • Total Time: 29 minute
  • Yield: 1 loaf 1x
Pin Recipe
Print Recipe

Description

This Lemon Poppy Seed Loaf is a delightful treat that combines zesty lemon flavor with crunchy poppy seeds. Topped with a citrus icing, it’s perfect for any occasion.


Ingredients

Scale
  • 1 ½ cups (190g) all-purpose flour
  • 1 teaspoon baking powder
  • ½ teaspoon baking soda
  • ½ teaspoon salt
  • 3 tablespoons poppy seeds
  • ½ cup (115g) unsalted butter, softened to room temperature
  • 1 cup (200g) granulated sugar
  • 2 large eggs
  • 1 teaspoon vanilla extract
  • 1 teaspoon lemon zest (from about 1 medium lemon)
  • ½ cup (120ml) buttermilk
  • 2 tablespoons fresh lemon juice
  • 1 cup (120g) powdered sugar
  • 2 tablespoons fresh lemon juice
  • 1 tablespoon orange juice
  • 1 teaspoon lemon zest (for garnish, optional)

Instructions

  1. Preheat your oven to 350°F (175°C). Grease a 9×5-inch loaf pan or line it with parchment paper for easy removal later.
  2. In a medium mixing bowl, whisk together 1 ½ cups of all-purpose flour, 1 teaspoon of baking powder, ½ teaspoon of baking soda, ½ teaspoon of salt, and 3 tablespoons of poppy seeds. This helps to evenly distribute the baking agents and ensures a uniform rise.
  3. In a large mixing bowl, cream together ½ cup of softened unsalted butter and 1 cup of granulated sugar using an electric mixer on medium speed for about 3-4 minutes, until the mixture is light and fluffy. Make sure to scrape down the sides of the bowl occasionally.
  4. Add 2 large eggs, 1 teaspoon of vanilla extract, and 1 teaspoon of lemon zest to the creamed butter and sugar, mixing until fully combined. You want a smooth consistency, so ensure there are no lumps of butter.
  5. In a small bowl, combine ½ cup of buttermilk and 2 tablespoons of fresh lemon juice. Alternately add the dry ingredients and buttermilk mixture to the butter mixture, starting and ending with the dry ingredients. Mix just until combined; do not overmix, as this can lead to a dense loaf.
  6. Pour the batter into the prepared loaf pan. Smooth the top with a spatula, ensuring it’s even. Bake in the preheated oven for 50-60 minutes, or until a toothpick inserted in the center comes out clean. The edges should be lightly golden brown, and the center should feel just set.
  7. Once baked, remove the loaf from the oven and allow it to cool in the pan for about 10 minutes. Then, transfer it to a wire rack to cool completely. Resist the urge to slice too soon, as it will be crumbly if it’s still warm.
  8. While the loaf is cooling, prepare the citrus icing. In a medium bowl, whisk together 1 cup of powdered sugar, 2 tablespoons of fresh lemon juice, and 1 tablespoon of orange juice until smooth. If the icing is too thick, you can add a little more juice to reach your desired consistency.
  9. Once the loaf is completely cool, drizzle the citrus icing over the top. If you like, sprinkle with an additional teaspoon of lemon zest for an extra pop of flavor and color.
  • Prep Time: 15 mins
  • Cook Time: 50-60 mins
  • Category: Dessert
  • Method: Baking
  • Cuisine: American

Nutrition

  • Serving Size: 1 slice
  • Calories: 200
  • Sugar: 15 g
  • Sodium: 150 mg
  • Fat: 8 g
  • Saturated Fat: 5 g
  • Unsaturated Fat: 3 g
  • Trans Fat: 0 g
  • Carbohydrates: 30 g
  • Fiber: 1 g
  • Protein: 3 g
  • Cholesterol: 40 mg

Keywords: Be careful not to overmix your batter; this is a common mistake that can lead to a dense loaf. Use room temperature ingredients for a smoother batter and even baking.

Did you make this recipe?

Share a photo and tag us — we can't wait to see what you've made!

  • Privacy Policy
  • Terms Of Service
  • Contact
  • About
  • GDPR

Copyright © 2025 Homesmad